spring-cloud-netflix中比较重要的组件有:
- spirng-cloud-netflix-Eureka: 注册中心
- hytrix: RPC保护组件
- ribbon: 客户端负载均衡组件
- zuul:内部网关组件
2.1 Eureka服务注册与发现
注册中心、服务提供者、远程客户端组件之间的关系大致如图
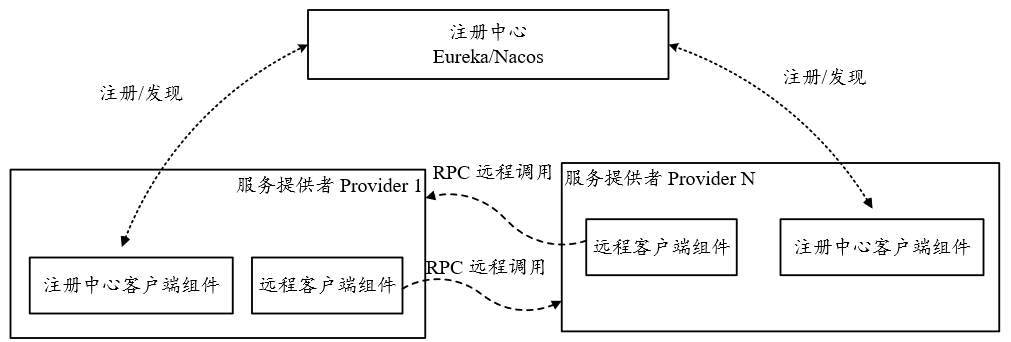
注册中心的主要功能:
- 服务注册表维护
- 服务健康检查
服务提供者的主要功能如下:
- 服务注册
- 心跳续约
-
2.1.2 Eureka Server注册中心
Eureka所治理的每一个微服务实例被称为Provider Instance,每个这样的实例都包含一个Eurka Client组件,该组件的主要工作如下:
向Eureka Server完成Provider Instance的注册、续约和下线等操作
- 向Eureka server获取Provider Instance清单,并且缓存在本地
在新建一个Eureka Server注册中心时,先导入依赖
<dependency><groupId>org.springframework.cloud</groupId><artifactId>spring-cloud-starter-netflix-eureka-server</artifactId></dependency>
在启动类中添加@EnableEurekaServer
@EnableEurekaServer@SpringBootApplicationpublic class EurekaServerApplication{public static void main(String[] args){SpringApplication.run(EurekaServerApplication.class, args);}}
在application.yml中对Eureka Server的一些参数进行配置
server:port: 7777spring:application:name: eureka-servercloud:inetutils:timeout-seconds: 10preferred-networks: ${SCAFFOLD_PREFERRED_NETWORKS:192.168.68.}prefer-ip-address: true #访问路径可以显示IP地址eureka:client:register-with-eureka: false #注册中心 Provider 实例,不向注册中心注册自己fetch-registry: false #注册中心 Provider 实例,不做检索服务service-url:defaultZone: http://localhost:7777/eureka/ # 服务注册中心的配置内容,指定服务注册中心的位置instance:prefer-ip-address: true #访问路径可以显示IP地址preferred-networks: ${SCAFFOLD_PREFERRED_NETWORKS:192.168.68.}instance-id: ${spring.cloud.client.ip-address}:${server.port}ip-address: ${spring.cloud.client.ip-address}server:enable-self-preservation: false # 关闭自我保护,防止失效的服务也被一直访问 (默认是 true)eviction-interval-timer-in-ms: 10000 # 扫描失效服务的间隔时间(单位毫秒,默认是60*1000)即60秒
注册中心的配置项:
- eureka.server.*: 作为服务提供者的配置项
- eureka.instance.*: 作为注册中心客户端组件的配置项
- eureka.client.*:
- Eureka Server作为注册中心的配置项,前缀为server
- enable-self-preservation
- eviction-interval-timer-in-ms
- Eureka Server作为服务提供者的配置项,前缀为instance
- hostname:当前实例的主机名称
- appname:当前实例的服务名称,默认为spirng.application.name的值
- ip-address
- prefer-ip-address: 选择是否用主机名还是ip地址来表示Provider实例的地址
- lease-renewal-internal-in-seconds: 定义Provider实例到注册中心续约(心跳)的时间间隔
- lease-expiration-duration-in-seconds
- status-page-url-path:定义provider实例状态页面的URL, 配置的是相对路径。默认相对路径是 /info
- status-page-url: 配置的是绝对路径
- health-check-url-path
- health-check-url
- Eureka Server作为注册中心客户端组件的配置项,前缀为client
- register-with-eureka: 是否将自己注册到其他Eureka Server上,默认为true
- fetch-registry
- registery-fetch-interval-seconds
- eureka-server-connect-timeout-seconds
- eureka-server-read-timeout-seconds
- eureka-connection-idle-timeout-seconds
- filter-only-up-instances
- service-url.defaultZone
- serviceUrl
Region表示地域,Zone表示可用区
eureka:client:region: BeijingavailabilityZones:Beijing: zone-2, zone-1serviceUrl:zone-1: http://localhost:7777/eureka/zone-2: http://localhost: 7777/eureka/
2.1.3 服务提供者的创建和配置
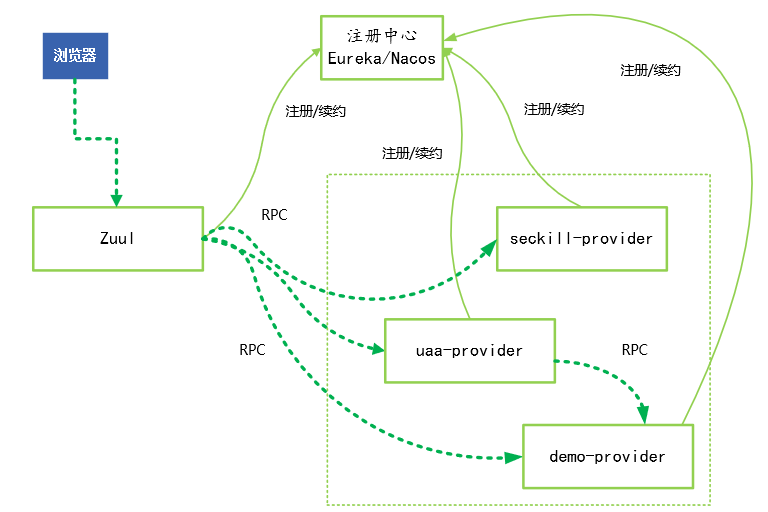
在本书的配套源码 crazy-springcloud 脚手架中设计了 3 个 Provider: uaa-provider (用户账号与认证)、 demo-provider (演示用途)、 seckill-provider (秒杀服务)
至少需要以下两个组件包
<dependency><groupId>org.springframework.boot</groupId><artifactId>spring-boot-starter-web</artifactId></dependency><dependency><groupId>org.springframework.cloud</groupId><artifactId>spring-cloud-starter-netflix-eureka-client</artifactId></dependency>
Spring Boot Web 服务组件用于提供 REST 接口服务, Eureka Client 组件用于服务注册与发现。
@SpringBootApplication@EnableEurekaClientpublic class UaaDemoApplication {public static void main(String[] args) {SpringApplication.run(UaaDemoApplication.class, args);}}
spring:application:name: uaa-providerserver:port: 7702servlet:context-path: /uaa-providereureka:instance:instance-id: ${spring.cloud.client.ip-address}:${server.port}ip-address: ${spring.cloud.client.ip-address}prefer-ip-address: truestatus-page-url-path: /infohealth-check-url-path: /healthclient:register-with-eureka: truefetch-registry: trueservice-url:defaultZone:http://localhost:7777/eureka
Spring Cloud 中的一个 Provider 实例身兼两个角色:服务提供者和注册中心客户端。所以,在 Provider 的配置文件中包含两类配置: Provider 实例角色的相关配置和 Eureka Client角色的相关配置
- provider实例角色的相关配置
- instance-id: 实例id,默认格式:${spring.cloud.client.hostname}:${spring.application.name} :${server.port}
- prefer-ip-address
- status-page-url-path
- health-check-url-path
- Eureka Client组件的相关配置
- register-with-eureka
- fetch-registry
- service-url.defaultZone
2.1.4 服务提供者的续约(心跳)
常见的Eureka Server应用事件eureka:instance:lease-renewal-interval-in-seconds: 5 #心跳时间,即 服务续约间隔时间(默认为30秒)lease-expiration-duration-in-seconds: 15 #租约有效期, 即服务续约到期时间(默认为90秒)
- EurekaInstanceRenewedEvent: 服务续约事件
- EurekaInstanceRegisteredEvent: 服务注册事件
- EurekaInstanceCanceledEvent: 服务下线事件
- EurekaRegistryAvailableEvent: Eureka注册中心启动事件
EurekaServerStatertedEvent:Eureka Server启动事件 ```java @Component @Slf4j public class EurekaStateChangeListner {
/**
服务上线 事件 */ @EventListener public void listen(EurekaInstanceRegisteredEvent event){ InstanceInfo inst = event.getInstanceInfo(); log.info(“{}:{} \t {} 服务上线”,
inst.getIPAddr(),inst.getPort(),inst.getAppName());
}
/**
- 服务下线事件
*/ @EventListener public void listen(EurekaInstanceCanceledEvent event){ log.info(“{} \t {} 服务下线”,event.getServerId(),event.getAppName()); }
/*** 服务续约(服务心跳) 事件*/@EventListenerpublic void listen(EurekaInstanceRenewedEvent event){log.info("{} \t {} 服务续约",event.getServerId(),event.getAppName());}@EventListenerpublic void listen(EurekaServerStartedEvent event){log.info("Eureka Server 启动");}
}
可以通过Eureka Server的 /apps/{Application}地址获取某个Provider实例的详细信息,Application名称不区分大小写<br />[http://192.168.5.1:7777/eureka/apps/UAA-PROVIDER](http://192.168.5.1:7777/eureka/apps/UAA-PROVIDER)<br />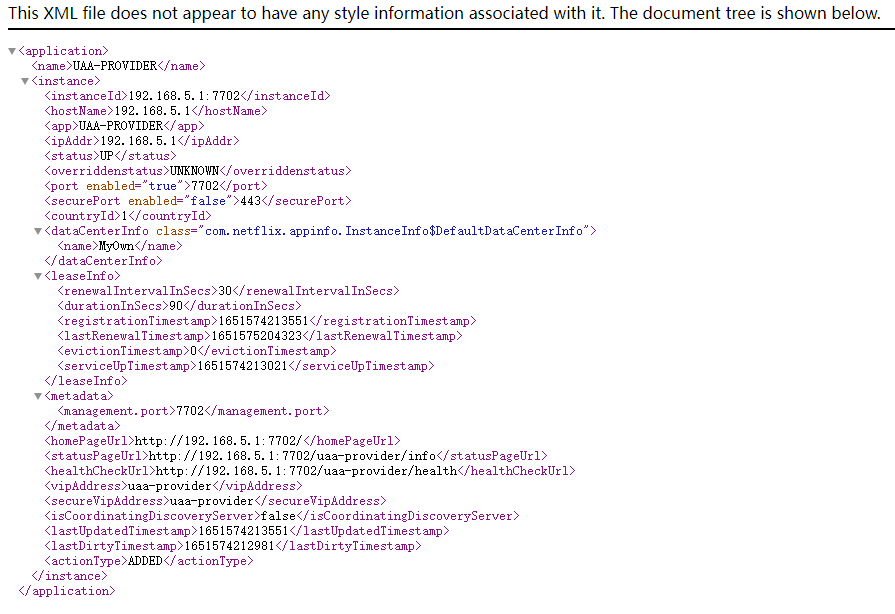<a name="yiHBJ"></a>## 2.1.6 Eureka自我保护模式与失效Provider的快速剔除Eureka Server中的Provider失效比例如果低于阈值,就会将所有的Provider实例的注册信息保护起来,让这些实例不会过期<br />为了快速剔除失效的 Provider,除了在 Eureka 中进行合理的配置之外,还需要在 Provider(Eureka Client)微服务端进行有效的配置,从而与 Eureka 注册中心相互配置。 Provider 微服务的主要选项包括开启健康状态检查和续约心跳,如下所示:```yamleureka:client:healthcheck:enabled: true #开启客户端健康检查instance:lease-renewal-interval-in-seconds: 5 #续约(心跳) 频率lease-expiration-duration-in-seconds: 15 #租约有效期
这里需要注意的是:配置项 eureka.client.healthcheck.enabled=true 应该放在 application.yml 文件中,而不应该放在 bootstrap.yml 文件中。如果该选项配置在 bootstrap.yml 文件中, 就可能导致Provider 实例在 Eureka 上的状态为 UNKNOWN 
2.2 Config配置中心
- config-server: 服务端配置
-
2.2.1 config-server服务端组件
<!--配置中心--><dependency><groupId>org.springframework.cloud</groupId><artifactId>spring-cloud-config-server</artifactId></dependency>
```java @SpringBootApplication @EnableConfigServer public class ConfigDemoApplication {
public static void main(String[] args) {
SpringApplication.run(ConfigDemoApplication.class, args);
}
}
```yamlserver:port: 7788 #配置中心端口spring:application:name: config-serverprofiles:active: native #设置读取本地配置文件cloud:config:server:native:search-locations: classpath:config/ #声明本地配置 文件的存放位置
服务端的配置文件放置规则:在配置路径下以 {label} / {application}-{profile}.properties的命令规范放置对应的配置文件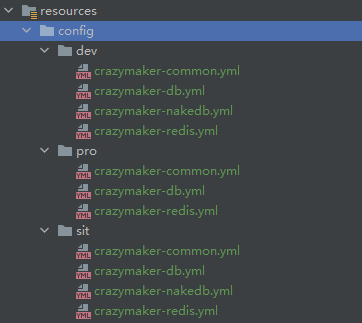
config配置中心启动后,可以用以下地址格式直接访问加载
http://${CONFIG-HOST}: ${CONFIG-PORT}/{application}/{profile}[/{label}]
2.2.2 config-client客户端组件
依赖:
<dependencies>...<dependency><groupId>org.springframework.cloud</groupId><artifactId>spring-cloud-starter-config</artifactId></dependency><dependency><groupId>org.springframework.cloud</groupId><artifactId>spring-cloud-starter-eureka-client</artifactId></dependency></dependencies>
2.3 微服务的RPC远程调用
2.3.3 Feign远程调用
Feign 是在 RestTemplate 基础上封装的,使用注解的方式来声明一组与服务提供者 Rest 接口所对应的本地 Java API 接口方法。
<!--添加 Feign 依赖--><dependency><groupId>org.springframework.cloud</groupId><artifactId>spring-cloud-starter-openfeign</artifactId></dependency>
Feign 的第 2 步是在主函数的类上添加@EnableFeignClient,在客户端启动 Feign:
//启动Feign@EnableFeignClients(basePackages ={"com.crazymaker.springcloud.seckill.remote.client"},defaultConfiguration = {TokenFeignConfiguration.class})@Slf4j//@EnableHystrixpublic class UAACloudApplication{}
使用 Feign 的第 3 步是编写声明式接口。
package com.crazymaker.springcloud.seckill.remote.client;import com.alibaba.fastjson.JSONObject;import com.crazymaker.springcloud.common.result.RestOut;import com.crazymaker.springcloud.seckill.remote.fallback.DemoDefaultFallback;import org.springframework.cloud.openfeign.FeignClient;import org.springframework.web.bind.annotation.GetMapping;import org.springframework.web.bind.annotation.PathVariable;import org.springframework.web.bind.annotation.RequestMapping;import org.springframework.web.bind.annotation.RequestMethod;/*** @description:远程服务的本地声明式接口*/@FeignClient(value = "demo-provider", path = "/demo-provider/api/demo/",fallback = DemoDefaultFallback.class)public interface DemoClient{/*** 远程调用接口的方法:* 调用 demo-provider 的 REST 接口 api/demo/hello/v1* REST 接口 功能:返回 hello world* @return JSON 响应实例*/@GetMapping("/hello/v1")RestOut<JSONObject> hello();/*** 远程调用接口的方法:* 调用 demo-provider 的 REST 接口 api/demo/echo/{0}/v1* REST 接口 功能: 回显输入的信息* @return echo 回显消息 JSON 响应实例*/@RequestMapping(value = "/echo/{word}/v1",method = RequestMethod.GET)RestOut<JSONObject> echo(@PathVariable(value = "word") String word);}
使用 Feign 的第 4 步是调用声明式接口
@Slf4j@RestController@RequestMapping("/api/call/demo/")@Api(tags = "演示 demo-provider 远程调用")public class DemoRPCController{//注入 @FeignClient 注解配置 所配置的 demo-provider 客户端Feign实例@ResourceDemoClient demoClient;@GetMapping("/hello/v1")@ApiOperation(value = "hello 远程调用")public RestOut<JSONObject> remoteHello(){log.info("方法 remoteHello 被调用了");/*** 调用 demo-provider 的 REST 接口 api/demo/hello/v1*/RestOut<JSONObject> result = demoClient.hello();JSONObject data = new JSONObject();data.put("demo-data", result);return RestOut.success(data).setRespMsg("操作成功");}@GetMapping("/echo/{word}/v1")@ApiOperation(value = "echo 远程调用")public RestOut<JSONObject> remoteEcho(@PathVariable(value = "word") String word){/*** 调用 demo-provider 的 REST 接口 api/demo/echo/{0}/v1*/RestOut<JSONObject> result = demoClient.echo(word);JSONObject data = new JSONObject();data.put("demo-data", result);return RestOut.success(data).setRespMsg("操作成功");}}
2.4 Feign + Ribbon实现客户端负载均衡
- 服务端负载均衡
在消费者和服务提供者中间使用独立的反向代理服务进行负载均衡。可以通过硬件的方式提供反向代理服务,比如 F5 专业设备;也可以通过软件的方式提供反向代理服务,比如 Nginx 反向代理服务器;更多的情况是两种方式结合,并且有多个层级的反向代理。
- 客户端负载均衡
客户端自己维护一份从注册中心获取的 Provider 列表清单,根据自己配置的 Provider 负载均衡选择算法在客户端进行请求的分发。 Ribbon 就是一个客户端的负载均衡开源组件, 是 Netflix 发布的开源项目。
2.4.1 Spring Cloud Ribbon基础
Spring Cloud Ribbon 是 Spring Cloud 集成 Ribbon 开源组件的一个模块,它不像服务注册中心Eureka Server、配置中心 Spring Cloud Config 那样独立部署,而是作为基础设施模块,几乎存在于每个 Spring Cloud 微服务提供者中。
<!--导入 Spring Cloud Ribbon --><dependency><groupId>org.springframework.cloud</groupId><artifactId>spring-cloud-starter-netflix-ribbon</artifactId></dependency>
2.4.2 Spring Cloud Ribbon的负载均衡策略
2.4.3 Spring Cloud Ribbon的常用配置
- 手工配置 Provider 实例清单
如果 Ribbon 没有和 Eureka 集成, Ribbon 消费者客户端就不能从 Eureka(或者其他的注册中心)拉取到 Provider 清单。如果不需要和 Eureka 集成, 那么可以使用如下方式手工配置 Provider清单:
ribbon:eureka:enabled: false #禁用 Eurekauaa-provider:ribbon:listOfServers: 192.168.142.1:7702,192.168.233.128:7702 #手工配置Provider 清单
RPC 请求超时配置
ribbon:ConnectTimeout: 30000 #连接超时时间,单位为毫秒ReadTimeout: 30000 #读取超时时间,单位为毫秒
重试机制配置
ribbon:MaxAutoRetries: 1 #同一台实例的最大重试次数,但是不包括首次调用,默认为 1 次MaxAutoRetriesNextServer: 1 #重试其他实例的最大重试次数,不包括首次调用,默认为 0 次OkToRetryOnAllOperations: true #是否对所有操作都进行重试,默认为 falseServerListRefreshInterval: 2000 #从注册中心刷新 Provider 的时间间隔,默认为2000 毫秒,即 2 秒retryableStatusCodes: 400,401,403,404,500,502,504NFLoadBalancerRuleClassName: com.netflix.loadbalancer.RetryRule #负载均衡配置为重试策略
代码配置 Ribbon ```java @Configuration public class FeignConfiguration implements RequestInterceptor {
/**
- 配置 PRC 时的请求头部与参数 *
@param template 请求模板 / @Override public void apply(RequestTemplate template) { /*
取得请求上下文属性 */ ServletRequestAttributes attributes =
(ServletRequestAttributes) RequestContextHolder.getRequestAttributes();
if (null == attributes) { return; } HttpServletRequest request = attributes.getRequest();
/**
- 获取令牌
/
String token = request.getHeader(SessionConstants.AUTHORIZATION_HEAD);
if (null != token)
{
token = StringUtils.removeStart(token, “Bearer “);
/*
- 设置令牌 */ template.header(SessionConstants.AUTHORIZATION_HEAD, new String[]{token}); }
String userIdentifier = request.getHeader(SessionConstants.USER_IDENTIFIER);if (null != userIdentifier){template.header(SessionConstants.USER_IDENTIFIER, new String[]{userIdentifier});}}/*** 配置负载均衡策略*/
// @Bean // public IRule ribbonRule() // { // /* // 配置为线性轮询策略 // */ // return new RoundRobinRule(); // }
/*** 配置 Feign 日志等级*/@BeanLogger.Level feignLoggerLevel(){/**需要根据实际情况选择合适的的Feign日志level* BASIC :记录请求方法、URL、响应状态代码、执行时间。* NONE :没有日志*/return Logger.Level.NONE;}
}
<a name="nKeaJ"></a># 2.5 Feign + Hystrix实现RPC调用保护```xml<!--引入 Spring Cloud Hystrix 依赖--><dependency><groupId>org.springframework.cloud</groupId><artifactId>spring-cloud-starter-netflix-hystrix</artifactId></dependency>
Hystrix 是和 Feign 组合起来使用的,所以需要在应用的属性配置文件中开启 Feign 对 Hystrix 的支持:
feign:hystrix:enabled: true #开启 Hystrix 对 Feign 的支持
在启动类上添加@EnableHystrix 或者@EnableCircuitBreaker。注意, @EnableHystrix 中包含了@EnableCircuitBreaker。
Spring Cloud Hystrix 的 RPC 保护功能包括失败回退、熔断、重试、舱壁隔离等
2.5.1 Spring Cloud Hystrix失败回退
当目标 Provider 实例发生故障时, RPC 的失败回退会产生作用,返回一个后备的结果。 
如何设置 RPC 调用的回退逻辑呢?有两种方式:
- 定义和使用一个 Fallback 回退处理类。
定义和使用一个 FallbackFactory 回退处理工厂类。
2.5.2 分布式系统面临的雪崩难题
引发雪崩效应的原因比较多,下面是常见的几种:
硬件故障:如服务器宕机、机房断电、光纤被挖断等。
- 流量激增:如流量异常、巨量请求瞬时涌入(如秒杀)等。 缓存穿透:一般发生在系统重启所有缓存失效时,或者发生在短时间内大量缓存失效时,前端过来的大量请求没有命中缓存,直击后端服务和数据库,造成服务提供者和数据库超负荷运行,引起整体瘫痪
- 程序 BUG:如程序逻辑 BUG 导致内存泄漏等原因引发的整体瘫痪。
- JVM 卡顿: JVM 的 FullGC 时间较长, 极端的情况长达数十秒,这段时间内 JVM 不能提供任何服务
为了解决雪崩效应,业界提出了熔断器模型。通过熔断器,当一些非核心服务出现响应迟缓或者宕机等异常时,对服务进行降级并提供有损服务, 以保证服务的柔性可用,避免引起雪崩效应。
2.5.3 Spring Cloud Hystrix熔断器
具体的工作机制为: 统计最近 RPC 调用发生错误的次数,然后根据统计值中的失败比例等信息来决定是否允许后面的 RPC 调用继续或者快速地失败回退。
熔断器的 3 种状态如下:
- 关闭(closed) : 熔断器关闭状态,这也是熔断器的初始状态,此状态下 RPC 调用正常放行。
- 开启(open) :失败比例到一定的阈值之后, 熔断器进入开启状态, 此状态下 RPC 将会快速失败, 然后执行失败回退逻辑
- 半开启(half-open) :在打开一定时间之后(睡眠窗口结束), 熔断器进入半开启状态,小流量尝试进行 RPC 调用放行。如果尝试成功, 熔断器就变为关闭状态, RPC 调用正常;如果尝试失败, 熔断器就变为开启状态, RPC 调用快速失败
 ```yaml
hystrix:
…
command:
default: #全局默认配置
…
circuitBreaker: #熔断器相关配置
```yaml
hystrix:
…
command:
default: #全局默认配置
…
circuitBreaker: #熔断器相关配置
metrics:enabled: true #是否启动熔断器,默认为true,false表示不要启动熔断器requestVolumeThreshold: 20 #启用熔断器功能窗口时间内的最小请求数,假设我们设置的窗口时间为10秒,sleepWindowInMilliseconds: 5000 #此配置的作用是指定熔断器打开后多长时间内允许一次请求尝试执行,官方默认配置为5秒。errorThresholdPercentage: 50 #窗口时间内超过50%的请求失败后就会打开熔断器将后续请求快速失败掉,默认配置为50
UserClient#detail(Long): # 独立接口配置,格式为: 远程接口名#方法名(参数类型列表)rollingStats:timeInMilliseconds: 6000numBuckets: 10
circuitBreaker: #断路器相关配置enabled: true #是否使用断路器,默认为truerequestVolumeThreshold: 20 # 窗口时间内的最小请求数sleepWindowInMilliseconds: 5000 #打开后允许一次尝试的睡眠时间,默认配置为5秒errorThresholdPercentage: 50 # 窗口时间内断路器开启的错误比例,默认配置为50metrics:rollingStats:timeInMilliseconds: 10000 # 滚动窗口时间numBuckets: 10 # 滚动窗口的时间桶数
``
以上有关 Hystrix 熔断器的配置选项使用的是 hystrix.command.default 前缀,这些默认配置项将对项目中所有 Feign RPC 接口生效,除非某个 Feign RPC 接口进行单独配置。如果需要对某个Feign RPC 调用进行特殊的配置,配置项前缀的格式如下: <br />
hystrix.command.类名#方法名(参数类型列表) `

若有收获,就点个赞吧
0 人点赞
