- 3.1 什么是CAS
- 3.1.1 Unsafe类中的CAS方法
- 3.1.2 使用CAS进行无锁编程
- 3.1.3 使用无锁编程实现轻量级安全自增
- 3.1.4 字段偏移量的计算
- 3.2 JUC原子类
- 3.2.1 JUC中的Atomic原子操作包
- 3.2.2 基础原子类AtomicInteger
- 3.2.3 数组原子类AtomicIntegerArray
- 3.2.4 AtomicInteger线程安全原理
- 3.3 对象操作的原子性
- 3.3.1 引用类型原子类
- 3.3.2 属性更新原子类
- 3.4 ABA问题
- 3.4.1 了解ABA问题
- 3.4.2 ABA问题解决方案
- 3.4.3 使用AtomicStampedReference解决ABA问题
- 3.4.4 使用AtomicMarkableReference解决ABA问题
- 3.5 提升高并发场景下CAS操作的性能
- 3.6 CAS在JDK中的广泛应用
VM的Synchronized轻量级锁使用CAS(Compare And Swap,比较并交换)进行自旋抢锁,CAS是CPU指令级的原子操作,并处于用户态下,所以JVM轻量级锁的开销较小。
3.1 什么是CAS
JDK 5所增加的JUC(java.util.concurrent)并发包对操作系统的底层CAS原子操作进行了封装,为上层Java程序提供了CAS操作的API。
3.1.1 Unsafe类中的CAS方法
获取Unsafe实例 ```java public final class Unsafe {
private static final Unsafe theUnsafe;public static final int INVALID_FIELD_OFFSET = -1;private static native void registerNatives();// 构造函数是private的,不允许外部实例化private Unsafe() {}...
}
因此,我们无法在外部对Unsafe进行实例化,那么怎么获取Unsafe的实例呢?可以通过反射的方式自定义地获取Unsafe实例的辅助方法,代码如下:```javapackage com.crazymakercircle.util;// 省略importpublic class JvmUtil{//自定义地获取Unsafe实例的辅助方法public static Unsafe getUnsafe(){try{Field theUnsafe = Unsafe.class.getDeclaredField("theUnsafe");theUnsafe.setAccessible(true);return (Unsafe) theUnsafe.get(null);} catch (Exception e){throw new AssertionError(e);}}// 省略不相干代码}
调用Unsafe提供的CAS方法 ```java /**
* 定义在Unsafe类中的三个“比较并交换”原子方法* @param o 需要操作的字段所在的对象* @param offset 需要操作的字段的偏移量(相对的,相对于对象头)* @param expected 期望值(旧的值)* @param update 更新值(新的值)* @return true 更新成功 | false 更新失败*/
public final native boolean compareAndSwapObject(
Object o, long offset, Object expected, Object update);
public final native boolean compareAndSwapInt(
Object o, long offset, int expected,int update);
public final native boolean compareAndSwapLong(
Object o, long offset, long expected, long update);
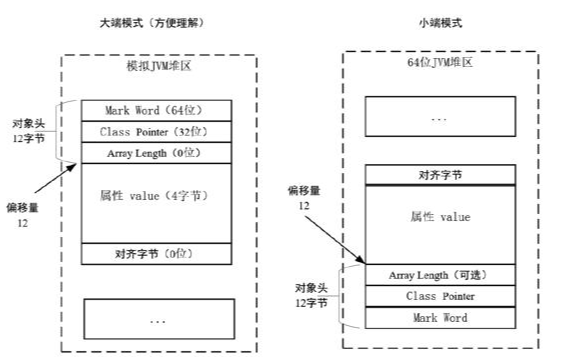
3. 调用Unsafe提供的偏移量相关```java/*** 定义在Unsafe类中的几个获取字段偏移量的方法* @param o 需要操作字段的反射* @return 字段的偏移量*/public native long staticFieldOffset(Field field);public native long objectFieldOffset(Field field);
一个获取非静态Field(非静态属性)在Object实例中的偏移量的示例代码如下:
static{try{//获取反射的Field对象OptimisticLockingPlus.class.getDeclaredField("value");//取得内存偏移valueOffset = unsafe.objectFieldOffset();} catch (Exception ex){throw new Error(ex);}}
3.1.2 使用CAS进行无锁编程
使用CAS进行无锁编程的伪代码如下:
do{获得字段的期望值(oldValue);计算出需要替换的新值(newValue);} while (!CAS(内存地址,oldValue,newValue))
3.1.3 使用无锁编程实现轻量级安全自增
这里使用CAS无锁编程算法实现一个轻量级的安全自增实现版本:总计10个线程并行运行,每个线程通过CAS自旋对一个共享数据进行自增运算,并且每个线程需要成功自增运算1000次。
基于CAS无锁编程的安全自增实现版本的具体代码如下:
package com.crazymakercircle.cas;// 省略importpublic class TestCompareAndSwap{// 基于CAS无锁实现的安全自增static class OptimisticLockingPlus{//并发数量private static final int THREAD_COUNT = 10;//内部值,使用volatile保证线程可见性private volatile int value;//值//不安全类private static final Unsafe unsafe = getUnsafe();;//value 的内存偏移(相对于对象头部的偏移,不是绝对偏移)private static final long valueOffset;//统计失败的次数private static final AtomicLong failure = new AtomicLong(0);static{try{//取得value属性的内存偏移valueOffset = unsafe.objectFieldOffset(OptimisticLockingPlus.class.getDeclaredField("value"));Print.tco("valueOffset:=" + valueOffset);} catch (Exception ex){throw new Error(ex);}}//通过CAS原子操作,进行“比较并交换”public final boolean unSafeCompareAndSet(int oldValue, int newValue){//原子操作:使用unsafe的“比较并交换”方法进行value属性的交换return unsafe.compareAndSwapInt(this, valueOffset,oldValue ,newValue );}//使用无锁编程实现安全的自增方法public void selfPlus(){int oldValue = value;//通过CAS原子操作,如果操作失败就自旋,一直到操作成功do{// 获取旧值oldValue = value;//统计无效的自旋次数if (i++ > 1){//记录失败的次数failure.incrementAndGet();}} while (!unSafeCompareAndSet(oldValue, oldValue + 1));}//测试用例入口方法public static void main(String[] args) throws InterruptedException{final OptimisticLockingPlus cas = new OptimisticLockingPlus();//倒数闩,需要倒数THREAD_COUNT次CountDownLatch latch = new CountDownLatch(THREAD_COUNT);for (int i = 0; i < THREAD_COUNT; i++){// 提交10个任务ThreadUtil.getMixedTargetThreadPool().submit(() ->{//每个任务累加1000次for (int j = 0; j < 1000; j++){cas.selfPlus();}latch.countDown(); // 执行完一个任务,倒数闩减少一次});}latch.await(); //主线程等待倒数闩倒数完毕Print.tco("累加之和:" + cas.value);Print.tco("失败次数:" + cas.failure.get());}}}
3.1.4 字段偏移量的计算

也可以通过JOL工具查看OptimisticLockingPlus成员属性value的内存相对偏移,具体代码如下:
package com.crazymakercircle.cas;// 省略importpublic class TestCompareAndSwap{@Testpublic void printObjectStruct(){//创建一个对象OptimisticLockingPlus object=new OptimisticLockingPlus();//给成员赋值object.value=100;//通过JOL工具输出内存布局String printable = ClassLayout.parseInstance(object).toPrintable();Print.fo("object = " + printable);}// 省略不相关代码}
3.2 JUC原子类
JDK为这些类型不安全的操作提供了一些原子类,与synchronized同步机制相比,JDK原子类是基于CAS轻量级原子操作的实现,使得程序运行效率变得更高。
3.2.1 JUC中的Atomic原子操作包
根据操作的目标数据类型,可以将JUC包中的原子类分为4类:基本原子类、数组原子类、原子引用类和字段更新原子类。
- 基本原子类
- AtomicInteger:整型原子类。
- AtomicLong:长整型原子类。
- AtomicBoolean:布尔型原子类。
- 数组原子类
- AtomicIntegerArray:整型数组原子类。
- AtomicLongArray:长整型数组原子类。
- AtomicReferenceArray:引用类型数组原子类。
- 引用原子类
- AtomicReference:引用类型原子类。
- AtomicMarkableReference:带有更新标记位的原子引用类型。
- AtomicStampedReference:带有更新版本号的原子引用类型。
- 字段更新原子类
- AtomicIntegerFieldUpdater:原子更新整型字段的更新器。
- AtomicLongFieldUpdater:原子更新长整型字段的更新器。
- AtomicReferenceFieldUpdater:原子更新引用类型中的字段。
3.2.2 基础原子类AtomicInteger
基础原子类AtomicInteger常用的方法如下: ```java public final int get() //获取当前的值 public final int getAndSet(int newValue) //获取当前的值,然后设置新的值 public final int getAndIncrement() //获取当前的值,然后自增 public final int getAndDecrement() //获取当前的值,然后自减 public final int getAndAdd(int delta) //获取当前的值,并加上预期的值 boolean compareAndSet(int expect, int update) //通过CAS方式设置整数值
下面是一个基础原子类AtomicInteger的使用示例,具体代码如下:```javapackage com.crazymakercircle.cas;// 省略importpublic class AtomicTest{@Testpublic void atomicIntegerTest(){int tempvalue = 0;//定义一个整数原子类实例,赋值到变量 iAtomicInteger i = new AtomicInteger(0);//取值,然后设置一个新值tempvalue = i.getAndSet(3);//输出tempvalue:0; i:3Print.fo("tempvalue:" + tempvalue + "; i:" + i.get());//取值,然后自增tempvalue = i.getAndIncrement();//输出tempvalue:3; i:4Print.fo("tempvalue:" + tempvalue + "; i:" + i.get());//取值,然后增加5tempvalue = i.getAndAdd(5);//输出tempvalue:4; i:9Print.fo("tempvalue:" + tempvalue + "; i:" + i.get());//CAS交换boolean flag = i.compareAndSet(9, 100);//输出flag:true; i:100Print.fo("flag:" + flag + "; i:" + i.get());}}
接下来通过一个使用原子类进行安全自增的综合示例展示一下基础原子类的使用,具体代码如下:
package com.crazymakercircle.cas;// 省略importpublic class AtomicTest{@Testpublic static void main(String[] args) throws InterruptedException{CountDownLatch latch = new CountDownLatch(THREAD_COUNT);//定义一个整数原子类实例,赋值到变量 iAtomicInteger atomicInteger = new AtomicInteger(0);for (int i = 0; i < THREAD_COUNT; i++){// 创建10个线程,模拟多线程环境ThreadUtil.getMixedTargetThreadPool().submit(() ->{for (int j = 0; j < 1000; j++){atomicInteger.getAndIncrement();}latch.countDown();});}latch.await();Print.tco("累加之和:" + atomicInteger.get());}// 省略不相关代码}
3.2.3 数组原子类AtomicIntegerArray
AtomicIntegerArray类的常用方法如下:
//获取 index=i 位置元素的值public final int get(int i)//返回 index=i 位置当前的值,并将其设置为新值:newValuepublic final int getAndSet(int i, int newValue)//获取 index=i 位置元素的值,并让该位置的元素自增public final int getAndIncrement(int i)//获取 index=i 位置元素的值,并让该位置的元素自减public final int getAndDecrement(int i)//获取 index=i 位置元素的值,并加上预期的值public final int getAndAdd(int delta)//如果输入的数值等于预期值,就以原子方式将位置i的元素值设置为输入值(update)boolean compareAndSet(int expect, int update)//最终将位置i的元素设置为newValue//lazySet()方法可能导致其他线程在之后的一小段时间内还是可以读到旧的值public final void lazySet(int i, int newValue)
下面是一个数组原子类AtomicIntegerArray的使用示例,具体代码如下:
package com.crazymakercircle.cas;// 省略importpublic class AtomicTest{@Testpublic void testAtomicIntegerArray () {int tempvalue = 0;//原始的数组int[] array = { 1, 2, 3, 4, 5, 6 };//包装为原子数组AtomicIntegerArray i = new AtomicIntegerArray(array);//获取第0个元素,然后设置为2tempvalue = i.getAndSet(0, 2);//输出tempvalue:1; i:[2, 2, 3, 4, 5, 6]Print.fo("tempvalue:" + tempvalue + "; i:" + i);//获取第0个元素,然后自增tempvalue = i.getAndIncrement(0);//输出tempvalue:2; i:[3, 2, 3, 4, 5, 6]Print.fo("tempvalue:" + tempvalue + "; i:" + i);//获取第0个元素,然后增加一个delta 5tempvalue = i.getAndAdd(0, 5);//输出tempvalue:3; i:[8, 2, 3, 4, 5, 6]Print.fo("tempvalue:" + tempvalue + "; i:" + i);}}
3.2.4 AtomicInteger线程安全原理
基础原子类(以AtomicInteger为例)主要通过CAS自旋+volatile的方案实现,既保障了变量操作的线程安全性,又避免了synchronized重量级锁的高开销,使得Java程序的执行效率大为提升。
下面以AtomicInteger源码为例分析一下原子类的CAS自旋+volatile的实现方案。AtomicInteger源码的具体代码如下:
public class AtomicInteger extends Numberimplements java.io.Serializable {//Unsafe类实例private static final Unsafe unsafe = Unsafe.getUnsafe();//内部value值,使用volatile保证线程可见性private volatile int value;//value属性值的地址偏移量private static final long valueOffset;static {try {//计算value 属性值的地址偏移量valueOffset = unsafe.objectFieldOffset(AtomicInteger.class.getDeclaredField("value"));} catch (Exception ex) { throw new Error(ex); }}//初始化public AtomicInteger(int initialValue) {value = initialValue;}//获取当前value值public final int get() {return value;}//方法:返回旧值并赋新值public final int getAndSet(int newValue) {for (;;) {//自旋int current = get();//获取旧值//以CAS方式赋值,直到成功返回if (compareAndSet(current, newValue)) return current;}}//方法:封装底层的CAS操作,对比expect(期望值)与value,若不同则返回false//若expect与value相同,则将新值赋给value,并返回truepublic final boolean compareAndSet(int expect, int update) {return unsafe.compareAndSwapInt(this, valueOffset, expect, update);}//方法:安全自增 i++public final int getAndIncrement() {for (;;) { //自旋int current = get();int next = current + 1;if (compareAndSet(current, next))return current;}}//方法:自定义增量数public final int getAndAdd(int delta) {for (;;) { //自旋int current = get();int next = current + delta;if (compareAndSet(current, next))return current;}}//方法:类似++i,返回自增后的值public final int incrementAndGet() {for (;;) { //自旋int current = get();int next = current + 1;if (compareAndSet(current, next))return next;}}//方法:返回加上delta后的值public final int addAndGet(int delta) {for (;;) { //自旋int current = get();int next = current + delta;if (compareAndSet(current, next))return next;}}// 省略其他源码}
AtomicInteger源码中的主要方法都是通过CAS自旋实现的。CAS自旋的主要操作为:如果一次CAS操作失败,获取最新的value值后,再次进行CAS操作,直到成功。
3.3 对象操作的原子性
基础的原子类型只能保证一个变量的原子操作,当需要对多个变量进行操作时,CAS无法保证原子性操作,这时可以用AtomicReference(原子引用类型)保证对象引用的原子性。
3.3.1 引用类型原子类
下面为大家介绍一个简单的AtomicReference类的使用示例,首先定义一个普通的POJO对象,代码如下:
package com.crazymakercircle.im.common.bean;// 省略importpublic class User implements Serializable{String uid; //用户IDString nickName; //昵称public volatile int age; //年龄public User(String uid, String nickName){this.uid = uid;this.nickName = nickName;}@Overridepublic String toString(){return "User{" +"uid='" + getUid() + '\'' +", nickName='" + getNickName() + '\'' +", platform=" + getPlatform() +'}';}
接下来介绍如何使用AtomicReference对User的引用进行原子性修改,代码如下:
package com.crazymakercircle.cas;// 省略importpublic class AtomicTest{@Testpublic void testAtomicReference(){//包装的原子对象AtomicReference<User> userRef = new AtomicReference<User>();//待包装的User对象User user = new User("1", "张三");//为原子对象设置值userRef.set(user);Print.tco("userRef is:" + userRef.get());//要使用CAS替换的User对象User updateUser = new User("2", "李四");//使用CAS替换boolean success = userRef.compareAndSet(user, updateUser);Print.tco(" cas result is:" + success);Print.tco(" after cas,userRef is:" + userRef.get());}// 省略其他}
3.3.2 属性更新原子类
以AtomicIntegerFieldUpdater为例来介绍。
下面为大家介绍一个简单的AtomicIntegerFieldUpdater类的使用示例,原子性地更新User对象的age属性,代码如下:
@Testpublic void testAtomicIntegerFieldUpdater(){//调用静态方法newUpdater()创建一个更新器updaterAtomicIntegerFieldUpdater<User> updater=AtomicIntegerFieldUpdater.newUpdater(User.class, "age");User user = new User("1", "张三");//使用属性更新器的getAndIncrement、getAndAdd增加user的age值Print.tco(updater.getAndIncrement(user));// 1Print.tco(updater.getAndAdd(user, 100));// 101//使用属性更新器的get获取user的age值Print.tco(updater.get(user));// 101}
3.4 ABA问题
3.4.1 了解ABA问题
3.4.2 ABA问题解决方案
很多乐观锁的实现版本都是使用版本号(Version)方式来解决ABA问题。乐观锁每次在执行数据的修改操作时都会带上一个版本号,版本号和数据的版本号一致就可以执行修改操作并对版本号执行加1操作,否则执行失败。因为每次操作的版本号都会随之增加,所以不会出现ABA问题,因为版本号只会增加,不会减少。
3.4.3 使用AtomicStampedReference解决ABA问题
AtomicStampReference的构造器有两个参数,具体如下:
//构造器,V表示要引用的原始数据,initialStamp表示最初的版本印戳(版本号)AtomicStampedReference(V initialRef, int initialStamp)
AtomicStampReference常用的几个方法如下:
//获取被封装的数据public V getRerference();//获取被封装的数据的版本印戳public int getStamp();
AtomicStampedReference的CAS操作的定义如下:
public boolean compareAndSet(V expectedReference, //预期引用值V newReference, //更新后的引用值int expectedStamp, //预期印戳(Stamp)标志值int newStamp) //更新后的印戳(Stamp)标志值
下面是一个简单的AtomicStampedReference使用示例,通过两个线程分别带上印戳更新同一个atomicStampedRef实例的值,第一个线程会更新成功,而第二个线程会更新失败,具体代码如下:
package com.crazymakercircle.cas;// 省略importpublic class AtomicTest{@Testpublic void testAtomicStampedReference(){CountDownLatch latch = new CountDownLatch(2);AtomicStampedReference<Integer> atomicStampedRef =new AtomicStampedReference<Integer>(1, 0);ThreadUtil.getMixedTargetThreadPool().submit(new Runnable(){@Overridepublic void run(){boolean success = false;int stamp = atomicStampedRef.getStamp();Print.tco("before sleep 500: value="+ atomicStampedRef.getReference()+ " stamp=" + atomicStampedRef.getStamp());//等待500毫秒sleepMilliSeconds(500);success = atomicStampedRef.compareAndSet(1, 10,stamp, stamp + 1);Print.tco("after sleep 500 cas 1: success=" + success+ " value=" + atomicStampedRef.getReference()+ " stamp=" + atomicStampedRef.getStamp());//增加印戳值,然后更新,如果stamp被其他线程改了,就会更新失败stamp++;success = atomicStampedRef.compareAndSet(10, 1,stamp, stamp+1);Print.tco("after sleep 500 cas 2: success=" + success+ " value=" + atomicStampedRef.getReference()+ " stamp=" + atomicStampedRef.getStamp());latch.countDown();}});ThreadUtil.getMixedTargetThreadPool().submit(new Runnable(){@Overridepublic void run(){boolean success = false;int stamp = atomicStampedRef.getStamp();// stamp = 0Print.tco("before sleep 1000: value="+ atomicStampedRef.getReference()+ " stamp=" + atomicStampedRef.getStamp());//等待1000毫秒sleepMilliSeconds(1000);Print.tco("after sleep 1000: stamp = "+ atomicStampedRef.getStamp());//stamp = 1,这个值实际已经被修改了success = atomicStampedRef.compareAndSet(1, 20, stamp, stamp++);Print.tco("after cas 3 1000: success=" + success+ " value=" + atomicStampedRef.getReference()+ " stamp=" + atomicStampedRef.getStamp());latch.countDown();}});latch.await();}// 省略其他}
3.4.4 使用AtomicMarkableReference解决ABA问题
AtomicMarkableReference是AtomicStampedReference的简化版,不关心修改过几次,只关心是否修改过。因此,其标记属性mark是boolean类型,而不是数字类型,标记属性mark仅记录值是否修改过。
下面是一个简单的AtomicMarkableReference使用示例,通过两个线程分别更新同一个atomicRef的值,第一个线程会更新成功,而第二个线程会更新失败,具体代码如下:
package com.crazymakercircle.cas;// 省略importpublic class AtomicTest{@Testpublic void testAtomicMarkableReference() throws InterruptedException{CountDownLatch latch = new CountDownLatch(2);AtomicMarkableReference<Integer> atomicRef =new AtomicMarkableReference<Integer>(1, false);ThreadUtil.getMixedTargetThreadPool().submit(new Runnable(){@Overridepublic void run(){boolean success = false;int value = atomicRef.getReference();boolean mark = getMark(atomicRef);Print.tco("before sleep 500: value=" + value+ " mark=" + mark);//等待500毫秒sleepMilliSeconds(500);success = atomicRef.compareAndSet(1, 10, mark, !mark);Print.tco("after sleep 500 cas 1: success=" + success+ " value=" + atomicRef.getReference()+ " mark=" + getMark(atomicRef));latch.countDown();}});ThreadUtil.getMixedTargetThreadPool().submit(new Runnable(){@Overridepublic void run(){boolean success = false;int value = atomicRef.getReference();boolean mark = getMark(atomicRef);Print.tco("before sleep 1000: value="+ atomicRef.getReference()+ " mark=" + mark);//等待1000毫秒sleepMilliSeconds(1000);Print.tco("after sleep 1000: mark = " + getMark(atomicRef));success = atomicRef.compareAndSet(1, 20, mark,!mark);Print.tco("after cas 3 1000: success=" + success+ " value=" + atomicRef.getReference()+ " mark=" + getMark(atomicRef));latch.countDown();}});latch.await();}//取得修改标志值private boolean getMark(AtomicMarkableReference<Integer> atomicRef){boolean[] markHolder = {false};int value = atomicRef.get(markHolder);return markHolder[0];}// 省略其他}
3.5 提升高并发场景下CAS操作的性能
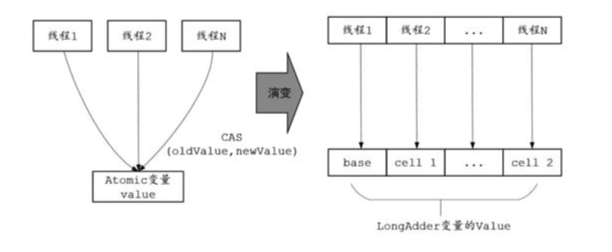
在争用激烈的场景下,会导致大量的CAS空自旋。比如,在大量线程同时并发修改一个AtomicInteger时,可能有很多线程会不停地自旋,甚至有的线程会进入一个无限重复的循环中。
大量的CAS空自旋会浪费大量的CPU资源,大大降低了程序的性能。
3.5.1 以空间换时间:LongAdder

下面是一个LongAdder和AtomicLong的对比实验,使用10个线程,每个线程累加1000次,具体代码如下:
package com.crazymakercircle.cas;// 省略importpublic class LongAdderVSAtomicLongTest{//每个线程的执行轮数final int TURNS = 100000000;//对比测试用例一:调用AtomicLong完成10个线程累加1000次@org.junit.Testpublic void testAtomicLong() {// 并发任务数final int TASK_AMOUNT = 10;//线程池,获取CPU密集型任务线程池ExecutorService pool = ThreadUtil.getCpuIntenseTargetThreadPool();//定义一个原子对象AtomicLong atomicLong = new AtomicLong(0);// 线程同步倒数闩CountDownLatch countDownLatch = new CountDownLatch(TASK_AMOUNT);long start = System.currentTimeMillis();for (int i = 0; i < TASK_AMOUNT; i++) {pool.submit(() ->{try {for (int j = 0; j < TURNS; j++) {atomicLong.incrementAndGet();}// Print.tcfo("本线程累加完成");} catch (Exception e) {e.printStackTrace();}//倒数闩,倒数一次countDownLatch.countDown();});}try {//等待倒数闩完成所有的倒数操作countDownLatch.await();} catch (InterruptedException e) {e.printStackTrace();}float time = (System.currentTimeMillis() - start) / 1000F;//输出统计结果Print.tcfo("运行的时长为:" + time);Print.tcfo("累加结果为:" + atomicLong.get());}@org.junit.Testpublic void testLongAdder() {// 并发任务数final int TASK_AMOUNT = 10;//线程池,获取CPU密集型任务线程池ExecutorService pool = ThreadUtil.getCpuIntenseTargetThreadPool();//定义一个LongAdder 对象LongAdder longAdder = new LongAdder();// 线程同步倒数闩CountDownLatch countDownLatch = new CountDownLatch(TASK_AMOUNT);long start = System.currentTimeMillis();for (int i = 0; i < TASK_AMOUNT; i++) {pool.submit(() ->{try {for (int j = 0; j < TURNS; j++) {longAdder.add(1);}// Print.tcfo("本线程累加完成");} catch (Exception e) {e.printStackTrace();}//倒数闩,倒数一次countDownLatch.countDown();});}try {//等待倒数闩完成所有的倒数操作countDownLatch.await();} catch (InterruptedException e) {e.printStackTrace();}float time = (System.currentTimeMillis() - start) / 1000F;//输出统计结果Print.tcfo("运行的时长为:" + time);Print.tcfo("累加结果为:" + longAdder.longValue());}
3.5.2 LongAdder的原理
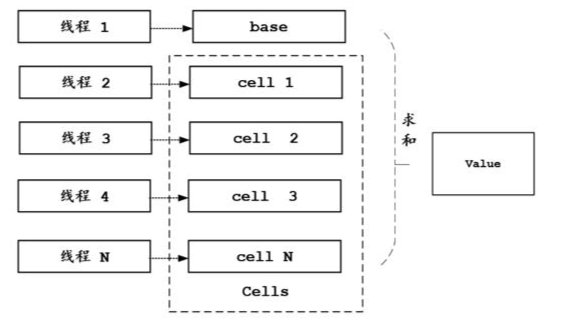
- LongAdder实例的内部结构

- 基类Striped64内部三个重要的成员
LongAdder继承于Striped64类,base值和cells数组都在Striped64类中定义。基类Striped64内部三个重要的成员如下:
/*** 成员一:存放Cell的哈希表,大小为2的幂*/transient volatile Cell[] cells;/*** 成员二:基础值* 1. 在没有竞争时会更新这个值* 2. 在cells初始化时,cells不可用,也会尝试通过CAS操作值累加到base*/transient volatile long base;/*** 自旋锁,通过CAS操作加锁,为0表示cells数组没有处于创建、扩容阶段* 为1表示正在创建或者扩展cells数组,不能进行新Cell元素的设置操作*/transient volatile int cellsBusy;
Striped64的整体值value的获取函数如下
public long longValue() {//longValue()方法调用了sum(),累加所有Cell的值return sum();}/*** 将多个cells数组中的值加起来的和就类似于AtomicLong中的value*/public long sum() {Cell[] as = cells;Cell a;long sum = base;if (as != null) {//累加所有cell的值for (int i = 0; i < as.length; ++i) {if ((a = as[i]) != null)sum += a.value;}}return sum;}
- LongAdder类的add()方法 ```java /**
- 自增1 */ public void increment() { add(1L); }
/**
- 自减1 */ public void decrement() { add(-1L); }
public void add(long x) { Cell[] as; long b, v; int m; Cell a; if ((as = cells) != null || //CASE 1 !casBase(b = base, b + x)) { //CASE 2 if (as == null || (m = as.length - 1) < 0 || //CASE 3 (a = as[getProbe() & m]) == null || //CASE 4 !(uncontended = a.cas(v = a.value, v + x))) //CASE 5 longAccumulate(x, null, uncontended); } }
4. LongAdder类中的longAccumulate()方法longAccumulate()是Striped64中重要的方法,实现不同的线程更新各自Cell中的值,其实现逻辑类似于分段锁,具体的代码如下:```javafinal void longAccumulate(long x, LongBinaryOperator fn,boolean wasUncontended) {int h;if ((h = getProbe()) == 0) {ThreadLocalRandom.current(); // force initializationh = getProbe();wasUncontended = true;}//扩容意向,collide=true可以扩容,collide=false不可扩容boolean collide = false;//自旋,一直到操作成功for (;;) {//as 表示cells引用//a 表示当前线程命中的Cell//n 表示cells数组长度//v 表示期望值Cell[] as; Cell a; int n; long v;//CASE1: 表示cells已经初始化了,当前线程应该将数据写入对应的Cell中//这个大的if分支有三个小分支if ((as = cells) != null && (n = as.length) > 0) {//CASE1.1:true表示下标位置的Cell为null,需要创建new Cellif ((a = as[(n - 1) & h]) == null) {if (cellsBusy == 0) { // cells数组没有处于创建、扩容阶段Cell r = new Cell(x); // Optimistically createif (cellsBusy == 0 && casCellsBusy()) {boolean created = false;try { // Recheck under lockCell[] rs; int m, j;if ((rs = cells) != null &&(m = rs.length) > 0 &&rs[j = (m - 1) & h] == null) {rs[j] = r;created = true;}} finally {cellsBusy = 0;}if (created)break;continue; // Slot is now non-empty}}collide = false;}// CASE1.2:当前线程竞争修改失败,wasUncontended为falseelse if (!wasUncontended) // CAS already known to failwasUncontended = true; // Continue after rehash//CASE 1.3:当前线程rehash过哈希值,CAS更新Cellelse if (a.cas(v = a.value, ((fn == null) ? v + x :fn.applyAsLong(v, x))))break;//CASE 1.4:调整扩容意向,然后进入下一轮循环else if (n >= NCPU || cells != as)collide = false; // 达到最大值,或者as值过期//CASE 1.5:设置扩容意向为true,但是不一定真的发生扩容if (!collide)collide = true;//CASE 1.6:真正扩容的逻辑else if (cellsBusy == 0 && casCellsBusy()) {try {if (cells == as) { // Expand table unless staleCell[] rs = new Cell[n << 1];for (int i = 0; i < n; ++i)rs[i] = as[i];cells = rs;}} finally {cellsBusy = 0; //释放锁}collide = false;continue; // Retry with expanded table}h = advanceProbe(h); //重置(rehash)当前线程Hash值}
- LongAdder类的casCellsBusy()方法
casCellsBusy()方法的代码很简单,就是将cellsBusy成员的值改为1,表示目前的cells数组在初始化或扩容中,具体的代码如下:
final boolean casCellsBusy() {return UNSAFE.compareAndSwapInt(this, CELLSBUSY, 0, 1);}
3.6 CAS在JDK中的广泛应用
3.6.1 CAS操作的弊端和规避措施
- ABA问题
- 只能保证一个共享变量之间的原子性操作
- 开销问题

