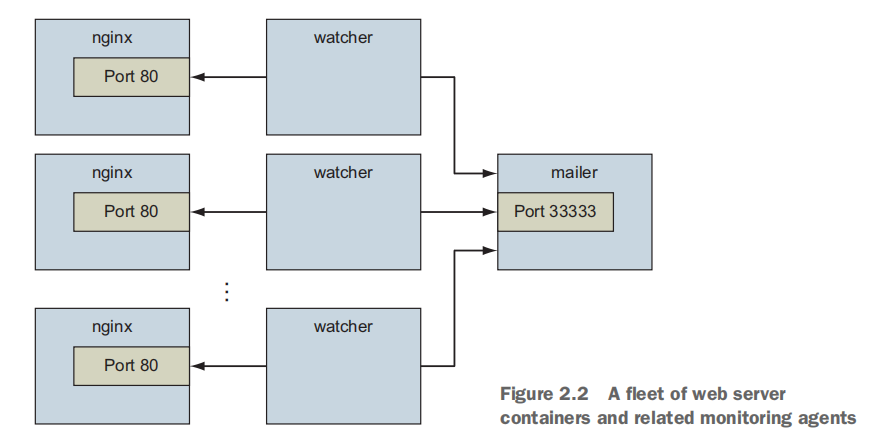
2.1 Controlling containers:Building a website monitor
- Create detached and interactive containers
- List containers on your system
- view container logs
- Stop and restart containers
- Reattach a terminal to a container
- Detach from an attached container
2.1.1 Creating and starting a new container
—detach: started the program in the background, the short form is “-d”docker run --detach \--name web nginx:latest
The following command installs and run a mailer that will work for this example:
docker run -d \--name mailer \dockerinaction/ch2_mailer
2.1.2 Running interactive containers
Runing interactive programs in Docker requires that you bind parts of your terminal to the input or output of a running container
docker run --interactive --tty \--link web:web \--name web_test \busybox:1.29 /bin/sh
—interactive(or -i): tells Docker to keep the standart input stream open for the container even if no terminal is attached
—tty: tells Docker to allocate a virtual terminal for the container, which will allow you to pass signals to the container
/bin/sh: you specified the program to run inside the container that is a shell program called sh.
From this shell, you can run a command to verify that your web server is running correctly:
wget -O - http://web:80/
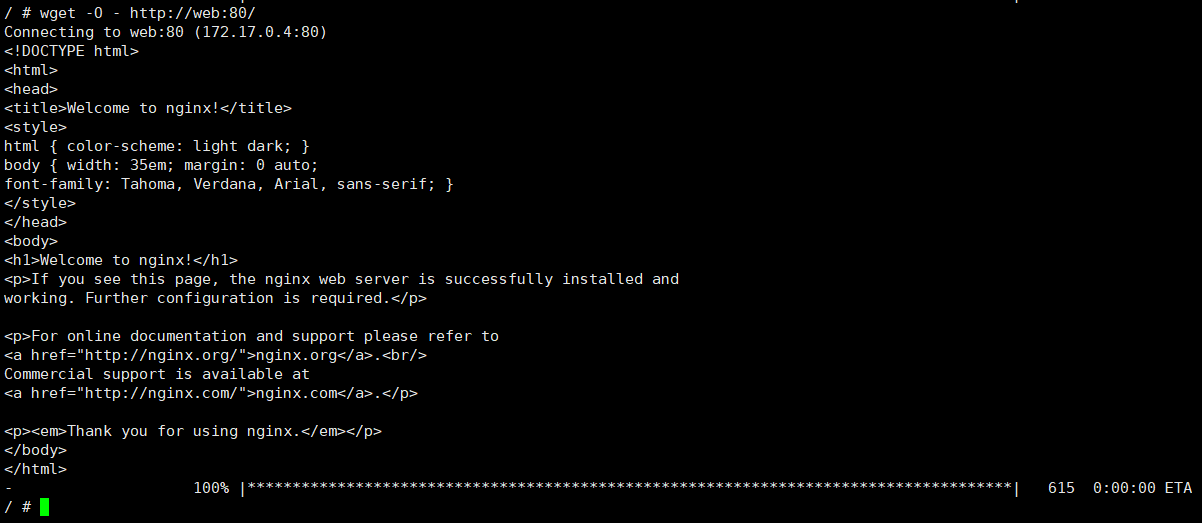
you can shut down this interactive container by typing “exit”
This is a monitoring agent that will test the web server as you did in the preceding example and send a message with the mailer if the web server stops
docker run -it \--name agent \--link web:insideweb \--link mailer:insidemailer \dockerinaction/ch2_agent
the container will test the web container every second and print a message like the following:
System up.
hold the ctrl + P + Q. After doing so, you’ll be returned to the shell for your host computer. Do not stop the progra; otherwise, the monitor will stop checing the web server
2.1.3 Listing, stopping, restarting, and viewing output of containers
docker ps: check which containers are currently running
docker ps

Running the command will display the following information about each running container:
- The container ID
- The image used
- The command exected in the container
- The time since the container was created
- The duration that the container has been running
- The network ports exposed by the container
- The name of the container
The next three commands will restart each container by using the container name:
docker restart webdocker restart mailerdocker restart agent
examine the logs of the web container
docker logs web
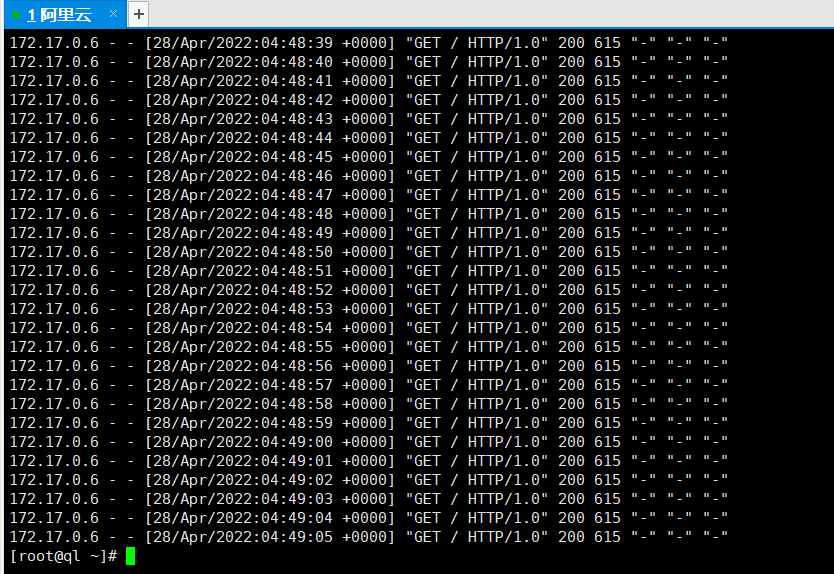
For completeness, you should examine the log output for mailer and agent as well:
docker logs mailerdocker logs agent
The logs for mailer should look something like this:
CH2 Example Mailer has started
The logs for agent should look something like this:
System up
The docker stop command tells the program with PID 1 in the container to halt. Use it in the following commands to test the system:
docker stop webdocker logs mailer
2.2 Solved problems and the PID namespace
A PID namespace is a set of unique numbers that identify process.
Docker creates a new PID namespace for each container by default. A container’s PID namespace isolates processes in that container from processes in other containers.
PID 1 might refer to an init system process such as runit or supervisord. In a different container, PID 1 might refer to a command shell such as bash.
docker run -d --name namespaceA \busybox:1.29 /bin/sh -c "sleep 30000"docker run -d --name namespaceB \busybox:1.29 /bin/sh -c "nc -l 0.0.0.0 -p 80"docker exec namespaceA psdocker exec namespaceB ps
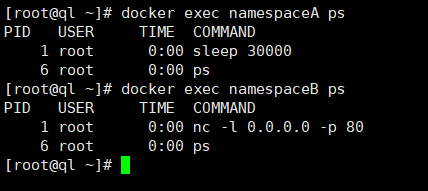
You can optionally create containers without their own PID namespace. You can try this yourself by setting the “—pid” flag on “docker create” or “docker run” and setting the value to host
docker run --pid host busybox:1.29 ps
You can see it in action by tring to run two copies of NGINX in the same container:
docker run -d --name webConflict nginx:latestdocker logs webConflictdocker exec webConflict nginx -g 'daemon off;'
The last command should display output like this:
It’s a great example of a conflict problem that Docker simplifies and solves. Run each in a different container, like this:
docker run -d --name webA nginx:latestdocker logs webAdocker run -d --name webB nginx:latestdocker logs webB
Here are some common conflict problems:
- Two programs want to the same network port
- Two programs use the same temporary filename, and file locks are preventing that
- Two programs want to use different versions of a globally installed library.
- Two programs want to use the same PID file.
- A second program you installed modified an environment variable that another program uses. Now the first program breaks.
- Multiple process are competing for memory or CPU time.
2.3 Eliminating metaconflicts: Building a website farm
2.3.1 Flexible container identification
If a situation arises in which the name of a container needs to change, you can always rename the container with the “docker rename “ command :
docker rename webid webid-old# Creates another container named "webid"docker run -d --name webid nginx
you could use the previous ID with a stop or exec command:
docker exec \7cb5d2b9a7eab87f07182b5bf58936c9947890995b1b94f412912fa822a9ecb5 \echo hellodocker stop \7cb5d2b9a7eab87f07182b5bf58936c9947890995b1b94f412912fa822a9ecb5
because of the first 12 characters of this ID wouldn’t be a collision, so the previous two commands could be written like this:
docker exec 7cb5d2b9a7ea psdocker stop 7cb5d2b9a7ea
The “docker create” command is similar to “docker run”, the primary difference being that the container is created in a stopped state:
docker create nginx
If you’re using a Linux command shell such as sh or bash, you can assign that result to a shell variable and use it again later:
CID=$(docker create nginx:latest)echo $CID
Both the docker run and docker create commands provide another flag to write the ID of a new container to a known file:
docker create --cidfile /tmp/web.cid nginxcat /tmp/web.cid
if you want to get the truncated ID of the last created container, you can use this:
CID=$(docker ps --latest --quiet)echo $CIDCID=$(docker ps -l -q)echo $CID
2.3.2 Container state and dependencies
the new system might look something like this:
MAILER_CID=$(docker run -d dockerinaction/ch2_mailer)WEB_CID=$(docker create nginx)AGENT_CID=$(docker create --link $WEB_CID:insideweb \--link $MAILER_CID:insidemailer \dockerinaction/ch2_agent)
The docker container management commands to move between states annotate each transition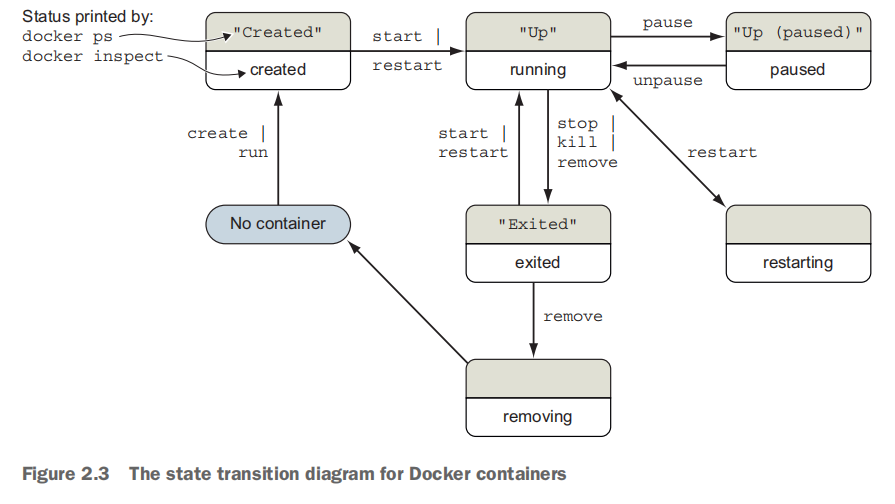
To see all the containers( including those in the created state), use the -a option:
docker ps -a
# The containers need to be started in reverse order of their dependency chaindocker start $WEB_CIDdocker start $AGENT_CID
2.4 Building environment-agnostic systems
Docker has three specific features to help build environment-agnostic systems:
- Read-only filesystems
- Environment variable injection
- Volumes
2.4.1 Read-only filesystems
To get started working on your client’s system, create and start a container from the WordPress image by using the —read-only flag:
The following command will print true if the container named wp is running, and false otherwise:docker run -d --name wp --read-only \wordpress:5.0.0-php7.2-apache
This command should simply output falsedocker inspect --format "{.State.Running}" wp
To determine why, examine the logs for the container:docker logs wp

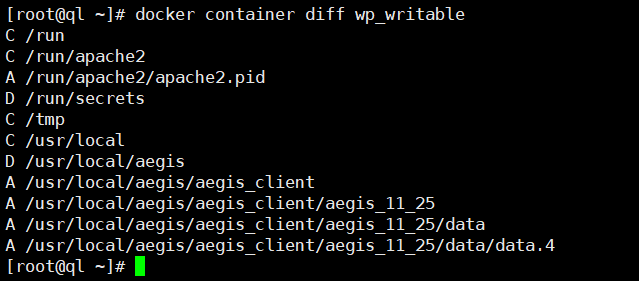
Now let’s check where Apache changed the container’s filesystem with the docker diff command:docker run -d --name wp_writable wordpress:5.0.0-php7.2-apache
docker container diff wp_writable
docker run -d --name wp2 \--read-only \# Mounts a writable directory from the host-v /run/apache2/ \# Provides container an in-memory temp filesystem--tmpfs /tmp \wordpress:5.0.0-php7.2-apache

WordPress also has a dependency on a Mysql database
create a different WordPress container that’s linked to this new database container:docker run -d --name wpdb \-e MYSQL_ROOT_PASSWORD=ch2demo \mysql:5.7
An updated version of the script you’ve been working on should look like this: ```shelldocker run -d --name wp3 \--link wpdb:mysql \# Directs traffic from host port 8000 to container port 80-p 8000:80 \--read-only \-v /run/apache2/ \--tmpfs /tmp \wordpress:5.0.0-php7.2-apache
!/bin/sh
DB_CID = $(docker create -e MYSQL_ROOT_PASSWORD=root mysql:5.7) docker start $DB_CID MAILER_CID = $(docker create dockerinaction/ch2_mailer) docker start $MAILER_CID
WP_CID = $(docker create —link $DB_CID:mysql -p 80 \ —read-only -v /run/apache2/ —tmpfs /tmp \ wordpress:5.0.0-php7.2-apache)
docker start $WP_CID
AGENT_CID = $(docker create —link $WP_CID:insideweb \ —link $MAILER_CID:insidemailer \ dockerinaction/ch2_agent)
docker start $AGENT_CID
<a name="surVW"></a>## 2.4.2 Environment variable injectionTo see environment variable injection in action, use the following command:```shelldocker run --env MY_ENVIRONMENT_VAR="this is a test" \busybox:1.29 \env
2.5 Building durable containers
2.5.1 Automatically restarting containers
2.5.1 Using PID 1 and init systems
a full LAMP(Linux, Apache, MySQL, PHP) stack inside a single container. That created this way use supervisord to make sure that all the related processes are kept running
docker run -d -p 80:80 --name lamp-test tutum/lamp
you can see which processes are running inside this container by using the docker top command:
Find the PID on the row for apache2 and then insert that for
docker exec lamp-test kill <PID>
# uses "cat" as the entrypointdocker run --entrypoint="cat" \wordpress:5.0.0-php7.2-apache \# passes the full of the default entrypoint script as an argument to cat/usr/local/bin/docker-entrypoint.sh
2.6 Cleaning up
To remove a container from your computer, use the docker rm command
docker rm wp
docker run --rm --name auto-exit-test busybox:1.29 echo Hello Worlddocker ps -a
Doing so will automatically remove the container as soon as it enters the exited state
docker rm -vf $(docker ps -a -q)

