概念
原理
xml 解析、工厂模式、反射
通过 xml 解析出 bean 的全限定类名,再通过反射创建对象,最后通过对象工厂获取对象。
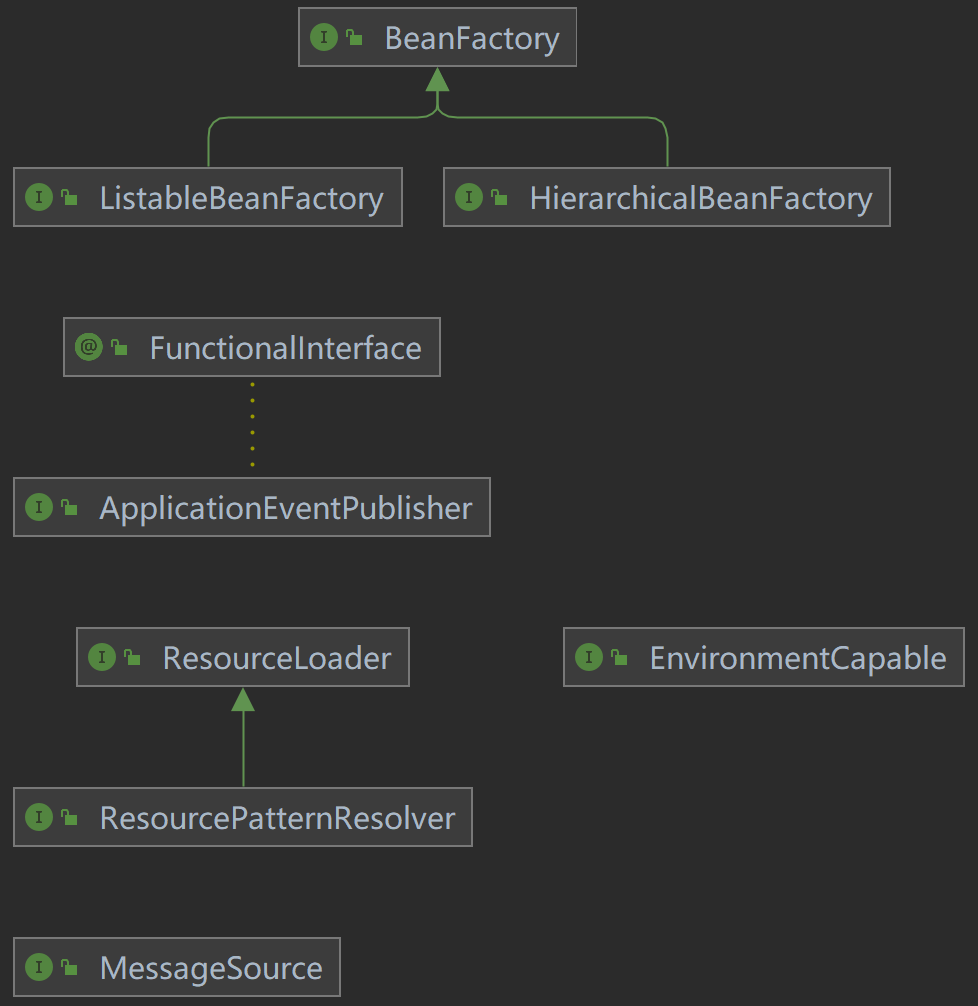
Spring IOC 实现方式(核心接口)
- BeanFactory:IOC 容器的基本实现,是 Spring 内部调用的接口,开发人员一般不使用;
- ApplicationContext:BeanFactory 接口的子接口,提供更多功能,对外提供开发人员使用;
- 区别:
- BeanFactory 加载配置文件的时候不会创建对象,在获取对象或使用对象的时候才去创建对象
- ApplicationContext 在加载配置文件的时候就会创建对象,
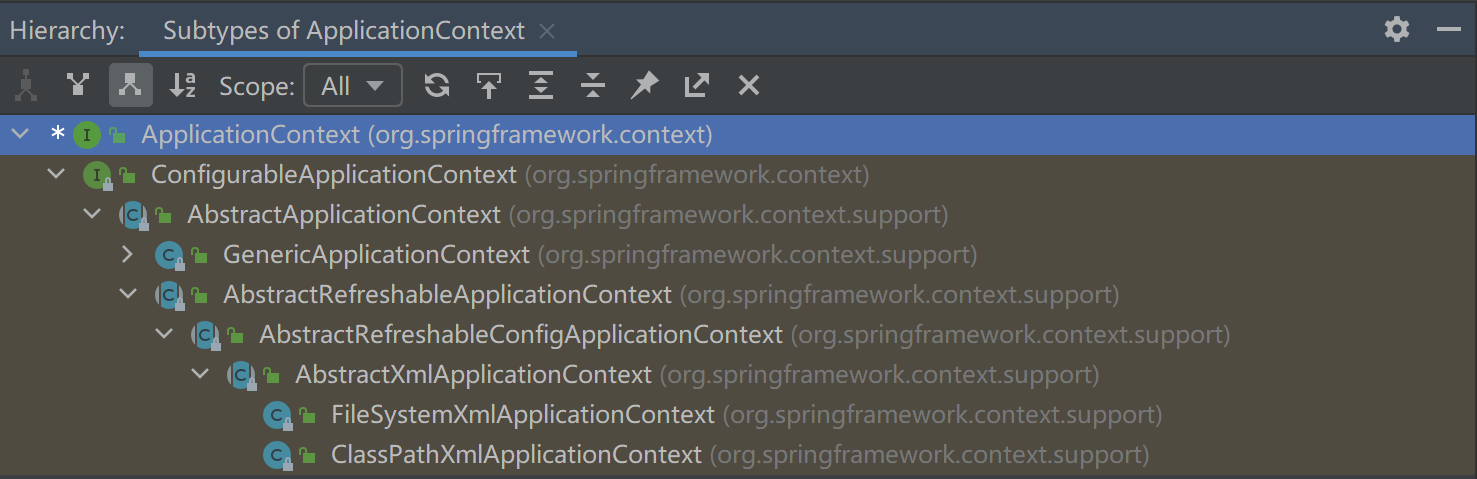
ApplicationContext 实现类
Bean 管理
Spring IOC bean 管理指的是两个操作,创建对象和注入属性。而这两个操作有两种实现方式:
- 基于 xml 配置文件的方式
- 基于注解的方式
Bean管理 - xml
创建对象
<bean id="id_user" class="io.zsy.hello.User"/>
User user = context.getBean("id_user", User.class);
通过在 spring 配置文件中声明 bean 标签,并通过一些属性的定义来创建对象。创建对象时实际上是执行的无参构造函数。
bean 标签属性:
- id:bean 唯一标识
- class:bean 全限定类名
name:可以替换 id 使用,与 id 不同的是 name 可以声明特殊符号,不常用。
注入属性
DI:依赖注入就是注入属性的实现方式。常见有两种注入方式:setter 方法和有参构造
setter 方法
<bean id="book" class="io.zsy.hello.aop.Book">
 <property name="bookName" value="笑傲江湖"/>
 <property name="author" value="金庸"/>
</bean>
@Test public void testDIByXml() { // 加载Spring配置文件创建对象 ApplicationContext context = new ClassPathXmlApplicationContext("bean.xml"); Book book = context.getBean("book", Book.class); System.out.println(book); }通过在 spring 配置文件 bean 标签下配置 property 标签来注入属性值,实际调用的是 bean 的 setter 方法。
property 标签属性:name:属性名称;
- value:属性值;
扩展:通过 p 命名空间简化 setter 方式属性注入xmlns:p="http://www.springframework.org/schema/p"
<?xml version="1.0" encoding="UTF-8"?>
<beans xmlns="http://www.springframework.org/schema/beans"
       xmlns:xsi="http://www.w3.org/2001/XMLSchema-instance"
       xmlns:p="http://www.springframework.org/schema/p"
       xsi:schemaLocation="http://www.springframework.org/schema/beans http://www.springframework.org/schema/beans/spring-beans.xsd">

  <bean id="book" class="io.zsy.hello.aop.Book" p:bookName="笑傲江湖" p:author="金庸"/>
</beans>
有参构造
<bean id="cat" class="io.zsy.hello.aop.Cat">
    <constructor-arg name="name" value="小狗"/>
    <constructor-arg name="age" value="1"/>
</bean>
@Test
public void testDIByConstructor() {
    // 加载Spring配置文件创建对象
    ApplicationContext context = new ClassPathXmlApplicationContext("bean.xml");
    Cat cat = context.getBean("cat", Cat.class);
    System.out.println(cat);
}
通过在 spring 配置文件 bean 标签下配置 constructor-arg 标签来注入属性值,实际调用的是 bean 中对应的有参构造方法。
constructor-arg 标签属性:
- name:构造方法参数名称;
- value:属性值;
-
外部bean
创建 UserService UserDao,在 UserService 中注入并调用 UserDao 中的方法。
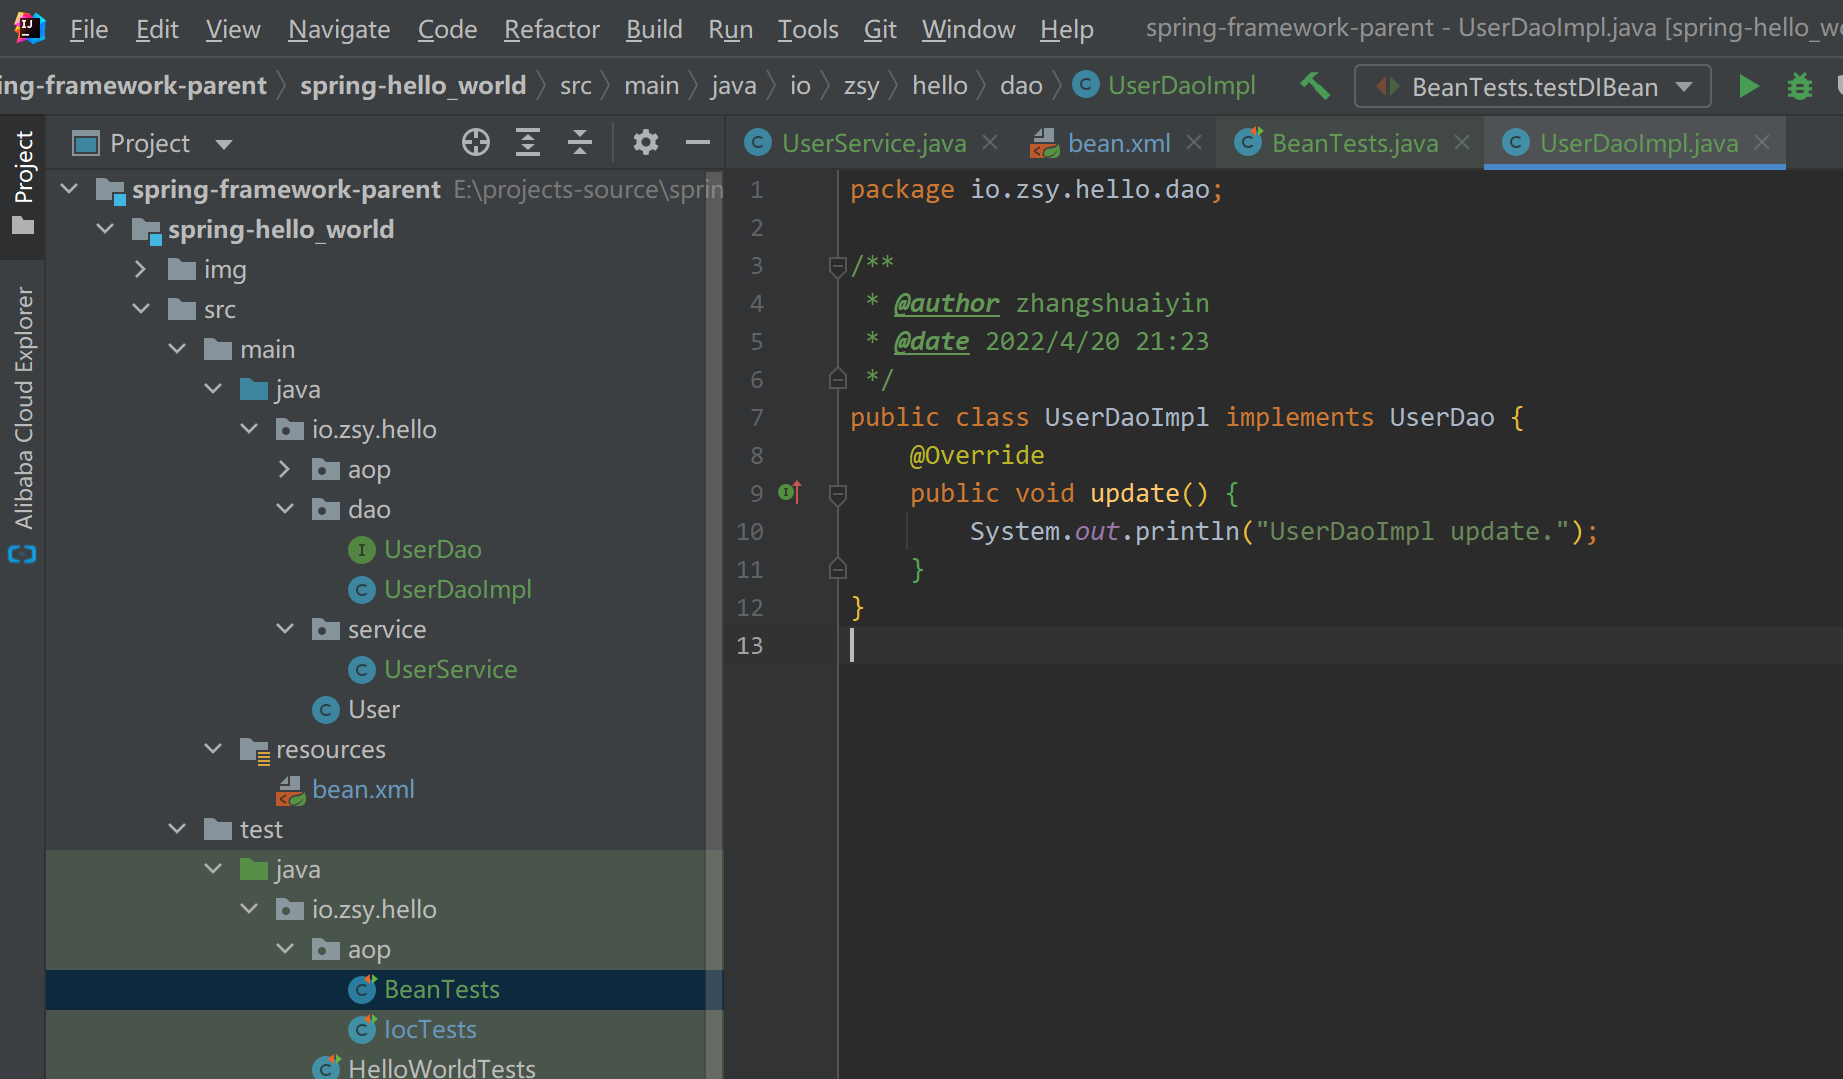
bean.xml<bean id="userDao" class="io.zsy.hello.dao.UserDaoImpl"/> <bean id="userService" class="io.zsy.hello.service.UserService"> <property name="userDao" ref="userDao"/> </bean>测试
@Test
public void testOuterBean() {
 // 加载Spring配置文件创建对象
 ApplicationContext context = new ClassPathXmlApplicationContext("bean.xml");
 UserService userService = context.getBean("userService", UserService.class);
 userService.update();
}
property 标签属性:
-
内部bean和级联赋值
用来表示一对多关系 ```xml
测试java
@Test
public void testInnerBean() {
// 加载Spring配置文件创建对象
ApplicationContext context = new ClassPathXmlApplicationContext(“bean.xml”);
Emp emp = context.getBean(“emp1”, Emp.class);
System.out.println(emp);
}
@Test
public void testCascadeBean() {
// 加载Spring配置文件创建对象
ApplicationContext context = new ClassPathXmlApplicationContext(“bean.xml”);
Emp emp = context.getBean(“emp2”, Emp.class);
System.out.println(emp);
}
级联赋值的另一种方式xml
测试
```java
@Test
public void testCascadeBean2() {
    // 加载Spring配置文件创建对象
    ApplicationContext context = new ClassPathXmlApplicationContext("bean.xml");
    Emp emp = context.getBean("emp3", Emp.class);
    System.out.println(emp);
}
注入集合属性
配置文件示例
<bean id="student" class="io.zsy.hello.collection.Student">
    <property name="array">
        <array>
            <value>数组1</value>
            <value>数组2</value>
        </array>
    </property>
    <property name="list">
        <list>
            <value>list1</value>
            <value>list2</value>
        </list>
    </property>
    <property name="map">
        <map>
            <entry key="key1" value="value1"/>
            <entry key="key2" value="value2"/>
        </map>
    </property>
    <property name="set">
        <set>
            <value>set1</value>
            <value>set2</value>
        </set>
    </property>
</bean>
自动装配
<!-- autowire: byName byType constructor default no -->
<bean id="orderService" class="io.zsy.hello.autowire.OrderService"
      autowire="constructor"/>

<bean id="orderDao" class="io.zsy.hello.autowire.OrderDao"/>
- byName:根据属性名称自动装配,实际是 setter 方法名;
- byType:根据属性类型自动装配;
-
引入外部配置文件
需要使用 context 命名空间。
jdbc.propertiesjdbc.driverClassName=com.mysql.cj.jdbc.Driver jdbc.url=jdbc:mysql//localhost:3306/db-name jdbc.username=root jdbc.password=123456spring-context.xml
<?xml version="1.0" encoding="UTF-8"?>
<beans xmlns="http://www.springframework.org/schema/beans"
    xmlns:xsi="http://www.w3.org/2001/XMLSchema-instance"
    xmlns:context="http://www.springframework.org/schema/context"
    xsi:schemaLocation="http://www.springframework.org/schema/beans http://www.springframework.org/schema/beans/spring-beans.xsd
     http://www.springframework.org/schema/context http://www.springframework.org/schema/context/spring-context.xsd">

 <context:property-placeholder location="classpath*:jdbc.properties"/>

 <!-- 演示 外部属性文件 -->
 <bean id="dataSource" class="com.alibaba.druid.pool.DruidDataSource">
     <!-- 使用 spring 表达式获取外部属性文件 -->
     <property name="driverClassName" value="${jdbc.driverClassName}"/>
     <property name="url" value="${jdbc.url}"/>
     <property name="username" value="${jdbc.username}"/>
     <property name="password" value="${jdbc.password}"/>
 </bean>
</beans>
Bean管理-FactoryBean
Spring IOC 容器中有两种类型的 bean,一种是常见的普通 bean,另一种是工厂 bean(FactoryBean)。与普通 bean 返回的类型唯一不同,工厂 bean 可以返回不同的类型。
创建一个 bean 继承 FactoryBean 接口,作为一个工厂 bean 示例; ```java package io.zsy.hello.factory.bean;
import io.zsy.hello.dao.UserDao; import io.zsy.hello.dao.UserDaoImpl; import org.springframework.beans.factory.FactoryBean;
/**
- @author zhangshuaiyin
@date 2022/4/21 21:01 */ public class UserDaoFactoryBean implements FactoryBean
{ @Override public UserDao getObject() throws Exception { return new UserDaoImpl();}
@Override public Class<?> getObjectType() {
return null;} } ```
- 实现接口的方法,完成 FactoryBean 返回不同类型的功能;
注入bean
<?xml version="1.0" encoding="UTF-8"?>
<beans xmlns="http://www.springframework.org/schema/beans"
  xmlns:xsi="http://www.w3.org/2001/XMLSchema-instance"
  xmlns:p="http://www.springframework.org/schema/p"
  xsi:schemaLocation="http://www.springframework.org/schema/beans http://www.springframework.org/schema/beans/spring-beans.xsd">

<bean id="userDaoFactoryBean" class="io.zsy.hello.factory.bean.UserDaoFactoryBean">
</bean>
</beans>
测试
@Test
public void testFactoryBean() {
 // 1. 加载Spring配置文件
 ApplicationContext context = new ClassPathXmlApplicationContext("factory-bean.xml");
 // 2. 获取配置中注入的 bean 对象
 UserDao userDao = context.getBean("userDaoFactoryBean", UserDao.class);
 // 3. 创建对象成功,调用成员方法
 userDao.update();
}
Bean 管理 - 生命周期
作用域
<bean id="book" class="io.zsy.hello.aop.Book" scope="prototype" p:bookName="笑傲江湖" p:author="金庸"/>配置文件 bean 标签中有个 scope 属性,该属性可以声明 bean 的生命周期。该属性有两个可选值,prototype 和 singleton,缺省默认值为 singleton。
singleton:单例,在 ApplicationContext 加载配置文件的时候就已经被创建,伴随 Spring 整个生命周期;
prototype:多例,在 getBean() 方法调用的时候才会创建。
生命周期
生命周期就是创建到销毁的过程。
通过类的无参构造方法创建一个 bean 对象;
- 通过类属性的 setter 方法给 bean 的属性注入值;
- 调用 bean 的初始化方法;(初始化方法需要配置)
- 获取到 bean 实例,进行使用;
IOC 容器关闭时,调用 bean 的销毁方法;(销毁方法需要配置)
生命周期演示
创建 bean ```java package io.zsy.hello.lifecycle;
/**
- @author zhangshuaiyin
@date 2022/4/21 21:34 */ public class Order {
String orderName;
public Order() {
System.out.println("1. 通过类的无参构造方法创建一个 bean 对象");}
public void setOrderName(String orderName) {
 System.out.println("2. 通过类属性的 setter 方法给 bean 的属性注入值;");
 this.orderName = orderName;
}
public void init() {
System.out.println("3. 调用 bean 的初始化方法;(初始化方法需要配置)");}
public void pay() {
System.out.println("4. 获取到 bean 实例,进行使用;");}
public void destroy() {
System.out.println("5. IOC 容器关闭时,调用 bean 的销毁方法;(销毁方法需要配置)");} }
```xml
<!-- 演示生命周期 -->
<bean id="order" class="io.zsy.hello.lifecycle.Order"
      init-method="init" destroy-method="destroy">
    <property name="orderName" value="测试订单"/>
</bean>
测试
@Test
public void testLifecycle() {
 ClassPathXmlApplicationContext context = new ClassPathXmlApplicationContext("factory-bean.xml");
 Order order = context.getBean("order", Order.class);
 order.pay();
 // 关闭容器
 context.close();
}
bean 后置处理器
bean 除了上面介绍的核心生命周期外,还有后置处理器执行的两步操作,分别在
3. 调用 bean 的初始化方法前后执行。
后置处理器就是 BeanPostProcessor 他能在初始化前后传递 bean 实例,并执行一些其他的操作。后置处理器会在当前配置文件中的所有 bean创建时执行后置处理操作。postProcessBeforeInitialization:在初始化方法执行前执行;
- postProcessAfterInitialization:在初始化方法执行后执行; ```java package io.zsy.hello.lifecycle;
import org.springframework.beans.BeansException; import org.springframework.beans.factory.config.BeanPostProcessor;
/**
- @author zhangshuaiyin
@date 2022/4/21 21:48 */ public class MyBeanPostProcessor implements BeanPostProcessor {
@Override public Object postProcessBeforeInitialization(Object bean, String beanName) throws BeansException {
 System.out.println("后置处理器-在初始化方法执行前执行;");
 return BeanPostProcessor.super.postProcessBeforeInitialization(bean, beanName);
}
@Override public Object postProcessAfterInitialization(Object bean, String beanName) throws BeansException {
 System.out.println("后置处理器-在初始化方法执行后执行;");
 return BeanPostProcessor.super.postProcessAfterInitialization(bean, beanName);
} }
```xml
<!-- 配置bean后置处理器 -->
<bean id="beanPostProcessor" class="io.zsy.hello.lifecycle.MyBeanPostProcessor"/>

示例:后置处理器会在当前配置文件中的所有 bean创建时执行后置处理操作
根据运性结果可以看出,配置文件中共有三个bean,其中 book 因为声明了作用域为 prototype,在加载配置文件的时候并不会创建,所以只执行了两次。
注解
创建对象
Spring 创建对象的注解如下,功能是一样的,都可以用来创建 bean 实例。
@Component@Service:service 层@Controller:controller 层@Repository:dao 层
配置文件中开启注解扫描的包
<?xml version="1.0" encoding="UTF-8"?>
<beans xmlns="http://www.springframework.org/schema/beans"
       xmlns:xsi="http://www.w3.org/2001/XMLSchema-instance"
       xmlns:context="http://www.springframework.org/schema/context"
       xsi:schemaLocation="http://www.springframework.org/schema/beans http://www.springframework.org/schema/beans/spring-beans.xsd
        http://www.springframework.org/schema/context http://www.springframework.org/schema/context/spring-context.xsd">
    <context:component-scan base-package="io.zsy.annotation"/>
</beans>
filter
<!--
use-default-filters="false" 表示不适用默认的filter 使用自己配置的filter
context:include-filter 表示只扫描当前包下 Controller 注解的类
context:exclude-filter 表示当前包下哪些类不扫描
-->
<context:component-scan base-package="io.zsy.annotation" use-default-filters="false">
    <context:include-filter type="annotation" expression="org.springframework.stereotype.Controller"/>
</context:component-scan>
注入属性
Spring 属性注入的注解:
@Autowired:根据属性类型自动装配@Qualifier:根据属性名称注入,配置@Autowired注解一起使用@Resource:首先根据类型注入(类型相同,默认根据属性名注入),也可以指定名称注入@Value:注入普通类型属性 ```java package io.zsy.annotation.service;
import io.zsy.annotation.dao.UserDao; import org.springframework.beans.factory.annotation.Autowired; import org.springframework.beans.factory.annotation.Qualifier; import org.springframework.beans.factory.annotation.Value; import org.springframework.stereotype.Service;
import javax.annotation.Resource;
/**
- @author zhangshuaiyin
@date 2022/4/24 20:47 */ @Service(value = “userService”) public class UserService {
@Value(value = “zhangsan”) private String name;
@Autowired @Qualifier(value = “userDaoImpl”) public UserDao userDao;
@Resource public UserDao userMapper;
@Resource(name = “userMapper”) public UserDao userDao2;
public void add() {
System.out.println("UserService - 注解value属性可以省略,缺省值为类名首字母小写 我叫" + name); userDao.add(); userDao2.add(); userMapper.add();完全注解开发
```java package io.zsy.annotation.config;
import org.springframework.context.annotation.ComponentScan; import org.springframework.context.annotation.Configuration;
/**
- 使用 Java 配置类替代配置文件,实现完全注解开发
- @author zhangshuaiyin
- @date 2022/4/24 21:18
*/
@Configuration
@ComponentScan(basePackages = {“io.zsy.annotation”})
public class SpringConfig {
}
测试:
```java
 @Test
 public void testAllAnnotation() {
     ApplicationContext context = new AnnotationConfigApplicationContext(SpringConfig.class);
     UserService userService = context.getBean("userService", UserService.class);
     userService.add();
 }

若有收获,就点个赞吧
0 人点赞
