前言
此处又是自我抒情的自嗨时间,Spring AOP平常开发中也会用到,但也只是用到,一直没有系统的总结下,深一点的原理一直没有去了解。恰好最近刚好在看Spring源码,正所谓,早搞晚搞都得搞,此时不搞,何时搞,所以就搞了这篇文章。
AOP介绍
AOP,Aspect Oriented programming 面向切面编程。AOP是一种编程范式,一种思想,区别于传统的纵向开发,AOP是横向的,可以做到无入侵开发,与目标代码解耦,无论从扩展还是维护都更加的方便。而Spring将AOP引入到框架中,也成为其中一个重要的模块。
Spring AOP的使用
Spring提供了两种方式对AOP的支持,一种是基于xml的,一种是基于注解的。我理解为AOP其实就是可以对指定的方法进行拦截处理,先来看下两种方式的具体代码实现,代码全部贴出来了,所以你可以直接复制(联合国建议,有助于理解),但你也可以访问GitHub直接下载。
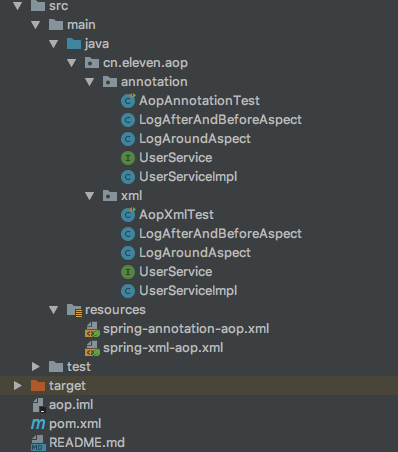
项目目录结构:

Maven依赖:
<dependencies><dependency><groupId>org.springframework</groupId><artifactId>spring-context</artifactId><version>5.1.7.RELEASE</version></dependency><dependency><groupId>org.springframework</groupId><artifactId>spring-aspects</artifactId><version>5.1.7.RELEASE</version></dependency><dependency><groupId>junit</groupId><artifactId>junit</artifactId><version>4.12</version></dependency><dependency><groupId>org.springframework</groupId><artifactId>spring-test</artifactId><version>5.1.9.RELEASE</version></dependency></dependencies>
基于xml方式
spring-annotation-aop.xml配置:
<?xml version="1.0" encoding="UTF-8"?><beans xmlns="http://www.springframework.org/schema/beans"xmlns:xsi="http://www.w3.org/2001/XMLSchema-instance"xmlns:aop="http://www.springframework.org/schema/aop"xsi:schemaLocation="http://www.springframework.org/schema/beanshttp://www.springframework.org/schema/beans/spring-beans-2.5.xsdhttp://www.springframework.org/schema/aophttp://www.springframework.org/schema/aop/spring-aop-3.1.xsd"><!--目标对象,要拦截的类--><bean id="userServiceImpl" class="cn.eleven.aop.xml.UserServiceImpl"/><!-- Advice通知/增强类,拦截后的处理逻辑类 --><bean id="logAfterAndBeforeAspect" class="cn.eleven.aop.xml.LogAfterAndBeforeAspect"/><!-- Advice通知/增强类,拦截后的处理逻辑类 --><bean id="logAroundAspect" class="cn.eleven.aop.xml.LogAroundAspect"/><aop:config><!-- Joinpoint 切入点 也就是拦截这个方法 --><aop:pointcut expression="execution(* cn.eleven.aop.xml.UserService.insert(..))"id="insertInterceptorMethod"/><!-- Advice通知类型 有前置通知,后置通知,异常通知,最终通知,环绕通知--><aop:aspect ref="logAfterAndBeforeAspect"><!-- 前置通知: 拦截方法执行前执行 --><aop:before method="before" pointcut-ref="insertInterceptorMethod" /><!-- 后置通知:拦截方法执行后执行 --><aop:after method="after" pointcut-ref="insertInterceptorMethod"/></aop:aspect></aop:config><aop:config><!-- 拦截这个方法 --><aop:pointcut expression="execution(* cn.eleven.aop.xml.UserService.deleteAll())"id="deleteAllInterceptorMethod"/><aop:aspect ref="logAroundAspect"><!-- 环绕通知:拦截方法执行前后都要执行 --><aop:around method="around" pointcut-ref="deleteAllInterceptorMethod"/></aop:aspect></aop:config></beans>
目标类:
public interface UserService {void insert(String name, int age);void deleteAll();}// 实现类@Servicepublic class UserServiceImpl implements UserService {public void insert(String name, int age) {System.out.println("xml-保存信息,name:" + name + ",age: " + age);}public void deleteAll() {System.out.println("xml-删除所有");}}
切面处理:
// 前置通知和后置通知public class LogAfterAndBeforeAspect {public void interceptorMethod() {}public void before() {System.out.println("方法执行前调用 ====>");}public void after() {System.out.println("方法执行后调用 ====>");}}// 环绕通知public class LogAroundAspect {public void interceptorMethod() {}public void around(ProceedingJoinPoint joinPoint) {System.out.println("环绕调用,方法调用前执行 ====>");try {joinPoint.proceed();} catch (Throwable throwable) {throwable.printStackTrace();}System.out.println("环绕调用,方法调用后执行 ====>");}}
单元测试:
public class AopXmlTest {private UserService userService;@Beforepublic void setup() {ApplicationContext context = new ClassPathXmlApplicationContext("spring-xml-aop.xml");userService = (UserService)context.getBean("userServiceImpl");}@Testpublic void testBeforeAndAfter() {userService.insert("eleven-xml",22);}@Testpublic void testAround() {userService.deleteAll();}}
基于注解方式
spring-annotation-aop.xml配置:
<?xml version="1.0" encoding="UTF-8"?><beans xmlns="http://www.springframework.org/schema/beans"xmlns:xsi="http://www.w3.org/2001/XMLSchema-instance"xmlns:context="http://www.springframework.org/schema/context"xmlns:aop="http://www.springframework.org/schema/aop"xsi:schemaLocation="http://www.springframework.org/schema/beanshttp://www.springframework.org/schema/beans/spring-beans-2.5.xsdhttp://www.springframework.org/schema/contexthttp://www.springframework.org/schema/context/spring-context-2.5.xsdhttp://www.springframework.org/schema/aophttp://www.springframework.org/schema/aop/spring-aop-3.1.xsd"><!--开启注解扫描--><context:component-scan base-package="cn.eleven.aop.annotation"/><!--开启aspect代理--><aop:aspectj-autoproxy/></beans>
目标类:
public interface UserService {void insert(String name, int age);void deleteAll();}// 实现类@Servicepublic class UserServiceImpl implements UserService {public void insert(String name, int age) {System.out.println("xml-保存信息,name:" + name + ",age: " + age);}public void deleteAll() {System.out.println("xml-删除所有");}}
切面处理:
@Aspect@Componentpublic class LogAfterAndBeforeAspect {@Pointcut("execution(* cn.eleven.aop.annotation.UserService.*(String,int))")public void interceptorMethod() {}@Before("interceptorMethod()")public void before() {System.out.println("方法执行前调用 ====>");}@After("interceptorMethod()")public void after() {System.out.println("方法执行后调用 ====>");}}// 环绕通知@Aspect@Componentpublic class LogAroundAspect {@Pointcut("execution(* cn.eleven.aop.annotation.UserService.deleteAll())")public void interceptorMethod() {}@Around("interceptorMethod()")public void around(ProceedingJoinPoint joinPoint) {System.out.println("环绕调用,方法调用前执行 ====>");try {joinPoint.proceed();} catch (Throwable throwable) {throwable.printStackTrace();}System.out.println("环绕调用,方法调用后执行 ====>");}}
单元测试:
@RunWith(SpringJUnit4ClassRunner.class)@ContextConfiguration(locations = "classpath:spring-annotation-aop.xml")public class AopAnnotationTest {@Autowiredprivate UserService userService;@Testpublic void testBeforeAndAfter() {userService.insert("annotation-eleven",22);}@Testpublic void testAround() {userService.deleteAll();}}
在SpringBoot中使用也只需要在启动类上加这个注解:**
@EnableAspectJAutoProxy**就可以了
AOP中的一些概念
无论你是复制了一遍,还是直接把demo下载下来运行,你会发现其实差不多,而且工作中注解用的更多(但看xml更直观),那为什么还要重复,当你问出这个问题时上去就是一巴掌,还不是为了让你多熟练熟练,不然怎么往下继续!
Joinpoint
连接点,目标方法
Pointcut
切入点,就是要对那些Joinpoint进行拦截定义。execution表达式格式:
execution([修饰符] 返回值类型 包名.类名.方法名.(参数类型))
- 修饰符:可以省略
- 返回值类型:必须,可以使用通配符“*”
- 包名:必须,可以使用通配符“”,多级包可以用多个“”,中间包名省略用“..”
- 类名:必须,可以使用通配符“”,且支持模糊匹配,例如:`Impl`
- 方法名:必须,可以使用通配符“”,且支持模糊匹配,例如:`find`
-
Advice
通知/增强,拦截到Joinpoint后要做的事情,有以下几种:
前置通知(Before):目标方法执行前执行
- 后置通知(AfterReturn):目标方法执行后执行,但是有异常就不执行
- 异常通知(AfterThrowing):目标方法发生异常后执行
- 最终通知(After):目标方法执行后执行,有异常也执行
- 环绕通知(Before):目标方法执行前后都会执行一遍
Introduction
引介,是一种特殊的通知,可以在运行期间动态添加方法和field
Target
目标对象,代理的目标对象
Weaving
织入,将切面应用到目标对象的过程,Spring AOP是在运行时执行织入
Proxy
代理,一个类被织入增强后,会产生一个结果代理类
Aspect
切面,切入点和通知的结合
Advisor
通知器,类似于Aspect,不过它只有Advice
Spring AOP实现原理
Spring AOP是通过动态代理来实现的,动态代理有两种实现方式。一种是实现JDK提供的接口,一种是CGLib生成代理类,默认如果目标对象是接口,则使用 JDK 动态代理,否则使用 CGLIB 来生成代理类,这里简单的说下两者的区别:
JDK 动态代理机制只能对接口进行代理,其原理是动态生成一个代理类,这个代理类实现了目标对象的接口,目标对象和代理类都实现了接口,但是目标对象和代理类的 Class 对象是不一样的,所以两者是没法相互赋值的。
CGLIB 是对目标对象本身进行代理,所以无论目标对象是否有接口,都可以对目标对象进行代理,其原理是使用字节码生成工具在内存生成一个继承目标对象的代理类,然后创建代理对象实例。由于代理类的父类是目标对象,所以代理类是可以赋值给目标对象的,自然如果目标对象有接口,代理对象也是可以赋值给接口的。
具体代码这里就不占文章篇幅了,demo已经放在GitHub上了,感兴趣可以看看。

