文件流导出函数示例
// 前端代码const exportExcel = (body: Record<string,{key_name: string;value: string;}[]>,setExportLoading: (bool: boolean) => void,) => {const xhr = new XMLHttpRequest();const url = `/api/i18n/exportErrorI18nByJsonZipFile`;xhr.open('POST', url, true); // 也可用POST方式xhr.setRequestHeader('Content-Type', 'application/json');xhr.responseType = 'blob';xhr.onload = function () {if (this.status === 200) {setExportLoading(false);const blob = this.response;const a = document.createElement('a');a.download = 'errorLang.zip';a.href = URL.createObjectURL(blob);a.click();}setTimeout(() => {setExportLoading(false);}, 5000);};try {setExportLoading(true);xhr.send(JSON.stringify({ data: body }));} catch (err) {setExportLoading(false);}};// 后台代码const archiver = require('archiver');async exportErrorI18nByJsonZipFile(body) {const { data: __data } = body;const types = await this.app.mysql.query('select distinct type from i18n_config');const dir = path.join(__dirname, '../../tmp/exportLang');const newDir = path.join(dir, './temp');try {fs.mkdirSync(path.join(__dirname, '../../tmp'));} catch (e) {// 如果目录存在,则不能创建成功,但是这里不做处理}try {// 创建目录fs.mkdirSync(dir);} catch (e) {// 如果目录存在,则不能创建成功,但是这里不做处理}try {// 删除目录deleteFolder(newDir);fs.mkdirSync(newDir);fs.mkdirSync(path.resolve(newDir, './lang'));} catch (e) {// 如果目录存在,则不能创建成功,但是这里不做处理}for (let i = 0; i < types.length; i += 1) {const type = types[i].type;const data = __data[type] || [];try {fs.mkdirSync(path.resolve(newDir, `./lang/${type}`));} catch (e) {//}const writable = fs.createWriteStream(path.resolve(newDir, `./lang/${type}/index.json`));const obj = {};data.forEach(item => {obj[item.key_name] = item.value;});writable.write(JSON.stringify(obj));writable.end();}const targetDir = path.resolve(newDir, './lang.zip');const output = fs.createWriteStream(targetDir);const archive = archiver('zip', {zlib: { level: 9 }, // Sets the compression level.});archive.pipe(output);archive.directory(path.resolve(newDir, './lang'), 'lang');await archive.finalize();output.close();this.ctx.attachment('errorLang.zip');this.ctx.set('Content-Type', 'application/octet-stream');this.ctx.body = fs.createReadStream(targetDir);}
Google Chrome禁用触摸板滑动前进后退
window
浏览器中输入 chrome://flags/#overscroll-history-navigation
接下来就是将选项值设置为disable
mac环境
defaults write com.google.Chrome AppleEnableSwipeNavigateWithScrolls -bool FALSE
版本号比较
const versionCompare = (source, target) => {// /^\d+.\d+.\d+$/.test(source)// /^\d+.\d+.\d+$/.test(target)const newVersion = target.split('.')const oldVersion = source.split('.')if (target === source) {return false}if (Number(newVersion[0]) > Number(oldVersion[0])) {return true}if (Number(newVersion[1]) > Number(oldVersion[1])) {return true}if (Number(newVersion[2]) > Number(oldVersion[2])) {return true}return false}
ssh错误
IT IS POSSIBLE THAT SOMEONE IS DOING SOMETHING NASTY!
Someone could be eavesdropping on you right now (man-in-the-middle attack)!
It is also possible that a host key has just been changed.
The fingerprint for the ED25519 key sent by the remote host is
SHA256:eOUyGO7XUx+YBeJ8Bz9AekyGps46wC8y13FDCIeFCFo.
Please contact your system administrator.
Add correct host key in /Users/lijunyang/.ssh/known_hosts to get rid of this message.
Offending ED25519 key in /Users/lijunyang/.ssh/known_hosts:3
Host key for 1.117.51.164 has changed and you have requested strict checking.
Host key verification failed.
rm -rf ~/.ssh/known_hosts
require的实现
stream的实现
stream的类型
git 查看代码提交量
git log --since="2022-02-01" --before="2022-02-28" --author="$(git config --get user.name)" --pretty=tformat: --numstat | gawk '{ add += $1 ; subs += $2 ; loc += $1 - $2 } END { printf "added lines: %s removed lines : %s total lines: %s\n",add,subs,loc }'# gawk 不存在用下面的语句git log --since="2022-02-01" --before="2022-02-28" --author="$(git config --get user.name)" --pretty=tformat: --numstat | awk '{ add += $1 ; subs += $2 ; loc += $1 - $2 } END { printf "added lines: %s removed lines : %s total lines: %s\n",add,subs,loc }'
google 跨域问题解决方案
The request client is not a secure context and the resource is in more-private address space local.
- chrome://flags
- 搜索Block insecure private network requests
- 设置为Disabled,Relaunch就好了。
按下 F12,然后同时按下组合键 Ctrl+Shift+P ,接着在跳出的框框里输入入 Capture full size screenshot ,如下。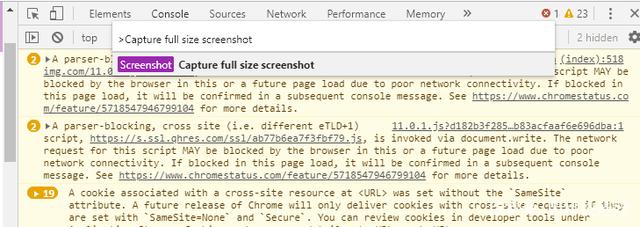
https 生成证书
npm i -g mkcert
mkcert create-ca
mkcert create-cert —domains localhost,127.0.0.1,你的域名
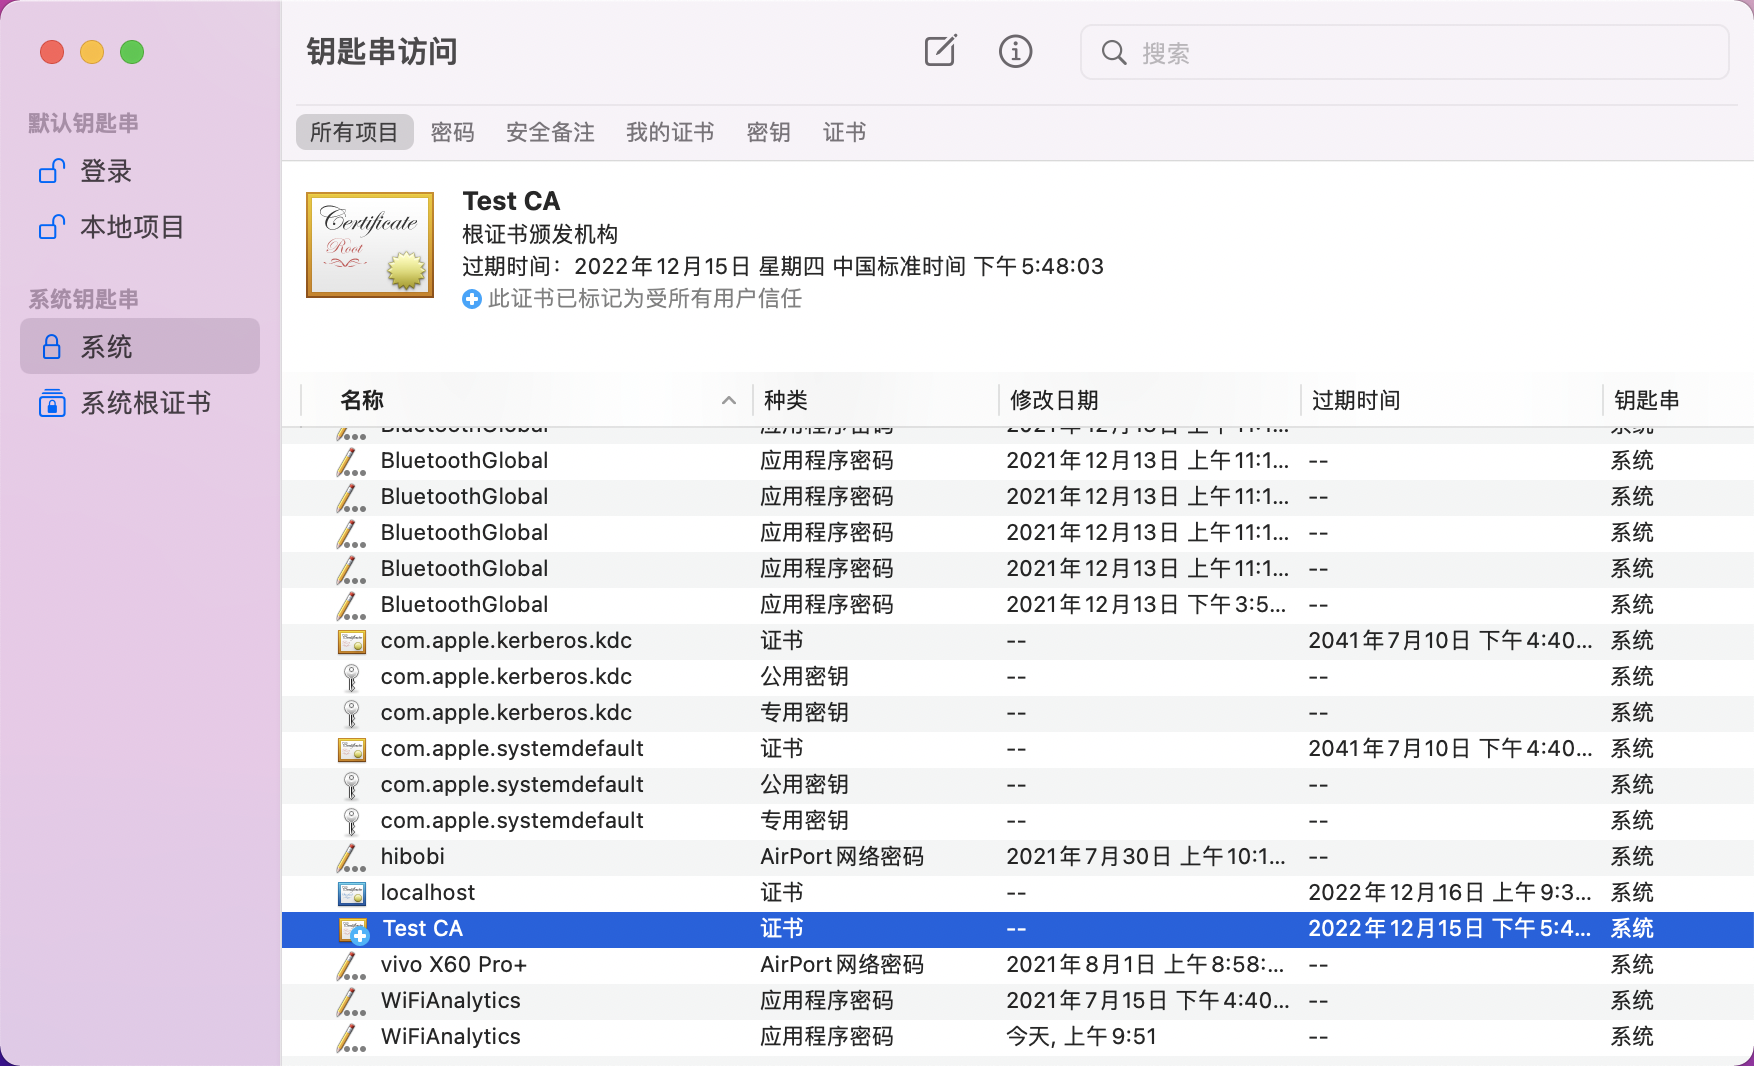
mac 下 添加证书,打开下面界面,选择文件导入项目,然后找到你的证书,双击它,信任。 打开 Chrome 。 在右上角,依次点击“更多”图标 设置。 在“隐私设置和安全性”下,依次点击网站设置 不安全内容。 点击“不得使用”旁边的添加并插入网站网址。 如需更改所添加网站的具体默认设置,请点击网址旁边的“更多”图标 。 点击允许、修改或移除。
nginx
server {listen 443 ssl http2;listen [::]:443 ssl http2;ssl_certificate /opt/homebrew/etc/nginx/https/cert.crt;ssl_certificate_key /opt/homebrew/etc/nginx/https/cert.key;server_name m-local.hibobi.com;add_header Strict-Transport-Security max-age=31536000;error_page 500 502 503 504 /50x.html;location = /50x.html {root html;}location / {proxy_redirect off;proxy_set_header Host $host;proxy_set_header X-Real-IP $remote_addr;proxy_set_header X-Forwarded-For $proxy_add_x_forwarded_for;proxy_pass https://webserver1;}}upstream webserver1 {server 127.0.0.1:8003 weight=1;# ip_hash;}
nuxt 使用 此证书
// nuxt.config.jsmodule.exports = {server: {https: {key: fs.readFileSync(path.join(__dirname, '/cert/cert.key')),cert: fs.readFileSync(path.join(__dirname, '/cert/cert.crt'))}}}
测试网速
https://tool.chinaz.com/speedworld/https://images.hibobi.com/products/000007/456d6049-e235-46ab-80c4-d1b7a8dd2f84.jpg
iphone 手机调试 使用 Safari 手机
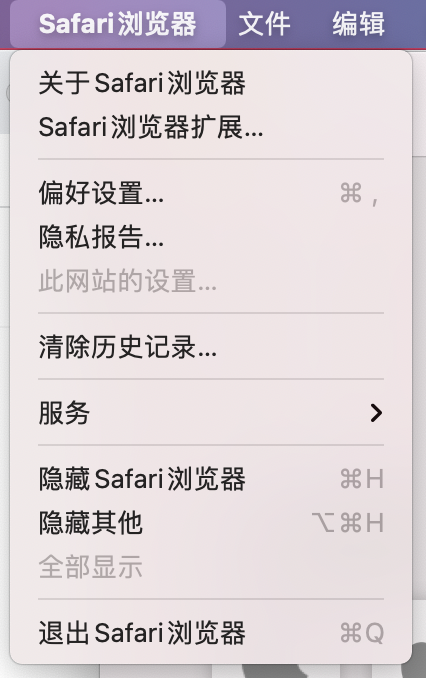
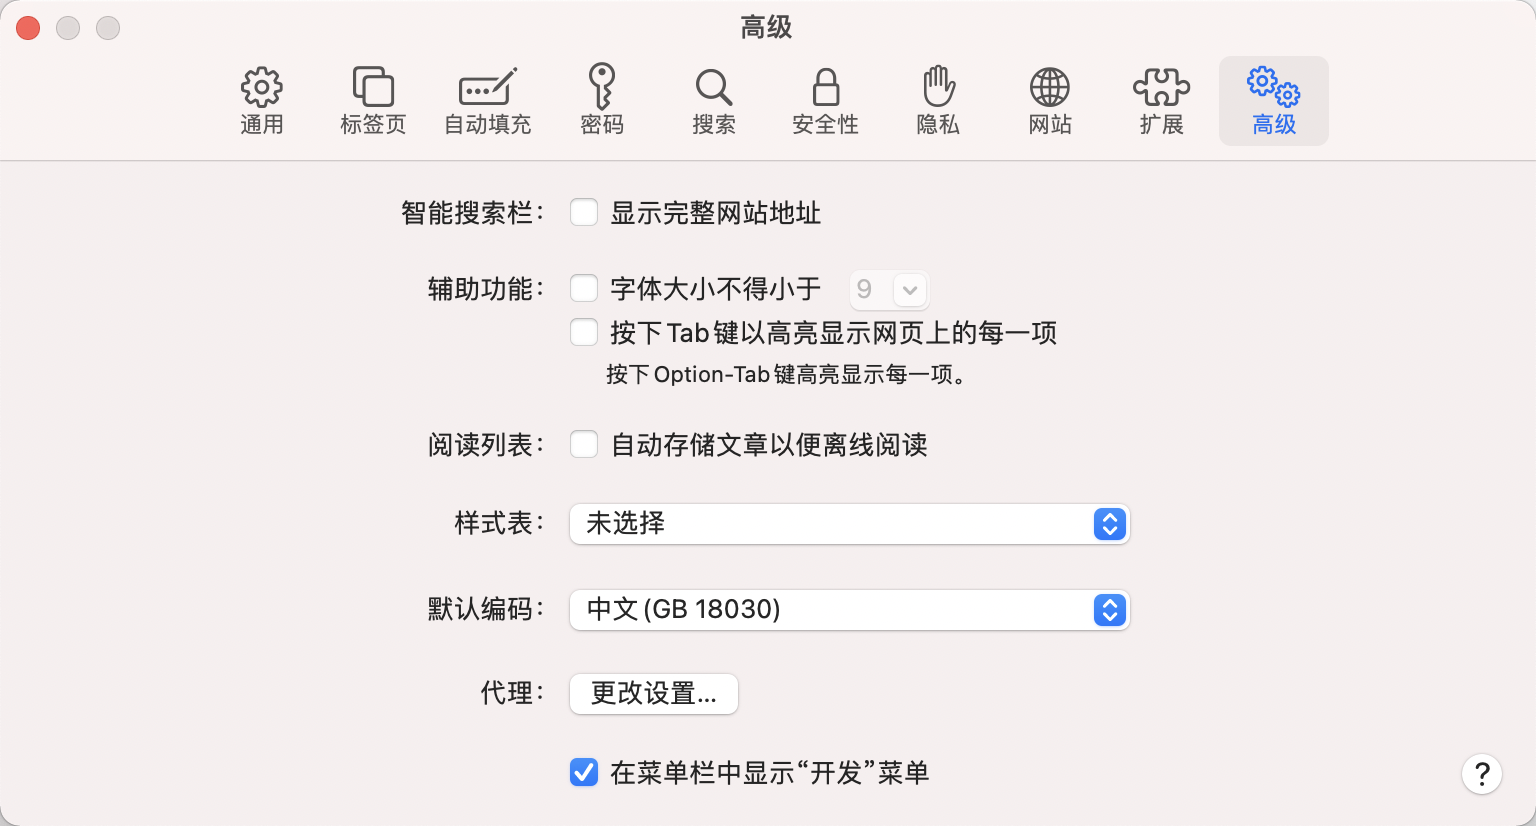
一、首先打开Safari开发-偏好设置-高级-勾选“在菜单栏中显示“开发”菜单”
二、点击开发菜单-点击对应的iphone
获取滚动条位置
const scrollTop = document.body.scrollTop || document.documentElement.scrollTop
选中与选取
https://developer.mozilla.org/zh-CN/docs/Web/API/Selection
var selObj = window.getSelection() // 会返回// sel.setBaseAndExtent(anchorNode,anchorOffset,focusNode,focusOffset)selObj.setBaseAndExtent(dom1, 0, dom2, 0)var input = document.getElementById('Id');input.value = 'abc';input.foucs(); // 聚焦input.select(); // 全选input.setSelectionRange(0, 2); // 'ab' 会被选中
验证码组件
<template><div class="verify-short-message"><spanv-for="(item, index) in value":key="index":class="index === activeIndex ? 'active' : ''"@click="clickFn(index)">{{ item || '' }}</span><inputid="verify"ref="verify"autocomplete="off"maxlength="5"class="short-message-input"@input="inputChange"@blur="blur"type="tel"/></div><script>export default {data () {return {value: ['', '', '', '', ''],activeIndex: -1,}}methods: {getHeight () {return (window.innerHeight ||document.documentElement.clientHeight ||document.body.clientHeight)},clickFn (index) {if (!(this.$refs && this.$refs.verify)) {return}this.$refs.verify.focus()if (this.getHeight() < 480) {// 兼容ios手机,小于这个屏幕会被挡住输入框的问题setTimeout(() => {document.documentElement.scrollTop = 30document.body.scrollTop = 30}, 200)}const value = this.$refs.verify.valueif (value.length) {try {if (value.length === 5) {this.activeIndex = index <= value.length ? index : value.lengththis.$refs.verify.setSelectionRange(index, index + 1)return}this.activeIndex = value.length} catch (e) {console.error(e)}} else {this.activeIndex = 0}},blur () {// 离开焦点this.activeIndex = -1},valueFormat (value) {if (!value) {return ''}return value.replace(/[^0-9]/g, '')},inputChange (e) {if (e.data && /[^0-9]/g.test(e.data)) {e.target.value = this.value.join('')if (this.activeIndex !== e.target.value.length) {this.$refs.verify.setSelectionRange(this.activeIndex, this.activeIndex + 1)}e.preventDefault()return false}let value = e.target.valuethis.value = [this.valueFormat(value[0]),this.valueFormat(value[1]),this.valueFormat(value[2]),this.valueFormat(value[3]),this.valueFormat(value[4])]if (value && value.length > 5) {e.target.value = this.value.join('')}if (value.length === 5) {this.verify()return}if (e.data) {this.activeIndex++this.$refs.verify.setSelectionRange(this.activeIndex, this.activeIndex + 1)} else {this.activeIndex--if (this.activeIndex < 0) {this.activeIndex = 0}this.$refs.verify.setSelectionRange(this.activeIndex, this.activeIndex + 1)}}}}</script><style>.verify-short-message {width: 396/@rem;height: 100%;margin: 0 auto;font-size: 0;position: relative;margin-bottom: 0.5rem;.short-message-input {position: fixed;height: 100%;width: 280px;z-index: 2;bottom: -100%;// right: 30px;// top: 50px;border: 1px solid;background-color: rgba(0, 0, 0, 0);color: rgba(0,0,0,0);height: 60/@rem;font-size: 0.24rem;}/deep/span {position: relative;border: 1px solid;width: 60/@rem;height: 60/@rem;line-height: 0.6rem;display: inline-block;text-align: center;margin-right: 0.24rem;font-size: 0.24rem;vertical-align: text-top;&.active:after {content: ' ';width: 60%;margin: 0 auto;border-bottom: 1px solid #000;display: block;position: absolute;left: 50%;transform: translateX(-50%);bottom: 0.08rem;animation-name: TopTransition;animation-duration: 1.5s; // 动画完成一个周期所需要的时间animation-timing-function: linear; // 动画的曲速animation-iteration-count: infinite;}&:nth-child(5) {margin-right: 0;}}}</style></template>
input [type=”number”] 隐藏步长计步器
input::-webkit-outer-spin-button, input::-webkit-inner-spin-button { -webkit-appearance: none; }input[type="number"]{appearance: textfield;-moz-appearance: textfield;}
编辑器的实现
https://developer.mozilla.org/zh-CN/docs/Web/API/Selection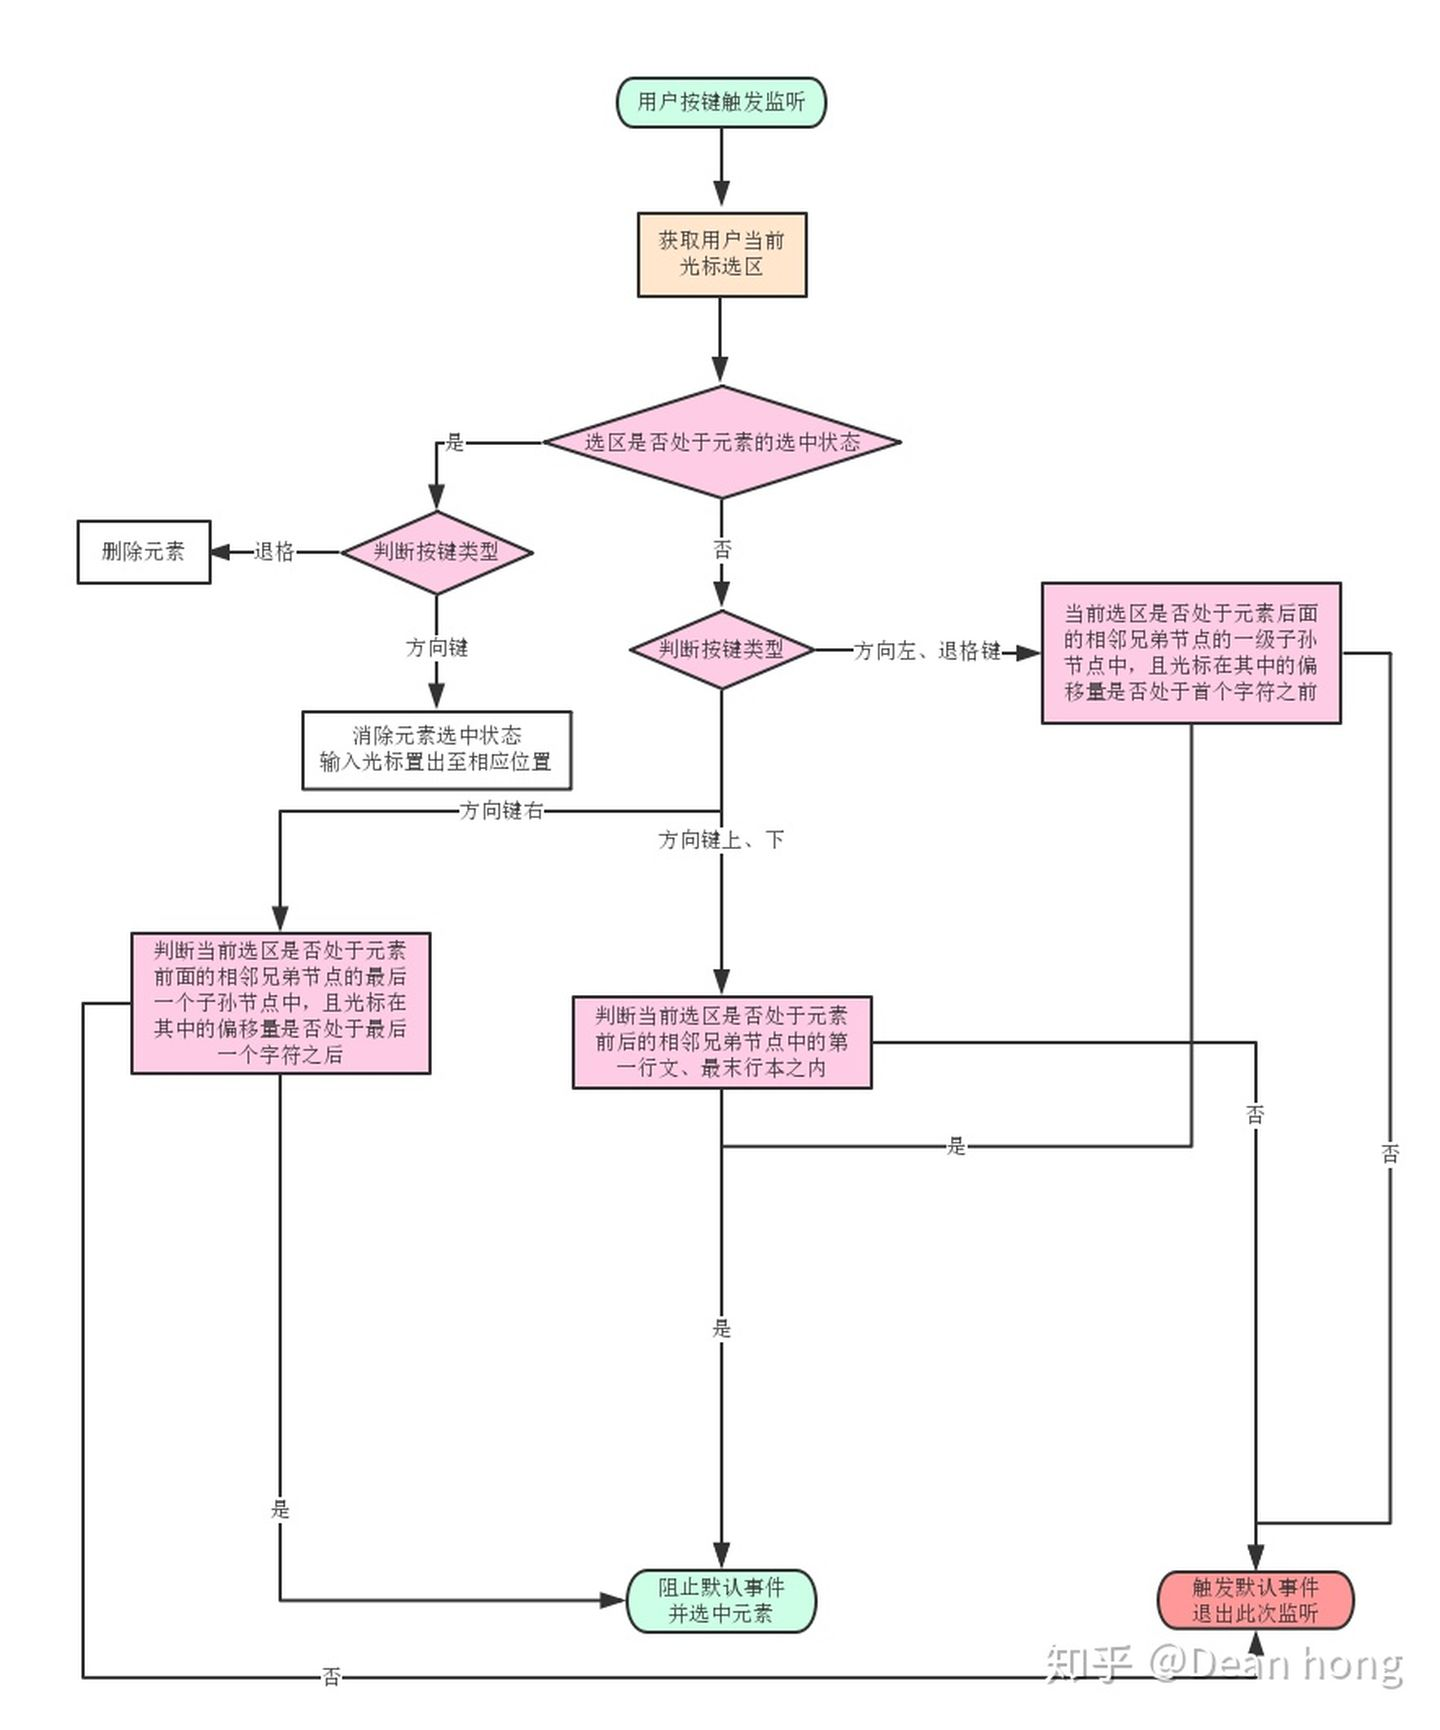
<divclass="verify-short-message"contenteditable="true"></div>
键盘监听按下键
function keyUp(e) {var currKey=0,e=e||event;currKey=e.keyCode||e.which||e.charCode;var keyName = String.fromCharCode(currKey);alert("按键码: " + currKey + " 字符: " + keyName);}document.onkeyup = keyUp;
node eventloop
Micro-Task 与 Macro-Task
浏览器端事件循环中的异步队列有两种:macro(宏任务)队列和 micro(微任务)队列。**宏任务队列可以有多个,微任务队列只有一个**。
- 常见的 macro-task 比如:setTimeout、setInterval、script(整体代码)、 I/O 操作、UI 渲染等。
- 常见的 micro-task 比如: new Promise().then(回调)、MutationObserver(html5新特性) 等。
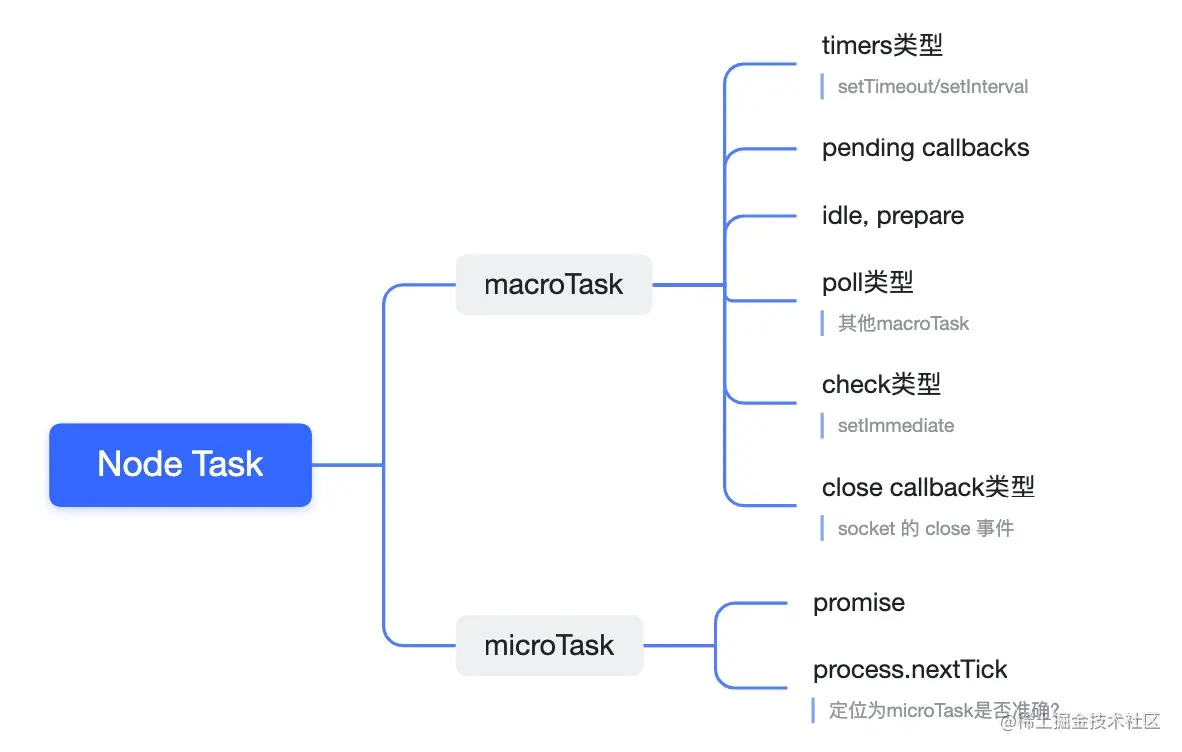
1.Node Task分类
2. Node Task Queue说明
- 定时器(timer):本阶段执行已经被 setTimeout() 和 setInterval() 的调度回调函数。(也就是那些到时间应该执行的定时器回调函数。)
- 待定回调(pending callbacks):执行延迟到下一个循环迭代的 I/O 回调。(这个阶段参考poll阶段的说明2)
- idle, prepare:仅系统内部使用。idle 闲置的 [ˈaɪdl] ,prepare 准备,预备 [prɪˈpeə(r)]
- 轮询(poll):检索新的 I/O 事件;执行与 I/O 相关的回调(几乎所有情况下,除了关闭的回调函数,那些由计时器和 setImmediate() 调度的之外),其余情况 node 将在适当的时候在此阻塞。(说明:
1. 适当的时候:已经没有其它可执行的任务的时候,此时还有异步的I/O没有返回;此时程序会在此阻塞,等待I/O的回调;
2. 当队列用尽或达到回调限制,事件循环将移动到下一阶段执行,也就是到待定回调pending callbacks阶段执行 )
- 检测(check):setImmediate() 回调函数在这里执行。
- 关闭的回调函数(close callbacks):一些关闭的回调函数,如:socket.on(‘close’, …)。
其中libuv引擎中的事件循环分为 6 个阶段,它们会按照顺序反复运行。每当进入某一个阶段的时候,都会从对应的回调队列中取出函数去执行。当队列为空或者执行的回调函数数量到达系统设定的阈值,就会进入下一阶段。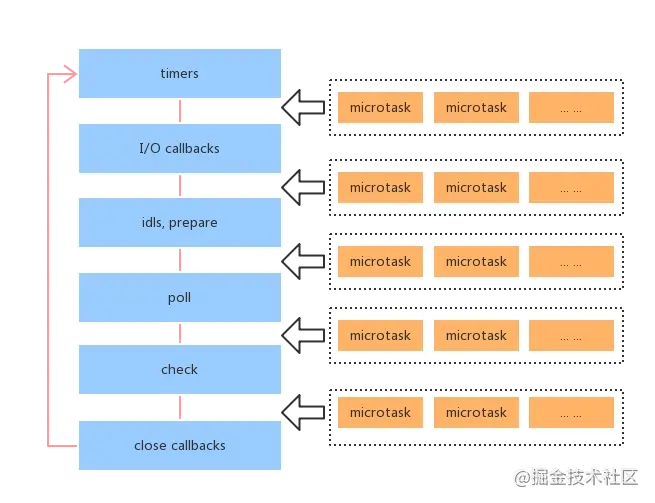
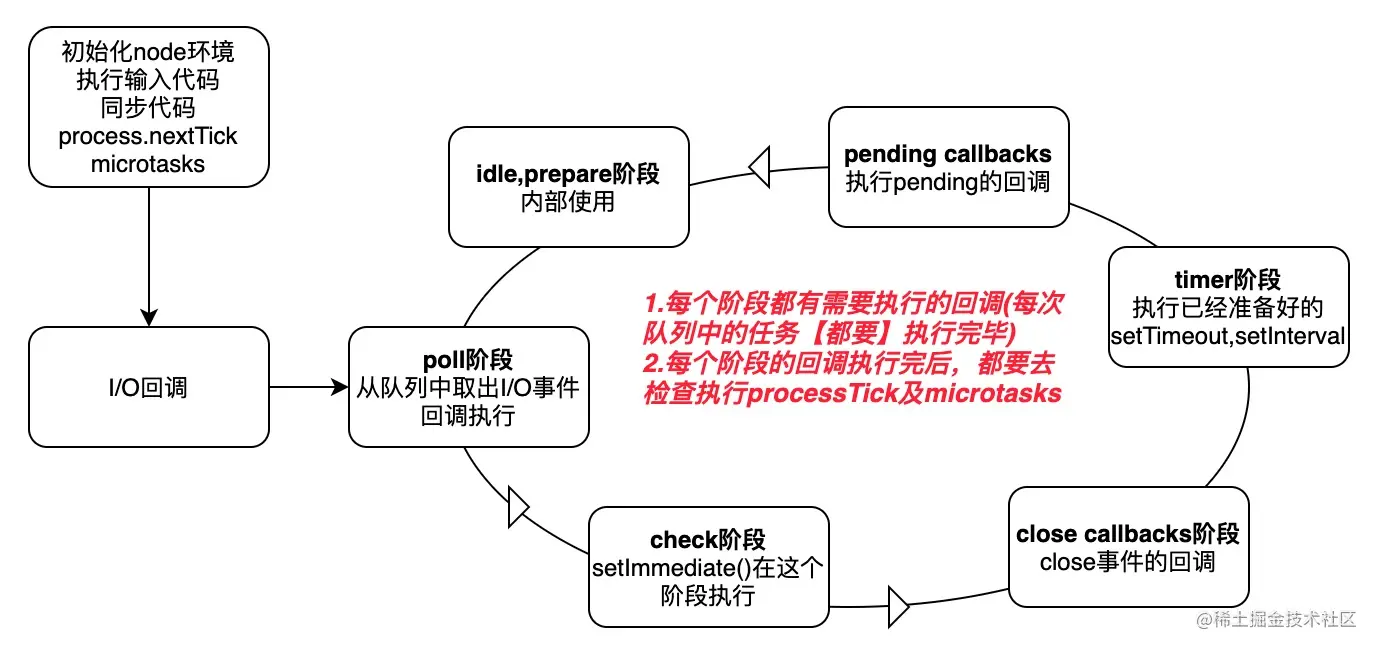
大致看出node中的事件循环的顺序:
外部输入数据—>轮询阶段(poll)—>检查阶段(check)—>关闭事件回调阶段(close callback)—>定时器检测阶段(timer)—>I/O事件回调阶段(I/O callbacks)—>闲置阶段(idle, prepare)—>轮询阶段(按照该顺序反复运行)…
- timers 阶段:这个阶段执行timer(setTimeout、setInterval)的回调
- I/O callbacks 阶段:处理一些上一轮循环中的少数未执行的 I/O 回调
- idle, prepare 阶段:仅node内部使用
- poll 阶段:获取新的I/O事件, 适当的条件下node将阻塞在这里
- check 阶段:执行 setImmediate() 的回调
- close callbacks 阶段:执行 socket 的 close 事件回调
注意:上面六个阶段都不包括 process.nextTick()(下文会介绍)
接下去我们详细介绍timers、poll、check这3个阶段,因为日常开发中的绝大部分异步任务都是在这3个阶段处理的。
(1) timer
timers 阶段会执行 setTimeout 和 setInterval 回调,并且是由 poll 阶段控制的。 同样,在 Node 中定时器指定的时间也不是准确时间,只能是尽快执行。
(2) poll
poll 是一个至关重要的阶段,这一阶段中,系统会做两件事情
1.回到 timer 阶段执行回调
2.执行 I/O 回调
并且在进入该阶段时如果没有设定了 timer 的话,会发生以下两件事情
- 如果 poll 队列不为空,会遍历回调队列并同步执行,直到队列为空或者达到系统限制
- 如果 poll 队列为空时,会有两件事发生
- 如果有 setImmediate 回调需要执行,poll 阶段会停止并且进入到 check 阶段执行回调
- 如果没有 setImmediate 回调需要执行,会等待回调被加入到队列中并立即执行回调,这里同样会有个超时时间设置防止一直等待下去
当然设定了 timer 的话且 poll 队列为空,则会判断是否有 timer 超时,如果有的话会回到 timer 阶段执行回调。
(3) check阶段
setImmediate()的回调会被加入check队列中,从event loop的阶段图可以知道,check阶段的执行顺序在poll阶段之后。 我们先来看个例子:
console.log('start')setTimeout(() => {console.log('timer1')Promise.resolve().then(function() {console.log('promise1')})}, 0)setTimeout(() => {console.log('timer2')Promise.resolve().then(function() {console.log('promise2')})}, 0)Promise.resolve().then(function() {console.log('promise3')})console.log('end')//start=>end=>promise3=>timer1=>timer2=>promise1=>promise2
- 一开始执行栈的同步任务(这属于宏任务)执行完毕后(依次打印出start end,并将2个timer依次放入timer队列),会先去执行微任务(这点跟浏览器端的一样),所以打印出promise3
然后进入timers阶段,执行timer1的回调函数,打印timer1,并将promise.then回调放入microtask队列,同样的步骤执行timer2,打印timer2;这点跟浏览器端相差比较大,timers阶段有几个setTimeout/setInterval都会依次执行,并不像浏览器端,每执行一个宏任务后就去执行一个微任务(关于Node与浏览器的 Event Loop 差异,下文还会详细介绍)。
3.Micro-Task 与 Macro-Task
Node端事件循环中的异步队列也是这两种:macro(宏任务)队列和 micro(微任务)队列。
常见的 macro-task 比如:setTimeout、setInterval、 setImmediate、script(整体代码)、 I/O 操作等。
- 常见的 micro-task 比如: process.nextTick、new Promise().then(回调)等。
4.注意点
(1) setTimeout 和 setImmediate
二者非常相似,区别主要在于调用时机不同。
- setImmediate 设计在poll阶段完成时执行,即check阶段;
setTimeout 设计在poll阶段为空闲时,且设定时间到达后执行,但它在timer阶段执行
setTimeout(function timeout () { console.log('timeout'); }, 0);setImmediate(function immediate () { console.log('immediate'); });
对于以上代码来说,setTimeout 可能执行在前,也可能执行在后。
- 首先 setTimeout(fn, 0) === setTimeout(fn, 1),这是由源码决定的 进入事件循环也是需要成本的,如果在准备时候花费了大于 1ms 的时间,那么在 timer 阶段就会直接执行 setTimeout 回调
- 如果准备时间花费小于 1ms,那么就是 setImmediate 回调先执行了
但当二者在异步i/o callback内部调用时,总是先执行setImmediate,再执行setTimeout
const fs = require('fs')fs.readFile(__filename, () => {setTimeout(() => {console.log('timeout');}, 0)setImmediate(() => {console.log('immediate')})})// immediate// timeout
在上述代码中,setImmediate 永远先执行。因为两个代码写在 IO 回调中,IO 回调是在 poll 阶段执行,当回调执行完毕后队列为空,发现存在 setImmediate 回调,所以就直接跳转到 check 阶段去执行回调了。
(2) process.nextTick
这个函数其实是独立于 Event Loop 之外的,它有一个自己的队列,当每个阶段完成后,如果存在 nextTick 队列,就会清空队列中的所有回调函数,并且优先于其他 microtask 执行。
setTimeout(() => {console.log('timer1')Promise.resolve().then(function() {console.log('promise1')})}, 0)process.nextTick(() => {console.log('nextTick')process.nextTick(() => {console.log('nextTick')process.nextTick(() => {console.log('nextTick')process.nextTick(() => {console.log('nextTick')})})})})// nextTick=>nextTick=>nextTick=>nextTick=>timer1=>promise1
Node与浏览器的 Event Loop 差异
浏览器环境下,microtask的任务队列是每个macrotask执行完之后执行。而在Node.js中,microtask会在事件循环的各个阶段之间执行,也就是一个阶段执行完毕,就会去执行microtask队列的任务。
setTimeout(() => {console.log('timer1')Promise.resolve().then(function () {console.log('promise1')})})setTimeout(() => {console.log('timer2')Promise.resolve().then(function () {console.log('promise2')})})// node v10.16.3timer1timer2promise1promise2// node v16.5.0timer1promise1timer2promise2// 浏览器 google 94.xtimer1promise1timer2promise2
例子
const fs = require('fs');console.log('1.同步代码!'); // 同步代码一定比异步代码先执行process.nextTick(() => { // 整个函数我们理解为一个宏任务,当整个代码执行完,// 会执行此宏任务产生的微任务,process.nextTick 会立即执行 console.log('3.process.nextTick!');});setImmediate(() => { // check阶段执行console.log('5.setImmediate!');});Promise.resolve().then(() => { // 微任务,等待宏任务执行完毕后执行,执行顺序在process.nextTick 之后console.log('4.Promise.resolve then!');});setTimeout(() => { // 1s后会将此会将此setTimeout的回调推送到 timer阶段对应的task queue中console.log('7.setTimeout');process.nextTick(() => {console.log('8.setTimeout process.nextTick!');});Promise.resolve().then(() => {console.log('9.setTimeout Promise.resolve then');});}, 1000);fs.readFile('./event.js', () => { // I/O 回调在poll阶段执行,具体何时执行以来fs.readFile异步读取文件的所需时间console.log('6.fs.readFile');});console.log('2.同步代码!');// 以下是输出:// 1.同步代码!// 2.同步代码!// 3.process.nextTick!// 4.Promise.resolve then!// 5.setImmediate!// 6.fs.readFile// 7.setTimeout// 8.setTimeout process.nextTick!// 9.setTimeout Promise.resolve then
作者:浪里行舟
链接:https://juejin.cn/post/6844903761949753352
来源:稀土掘金
著作权归作者所有。商业转载请联系作者获得授权,非商业转载请注明出处。
作者:linge
链接:https://juejin.cn/post/6921692824535007246
来源:稀土掘金
著作权归作者所有。商业转载请联系作者获得授权,非商业转载请注明出处。
