引言 当我们需要在Flask中对数据库(mysql)进行数据操作时,可以直接使用PyMysql库。 学习内容
- 【工具类】PyMysql的封装
- 安装pymysql
- pymysql基本操作流程
- 常用方法
- 【整合】Flask(蓝图)整合PyMsql
1.【工具类】PyMysql的封装
1.安装PyMysql
# 使用pipenv进行安装pipenv install pymysql
2.PyMysql基本操作流程
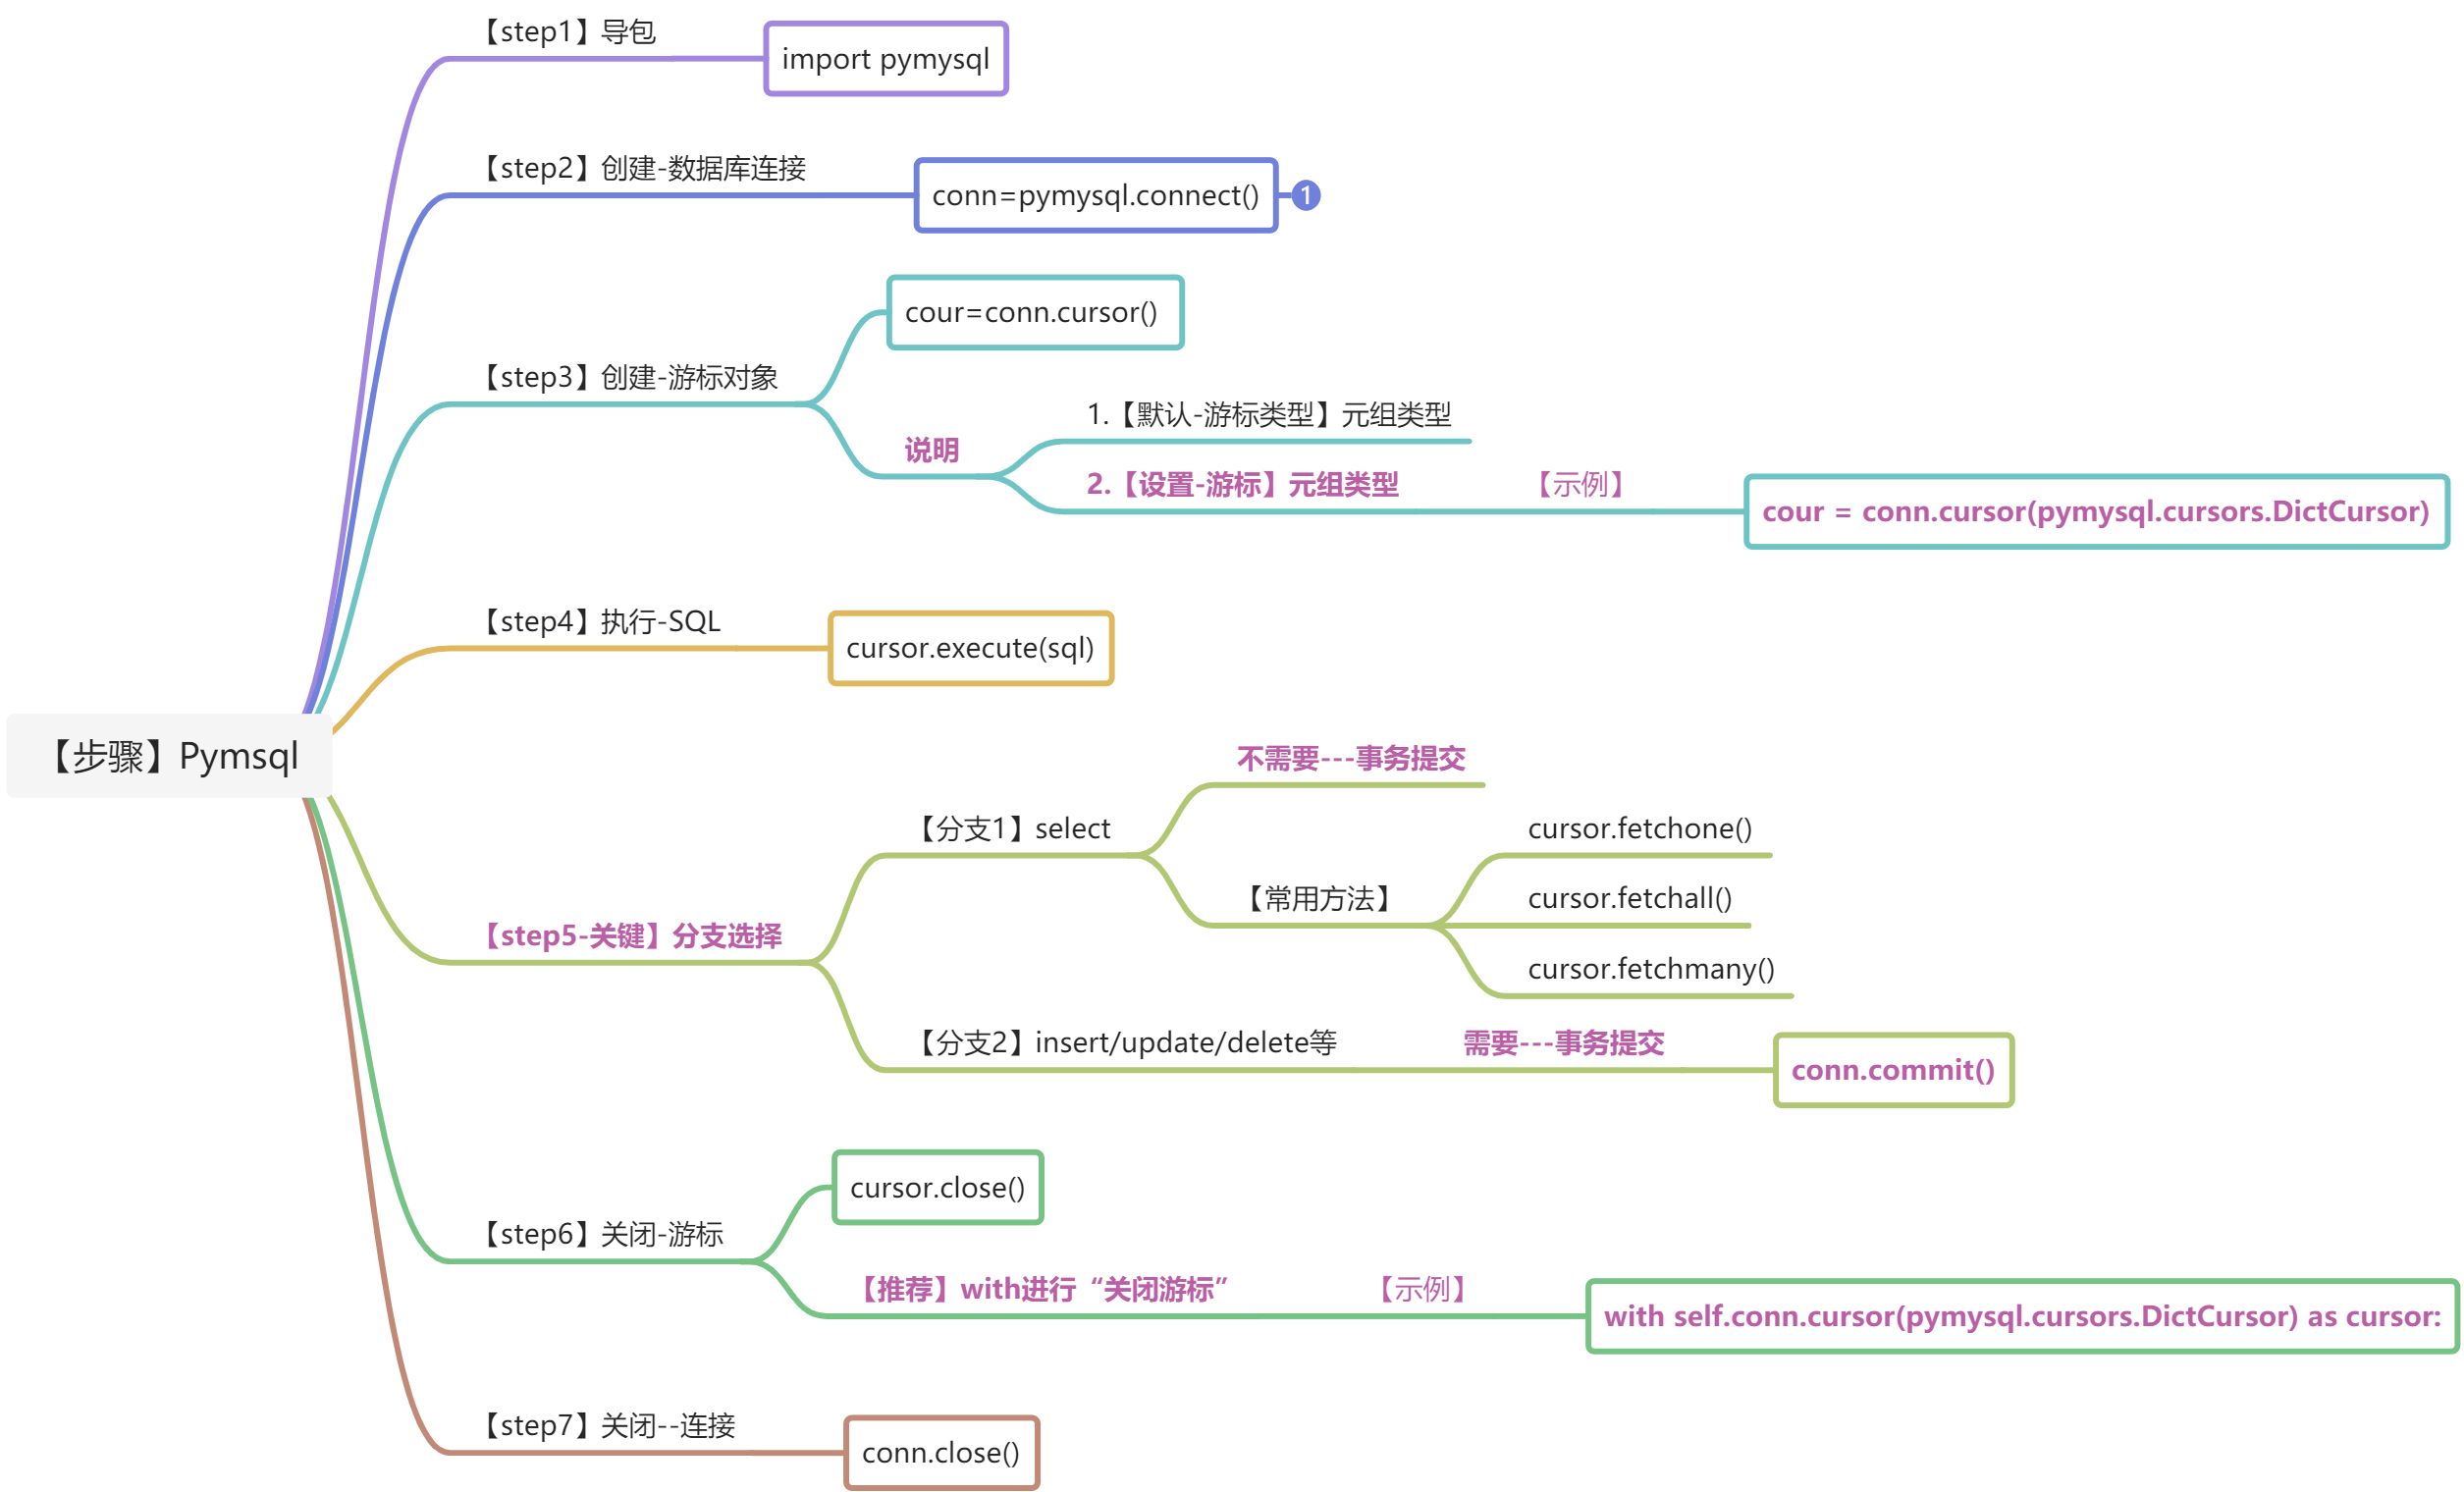
3.常用方法
| 分类 | 操作项 | 方法 | 备注 |
|---|---|---|---|
| 创建 | 创建-连接 | conn = pymysql.connect(host=data[‘host’], port=data[‘port’], user=data[‘user’], password=data[‘password’], database=data[‘database’]) |
|
| 创建-游标对象 | cursor=conn.cursor(pymysql.cursors.DictCursor) 推荐 使用with方式 with conn.cursor(pymysql.cursors.DictCursor) as cursor |
||
| 执行 | 执行SQL | cursor.execute(sql) | |
| 提交 | 事务提交 | conn.commit() | |
| 关闭 | 关闭-游标 | cousor.close() 推荐 使用with方式 with conn.cursor(pymysql.cursors.DictCursor) as cursor |
|
| 关闭-连接 | conn.close() |
3.代码实现
将PyMsql操作封装成一个工具类,方便其他业务场景的使用。
# -*- coding: utf-8 -*-"""====================================@File Name :dbUtils.py@Time : 2022/4/23 9:35@Program IDE :PyCharm@Create by Author : 一一Cooling===================================="""import pymysql # 【step1】导入包import json, timedata = {"host": "42.193.53.xx", "port": x310, "user": 'adminxxxxx',"password": '123456',"database": 'xx-mock'}class DB_Utils:def __init__(self):# 【step2】创建数据库连接self.conn = pymysql.connect(host=data['host'],port=data['port'],user=data['user'],password=data['password'],database=data['database'])# 【step3】创建游标对象self.cursor = self.conn.cursor(pymysql.cursors.DictCursor) # 设置为【字典游标】# 非select操作(不需进行--事务提交)def no_select_sql(self, sql):try:with self.conn.cursor(pymysql.cursors.DictCursor) as cursor:res = cursor.execute(sql) # 【step3】 执行sqlself.conn.commit() # 【step4】提交事务return resexcept Exception as e:return f"【数据库-异常--执行出错!】-->{e}"# finally:# # gevent:不需要finally# time.sleep(2)# self.cour.close()# self.conn.close()# 非select操作(不需进行--事务提交)def select_sql(self, sql):try:with self.conn.cursor(pymysql.cursors.DictCursor) as cursor:cursor.execute(sql) # 【step3】 执行sqlres = cursor.fetchall() # 【step4】显示所有数据res_length = len(res)self.queryResult = {"reslut": res, "total": res_length}return self.queryResultexcept Exception as e:return f"【数据库-异常--执行出错!】-->{e}"# finally:# # gevent:不需要finally# time.sleep(2)## self.conn.close()if __name__ == '__main__':db_utils = DB_Utils()# sql = "select * from users where username='admin' and password='123456'"username = "admin"password = "123456"sql = f"select * from users where username='{username}' and password='{password}'"print(db_utils.select_sql(sql))
2.【整合】Flask(蓝图)整合PyMsql
1.蓝图对象实现
# -*- coding: utf-8 -*-"""====================================@File Name :doMysql.py@Time : 2022/4/13 14:46@Program IDE :PyCharm@Create by Author : 一一Cooling===================================="""import json,operatorfrom utils.optUtils import dictSortfrom flask import request,jsonifyfrom utils.dbUtils import DB_Utilsdb_utils = DB_Utils()from flask import Blueprint as bpsqlApp = bp("sqlApp", __name__,url_prefix="/sql")@sqlApp.get("/")def index():return 'hello--sql'@sqlApp.post("/login")def execSQL():requestBody = json.loads(request.get_data(as_text=True))# requestBody = request.get_json()username = requestBody['username']password = requestBody['password']dataMsg = f"{username}+{password}"print("输入:\t", dataMsg)# return "123456"# 业务sqlsql = f"select * from users where username='{username}' and password='{password}'"# data = sqlProcess(sql)data = db_utils.select_sql(sql) #sql执行print("res-data输出:\t", data)# return 'hello'if data is None:print("暂无数据")msg = {"status": 'False','code':"E5001"}msg.update(data)else:msg = {"status": 'True','code':"S2001","a":"test21"}msg.update(data)dictSort(data=msg) #按照ascii升序排序# print("res输出:\t", msg)return jsonify(msg)# return "dataMsg"# # 关闭数据库连接## if __name__ == '__main__':# runFlask()
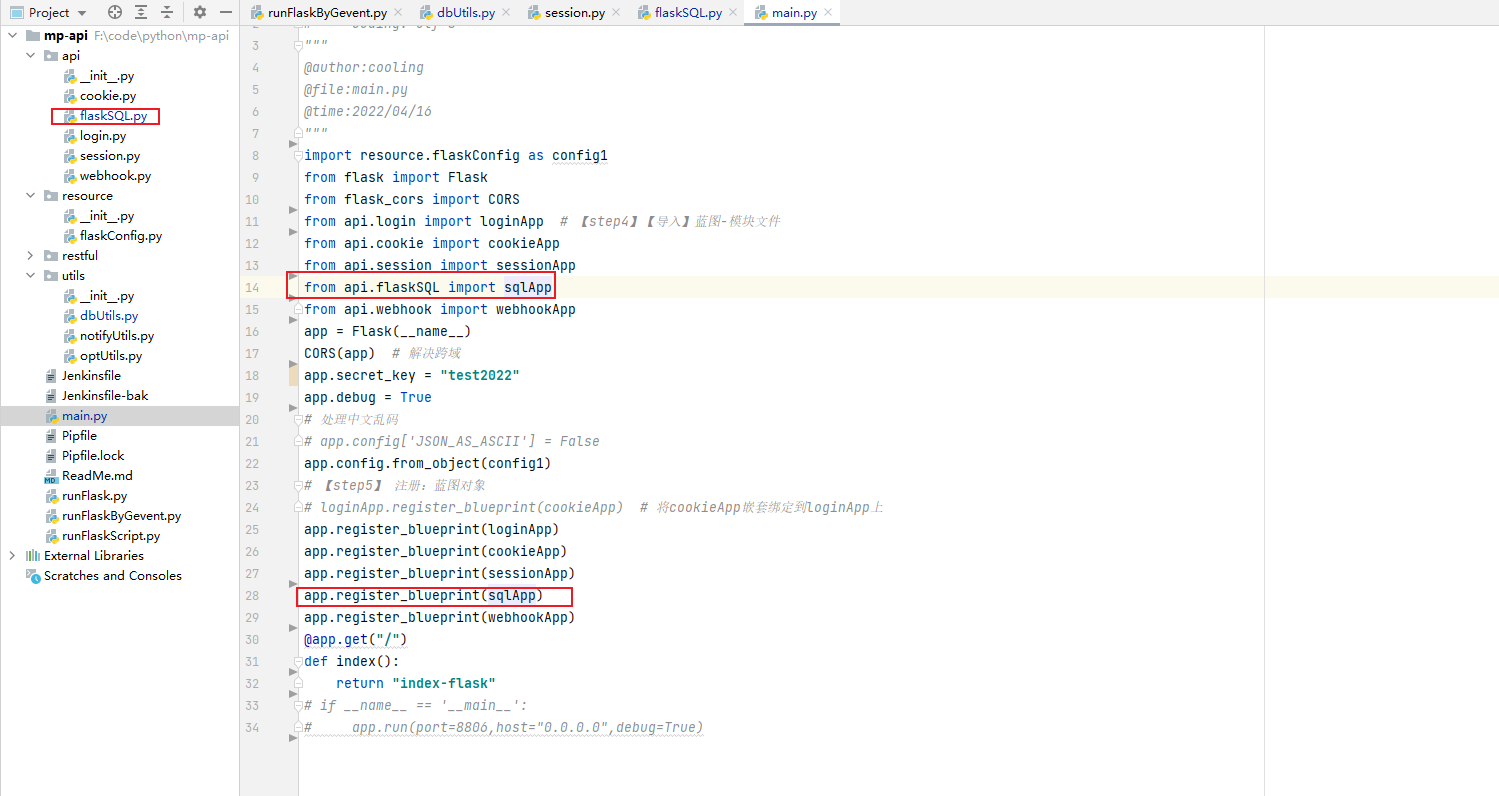
2.蓝图绑定
#!/usr/bin/env pytho# -*- coding: utf-8 -*-"""@author:cooling@file:main.py@time:2022/04/16"""import resource.flaskConfig as config1from flask import Flaskfrom flask_cors import CORSfrom api.login import loginApp # 【step4】【导入】蓝图-模块文件from api.cookie import cookieAppfrom api.session import sessionAppfrom api.flaskSQL import sqlAppfrom api.webhook import webhookAppapp = Flask(__name__)CORS(app) # 解决跨域app.secret_key = "test2022"app.debug = True# 处理中文乱码# app.config['JSON_AS_ASCII'] = Falseapp.config.from_object(config1)# 【step5】 注册:蓝图对象# loginApp.register_blueprint(cookieApp) # 将cookieApp嵌套绑定到loginApp上app.register_blueprint(loginApp)app.register_blueprint(cookieApp)app.register_blueprint(sessionApp)app.register_blueprint(sqlApp)app.register_blueprint(webhookApp)@app.get("/")def index():return "index-flask"# if __name__ == '__main__':# app.run(port=8806,host="0.0.0.0",debug=True)
3.接口验证
使用apifox对“/sql/login”进行验证,如下图所示: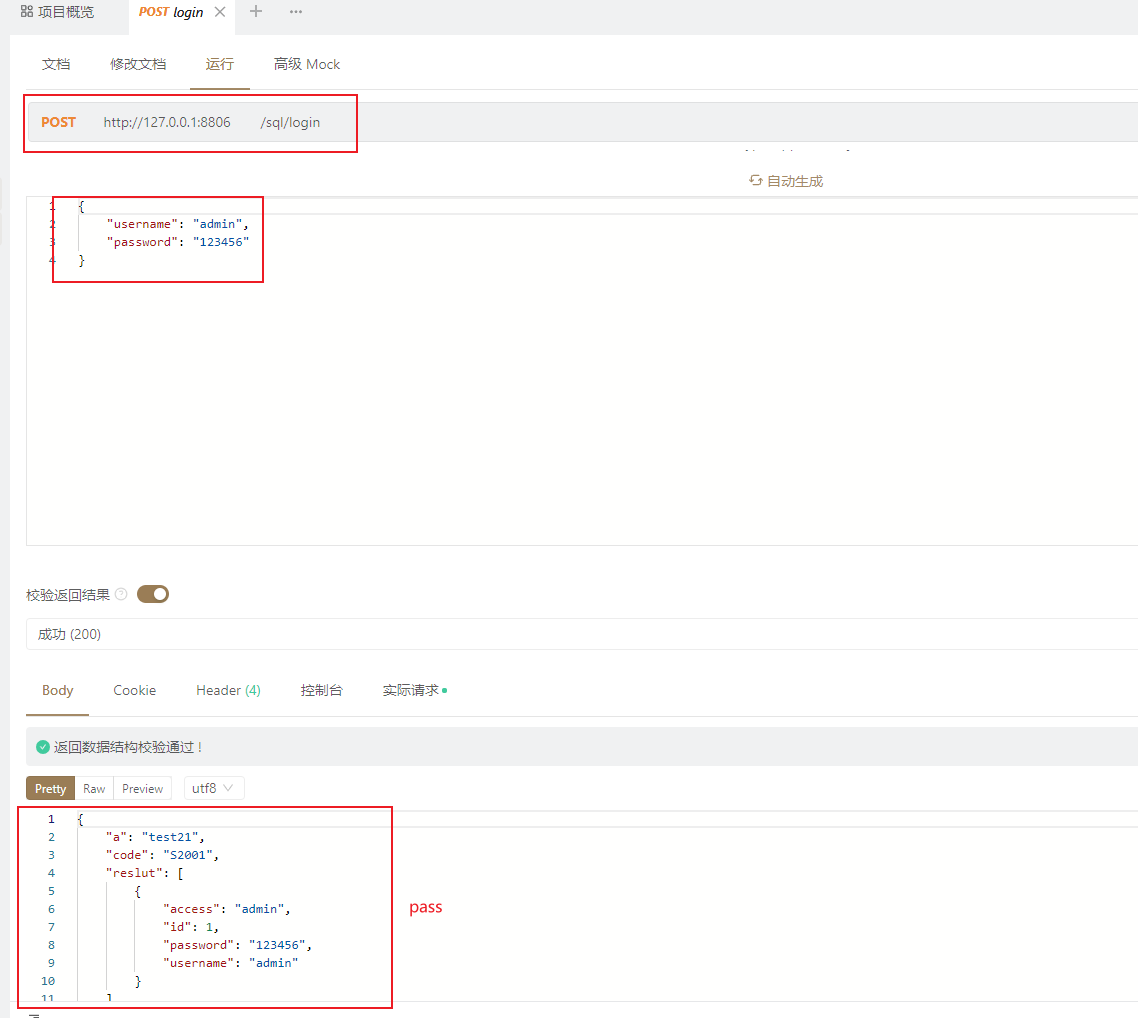

若有收获,就点个赞吧
0 人点赞
