一、NIO 非阻塞网络编程原理分析图
**NIO** 非阻塞网络编程相关的(**Selector**、**SelectionKey**、**ServerScoketChannel** 和 **SocketChannel**)关系梳理图

对上图的说明:
- 当客户端连接时,会通过
ServerSocketChannel得到SocketChannel。 Selector进行监听select方法,返回有事件发生的通道的个数。- 将
socketChannel注册到Selector上,register(Selector sel, int ops),一个Selector上可以注册多个SocketChannel。 - 注册后返回一个
SelectionKey,会和该Selector关联(集合)。 - 进一步得到各个
SelectionKey(有事件发生)。 - 在通过
SelectionKey反向获取SocketChannel,方法channel()。 - 可以通过得到的
channel,完成业务处理。
在这其中有3个类要先解释一下理论,后会经过代码进行一一实践
SelectionKey ServerSocketChannel SocketChannel
二、SelectionKey
- **
**SelectionKey**,表示**Selector**和网络通道的注册关系,共四种:
- `int OP_ACCEPT`:有新的网络连接可以 `accept`,值为 `16`- `int OP_CONNECT`:代表连接已经建立,值为 `8`- `int OP_READ`:代表读操作,值为 `1`- `int OP_WRITE`:代表写操作,值为 `4`
**SelectionKey**相关方法

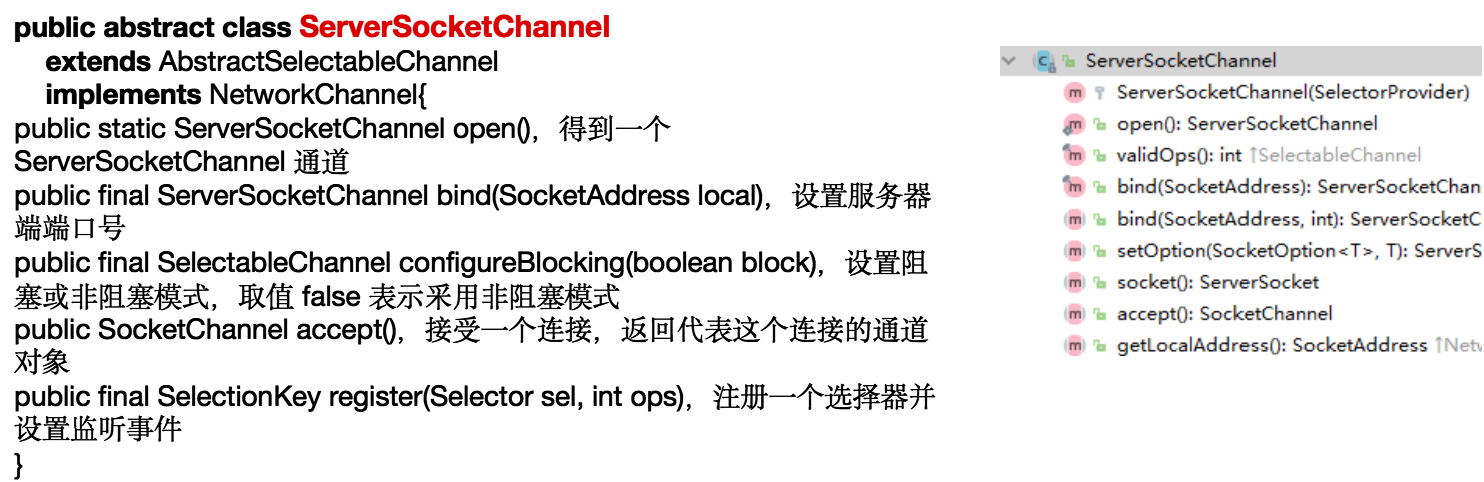
三、ServerSocketChannel
**ServerSocketChannel**在服务器端监听新的客户端**Socket**连接- 相关方法如下
四、SocketChannel
**SocketChannel**,网络**IO**通道,具体负责进行读写操作。**NIO**把缓冲区的数据写入通道,或者把通道里的数据读到缓冲区。- 相关方法如下

五、NIO 非阻塞网络编程案例
案例要求:
- 编写一个
NIO入门案例,实现服务器端和客户端之间的数据简单通讯(非阻塞) - 目的:理解
NIO非阻塞网络编程机制
代码:
- 服务端 ```java import java.net.InetSocketAddress; import java.nio.ByteBuffer; import java.nio.channels.*; import java.util.Iterator; import java.util.Set;
/**
- @author : [王振宇]
- @version : [v1.0]
- @className : NIOServer
- @description : [服务端]
- @createTime : [2021/8/2 14:18]
- @updateUser : [王振宇]
- @updateTime : [2021/8/2 14:18]
@updateRemark : [描述说明本次修改内容] */ public class NIOServer { public static void main(String[] args) throws Exception {
 //1.创建ServerSocketChannel  ===> 类似于ServerSocket
 ServerSocketChannel serverSocketChannel = ServerSocketChannel.open();
 //2.创建一个Selector选择器
 Selector selector = Selector.open();
 //3.绑定端口
 InetSocketAddress inetSocketAddress = new InetSocketAddress(9999);
 serverSocketChannel.socket().bind(inetSocketAddress);
 //4.设置为非阻塞
 serverSocketChannel.configureBlocking(false);
 //5.把serverSocketChannel注册到selector里, 关心的是SelectionKey.OP_ACCEPT 链接事件
 serverSocketChannel.register(selector, SelectionKey.OP_ACCEPT);
 System.out.println("selector中的selector数量为:"+selector.keys().size());
 //6.循环等待客户端链接
 while (true){
     //这里我们等待1秒,
     if (selector.select(1000)==0){ //没有事件发生
         //System.out.println("服务器等待了1秒,无连接");
         continue;
     }
     //如果返回>0,就获取相关的selectionKeys集合
     //分析:
     //     1.如果返回>0,表示已经又关注事件发生了。
     //     2.通过selector.selectedKeys(),返回一下发生关注事件的集合
     //       然后通过selectionKeys反向获取通道
     Set<SelectionKey> selectionKeys = selector.selectedKeys();
     //7.编列集合,使用迭代器
     Iterator<SelectionKey> keyIterator = selectionKeys.iterator();
     while (keyIterator.hasNext()){
         //获取到SelectionKey
         SelectionKey key = keyIterator.next();
         //这时候我们还得看看发生了什么事件
         if (key.isAcceptable()){ //如果是OP_ACCEPT事件就代表有客户端(新的网络)链接服务器了
             //8.有链接就生成了SocketChannel了
             //这里注意,我们在BIO的编程中,accept()是一个阻塞的方法,
             // 这个我们不用担心,BIO中阻塞因为不知道下面还有没有客户端请求了,只能傻傻的等,
             // 我们这边已经通过迭代便利就已经知道要链接了,链接行为都发生了,就不会阻塞了
             SocketChannel socketChannel = serverSocketChannel.accept();
             //9.把SocketChannel也放在selector选择器中 ,关注事件为OP_READ(表示通道里面已经有数据了,可以读了),再关联一个buffer缓存区
             //注意设置socketChannel为非阻塞方式
             socketChannel.configureBlocking(false);
             System.out.println("有客户端链接了"+socketChannel.hashCode());
             socketChannel.register(selector,SelectionKey.OP_READ, ByteBuffer.allocate(1024));
             System.out.println("selector中的selector数量为:"+selector.keys().size());//因为服务器ServerSocketChannel已经占了一位了,这里客户端和服务器每链接一次就会加1
             //2  3  4
         }
         if (key.isReadable()){ //如果是OP_READ事件(表示通道里面已经有数据了,可以读了)
             //10.根据key反向获取相对应的通道  =>这里SelectableChannel强转一下
             SocketChannel socketChannel = (SocketChannel)key.channel();
             //11.根据key再获取当前通道关联的buffer,上文socketChannel注册的时候就已经关联进去buffer了 ==>这里Object强转一下
             ByteBuffer buffer = (ByteBuffer) key.attachment();
             //12.读入buffer
             socketChannel.read(buffer);
             System.out.println("from 客户端数据为:"+new String(buffer.array()));
             //清空buffer
             buffer.clear();
         }
         //13.特别注意,当一次遍历完后,要即使把SelectionKey从集合中删除出去,防止多线程重复操作
         keyIterator.remove();
     }

 }
} } ```
- 客户端 ```java import java.net.InetSocketAddress; import java.nio.ByteBuffer; import java.nio.channels.SocketChannel;
/**
- @author : [王振宇]
- @version : [v1.0]
- @className : NIOClient
- @description : [客户端]
- @createTime : [2021/8/2 15:38]
- @updateUser : [王振宇]
- @updateTime : [2021/8/2 15:38]
- @updateRemark : [描述说明本次修改内容]
*/
public class NIOClient {
public static void main(String[] args) throws Exception{
} } ```//得到一个网络通道 SocketChannel socketChannel = SocketChannel.open(); //设置为非阻塞 socketChannel.configureBlocking(false);//设置非阻塞 //绑定域名端口 InetSocketAddress inetSocketAddress = new InetSocketAddress("127.0.0.1",9999); //连接服务器 if (!socketChannel.connect(inetSocketAddress)){ while (!socketChannel.finishConnect()){ System.out.println("因为连接需要时间,客户端不会阻塞,可以其他工作"); } } //如果链接成功,,就发生数据 String str = "这是一条客户端发生的数据"; //创建buffer ByteBuffer buffer = ByteBuffer.wrap(str.getBytes()); socketChannel.write(buffer); System.in.read();
- 运行结果


若有收获,就点个赞吧
0 人点赞
