1. 父组件向子组件传值 props
//父组件<template><div id="app"><users v-bind:users="users"></users> //前者自定义名称便于子组件调用,后者要传递数据名</div></template><script>import Users from "./components/Users"export default {name: 'App',data(){return{users:["Henry","Bucky","Emily"]}},components:{"users":Users}}
在子组件中使用props(可以是数组也可以是对象)接收即可。可以传多个属性。
//users子组件<template><div class="hello"><ul><li v-for="user in users">{{user}}</li>//遍历传递过来的值,然后呈现到页面</ul></div></template><script>export default {name: 'HelloWorld',props:{users:{ //这个就是父组件中子标签自定义名字type:Array,required:true}},data() {return {name : this.users // 把传过来的值赋值给新的变量}},}</script>/*props: ['users']props: { users: String } //这样指定传入的类型,如果类型不对会警告props: { users: [String, Number] } // 多个可能的类型prosp: { users: { type: String, requires: true } } //必填的的字符串props: {childMsg: {type: Array,default: () => []}} // default指定默认值如果 props 验证失败,会在控制台发出一个警告。*/
子组件接收的父组件的值分为引用类型和普通类型两种:
普通类型:字符串(String)、数字(Number)、布尔值(Boolean)、空(Null)
引用类型:数组(Array)、对象(Object)
单向数据流
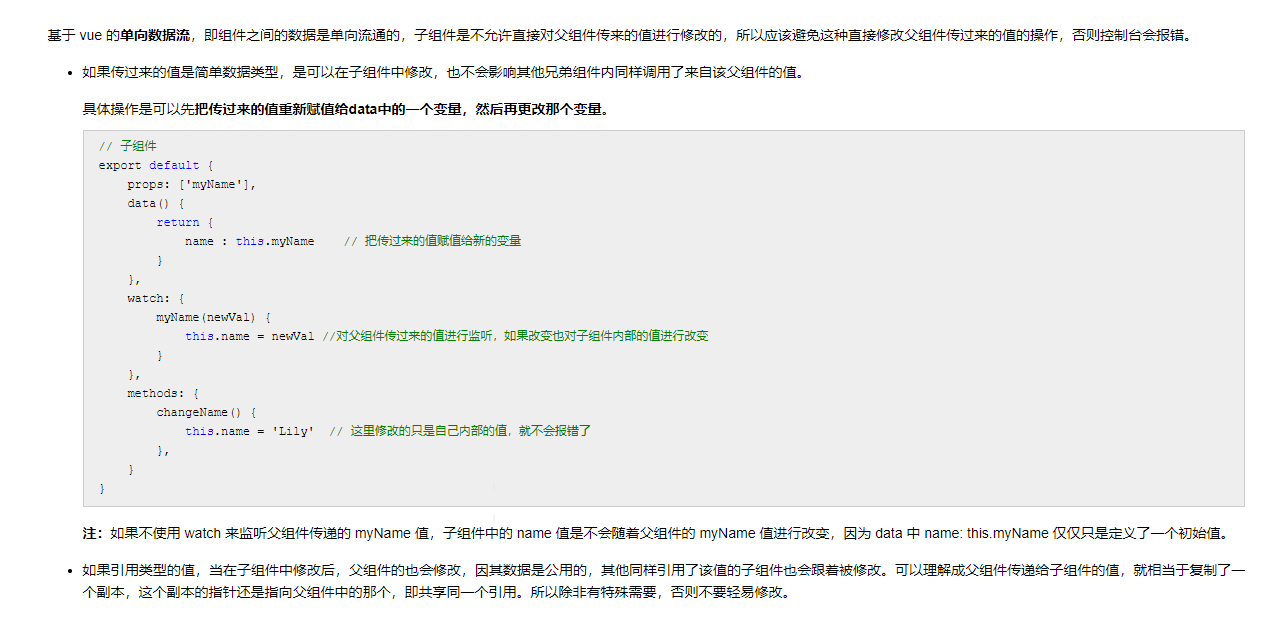
vue不推荐直接在子组件中修改父组件传来的props的值,会报错
[Vue warn]: Avoid mutating a prop directly since the value will be overwritten whenever the parent component re-renders. Instead, use a data or computed property based on the prop’s value. Prop being mutated: “result” (found in component )
export default {name:"round-search-bar",props:['search'], //父组件传来的值data(){return {currentSearch: this.search //通过data, 定义新变量currentSearch, 这样currentSearch的值变更时,不会影响父组件传来的search的值}},methods: {doSearch(){Util.searchAPI(this.$router,this.currentSearch)}},}
2. 子组件向父组件传值
(通过 emit 事件形式)
// 子组件<template><h1 @click="clicked">绑定一个点击事件</h1></template><script>export default {data() {return {info: '爸爸的爱好好收下'};},methods: {clicked() {this.$emit("childChanged", this.info); //子组件的自定义事件},},};</script>
// 父组件<template><div><my-child v-on:childChanged="getInfo" /><h2>{{title}}</h2></div></template><script>import MyChild from "./components/MyChild"export default {name: 'App',components:{MyChild,},data(){return{title:"我才是你爸爸"}},methods:{getInfo(e){ //声明这个函数this.title = e;}},}</script>
$refs 父组件通过 $refs获取子组件实例
在使用选项式API时,我们可以通过this.$refs.name的方式获取指定元素或者组件,但是组合式API中就无法使用哪种方式获取。如果我们想要通过ref的方式获取组件或者元素,需要定义一个同名的Ref对象,在组件挂载后就可以访问了。
<template><ul class="parent list-group"><li class="list-group-item" v-for="i in childRefs?.list" :key="i">{{ i }}</li></ul><!-- 子组件 ref的值与<script>中的保持一致 --><child-components ref="childRefs"></child-components><!-- 父组件 --></template><script setup>import { ref } from 'vue'import ChildComponents from './child.vue'const childRefs = ref(null)</script>
3. 任何组件间的通信 $bus 事件总线
// main.jsVue.prototype.$eventBus = new Vue()------------------------------------------// 需要订阅的地方 mounted 、created 等this.$eventBus.$on('update', val => {})// 需要发布信息的地方this.$eventBus.$emit('update', '更新信息')//移除事件监听this.$eventBus.$off('update', {})
- 通过
$on(eventName, eventHandler)侦听一个事件 - 通过
$once(eventName, eventHandler)一次性侦听一个事件 - 通过
$off(eventName, eventHandler)停止侦听一个事件
Vue3中移除了事件总线,但是可以借助于第三方工具来完成,Vue官方推荐mitt[2]或tiny-emitter[3];
在大多数情况下不推荐使用全局事件总线的方式来实现组件通信,虽然比较简单粗暴,但是长久来说维护事件总线是一个大难题,所以这里就不展开讲解了,具体可以阅读具体工具的文档
4. vue3 v-model方式 组件中使用
v-model是Vue中一个比较出色的语法糖,就比如下面这段代码
<ChildComponent v-model:title="pageTitle" />
就是下面这段代码的简写形势
<ChildComponent :title="pageTitle" @update:title="pageTitle = $event" />
v-model确实简便了不少,现在我们就来看一下上面那个demo,如何用v-model实现。
子组件:
<template><div class="child-wrap input-group"><inputv-model="value"type="text"class="form-control"placeholder="请输入"/><div class="input-group-append"><button @click="handleAdd" class="btn btn-primary" type="button">添加</button></div></div></template><script setup>import { ref, defineEmits, defineProps } from 'vue'const value = ref('')const props = defineProps({list: {type: Array,default: () => [],},})const emits = defineEmits(['update:list'])// 添加操作const handleAdd = () => {const arr = props.listarr.push(value.value)emits('update:list', arr)value.value = ''}</script>
在子组件中我们首先定义props和emits,然后添加完成之后emit指定事件。
注:update:是Vue中的固定写法,表示props中的某个属性名。
父组件中使用就比较简单,代码如下:
<template><!-- 父组件 --><ul class="parent list-group"><li class="list-group-item" v-for="i in list" :key="i">{{ i }}</li></ul><!-- 子组件 --><child-components v-model:list="list"></child-components></template><script setup>import { ref } from 'vue'import ChildComponents from './child.vue'const list = ref(['JavaScript', 'HTML', 'CSS'])</script>

若有收获,就点个赞吧
0 人点赞
