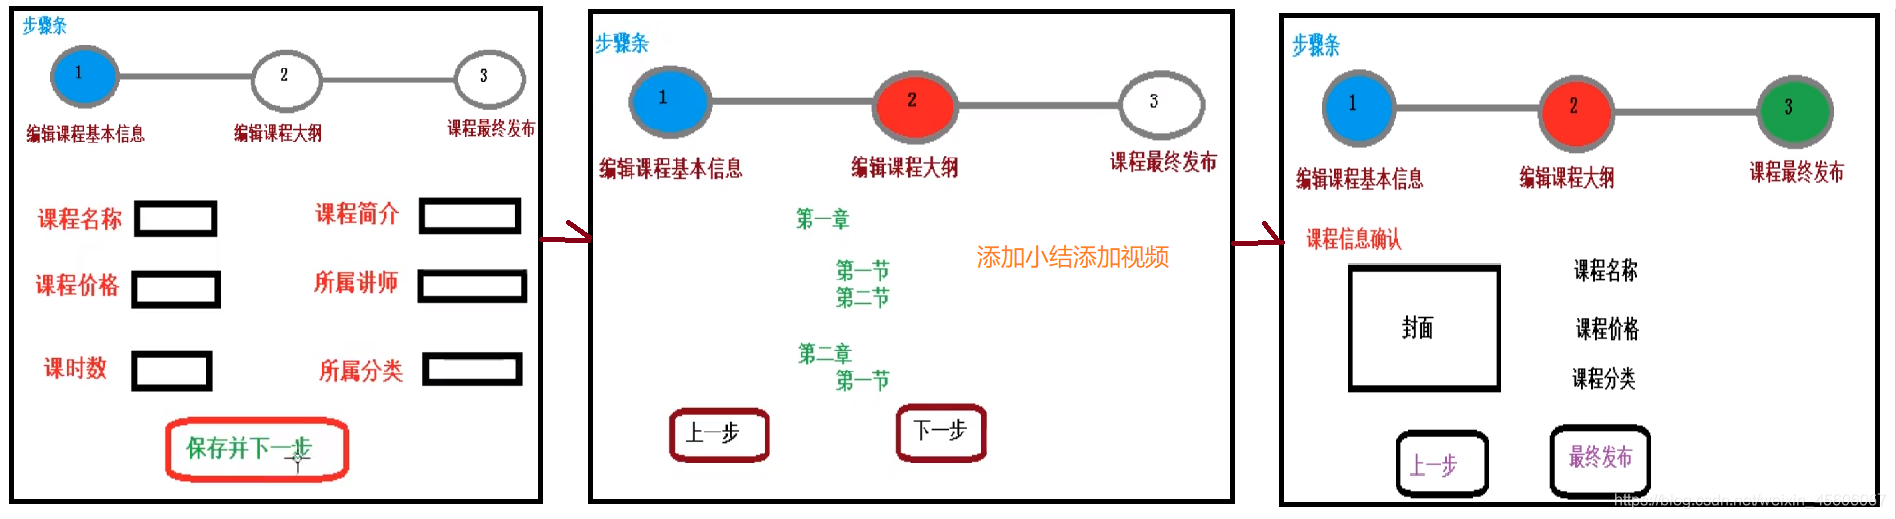
项目流程
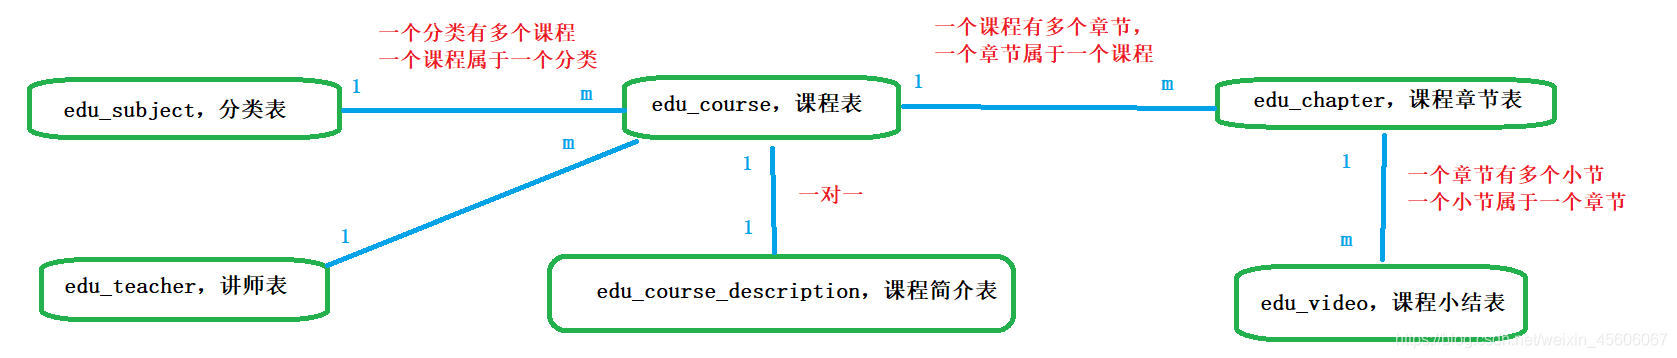
数据表对应

数据表ER图
1、编辑课程页面
预备工作
使用CodeGenerator生产代码
//修改需要逆向生成的数据库名
strategy.setInclude("edu_course","edu_course_description","edu_chapter","edu_video");
细节
创建用于上传的数据的数据类CourseInfoVo,此类中仅包含自定义的要上传的数据
后端实现添加课程接口
@ApiModel(value = "Course查询对象", description = "课程管理查询对象封装")
@Data
public class CourseInfoVo {
@ApiModelProperty(value = "课程ID")
@TableId(value = "id", type = IdType.ID_WORKER_STR)
private String id;

@ApiModelProperty(value = "课程讲师ID")
private String teacherId;

@ApiModelProperty(value = "二级分类ID")
private String subjectId;

@ApiModelProperty(value = "一级分类ID")
private String subjectParentId;

@ApiModelProperty(value = "课程标题")
private String title;

@ApiModelProperty(value = "课程销售价格,设置为0则可免费观看")
private BigDecimal price;

@ApiModelProperty(value = "总课时")
private Integer lessonNum;

@ApiModelProperty(value = "课程封面图片路径")
private String cover;

@ApiModelProperty(value = "课程简介")
private String description;
}
编写EduCourseController,编写课程信息的上传接口
@Api(description = "课程管理")
@RestController
@RequestMapping("/eduservice/course")
@CrossOrigin
public class EduCourseController {

 @Autowired
 private EduCourseService courseService;

 @ApiOperation(value = "添加课程基本信息")
 @PostMapping("addCourseInfo")
 public R addCourseInfo(@RequestBody CourseInfoVo courseInfoVo){
     //返回添加之后课程id,为了后面添加大纲使用
     String id = courseService.saveCourseInfo(courseInfoVo);
     return R.ok().data("courseId",id);
 }
}
实现接口里的saveCourseInfo方法
@Service
public class EduCourseServiceImpl extends ServiceImpl<EduCourseMapper, EduCourse> implements EduCourseService {

 @Autowired
 private EduCourseDescriptionService courseDescriptionService;

 @Override
 public String saveCourseInfo(CourseInfoVo courseInfoVo) {
     //1 向课程表添加课程基本信息
     EduCourse eduCourse =new EduCourse();
     //将courseInfoVo对象转化成eduCourse
     BeanUtils.copyProperties(courseInfoVo,eduCourse);
     int insert = baseMapper.insert(eduCourse);

     if (insert == 0) {
         throw new GuliException(20001,"添加课程信息失败");
     }

     //获取添加之后课程id
     String cid = eduCourse.getId();

     //2 向课程简介表添加课程简介
     EduCourseDescription courseDescription =new EduCourseDescription();
     courseDescription.setDescription(courseInfoVo.getDescription());
     //设置描述id 就是课程id,记得将实体类中的填充模式改为INPUT
     courseDescription.setId(cid);
     courseDescriptionService.save(courseDescription);

     //这里存在一个问题就是:课程和描述是一对一关系,添加之后,id应该是相同的
     return cid;
 }
}
注意细节
上传的数据不一定是百分百对应数据表中的字段,所以可以自定义上传的数据。这时需要一个数据类vo,其中存储要上传数据属性,根据不同要求加上相关注解。
- 因为课程表和描述表里的课程是对应的,所以两个表中数据的id应是相同的。通过下面的语句完成同id。且应为描述表中的id是自己在实现类中通过get和set方法填充的,此为手动填充。所以还要在描述表中的id属性上加上INPUT注解。 ```java String cid = eduCourse.getId(); … courseDescription.setId(cid);
@TableId(value = “id”, type = IdType.INPUT)
3. 课程表和课程描述表中的时间字段要设置为自动填充---@TableField(fill = FieldFill.INSERT),vo类中可以不加这些自动填充的属性
3. 因为课程表和课程描述表中id均为string类型,所以vo类中的id也应该加注解使其为string类型
<a name="pKgug"></a>
## 前端
<a name="r7TxX"></a>
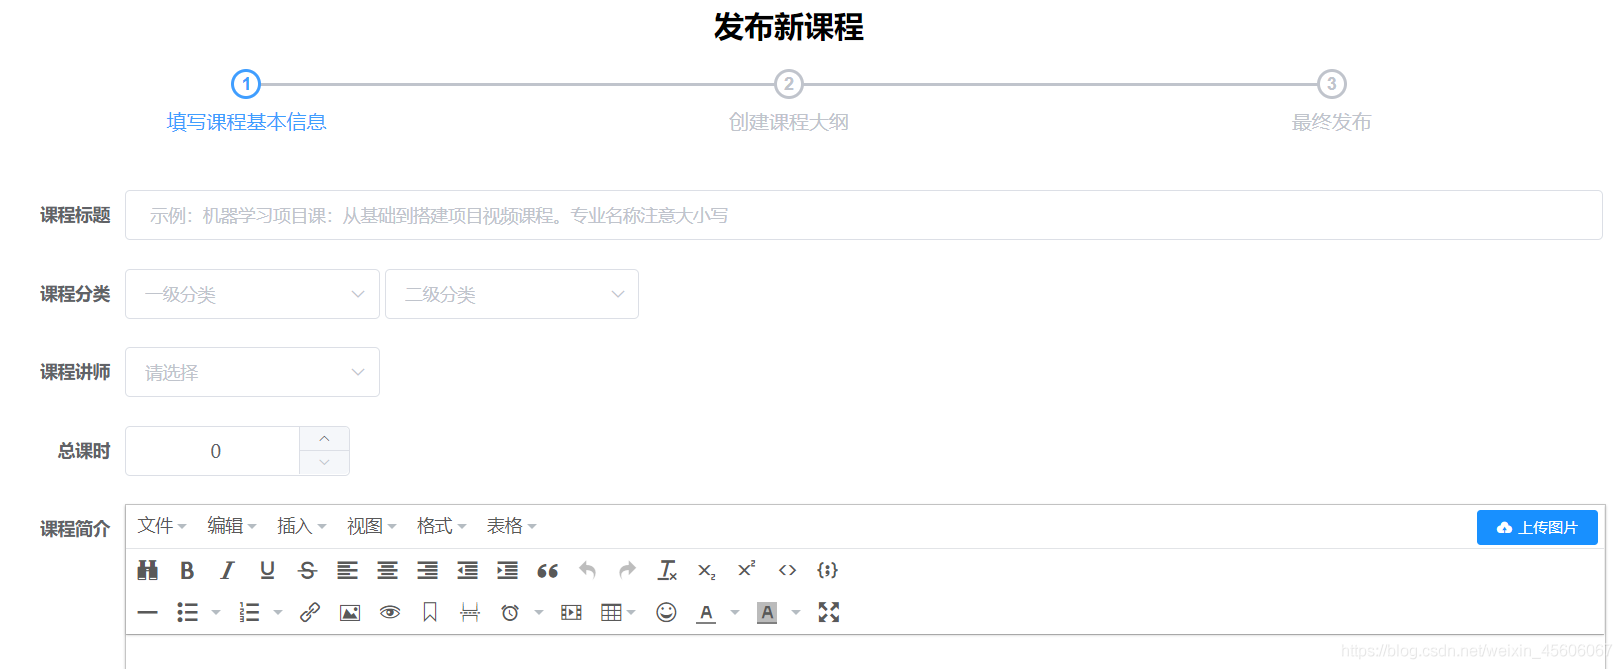
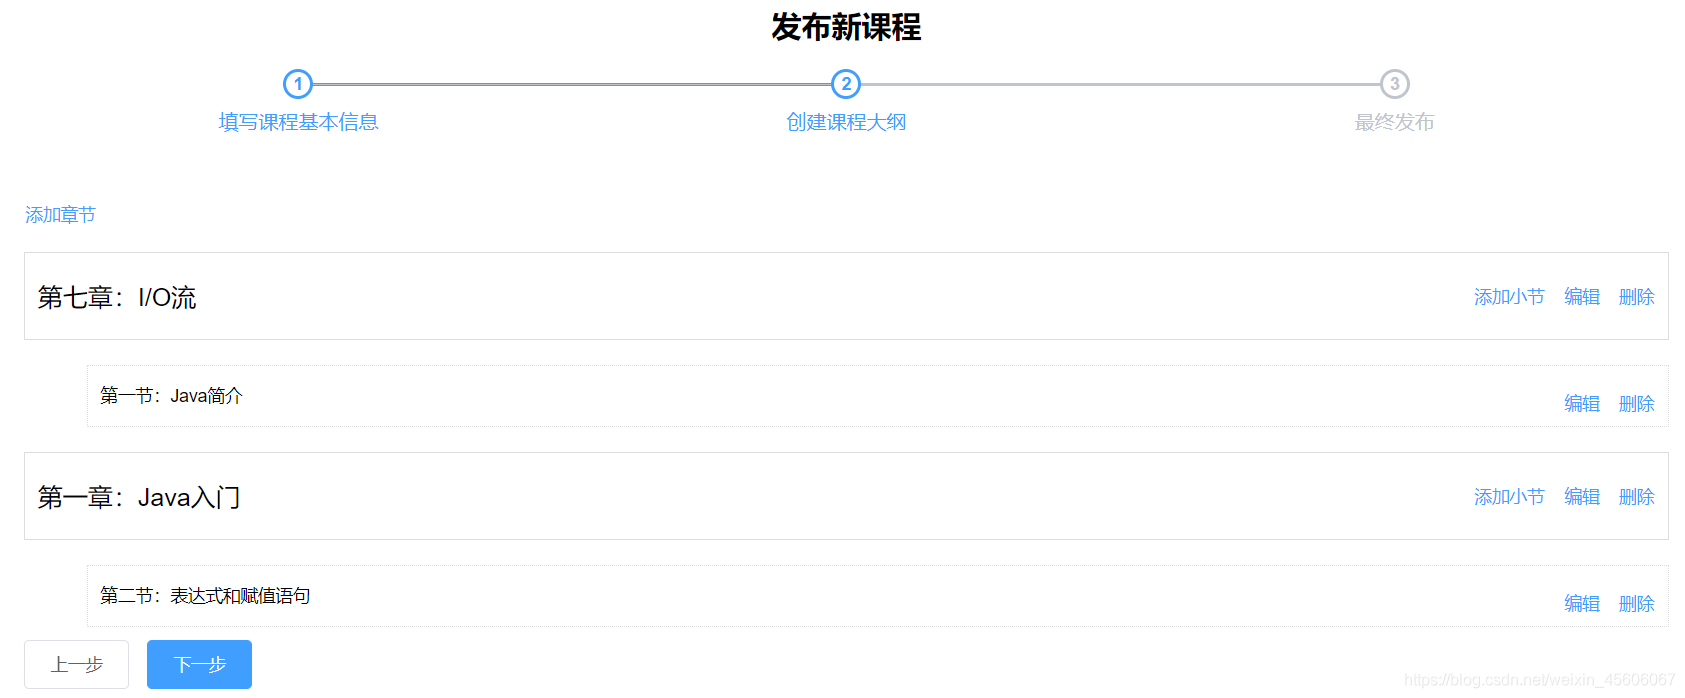
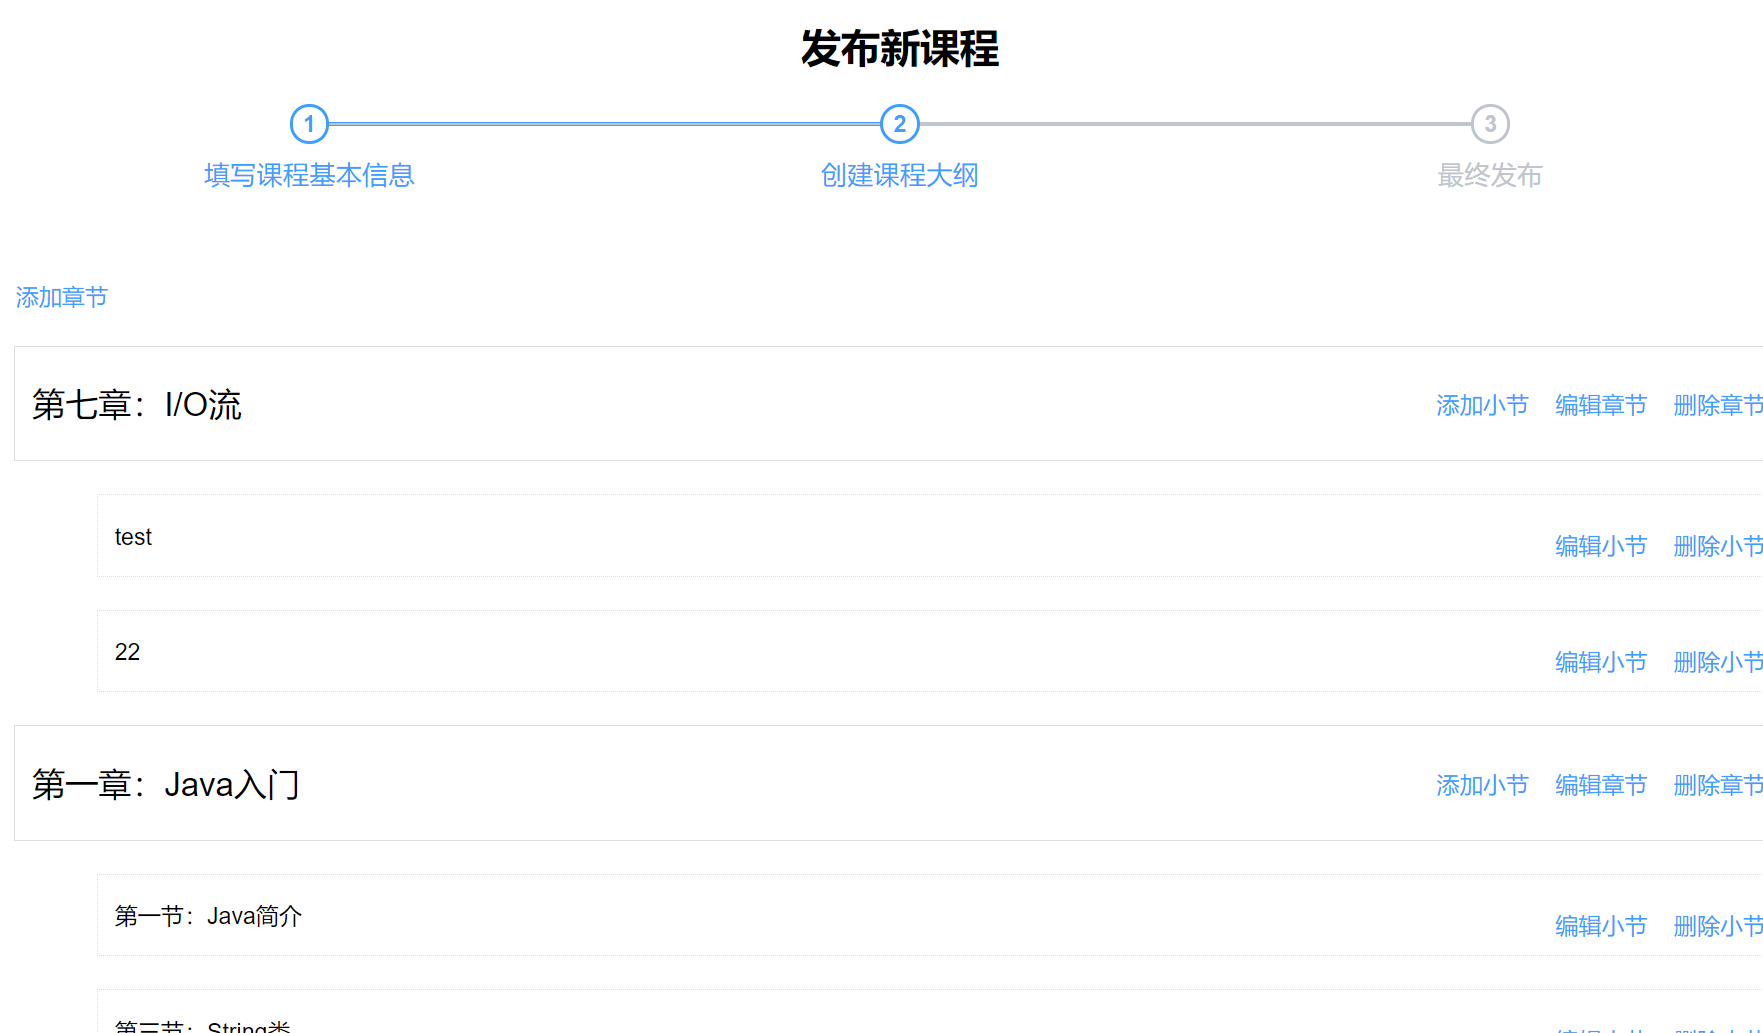
### 完成后的效果图
<a name="YGifI"></a>
### 附加功能
1. 添加课程管理路由---index.js
1. 注意有三个隐藏路由:编辑课程基本信息,课程大纲,发布课程
```javascript
{
path: '/course',
component: Layout,
redirect: '/course/list',
name: '课程管理',
meta: { title: '课程管理', icon: 'example' },
children: [
{
path: 'list',
name: '课程列表',
component: () => import('@/views/edu/course/list'),
meta: { title: '课程列表', icon: 'table' }
},
{
path: 'info',
name: '添加课程',
component: () => import('@/views/edu/course/info'),
meta: { title: '添加课程', icon: 'tree' }
},
{
path: 'info/:id',
name: 'EduCourseInfoEdit',
component: () => import('@/views/edu/course/info'),
meta: { title: '编辑课程基本信息', noCache: true },
hidden: true
},
{
path: 'chapter/:id',
name: 'EduCourseChapterEdit',
component: () => import('@/views/edu/course/chapter'),
meta: { title: '编辑课程大纲', noCache: true },
hidden: true
},
{
path: 'publish/:id',
name: 'EduCoursePublishEdit',
component: () => import('@/views/edu/course/publish'),
meta: { title: '发布课程', noCache: true },
hidden: true
}
]
},
根据路由添加对应的vue组件——- info.vue
- 初步编写,实现头部进度栏
```vue
```
发布新课程
<el-form-item> <el-button :disabled="saveBtnDisabled" type="primary" @click="saveOrUpdate">保存并下一步</el-button> </el-form-item> 编写课程简介、课程封面。 二级分类和课程讲师后续。 ```vue
<el-input v-model="courseInfo.title" placeholder=" 示例:机器学习项目课:从基础到搭建项目视频课程。专业名称注意大小写"/>
<el-form-item label="总课时">
    <el-input-number :min="0" v-model="courseInfo.lessonNum" controls-position="right" placeholder="请填写课程的总课时数"/>
</el-form-item>

<!-- 课程简介 TODO -->
<el-form-item label="课程简介">
  <el-input v-model="courseInfo.description" placeholder=" "/>
<!-- 课程封面 TODO --> <el-form-item label="课程价格"> <el-input-number :min="0" v-model="courseInfo.price" controls-position="right" placeholder="免费课程请设置为0元"/> 元 </el-form-item> <el-form-item> <el-button :disabled="saveBtnDisabled" type="primary" @click="saveOrUpdate">保存并下一步</el-button> </el-form-item>4. 编写前端接口 ---course.js ```javascript import request from '@/utils/request' export default{ //1 添加课程信息 addCourseInfo(courseInfo){ return request({ url: `/eduservice/course/addCourseInfo`, method: 'post', data:courseInfo }) } }完善info.vue
- 编写js,通过前端接口调用后端接口,达到addCourseInfo
利用element-ui进行页面中的数据展示
<script>
import course from '@/api/edu/course'
export default {
data() {
  return {
      saveBtnDisabled:false,
      courseInfo:{
          title: '',
          subjectId: '',//二级分类id
          subjectParentId:'',//一级分类id
          teacherId: '',
          lessonNum: 0,
          description: '',
          cover: '',
          price: 0
      },
  }
},
created() {

},
methods:{
  saveOrUpdate() {
      course.addCourseInfo(this.courseInfo)
          .then(response => {
              //提示
              this.$message({
                  type: 'success',
                  message: '添加课程信息成功!'
              });
              //跳转到第二步
              this.$router.push({path:'/course/chapter/'+response.data.courseId})
          })
  }
}
}
</script>
讲师下拉选框
编写前端vue ```vue
4. 编写前端接口,调用之前编写的查询所有讲师的后端接口 ```javascript //2 查询所有讲师 getListTeacher() { return request({ url: `/eduservice/teacher/findAll`, method: 'get' }) }- 编写前端js
- 引入teacher.api
- 在data中定义变量:teacherList
- 初始化表单,并编写方法获取数据并返回 ```javascript import teacher from ‘@/api/edu/teacher’
data中加入:
teacherList: [] // 讲师列表
created() { //初始化所有讲师 this.getListTeacher() }, methods:{ // ….. //查询所有的讲师 getListTeacher() { course.getListTeacher() .then(response => { this.teacherList = response.data.items }) }, }
<a name="l49zq"></a>
#### 分类的二级联动

1. 前端
   1. 在data中定义返回的数据
   1. 添加一、二级课程分类组件
   1. 编写js方法,返回数据
   1. 定义change 实现一二级标题的关联
```javascript
subjectOneList:[],//一级分类
subjectTwoList:[]//二级分类
-------------------------------
  <el-form-item label="课程分类">
    <el-select
        v-model="courseInfo.subjectParentId"
        placeholder="一级分类">

        <el-option
            v-for="subject in subjectOneList"
            :key="subject.id"
            :label="subject.title"
            :value="subject.id"/>
    </el-select>

    <!-- 二级分类 -->
    <el-select v-model="courseInfo.subjectId" placeholder="二级分类">
        <el-option
            v-for="subject in subjectTwoList"
            :key="subject.id"
            :label="subject.title"
            :value="subject.id"/>
    </el-select>

</el-form-item>

---------------------------------------------------
import subject from '@/api/edu/subject'

created() {
    //初始化一级分类
    this.getOneSubject()
},
method:{
    //....
    //查询所有的一级分类
    getOneSubject() {
        subject.getSubjectList()
            .then(response => {
                this.subjectOneList = response.data.list
            })
    },
}
--------------------------------------------------------
//在一级标题标签中加入change属性
<el-select @change="subjectLevelOneChanged" ....>


  //点击某个一级分类,触发change,显示对应二级分类
subjectLevelOneChanged(value) {
    //value就是一级分类id值
    //遍历所有的分类,包含一级和二级
    for(var i=0;i<this.subjectOneList.length;i++) {
        //每个一级分类
        var oneSubject = this.subjectOneList[i]
        //判断:所有一级分类id 和 点击一级分类id是否一样
        if(value === oneSubject.id) {
            //从一级分类获取里面所有的二级分类
            this.subjectTwoList = oneSubject.children
            //把二级分类id值清空
            this.courseInfo.subjectId = ''
        }
    }
},
课程封面
定义默认封面
courseInfo:{
   //....
 cover: '/static/01.jpg',
 //cover: process.env.OSS_PATH + '/cover/default.gif',
 //....
},
定义data数据地址
BASE_API: process.env.BASE_API // 接口API地址添加课程封面组件 ```vue
<el-upload
 :show-file-list="false"
 :on-success="handleAvatarSuccess"
 :before-upload="beforeAvatarUpload"
 :action="BASE_API+'/eduoss/fileoss'"
 class="avatar-uploader">
 <img :src="courseInfo.cover">
4. js方法
```javascript
//上传封面成功调用的方法
handleAvatarSuccess(res, file) {
   this.courseInfo.cover = res.data.url
},
//上传之前调用的方法
beforeAvatarUpload(file) {
   const isJPG = file.type === 'image/jpeg'
   const isLt2M = file.size / 1024 / 1024 < 2

   if (!isJPG) {
       this.$message.error('上传头像图片只能是 JPG 格式!')
   }
   if (!isLt2M) {
       this.$message.error('上传头像图片大小不能超过 2MB!')
   }
   return isJPG && isLt2M
},
富文本编辑器
- 加入第三方组件库
- 上传图片时会对图片进行编码,再进行存储。所以存到数据库中的是一串编码。使用的是base64编码方法
- https://gitee.com/rui-gitee/guliacademy/blob/master/components.7z
- https://gitee.com/rui-gitee/guliacademy/blob/master/static.7z
在 guli-admin/build/webpack.dev.conf.js 中添加配置,使在html页面中可以使用这里定义的BASE_URL变量
new HtmlWebpackPlugin({
//.....
templateParameters: {
 BASE_URL: config.dev.assetsPublicPath + config.dev.assetsSubDirectory
}
})
引入脚本库中的脚本.
- 在guli-admin/index.html 中引入js脚本
<script src=<%= BASE_URL %>/tinymce4.7.5/tinymce.min.js></script>
<script src=<%= BASE_URL %>/tinymce4.7.5/langs/zh_CN.js></script>
- 在guli-admin/index.html 中引入js脚本
引入模板 ```java import Tinymce from ‘@/components/Tinymce’ //引入组件
export default { components: { Tinymce }, //声明组件 …… }
5. 替换原先的课程简介组件 ```vue <!-- 课程简介--> <el-form-item label="课程简介"> <tinymce :height="300" v-model="courseInfo.description"/> </el-form-item>- 在info.vue文件的最后添加如下代码,调整上传图片按钮的高度
<style scoped>
.tinymce-container {
line-height: 29px;
}
</style>
2、课程大纲页面
调用数据显示课程
后端
创建章节和小节的VO类
封装仅需要在页面显示的数据 ```java @ApiModel(value = “章节封装类”,description = “章节封装类”) @Data public class ChapterVo {
private String id;

private String title;
//表示小节 private List
children = new ArrayList<>(); }
@ApiModel(value = “小节封装类”,description = “小节封装类”) @Data public class VideoVo {
private String id; private String title;}
2. 编写后端接口getChapterVideoByCourseId,根据前一页的课程id,获取数据库中对应的章节和小节数据
```java
@Api(description = "章节")
@RestController
@RequestMapping("/eduservice/chapter")
@CrossOrigin
public class EduChapterController {

    @Autowired
    private EduChapterService chapterService;

    //根据课程id进行查询
    @ApiOperation(value = "课程大纲列表")
    @GetMapping("/getChapterVideo/{courseId}")
    public R getChapterVideo(@PathVariable String courseId){
        List<ChapterVo> list = chapterService.getChapterVideoByCourseId(courseId);
        return R.ok().data("allChapterVideo",list);
    }

}
编写service实现类,把查到的章节和小节封装到一个集合中,并设置父子关联
- baseMapper:此类实现了EduChapterService接口,在chapter表中根据课程id查询
- videoService:此类注入了videoService,在video表中根据课程id查询
先根据相同CourseId查到章节和小节,再根据章节号让小节封装在章节中
@Service
public class EduChapterServiceImpl extends ServiceImpl<EduChapterMapper, EduChapter> implements EduChapterService {

@Autowired
private EduVideoService videoService;

@Override
public List<ChapterVo> getChapterVideoByCourseId(String courseId) {

  //1 根据课程id查询课程里面的章节
  QueryWrapper<EduChapter> wrapperChapter = new QueryWrapper<>();
  wrapperChapter.eq("course_id",courseId);
  List<EduChapter> eduChapterList = baseMapper.selectList(wrapperChapter);

  //2 根据课程id查询课程里面的小节
  QueryWrapper<EduVideo> wrapperVideo = new QueryWrapper<>();
  wrapperVideo.eq("course_id",courseId);
  List<EduVideo> eduVideoList = videoService.list(wrapperVideo);

  //创建list集合,用于最终封装的集合
  List<ChapterVo> finallList = new ArrayList<>();

  //3 遍历查询章节list集合进行封装
  for (int i = 0; i < eduChapterList.size(); i++) {
      //得到每个章节
      EduChapter eduChapter = eduChapterList.get(i);
      //将edChapter对象复制到ChapterVo里面
      ChapterVo chapterVo = new ChapterVo();
      BeanUtils.copyProperties(eduChapter,chapterVo);
      //把chapterVo放到最终的list集合中
      finallList.add(chapterVo);

      //创建集合,用于封装章节中的小节
      List<VideoVo> videoList = new ArrayList<>();

      //4 遍历查询小节list集合进行封装
      for (int m = 0; m < eduVideoList.size(); m++) {
          //得到每个小节
          EduVideo eduVideo = eduVideoList.get(m);
          //判断:小节里面chapterid和章节里面的id是否一样
          if (eduVideo.getChapterId().equals(eduChapter.getId())) {
              //进行封装
              VideoVo videoVo = new VideoVo();
              BeanUtils.copyProperties(eduVideo,videoVo);
              //放在小节的集合中
              videoList.add(videoVo);
          }
      }
      //把封装之后的小节list集合,放到章节对象里面
      chapterVo.setChildren(videoList);
  }
  return finallList;
}
}
前端
根据之前在router/index.js中定义的路由位置,编写chapter.vue——课程大纲页面
<template>
<div class="app-container">
 <h2 style="text-align: center;">发布新课程</h2>
 <el-steps :active="2" process-status="wait" align-center style="margin-bottom: 40px;">
   <el-step title="填写课程基本信息"/>
   <el-step title="创建课程大纲"/>
   <el-step title="提交审核"/>
 </el-steps>

 <el-form label-width="120px">
   <el-form-item>
     <el-button @click="previous">上一步</el-button>
     <el-button :disabled="saveBtnDisabled" type="primary" @click="next">下一步</el-button>
   </el-form-item>
 </el-form>
</div>
</template>
<script>
export default {
data() {
 return {
   saveBtnDisabled: false // 保存按钮是否禁用
 }
},

created() {

},

methods: {
  previous() {
         this.$router.push({path:'/course/info/'+this.courseId})
     },
     next() {
         //跳转到第二步
         this.$router.push({path:'/course/publish/'+this.courseId})
     }
}
}
</script>
定义前端api,调用后端接口:`/eduservice/chapter/getChapterVideo/${courseId},获得章节和小结的数据
- 并在组件中引用 ```javascript import request from ‘@/utils/request’
export default{ //1 查询所有讲师 getChapterVideo(courseId) { return request({ url:
/eduservice/chapter/getChapterVideo/${courseId}, method: ‘get’ }) } }3. 在组件中引入js接口,并使用接口中调用数据的方法 ```javascript import chapter from '@/api/edu/chapter' ----------------------------------------- created() { //获取路由中的id值 if(this.$route.params && this.$route.params.id) { this.courseId = this.$route.params.id //调用 根据课程id查询章节和小节,获取数据 this.getChapterVideo() } }, methods:{ //根据课程id查询章节和小节 getChapterVideo() { chapter.getChapterVideo(this.courseId) .then(response =>{ this.chapterVideoList = response.data.allChapterVideo }) }, //...... }- 编写显示页面,把传来的数据进行显示
- 注意若数据库中没有输入的课程id则此页面则不显示内容
- 先遍历章节,在遍历每个章节中的小节
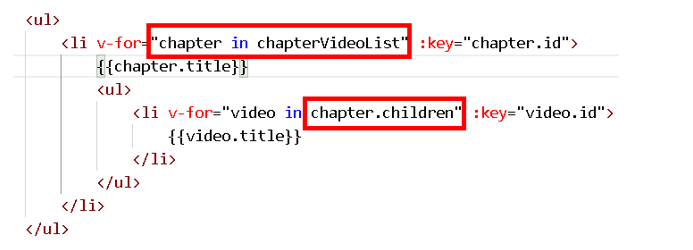
<!-- 章节 --> <ul class="chanpterList"> <li v-for="chapter in chapterVideoList" :key="chapter.id"> <p> {{ chapter.title }} <span class="acts"> <el-button style="" type="text" @click="openVideo(chapter.id)">添加小节</el-button> <el-button style="" type="text" @click="openEditChatper(chapter.id)">编辑</el-button> <el-button type="text" @click="removeChapter(chapter.id)">删除</el-button> </span> </p> <!-- 视频 --> <ul class="chanpterList videoList"> <li v-for="video in chapter.children" :key="video.id"> <p>{{ video.title }} <span class="acts"> <el-button style="" type="text" @click="openEditVideo(video.id)">编辑</el-button> <el-button type="text" @click="removeVideo(video.id)">删除</el-button> </span> </p> </li> </ul> </li> </ul> <div> <el-button @click="previous">上一步</el-button> <el-button :disabled="saveBtnDisabled" type="primary" @click="next">下一步</el-button> </div>- 加入页面样式
```html
<a name="yX63D"></a> ## 实现返回上一步修改课程 <br />在chapter页面想要对前一步的课程信息页面再做修改,可以通过上一步返回。返回之后页面要回显之前的课程信息。修改完毕之后点击提交对之前已经保存在数据库中的课程信息进行更新。 <a name="Ry1cs"></a> ### 后端 1. 编写修改课程信息controller,返回到上一层的目的是修改. 1. 返回的是VO类,是之前上传进来的VO类 ```java @ApiOperation(value = "根据课程查询课程基本信息") @GetMapping("getCourseInfo/{courseId}") public R getCourseInfo(@PathVariable String courseId) { CourseInfoVo courseInfoVo = courseService.getCourseInfo(courseId); return R.ok().data("courseInfoVo",courseInfoVo); } @ApiOperation(value = "根据id修改课程信息") @PostMapping("updateCourseInfo") public R updateCourseInfo(@RequestBody CourseInfoVo courseInfoVo) { courseService.updateCourseInfo(courseInfoVo); return R.ok(); }实现类中重写getCourseInfo,updateCourseInfo方法 ```java @Override public CourseInfoVo getCourseInfo(String courseId) { //1 查询课程表 EduCourse eduCourse = baseMapper.selectById(courseId); CourseInfoVo courseInfoVo =new CourseInfoVo(); BeanUtils.copyProperties(eduCourse,courseInfoVo);
//2 查询描述表 EduCourseDescription courseDescription = courseDescriptionService.getById(courseId); courseInfoVo.setDescription(courseDescription.getDescription());
return courseInfoVo; }
@Override public void updateCourseInfo(CourseInfoVo courseInfoVo) { //1 修改课程表 EduCourse eduCourse = new EduCourse(); BeanUtils.copyProperties(courseInfoVo,eduCourse); int update = baseMapper.updateById(eduCourse); if(update ==0) { throw new GuliException(20001,”修改课程信息失败”); }
//2 修改描述表
EduCourseDescription description = new EduCourseDescription();
description.setId(courseInfoVo.getId());
description.setDescription(courseInfoVo.getDescription());
courseDescriptionService.updateById(description);
}
<a name="yFEfT"></a>
### 前端

1. 前端接口
```javascript
//根据课程id查询课程基本信息
getCourseInfoId(id) {
    return request({
        url: `/eduservice/course/getCourseInfo/${id}`,
        method: 'get'
    })
},
//修改课程信息
updateCourseInfo(courseInfo) {
    return request({
        url: `/eduservice/course/updateCourseInfo`,
        method: 'post',
        data: courseInfo
    })
}
修改前一步的跳转路径
注意前一步的路径再填写返回路径
previous() {
//回到上一步
this.$router.push({ path: "/course/info/"+this.courseId });
},

next() {
//跳转到第二步
this.$router.push({ path: "/course/publish/"+this.courseId });
},
编写js,从后台获取数据并返回
- 在created中进行id值判断
- 若不存在id说明第一次进行课程编写页面;若存在id说明是通过上一步返回来的,需进行数据的回显
created() {
//获取路由id值,回显数据
if(this.$route.params && this.$route.params.id) {
this.courseId = this.$route.params.id
//调用根据id查询课程的方法
this.getInfo()
}else{
//初始化所有讲师
this.getListTeacher()
//初始化一级分类
this.getOneSubject()
}
},
methods:{
//根据课程id查询,回显数据
getInfo() {
course.getCourseInfoId(this.courseId).then((response) => {
//在courseInfo课程基本信息,包含一级分类id和二级分类id
//courseInfoVo是后端返回的键
this.courseInfo = response.data.courseInfoVo;
//-------------------------------------------------------
//下面的代码加在这里,解决二级标题不显示的bug
//1 查询所有的分类,包括一级和二级
subject.getSubjectList().then((response) => {
 //2 获取所有一级分类
 this.subjectOneList = response.data.list;
 //3 把所有的一级分类数组进行遍历,比较当前courseInfo里面一级分类id和所有的一级分类id,获取此id下的所有二级分类
 for (var i = 0; i < this.subjectOneList.length; i++) {
   //获取每一个一级分类
   var oneSubject = this.subjectOneList[i];
   //比较当前courseInfo里面一级分类id和所有的一级分类id
   if (this.courseInfo.subjectParentId == oneSubject.id) {
     //获取一级分类所有的二级分类
     this.subjectTwoList = oneSubject.children;
   }
 }
});
//初始化所有讲师
this.getListTeacher();
});
},
//....
}
- 若不存在id说明第一次进行课程编写页面;若存在id说明是通过上一步返回来的,需进行数据的回显
- 在data中增加courseId属性值
export default {
data() {
return {
 ...
 courseId: "",
 ...
};
},
- 在created中进行id值判断
添加更新方法,因为更新和保存公用一个页面,一个按钮。当返回到上一个页面后,修改课程,再保存。
- 会把之前存在数据库中的课程信息做更新。所以再添加一个saveOrUpdate方法
methods:{
//.....
//添加课程
saveCourse() {
  course.addCourseInfo(this.courseInfo)
      .then(response => {
          //提示
          this.$message({
              type: 'success',
              message: '添加课程信息成功!'
          });
          //跳转到第二步
          this.$router.push({path:'/course/chapter/'+response.data.courseId})
      })
},
//修改课程
updateCourse() {
  course.updateCourseInfo(this.courseInfo)
      .then(response => {
          //提示
          this.$message({
              type: 'success',
              message: '修改课程信息成功!'
          });
          //跳转到第二步
          this.$router.push({path:'/course/chapter/'+this.courseId})
      })
},
saveOrUpdate() {
  //判断添加还是修改
  if(!this.courseInfo.id) {
      //添加
      this.saveCourse()
  }else{
      //更新
      this.updateCourse()
  }
}
}
- 会把之前存在数据库中的课程信息做更新。所以再添加一个saveOrUpdate方法
实现章节的CURD
点击添加章节后会有弹窗,并填入相关信息,再确认——add。
点击编辑会出现弹框,并回显相关信息,再确认——update。
点击删除会有弹框,再确认删除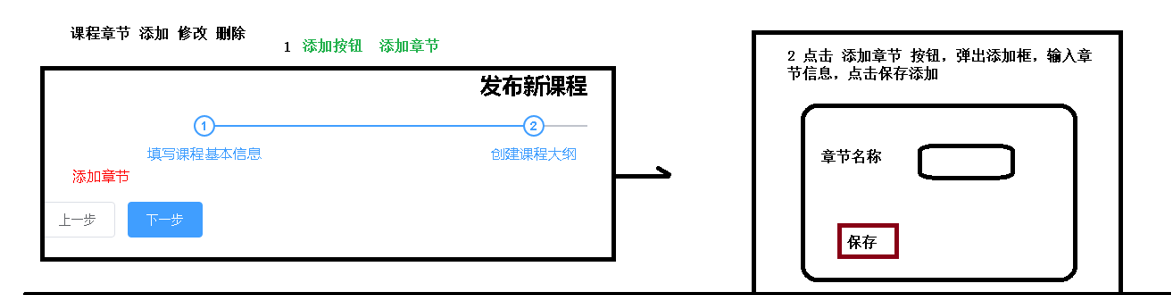
后端
- CURD的Controller ```java @ApiOperation(value = “添加章节”) @PostMapping(“addChapter”) public R addChapter(@RequestBody EduChapter eduChapter){ chapterService.save(eduChapter); return R.ok(); }
@ApiOperation(value = “根据章节id查询”) @GetMapping(“getChapterInfo/{chapterId}”) public R getChapterInfo(@PathVariable String chapterId) { EduChapter eduChapter = chapterService.getById(chapterId); return R.ok().data(“chapter”,eduChapter); }
@ApiOperation(value = “修改章节”) @PostMapping(“updateChapter”) public R updateChapter(@RequestBody EduChapter eduChapter){ chapterService.updateById(eduChapter); return R.ok(); }
@ApiOperation(value = “删除章节”) @DeleteMapping(“deleteChapter/{chapterId}”) public R deleteChapter(@PathVariable String chapterId){ boolean flag = chapterService.deleteChapter(chapterId); if (flag){ return R.ok(); }else { return R.error(); } }
2. 编写实现类,实现deleteChapter。
   1. 删除有两种情况:第一种:删除章节的时候,把章节里面所有小节都删除。第二种:如果删除章节下面有小节,不让进行删除。
   1. 自定义的删除方法deleteChapter
```java
@Override
public boolean deleteChapter(String chapterId) {
    //根据chapterid章节id查询小节表,如果查询到数据,不进行删除
    QueryWrapper<EduVideo> wrapper = new QueryWrapper<>();
    wrapper.eq("chapter_id",chapterId);
    int count = videoService.count(wrapper);

    if (count > 0) {//查询出小节,不进行删除
        throw new GuliException(20001,"不能删除");
    }else{//没有查询数据,进行删除
        //删除章节
        int result = baseMapper.deleteById(chapterId);
        //成功 1>0  0>0
        return result>0;
    }
}
在chapter实体类的更新时间和修改时间上加上自动填充注解
前端api
//2 添加章节
addChapter(chapter) {
 return request({
     url: `/eduservice/chapter/addChapter`,
     method: 'post',
     data:chapter
 })
},
//3 修改章节
updateChapter(chapter) {
 return request({
     url: `/eduservice/chapter/updateChapter`,
     method: 'post',
     data:chapter
 })
},
//4 删除章节
deleteChapter(chapterId) {
 return request({
     url: `/eduservice/chapter/deleteChapter/${chapterId}`,
     method: 'delete'
 })
},
//5 根据id进行查询
getChapterInfo(chapterId) {
 return request({
     url: `/eduservice/chapter/getChapterInfo/${chapterId}`,
     method: 'get'
 })
}
编写chapter.vue组件
上一步和下一步
<div>
   <el-button @click="previous">上一步</el-button>
   <el-button :disabled="saveBtnDisabled" type="primary" @click="next">下一步</el-button>
</div>
页面数据的呈现
<!-- 章节 -->
<ul class="chanpterList">
   <li
       v-for="chapter in chapterVideoList"
       :key="chapter.id">
       <p>
           {{ chapter.title }}

           <span class="acts">
               <el-button style="" type="text" @click="openVideo(chapter.id)">添加小节</el-button>
               <el-button style="" type="text" @click="openEditChatper(chapter.id)">编辑章节</el-button>
               <el-button type="text" @click="removeChapter(chapter.id)">删除章节</el-button>
           </span>
       </p>

       <!-- 视频 -->
       <ul class="chanpterList videoList">
           <li
               v-for="video in chapter.children"
               :key="video.id">
               <p>{{ video.title }}

           <span class="acts">
               <el-button style="" type="text" @click="openEditVideo(video.id)">编辑小节</el-button>
               <el-button type="text" @click="removeVideo(video.id)">删除小节</el-button>
           </span>
               </p>
           </li>
       </ul>
   </li>
</ul>
增加章节按钮,和修改章节弹窗 ```vue 添加章节按钮
添加章节
<el-dialog :visible.sync="dialogChapterFormVisible" title="添加章节">
    <el-form :model="chapter" label-width="120px">
        <el-form-item label="章节标题">
            <el-input v-model="chapter.title"/>
        </el-form-item>
        <el-form-item label="章节排序">
            <el-input-number v-model="chapter.sort" :min="0" controls-position="right"/>
        </el-form-item>
    </el-form>
    <div slot="footer" class="dialog-footer">
        <el-button @click="dialogChapterFormVisible = false">取 消</el-button>
        <el-button type="primary" @click="saveOrUpdate">确 定(章节)</el-button>
    </div>
</el-dialog>
3. 编写CURD的Js ```java 1. 在data中增加chapter封装数据 data() { return { saveBtnDisabled:false, courseId:'',//课程id videoId:'', chapterVideoList:[], chapter:{ //封装章节数据 title: '', sort: 0 }, video: { title: '', sort: 0, free: 0, videoSourceId: '' }, dialogChapterFormVisible:false,//章节弹框 dialogVideoFormVisible:false //小节弹框 } }, 2. //==============================初始化操作==================================== created() { //获取路由的id值 if(this.$route.params && this.$route.params.id) { this.courseId = this.$route.params.id //根据课程id查询章节和小节 this.getChapterVideo() } }, 3. 编写CURD的js: //==============================章节操作==================================== //删除章节 removeChapter(chapterId) { this.$confirm('此操作将删除章节, 是否继续?', '提示', { confirmButtonText: '确定', cancelButtonText: '取消', type: 'warning' }).then(() => { //点击确定,执行then方法 //调用删除的方法 chapter.deleteChapter(chapterId) .then(response =>{//删除成功 //提示信息 this.$message({ type: 'success', message: '删除成功!' }); //刷新页面 this.getChapterVideo() }) }) //点击取消,执行catch方法 }, //修改章节弹框数据回显 openEditChatper(chapterId) { //弹框 this.dialogChapterFormVisible = true //调用接口 chapter.getChapter(chapterId) .then(response => { this.chapter = response.data.chapter }) }, //弹出添加章节页面 openChapterDialog() { //弹框 this.dialogChapterFormVisible = true //表单数据清空 this.chapter.title = '' this.chapter.sort = 0 }, //添加章节 addChapter() { //设置课程id到chapter对象里面 this.chapter.courseId = this.courseId chapter.addChapter(this.chapter) .then(response => { //关闭弹框 this.dialogChapterFormVisible = false //提示 this.$message({ type: 'success', message: '添加章节成功!' }); //刷新页面 this.getChapterVideo() }) }, //修改章节的方法 updateChapter() { chapter.updateChapter(this.chapter) .then(response => { //关闭弹框 this.dialogChapterFormVisible = false //提示 this.$message({ type: 'success', message: '修改章节成功!' }); //刷新页面 this.getChapterVideo() }) }, saveOrUpdate() { if(!this.chapter.id) { this.addChapter() } else { this.updateChapter() } }, //根据课程id查询章节和小节 getChapterVideo() { chapter.getAllChapterVideo(this.courseId) .then(response => { this.chapterVideoList = response.data.allChapterVideo }) }, previous() { this.$router.push({path:'/course/info/'+this.courseId}) }, next() { //跳转到第二步 this.$router.push({path:'/course/publish/'+this.courseId}) } } }实现小节的CURD
后端
EduVideoController的CURD
@Api(description = "小节")
@RestController
@RequestMapping("/eduservice/video")
@CrossOrigin
public class EduVideoController {

 @Autowired
 private EduVideoService videoService;

 @ApiOperation(value = "添加小节")
 @PostMapping("addVideo")
 public R addVideo(@RequestBody EduVideo eduVideo){
     videoService.save(eduVideo);
     return R.ok();
 }

 @ApiOperation(value = "根据小节id查询")
 @GetMapping("getVideoInfo/{id}")
 public R getVideoInfo(@PathVariable String id){
     EduVideo eduVideo = videoService.getById(id);
     return R.ok().data("eduVideo",eduVideo);
 }

 @ApiOperation(value = "修改小节")
 @PostMapping("updateVideo")
 public R updateVideo(@RequestBody EduVideo eduVideo){
     videoService.updateById(eduVideo);
     return R.ok();
 }

 //TODO 后面这个方法需要完善:删除小节时候,同时要把里面的视频删除
 @ApiOperation(value = "删除小节")
 @DeleteMapping("deleteVideo/{id}")
 public R deleteVideo(@PathVariable String id){
     videoService.removeById(id);
     return R.ok();
 }
}
前端
编写前端api ```javascript import request from ‘@/utils/request’
export default{ //添加小节 addVideo(video) { return request({ url:
/eduservice/video/addVideo, method: ‘post’, data:video }) }, //根据id进行查询 getVideoInfo(id) { return request({ url:/eduservice/video/getVideoInfo/${id}, method: ‘get’ }) }, //修改小节 updateVideo(video) { return request({ url:/eduservice/video/updateVideo, method: ‘post’, data:video }) }, //删除小节 deleteVideo(id) { return request({ url:/eduservice/video/deleteVideo/${id}, method: ‘delete’ }) } }2. 修改页面 ```vue <!-- 添加和修改课时表单,即修改小节的弹窗 --> <el-dialog :visible.sync="dialogVideoFormVisible" title="添加课时"> <el-form :model="video" label-width="120px"> <el-form-item label="课时标题"> <el-input v-model="video.title"/> </el-form-item> <el-form-item label="课时排序"> <el-input-number v-model="video.sort" :min="0" controls-position="right"/> </el-form-item> <el-form-item label="是否免费"> <el-radio-group v-model="video.free"> <el-radio :label="true">免费</el-radio> <el-radio :label="false">默认</el-radio> </el-radio-group> </el-form-item> <el-form-item label="上传视频"> <!-- TODO --> </el-form-item> </el-form> <div slot="footer" class="dialog-footer"> <el-button @click="dialogVideoFormVisible = false">取 消(小节)</el-button> <el-button :disabled="saveVideoBtnDisabled" type="primary" @click="saveOrUpdateVideo">确 定(小节)</el-button> </div> </el-dialog>- 编写js获取后台数据 ```javascript 引入包 import chapter from ‘@/api/edu/chapter’ import video from ‘@/api/edu/video’
定义数据 data() { return { saveBtnDisabled:false, courseId:’’,//课程id videoId:’’, chapterVideoList:[], chapter:{ //封装章节数据 title: ‘’, sort: 0 }, video: { title: ‘’, sort: 0, free: 0, videoSourceId: ‘’ }, dialogChapterFormVisible:false,//章节弹框 dialogVideoFormVisible:false //小节弹框
    }
},
//==============================小节操作==================================== //删除小节 removeVideo(id) { this.$confirm(‘此操作将删除小节, 是否继续?’, ‘提示’, { confirmButtonText: ‘确定’, cancelButtonText: ‘取消’, type: ‘warning’ }).then(() => { //点击确定,执行then方法 //调用删除的方法 video.deleteVideo(id) .then(response =>{//删除成功 //提示信息 this.$message({ type: ‘success’, message: ‘删除小节成功!’ }); //刷新页面 this.getChapterVideo() }) }) //点击取消,执行catch方法 }, //添加小节弹框的方法 openVideo(chapterId) { //弹框 this.dialogVideoFormVisible = true //设置章节id this.video.chapterId = chapterId }, //小节回显 openEditVideo(videoId) { //弹框 this.dialogVideoFormVisible = true //调用接口 video.getVideo(videoId)
.then(response => { this.video = response.data.video }) }, //添加小节 addVideo() { //设置课程id this.video.courseId = this.courseId video.addVideo(this.video) .then(response => { //关闭弹框 this.dialogVideoFormVisible = false //提示 this.$message({ type: ‘success’, message: ‘添加小节成功!’ }); //刷新页面 this.getChapterVideo() }) }, //修改小节的方法 updateVideo() { video.updateVideo(this.video).then(response => { //关闭弹框 this.dialogVideoFormVisible = false //提示 this.$message({ type: 'success', message: '修改小节成功!' }); //刷新页面 this.getChapterVideo() }) }, saveOrUpdateVideo() { console.log(this.video.id) if(!this.video.id) { this.addVideo() } else { this.updateVideo() } },<a name="wf0P4"></a> # 3、发布课程页面 <a name="Eby5o"></a> ## 课程信息确认 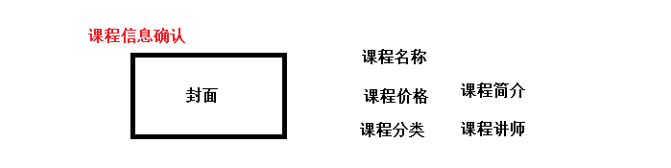 <a name="jbR2M"></a> ### 后端 1. 传输的vo类 ```java @ApiModel(value = "课程最终发布") @Data public class CoursePublishVo { private String id; private String title; private String cover; private String lessonNum; private String subjectLevelOne; private String subjectLevelTwo; private String teacherName; private String price; }编写controller查询接口
@ApiOperation(value = "根据课程id查询课程确认信息")
@GetMapping("getPublishCourseInfo/{id}")
public R getPublishCourseInfo(@PathVariable String id) {
 CoursePublishVo coursePublishVo = courseService.publishCourseInfo(id);
 return R.ok().data("publishCourse",coursePublishVo);
}
编写service实现查询,但对于多表的操作,推荐使用sql语句。
在实现类中调用mapper
//根据课程id查询课程确认信息
@Override
public CoursePublishVo publishCourseInfo(String id) {
   //调用mapper
   CoursePublishVo publishCourseInfo = baseMapper.getPublishCourseInfo(id);
   return publishCourseInfo;
}
编写mapper接口
public CoursePublishVo getPublicCourseInfo(String courseId);编写mapper的配置文件xml。对课程表、课程描述表、讲师表、分类表进行查询
<!--sql语句:根据课程id查询课程确认信息-->
<select id="getPublishCourseInfo" resultType="com.atguigu.eduservice.entity.vo.CoursePublishVo">
   SELECT ec.id,ec.title,ec.price,ec.lesson_num AS lessonNum,ec.cover,
          et.name AS teacherName,
          es1.title AS subjectLevelOne,
          es2.title AS subjectLevelTwo
   FROM edu_course ec LEFT OUTER JOIN edu_course_description ecd ON ec.id=ecd.id
                      LEFT OUTER JOIN edu_teacher et ON ec.teacher_id=et.id
                      LEFT OUTER JOIN edu_subject es1 ON ec.subject_parent_id=es1.id
              LEFT OUTER JOIN edu_subject es2 ON ec.subject_id=es2.id
   WHERE ec.id=#{courseId}
</select>
注:项目可能会出错,因为maven默认对java文件进行加载,忽略了xml
在service的pom中加入
<build>
<resources>
   <resource>
       <directory>src/main/java</directory>
       <includes>
           <include>**/*.xml</include>
       </includes>
       <filtering>false</filtering>
   </resource>
</resources>
</build>
在配置文件中加入
# 配置mapper xml文件的路径
mybatis-plus.mapper-locations=classpath:com/kuang/eduservice/mapper/xml/*.xml
前端
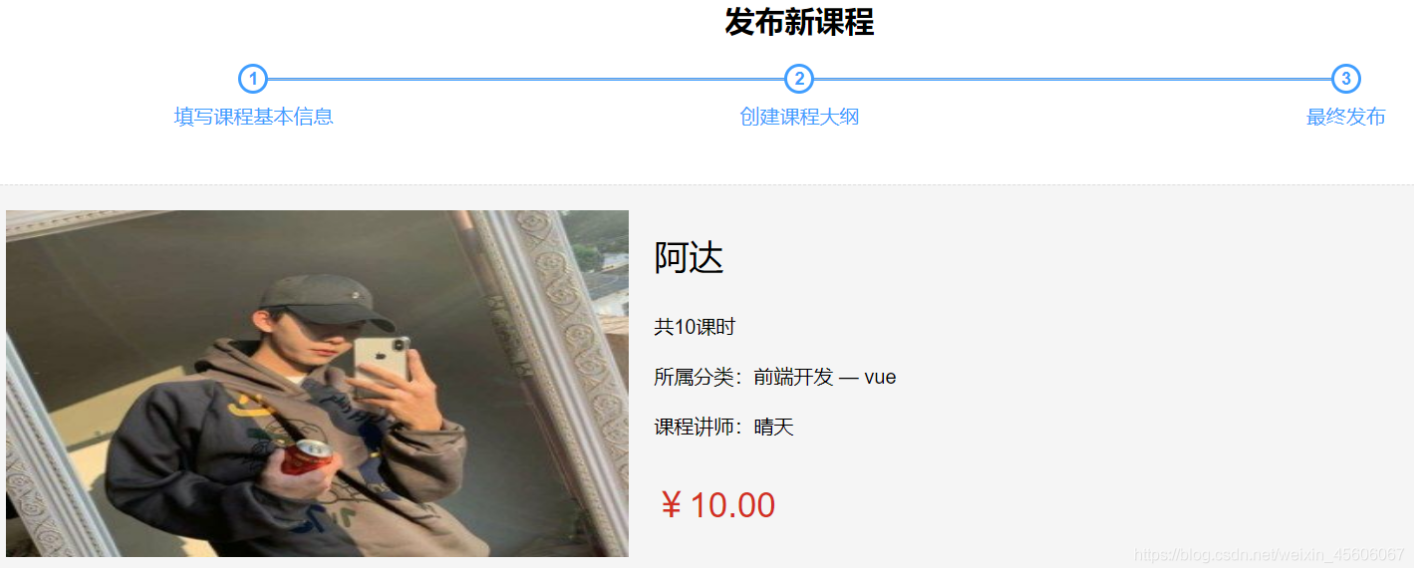
完成图:
api
//课程确认信息显示
getPublishCourseInfo(id) {
 return request({
     url: `/eduservice/course/getPublishCourseInfo/${id}`,
     method: 'get'
 })
}
js返回数据到页面中
```javascriptimport course from ‘@/api/edu/course’
data() { return { //…. courseId: ‘’, coursePublish: {} } }, created() { //获取路由中id值 if(this.$route.params && this.$route.params.id) {
 this.courseId = this.$route.params.id
 //调用接口方法根据课程id查询
 this.getCoursePublishId()
} }, methods: { //根据课程id查询课程信息 getCoursePublishId() {
 course.getPublishCourseInfo(this.courseId)
   .then(response => {
       this.coursePublish = response.data.publishCourse
   })
}, //….. }
3. 页面组件 ```vue <template> <div class="app-container"> <h2 style="text-align: center">发布新课程</h2> <el-steps :active="3" process-status="wait" align-center style="margin-bottom: 40px" > <el-step title="填写课程基本信息" /> <el-step title="创建课程大纲" /> <el-step title="发布课程" /> </el-steps> <div class="ccInfo"> <img :src="coursePublish.cover" /> <div class="main"> <h2>{{ coursePublish.title }}</h2> <p class="gray"> <span>共{{ coursePublish.lessonNum }}课时</span> </p> <p> <span >所属分类:{{ coursePublish.subjectLevelOne }} — {{ coursePublish.subjectLevelTwo }}</span > </p> <p>课程讲师:{{ coursePublish.teacherName }}</p> <h3 class="red">¥{{ coursePublish.price }}</h3> </div> </div> <div> <el-button @click="previous">返回修改</el-button> <el-button :disabled="saveBtnDisabled" type="primary" @click="publish" >发布课 程</el-button > </div> </div> </template>- css样式
```css
<a name="y6ouk"></a> ## 课程最终发布 <br />把数据最终上传到数据库中,且status会改为normal <a name="EGAxI"></a> ### 后端 1. controller ```java @ApiOperation(value = "课程最终发布修改课程状态") @PostMapping("publishCourse/{id}") public R publishCourse(@PathVariable String id) { EduCourse eduCourse = new EduCourse(); eduCourse.setId(id); eduCourse.setStatus("Normal");//设置课程发布状态 courseService.updateById(eduCourse); return R.ok(); }前端
- api
```javascript
//课程最终发布
publishCourse(id) {
return request({
}) }url: `/eduservice/course/publishCourse/${id}`, method: 'post'
2. js提交数据,并跳转页面至课程列表页面
```javascript
publish() {
   this.$confirm('确认最终发布课程, 是否继续?', '提示', {
           confirmButtonText: '确定',
           cancelButtonText: '取消',
           type: 'warning'
       }).then(() => {//点击确定,删除成功
           //调用删除方法
           course.publishCourse(this.courseId)
           .then(response => {//删除成功
               //提示信息
               this.$message({
               type: 'success',
               message: '课程发布成功!'
               });
               //跳转到课程列表页面
               this.$router.push({ path: '/course/list' })
           })
       })//点击取消,发布失败
 }
}
4、课程列表页面
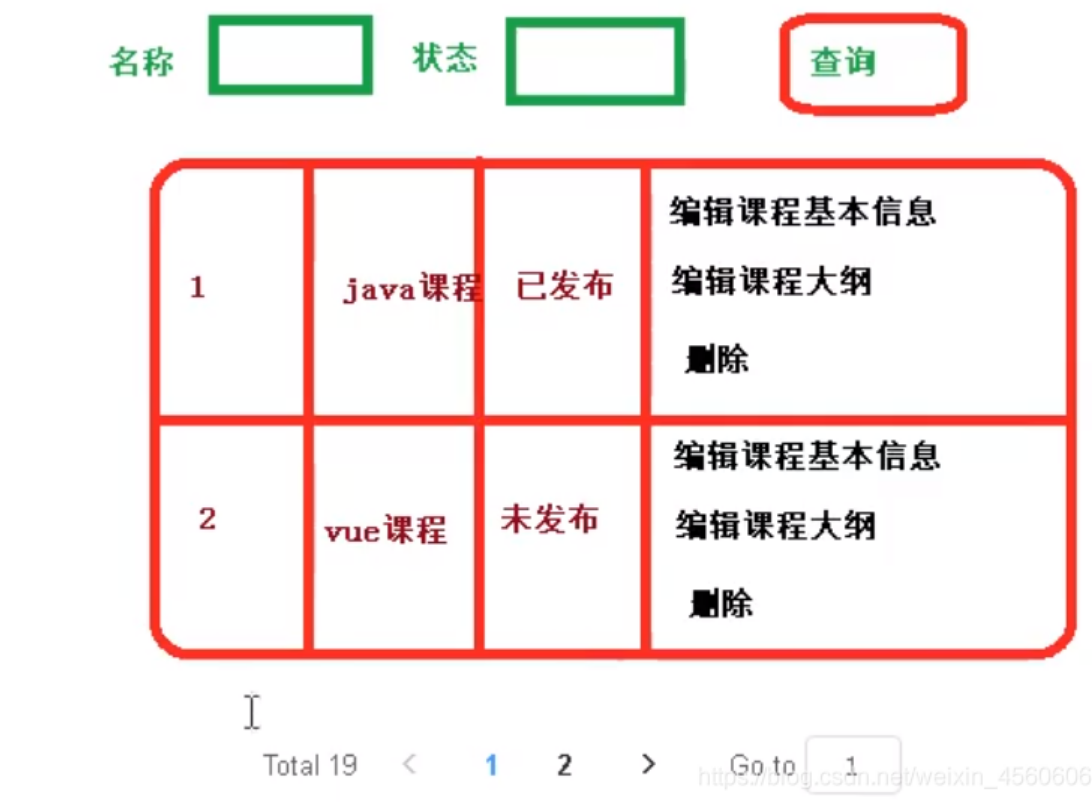
类似于讲师列表,在分页列出希望呈现的信息之外,还可以进行条件查询
课程信息展示
后端
- controller编写基本查询接口,分页查询接口,条件分页查询接口
```java
@ApiOperation(value = “课程列表”)
@GetMapping(“getCourseList”)
public R getCourseList(){
List
list = courseService.list(null); return R.ok().data(“list”,list); }
@ApiOperation(value = “分页查询课程列表”) @PostMapping(“pageListCourse/{current}/{limit}”) public R pageListCourse( @ApiParam(name = “current”, value = “当前页码”, required = true) @PathVariable Long current, @ApiParam(name = “limit”, value = “每页记录数”, required = true) @PathVariable Long limit){ //创建page对象 Page
pageCourse =new Page<>(current,limit); //调用方法查询 courseService.page(pageCourse,null); long total = pageCourse.getTotal(); List<EduCourse> courseList = pageCourse.getRecords(); return R.ok().data("total",total).data("rows",courseList);}
//带条件的分页查询,条件构造器以及判别过程可以放在service中封装,此处直接写在了本方法中 @ApiOperation(value = “条件查询带分页课程列表”) @PostMapping(“pageCourseCondition/{current}/{limit}”) public R pageCourseCondition( @ApiParam(name = “current”, value = “当前页码”, required = true) @PathVariable Long current, @ApiParam(name = “limit”, value = “每页记录数”, required = true) @PathVariable Long limit, @RequestBody(required = false) CourseQuery courseQuery){ //创建page对象 Page
pageCourse =new Page<>(current,limit); //构建条件 QueryWrapper<EduCourse> wrapper = new QueryWrapper<>(); //组合条件查询 String title = courseQuery.getTitle(); String status = courseQuery.getStatus(); //判断是否为空,不为空就拼接查询 if (!StringUtils.isEmpty(title)) { wrapper.like("title",title); } if (!StringUtils.isEmpty(status)) { wrapper.eq("status",status); } //调用方法查询 courseService.page(pageCourse,wrapper); long total = pageCourse.getTotal(); List<EduCourse> courseList = pageCourse.getRecords(); return R.ok().data("total",total).data("rows",courseList);}
<a name="gmorK"></a> ### 前端 1. api ```javascript //课程列表(条件查询分页) //current当前页 limit每页记录数 courseQuery条件对象 pageCourseCondition(current,limit,courseQuery){ return request({ url: `/eduservice/course/pageCourseCondition/${current}/${limit}`, method: 'post', data: courseQuery }) }- js获取数据
```javascript
3. vue呈现数据,加入了分页插件
```vue
<template>
  <div class="app-container">
    课程列表

    <!--查询表单-->
    <el-form :inline="true" class="demo-form-inline">
      <el-form-item>
        <el-input v-model="courseQuery.title" placeholder="课程名称"/>
      </el-form-item>

      <el-form-item>
        <el-select v-model="courseQuery.status" clearable placeholder="课程状态">
          <el-option value="Normal" label="已发布"/>
          <el-option value="Draft" label="未发布"/>
        </el-select>
      </el-form-item>

      <el-button type="primary" icon="el-icon-search" @click="getList()">查询</el-button>
      <el-button type="default" @click="resetData()">清空</el-button>
    </el-form>

    <!-- 表格 -->
    <el-table
      :data="list"
      border
      fit
      highlight-current-row>

      <el-table-column
        label="序号"
        width="70"
        align="center">
        <template slot-scope="scope">
          {{ (page - 1) * limit + scope.$index + 1 }}
        </template>
      </el-table-column>

      <el-table-column prop="title" label="课程名称" />

      <el-table-column label="课程状态" width="80">
        <template slot-scope="scope">
          {{ scope.row.status==='Normal'?'已发布':'未发布' }}
        </template>
      </el-table-column>

      <el-table-column prop="lessonNum" label="课时数" width="100"/>

      <el-table-column prop="gmtCreate" label="添加时间" width="180"/>

      <el-table-column prop="viewCount" label="浏览数量" width="70" />

      <el-table-column label="操作" width="200" align="center">
        <template slot-scope="scope">
          <router-link :to="'/teacher/edit/'+scope.row.id">
            <el-button type="primary" size="mini" icon="el-icon-edit">编辑课程基本信息</el-button>
          </router-link>
          <router-link :to="'/teacher/edit/'+scope.row.id">
            <el-button type="primary" size="mini" icon="el-icon-edit">编辑课程大纲息</el-button>
          </router-link>
          <el-button type="danger" size="mini" icon="el-icon-delete" @click="removeDataById(scope.row.id)">删除课程信息</el-button>
        </template>
      </el-table-column>
    </el-table>

  <!-- 分页 -->
    <el-pagination
      :current-page="page"
      :page-size="limit"
      :total="total"
      style="padding: 30px 0; text-align: center;"
      layout="total, prev, pager, next, jumper"
      @current-change="getList"
    />

  </div>
</template>
删除课程信息
后端
controller
@ApiOperation(value = "删除课程")
@PostMapping("deleteCourse/{courseId}")
public R deleteCourse(@PathVariable String courseId){
 courseService.removeCourse(courseId);
 return R.ok();
}
service
@Override
public void removeCourse(String courseId) {
 //1 根据课程id删除小节
 videoService.removeVideoByCourseId(courseId);

 //2 根据课程id删除章节
 chapterService.removeChapterByCourseId(courseId);

 //3 根据课程id删除描述
 courseDescriptionService.removeById(courseId);

 //4 根据课程id删除课程本身
 int result = baseMapper.deleteById(courseId);
 if (result == 0){
     throw new GuliException(20001,"删除失败");
 }
}
前端
api
//删除课程
deleteCourse(courseId) {
 return request({
     url: `/eduservice/course/deleteCourse/${courseId}`,
     method: 'post'
 })
},
js
removeDataById(id) {
this.$confirm('此操作将永久删除课程, 是否继续?', '提示', {
    confirmButtonText: '确定',
    cancelButtonText: '取消',
    type: 'warning'
}).then(() => {//点击确定,删除成功
    //调用删除方法
    course.deleteCourse(id)
    .then(response => {//删除成功
        //提示信息
        this.$message({
        type: 'success',
        message: '删除课程成功!'
        });
        //刷新页面
        this.getList()
    })
})//点击取消,删除失败
},
编辑课程基本信息
编辑课程大纲信息
后续编写
publish.vue
<template>

  <div class="app-container">

    <h2 style="text-align: center;">发布新课程</h2>

    <el-steps :active="3" process-status="wait" align-center style="margin-bottom: 40px;">
      <el-step title="填写课程基本信息"/>
      <el-step title="创建课程大纲"/>
      <el-step title="最终发布"/>
    </el-steps>

    <el-form label-width="120px">

      <el-form-item>
        <el-button @click="previous">返回修改</el-button>
        <el-button :disabled="saveBtnDisabled" type="primary" @click="publish">发布课程</el-button>
      </el-form-item>
    </el-form>
  </div>
</template>

<script>

export default {
  data() {
    return {
      saveBtnDisabled: false // 保存按钮是否禁用
    }
  },

  created() {
    console.log('publish created')
  },

  methods: {
    previous() {
      console.log('previous')
      this.$router.push({ path: '/course/chapter/1' })
    },

    publish() {
      console.log('publish')
      this.$router.push({ path: '/course/list' })
    }
  }
}
</script>
章节类似之前的二级课程开发
后端重点都在封装数据
一个章节有多个小结,但是要有个前提 相同的课程id大纲页面可以按之前的课程管理前端,这里新建页面显示
- api
```javascript
//课程最终发布
publishCourse(id) {
return request({
- 初步编写,实现头部进度栏
```vue

若有收获,就点个赞吧
0 人点赞
