需要再用短信云服务给redis中添加验证码,在此之前可以手动添加验证码, 注册阶段使用验证码注册
腾讯云短信验证
单一服务器

早期单一服务器,用户认证,通过对session机制。多模块再通过session复制则效率低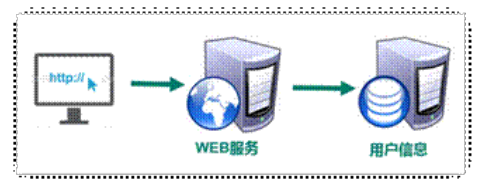
多台服务器
采用单点登录模式
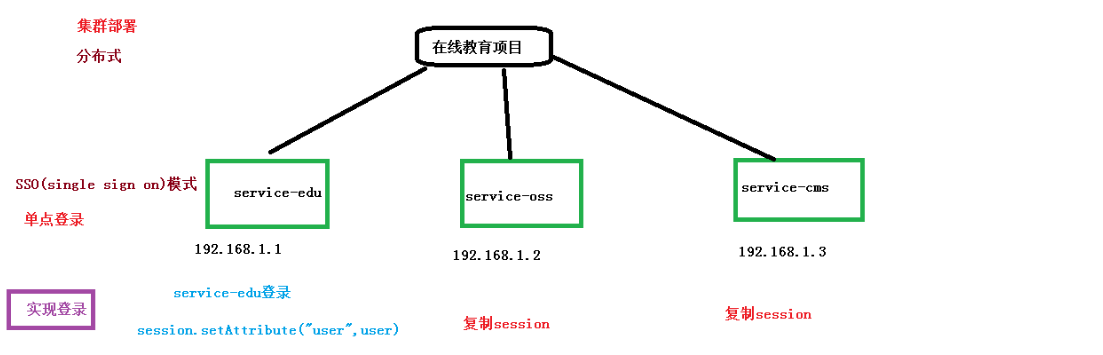
什么是单点登录
例子:在百度首页登录后,再进入百度贴吧,百度文库等其他模块就无须再次登录。这种登录就是单点登录
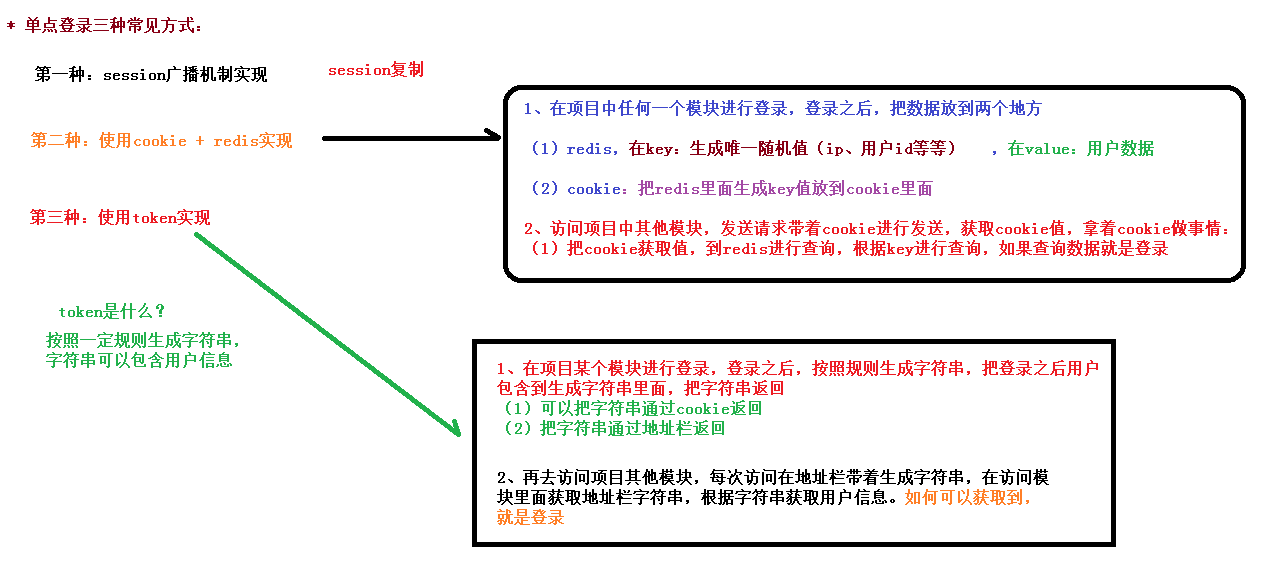
单点登录的三种机制
登录注册的后端
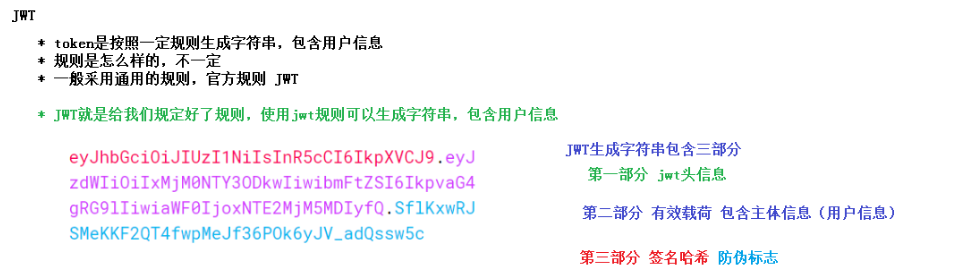
JWT
简介
整合JWT
先引入依赖,再使用工具类:JwtUtils.txt
//JwtUtils看懂代码,会自定义修改就行

public class JwtUtils {

    //token过期时间
    public static final long EXPIRE = 1000 * 60 * 60 * 24;

    //秘钥,每个公司生成规则不一样
    public static final String APP_SECRET = "ukc8BDbRigUDaY6pZFfWus2jZWLPHO";

    //生成token字符串方法
    public static String getJwtToken(String id, String nickname) {
        String JwtToken = Jwts.builder()
                //设置jwt头信息,红色部分,内容固定,不需要改
                .setHeaderParam("typ", "JWT")
                .setHeaderParam("alg", "HS256")

                .setSubject("guli-user")
                .setIssuedAt(new Date())
                .setExpiration(new Date(System.currentTimeMillis() + EXPIRE))//设置过期时间

                //设置token主体部分,存储用户信息,可设置多个值
                .claim("id", id)
                .claim("nickname", nickname)

                //设置签名哈希(防伪标志)
                .signWith(SignatureAlgorithm.HS256, APP_SECRET)
                .compact();

        return JwtToken;
    }

    /**
     * 判断token是否存在与有效
     *
     * @param jwtToken
     * @return
     */
    public static boolean checkToken(String jwtToken) {
        if (StringUtils.isEmpty(jwtToken)) return false;
        try {
            //根据设置的防伪码解析token
            Jwts.parser().setSigningKey(APP_SECRET).parseClaimsJws(jwtToken);
        } catch (Exception e) {
            e.printStackTrace();
            return false;
        }
        return true;
    }

    /**
     * 判断token是否存在与有效
     *
     * @param request
     * @return
     */
    public static boolean checkToken(HttpServletRequest request) {
        try {
            String jwtToken = request.getHeader("token");
            if (StringUtils.isEmpty(jwtToken)) return false;
            //根据设置的防伪码解析token
            Jwts.parser().setSigningKey(APP_SECRET).parseClaimsJws(jwtToken);
        } catch (Exception e) {
            e.printStackTrace();
            return false;
        }
        return true;
    }

    /**
     * 根据token获取会员id
     *
     * @param request
     * @return
     */
    public static String getMemberIdByJwtToken(HttpServletRequest request) {
        String jwtToken = request.getHeader("token");
        if (StringUtils.isEmpty(jwtToken)) return "";
        //根据设置的防伪码解析token,获取对象
        Jws<Claims> claimsJws =
                Jwts.parser().setSigningKey(APP_SECRET).parseClaimsJws(jwtToken);
        //获取token有效载荷【用户信息】
        Claims claims = claimsJws.getBody();
        return (String) claims.get("id");
    }
}
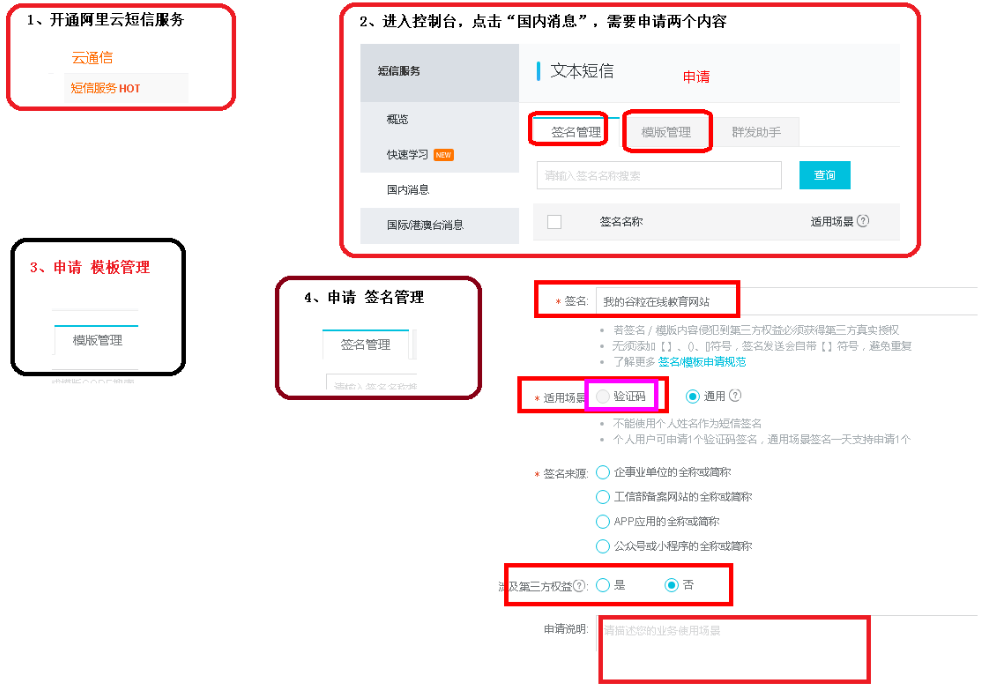
阿里云短信服务
准备工作
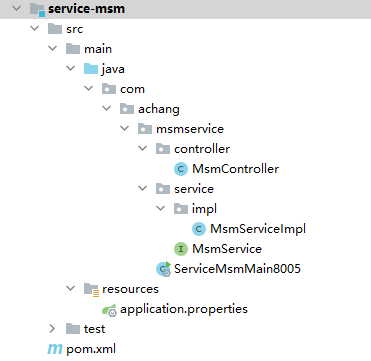
- 在service模块下创建子模块service-msm
创建controller和service代码 ```java @RestController @RequestMapping(“/edumsm/msm”) @CrossOrigin public class MsmController {
@Autowired private MsmService msmService;
@Autowired private RedisTemplate
//发送短信的方法 @GetMapping(“send/{phone}”) public R sendMsm(@PathVariable String phone) {
 //1 从redis获取验证码,如果获取到直接返回
 String code = redisTemplate.opsForValue().get(phone);
 if(!StringUtils.isEmpty(code)) {
     return R.ok();
 }
 //2 如果redis获取 不到,进行阿里云发送
 //生成随机值,传递阿里云进行发送
 code = RandomUtil.getFourBitRandom();
 Map<String,Object> param = new HashMap<>();
 param.put("code",code);
 //调用service发送短信的方法
 boolean isSend = msmService.send(param,phone);
 if(isSend) {
     //发送成功,把发送成功验证码放到redis里面
     //设置有效时间
     redisTemplate.opsForValue().set(phone,code,5, TimeUnit.MINUTES);
     return R.ok();
 } else {
     return R.error().message("短信发送失败");
 }
} }
public interface MsmService {
//发送短信的方法
boolean send(Map
@Service public class MsmServiceImpl implements MsmService {
//发送短信的方法
@Override
public boolean send(Map<String, Object> param, String phone) {
    if(StringUtils.isEmpty(phone)) return false;

    //三个参数:地域节点,id,秘钥
    DefaultProfile profile =
            DefaultProfile.getProfile("default", "LTAI4FvvVEWiTJ3GNJJqJnk7", "9st82dv7EvFk9mTjYO1XXbM632fRbG");
    IAcsClient client = new DefaultAcsClient(profile);

    //设置相关固定的参数
    CommonRequest request = new CommonRequest();
    //request.setProtocol(ProtocolType.HTTPS);
    request.setMethod(MethodType.POST);
    request.setDomain("dysmsapi.aliyuncs.com");
    request.setVersion("2017-05-25");
    request.setAction("SendSms");

    //设置发送相关的参数
    request.putQueryParameter("PhoneNumbers",phone); //手机号
    request.putQueryParameter("SignName","我的谷粒在线教育网站"); //申请阿里云 签名名称
    request.putQueryParameter("TemplateCode","SMS_180051135"); //申请阿里云 模板code
    request.putQueryParameter("TemplateParam", JSONObject.toJSONString(param)); //验证码数据,转换json数据传递

    try {
        //最终发送
        CommonResponse response = client.getCommonResponse(request);
        boolean success = response.getHttpResponse().isSuccess();
        return success;
    }catch(Exception e) {
        e.printStackTrace();
        return false;
    }

}
}
3. 配置application.properties:[properties.txt](https://www.yuque.com/attachments/yuque/0/2021/txt/22137958/1632377897943-58bc7342-905f-443b-8663-cd4d5a4773e2.txt?_lake_card=%7B%22src%22%3A%22https%3A%2F%2Fwww.yuque.com%2Fattachments%2Fyuque%2F0%2F2021%2Ftxt%2F22137958%2F1632377897943-58bc7342-905f-443b-8663-cd4d5a4773e2.txt%22%2C%22name%22%3A%22properties.txt%22%2C%22size%22%3A2809%2C%22type%22%3A%22text%2Fplain%22%2C%22ext%22%3A%22txt%22%2C%22status%22%3A%22done%22%2C%22taskId%22%3A%22u0b914e43-46eb-4f24-b45e-c4d952d999c%22%2C%22taskType%22%3A%22upload%22%2C%22id%22%3A%22PJ33x%22%2C%22card%22%3A%22file%22%7D)
3. 创建启动类:[MsmApplication.java](https://www.yuque.com/attachments/yuque/0/2021/java/22137958/1632378106473-c10d9ce4-f5ba-40a1-9b62-ab8c994451d8.java?_lake_card=%7B%22src%22%3A%22https%3A%2F%2Fwww.yuque.com%2Fattachments%2Fyuque%2F0%2F2021%2Fjava%2F22137958%2F1632378106473-c10d9ce4-f5ba-40a1-9b62-ab8c994451d8.java%22%2C%22name%22%3A%22MsmApplication.java%22%2C%22size%22%3A551%2C%22type%22%3A%22%22%2C%22ext%22%3A%22java%22%2C%22status%22%3A%22done%22%2C%22taskId%22%3A%22ub10ec6df-2e64-40c5-94e7-817a11ebf52%22%2C%22taskType%22%3A%22upload%22%2C%22id%22%3A%22uf7428946%22%2C%22card%22%3A%22file%22%7D)
<a name="kQTmW"></a>
### 开通短信服务
1. 开通服务并申请模板和签名
<a name="Iq18s"></a>
### 生成随机数工具类
```java
public class RandomUtil {
private static final Random random = new Random();
private static final DecimalFormat fourdf = new DecimalFormat("0000");
private static final DecimalFormat sixdf = new DecimalFormat("000000");
public static String getFourBitRandom() {
return fourdf.format(random.nextInt(10000));
}
public static String getSixBitRandom() {
return sixdf.format(random.nextInt(1000000));
}
/**
* 给定数组,抽取n个数据
* @param list
* @param n
* @return
*/
public static ArrayList getRandom(List list, int n) {
Random random = new Random();
HashMap<Object, Object> hashMap = new HashMap<Object, Object>();
// 生成随机数字并存入HashMap
for (int i = 0; i < list.size(); i++) {
int number = random.nextInt(100) + 1;
hashMap.put(number, i);
}
// 从HashMap导入数组
Object[] robjs = hashMap.values().toArray();
ArrayList r = new ArrayList();
// 遍历数组并打印数据
for (int i = 0; i < n; i++) {
r.add(list.get((int) robjs[i]));
System.out.print(list.get((int) robjs[i]) + "\t");
}
System.out.print("\n");
return r;
}
}
设置验证码有效时间
先从redis中取,取不到再用阿里云发。发成功之后存入redis中,并设置有效时间
后端代码
- 关于登录
- 关于注册
- 根据token获取信息

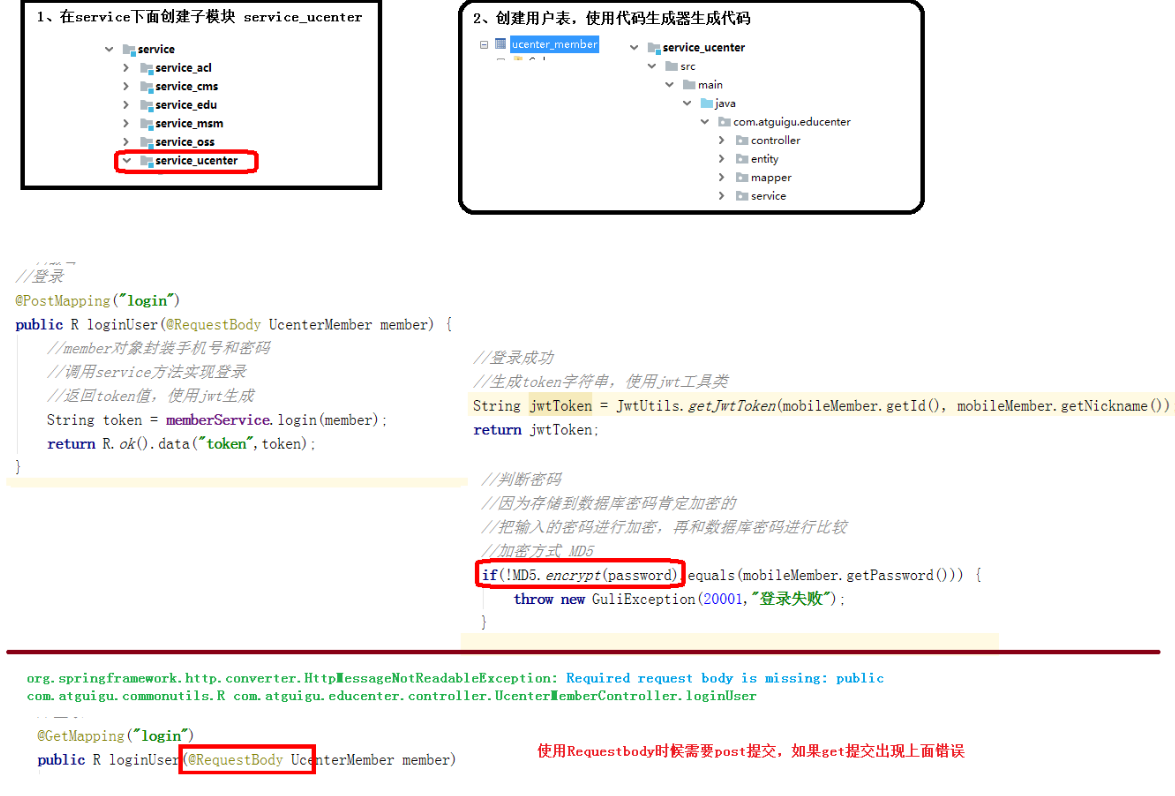
- 在service模块下创建子模块service-ucenter,用于新建用户
- 使用代码生成器生成代码:guli_ucenter.sql,注意在实体类添加时间的自动填充
- 配置信息properties.txt
启动类
@SpringBootApplication(exclude = DataSourceAutoConfiguration.class)//取消数据源自动配置
@ComponentScan("com.achang")
@MapperScan("com.achang.serviceUcenter.mapper")
public class serviceUcenterMain8006 {
 public static void main(String[] args) {
     SpringApplication.run(serviceUcenterMain8006.class,args);
 }
}
后端注册、登录接口
```java @Api(description = “前端登录注册接口”) @RestController @RequestMapping(“/educenter/member”) @CrossOrigin public class UcenterMemberController {
@Autowired private UcenterMemberService memberService;
@ApiOperation(value = “登录”) @PostMapping(“login”) public R loginUser(@RequestBody UcenterMember member) {
 //member对象封装手机号和密码
 //调用service方法实现登录
 //返回token值,使用jwt生成
 String token = memberService.login(member);
 return R.ok().data("token",token);
}
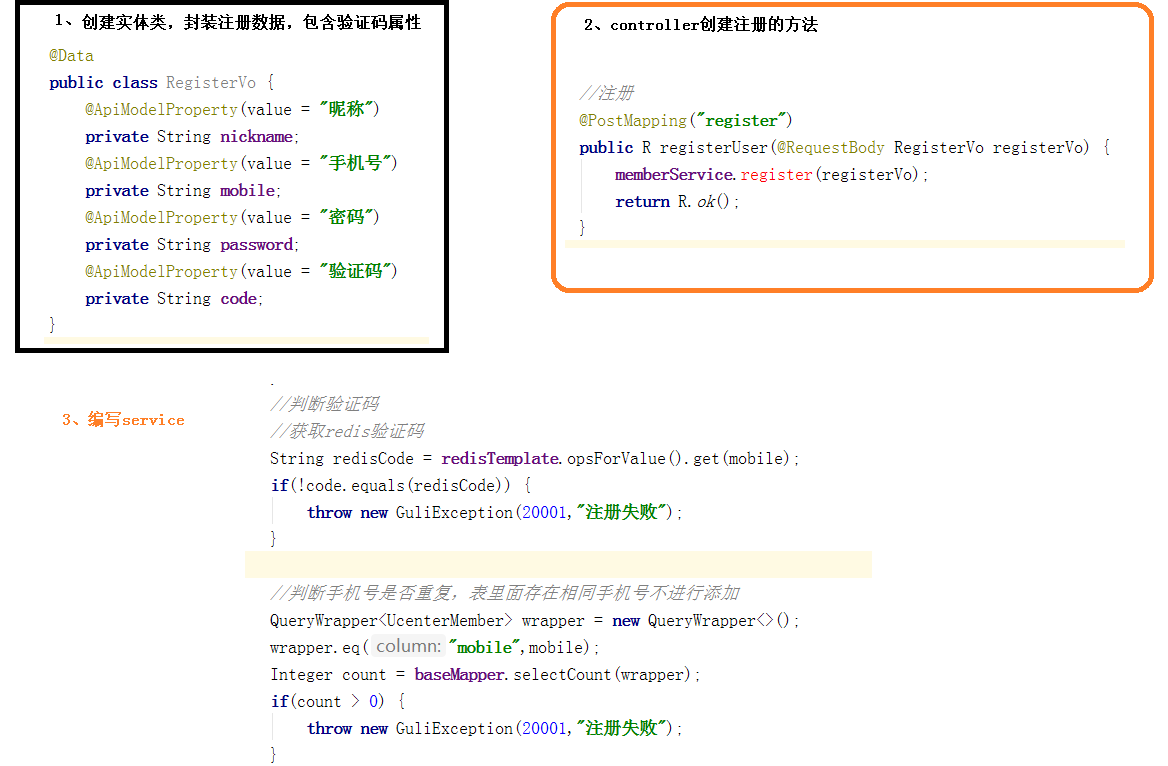
@ApiOperation(value = “注册”) @PostMapping(“register”) public R registerUser(@RequestBody RegisterVo registerVo) {
 memberService.register(registerVo);
 return R.ok();
}
//======== 根据token给前台页面返回必要数据,比如返回用户名,用户头像等信息===================== @ApiOperation(value = “根据token获取用户信息”) @GetMapping(“getMemberInfo”) public R getMemberInfo(HttpServletRequest request) { //调用jwt工具类的方法。根据request对象获取头信息,返回用户id String memberId = JwtUtils.getMemberIdByJwtToken(request); //查询数据库根据用户id获取用户信息 UcenterMember member = memberService.getById(memberId); return R.ok().data(“userInfo”,member); }
}
---

<a name="NNiaS"></a>
### 编写service接口及其实现类
```java
@Service
public class UcenterMemberServiceImpl extends ServiceImpl<UcenterMemberMapper, UcenterMember> implements UcenterMemberService {
//==============================下面是登录方法============================
    @Autowired
    private RedisTemplate<String,String> redisTemplate;

    @Override
    public String login(UcenterMember member) {
        //获取登录手机号和密码
        String mobile = member.getMobile();
        String password = member.getPassword();

        //手机号和密码非空判断
        if(StringUtils.isEmpty(mobile) || StringUtils.isEmpty(password)) {
            throw new GuliException(20001,"登录失败");
        }

        //判断手机号是否正确
        QueryWrapper<UcenterMember> wrapper = new QueryWrapper<>();
        wrapper.eq("mobile",mobile);
        UcenterMember mobileMember = baseMapper.selectOne(wrapper);
        //判断查询对象是否为空
        if(mobileMember == null) {//没有这个手机号
            throw new GuliException(20001,"登录失败");
        }

        //判断密码
        //因为存储到数据库密码肯定加密的
        //把输入的密码进行加密,再和数据库密码进行比较
        //加密方式 MD5
        if(!MD5.encrypt(password).equals(mobileMember.getPassword())) {
            throw new GuliException(20001,"登录失败");
        }

        //判断用户是否禁用
        if(mobileMember.getIsDisabled()) {
            throw new GuliException(20001,"登录失败");
        }

        //登录成功
        //生成token字符串,使用jwt工具类
        String jwtToken = JwtUtils.getJwtToken(mobileMember.getId(), mobileMember.getNickname());
        return jwtToken;
    }
//==============================下面是注册方法============================
    @Override
    public void register(RegisterVo registerVo) {
        //获取注册的数据
        String code = registerVo.getCode(); //验证码
        String mobile = registerVo.getMobile(); //手机号
        String nickname = registerVo.getNickname(); //昵称
        String password = registerVo.getPassword(); //密码

        //非空判断
        if(StringUtils.isEmpty(mobile) || StringUtils.isEmpty(password)
                || StringUtils.isEmpty(code) || StringUtils.isEmpty(nickname)) {
            throw new GuliException(20001,"注册失败");
        }
        //判断验证码
        //获取redis验证码
        String redisCode = redisTemplate.opsForValue().get(mobile);
        if(!code.equals(redisCode)) {
            throw new GuliException(20001,"注册失败");
        }

        //判断手机号是否重复,表里面存在相同手机号不进行添加
        QueryWrapper<UcenterMember> wrapper = new QueryWrapper<>();
        wrapper.eq("mobile",mobile);
        Integer count = baseMapper.selectCount(wrapper);
        if(count > 0) {
            throw new GuliException(20001,"注册失败");
        }

        //数据添加数据库中
        UcenterMember member = new UcenterMember();
        member.setMobile(mobile);
        member.setNickname(nickname);
        member.setPassword(MD5.encrypt(password));//密码需要加密的
        member.setIsDisabled(false);//用户不禁用
        member.setAvatar("https://guli-edu-20201.oss-cn-beijing.aliyuncs.com/2020/10/08/3a6bf3d4a85f415693e062db5fb17df8file.png");
        baseMapper.insert(member);
    }
}
- 涉及md5加密
- 使用jwt规则生产token字符串:传入的参数是根据页面传入的手机号在数据库中检索,从数据库检索到的手机号对应的相关数据:(mobileMember.getId(), mobileMember.getNickname())
实体类RegisterVo
用于上传注册时的数据,包含验证码
登录时需上传:手机号,因为就一个属性,所以就直接使用了@RequesBody,没有封装成vo类
@Data
public class RegisterVo {
    private String nickname;

    private String mobile;

    private String password;

    private String code;
}
MD5工具类
public final class MD5 {

    public static String encrypt(String strSrc) {
        try {
            char hexChars[] = { '0', '1', '2', '3', '4', '5', '6', '7', '8',
                    '9', 'a', 'b', 'c', 'd', 'e', 'f' };
            byte[] bytes = strSrc.getBytes();
            MessageDigest md = MessageDigest.getInstance("MD5");
            md.update(bytes);
            bytes = md.digest();
            int j = bytes.length;
            char[] chars = new char[j * 2];
            int k = 0;
            for (int i = 0; i < bytes.length; i++) {
                byte b = bytes[i];
                chars[k++] = hexChars[b >>> 4 & 0xf];
                chars[k++] = hexChars[b & 0xf];
            }
            return new String(chars);
        } catch (NoSuchAlgorithmException e) {
            e.printStackTrace();
            throw new RuntimeException("MD5加密出错!!+" + e);
        }
    }

    public static void main(String[] args) {
        System.out.println(MD5.encrypt("111111"));
    }

}
最后用swagger测试
登录注册的前端
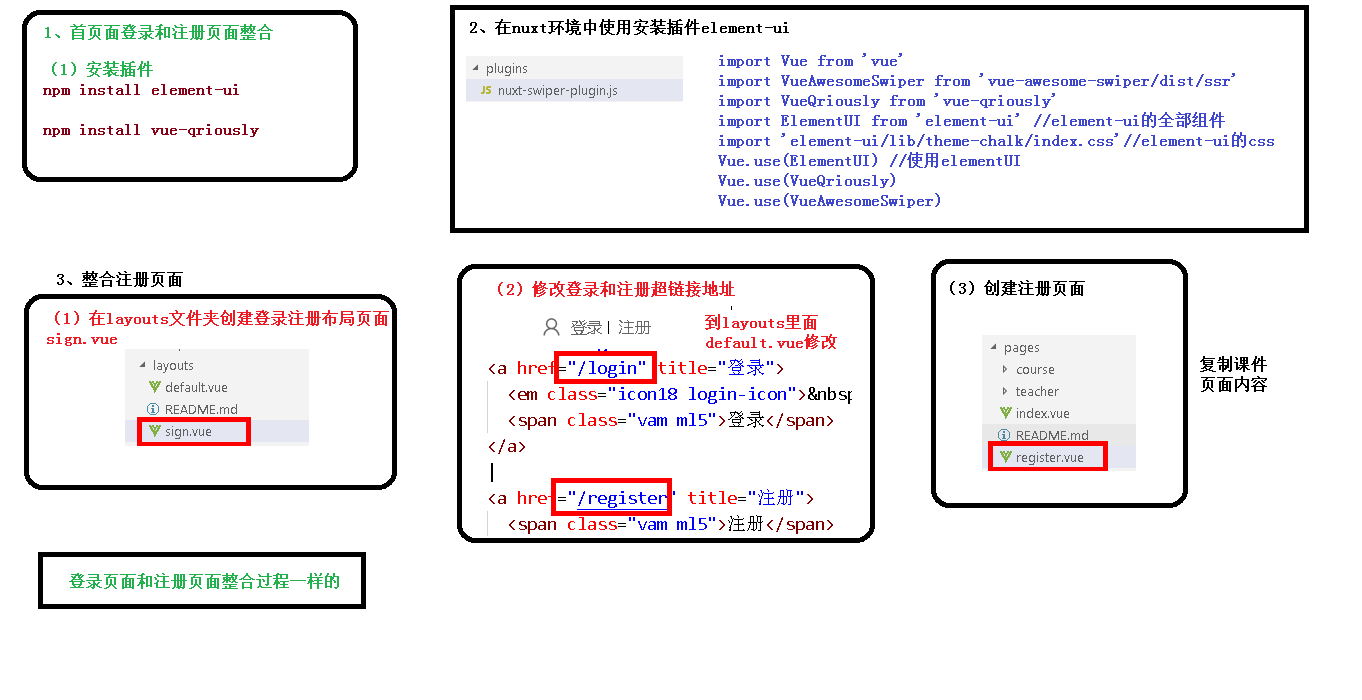
在nuxt中安装插件并配置
(1)安装element-ui 和 vue-qriously插件
npm install element-ui
npm install vue-qriously                //用于微信支付


(2)修改配置文件 nuxt-swiper-plugin.js,引用插件,类似引用之前的轮播图插件
import Vue from 'vue'
import VueAwesomeSwiper from 'vue-awesome-swiper/dist/ssr'
import VueQriously from 'vue-qriously'
import ElementUI from 'element-ui' //element-ui的全部组件
import 'element-ui/lib/theme-chalk/index.css'//element-ui的css
Vue.use(ElementUI) //使用elementUI
Vue.use(VueQriously)
Vue.use(VueAwesomeSwiper)
注册
- 前端注册接口: register.js ```javascript import request from ‘@/utils/request’
export default {
//根据手机号发验证码
sendCode(phone) {
return request({
url: /edumsm/msm/send/${phone},
method: ‘get’
})
},
//注册的方法
registerMember(formItem) {
return request({
url: /educenter/member/register,
method: ‘post’,
data: formItem
})
}
}
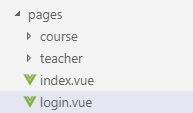
2. 在pages文件夹中创建注册页面sign.vue。
   - 此页面的作用是当点击登录后会跳转到一个新的布局页面(sign.vue)。不再使用default.vue
   - 依旧是放在layout文件夹中,但是要后期引用
```vue
<template>
  <div class="sign">
    <!--标题-->
    <div class="logo">
      <img src="~/assets/img/logo.png" alt="logo">
    </div>
    <!--表单-->
    <nuxt/>
  </div>
</template>
- 对default.vue中的超链接进行修改,引入注册、登录页面
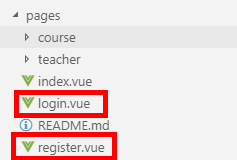
- 在pages中创建登录和注册组件
<a name="kEmK3"></a>
### 登录

1. 登录接口api(之前已写)
1. 登录用到的Js方法
```javascript
import request from '@/utils/request'

export default {
  //用户登录
  submitLoginUser(userInfo) {
    return request({
        url: `/educenter/member/login`,
        method: 'post',
        data: userInfo
      })
  },
  //根据token获取用户信息
  getLoginUserInfo() {
    return request({
      url: `/educenter/member/getMemberInfo`,
      method: 'get'
    })
  }
}
- pages中编写登录页面
- 引入插件: npm install js-cookie
- 编写login.vue组件,其中需要上一步安装的插件
配置nginx ```vue //login.vue
<a name="WAHjt"></a>
#### 操作步骤
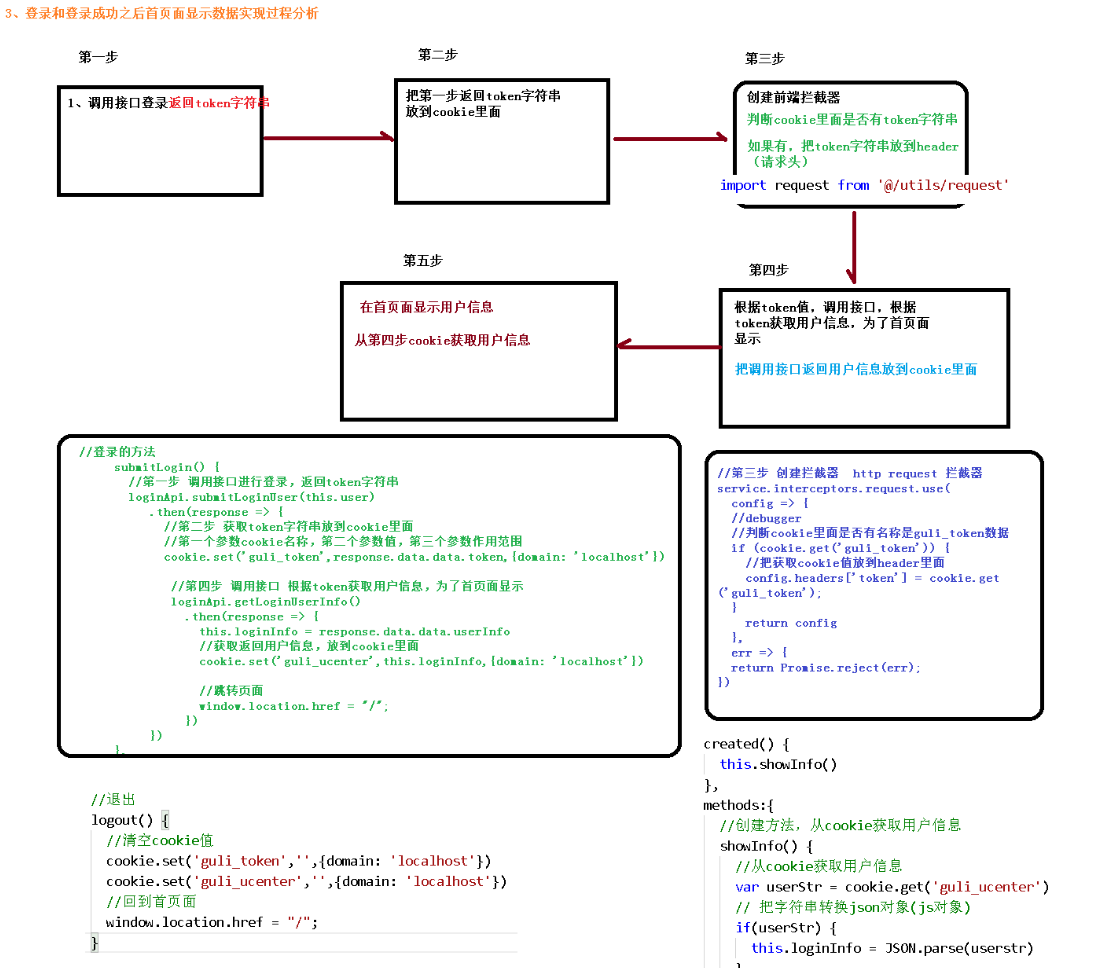<br />(1)前端调用登录接口进行登录,结果是返回jwt规则的token字符串<br />(2)把返回token字符串放到cookie里面<br /><br />(3)创建拦截器:判断cookie里面是否有token字符串,如果有,把token字符串放到header(请求头中)
```java
//拦截器 在request.js中添加
import { MessageBox, Message } from 'element-ui'
import cookie from 'js-cookie'
//第三步 创建拦截器 http request 拦截器
service.interceptors.request.use(
config => {
//debugger
//判断cookie里面是否有名称是guli_token数据
if (cookie.get('guli_token')) {
//把获取cookie值放到header里面
config.headers['token'] = cookie.get('guli_token');
}
return config
},
err => {
return Promise.reject(err);
})
// http response 拦截器
service.interceptors.response.use(
response => {
//debugger
if (response.data.code == 28004) {
console.log("response.data.resultCode是28004")
// 返回 错误代码-1 清除ticket信息并跳转到登录页面
//debugger
window.location.href="/login"
return
}else{
if (response.data.code !== 20000) {
//25000:订单支付中,不做任何提示
if(response.data.code != 25000) {
Message({
message: response.data.message || 'error',
type: 'error',
duration: 5 * 1000
})
}
} else {
return response;
}
}
},
error => {
return Promise.reject(error.response) // 返回接口返回的错误信息
});
(4)根据token值,调用接口,根据token获取用户信息,这是为了首页面进行登录信息显示。
- 其实上一步已经完成了登录,但是用户并不知道
- 具体过程是调用接口返回用户信息放到cookie里面,通过login.vue页面对cookie进行解析
(5)从首页面显示用户信息,从第四步cookie获取用户信息
<template>
<div class="in-wrap">
<!-- 公共头引入 -->
<header id="header">
<section class="container">
<h1 id="logo">
<a href="#" title="谷粒学院">
<img src="~/assets/img/logo.png" width="100%" alt="谷粒学院">
</a>
</h1>
<div class="h-r-nsl">
<ul class="nav">
<router-link to="/" tag="li" active-class="current" exact>
<a>首页</a>
</router-link>
<router-link to="/course" tag="li" active-class="current">
<a>课程</a>
</router-link>
<router-link to="/teacher" tag="li" active-class="current">
<a>名师</a>
</router-link>
<router-link to="/article" tag="li" active-class="current">
<a>文章</a>
</router-link>
<router-link to="/qa" tag="li" active-class="current">
<a>问答</a>
</router-link>
</ul>
<!-- / nav -->
<!-- / nav -->
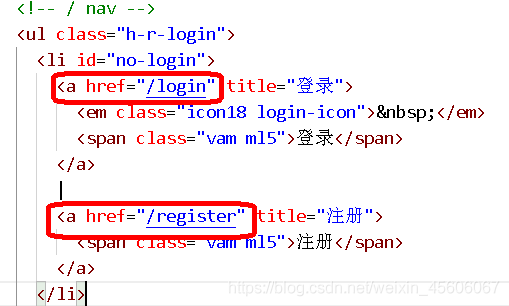
<ul class="h-r-login">
<li v-if="!loginInfo.id" id="no-login">
<a href="/login" title="登录">
<em class="icon18 login-icon"> </em>
<span class="vam ml5">登录</span>
</a>
|
<a href="/register" title="注册">
<span class="vam ml5">注册</span>
</a>
</li>
<li v-if="loginInfo.id" id="is-login-one" class="mr10">
<a id="headerMsgCountId" href="#" title="消息">
<em class="icon18 news-icon"> </em>
</a>
<q class="red-point" style="display: none"> </q>
</li>
<li v-if="loginInfo.id" id="is-login-two" class="h-r-user">
<a href="/ucenter" title>
<img
:src="loginInfo.avatar"
width="30"
height="30"
class="vam picImg"
alt
>
<span id="userName" class="vam disIb">{{ loginInfo.nickname }}</span>
</a>
<a href="javascript:void(0);" title="退出" @click="logout()" class="ml5">退出</a>
</li>
<!-- /未登录显示第1 li;登录后显示第2,3 li -->
</ul>
<aside class="h-r-search">
<form action="#" method="post">
<label class="h-r-s-box">
<input type="text" placeholder="输入你想学的课程" name="queryCourse.courseName" value>
<button type="submit" class="s-btn">
<em class="icon18"> </em>
</button>
</label>
</form>
</aside>
</div>
<aside class="mw-nav-btn">
<div class="mw-nav-icon"></div>
</aside>
<div class="clear"></div>
</section>
</header>
<!-- /公共头引入 -->
<nuxt/>
<!-- 公共底引入 -->
<footer id="footer">
<section class="container">
<div class>
<h4 class="hLh30">
<span class="fsize18 f-fM c-999">友情链接</span>
</h4>
<ul class="of flink-list">
<li>
<a href="http://www.atguigu.com/" title="尚硅谷" target="_blank">尚硅谷</a>
</li>
</ul>
<div class="clear"></div>
</div>
<div class="b-foot">
<section class="fl col-7">
<section class="mr20">
<section class="b-f-link">
<a href="#" title="关于我们" target="_blank">关于我们</a>|
<a href="#" title="联系我们" target="_blank">联系我们</a>|
<a href="#" title="帮助中心" target="_blank">帮助中心</a>|
<a href="#" title="资源下载" target="_blank">资源下载</a>|
<span>服务热线:010-56253825(北京) 0755-85293825(深圳)</span>
<span>Email:info@atguigu.com</span>
</section>
<section class="b-f-link mt10">
<span>©2018课程版权均归谷粒学院所有 京ICP备17055252号</span>
</section>
</section>
</section>
<aside class="fl col-3 tac mt15">
<section class="gf-tx">
<span>
<img src="~/assets/img/wx-icon.png" alt>
</span>
</section>
<section class="gf-tx">
<span>
<img src="~/assets/img/wb-icon.png" alt>
</span>
</section>
</aside>
<div class="clear"></div>
</div>
</section>
</footer>
<!-- /公共底引入 -->
</div>
</template>
<script>
import "~/assets/css/reset.css";
import "~/assets/css/theme.css";
import "~/assets/css/global.css";
import "~/assets/css/web.css";
import cookie from 'js-cookie'
import loginApi from '@/api/login'
export default {
data() {
return {
token:'',
loginInfo: {
id: '',
age: '',
avatar: '',
mobile: '',
nickname: '',
sex: ''
}
}
},
created() {
//获取路径里面token值
this.token = this.$route.query.token
console.log(this.token)
if(this.token) {//判断路径是否有token值
this.wxLogin()
}
this.showInfo()
},
methods:{
//=============================微信登录显示的方法===================================
wxLogin() {
//console.log('************'+this.token)
//把token值放到cookie里面
cookie.set('guli_token',this.token,{domain: 'localhost'})
cookie.set('guli_ucenter','',{domain: 'localhost'})
//console.log('====='+cookie.get('guli_token'))
//调用接口,根据token值获取用户信息
loginApi.getLoginUserInfo()
.then(response => {
// console.log('################'+response.data.data.userInfo)
this.loginInfo = response.data.data.userInfo
cookie.set('guli_ucenter',this.loginInfo,{domain: 'localhost'})
})
},
//创建方法,从cookie获取用户信息
showInfo() {
//从cookie获取用户信息
var userStr = cookie.get('guli_ucenter')
// 把字符串转换json对象(js对象)
if(userStr) {
this.loginInfo = JSON.parse(userStr)
}
},
//================================登录退出====================================
//通过清空cookie来实现
//退出
logout() {
//清空cookie值
cookie.set('guli_token','',{domain: 'localhost'})
cookie.set('guli_ucenter','',{domain: 'localhost'})
//回到首页面
window.location.href = "/";
}
}
};
</script>
微信扫码登录
OAuth2介绍
OAuth2可以解决:开放系统间授权和分布式访问(开放系统间权限应用场景类似相片云打印)
OAuth2只是一种解决方案,其中生产字符串的具体规则(比如jwt)OAuth2并未明确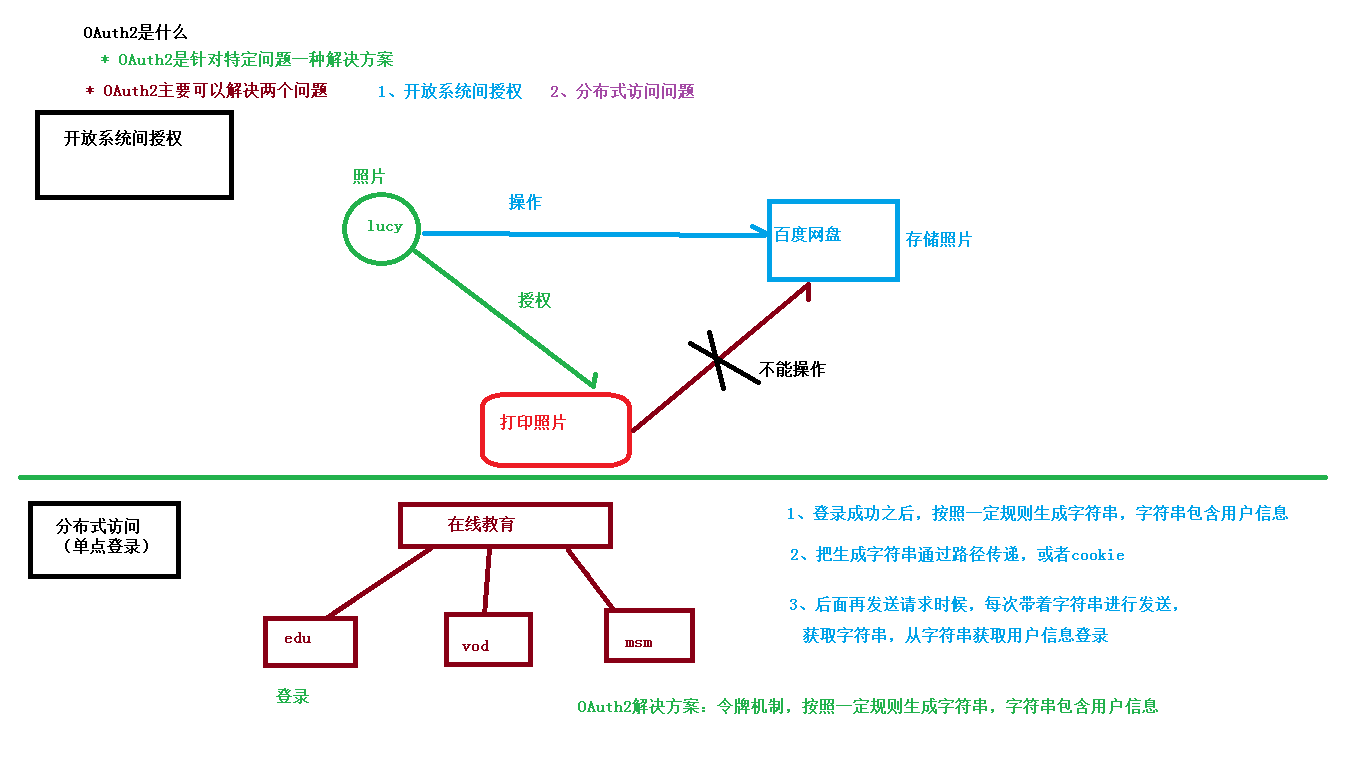
扫码登录实现
wx:
  open:
    # 微信开放平台 appid

    appid: wxed9954c01bb89b47

    # 微信开放平台 appsecret
    appsecret: a7482517235173ddb4083788de60b90e

    # 微信开放平台 重定向url(guli.shop需要在微信开放平台配置)
    redirecturl: http://guli.shop/api/ucenter/wx/callback
后端
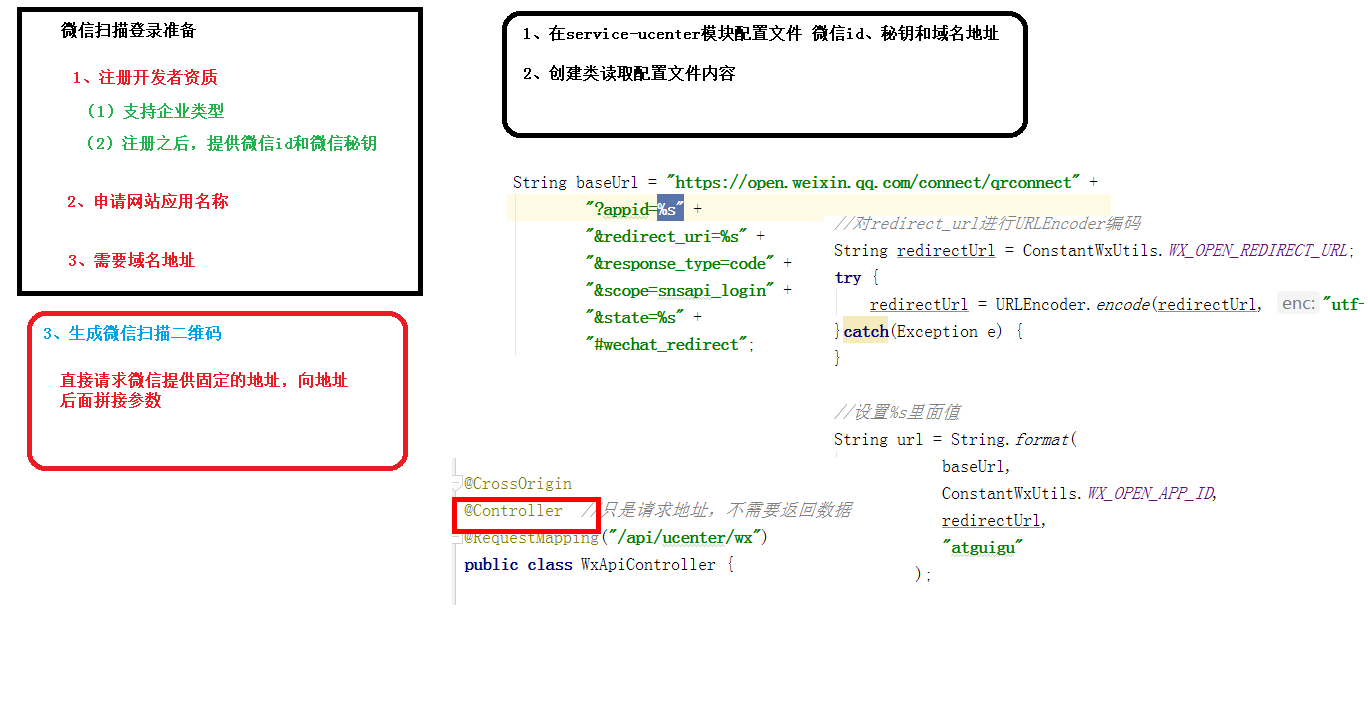
生成二维码
application.properties添加相关配置信息
# 微信开放平台 appid
wx.open.app_id=wxed9954c01bb89b47
# 微信开放平台 appsecret
wx.open.app_secret=a7482517235173ddb4083788de60b90e
# 微信开放平台 重定向url
wx.open.redirect_url=http://guli.shop/api/ucenter/wx/callback
创建常量类
//创建util包,创建ConstantPropertiesUtil.java常量类,用于读取配置文件中的值
@Component
public class ConstantWxUtils implements InitializingBean {

 @Value("${wx.open.app_id}")
 private String appId;

 @Value("${wx.open.app_secret}")
 private String appSecret;

 @Value("${wx.open.redirect_url}")
 private String redirectUrl;

 public static String WX_OPEN_APP_ID;
 public static String WX_OPEN_APP_SECRET;
 public static String WX_OPEN_REDIRECT_URL;

 @Override
 public void afterPropertiesSet() throws Exception {
     WX_OPEN_APP_ID = appId;
     WX_OPEN_APP_SECRET = appSecret;
     WX_OPEN_REDIRECT_URL = redirectUrl;
 }
}
编写接口controller,后端生成二维码
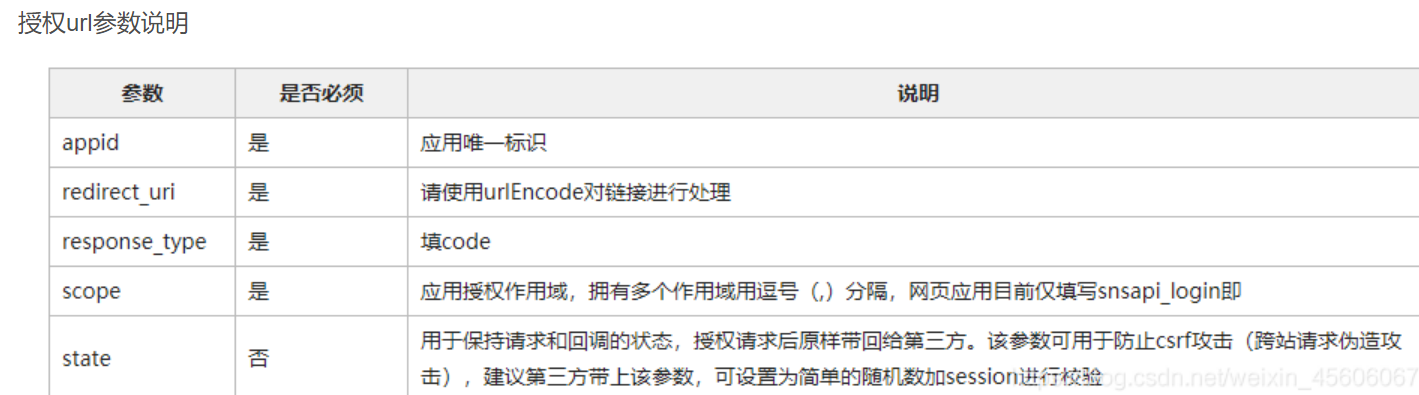
@Api(description = "前端微信扫码登录")
@CrossOrigin
@Controller  //只是请求地址,不需要返回数据
@RequestMapping("/api/ucenter/wx")
public class WxApiController {

 @ApiOperation(value = "生成微信扫描二维码")
 @GetMapping("login")
 public String getWxCode() {
     //url拼接方式1:固定地址,?后面拼接参数,用&连接
//        String url = "https://open.weixin.qq.com/" +
//                "connect/qrconnect?appid="+ ConstantWxUtils.WX_OPEN_APP_ID+"&response_type=code";

     //url拼接方式2:
     // 微信开放平台授权baseUrl  %s相当于?代表占位符,在后面用String.format传入值
     String baseUrl = "https://open.weixin.qq.com/connect/qrconnect" +
             "?appid=%s" +
             "&redirect_uri=%s" +
             "&response_type=code" +
             "&scope=snsapi_login" +
             "&state=%s" +
             "#wechat_redirect";

     //对redirect_url进行URLEncoder编码
     String redirectUrl = ConstantWxUtils.WX_OPEN_REDIRECT_URL;
     try {
         redirectUrl = URLEncoder.encode(redirectUrl, "utf-8");
     }catch(Exception e) {
     }

     //设置%s里面值
     String url = String.format(
             baseUrl,
             ConstantWxUtils.WX_OPEN_APP_ID,
             redirectUrl,
             "atguigu"
     );

     //重定向到请求微信地址里面
     return "redirect:"+url;
 }
}
注意
使用@Controller 而不是@ResponseBody,因为只是请求地址,不需要返回数据。
使用尚硅谷的配置信息要修改一处配置,因为尚硅谷申请时域名端口填写的是8160,且目前微信登录回调可以直接请求localhost地址了,所以修改了回调配置就是http://localhost:8160
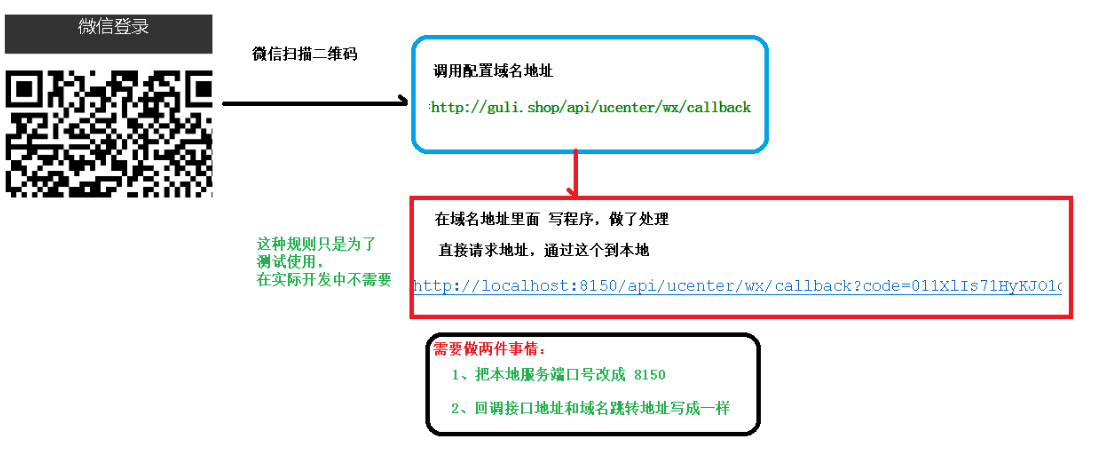
wx.open.redirect_url=http://localhost:8160/api/ucenter/wx/callback扫码二维码
实际开发不需要如此做,直接填写公司域名即可。此步是通过扫码回调至自定义的跳转地址

扫码跳转具体过程
代码实现
引入依赖:在service_ucenter的pom中
<dependencies>
 <!--httpclient-->
 <dependency>
     <groupId>org.apache.httpcomponents</groupId>
     <artifactId>httpclient</artifactId>
 </dependency>
 <!--commons-io-->
 <dependency>
     <groupId>commons-io</groupId>
     <artifactId>commons-io</artifactId>
 </dependency>
 <!--gson-->
 <dependency>
     <groupId>com.google.code.gson</groupId>
     <artifactId>gson</artifactId>
 </dependency>
</dependencies>
创建httpclient工具类
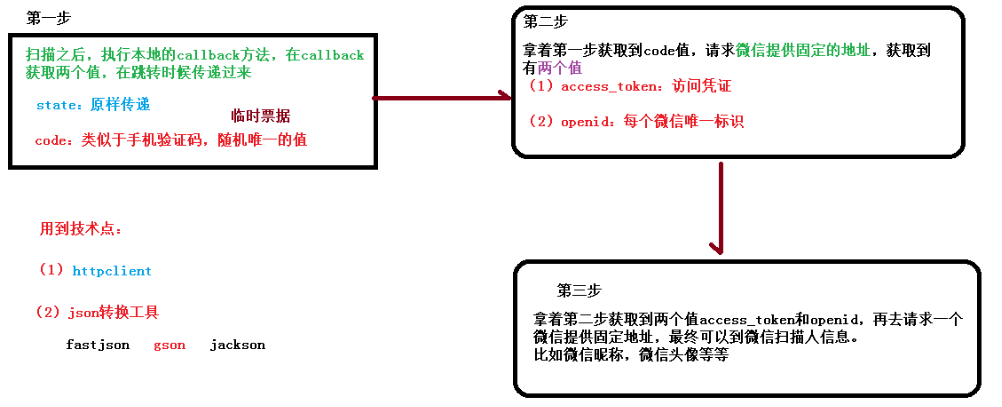
/**
*  依赖的jar包有:commons-lang-2.6.jar、httpclient-4.3.2.jar、httpcore-4.3.1.jar、commons-io-2.4.jar
* @author zhaoyb
*
*/
public class HttpClientUtils {

 public static final int connTimeout=10000;
 public static final int readTimeout=10000;
 public static final String charset="UTF-8";
 private static HttpClient client = null;

 static {
     PoolingHttpClientConnectionManager cm = new PoolingHttpClientConnectionManager();
     cm.setMaxTotal(128);
     cm.setDefaultMaxPerRoute(128);
     client = HttpClients.custom().setConnectionManager(cm).build();
 }

 public static String postParameters(String url, String parameterStr) throws ConnectTimeoutException, SocketTimeoutException, Exception{
     return post(url,parameterStr,"application/x-www-form-urlencoded",charset,connTimeout,readTimeout);
 }

 public static String postParameters(String url, String parameterStr,String charset, Integer connTimeout, Integer readTimeout) throws ConnectTimeoutException, SocketTimeoutException, Exception{
     return post(url,parameterStr,"application/x-www-form-urlencoded",charset,connTimeout,readTimeout);
 }

 public static String postParameters(String url, Map<String, String> params) throws ConnectTimeoutException,
         SocketTimeoutException, Exception {
     return postForm(url, params, null, connTimeout, readTimeout);
 }

 public static String postParameters(String url, Map<String, String> params, Integer connTimeout,Integer readTimeout) throws ConnectTimeoutException,
         SocketTimeoutException, Exception {
     return postForm(url, params, null, connTimeout, readTimeout);
 }

 public static String get(String url) throws Exception {
     return get(url, charset, null, null);
 }

 public static String get(String url, String charset) throws Exception {
     return get(url, charset, connTimeout, readTimeout);
 }

 /**
  * 发送一个 Post 请求, 使用指定的字符集编码.
  *
  * @param url
  * @param body RequestBody
  * @param mimeType 例如 application/xml "application/x-www-form-urlencoded" a=1&b=2&c=3
  * @param charset 编码
  * @param connTimeout 建立链接超时时间,毫秒.
  * @param readTimeout 响应超时时间,毫秒.
  * @return ResponseBody, 使用指定的字符集编码.
  * @throws ConnectTimeoutException 建立链接超时异常
  * @throws SocketTimeoutException  响应超时
  * @throws Exception
  */
 public static String post(String url, String body, String mimeType,String charset, Integer connTimeout, Integer readTimeout)
         throws ConnectTimeoutException, SocketTimeoutException, Exception {
     HttpClient client = null;
     HttpPost post = new HttpPost(url);
     String result = "";
     try {
         if (StringUtils.isNotBlank(body)) {
             HttpEntity entity = new StringEntity(body, ContentType.create(mimeType, charset));
             post.setEntity(entity);
         }
         // 设置参数
         Builder customReqConf = RequestConfig.custom();
         if (connTimeout != null) {
             customReqConf.setConnectTimeout(connTimeout);
         }
         if (readTimeout != null) {
             customReqConf.setSocketTimeout(readTimeout);
         }
         post.setConfig(customReqConf.build());

         HttpResponse res;
         if (url.startsWith("https")) {
             // 执行 Https 请求.
             client = createSSLInsecureClient();
             res = client.execute(post);
         } else {
             // 执行 Http 请求.
             client = HttpClientUtils.client;
             res = client.execute(post);
         }
         result = IOUtils.toString(res.getEntity().getContent(), charset);
     } finally {
         post.releaseConnection();
         if (url.startsWith("https") && client != null&& client instanceof CloseableHttpClient) {
             ((CloseableHttpClient) client).close();
         }
     }
     return result;
 }

 /**
  * 提交form表单
  *
  * @param url
  * @param params
  * @param connTimeout
  * @param readTimeout
  * @return
  * @throws ConnectTimeoutException
  * @throws SocketTimeoutException
  * @throws Exception
  */
 public static String postForm(String url, Map<String, String> params, Map<String, String> headers, Integer connTimeout,Integer readTimeout) throws ConnectTimeoutException,
         SocketTimeoutException, Exception {

     HttpClient client = null;
     HttpPost post = new HttpPost(url);
     try {
         if (params != null && !params.isEmpty()) {
             List<NameValuePair> formParams = new ArrayList<NameValuePair>();
             Set<Entry<String, String>> entrySet = params.entrySet();
             for (Entry<String, String> entry : entrySet) {
                 formParams.add(new BasicNameValuePair(entry.getKey(), entry.getValue()));
             }
             UrlEncodedFormEntity entity = new UrlEncodedFormEntity(formParams, Consts.UTF_8);
             post.setEntity(entity);
         }

         if (headers != null && !headers.isEmpty()) {
             for (Entry<String, String> entry : headers.entrySet()) {
                 post.addHeader(entry.getKey(), entry.getValue());
             }
         }
         // 设置参数
         Builder customReqConf = RequestConfig.custom();
         if (connTimeout != null) {
             customReqConf.setConnectTimeout(connTimeout);
         }
         if (readTimeout != null) {
             customReqConf.setSocketTimeout(readTimeout);
         }
         post.setConfig(customReqConf.build());
         HttpResponse res = null;
         if (url.startsWith("https")) {
             // 执行 Https 请求.
             client = createSSLInsecureClient();
             res = client.execute(post);
         } else {
             // 执行 Http 请求.
             client = HttpClientUtils.client;
             res = client.execute(post);
         }
         return IOUtils.toString(res.getEntity().getContent(), "UTF-8");
     } finally {
         post.releaseConnection();
         if (url.startsWith("https") && client != null
                 && client instanceof CloseableHttpClient) {
             ((CloseableHttpClient) client).close();
         }
     }
 }

 /**
  * 发送一个 GET 请求
  *
  * @param url
  * @param charset
  * @param connTimeout  建立链接超时时间,毫秒.
  * @param readTimeout  响应超时时间,毫秒.
  * @return
  * @throws ConnectTimeoutException   建立链接超时
  * @throws SocketTimeoutException   响应超时
  * @throws Exception
  */
 public static String get(String url, String charset, Integer connTimeout,Integer readTimeout)
         throws ConnectTimeoutException,SocketTimeoutException, Exception {

     HttpClient client = null;
     HttpGet get = new HttpGet(url);
     String result = "";
     try {
         // 设置参数
         Builder customReqConf = RequestConfig.custom();
         if (connTimeout != null) {
             customReqConf.setConnectTimeout(connTimeout);
         }
         if (readTimeout != null) {
             customReqConf.setSocketTimeout(readTimeout);
         }
         get.setConfig(customReqConf.build());

         HttpResponse res = null;

         if (url.startsWith("https")) {
             // 执行 Https 请求.
             client = createSSLInsecureClient();
             res = client.execute(get);
         } else {
             // 执行 Http 请求.
             client = HttpClientUtils.client;
             res = client.execute(get);
         }

         result = IOUtils.toString(res.getEntity().getContent(), charset);
     } finally {
         get.releaseConnection();
         if (url.startsWith("https") && client != null && client instanceof CloseableHttpClient) {
             ((CloseableHttpClient) client).close();
         }
     }
     return result;
 }

 /**
  * 从 response 里获取 charset
  *
  * @param ressponse
  * @return
  */
 @SuppressWarnings("unused")
 private static String getCharsetFromResponse(HttpResponse ressponse) {
     // Content-Type:text/html; charset=GBK
     if (ressponse.getEntity() != null  && ressponse.getEntity().getContentType() != null && ressponse.getEntity().getContentType().getValue() != null) {
         String contentType = ressponse.getEntity().getContentType().getValue();
         if (contentType.contains("charset=")) {
             return contentType.substring(contentType.indexOf("charset=") + 8);
         }
     }
     return null;
 }

 /**
  * 创建 SSL连接
  * @return
  * @throws GeneralSecurityException
  */
 private static CloseableHttpClient createSSLInsecureClient() throws GeneralSecurityException {
     try {
         SSLContext sslContext = new SSLContextBuilder().loadTrustMaterial(null, new TrustStrategy() {
             public boolean isTrusted(X509Certificate[] chain,String authType) throws CertificateException {
                 return true;
             }
         }).build();

         SSLConnectionSocketFactory sslsf = new SSLConnectionSocketFactory(sslContext, new X509HostnameVerifier() {

             @Override
             public boolean verify(String arg0, SSLSession arg1) {
                 return true;
             }

             @Override
             public void verify(String host, SSLSocket ssl)
                     throws IOException {
             }

             @Override
             public void verify(String host, X509Certificate cert)
                     throws SSLException {
             }

             @Override
             public void verify(String host, String[] cns,
                                String[] subjectAlts) throws SSLException {
             }

         });

         return HttpClients.custom().setSSLSocketFactory(sslsf).build();

     } catch (GeneralSecurityException e) {
         throw e;
     }
 }

 public static void main(String[] args) {
     try {
         String str= post("https://localhost:443/ssl/test.shtml","name=12&page=34","application/x-www-form-urlencoded", "UTF-8", 10000, 10000);
         //String str= get("https://localhost:443/ssl/test.shtml?name=12&page=34","GBK");
         /*Map<String,String> map = new HashMap<String,String>();
         map.put("name", "111");
         map.put("page", "222");
         String str= postForm("https://localhost:443/ssl/test.shtml",map,null, 10000, 10000);*/
         System.out.println(str);
     } catch (ConnectTimeoutException e) {
         // TODO Auto-generated catch block
         e.printStackTrace();
     } catch (SocketTimeoutException e) {
         // TODO Auto-generated catch block
         e.printStackTrace();
     } catch (Exception e) {
         // TODO Auto-generated catch block
         e.printStackTrace();
     }
 }
}
创建回调方法,获取信息。对之前callback方法改写
- 从回调页面中获取扫码人信息并把信息加入到数据库,获取扫码人信息的过程由微信规定并在之前编写 ```java @Autowired private UcenterMemberService memberService;
@ApiOperation(value = “获取扫描人信息添加数据”) @GetMapping(“callback”) public String callback(String code, String state) {
System.out.println("code:"+code);
System.out.println("state:"+state);
try {
//1 获取code值,临时票据,类似于验证码
//2 拿着code请求 微信固定的地址,得到两个值 accsess_token 和 openid
String baseAccessTokenUrl = "https://api.weixin.qq.com/sns/oauth2/access_token" +
"?appid=%s" +
"&secret=%s" +
"&code=%s" +
"&grant_type=authorization_code";
//拼接三个参数 :id 秘钥 和 code值
String accessTokenUrl = String.format(
baseAccessTokenUrl,
ConstantWxUtils.WX_OPEN_APP_ID,
ConstantWxUtils.WX_OPEN_APP_SECRET,
code
);
//请求这个拼接好的地址,得到返回两个值 accsess_token 和 openid
//使用httpclient发送请求,得到返回结果
String accessTokenInfo = HttpClientUtils.get(accessTokenUrl);
System.out.println("accessTokenInfo:"+accessTokenInfo);
//从accessTokenInfo字符串获取出来两个值 accsess_token 和 openid
//把accessTokenInfo字符串转换map集合,根据map里面key获取对应值
//使用json转换工具 Gson
Gson gson = new Gson();
HashMap mapAccessToken = gson.fromJson(accessTokenInfo, HashMap.class);
String access_token = (String)mapAccessToken.get("access_token");
String openid = (String)mapAccessToken.get("openid");
//把扫描人信息添加数据库里面
//判断数据表里面是否存在相同微信信息,根据openid判断
UcenterMember member = memberService.getOpenIdMember(openid);
if(member == null) {//memeber是空,表没有相同微信数据,进行添加
//3 拿着得到accsess_token 和 openid,再去请求微信提供固定的地址,获取到扫描人信息
//访问微信的资源服务器,获取用户信息
String baseUserInfoUrl = "https://api.weixin.qq.com/sns/userinfo" +
"?access_token=%s" +
"&openid=%s";
//拼接两个参数
String userInfoUrl = String.format(
baseUserInfoUrl,
access_token,
openid
);
//发送请求
String userInfo = HttpClientUtils.get(userInfoUrl);
System.out.println("userInfo:"+userInfo);
//获取返回userinfo字符串扫描人信息
HashMap userInfoMap = gson.fromJson(userInfo, HashMap.class);
String nickname = (String)userInfoMap.get("nickname");//昵称
String headimgurl = (String)userInfoMap.get("headimgurl");//头像
member = new UcenterMember();
member.setOpenid(openid);
member.setNickname(nickname);
member.setAvatar(headimgurl);
memberService.save(member);
}
//使用jwt根据member对象生成token字符串
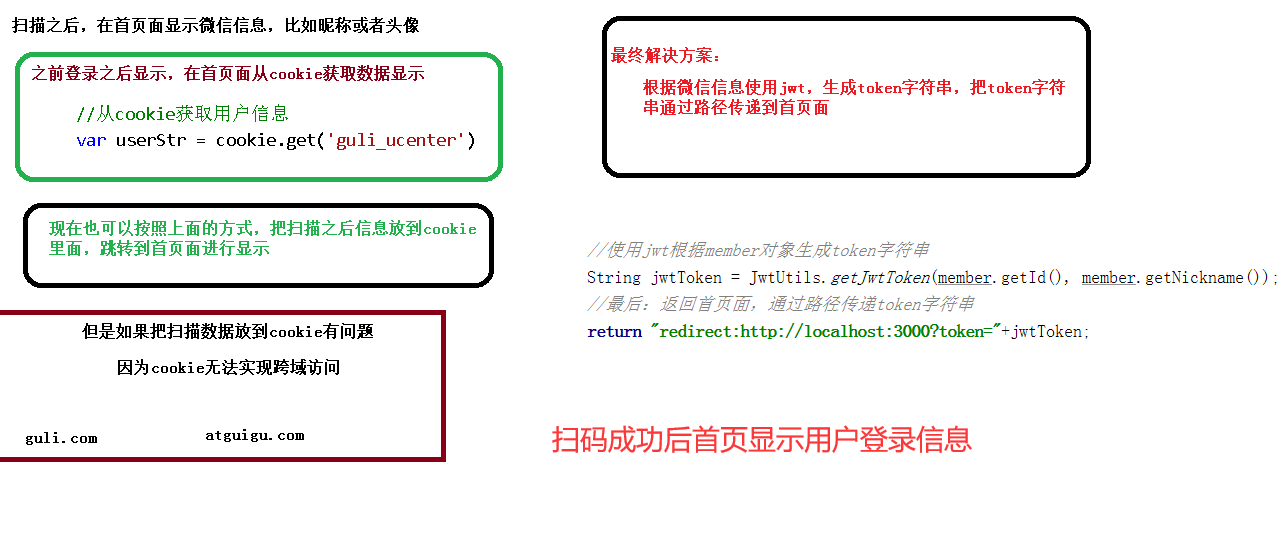
String jwtToken = JwtUtils.getJwtToken(member.getId(), member.getNickname());
//最后:返回首页面,通过路径传递token字符串
return "redirect:http://localhost:3000?token="+jwtToken;
}catch(Exception e) {
throw new GuliException(20001,"登录失败");
}
}
//扫描之后,在首页显示微信信息,比如昵称和头像。之前登录之后显示,在首页面从cookie获取数据显示 //现在也可以按照之前的方式,把扫描之后信息放到cookie里面,跳转到首页面进行显示,但是如果把扫码数 //据放到cookie有问题,因为cookie无法实现跨域访问。
//最终解决方案:根据微信信息使用jwt,生成token字符串,把token字符串通过路径传递到首页。
4. 创建业务类
```java
//根据openid判断
@Override
public UcenterMember getOpenIdMember(String openid) {
QueryWrapper<UcenterMember> wrapper = new QueryWrapper<>();
wrapper.eq("openid",openid);
UcenterMember member = baseMapper.selectOne(wrapper);
return member;
}

前端
修改default.vue页面脚本
import loginApi from '@/api/login'

created() {
    //获取路径里面token值
    this.token = this.$route.query.token
    if(this.token) {//判断路径中是否有token值
      this.wxLogin()
    }

    this.showInfo()
  },
  methods: {
    //微信登录显示的方法
    wxLogin() {
      //把token值放到cookie里面
      cookie.set('guli_token',this.token,{domain: 'localhost'})
      cookie.set('guli_ucenter','',{domain: 'localhost'})
      //调用接口,根据token值获取用户信息
      loginApi.getLoginUserInfo()
        .then(response => {
          this.loginInfo = response.data.data.userInfo
          cookie.set('guli_ucenter',this.loginInfo,{domain: 'localhost'})
        })
    },
}
注:注意nginx配置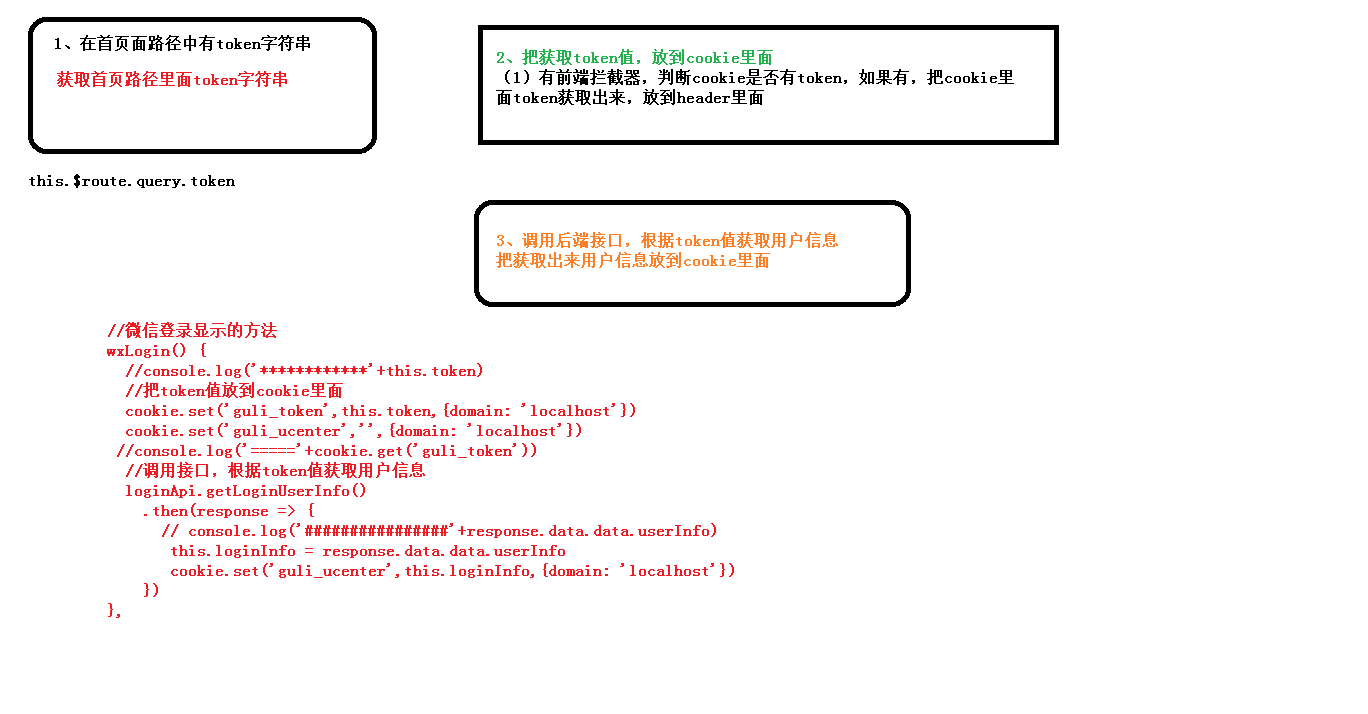

若有收获,就点个赞吧
0 人点赞
