CSS作用域
作用域即使加了scoped,也会有穿透,这应该是Vue的BUG。
解决方案:在<template></template>标签下加一个根div。
组件通信-父子
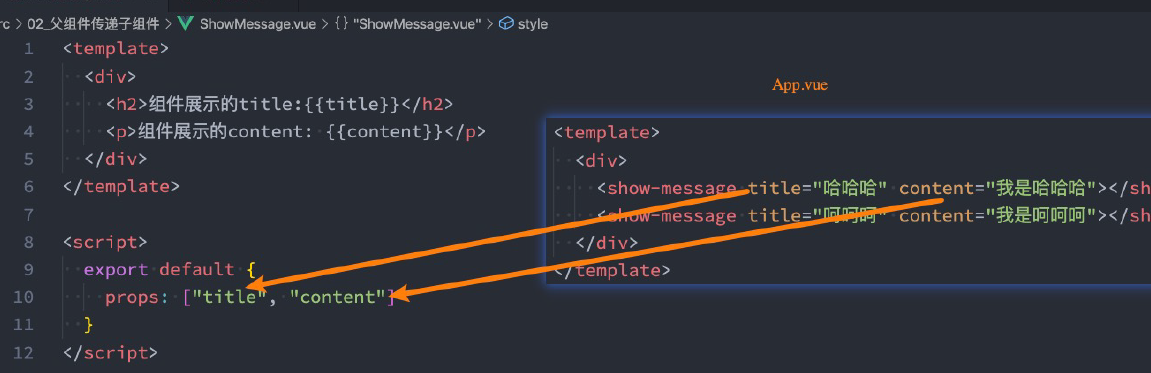
01.父->子:props
props数组用法(用的不多)
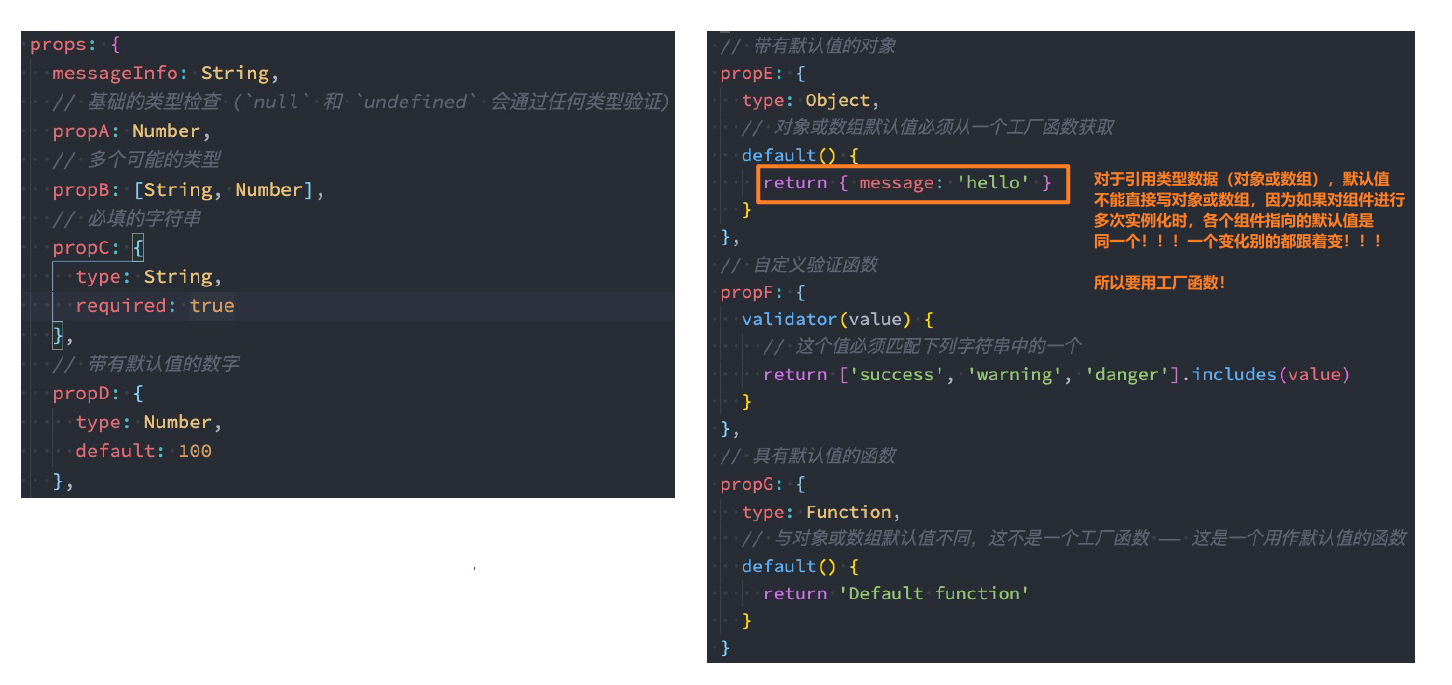
props对象用法(可以做更多约束)
可以传入的类型
- String
- Number
- Boolean
- Array
- Object
- Date
- Function
- Symbol

02.子->父:事件
同Props,事件的定义方式也是有两种:数组方式&对象方式。
对象方式同样也是为了验证。
<template><div><button @click="increment">+1</button><button @click="decrement">-1</button><input type="text" v-model.number="num"><button @click="incrementN">+n</button></div></template><script>export default {// emits: ["add", "sub", "addN"],// 对象写法的目的是为了进行参数的验证emits: {add: null,sub: null,addN: (num, name, age) => {console.log(num, name, age);// 以下便是数据验证if (num > 10) {return true}return false;}},data() {return {num: 0}},methods: {increment() {console.log("+1");this.$emit("add");},decrement() {console.log("-1");this.$emit("sub");},incrementN() {this.$emit('addN', this.num, "why", 18);}}}</script>
<template><div><h2>当前计数: {{counter}}</h2><counter-operation @add="addOne"@sub="subOne"@addN="addNNum"></counter-operation></div></template><script>import CounterOperation from './CounterOperation.vue';export default {components: {CounterOperation},data() {return {counter: 0}},methods: {addOne() {this.counter++},subOne() {this.counter--},addNNum(num, name, age) {console.log(name, age);this.counter += num;}}}</script>
03.综合小案例:Tab栏切换
<template><div class="tab-control"><div class="tab-control-item":class="{ active: currentIndex === index }"v-for="(title, index) in titles":key="title"@click="itemClick(index)"><span>{{ title }}</span></div></div></template><script lang="ts" setup>import { PropType, ref } from 'vue';const emit = defineEmits(['titleClick'])const props = defineProps({titles: {type: Array as PropType<string[]>,required: true}})const currentIndex = ref(0)const itemClick = (index: number) => {currentIndex.value = indexemit('titleClick', index) // 发射事件,并传入index参数}</script><style scoped>.tab-control {display: flex;}.tab-control-item {flex: 1;text-align: center;}.tab-control-item.active {color: red;}.tab-control-item.active span {border-bottom: 3px solid red;/** 这个padding太妙了呀!!! */padding: 5px 10px;}</style>
上面这个组件中用到的知识点非常多:
- 动态样式,
:class必须以冒号开头 <script setup>中定义事件和发射事件的方法:用定义事件后返回的对象来发射事件,优雅!- css技巧:原来Tab栏的border-bottom比字体要宽而且离字体有些距离,是通过设置span的padding值来实现的!!!
```vue
{{ contents[currentIndex] }}
```
04.爷爷->孙子: 依赖注入
直接看官网:https://staging-cn.vuejs.org/guide/components/provide-inject.html
05.兄弟之间
可以设置一个公共父组件
也可以直接使用Pinia!

若有收获,就点个赞吧
0 人点赞
