一、概述
MyBatis Generator是MyBatis的代码生成器,可以根据数据库生成model、mapper.xml、mapper接口和Example,通常情况下的单表查询不用再手写mapper。
创建目录结构: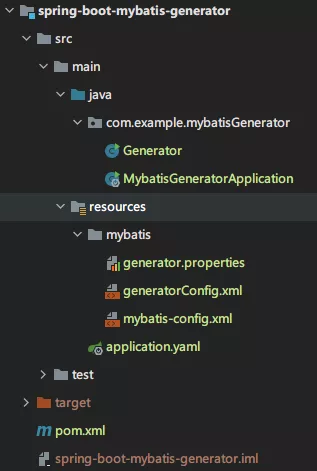
有如下数据库和数据表:
二、配置
依赖
<!-- MyBatis 生成器 --><dependency><groupId>org.mybatis.generator</groupId><artifactId>mybatis-generator-core</artifactId><version>1.3.7</version></dependency>
配置
首先创建生成器的启动程序:
import org.mybatis.generator.api.MyBatisGenerator;
import org.mybatis.generator.config.Configuration;
import org.mybatis.generator.config.xml.ConfigurationParser;
import org.mybatis.generator.internal.DefaultShellCallback;

import java.io.InputStream;
import java.util.ArrayList;
import java.util.List;

public class Generator {
    public static void main(String[] args) throws Exception {
        //MBG 执行过程中的警告信息
        List<String> warnings = new ArrayList<String>();
        //当生成的代码重复时,覆盖原代码
        boolean overwrite = true;
        //读取我们的 MBG 配置文件
        InputStream is = Generator.class.getResourceAsStream("/mybatis/generatorConfig.xml");
        ConfigurationParser cp = new ConfigurationParser(warnings);
        Configuration config = cp.parseConfiguration(is);
        is.close();

        DefaultShellCallback callback = new DefaultShellCallback(overwrite);
        //创建 MBG
        MyBatisGenerator myBatisGenerator = new MyBatisGenerator(config, callback, warnings);
        //执行生成代码
        myBatisGenerator.generate(null);
        //输出警告信息
        for (String warning : warnings) {
            System.out.println(warning);
        }
    }
}
这里需要加载一个 generatorConfig.xml 的配置文件,在resources下创建一个:
<?xml version="1.0" encoding="UTF-8"?>
<!DOCTYPE generatorConfiguration
PUBLIC "-//mybatis.org//DTD MyBatis Generator Configuration 1.0//EN"
"http://mybatis.org/dtd/mybatis-generator-config_1_0.dtd">
<generatorConfiguration>
<properties resource="mybatis/generator.properties"/>
<context id="MySqlContext" targetRuntime="MyBatis3" defaultModelType="flat">
<property name="beginningDelimiter" value="`"/>
<property name="endingDelimiter" value="`"/>
<property name="javaFileEncoding" value="UTF-8"/>
<!-- 为模型生成序列化方法-->
<plugin type="org.mybatis.generator.plugins.SerializablePlugin"/>
<!-- 为生成的Java模型创建一个toString方法 -->
<plugin type="org.mybatis.generator.plugins.ToStringPlugin"/>
<!--可以自定义生成model的代码注释-->
<!-- <commentGenerator type="com.example.mybatisGenerator.mbg.CommentGenerator">-->
<!-- <!– 是否去除自动生成的注释 true:是 : false:否 –>-->
<!-- <property name="suppressAllComments" value="true"/>-->
<!-- <property name="suppressDate" value="true"/>-->
<!-- <property name="addRemarkComments" value="true"/>-->
<!-- </commentGenerator>-->
<!--配置数据库连接-->
<jdbcConnection driverClass="${jdbc.driverClass}"
connectionURL="${jdbc.connectionURL}"
userId="${jdbc.userId}"
password="${jdbc.password}">
<!--解决mysql驱动升级到8.0后不生成指定数据库代码的问题-->
<property name="nullCatalogMeansCurrent" value="true" />
</jdbcConnection>
<!--指定生成model的路径-->
<javaModelGenerator targetPackage="com.example.mybatisGenerator.mbg.model" targetProject="spring-boot-mybatis\spring-boot-mybatis-generator\src\main\java"/>
<!--指定生成mapper.xml的路径-->
<sqlMapGenerator targetPackage="com.example.mybatisGenerator.mbg.mapper" targetProject="spring-boot-mybatis\spring-boot-mybatis-generator\src\main\resources"/>
<!--指定生成mapper接口的的路径-->
<javaClientGenerator type="XMLMAPPER" targetPackage="com.example.mybatisGenerator.mbg.mapper"
targetProject="spring-boot-mybatis\spring-boot-mybatis-generator\src\main\java"/>
<!--生成全部表tableName设为%-->
<!-- <table tableName="%">-->
<!-- <generatedKey column="id" sqlStatement="MySql" identity="true"/>-->
<!-- </table>-->
<!--用户表-->
<table tableName="user">
<generatedKey column="id" sqlStatement="MySql" identity="true"/>
</table>
<!--订单表-->
<table tableName="order">
<generatedKey column="id" sqlStatement="MySql" identity="true"/>
</table>
</context>
</generatorConfiguration>
可以看到,上面有两处被注释的xml:
- 第一个注释位置,在生成model时为代码添加注释,之后详细说明
- 第二个注释位置,如果需要将数据库里的所有表都生成对应的model,则可以将
tableName指定为%,如果只需要生成部分表的model,则分别列出来即可
配置中有一句:
<properties resource="generator.properties"/>
用于指定生成器的数据库连接配置,generator.properties内容如下:
jdbc.driverClass=com.mysql.cj.jdbc.Driver
jdbc.connectionURL=jdbc:mysql://localhost:3306/test?useUnicode=true&characterEncoding=utf-8&serverTimezone=Asia/Shanghai
jdbc.userId=root
jdbc.password=root
一切准备就绪,运行 Generator.java 的main方法即可。
生成好的结构如下: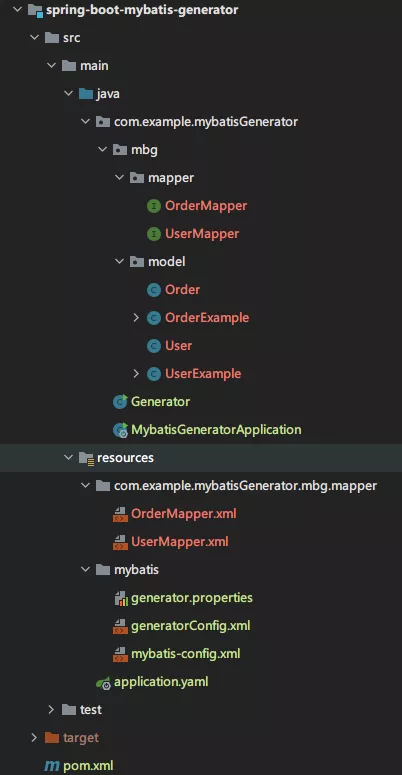
对应地,application.yaml 也需要修改:
server:
  port: 8026
mybatis:
  type-aliases-package: com.example.mybatisGenerator.mbg.model
  config-location: classpath:mybatis/mybatis-config.xml
  mapper-locations:
    - classpath:mapper/*.xml
    - classpath*:com/**/mapper/*.xml
spring:
  datasource:
    driver-class-name: com.mysql.cj.jdbc.Driver
    url: jdbc:mysql://localhost:3306/test?serverTimezone=UTC&useUnicode=true&characterEncoding=utf-8&useSSL=true
    username: root
    password: root
主要是 mapper-locations 添加了一个生成的mapper路径。
三、添加注释
前面的配置文件中,有一处注释,使用来为生成的model添加注释的:
<!--可以自定义生成model的代码注释-->
<commentGenerator type="com.example.mybatisGenerator.CommentGenerator">
  <!-- 是否去除自动生成的注释 true:是 : false:否 -->
  <property name="suppressAllComments" value="true"/>
  <property name="suppressDate" value="true"/>
  <property name="addRemarkComments" value="true"/>
</commentGenerator>
里面指定了生成注释的类 CommentGenerator,创建这个类:
import org.mybatis.generator.api.IntrospectedColumn;
import org.mybatis.generator.api.IntrospectedTable;
import org.mybatis.generator.api.dom.java.CompilationUnit;
import org.mybatis.generator.api.dom.java.Field;
import org.mybatis.generator.api.dom.java.FullyQualifiedJavaType;
import org.mybatis.generator.internal.DefaultCommentGenerator;
import org.mybatis.generator.internal.util.StringUtility;

import java.util.Properties;

public class CommentGenerator extends DefaultCommentGenerator {
    private boolean addRemarkComments = false;
    private static final String EXAMPLE_SUFFIX="Example";
    private static final String API_MODEL_PROPERTY_FULL_CLASS_NAME="io.swagger.annotations.ApiModelProperty";

    /**
     * 设置用户配置的参数
     */
    @Override
    public void addConfigurationProperties(Properties properties) {
        super.addConfigurationProperties(properties);
        this.addRemarkComments = StringUtility.isTrue(properties.getProperty("addRemarkComments"));
    }

    /**
     * 给字段添加注释
     */
    @Override
    public void addFieldComment(Field field, IntrospectedTable introspectedTable,
                                IntrospectedColumn introspectedColumn) {
        String remarks = introspectedColumn.getRemarks();
        //根据参数和备注信息判断是否添加备注信息
        if(addRemarkComments&&StringUtility.stringHasValue(remarks)){
//            addFieldJavaDoc(field, remarks);
            //数据库中特殊字符需要转义
            if(remarks.contains("\"")){
                remarks = remarks.replace("\"","'");
            }
            //给model的字段添加swagger注解
            field.addJavaDocLine("@ApiModelProperty(value = \""+remarks+"\")");
        }
    }

    /**
     * 给model的字段添加注释
     */
    private void addFieldJavaDoc(Field field, String remarks) {
        //文档注释开始
        field.addJavaDocLine("/**");
        //获取数据库字段的备注信息
        String[] remarkLines = remarks.split(System.getProperty("line.separator"));
        for(String remarkLine:remarkLines){
            field.addJavaDocLine(" * "+remarkLine);
        }
        addJavadocTag(field, false);
        field.addJavaDocLine(" */");
    }

    @Override
    public void addJavaFileComment(CompilationUnit compilationUnit) {
        super.addJavaFileComment(compilationUnit);
        //只在model中添加swagger注解类的导入
        if(!compilationUnit.isJavaInterface()&&!compilationUnit.getType().getFullyQualifiedName().contains(EXAMPLE_SUFFIX)){
            compilationUnit.addImportedType(new FullyQualifiedJavaType(API_MODEL_PROPERTY_FULL_CLASS_NAME));
        }
    }
}
这里主要是为model添加了swagger的注解,会根据数据表的注释添加注解。
生成的模型大概长这样:
四、使用Lombok
默认MyBatis Generator会生成带getter和setter的模型,看起来代码会不够整洁。如果想使用Lombok,可以使用插件mybatis-generator-lombok-plugin
添加依赖:
<dependency>
    <groupId>com.softwareloop</groupId>
    <artifactId>mybatis-generator-lombok-plugin</artifactId>
    <version>1.0</version>
</dependency>
修改generatorConfig.xml配置文件:
<context id="MySqlContext" targetRuntime="MyBatis3" defaultModelType="flat">
  <plugin type="com.softwareloop.mybatis.generator.plugins.LombokPlugin">
    <property name="builder" value="true"/>
    <property name="builder.fluent" value="true"/>
    <property name="builder.builderMethodName" value="myBuilder"/>
    <property name="accessors" value="true"/>
    <property name="accessors.prefix" value="m_, _"/>
    <property name="allArgsConstructor" value="true"/>
    <property name="noArgsConstructor" value="true"/>
    <property name="toString" value="true"/>
  </plugin>

  ...
</context>
因为lombok中添加了toString的注释,所以可以删除以下插件:
<!-- 为生成的Java模型创建一个toString方法 -->
<plugin type="org.mybatis.generator.plugins.ToStringPlugin"/>
ok,运行Generator,会看到生成的模型长这样:
package com.example.mybatisGenerator.mbg.model;

import io.swagger.annotations.ApiModelProperty;
import java.io.Serializable;
import lombok.AllArgsConstructor;
import lombok.Builder;
import lombok.Data;
import lombok.NoArgsConstructor;
import lombok.ToString;

@Data
@Builder
@AllArgsConstructor
@NoArgsConstructor
@ToString
public class User implements Serializable {
    @ApiModelProperty(value = "用户ID")
    private Long id;

    @ApiModelProperty(value = "用户名")
    private String userName;

    @ApiModelProperty(value = "密码")
    private String passWord;

    @ApiModelProperty(value = "性别")
    private String userSex;

    @ApiModelProperty(value = "昵称")
    private String nickName;

    private static final long serialVersionUID = 1L;
}
五、使用生成的模型
在控制器中使用:
import com.example.mybatisGenerator.mbg.mapper.UserMapper;
import com.example.mybatisGenerator.mbg.model.User;
import com.example.mybatisGenerator.mbg.model.UserExample;
import org.springframework.beans.factory.annotation.Autowired;
import org.springframework.web.bind.annotation.GetMapping;
import org.springframework.web.bind.annotation.RequestParam;
import org.springframework.web.bind.annotation.ResponseBody;
import org.springframework.web.bind.annotation.RestController;

import java.util.List;

@RestController
public class UserController {
    @Autowired
    private UserMapper userMapper;

    @GetMapping("/test")
    @ResponseBody
    public Object test(@RequestParam String username) {
        UserExample example = new UserExample();
        example.createCriteria().andUserNameEqualTo(username);

        List<User> userList = userMapper.selectByExample(example);

        if (userList != null && userList.size() > 0) {
            return userList.get(0);
        }

        return null;
    }
}
测试:http://localhost:8026/test?username=xiaoyu
当然,上面代码只是为了测试方便,通常我们还应该创建service进行调用:
package com.example.mybatisGenerator.service;

import com.example.mybatisGenerator.mbg.model.User;

public interface UserService {
    User getUserByUsername(String username);
}
package com.example.mybatisGenerator.service.impl;

import com.example.mybatisGenerator.mbg.mapper.UserMapper;
import com.example.mybatisGenerator.mbg.model.User;
import com.example.mybatisGenerator.mbg.model.UserExample;
import com.example.mybatisGenerator.service.UserService;
import org.springframework.beans.factory.annotation.Autowired;
import org.springframework.stereotype.Service;

import java.util.List;

@Service
public class UserServiceImpl implements UserService {
    @Autowired
    private UserMapper userMapper;

    @Override
    public User getUserByUsername(String username) {
        UserExample example = new UserExample();
        example.createCriteria().andUserNameEqualTo(username);

        List<User> userList = userMapper.selectByExample(example);

        if (userList != null && userList.size() > 0) {
            return userList.get(0);
        }

        return null;
    }
}
package com.example.mybatisGenerator.controller;

import com.example.mybatisGenerator.common.Result;
import com.example.mybatisGenerator.mbg.model.User;
import com.example.mybatisGenerator.service.UserService;
import org.springframework.beans.factory.annotation.Autowired;
import org.springframework.web.bind.annotation.GetMapping;
import org.springframework.web.bind.annotation.RequestParam;
import org.springframework.web.bind.annotation.ResponseBody;
import org.springframework.web.bind.annotation.RestController;

@RestController
public class UserController {
    @Autowired
    private UserService userService;

    @GetMapping("/test")
    @ResponseBody
    public Result test(@RequestParam String username) {
        User user = userService.getUserByUsername(username);
        if (user == null) {
            return Result.error("error");
        }

        return Result.ok(user);
    }
}
其中Result类参考:
语雀内容
访问:http://localhost:8026/test?username=xiaoyu,结果: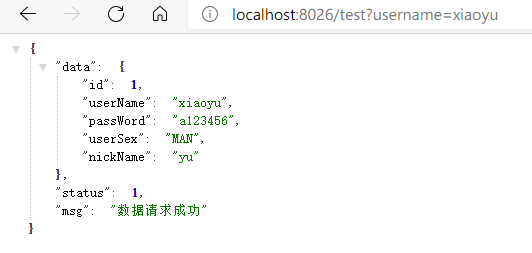
参考资料

若有收获,就点个赞吧
0 人点赞
