一、配置文件
默认 springBoot 项目使用 application.properties 文件进行配置, 但我们也可以使用 yaml 文件进行配置。
application.yaml
server:port: 8080 #端口配置servlet:context-path: /api # 路由前缀spring:http:multipart:maxFileSize: -1 # 最大文件上传大小,-1为不限制application:name: SpringBootDemo # 实例名# 配置数据源datasource:driver-class-name: com.mysql.cj.jdbc.Driver # 数据库驱动url: jdbc:mysql://localhost:3306/award?useUnicode=true&characterEncoding=utf8&serverTimezone=UTCusername: rootpassword: root# JPAjpa:database: MYSQL # 数据库类型showSql: true # 控制台是否打印sql语句properties:hibernate:dialect: org.hibernate.dialect.MySQL5Dialect # hql方言
二、引用配置参数
@Value
@RestController
@RequestMapping(value="/test", produces="application/json; charset=utf-8")
public class TestController {
    @Value("${spring.application.name}")
    private String visitorName;

    @RequestMapping(value = "/say", method = RequestMethod.GET)
    public String sayHello () {
        return "Hello " + this.visitorName;
    }
}
使用 @Value 注解,可以直接将属性值注入到beans中,然后通过Spring的Environment抽象或通过@ConfigurationProperties绑定到结构化对象来访问。
以上,通过 @Value("${spring.application.name}") 引用了配置参数, 此时 visitorName 将被赋值为 ‘SpringBootDemo’
它的好处不言而喻:
- 定义在配置文件里,变量发生变化,无需修改代码。
- 变量交给Spring来管理,性能更好。
@ConfigurationProperties
@ConfigurationProperties 可以将外部配置文件(application.yml 或 applicaition.properties)加载进来,填充对象的对应字段的数据,然后供其他Bean使用。
比如有如下结构的属性文件:
app:
  developer:
    name: xiaoxiao昱
    website: https://www.xiaoyulive.top
通过 @ConfigurationProperties 绑定:
@Data
@ConfigurationProperties(prefix = "app.developer")
@Component
public class DeveloperProperty {
    private String name;
    private String website;
}
@PropertySource
如果想要指定配置来源,可以使用 @PropertySource 注解。
@Data
@PropertySource("classpath:application.yml") // 指明配置源文件位置
@ConfigurationProperties(prefix = "app.developer") // 指明配置前缀
@Configuration   // 配置类注解,被自动扫描发现
public class DeveloperProperty {
    private String name;
    private String website;
}
三、注入随机值
在配置文件中可以注入随机值, 比如:
my.secret=${random.value}
my.number=${random.int}
my.bignumber=${random.long}
my.number.less.than.ten=${random.int(10)}
my.number.in.range=${random.int[1024,65536]}
四、配置文件加载顺序
SpringApplication将从以下位置加载application.properties文件,并把它们添加到Spring Environment中:
file:./config/file:./classpath:/config/classpath:/
该列表是按优先级排序的(列表中位置高的路径下定义的属性将覆盖位置低的)。
使用了 spring.config.location 配置自定义配置位置时,默认位置配置将被替代。例如,如果 spring.config.location 配置为 classpath:/custom-config/,file:./custom-config/,搜索顺序将变为以下:
file:./custom-config/classpath:custom-config/file:./config/file:./classpath:/config/classpath:/
五、属性占位符
当使用application.properties定义的属性时,Spring会先通过已经存在的Environment查找该属性,所以你可以引用事先定义的值(比如,系统属性):
app.name=MyApp
app.description=${app.name} is a Spring Boot application
如果要引入pom.xml中定义的值,可以使用 % 包裹:
application:
  artifactId: artifactId: @artifactId@
  version: version: @version@
六、自定义配置
有的时候,我们需要在配置中加入自定义配置,但是IDE却不认识,会在下面打波浪线,这对于有强迫症的我们来说简直不能忍受。比如:
jwt:
  tokenHeader: Authorization
  secret: admin-secret
  expiration: 604800
  tokenHead: Bearer
我们可以为其创建一个配置类:
@Data
@Configuration
@PropertySource("classpath:application.yaml")
@ConfigurationProperties(prefix = "jwt", ignoreUnknownFields = true)
@EnableConfigurationProperties(JwtConfig.class)
public class JwtConfig {
    private String tokenHeader;
    private String secret;
    private Integer expiration;
    private String tokenHead;
}
这样,波浪线就消失了。
可以在 resources/META-INF 下创建一个 additional-spring-configuration-metadata.json 文件定义这些配置:
{
    "properties": [
        {
            "name": "jwt.tokenHeader",
            "type": "java.lang.String",
            "description": "Description for jwt.tokenHeader."
        },
        {
            "name": "jwt.secret",
            "type": "java.lang.String",
            "description": "Description for jwt.secret."
        },
        {
            "name": "jwt.expiration",
            "type": "java.lang.String",
            "description": "Description for jwt.expiration."
        },
        {
            "name": "jwt.tokenHead",
            "type": "java.lang.String",
            "description": "Description for jwt.tokenHead."
        }
    ]
}
七、多环境配置
除了 application.properties 文件,profile-specific 属性也能通过命名惯例 application-{profile}.properties 定义。Environment(Spring的环境抽象接口)有个默认profiles集合(默认情况为[default]),在没有设置激活的 profiles 时会被使用(例如,如果没有明确指定激活的 profiles, application-default.properties 中的属性会被加载)。
在 application.yml 中添加:
spring:
  profiles:
    active: dev
含义是指定当前项目的默认环境为 dev,即项目启动时如果不指定任何环境,Spring Boot 会自动从 dev 环境文件中读取配置信息。我们可以将不同环境都共同的配置信息写到这个文件中。
然后创建多环境配置文件,文件名的格式为:application-{profile}.yml,其中,{profile} 替换为环境名字,如 application-dev.yml,我们可以在其中添加当前环境的配置信息,如添加数据源:
spring:
  datasource:
    driver-class-name: com.mysql.cj.jdbc.Driver
    url: jdbc:mysql://localhost:3306/test?serverTimezone=UTC&useUnicode=true&characterEncoding=utf-8&useSSL=true
    username: root
    password: root
这样,我们就实现了多环境的配置,每次编译打包我们无需修改任何东西,编译为 jar 文件后,运行命令:
java -jar api.jar --spring.profiles.active=dev

java -jar api.jar --spring.profiles.active=prod
如果在 Idea 中开发, 可以使用如下配置: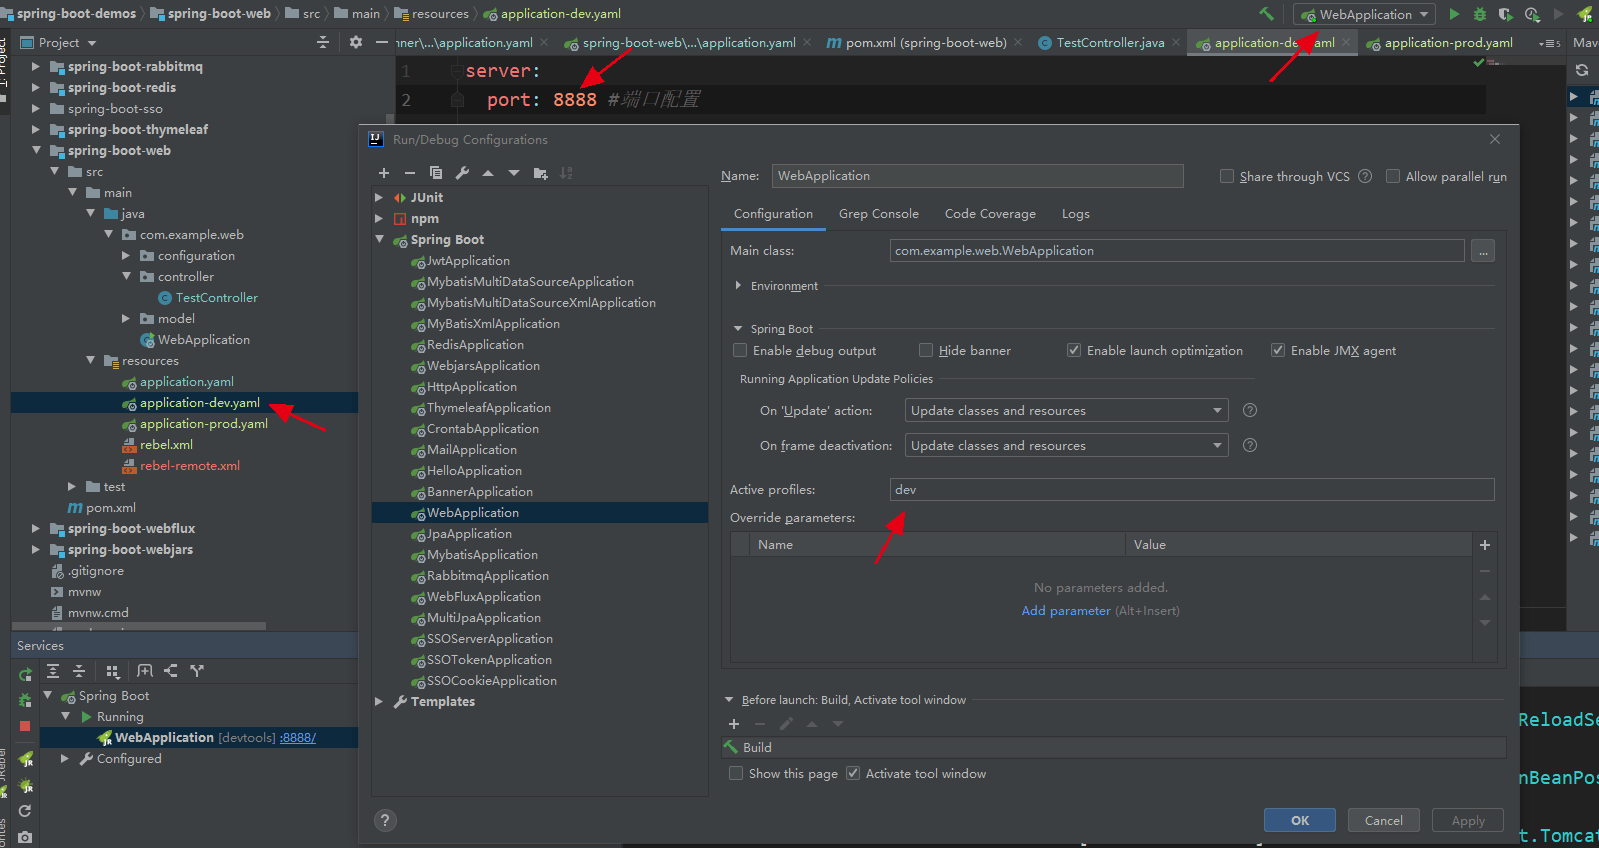

若有收获,就点个赞吧
0 人点赞
