作用
本地做开发调试的时候自动的重新监听文件的变化,然后进程项目代码的重新编译运行。
windows环境下, 集成到GIN
第一步 安装:
D:\code\go\xmly_flow_pro>go get -u github.com/cosmtrek/air
第二步 定义 .air.conf文件:
# Config file for [Air](https://github.com/cosmtrek/air) in TOML format# Working directory# . or absolute path, please note that the directories following must be under root.root = "."tmp_dir = "tmp"[build]# Just plain old shell command. You could use `make` as well.cmd = "go build -o ./tmp/main ."# Binary file yields from `cmd`.bin = "tmp/main"# Customize binary.full_bin = "APP_ENV=dev APP_USER=air ./tmp/main"# Watch these filename extensions.include_ext = ["go", "tpl", "tmpl", "html"]# Ignore these filename extensions or directories.exclude_dir = ["assets", "tmp", "vendor", "frontend/node_modules"]# Watch these directories if you specified.include_dir = []# Exclude files.exclude_file = []# This log file places in your tmp_dir.log = "air.log"# It's not necessary to trigger build each time file changes if it's too frequent.delay = 1000 # ms# Stop running old binary when build errors occur.stop_on_error = true# Send Interrupt signal before killing process (windows does not support this feature)send_interrupt = false# Delay after sending Interrupt signalkill_delay = 500 # ms[log]# Show log timetime = false[color]# Customize each part's color. If no color found, use the raw app log.main = "magenta"watcher = "cyan"build = "yellow"runner = "green"[misc]# Delete tmp directory on exitclean_on_exit = true
第三步当前目录下,执行air 启动项目:
D:\code\go\xmly_flow_pro>air -c .air.conf
错误提示:
修改配置文件信息:
# [Air](https://github.com/cosmtrek/air) TOML 格式的配置文件# 工作目录# 使用 . 或绝对路径,请注意 `tmp_dir` 目录必须在 `root` 目录下root = "."tmp_dir = "tmp"[build]# 只需要写你平常编译使用的shell命令。你也可以使用 `make`# Windows平台示例: cmd = "go build -o ./tmp/main.exe ."cmd = "go build -o ./tmp/main ."# 由`cmd`命令得到的二进制文件名# Windows平台示例:bin = "tmp/main.exe"bin = "tmp/main"# 自定义执行程序的命令,可以添加额外的编译标识例如添加 GIN_MODE=release# Windows平台示例:full_bin = "./tmp/main.exe"full_bin = "APP_ENV=dev APP_USER=air ./tmp/main"# 监听以下文件扩展名的文件.include_ext = ["go", "tpl", "tmpl", "html"]# 忽略这些文件扩展名或目录exclude_dir = ["assets", "tmp", "vendor", "frontend/node_modules"]# 监听以下指定目录的文件include_dir = []# 排除以下文件exclude_file = []# 如果文件更改过于频繁,则没有必要在每次更改时都触发构建。可以设置触发构建的延迟时间delay = 1000 # ms# 发生构建错误时,停止运行旧的二进制文件。stop_on_error = true# air的日志文件名,该日志文件放置在你的`tmp_dir`中log = "air_errors.log"[log]# 显示日志时间time = true[color]# 自定义每个部分显示的颜色。如果找不到颜色,使用原始的应用程序日志。main = "magenta"watcher = "cyan"build = "yellow"runner = "green"[misc]# 退出时删除tmp目录clean_on_exit = true
继续启动:
D:\code\go\xmly_flow_pro>air -c .air.conf
依然提示: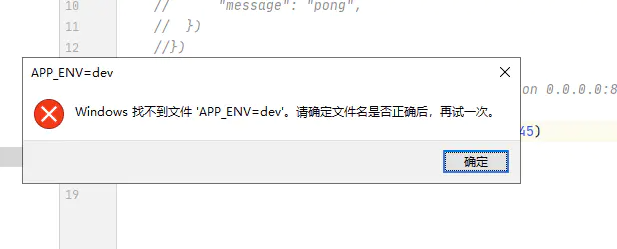
修改配置文件中存在
# 自定义执行程序的命令,可以添加额外的编译标识例如添加 GIN_MODE=release# Windows平台示例:full_bin = "./tmp/main.exe" full_bin = "APP_ENV=dev APP_USER=air ./tmp/main"full_bin = "./tmp/main.exe"
再继续执行:
D:\code\go\xmly_flow_pro>air -c .air.conf
第4步验证热重载:
修改代码查看热更新成功!

若有收获,就点个赞吧
0 人点赞
