一、前言
由于Spring Boot能够快速开发、便捷部署等特性,相信有很大一部分Spring Boot的用户会用来构建RESTful API。传统做法我们会创建一份RESTful API文档来记录所有接口细节,然而这样的做法有以下几个问题:
- 由于接口众多,并且细节复杂(需要考虑不同的HTTP请求类型、HTTP头部信息、HTTP请求内容等),高质量地创建这份文档本身就是件非常吃力的事,下游的抱怨声不绝于耳
- 随着时间推移,不断修改接口实现的时候都必须同步修改接口文档,而文档与代码又处于两个不同的媒介,除非有严格的管理机制,不然很容易导致不一致现象
为了解决上面这样的问题,本文将介绍RESTful API的重磅好伙伴Swagger2,它可以轻松的整合到Spring Boot中,并与Spring MVC程序配合组织出强大RESTful API文档。它既可以减少我们创建文档的工作量,同时说明内容又整合入实现代码中,让维护文档和修改代码整合为一体,可以让我们在修改代码逻辑的同时方便的修改文档说明。另外Swagger2也提供了强大的页面测试功能来调试每个RESTful API。具体效果如下图所示: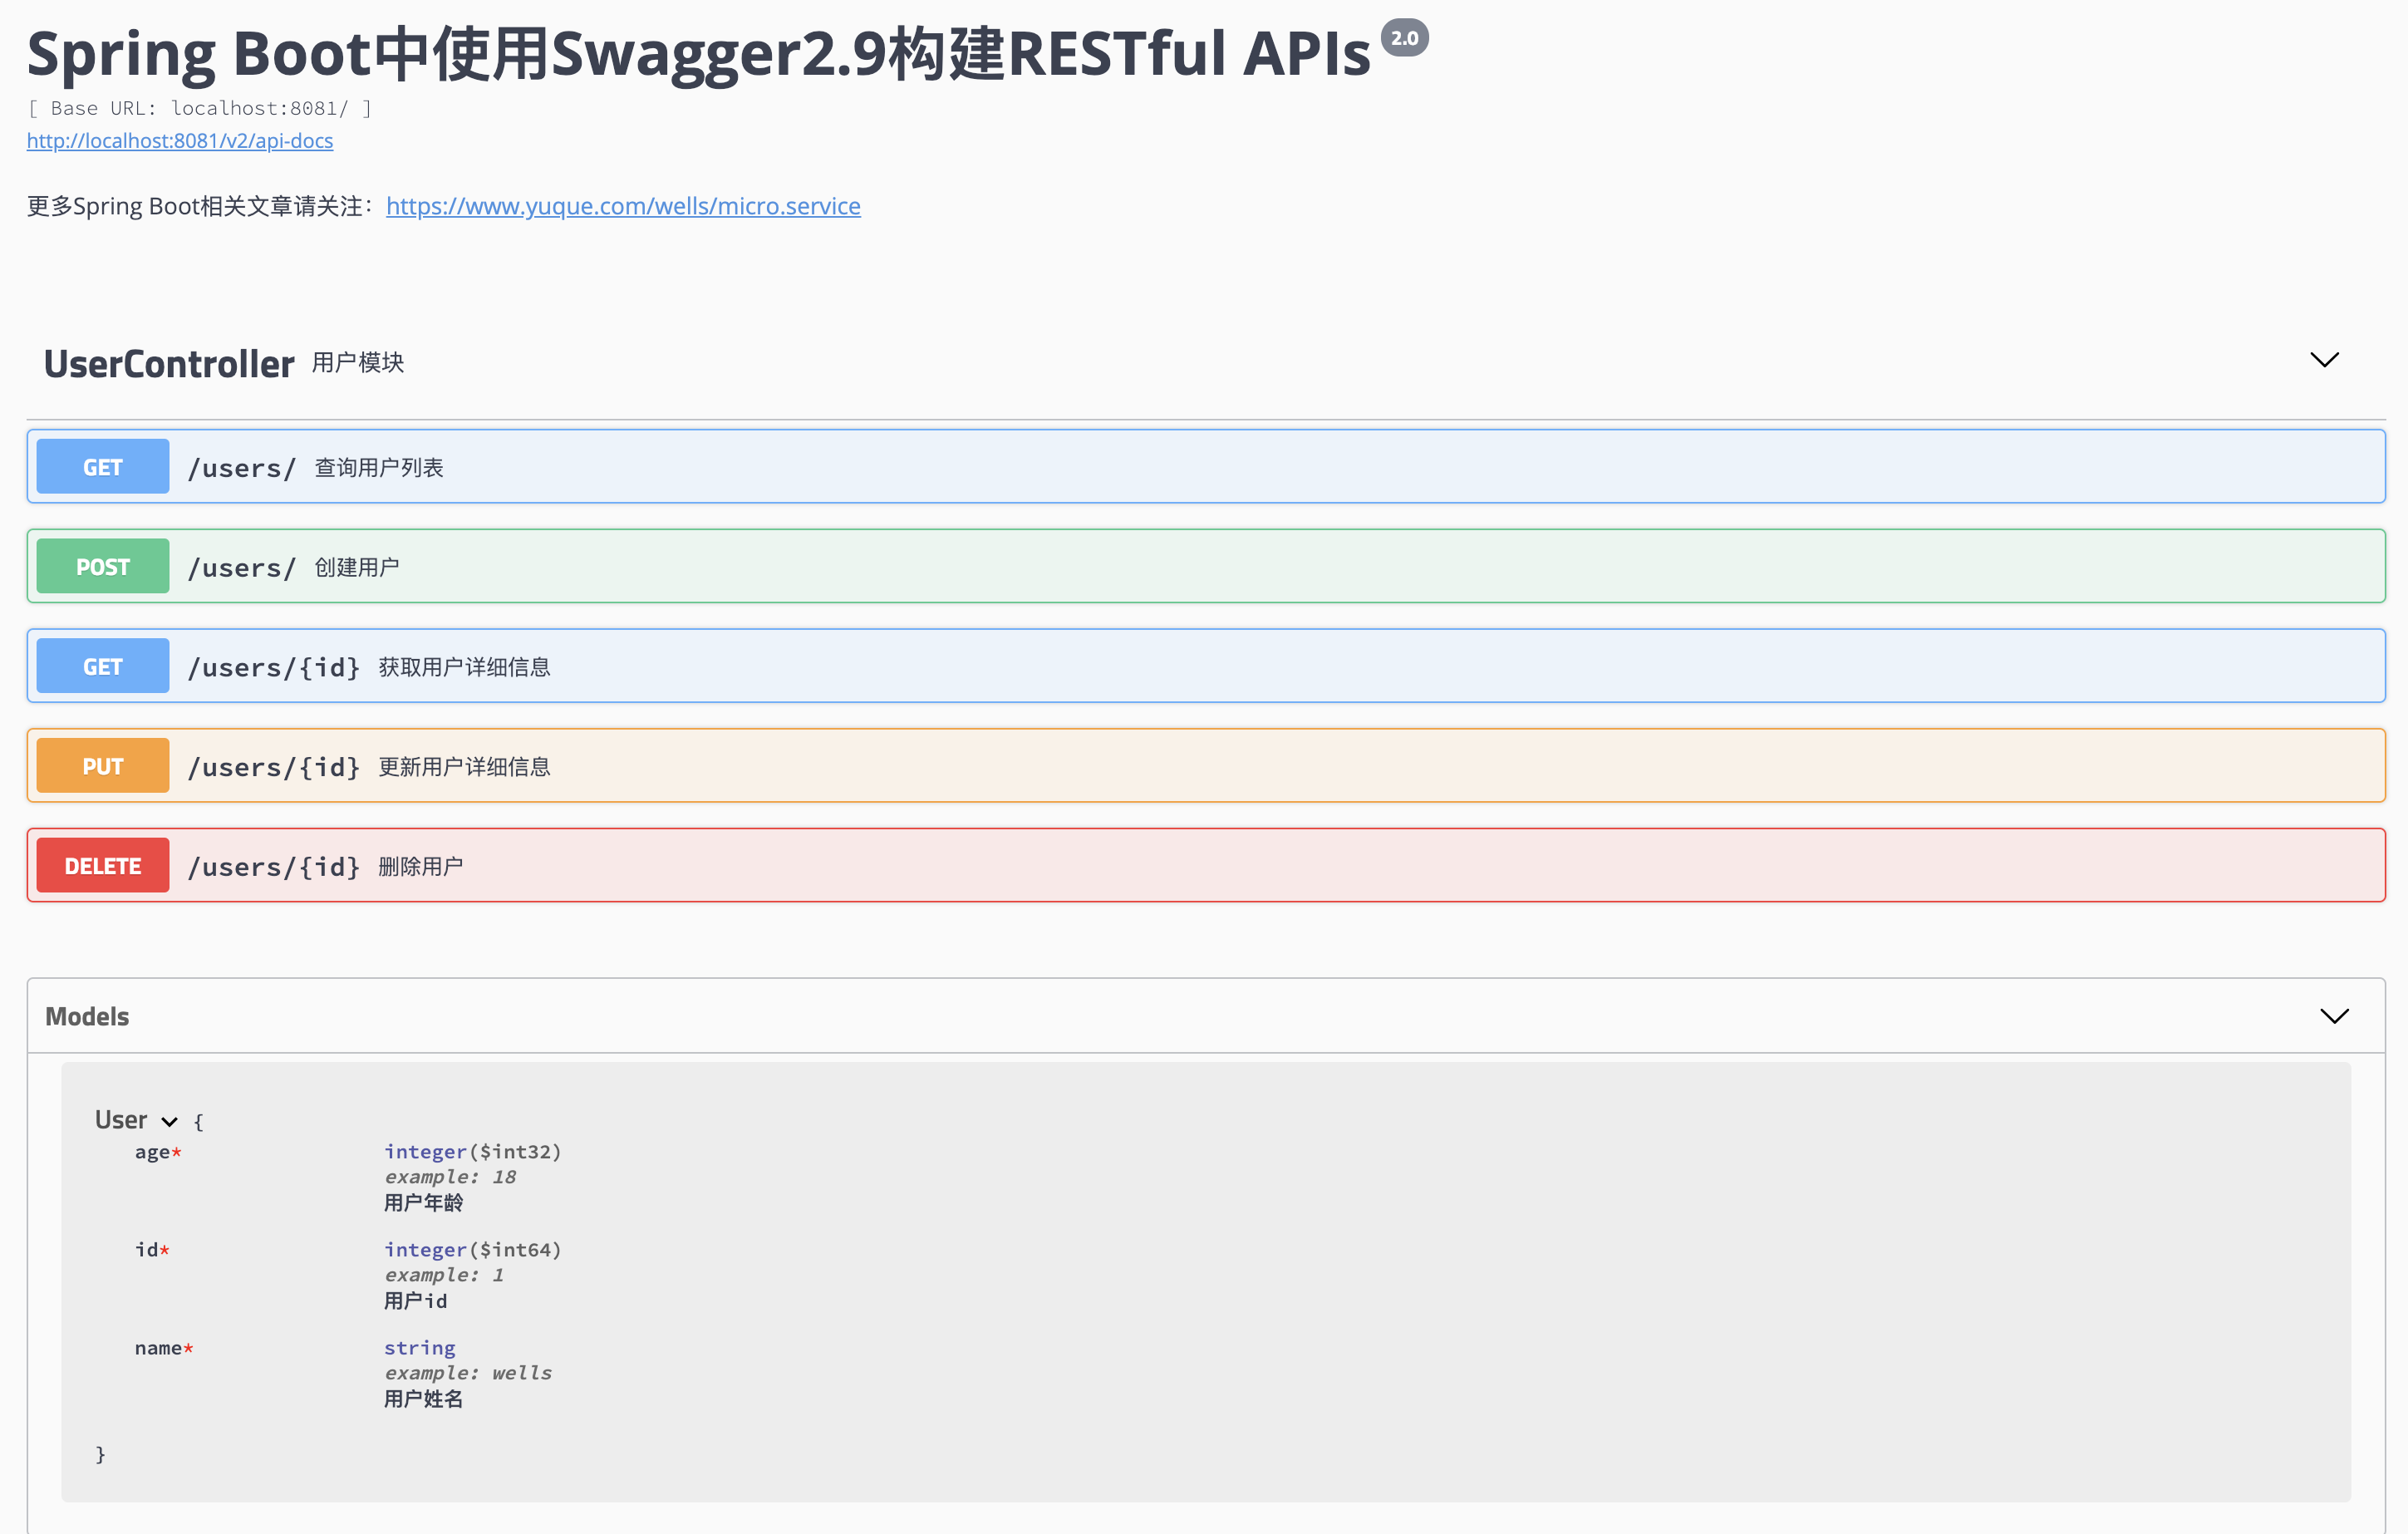
二、如何在Spring Boot中使用Swagger2
添加Swagger2依赖
<dependency><groupId>io.springfox</groupId><artifactId>springfox-swagger-ui</artifactId><version>2.9.2</version></dependency><dependency><groupId>io.springfox</groupId><artifactId>springfox-swagger2</artifactId><version>2.9.2</version></dependency>
主类添加@Swagger注解注解
- 添加@EnableSwagger2注解
- 重写 createRestApi方法
- 修改基础包参数为Controller所在包目录 ```java package com.wells.demo.chapter22;
import org.springframework.boot.SpringApplication; import org.springframework.boot.autoconfigure.SpringBootApplication; import org.springframework.context.annotation.Bean; import org.springframework.context.annotation.Configuration; import springfox.documentation.builders.ApiInfoBuilder; import springfox.documentation.builders.PathSelectors; import springfox.documentation.builders.RequestHandlerSelectors; import springfox.documentation.service.ApiInfo; import springfox.documentation.service.Contact; import springfox.documentation.spi.DocumentationType; import springfox.documentation.spring.web.plugins.Docket; import springfox.documentation.swagger2.annotations.EnableSwagger2;
@SpringBootApplication @Configuration @EnableSwagger2 public class Chapter22Application {
public static void main(String[] args) {
    SpringApplication.run(Chapter22Application.class, args);
}

@Bean
public Docket createRestApi() {
    return new Docket(DocumentationType.SWAGGER_2)
            .apiInfo(apiInfo())
            .select()
            .apis(RequestHandlerSelectors.basePackage("com.wells.demo.chapter22"))
            .paths(PathSelectors.any())
            .build();
}

private ApiInfo apiInfo() {
    return new ApiInfoBuilder()
            .title("Spring Boot中使用Swagger2.9构建RESTful APIs")
            .description("更多Spring Boot相关文章请关注:https://www.yuque.com/wells/micro.service")
            .contact(new Contact("wells", "", ""))
            .version("2.0")
            .build();
}
}
<a name="c1366658"></a>
## Controller类添加@Swagger相关描述注解
```java
package com.wells.demo.chapter22.controller;

import com.wells.demo.chapter22.entity.User;
import io.swagger.annotations.*;
import org.springframework.web.bind.annotation.*;

import java.util.ArrayList;
import java.util.HashMap;
import java.util.List;
import java.util.Map;

/**
 * Created by Wells on 2019年01月14日
 */

@Api(tags = "UserController", description = "用户模块")
@RestController
@RequestMapping("users")
public class UserController {
    static Map<Long, User> userMap = new HashMap<>();

    @ApiOperation(value="创建用户", notes="创建用户详情")
    @PostMapping("/")
    public String addUser(@ModelAttribute User user){
        userMap.put(user.getId(), user);
        return "success";
    }

    @ApiOperation(value="获取用户详细信息", httpMethod = "GET", produces = "application/json;charset=UTF-8")
    @ApiImplicitParam(name = "id", value = "用户id", required = false, dataType = "Long", example = "1")
    @GetMapping(value = "/{id}")
    public User getUserById(@PathVariable Long id){
        return userMap.get(id);
    }

    @ApiOperation(value = "查询用户列表", httpMethod = "GET", produces = "application/json;charset=UTF-8")
    @ApiResponse(code = 200, message = "success", response = List.class)
    @GetMapping("/")
    public List<User> findUserList(){
        List<User> userList = new ArrayList<>();
        for(Map.Entry<Long, User> entry : userMap.entrySet()){
            userList.add(entry.getValue());
        }
        return userList;
    }

    @ApiOperation(value="更新用户详细信息", notes="根据url的id来更新指定对象,并根据传过来的user信息来更新用户详细信息")
    @ApiImplicitParams({
            @ApiImplicitParam(name = "id", value = "用户ID", required = true, dataType = "Long", example = "1"),
            @ApiImplicitParam(name = "user", value = "用户详细实体user", required = true, dataType = "User")
    })
    @PutMapping(value = "/{id}")
    public String uptUser(@PathVariable @ApiParam(name = "id", required = true) Long id, @ModelAttribute User user){
        User oldUser = userMap.get(id);
        oldUser.setName(user.getName());
        oldUser.setAge(user.getAge());
        userMap.put(id, oldUser);
        return "success";
    }

    @ApiOperation(value="删除用户", notes="根据url的id来指定删除对象")
    @ApiImplicitParam(name = "id", value = "用户ID", required = true, dataType = "Long", example = "1")
    @DeleteMapping(value = "/{id}")
    public String delUserById(@PathVariable Long id){
        userMap.remove(id);
        return "success";
    }
}
完成上述代码添加上,启动Spring Boot程序,访问:http://localhost:8081/swagger-ui.html , 其中,8081是服务启动端口 。就能看到前文所展示的RESTful API的页面。我们可以再点开具体的API请求,以POST类型的/users请求为例,可找到上述代码中我们配置的notes信息以及参数user的描述信息,如下图所示: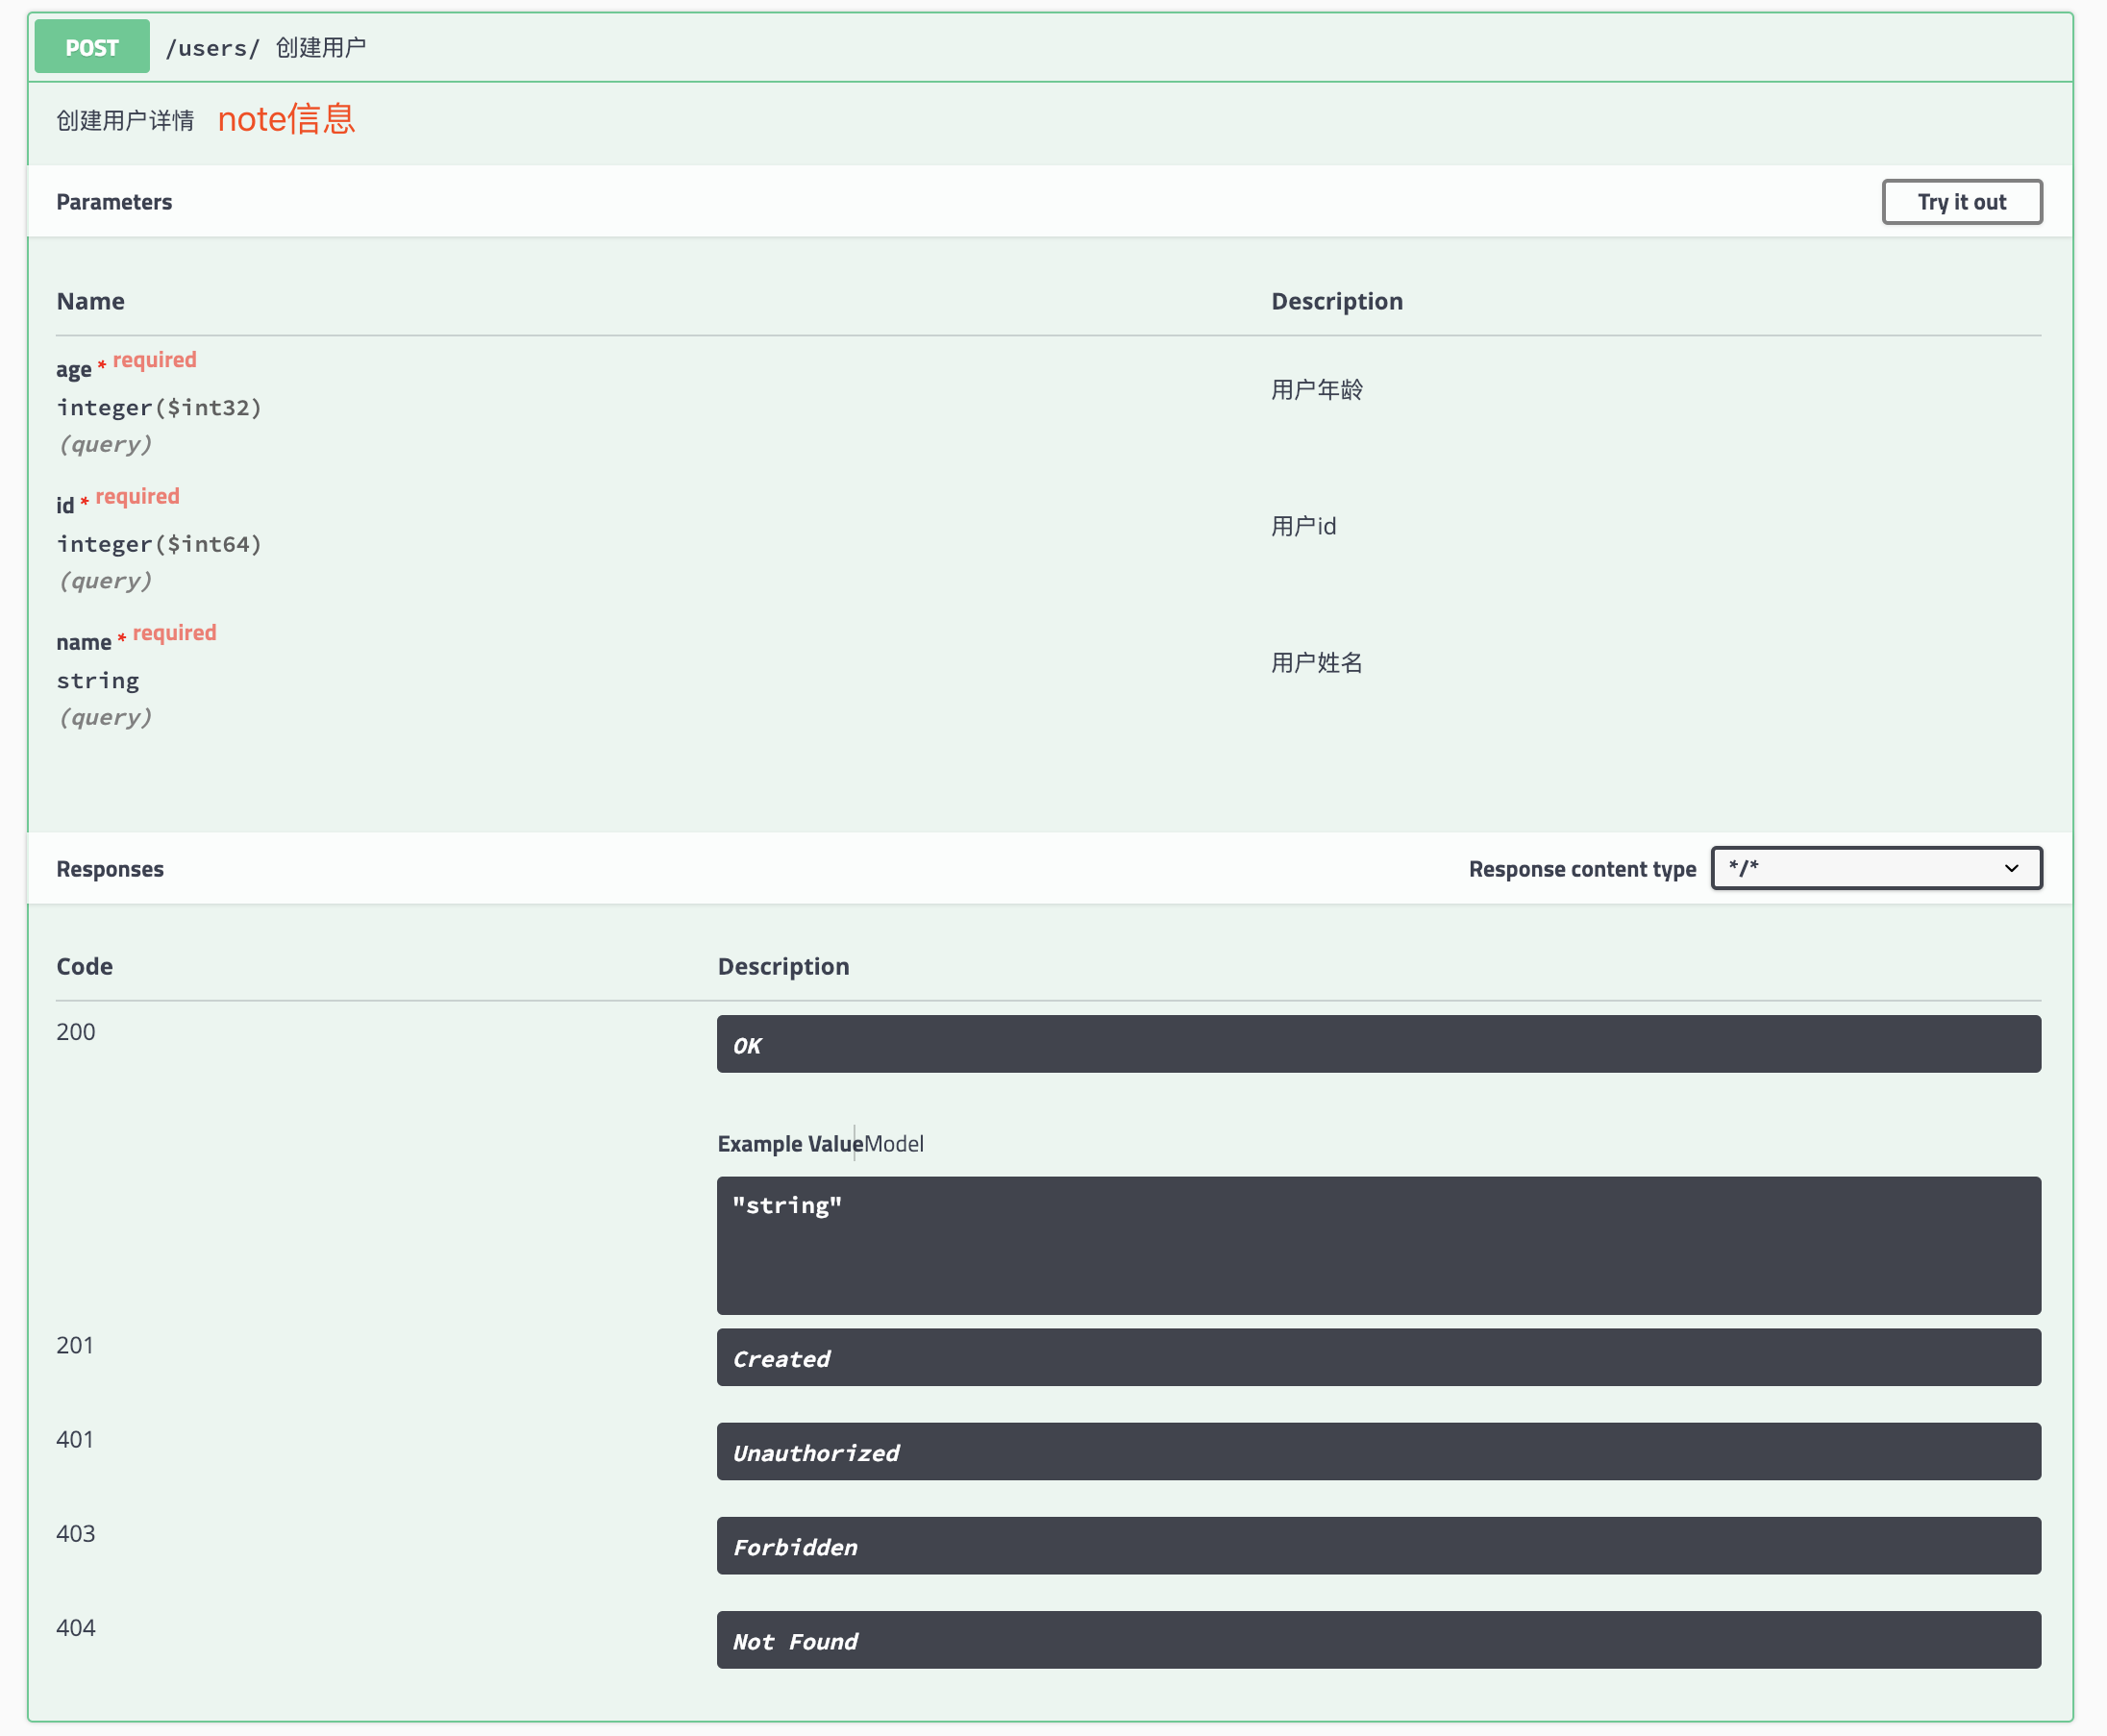
三、代码示例
完整示例:SpringBoot Swagger
四、API文档访问与调试
Swagger除了查看接口功能外,还提供了调试测试功能,我们可以点击上图中右侧的 Try it out 按钮,就可以输入参数,然后调试,如下图: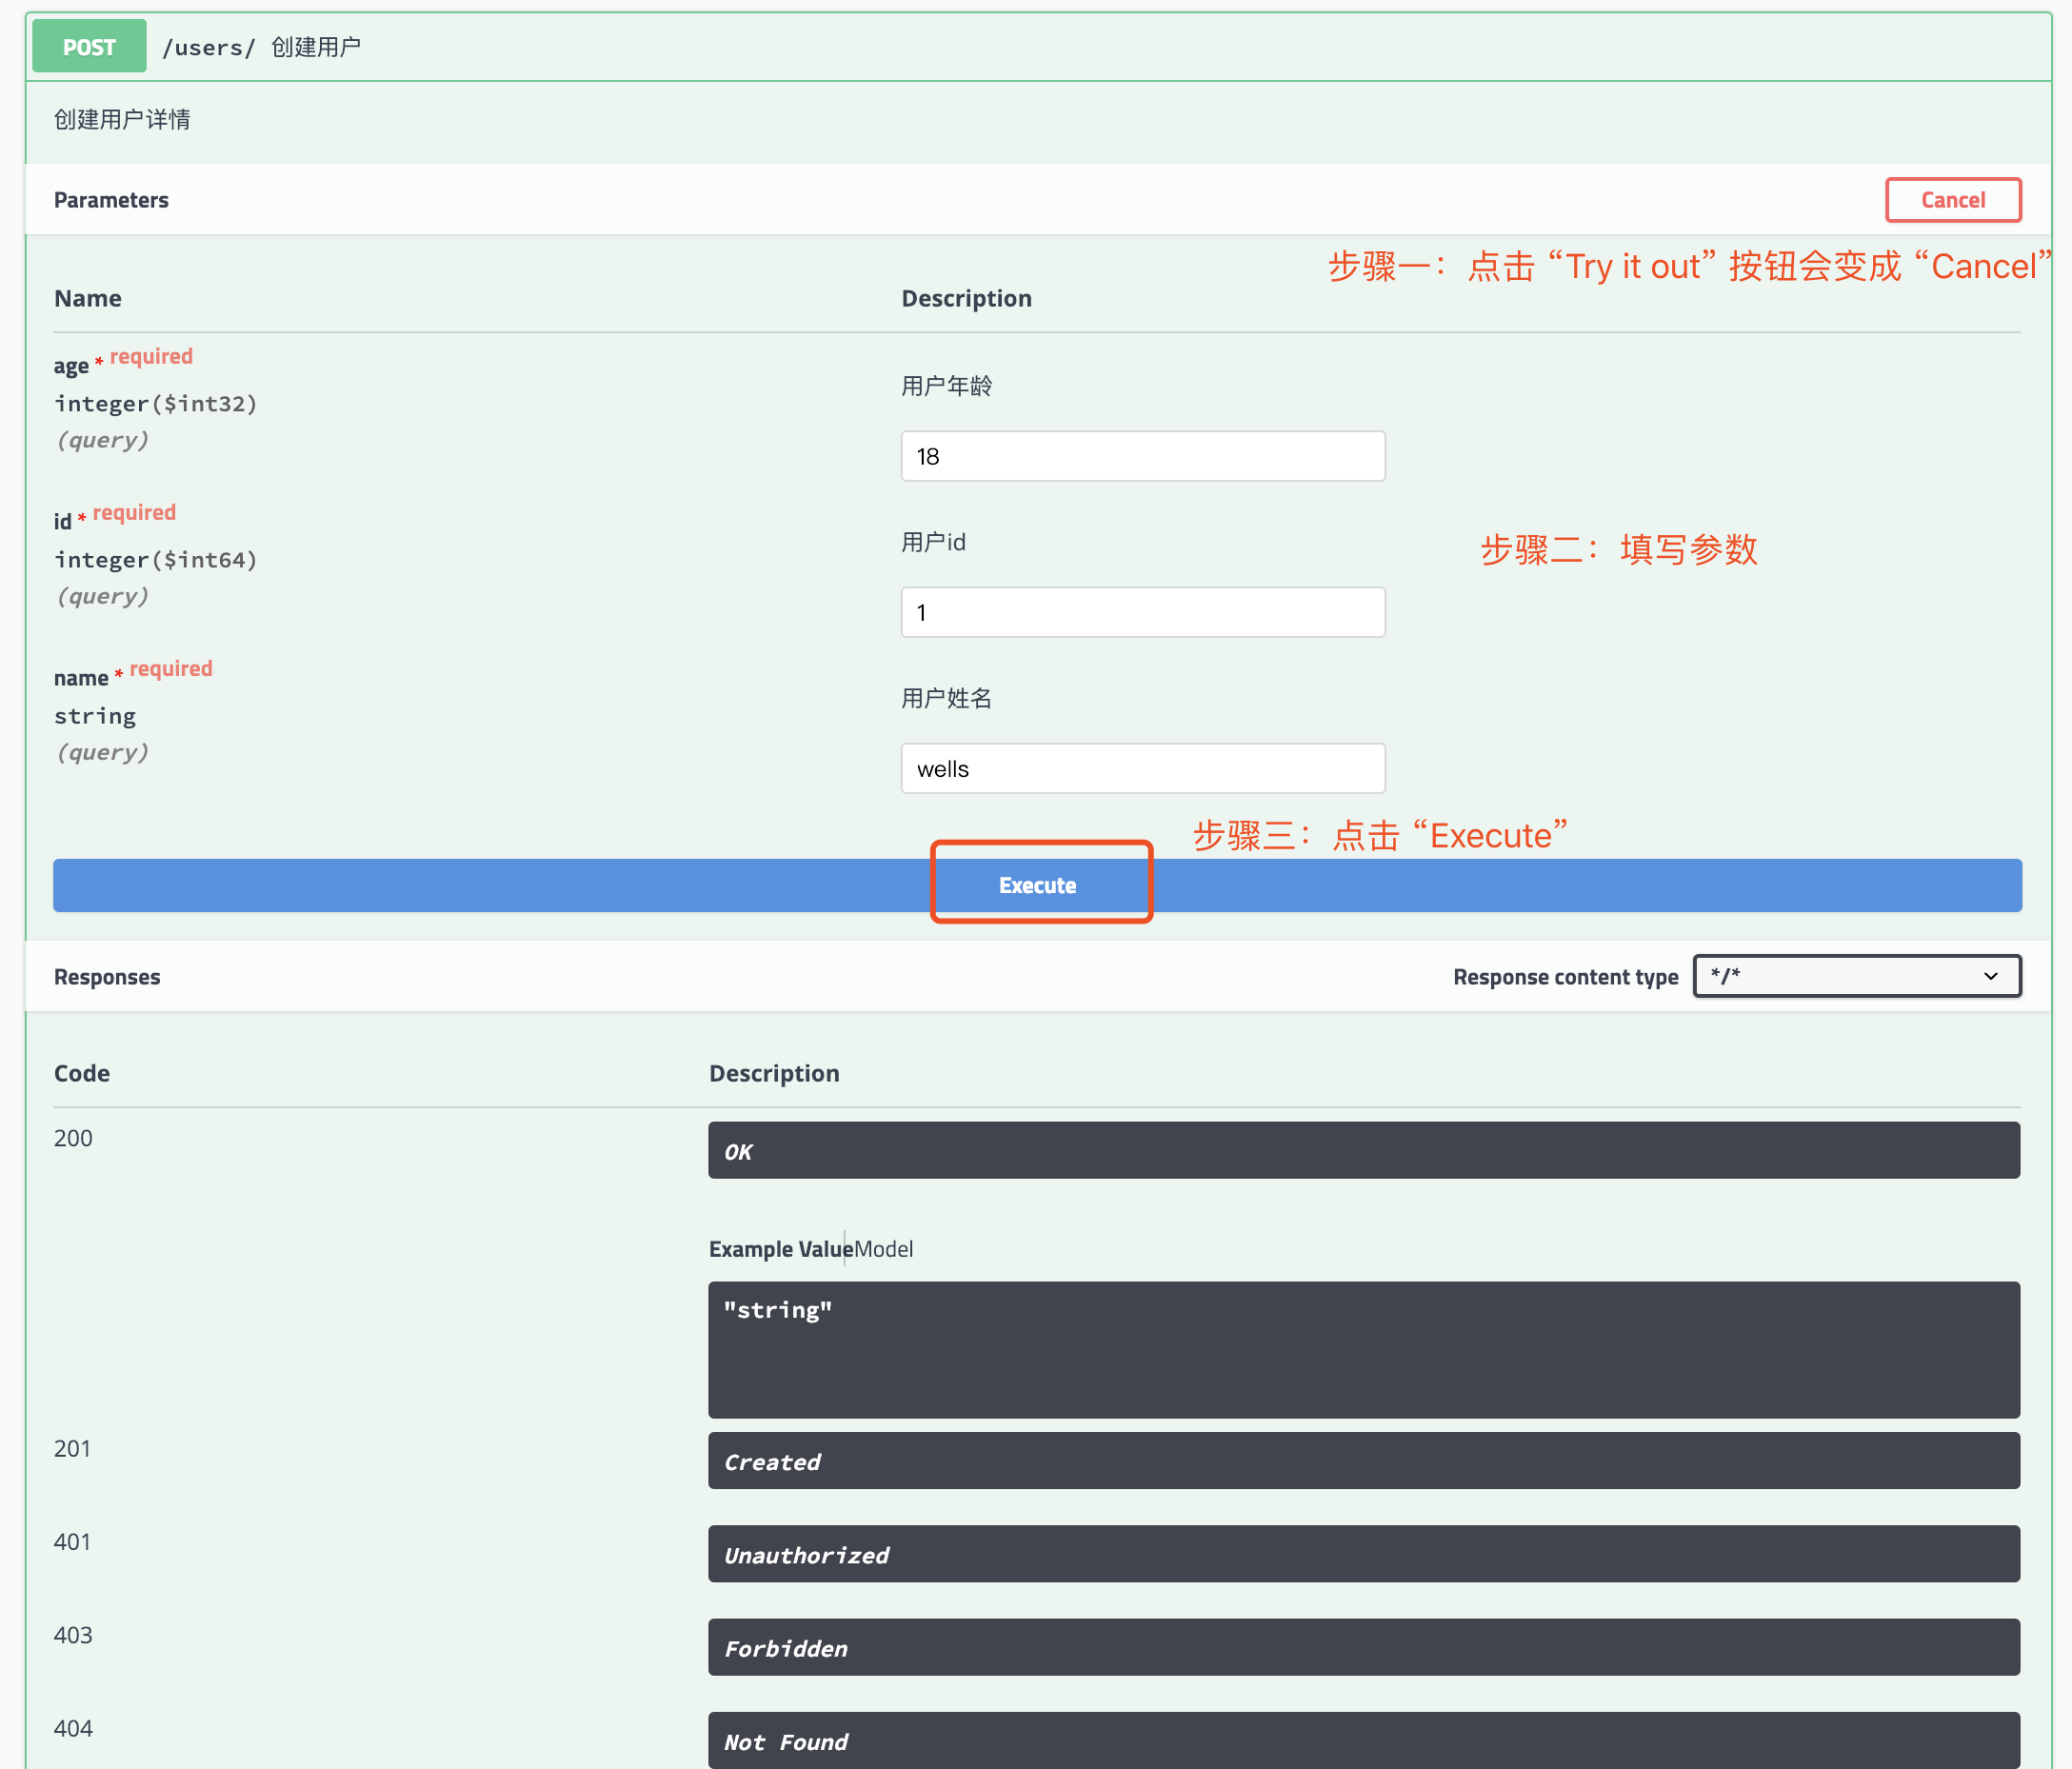
相比为这些接口编写文档的工作,我们增加的配置内容是非常少而且精简的,对于原有代码的侵入也在忍受范围之内。因此,在构建RESTful API的同时,加入swagger来对API文档进行管理,是个不错的选择
五、其他问题
在博主进行试验的阶段,发现一个问题
问题描述:
在Swagger2.9版本中,当给方法添加 @ApiImplicitParam 注解时,每次刷新swagger页面时,总是会报如下错误: java.lang.NumberFormatException: For input string: “”
问题解决:
在最终看了源码后,发现必须在使用 @ApiImplicitParam 注解时,必须添加一个参数:example ,如下:

若有收获,就点个赞吧
0 人点赞
