在Spring Boot的众多Starter POMs中有一个特殊的模块,它不同于其他模块那样大多用于开发业务功能或是连接一些其他外部资源。它完全是一个用于暴露自身信息的模块,所以很明显, 它的主要作用是用于监控与管理,它就是:spring-boot-starter-actuator。
spring-boot-starter-actuator模块的实现对于实施微服务的中小团队来说,可以有效地减少监控系统在采集应用指标时的开发量。当然,它也并不是万能的,有时候我们也需要对其做一些简单的扩展来帮助我们实现自身系统个性化的监控需求。下面,在本文中,我们将详解的介绍一些关于spring-boot-starter-actuator模块的内容,包括它的原生提供的端点以及一些常用的扩展和配置方式。
一、初识Actuator
下面,我们可以通过对快速入门中实现的Spring Boot应用增加spring-boot-starter-actuator模块功能,来对它有一个直观的认识。
1.1、引入Actuator
在现有的Spring Boot应用中引入该模块非常简单,只需要在pom.xml的dependencies节点中,新增spring-boot-starter-actuator的依赖即可,具体如下:
<dependency><groupId>org.springframework.boot</groupId><artifactId>spring-boot-starter-actuator</artifactId></dependency>
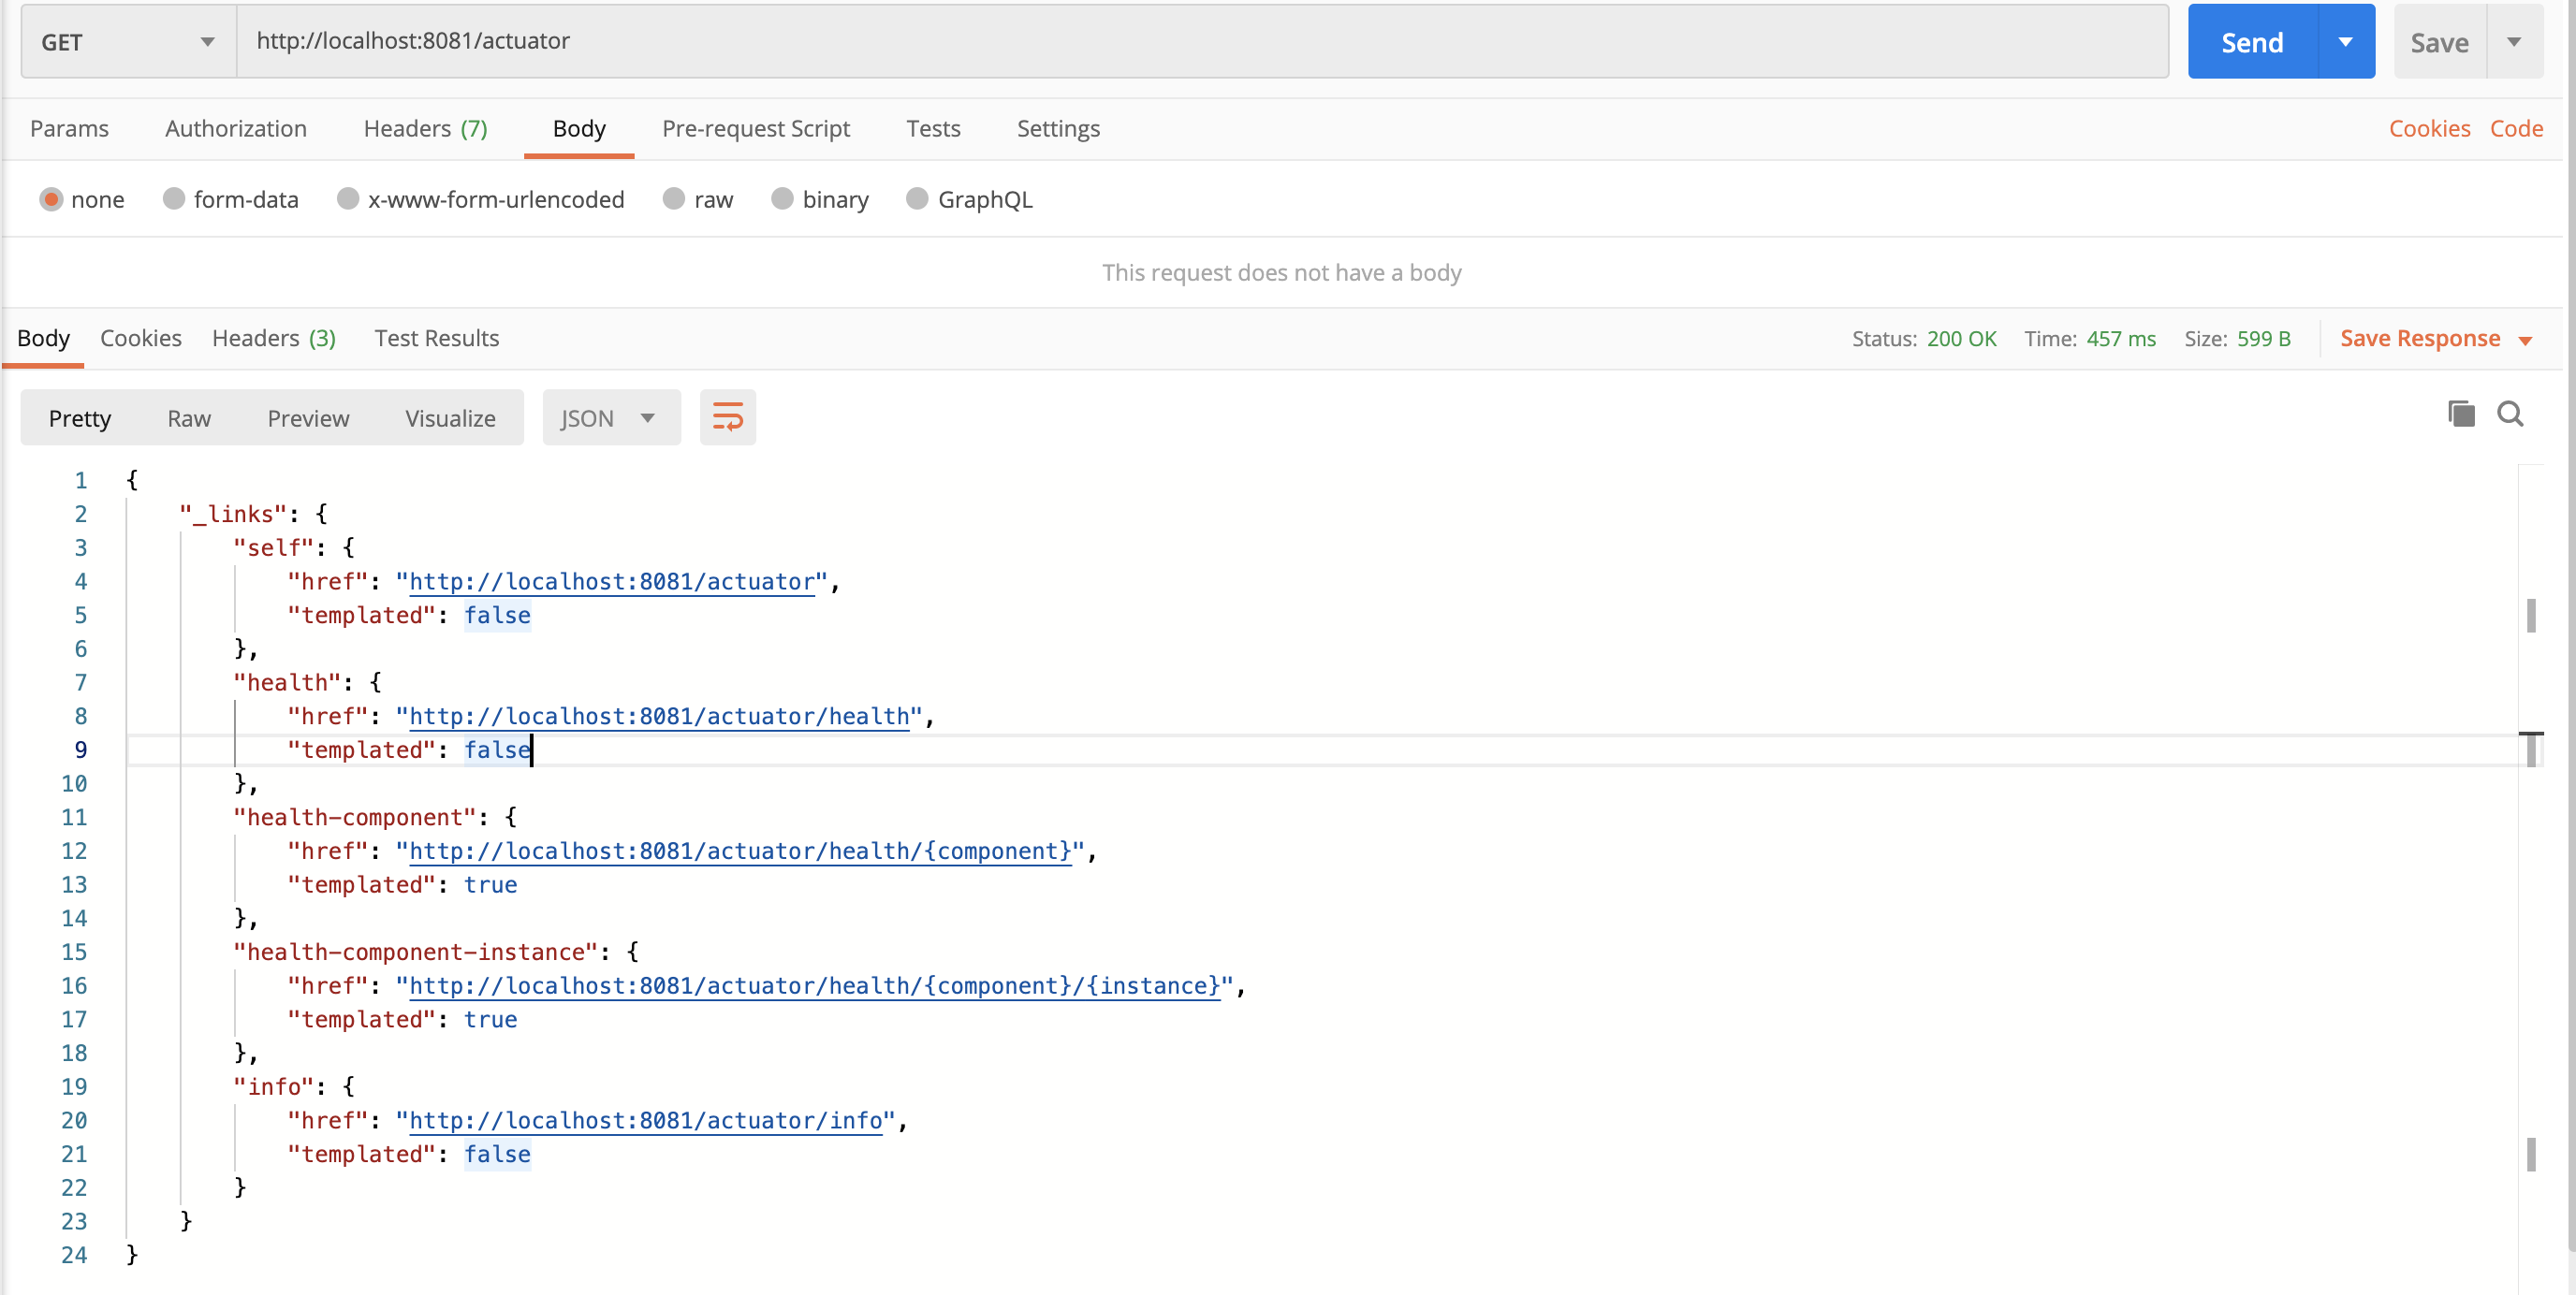
通过增加该依赖之后,重新启动应用。此时,我们可以访问:http://localhost:port/actuator 看到可以访问到的url输出,如下图:
以上是默认开启的一些 endpoint 监控,我们也可以通过配置文件,开启更多的 endpoint
1.2、开启更多 endpoint
开启更多的endpoint,配置如下:
# 开启所有的endpoints
management.endpoints.web.exposure.include=*
# 设置基础访问路径,默认为: actuator;
# management.endpoints.web.base-path=/
注意:
- 当xml中配置了 management.endpoints.web.base-path=/ 基础路径时,访问 http://localhost:port/actuator 会返回404;但是其他的endpoint是可以访问的,比如:http://localhost:8081/health,http://localhost:8081/beans
再次访问:http://localhost:port/actuator 看到可以访问到的url输出,结果如下:
{
    "_links": {
        "self": {
            "href": "http://localhost:8081/actuator",
            "templated": false
        },
        "auditevents": {
            "href": "http://localhost:8081/actuator/auditevents",
            "templated": false
        },
        "beans": {
            "href": "http://localhost:8081/actuator/beans",
            "templated": false
        },
        "caches": {
            "href": "http://localhost:8081/actuator/caches",
            "templated": false
        },
        "caches-cache": {
            "href": "http://localhost:8081/actuator/caches/{cache}",
            "templated": true
        },
        "health": {
            "href": "http://localhost:8081/actuator/health",
            "templated": false
        },
        "health-component-instance": {
            "href": "http://localhost:8081/actuator/health/{component}/{instance}",
            "templated": true
        },
        "health-component": {
            "href": "http://localhost:8081/actuator/health/{component}",
            "templated": true
        },
        "conditions": {
            "href": "http://localhost:8081/actuator/conditions",
            "templated": false
        },
        "configprops": {
            "href": "http://localhost:8081/actuator/configprops",
            "templated": false
        },
        "env-toMatch": {
            "href": "http://localhost:8081/actuator/env/{toMatch}",
            "templated": true
        },
        "env": {
            "href": "http://localhost:8081/actuator/env",
            "templated": false
        },
        "info": {
            "href": "http://localhost:8081/actuator/info",
            "templated": false
        },
        "loggers": {
            "href": "http://localhost:8081/actuator/loggers",
            "templated": false
        },
        "loggers-name": {
            "href": "http://localhost:8081/actuator/loggers/{name}",
            "templated": true
        },
        "heapdump": {
            "href": "http://localhost:8081/actuator/heapdump",
            "templated": false
        },
        "threaddump": {
            "href": "http://localhost:8081/actuator/threaddump",
            "templated": false
        },
        "metrics-requiredMetricName": {
            "href": "http://localhost:8081/actuator/metrics/{requiredMetricName}",
            "templated": true
        },
        "metrics": {
            "href": "http://localhost:8081/actuator/metrics",
            "templated": false
        },
        "scheduledtasks": {
            "href": "http://localhost:8081/actuator/scheduledtasks",
            "templated": false
        },
        "httptrace": {
            "href": "http://localhost:8081/actuator/httptrace",
            "templated": false
        },
        "mappings": {
            "href": "http://localhost:8081/actuator/mappings",
            "templated": false
        }
    }
}
1.3、endpoint列表
- 每个 endpoint 监控我们都可以控制采用 HTTP 或者 JMX的方式开启或者关闭;
- 通过基础的base url:/actuator,访问 endpoint,当然我们可以修改
| HTTP 方法 | 路径(设置基础路径为: / | 描述 |
|---|---|---|
| GET | /auditevents | 显示当前应用程序的审计事件信息 |
| GET | /beans | 显示一个应用中所有Spring Beans的完整列表 |
| GET | /caches | 展示可用的缓存 |
| GET | /conditions | 显示配置类和自动配置类(configuration and auto-configuration classes)的状态及它们被应用或未被应用的原因 |
| GET | /configprops | 显示一个所有@ConfigurationProperties的集合列表 |
| GET | /env | 显示来自Spring的 ConfigurableEnvironment的属性 |
| GET | /flyway | 显示数据库迁移路径,如果有的话 |
| GET | /health | 显示应用的健康信息(当使用一个未认证连接访问时显示一个简单的’status’,使用认证连接访问则显示全部信息详情) |
| GET | /httptrace | 显示http请求的请求体和响应,针对注入:HttpTraceRepository的bean |
| GET | /info | 显示任意的应用信息 |
| GET | /loggers | 获取配置的日志相关 |
| GET | /liquibase | 展示任何Liquibase数据库迁移路径,如果有的话 |
| GET | /metrics | 展示当前应用的metrics信息 |
| GET | /metrics/{name} | 报告指定名称的应用程序度量值;其中名称根据 /metrics 获取 |
| GET | /mappings | 显示一个所有@RequestMapping路径的集合列表 |
| GET | /scheduledtasks | 显示应用程序中的计划任务 |
| GET | /sessions | 允许从Spring会话支持的会话存储中检索和删除(retrieval and deletion)用户会话。使用Spring Session对反应性Web应用程序的支持时不可用。 |
| POST | /shutdown | 允许应用以优雅的方式关闭(默认情况下不启用) |
| GET | /threaddump | 执行一个线程dump |
如果使用web应用(Spring MVC, Spring WebFlux, 或者 Jersey),还可以使用以下接口:
| HTTP 方法 | 路径 | 描述 |
|---|---|---|
| GET | /heapdump | 返回一个GZip压缩的hprof堆dump文件 |
| GET | /jolokia | 通过HTTP暴露JMX beans(当Jolokia在类路径上时,WebFlux不可用) |
| GET | /logfile | 返回日志文件内容(如果设置了logging.file或logging.path属性的话),支持使用HTTP Range头接收日志文件内容的部分信息 |
| GET | /prometheus | 以可以被Prometheus服务器抓取的格式显示metrics信息 |
二、原生端点
通过在快速入门示例中添加spring-boot-starter-actuator模块,我们已经对它有了一个初步的认识。接下来,我们详细介绍一下spring-boot-starter-actuator模块中已经实现的一些原生端点。如果根据端点的作用来说,我们可以原生端点分为三大类:
- 应用配置类:获取应用程序中加载的应用配置、环境变量、自动化配置报告等与Spring Boot应用密切相关的配置类信息。
- 度量指标类:获取应用程序运行过程中用于监控的度量指标,比如:内存信息、线程池信息、HTTP请求统计等。
- 操作控制类:提供了对应用的关闭等操作类功能。
下面我们来详细了解一下这三类端点都分别可以为我们 提供怎么样的有用信息和强大功能,以及我们如何去扩展和配置它们
2.1、应用配置类
由于Spring Boot为了改善传统Spring应用繁杂的配置内容,采用了包扫描和自动化配置的机制来加载原本集中于xml文件中的各项内容。虽然这样的做法,让我们的代码变得非常简洁,但是整个应用的实例创建和依赖关系等信息都被离散到了各个配置类的注解上,这使得我们分析整个应用中资源和实例的各种关系变得非常的困难。而这类端点就可以帮助我们轻松的获取一系列关于Spring 应用配置内容的详细报告,比如:自动化配置的报告、Bean创建的报告、环境属性的报告等。
2.1.1、/beans
该端点用来获取应用上下文中创建的所有Bean。
[
    {
        "context": "hello:dev:8881",
        "parent": null,
        "beans": [
            {
                "bean": "org.springframework.boot.autoconfigure.web.DispatcherServletAutoConfiguration$DispatcherServletConfiguration",
                "scope": "singleton",
                "type": "org.springframework.boot.autoconfigure.web.DispatcherServletAutoConfiguration$DispatcherServletConfiguration$$EnhancerBySpringCGLIB$$3440282b",
                "resource": "null",
                "dependencies": [
                    "serverProperties",
                    "spring.mvc.CONFIGURATION_PROPERTIES",
                    "multipartConfigElement"
                ]
            },
            {
                "bean": "dispatcherServlet",
                "scope": "singleton",
                "type": "org.springframework.web.servlet.DispatcherServlet",
                "resource": "class path resource [org/springframework/boot/autoconfigure/web/DispatcherServletAutoConfiguration$DispatcherServletConfiguration.class]",
                "dependencies": []
            }
        ]
    }
]
如上示例中,我们可以看到在每个bean中都包含了下面这几个信息:
- bean:Bean的名称
- scope:Bean的作用域
- type:Bean的Java类型
- reource:class文件的具体路径
- dependencies:依赖的Bean名称
2.1.2、/configprops
该端点用来获取应用中配置的属性信息报告。从下面该端点返回示例的片段中,我们看到返回了关于该短信的配置信息,prefix 属性代表了属性的配置前缀,properties代表了各个属性的名称和值。所以,我们可以通过该报告来看到各个属性的配置路径,比如我们要关闭该端点,就可以通过使用 endpoints.configprops.enabled=false 来完成设置。{ "configurationPropertiesReportEndpoint": { "prefix": "endpoints.configprops", "properties": { "id": "configprops", "sensitive": true, "enabled": true } }, ... }
2.1.3、/env
该端点与 /configprops 不同,它用来获取应用所有可用的环境属性报告。包括:环境变量、JVM属性、应用的配置配置、命令行中的参数。从下面该端点返回的示例片段中,我们可以看到它不仅返回了应用的配置属性,还返回了系统属性、环境变量等丰富的配置信息,其中也包括了应用还没有使用的配置。所以它可以帮助我们方便地看到当前应用可以加载的配置信息,并配合[@ConfigurationProperties](https://github.com/ConfigurationProperties)注解将它们引入到我们的应用程序中来进行使用。另外,为了配置属性的安全,对于一些类似密码等敏感信息,该端点都会进行隐私保护,但是我们需要让属性名中包含:password、secret、key这些关键词,这样该端点在返回它们的时候会使用*来替代实际的属性值。
{
    "profiles": [
        "dev"
    ],
    "server.ports": {
        "local.server.port": 8881
    },
    "servletContextInitParams": {
    },
    "systemProperties": {
        "idea.version": "2016.1.3",
        "java.runtime.name": "Java(TM) SE Runtime Environment",
        "sun.boot.library.path": "C:\\Program Files\\Java\\jdk1.8.0_91\\jre\\bin",
        "java.vm.version": "25.91-b15",
        "java.vm.vendor": "Oracle Corporation",
        ...
    },
    "systemEnvironment": {
        "configsetroot": "C:\\WINDOWS\\ConfigSetRoot",
        "RABBITMQ_BASE": "E:\\tools\\rabbitmq",
        ...
    },
    "applicationConfig: [classpath:/application-dev.properties]": {
        "server.port": "8881"
    },
    "applicationConfig: [classpath:/application.properties]": {
        "server.port": "8885",
        "spring.profiles.active": "dev",
        "info.app.name": "spring-boot-hello",
        "info.app.version": "v1.0.0",
        "spring.application.name": "hello"
    }
}
2.1.4、/mappings
该端点用来返回所有Spring MVC的控制器映射关系报告。从下面的示例片段中,我们可以看该报告的信息与我们在启用Spring MVC的Web应用时输出的日志信息类似,其中 bean 属性标识了该映射关系的请求处理器,method 属性标识了该映射关系的具体处理类和处理函数。
{
    "/webjars/**": {
        "bean": "resourceHandlerMapping"
    },
    "/**": {
        "bean": "resourceHandlerMapping"
    },
    "/**/favicon.ico": {
        "bean": "faviconHandlerMapping"
    },
    "{[/hello]}": {
        "bean": "requestMappingHandlerMapping",
        "method": "public java.lang.String com.didispace.web.HelloController.index()"
    },
    "{[/mappings || /mappings.json],methods=[GET],produces=[application/json]}": {
        "bean": "endpointHandlerMapping",
        "method": "public java.lang.Object org.springframework.boot.actuate.endpoint.mvc.EndpointMvcAdapter.invoke()"
    },
    ...
}
2.1.5、/info
该端点用来返回一些应用自定义的信息。默认情况下,该端点只会返回一个空的json内容。我们可以在 application.properties 配置文件中通过 info 前缀来设置一些属性,比如下面这样:
info.app.name=spring-boot-hello
info.app.version=v1.0.0
再访问 info 端点,我们可以得到下面的返回报告,其中就包含了上面我们在应用自定义的两个参数。
{
    "app": {
        "name": "spring-boot-hello",
        "version": "v1.0.0"
    }
}
2.2、度量类指标
上面我们所介绍的应用配置类端点所提供的信息报告在应用启动的时候都已经基本确定了其返回内容,可以说是一个静态报告,而度量指标类端点提供的报告内容则是动态变化的,这些端点提供了应用程序在运行过程中的一些快照信息,比如:内存使用情况、HTTP请求统计、外部资源指标等。这些端点对于我们构建微服务架构中的监控系统非常有帮助,由于Spring Boot应用自身实现了这些端点,所以我们可以很方便地利用它们来收集我们想要的信息,以制定出各种自动化策略。下面,我们就来分别看看这些强大的端点功能。
2.2.1、/metrics
该端点用来返回当前应用的各类重要度量指标的name
{
    "names": [
        "jvm.memory.max",
        "http.server.requests",
        "jvm.threads.states",
        "process.files.max",
        "jvm.gc.memory.promoted",
        "tomcat.cache.hit",
        "tomcat.servlet.error",
        "system.load.average.1m",
        "tomcat.cache.access",
        "jvm.memory.used",
        "jvm.gc.max.data.size",
        "jvm.gc.pause",
        "jvm.memory.committed",
        "system.cpu.count",
        "logback.events",
        "tomcat.global.sent",
        "jvm.buffer.memory.used",
        "tomcat.sessions.created",
        "jvm.threads.daemon",
        "system.cpu.usage",
        "jvm.gc.memory.allocated",
        "tomcat.global.request.max",
        "tomcat.global.request",
        "tomcat.sessions.expired",
        "jvm.threads.live",
        "jvm.threads.peak",
        "tomcat.global.received",
        "process.uptime",
        "tomcat.sessions.rejected",
        "process.cpu.usage",
        "tomcat.threads.config.max",
        "jvm.classes.loaded",
        "jvm.classes.unloaded",
        "tomcat.global.error",
        "tomcat.sessions.active.current",
        "tomcat.sessions.alive.max",
        "jvm.gc.live.data.size",
        "tomcat.servlet.request.max",
        "tomcat.threads.current",
        "tomcat.servlet.request",
        "process.files.open",
        "jvm.buffer.count",
        "jvm.buffer.total.capacity",
        "tomcat.sessions.active.max",
        "tomcat.threads.busy",
        "process.start.time"
    ]
}
2.2.2、/metrics/{name}
比如:内存信息、线程信息、垃圾回收信息等。
从上面的示例中,我们看到有这些重要的度量值:
- 系统信息:包括处理器数量processors、运行时间uptime和instance.uptime、系统平均负载systemload.average。
- mem.*:内存概要信息,包括分配给应用的总内存数量以及当前空闲的内存数量。这些信息来自java.lang.Runtime。
- heap.*:堆内存使用情况。这些信息来自java.lang.management.MemoryMXBean接口中getHeapMemoryUsage方法获取的java.lang.management.MemoryUsage。
- nonheap.*:非堆内存使用情况。这些信息来自java.lang.management.MemoryMXBean接口中getNonHeapMemoryUsage方法获取的java.lang.management.MemoryUsage。
- threads.*:线程使用情况,包括线程数、守护线程数(daemon)、线程峰值(peak)等,这些数据均来自java.lang.management.ThreadMXBean。
- classes.*:应用加载和卸载的类统计。这些数据均来自java.lang.management.ClassLoadingMXBean。
- gc.*:垃圾收集器的详细信息,包括垃圾回收次数gc.ps_scavenge.count、垃圾回收消耗时间gc.ps_scavenge.time、标记-清除算法的次数gc.ps_marksweep.count、标记-清除算法的消耗时间gc.ps_marksweep.time。这些数据均来自java.lang.management.GarbageCollectorMXBean。
- httpsessions.*:Tomcat容器的会话使用情况。包括最大会话数httpsessions.max和活跃会话数httpsessions.active。该度量指标信息仅在引入了嵌入式Tomcat作为应用容器的时候才会提供。
- gauge.*:HTTP请求的性能指标之一,它主要用来反映一个绝对数值。比如上面示例中的gauge.response.hello: 5,它表示上一次hello请求的延迟时间为5毫秒。
- counter.*:HTTP请求的性能指标之一,它主要作为计数器来使用,记录了增加量和减少量。如上示例中counter.status.200.hello: 11,它代表了hello请求返回200状态的次数为11。
2.2.3、/health
该端点在一开始的示例中我们已经使用过了,它用来获取应用的各类健康指标信息。在spring-boot-starter-actuator模块中自带实现了一些常用资源的健康指标检测器。这些检测器都通过HealthIndicator接口实现,并且会根据依赖关系的引入实现自动化装配,比如用于检测磁盘的DiskSpaceHealthIndicator、检测DataSource连接是否可用的DataSourceHealthIndicator等。有时候,我们可能还会用到一些Spring Boot的Starter POMs中还没有封装的产品来进行开发,比如:当使用RocketMQ作为消息代理时,由于没有自动化配置的检测器,所以我们需要自己来实现一个用来采集健康信息的检测器。比如,我们可以在Spring Boot的应用中,为org.springframework.boot.actuate.health.HealthIndicator接口实现一个对RocketMQ的检测器类:
@Component
public class RocketMQHealthIndicator implements HealthIndicator {
    @Override
    public Health health() {
        int errorCode = check();
        if (errorCode != 0) {
          return Health.down().withDetail("Error Code", errorCode).build();
        }
        return Health.up().build();
    }
      private int check() {
         // 对监控对象的检测操作
      }
}
通过重写health()函数来实现健康检查,返回的Heath对象中,共有两项内容,一个是状态信息,除了该示例中的UP与DOWN之外,还有UNKNOWN和OUT_OF_SERVICE,可以根据需要来实现返回;还有一个详细信息,采用Map的方式存储,在这里通过withDetail函数,注入了一个Error Code信息,我们也可以填入一下其他信息,比如,检测对象的IP地址、端口等。重新启动应用,并访问/health接口,我们在返回的JSON字符串中,将会包含了如下信息:
"rocketMQ": {
  "status": "UP"
}
2.2.4、/dump
该端点用来暴露程序运行中的线程信息。它使用java.lang.management.ThreadMXBean的dumpAllThreads方法来返回所有含有同步信息的活动线程详情。
2.2.5、/trace
该端点用来返回基本的HTTP跟踪信息。默认情况下,跟踪信息的存储采用org.springframework.boot.actuate.trace.InMemoryTraceRepository实现的内存方式,始终保留最近的100条请求记录。它记录的内容格式如下:
[
    {
        "timestamp": 1482570022463,
        "info": {
            "method": "GET",
            "path": "/metrics/mem",
            "headers": {
                "request": {
                    "host": "localhost:8881",
                    "connection": "keep-alive",
                    "cache-control": "no-cache",
                    "user-agent": "Mozilla/5.0 (Windows NT 10.0; WOW64) AppleWebKit/537.36 (KHTML, like Gecko) Chrome/53.0.2785.143 Safari/537.36",
                    "postman-token": "9817ea4d-ad9d-b2fc-7685-9dff1a1bc193",
                    "accept": "*/*",
                    "accept-encoding": "gzip, deflate, sdch",
                    "accept-language": "zh-CN,zh;q=0.8"
                },
                "response": {
                    "X-Application-Context": "hello:dev:8881",
                    "Content-Type": "application/json;charset=UTF-8",
                    "Transfer-Encoding": "chunked",
                    "Date": "Sat, 24 Dec 2016 09:00:22 GMT",
                    "status": "200"
                }
            }
        }
    },
    ...
]
2.3、操作控制类
2.3.1、/shutdown
仔细的读者可能会发现,我们在“初识Actuator”时运行示例的控制台中输出的所有监控端点,已经在介绍应用配置类端点和度量指标类端点时都讲解完了。那么还有哪些是操作控制类端点呢?实际上,由于之前介绍的所有端点都是用来反映应用自身的属性或是运行中的状态,相对于操作控制类端点没有那么敏感,所以他们默认都是启用的。而操作控制类端点拥有更强大的控制能力,如果要使用它们的话,需要通过属性来配置开启。
在原生端点中,只提供了一个用来关闭应用的端点:/shutdown。我们可以通过如下配置开启它:
endpoints.shutdown.enabled=true
在配置了上述属性之后,只需要访问该应用的 /shutdown 端点就能实现关闭该应用的远程操作。由于开放关闭应用的操作本身是一件非常危险的事,所以真正在线上使用的时候,我们需要对其加入一定的保护机制,比如:定制Actuator的端点路径、整合Spring Security进行安全校验等。
三、引入安全校验
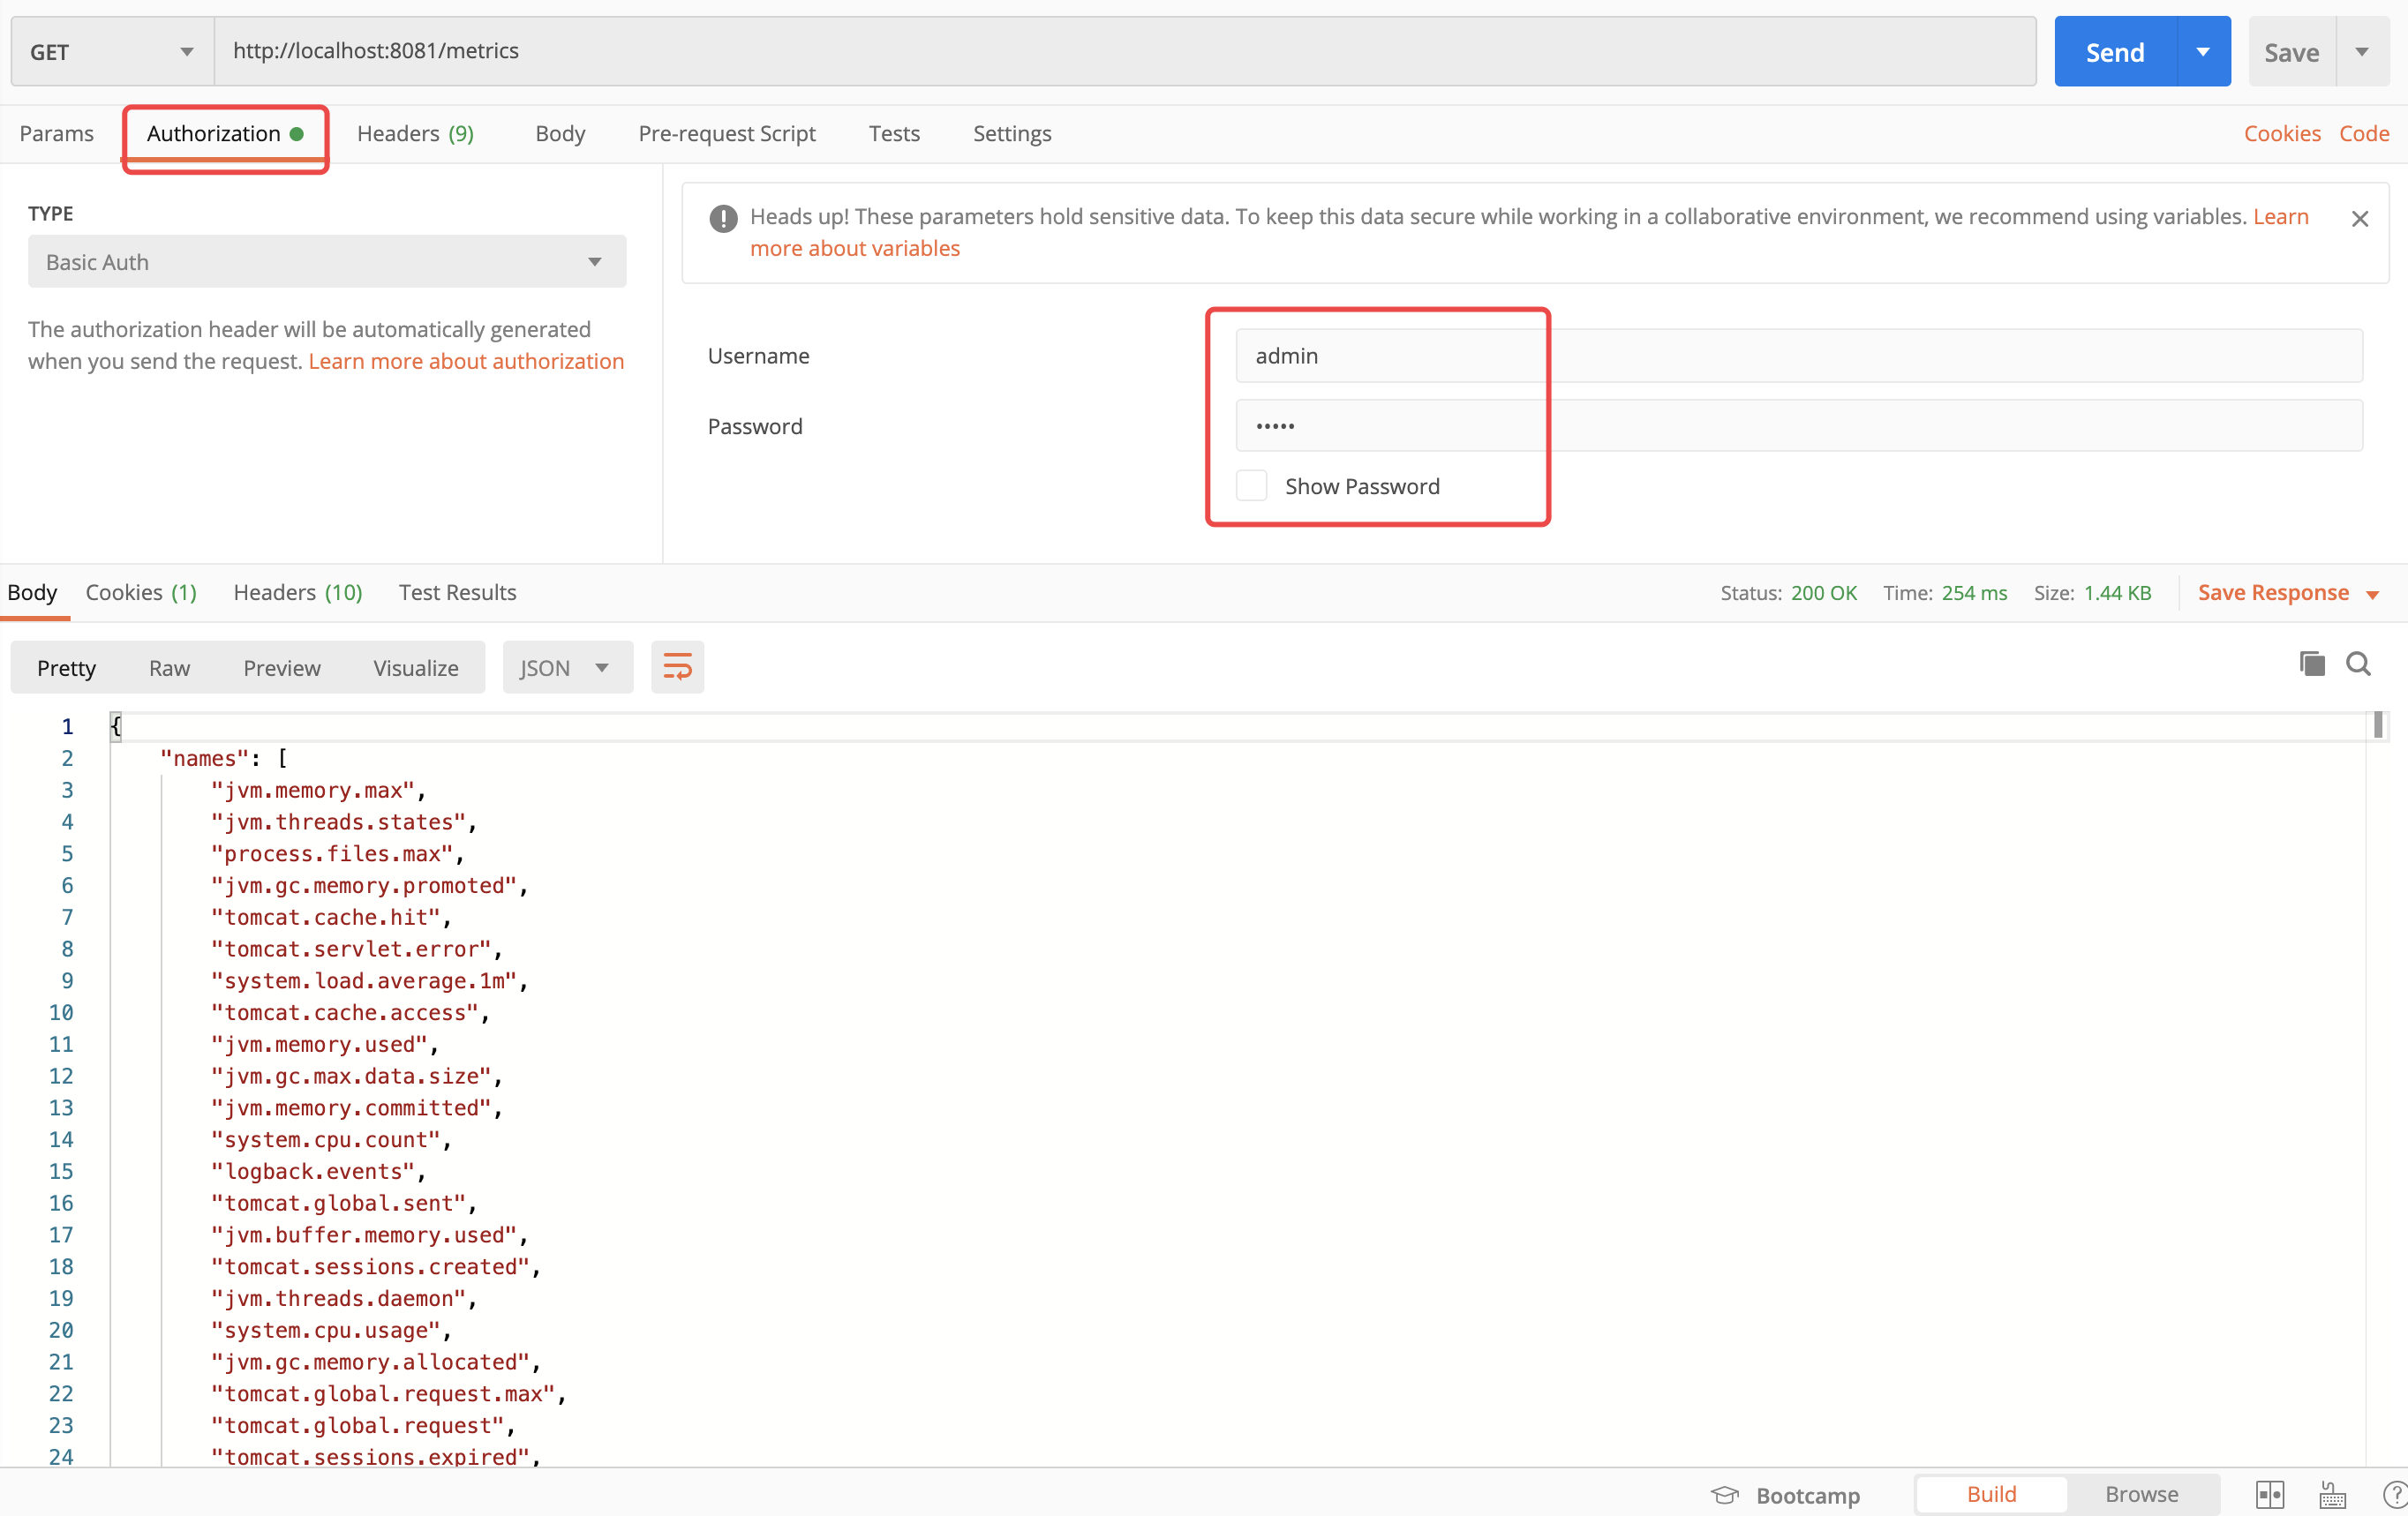
因 Spring Boot Actuator 会暴露我们服务的详细信息,为了保障安全性,建议添加安全控制的相关依赖 spring-boot-starter-security ,这样,在访问应用监控端点时,都需要输入验证信息。 根据业务场景需要进行添加
pom.xml
<dependency>
    <groupId>org.springframework.boot</groupId>
    <artifactId>spring-boot-starter-security</artifactId>
</dependency>
application.properties
spring.security.user.name=admin
spring.security.user.password=admin
访问示例:
四、示例
参考
官方文档:https://docs.spring.io/spring-boot/docs/current/reference/html/production-ready-features.html#production-ready-enabling
Spring3all社区:http://www.spring4all.com/article/259


