在线安装
环境准备
1、Linux基础
2、CentOS 7
3、Xshell连接远程操作
环境查看
#系统内核[root@Mi10Pro-C ~]# uname -r3.10.0-229.el7.x86_64# 系统版本[root@Mi10Pro-C ~]# cat /etc/os-releaseNAME="Red Hat Enterprise Linux Server"VERSION="7.1 (Maipo)"ID="rhel"ID_LIKE="fedora"VERSION_ID="7.1"PRETTY_NAME="Red Hat Enterprise Linux Server 7.1 (Maipo)"ANSI_COLOR="0;31"CPE_NAME="cpe:/o:redhat:enterprise_linux:7.1:GA:server"HOME_URL="https://www.redhat.com/"BUG_REPORT_URL="https://bugzilla.redhat.com/"REDHAT_BUGZILLA_PRODUCT="Red Hat Enterprise Linux 7"REDHAT_BUGZILLA_PRODUCT_VERSION=7.1REDHAT_SUPPORT_PRODUCT="Red Hat Enterprise Linux"REDHAT_SUPPORT_PRODUCT_VERSION="7.1"
安装
# 1、卸载旧版本yum remove docker \docker-client \docker-client-latest \docker-common \docker-latest \docker-latest-logrotate \docker-logrotate \docker-engine# 2、安装需要的安装包yum install -y yum-utils# 3、设置镜像的仓库地址yum-config-manager \--add-repo \http://mirrors.aliyun.com/docker-ce/linux/centos/docker-ce.repo #阿里源https://download.docker.com/linux/centos/docker-ce.repo #默认的这个是国外源# 更新yum软件包的索引yum makecache fast# 3、安装docker引擎 docker-ce 社区 ee 企业版本yum -y install docker-ce docker-ce-cli containerd.io# 注意:最小化安装的可能会报错,原因是container-selinux版本过低wget -O /etc/yum.repos.d/CentOS-Base.repo http://mirrors.aliyun.com/repo/Centos-7.repo安装后重新安装docker# 4、启动dockersystemctl start dockersystemctl enable docker.servicedocker version# 5、测试hello worlddocker run hello-world# 6、查看下载的hello world镜像docker images# 7、卸载dockeryum remove docker-ce docker-ce-cli containerd.io #卸载依赖rm -rf /var/lib/docker #删除资源,默认的工作路径/var/lib/docker
配置阿里云镜像加速服务
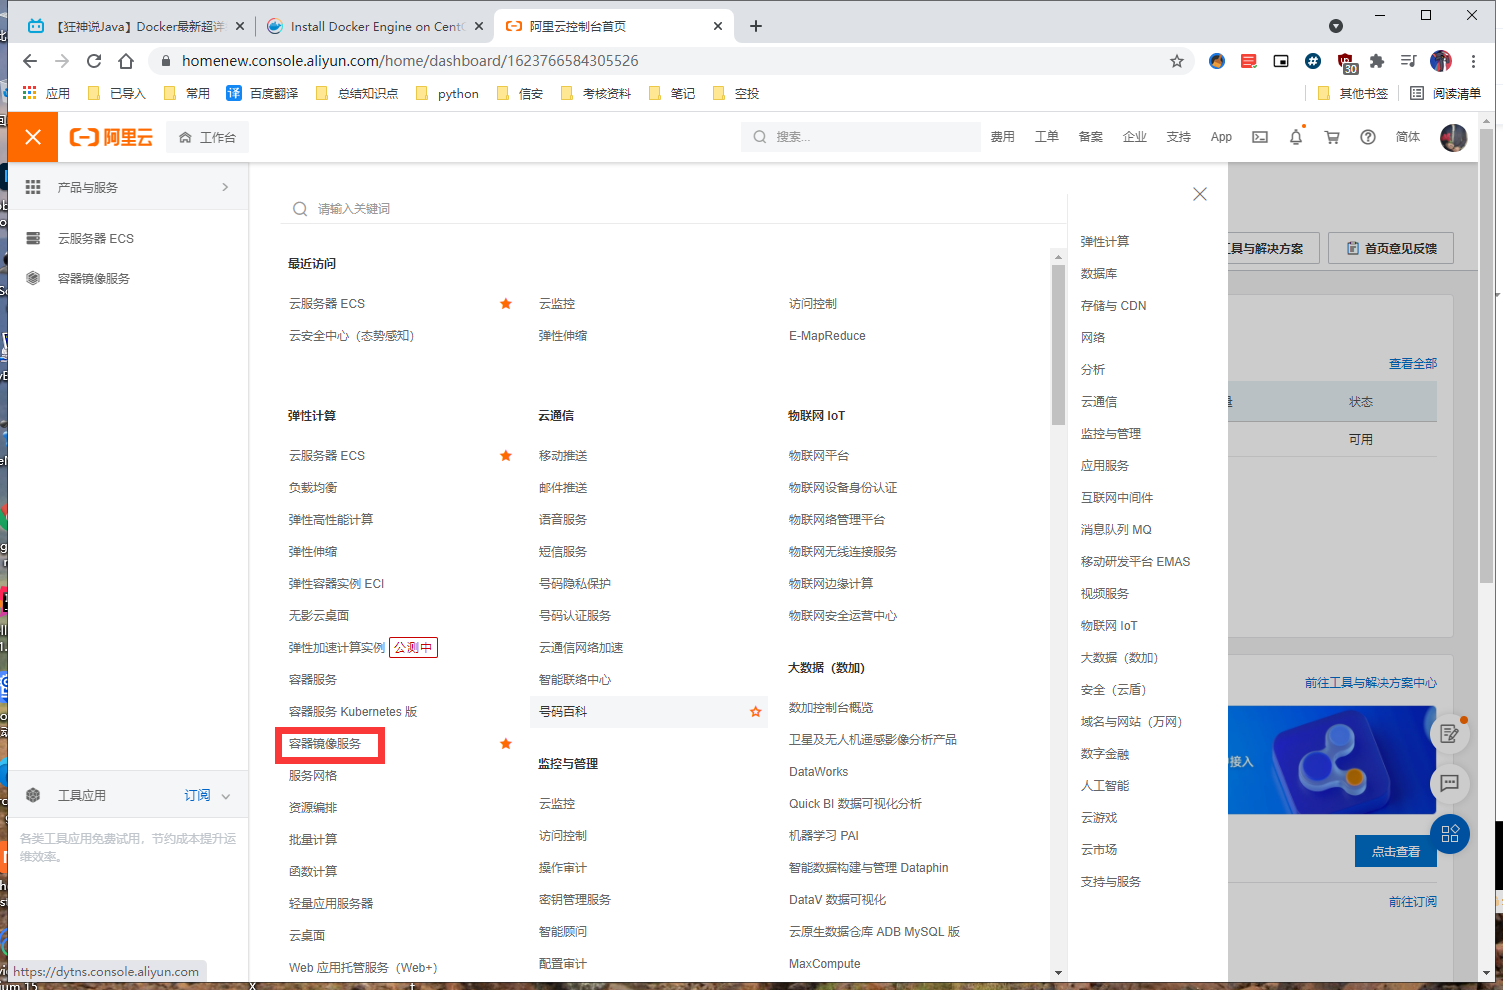
1、登录阿里云找到容器镜像服务
2、找到镜像加速地址
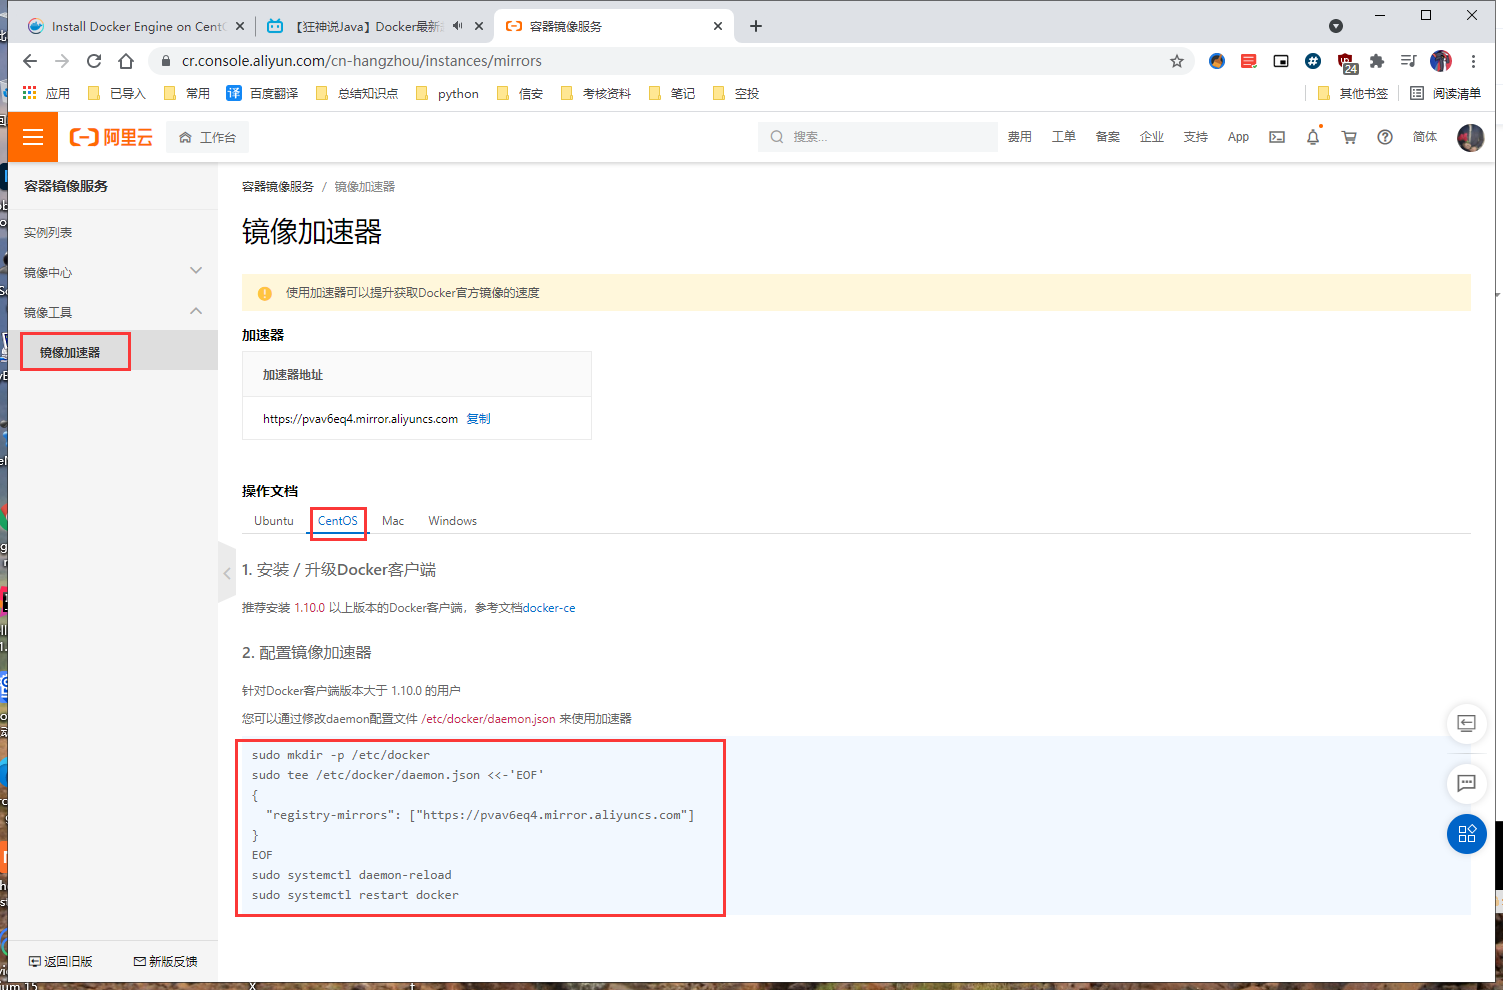 3、配置使用
#您可以通过修改daemon配置文件/etc/docker/daemon.json来使用加速器sudo mkdir -p /etc/dockersudo tee /etc/docker/daemon.json <<-'EOF'{"registry-mirrors": ["https://pvav6eq4.mirror.aliyuncs.com"]}EOFsudo systemctl daemon-reloadsudo systemctl restart docker
Docker Run的流程和原理
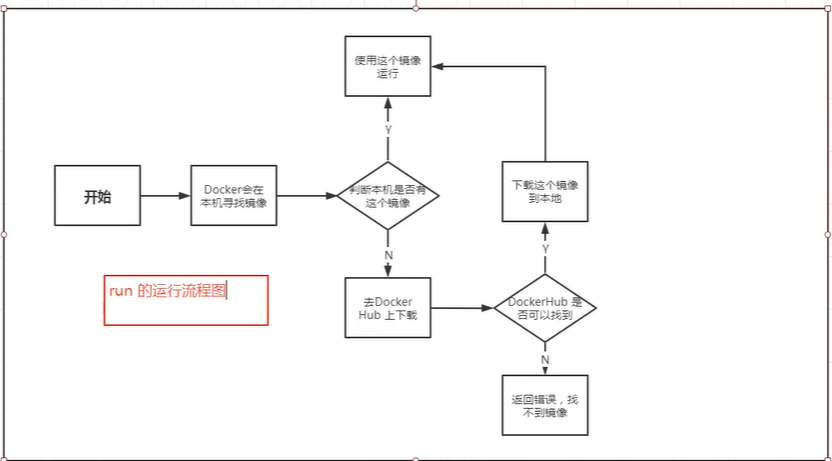
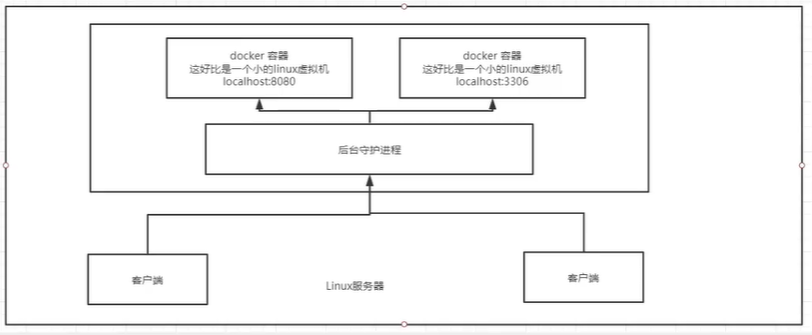
比虚拟机更少的抽象层,比虚拟机少了引导部分启动,决定了他更加轻量快速
离线安装docker
一、基础环境
1、Docker版本:18.06.1 官方下载地址(打不开可能需要梯子)
2、百度云Docker 18.06.1地址:https://pan.baidu.com/s/1YdN9z72QutPkHBfLq06H1A 密码:dvvh
3、官方参考文档:https://docs.docker.com/install/linux/docker-ce/binaries/#install-static-binaries
二、Docker安装
1、下载
wget https://download.docker.com/linux/static/stable/x86_64/docker-18.06.1-ce.tgz
2、解压
tar -xvf docker-18.06.1-ce.tgz
3、将解压出来的docker文件内容移动到 /usr/bin/ 目录下
cp docker/* /usr/bin/
4、将docker注册为service
vim /etc/systemd/system/docker.service[Unit]Description=Docker Application Container EngineDocumentation=https://docs.docker.comAfter=network-online.target firewalld.service``Wants=network-online.target`` ` `[Service]``Type=notify``# the default is not to use systemd for cgroups because the delegate issues still``# exists and systemd currently does not support the cgroup feature set required``# for containers run by docker``ExecStart=/usr/bin/dockerd``ExecReload=/bin/kill -s HUP $MAINPID``# Having non-zero Limit*s causes performance problems due to accounting overhead``# in the kernel. We recommend using cgroups to do container-local accounting.``LimitNOFILE=infinity``LimitNPROC=infinity``LimitCORE=infinity``# Uncomment TasksMax if your systemd version supports it.``# Only systemd 226 and above support this version.``#TasksMax=infinity``TimeoutStartSec=0``# set delegate yes so that systemd does not reset the cgroups of docker containers``Delegate=yes``# kill only the docker process, not all processes in the cgroup``KillMode=process``# restart the docker process if it exits prematurely``Restart=``on``-failure``StartLimitBurst=3``StartLimitInterval=60s`` ` `[Install]``WantedBy=multi-user.target
5、启动
chmod +x /etc/systemd/system/docker.service #添加文件权限并启动dockersystemctl daemon-reload #重新加载配置文件systemctl start docker #启动Dockersystemctl enable docker.service #设置开机自启
6、验证
systemctl status docker #查看Docker状态docker -v #查看Docker版本

若有收获,就点个赞吧
0 人点赞
