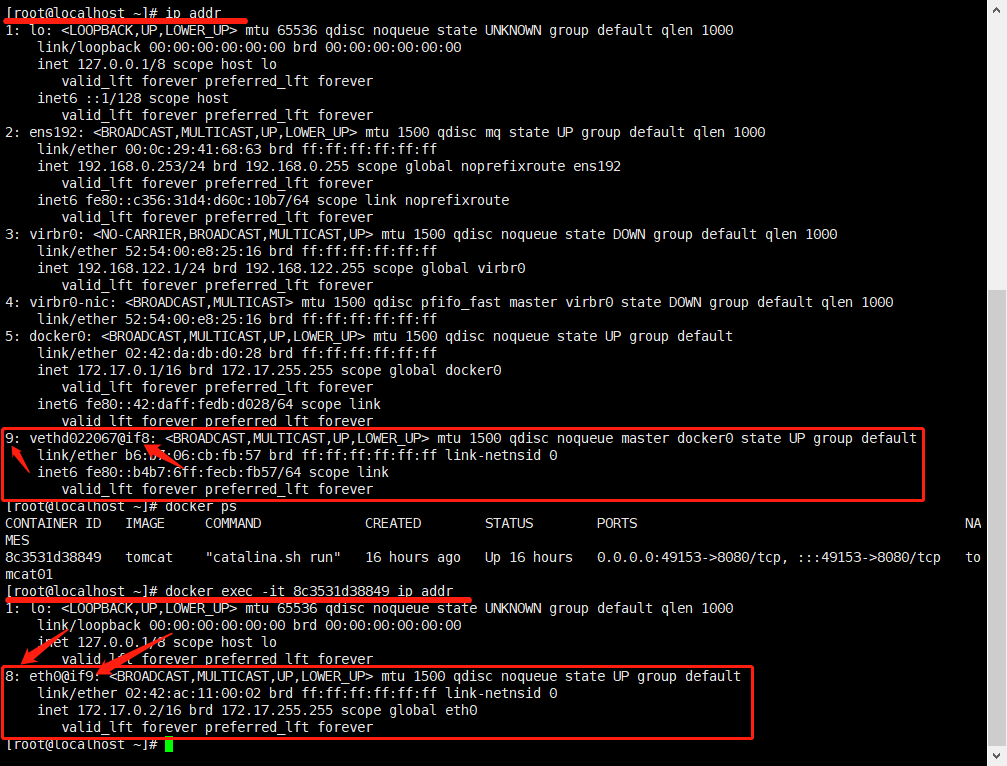
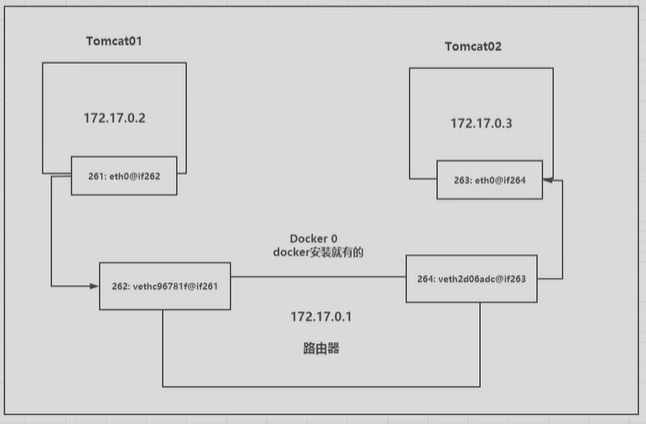
evth-pair
启动的容器是带网卡的,并且是成对的 evth-pair 就是一队虚拟设备接口,成对出现,一端连接协议,一端彼此相连 Openstac、Docker容器之间的连接,ovs的连接,都是用的 evth-pair 技术
测试连通性
[root@localhost ~]# docker exec -it tomcat02 ping 172.17.0.2PING 172.17.0.2 (172.17.0.2) 56(84) bytes of data.64 bytes from 172.17.0.2: icmp_seq=1 ttl=64 time=0.374 ms64 bytes from 172.17.0.2: icmp_seq=2 ttl=64 time=0.092 ms#容器和容器之间是可以通信的
—link
单项绑定网络,本质就是写个host指向
[root@localhost ~]# docker run -d -P --name tomcat03 --link tomcat02 tomcatWARNING: IPv4 forwarding is disabled. Networking will not work.c7c93fa009c3833788a0b98045c68be2fa37b0e543adbd7f4bcc3a1291dcf2c0[root@localhost ~]# docker exec -it tomcat03 ping tomcat02PING tomcat02 (172.17.0.3) 56(84) bytes of data.64 bytes from tomcat02 (172.17.0.3): icmp_seq=1 ttl=64 time=0.291 ms64 bytes from tomcat02 (172.17.0.3): icmp_seq=2 ttl=64 time=0.116 ms64 bytes from tomcat02 (172.17.0.3): icmp_seq=3 ttl=64 time=0.123 ms64 bytes from tomcat02 (172.17.0.3): icmp_seq=4 ttl=64 time=0.126 ms
自定义网络
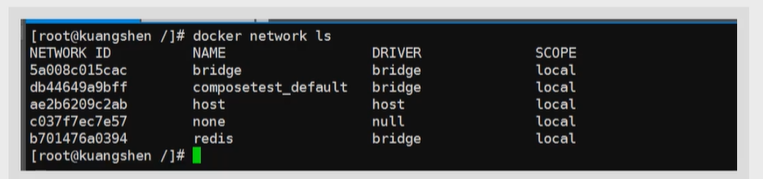
网络模式: bridge:桥接docker none:不配置网络 host:和宿主机共享 container:容器网络互连(用的少,局限性大)
自定义网络好处: 可以直接维护对应的网络表不需要再一个个link,平时强烈推荐使用
[root@localhost ~]# docker network create --driver bridge --subnet 192.168.1.0/24 --gateway 192.168.1.1 diynet9a1ff71f54dc9ae2d53db1aea234b6eb1c519afea23650fe8e30a5316a38f25c[root@localhost ~]# docker network lsNETWORK ID NAME DRIVER SCOPE6474be779eb7 bridge bridge local9a1ff71f54dc diynet bridge local93cf61d9aac6 host host localea6557cc9465 none null local[root@localhost ~]# docker network inspect diynet[{"Name": "diynet","Id": "9a1ff71f54dc9ae2d53db1aea234b6eb1c519afea23650fe8e30a5316a38f25c","Created": "2021-07-27T21:38:38.270250531+08:00","Scope": "local","Driver": "bridge","EnableIPv6": false,"IPAM": {"Driver": "default","Options": {},"Config": [{"Subnet": "192.168.1.0/24","Gateway": "192.168.1.1"}]},"Internal": false,"Attachable": false,"Ingress": false,"ConfigFrom": {"Network": ""},"ConfigOnly": false,"Containers": {},"Options": {},"Labels": {}}]# 指定自定义网络创建[root@localhost ~]# docker run -d -P --name tomcat01 --net diynet tomcatWARNING: IPv4 forwarding is disabled. Networking will not work.a55408b856e231251a797cc714f9bc6c6945d03b4b507e2fe5392953d9078d64[root@localhost ~]# docker run -d -P --name tomcat02 --net diynet tomcatWARNING: IPv4 forwarding is disabled. Networking will not work.b36969db2005b9be92b6d1a7dee86bac689713dd98410606c851c8f5a178c9fc# 再次查看diynet详情[root@localhost ~]# docker network inspect diynet[{"Name": "diynet","Id": "9a1ff71f54dc9ae2d53db1aea234b6eb1c519afea23650fe8e30a5316a38f25c","Created": "2021-07-27T21:38:38.270250531+08:00","Scope": "local","Driver": "bridge","EnableIPv6": false,"IPAM": {"Driver": "default","Options": {},"Config": [{"Subnet": "192.168.1.0/24","Gateway": "192.168.1.1"}]},"Internal": false,"Attachable": false,"Ingress": false,"ConfigFrom": {"Network": ""},"ConfigOnly": false,"Containers": {"a55408b856e231251a797cc714f9bc6c6945d03b4b507e2fe5392953d9078d64": {"Name": "tomcat01","EndpointID": "e3219aac6eae7461c74b6aefdee19a0ba6c05395af1f6f1e00e66f55b791e208","MacAddress": "02:42:c0:a8:01:02","IPv4Address": "192.168.1.2/24","IPv6Address": ""},"b36969db2005b9be92b6d1a7dee86bac689713dd98410606c851c8f5a178c9fc": {"Name": "tomcat02","EndpointID": "fa7351d0f4bb725385247bff70820dad417e3292bd774be58ab9ff4fdb79633f","MacAddress": "02:42:c0:a8:01:03","IPv4Address": "192.168.1.3/24","IPv6Address": ""}},"Options": {},"Labels": {}}]# 测试结果[root@localhost ~]# docker exec -it tomcat01 ping 192.168.1.3PING 192.168.1.3 (192.168.1.3) 56(84) bytes of data.64 bytes from 192.168.1.3: icmp_seq=1 ttl=64 time=0.185 ms64 bytes from 192.168.1.3: icmp_seq=2 ttl=64 time=0.121 ms64 bytes from 192.168.1.3: icmp_seq=2 ttl=64 time=0.131 ms[root@localhost ~]# docker exec -it tomcat01 ping tomcat02PING tomcat02 (192.168.1.3) 56(84) bytes of data.64 bytes from tomcat02.diynet (192.168.1.3): icmp_seq=1 ttl=64 time=0.130 ms64 bytes from tomcat02.diynet (192.168.1.3): icmp_seq=2 ttl=64 time=0.148 ms64 bytes from tomcat02.diynet (192.168.1.3): icmp_seq=3 ttl=64 time=0.082 ms
网络连通
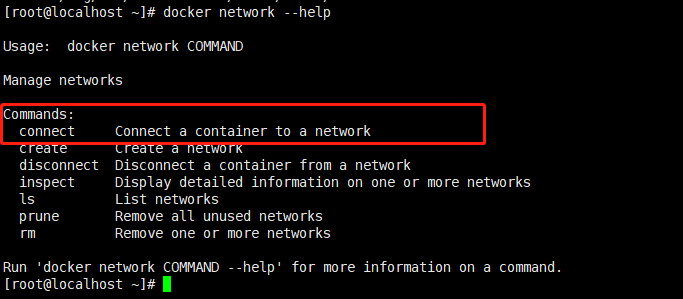
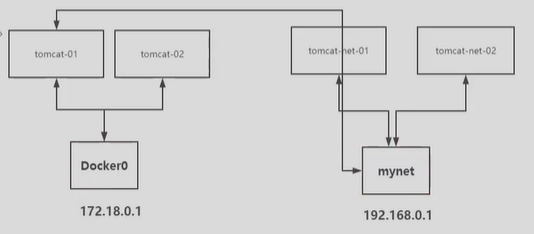
实际上打通就是将另一个容器的ip放到了自定义网络下 也就是一个容器两个ip段
[root@localhost ~]# docker run -d -P --name tomcat-net01 --net diynet tomcatWARNING: IPv4 forwarding is disabled. Networking will not work.d9ed9f6cbab8688c4cc9583d7cd7534e2b1b99aa0c4cc2af2c136896cab77308[root@localhost ~]# docker run -d -P --name tomcat-net02 --net diynet tomcatWARNING: IPv4 forwarding is disabled. Networking will not work.4495e3e542d95d81f0a986a8908138904246b162829f1672b4aa42f6a5ebde66[root@localhost ~]# docker run -d -P --name tomcat01 tomcatWARNING: IPv4 forwarding is disabled. Networking will not work.3feb35fd38e67bb350e52a4b7d35cc6fa871a7e23542b2504505072027503374[root@localhost ~]# docker run -d -P --name tomcat02 tomcatWARNING: IPv4 forwarding is disabled. Networking will not work.cf7adcd0e974cbf5cbc9d117f6b7dbfccf9a52ef02a32f3679950b28f89f8516# connect打通容器和自定义网络[root@localhost ~]# docker network connect diynet tomcat01[root@localhost ~]# docker network connect diynet tomcat02# 查看效果[root@localhost ~]# docker network inspect diynet[{"Name": "diynet","Id": "9a1ff71f54dc9ae2d53db1aea234b6eb1c519afea23650fe8e30a5316a38f25c","Created": "2021-07-27T21:38:38.270250531+08:00","Scope": "local","Driver": "bridge","EnableIPv6": false,"IPAM": {"Driver": "default","Options": {},"Config": [{"Subnet": "192.168.1.0/24","Gateway": "192.168.1.1"}]},"Internal": false,"Attachable": false,"Ingress": false,"ConfigFrom": {"Network": ""},"ConfigOnly": false,"Containers": {"3feb35fd38e67bb350e52a4b7d35cc6fa871a7e23542b2504505072027503374": {"Name": "tomcat01","EndpointID": "8800598e6f75e197295663d51d808abdff7f61a4f9c2d6b6818e40d0dc6278fb","MacAddress": "02:42:c0:a8:01:04","IPv4Address": "192.168.1.4/24","IPv6Address": ""},"4495e3e542d95d81f0a986a8908138904246b162829f1672b4aa42f6a5ebde66": {"Name": "tomcat-net02","EndpointID": "5e492c846949d0772b23c835f964e8e9974531d467a3f9c1250278d7b36febbf","MacAddress": "02:42:c0:a8:01:03","IPv4Address": "192.168.1.3/24","IPv6Address": ""},"cf7adcd0e974cbf5cbc9d117f6b7dbfccf9a52ef02a32f3679950b28f89f8516": {"Name": "tomcat02","EndpointID": "fa4270d46f4a22abe1663859714b349caf314026e844881843fb1cec5c3e6db4","MacAddress": "02:42:c0:a8:01:05","IPv4Address": "192.168.1.5/24","IPv6Address": ""},"d9ed9f6cbab8688c4cc9583d7cd7534e2b1b99aa0c4cc2af2c136896cab77308": {"Name": "tomcat-net01","EndpointID": "35d242d10811dad92f8b1207045bb18627ffba9ecc004706ae2eea0bb009a5af","MacAddress": "02:42:c0:a8:01:02","IPv4Address": "192.168.1.2/24","IPv6Address": ""}},"Options": {},"Labels": {}}]# 测试[root@localhost ~]# docker exec -it tomcat01 ping tomcat-net01PING tomcat-net01 (192.168.1.2) 56(84) bytes of data.64 bytes from tomcat-net01.diynet (192.168.1.2): icmp_seq=1 ttl=64 time=0.347 ms64 bytes from tomcat-net01.diynet (192.168.1.2): icmp_seq=2 ttl=64 time=0.692 ms64 bytes from tomcat-net01.diynet (192.168.1.2): icmp_seq=3 ttl=64 time=0.118 ms[root@localhost ~]# docker exec -it tomcat01 ping tomcat-net02PING tomcat-net02 (192.168.1.3) 56(84) bytes of data.64 bytes from tomcat-net02.diynet (192.168.1.3): icmp_seq=1 ttl=64 time=0.189 ms64 bytes from tomcat-net02.diynet (192.168.1.3): icmp_seq=2 ttl=64 time=0.126 ms
集群部署
# 通过shell脚本来创建六个redis配置for port in $(seq 1 6);domkdir -p /mydata/redis/node-${port}/conftouch /mydata/redis/node-${port}/conf/redis.confcat << eof >/mydata/redis/node-${port}/conf/redis.confport 6379bind 0.0.0.0cluster-enabled yescluster-node-timout 5000cluster-announce-ip 172.38.0.1${port}cluster-announce-bus-port 16379appendonly yeseofdone# shell脚本启动for port in $(seq 1 6);dodocker run -p 637${port}:6379 -p 1637${port}:16379 --name redis-${port} \-v /mydata/redis/node-${port}/data:/data \-v /mydata/redis/node-${port}/conf/redis.conf:/etc/redis/redis.conf \-d --net redis --ip 172.38.0.1${port} redis:5.0.9-alpine3.11 redis-server /etc/redis/redis.conf;done# 创建集群redis-cli --cluster create 172.38.0.11:6379 172.38.0.12:6379 172.38.0.13:6379 172.38.0.14:6379 172.38.0.15:6379 172.38.0.16:6379 --cluster-replicas 1# 进入集群docker exec -it redis-1 /bin/shredis-cli -ccluster infocluster nodes# set 值,查看哪个节点处理了set a b# 关闭当前运行的master节点,再查看集群docker stop redis-3redis-cli -cget a

若有收获,就点个赞吧
0 人点赞
