项目名称:cloud-provider-payment8001
鼠标点击父工程项目右击 —> New —> Module
具体创建步骤参考【搭建EurekaServer端服务注册中心】
1.添加pom.xml
<dependencies><!-- 引入eureka客户端 --><dependency><groupId>org.springframework.cloud</groupId><artifactId>spring-cloud-starter-netflix-eureka-client</artifactId></dependency><dependency><groupId>org.springframework.boot</groupId><artifactId>spring-boot-starter-web</artifactId></dependency><dependency><groupId>org.springframework.boot</groupId><artifactId>spring-boot-starter-actuator</artifactId></dependency><dependency><groupId>org.mybatis.spring.boot</groupId><artifactId>mybatis-spring-boot-starter</artifactId></dependency><dependency><groupId>com.alibaba</groupId><artifactId>druid-spring-boot-starter</artifactId><version>1.1.10</version></dependency><dependency><groupId>mysql</groupId><artifactId>mysql-connector-java</artifactId></dependency><dependency><groupId>org.springframework.boot</groupId><artifactId>spring-boot-starter-jdbc</artifactId></dependency><dependency><groupId>org.springframework.boot</groupId><artifactId>spring-boot-starter-test</artifactId><scope>test</scope></dependency><dependency><groupId>org.springframework.boot</groupId><artifactId>spring-boot-devtools</artifactId><scope>runtime</scope><optional>true</optional></dependency></dependencies>
2.添加application.yml配置文件
server:port: 8001spring:application:name: cloud-payment-servicedatasource:type: com.alibaba.druid.pool.DruidDataSource # 当前数据源操作类型driver-class-name: org.gjt.mm.mysql.Driver # mysql驱动url: jdbc:mysql://127.0.0.1:3306/db2019?useUnicode=true&characterEncoding=utf-8&useSSL=falseusername: rootpassword: 123456eureka:client:# 表示是否将自己注册进EurekaServer默认为trueregister-with-eureka: true# 是否从EurekaServer抓取已有的注册信息,默认为true。单节点无所谓,集群必须设置为true才能配合ribbon使用负载均衡fetch-registry: trueservice-url:defaultZone: http://eureka7001.com:7001/eureka,http://eureka7002.com:7002/eurekainstance:instance-id: payment8001#访问路径可以显示IP地址prefer-ip-address: true#Eureka客户端向服务端发送心跳的时间间隔,单位为秒(默认是30秒)#lease-renewal-interval-in-seconds: 1#Eureka服务端在收到最后一次心跳后等待时间上限,单位为秒(默认是90秒),超时将剔除服务#lease-expiration-duration-in-seconds: 2mybatis:mapper-locations: classpath:mapper/*.xmltype-aliases-package: com.springcloud.entities # 所有entities所在类的别名包
3.添加主启动类
@EnableEurekaClient
@SpringBootApplication
public class Payment8001Application {

    public static void main(String[] args) {
        SpringApplication.run(Payment8001Application.class,args);
    }

}
4.添加mapper文件
<?xml version="1.0" encoding="UTF-8"?>
<!DOCTYPE mapper PUBLIC "-//mybatis.org//DTD Mapper 3.0//EN" "http://mybatis.org/dtd/mybatis-3-mapper.dtd">
<mapper namespace="com.springcloud.dao.PaymentDao">
    <insert id="create" parameterType="com.springcloud.entities.Payment" useGeneratedKeys="true" keyProperty="id">
        insert into payment(serial) values(#{serial});
    </insert>
    <resultMap id="BaseResultMap" type="com.springcloud.entities.Payment">
        <id column="id" property="id" jdbcType="BIGINT"></id>
        <id column="serial" property="serial" jdbcType="VARCHAR"></id>
    </resultMap>
    <select id="getPaymentById" parameterType="java.lang.Long" resultMap="BaseResultMap">
        select * from payment where id = #{id};
    </select>
</mapper>
5.添加PaymentDao
@Mapper
public interface PaymentDao {

    int create(Payment payment);

    Payment getPaymentById(@Param("id") Long id);
}
6.添加PaymentService
public interface PaymentService {

    int create(Payment payment);

    Payment getPaymentById(@Param("id") Long id);
}
实现类:PaymentServiceImpl
@Service
public class PaymentServiceImpl implements PaymentService {

    @Resource
    private PaymentDao paymentDao;

    @Override
    public int create(Payment payment) {
        return paymentDao.create(payment);
    }

    @Override
    public Payment getPaymentById(Long id) {
        return paymentDao.getPaymentById(id);
    }
}
7.添加PaymentController
@Slf4j
@RestController
public class PaymentController {

    @Resource
    private PaymentService paymentService;

    @Value("${server.port}")
    private String serverPort;

    @Resource
    private DiscoveryClient discoveryClient;

    @PostMapping(value = "/payment/create")
    public CommonResult create(@RequestBody Payment payment) {
        int result = paymentService.create(payment);
        log.info("插入结果:" + result);
        if (result > 0) {
            return new CommonResult(200, "插入成功,serverPort: " + serverPort, result);
        } else {
            return new CommonResult(444, "插入失败", null);
        }
    }

    @GetMapping(value = "/payment/get/{id}")
    public CommonResult getPaymentById(@PathVariable("id") Long id) {
        Payment paymentById = paymentService.getPaymentById(id);
        log.info("插入结果:" + paymentById);
        if (paymentById != null) {
            return new CommonResult(200, "查询成功,serverPort: " + serverPort, paymentById);
        } else {
            return new CommonResult(444, "没有对应记录,查询id:" + id, null);
        }
    }

    @GetMapping(value = "/payment/discovery")
    public Object discovery() {
        // 获取服务列表
        List<String> services = discoveryClient.getServices();
        for (String element : services) {
            log.info("*****element: " + element);
        }

        // 获取指定服务的实例
        List<ServiceInstance> instances = discoveryClient.getInstances("CLOUD-PAYMENT-SERVICE");
        for (ServiceInstance instance : instances) {
            log.info(instance.getServiceId() + "\t" + instance.getHost() + "\t" + instance.getPort() + "\t" + instance.getUri());
        }
        return this.discoveryClient;
    }
}
8.创建cloud-provide-payment8002项目作为第二个服务提供者
项目搭建步骤参考:【创建服务提供者】
cloud-provide-payment8002项目中的application.yml
server:
  port: 8002

spring:
  application:
    name: cloud-payment-service
  datasource:
    type: com.alibaba.druid.pool.DruidDataSource      # 当前数据源操作类型
    driver-class-name: org.gjt.mm.mysql.Driver        # mysql驱动
    url: jdbc:mysql://127.0.0.1:3306/db2019?useUnicode=true&characterEncoding=utf-8&useSSL=false
    username: root
    password: 123456

eureka:
  client:
    # 表示是否将自己注册进EurekaServer默认为true
    register-with-eureka: true
    # 是否从EurekaServer抓取已有的注册信息,默认为true。单节点无所谓,集群必须设置为true才能配合ribbon使用负载均衡
    fetch-registry: true
    service-url:
      defaultZone: http://eureka7001.com:7001/eureka,http://eureka7002.com:7002/eureka
  instance:
    instance-id: payment8002
    #访问路径可以显示IP地址
    prefer-ip-address: true
    #Eureka客户端向服务端发送心跳的时间间隔,单位为秒(默认是30秒)
    #lease-renewal-interval-in-seconds: 1
    #Eureka服务端在收到最后一次心跳后等待时间上限,单位为秒(默认是90秒),超时将剔除服务
    #lease-expiration-duration-in-seconds: 2

mybatis:
  mapper-locations: classpath:mapper/*.xml
  type-aliases-package: com.springcloud.entities    # 所有entities所在类的别名包
主启动类
@EnableEurekaClient
@SpringBootApplication
public class Payment8002Application {

    public static void main(String[] args) {
        SpringApplication.run(Payment8002Application.class,args);
    }

}
9.启动cloud-provide-payment8001和cloud-provide-payment8002
浏览器输入:http://eureka7001.com:7001 或者 http://eureka7002.com:7002/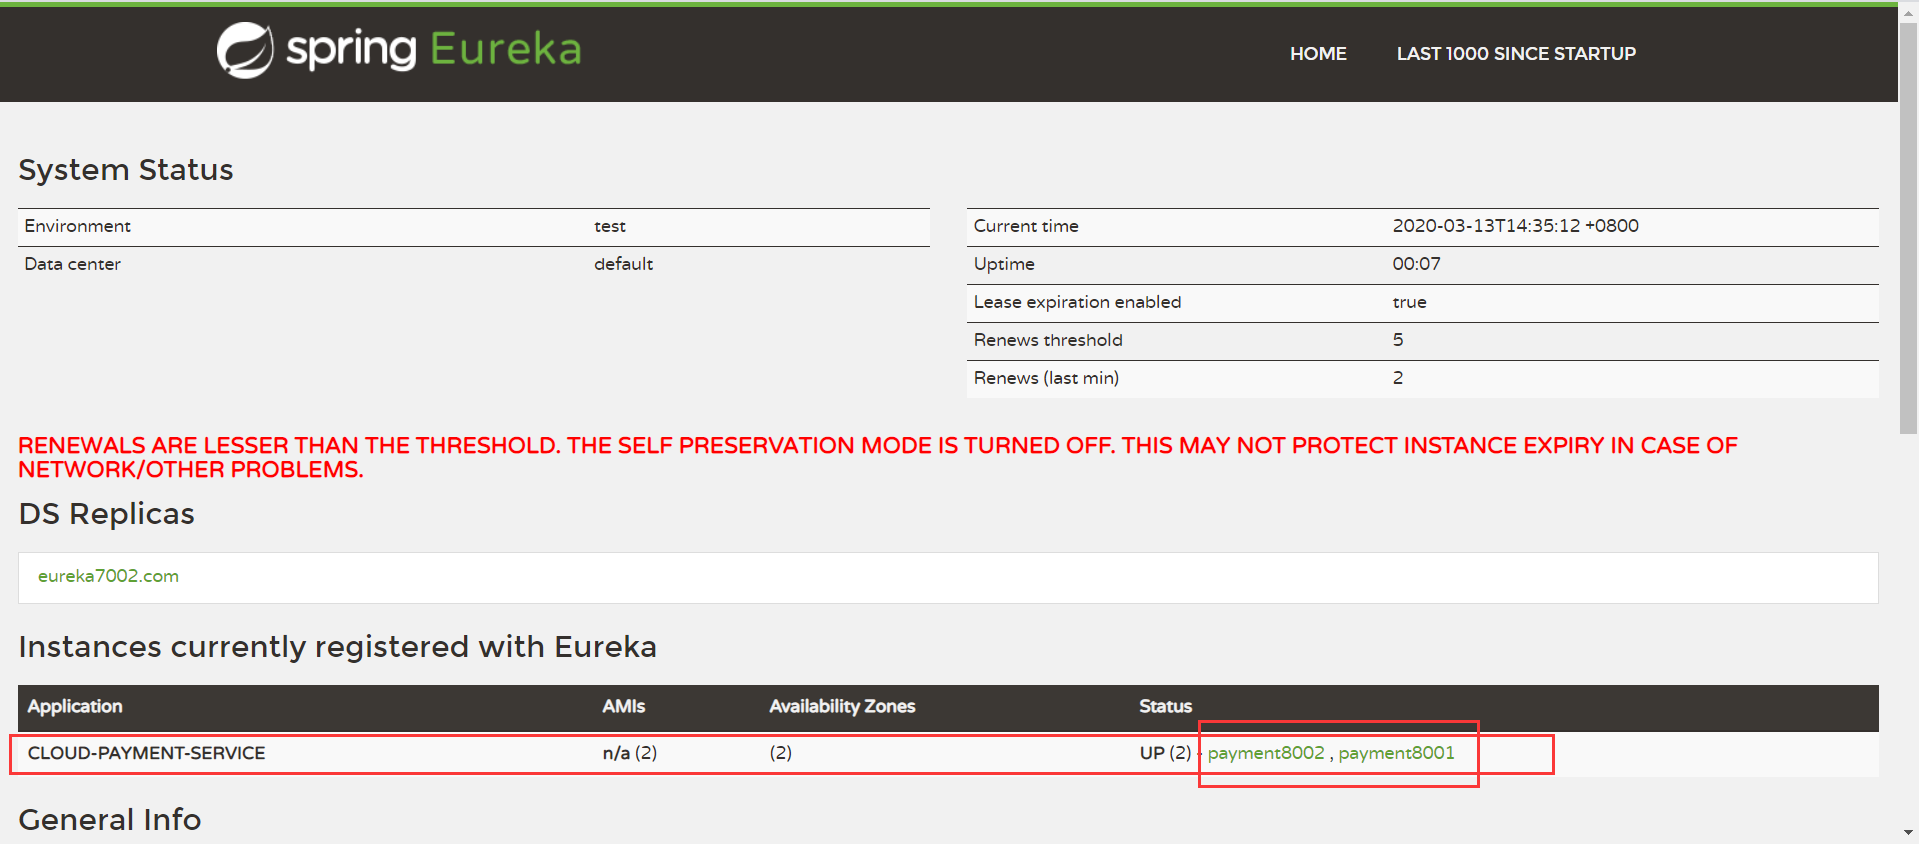
可以看到两个服务提供者都已经注册成功了

若有收获,就点个赞吧
0 人点赞
