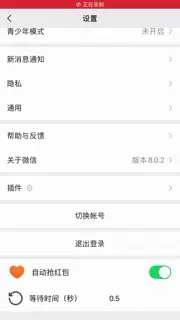
使用MokeyDev对WeChat进行重签名并安装,在设置页,增加自动抢红包的UI,包含是否启用自动抢红包功能的开关,以及抢红包时的手速设置
界面分析
使用
class-dump导出全部头文件
./class-dump -H WeChat -o ./header/使用
MokeyDev重签名wx8.0.2.ipa真机运行项目,使用
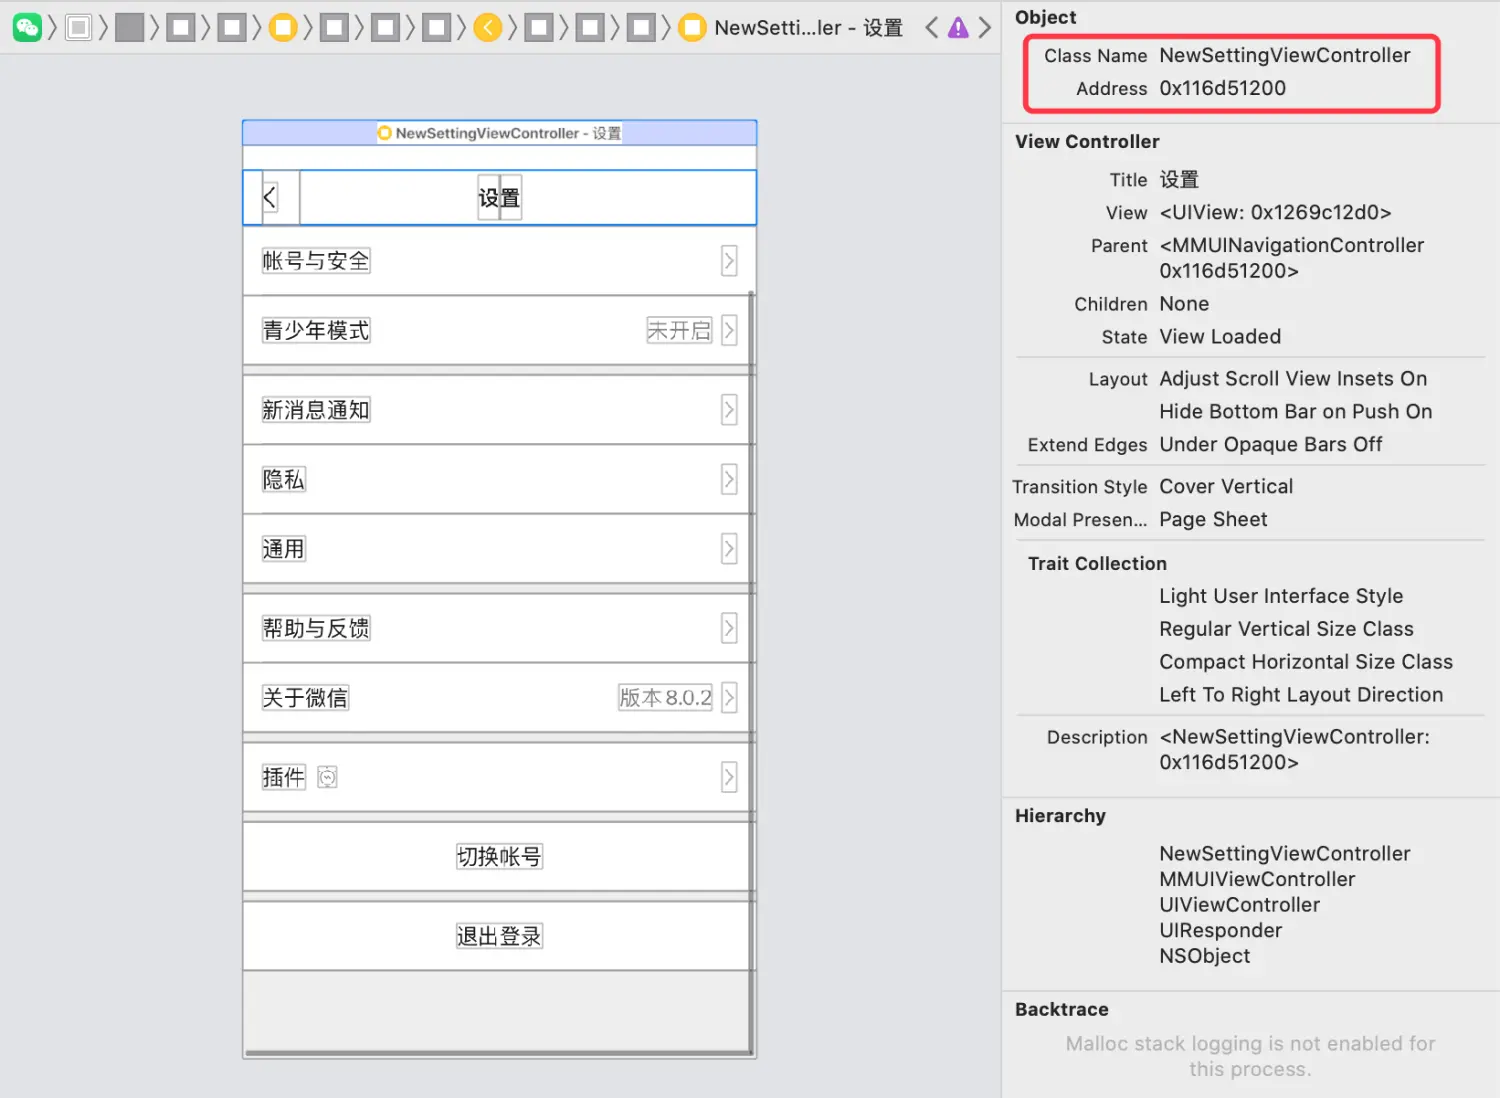
Debug Viwe找到设置页的控制器名称
使用
Debug Viwe时,如果经常卡死,可以先将其暂停/继续一次
使用
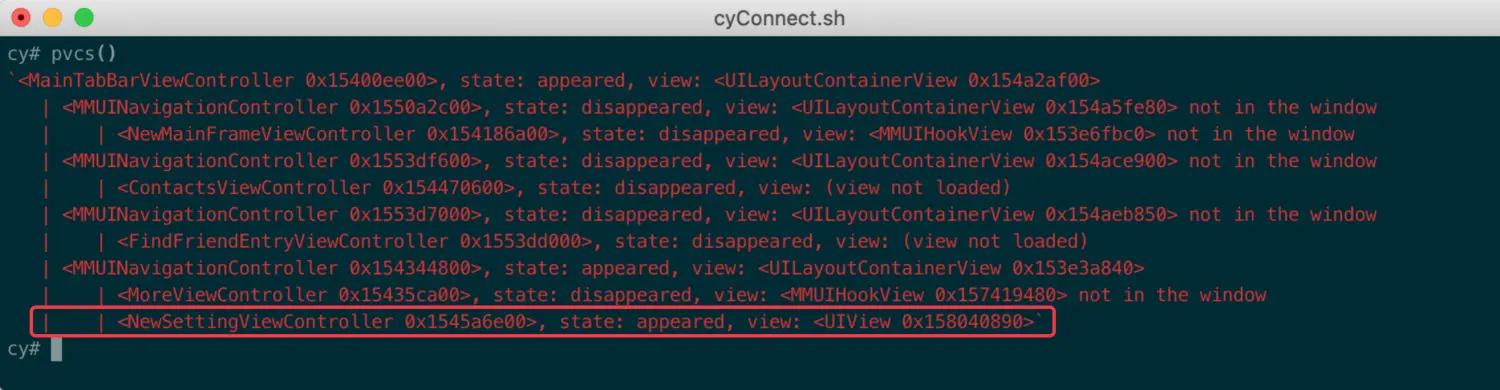
Cycript附加进程使用
pvcs()找到设置页的控制器
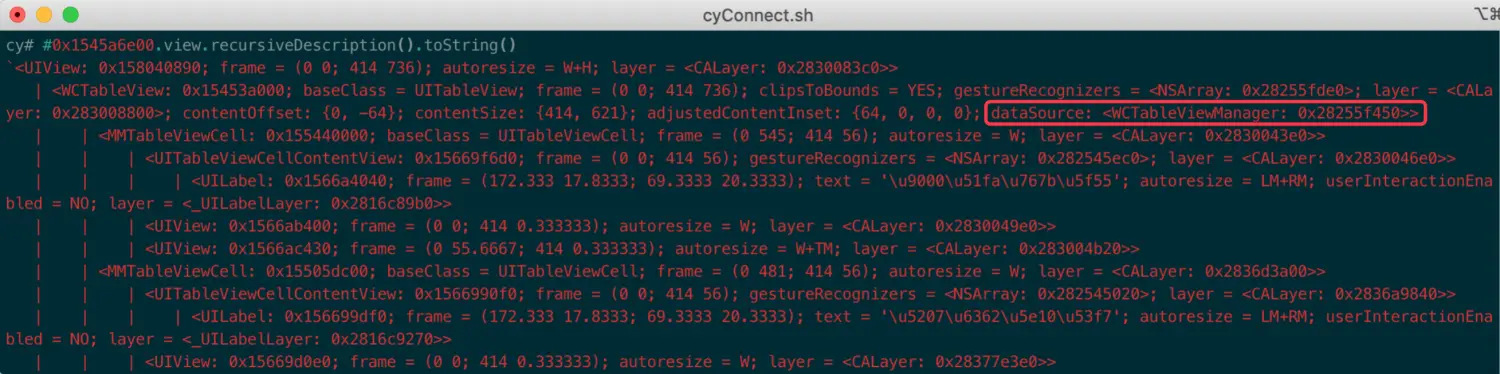
打印控制器
View下的所有视图,从中找到UITableView,并找到对应的数据源
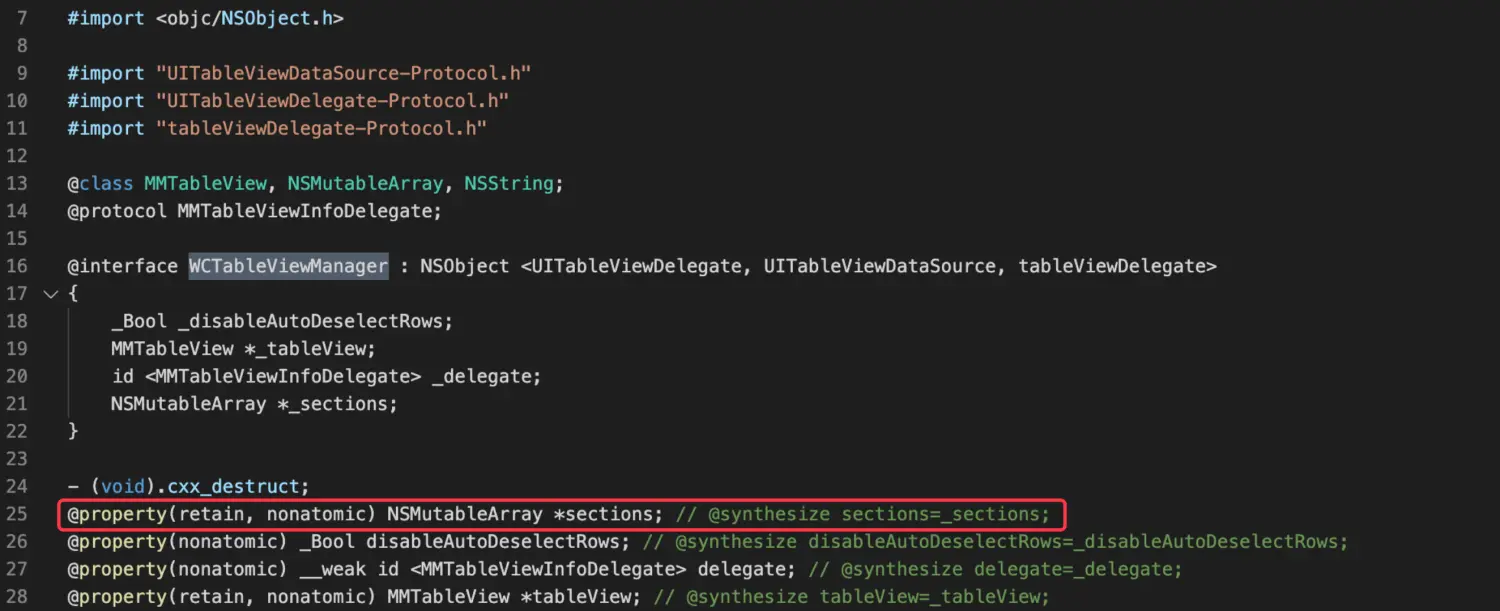
打开
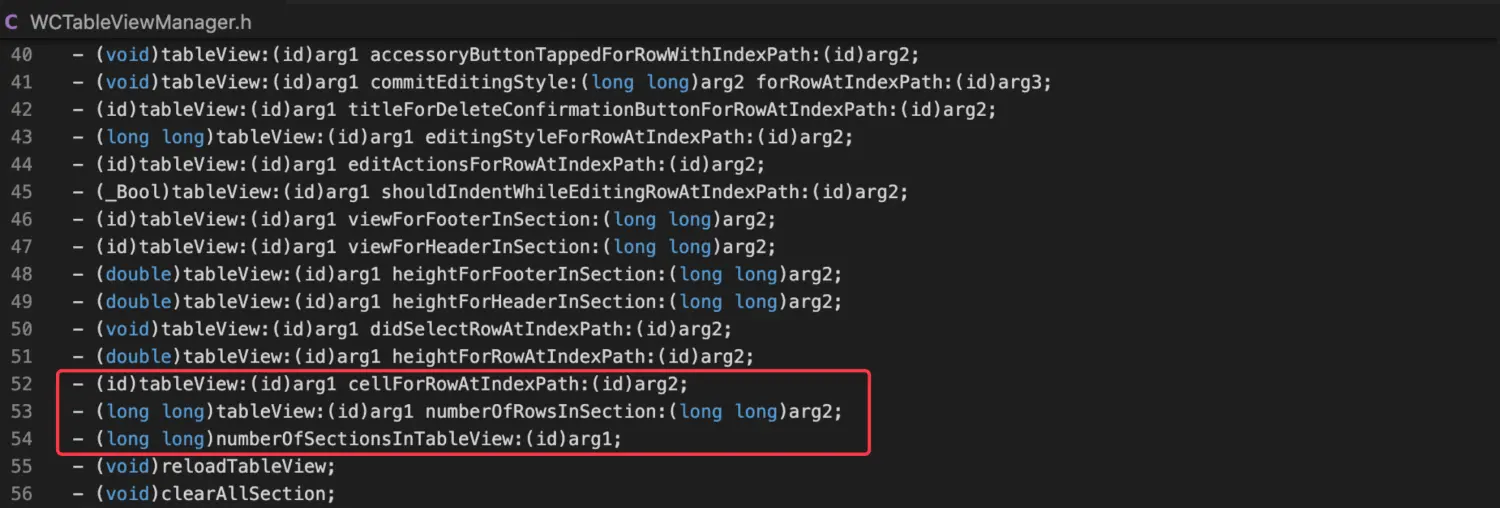
WCTableViewManager.h文件,找到数据源和关键方法
后续对关键方法进行
HOOK

精准定位注入点
找到影响
UITableView展示行数的数据源对
WCTableViewManager中的numberOfSectionsInTableView方法进行HOOK,打印数组总数和Section数```
import
@interface WCTableViewManager : NSObject @property(retain, nonatomic) NSMutableArray *sections; @end
%hook WCTableViewManager
- (NSInteger)numberOfSectionsInTableView:(UITableView *)tableView { NSLog(@”数据源:%ld,Sections:%ld”, (long)self.sections.count, (long)[tableView numberOfSections]); return %orig; }
%end
> 真机运行项目,查看`HOOK`之后的打印结果<br />> 从打印结果来看,`UITableView`的显示行数和数组总数是一致的。但也打印出其他页面的内容,证明`WCTableViewManager`在项目中是通用的。如果想对其`HOOK`,需要精准定位在设置页,不能影响其他功能> 想要精准定位,需要在`WCTableViewManager`中,对所属控制器进行判断> 我们要找到`WCTableViewManager`和控制器的关联> 找到`WCTableViewManager`>
0x280bfe5e0
““
> 找到`UITableView`,通过响应链条,向下找一层>
0x280bfe5e0.tableView.nextResponder
“>”
> 通过响应链条,再向下找一层>
0x280bfe5e0.tableView.nextResponder.nextResponder
““
> 通过响应链条,成功找到`NewSettingViewController`> 修改代码,增加判断条件,保证`HOOK`代码仅在设置页有效>
(NSInteger)numberOfSectionsInTableView:(UITableView *)tableView {
if([tableView.nextResponder.nextResponder isKindOfClass:%c(NewSettingViewController)]){
NSLog(@"数据源:%ld,Sections:%ld", (long)self.sections.count, (long)[tableView numberOfSections]);
}
return %orig; } ```
真机运行项目,查看
HOOK之后的打印结果
仅在
NewSettingViewController中打印结果

修改界面
确保代码仅在
NewSettingViewController中生效,接下来对几个关键方法进行HOOK,将界面修改成我们预期的样子增加
Section```
- (NSInteger)numberOfSectionsInTableView:(UITableView *)tableView {
if([tableView.nextResponder.nextResponder isKindOfClass:%c(NewSettingViewController)]){ return %orig+1; }
return %orig; }
> 最后`Section`下面的`Rows`,固定为`2`>
(NSInteger)tableView:(UITableView *)tableView numberOfRowsInSection:(NSInteger)section {
if([tableView.nextResponder.nextResponder isKindOfClass:%c(NewSettingViewController)] && (section==[self numberOfSectionsInTableView:tableView]-1)){
return 2;
}
return %orig; } ```
为了编译通过,需要在
WCTableViewManager中,声明numberOfSectionsInTableView:方法
@interface WCTableViewManager : NSObject <UITextFieldDelegate>- (NSInteger)numberOfSectionsInTableView:(UITableView *)tableView;@end自定义
Cell的高度,固定为60```
- (CGFloat)tableView:(UITableView )tableView heightForRowAtIndexPath:(NSIndexPath )indexPath {
if([tableView.nextResponder.nextResponder isKindOfClass:%c(NewSettingViewController)] && (indexPath.section==[self numberOfSectionsInTableView:tableView]-1)){ return 60; }
return %orig; }
> 自定义`Cell`,只设置背景色,看一下运行后的结果,确认`HOOK`代码的有效性>
(UITableViewCell )tableView:(UITableView )tableView cellForRowAtIndexPath:(NSIndexPath *)indexPath {
if([tableView.nextResponder.nextResponder isKindOfClass:%c(NewSettingViewController)] && (indexPath.section==[self numberOfSectionsInTableView:tableView]-1)){
NSString *strIdentifier=[NSString stringWithFormat:@"HookCell_%i",(int)indexPath.row];UITableViewCell *cell = [tableView dequeueReusableCellWithIdentifier:strIdentifier];if (cell == nil) {cell = [[UITableViewCell alloc] initWithStyle:UITableViewCellStyleDefault reuseIdentifier:strIdentifier];}if(indexPath.row==0){cell.backgroundColor=[UIColor redColor];}else{cell.backgroundColor=[UIColor blueColor];}return cell;
}
return %orig; } ```
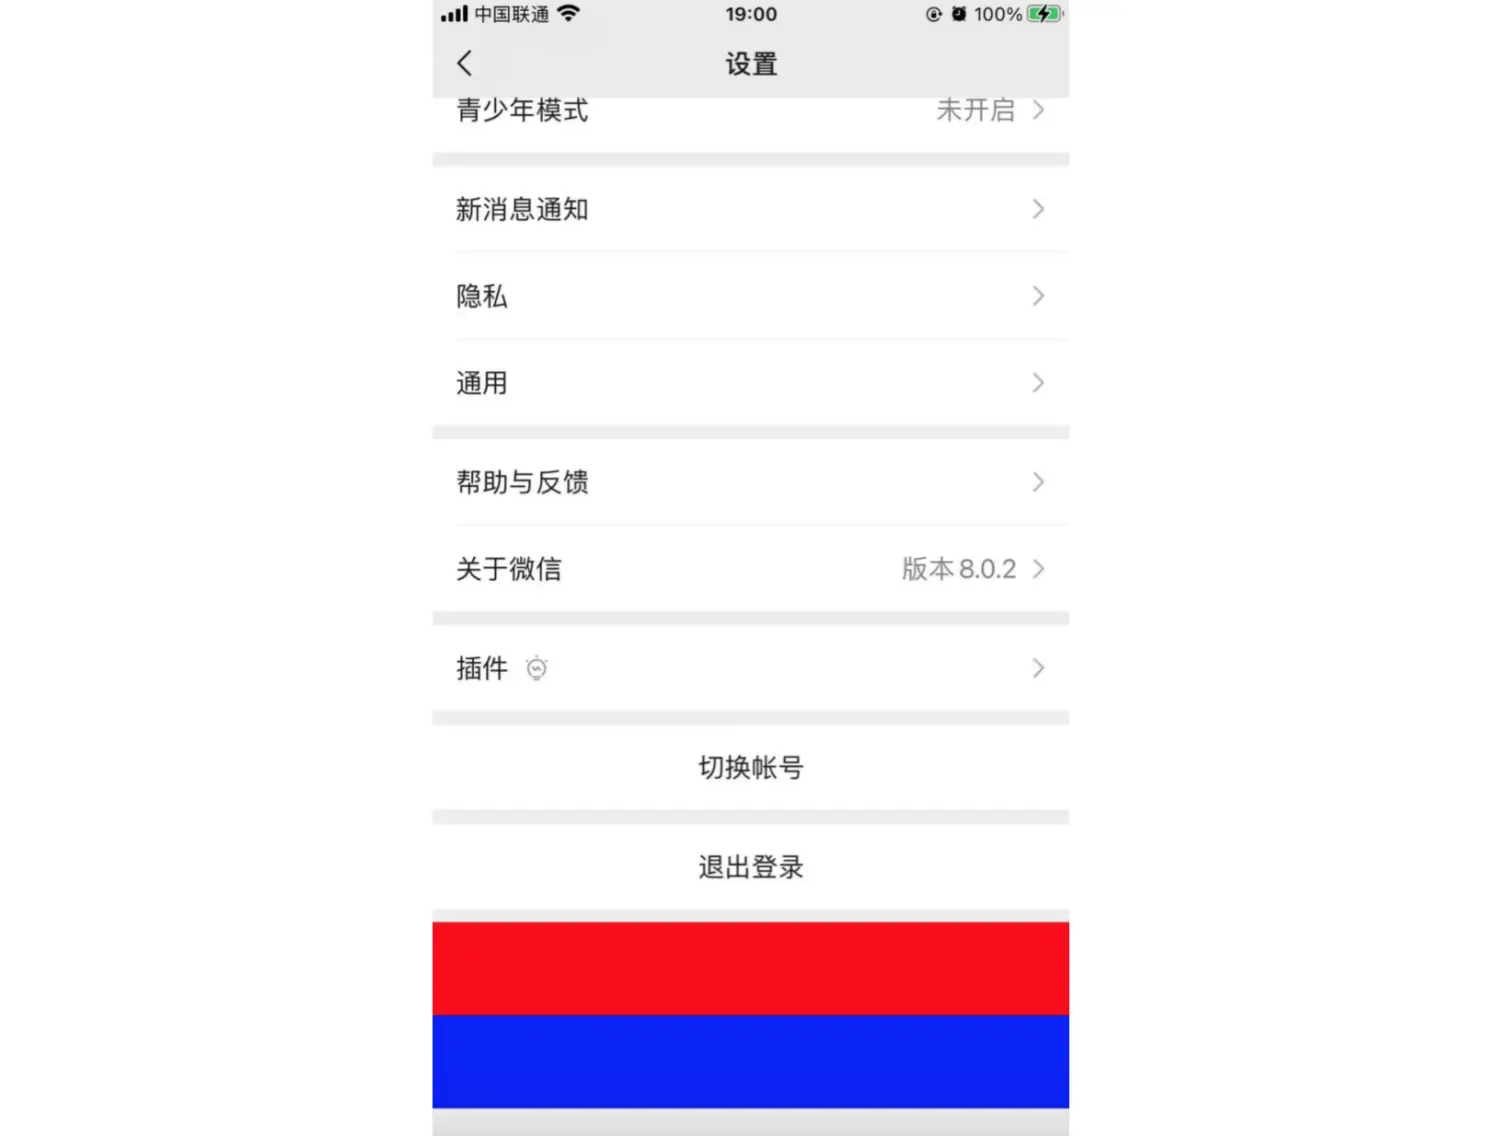
真机运行项目,查看
UI效果
修改
NewSettingViewController成功,在原有界面的下方,增加了自定义Cell
完善界面
确认
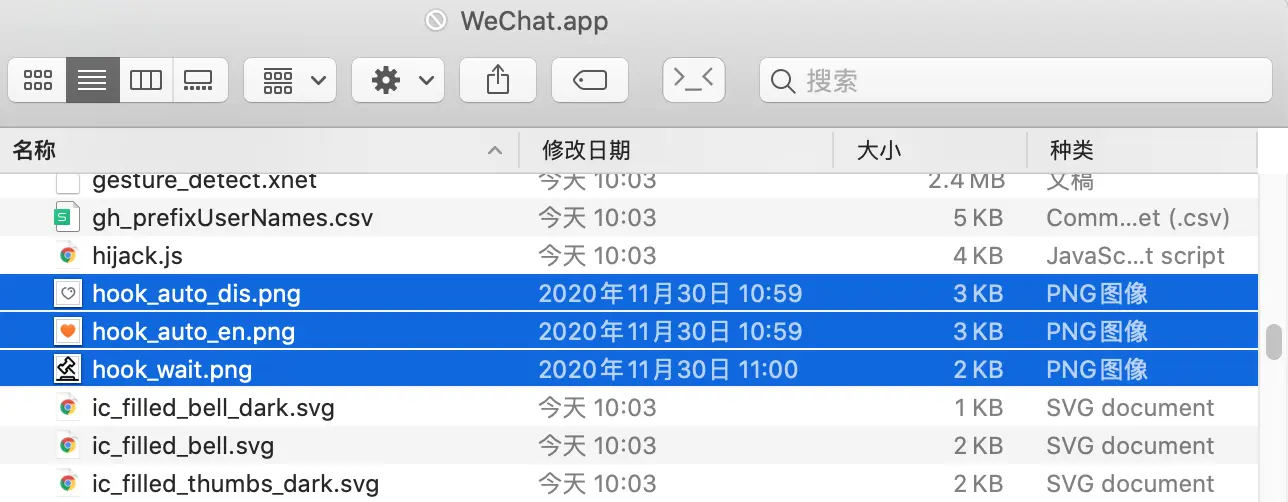
HOOK代码是有效的,下面完善自定义Cell的界面将自定义图标,导入
完善
tableView:cellForRowAtIndexPath:方法```
- (UITableViewCell )tableView:(UITableView )tableView cellForRowAtIndexPath:(NSIndexPath *)indexPath {
if([tableView.nextResponder.nextResponder isKindOfClass:%c(NewSettingViewController)] && (indexPath.section==[self numberOfSectionsInTableView:tableView]-1)){
NSString *strIdentifier=[NSString stringWithFormat:@"HookCell_%i",(int)indexPath.row];UITableViewCell *cell = [tableView dequeueReusableCellWithIdentifier:strIdentifier];if (cell == nil) {cell = [[UITableViewCell alloc] initWithStyle:UITableViewCellStyleDefault reuseIdentifier:strIdentifier];}cell.backgroundColor = [UIColor whiteColor];cell.selectionStyle = UITableViewCellSelectionStyleNone;if(indexPath.row==0){BOOL isAutoEnable = NO;cell.imageView.image = [UIImage imageNamed:(isAutoEnable ? @"hook_auto_en" : @"hook_auto_dis")];cell.textLabel.text = @"自动抢红包";UISwitch *switchAuto = [[UISwitch alloc] init];[switchAuto addTarget:self action:@selector(hookAutoAction:) forControlEvents:UIControlEventValueChanged];switchAuto.on=isAutoEnable;cell.accessoryView = switchAuto;}else{cell.imageView.image = [UIImage imageNamed:@"hook_wait"];cell.textLabel.text = @"等待时间(秒)";UITextField *txtWait=[[UITextField alloc] initWithFrame:CGRectMake(0, 0, 150, 40)];txtWait.borderStyle = UITextBorderStyleRoundedRect;txtWait.backgroundColor = [UIColor whiteColor];txtWait.keyboardType = UIKeyboardTypeNumberPad;txtWait.returnKeyType = UIReturnKeyDone;cell.accessoryView = txtWait;}return cell;
}
return %orig; }
> 增加`UISwitch`切换时,触发的`hookAutoAction:`方法>
%new -(void)hookAutoAction:(UISwitch *)sender{ NSLog(@”自动抢红包:%@”, (sender.isOn ? @”启用” : @”禁用”)); }
> 真机运行项目,查看`UI`效果<br />#####实现功能> `UI`搭建完成后,还差最后一步,实现功能> 自动抢红包功能的启用/禁用标识,以及抢红包时的手速设置,都要进行本地化保存> 增加宏定义>
define HOOKAUTOVALUE @”HookAutoValue”
define HOOKWAITVALUE @”HookWaitValue”
> 实现`UISwitch`切换的逻辑>
%new -(void)hookAutoAction:(UISwitch *)sender{
[[NSUserDefaults standardUserDefaults] setBool:sender.isOn forKey:HOOKAUTOVALUE];
[[NSUserDefaults standardUserDefaults] synchronize];
[MSHookIvar
> 修改`tableView:cellForRowAtIndexPath:`方法,将`UI`和功能进行关联>
BOOL isAutoEnable = [[NSUserDefaults standardUserDefaults] boolForKey:HOOKAUTOVALUE]; cell.imageView.image = [UIImage imageNamed:(isAutoEnable ? @”hook_auto_en” : @”hook_auto_dis”)]; cell.textLabel.text = @”自动抢红包”;
UISwitch *switchAuto = [[UISwitch alloc] init]; [switchAuto addTarget:self action:@selector(hookAutoAction:) >forControlEvents:UIControlEventValueChanged]; switchAuto.on=isAutoEnable; cell.accessoryView = switchAuto;
> 完成抢红包时的手速设置逻辑> 添加`UITextFieldDelegate`>
@interface WCTableViewManager : NSObject
> 增加`textField:shouldChangeCharactersInRange:replacementString:`方法,文本框内输入`\n`,视为输入完成,自动收起键盘>
%new
(BOOL)textField:(UITextField )textField shouldChangeCharactersInRange:(NSRange)range replacementString:(NSString )string {
if ([string isEqualToString:@”\n”]) {
[textField resignFirstResponder];return NO;
}
return YES; } ```
增加
textFieldDidEndEditing:方法,输入完成,将文本框内存本地化保存
%new-(void)textFieldDidEndEditing:(UITextField *)textField {[[NSUserDefaults standardUserDefaults] setObject:textField.text forKey:HOOKWAITVALUE];[[NSUserDefaults standardUserDefaults] synchronize];}修改
tableView:cellForRowAtIndexPath:方法,将UI和功能进行关联``` cell.imageView.image = [UIImage imageNamed:@”hook_wait”]; cell.textLabel.text = @”等待时间(秒)”;
UITextField *txtWait=[[UITextField alloc] initWithFrame:CGRectMake(0, 0, 150, 40)]; txtWait.borderStyle = UITextBorderStyleRoundedRect; txtWait.backgroundColor = [UIColor whiteColor]; txtWait.keyboardType = UIKeyboardTypeNumberPad; txtWait.returnKeyType = UIReturnKeyDone; txtWait.delegate = self; txtWait.text = [[NSUserDefaults standardUserDefaults] objectForKey:HOOKWAITVALUE]; cell.accessoryView = txtWait;
> 真机运行项目,查看`UI`效果<br />#####优化> 整体的界面和功能都已经完成,还有两个小问题需要优化> - 触发文本框,键盘弹出,会遮挡底部的功能区域> - 设置页的列表滑动时,键盘无法自动收起,影响体验> 解决遮挡问题> 对`NewSettingViewController`进行`HOOK`,对键盘的通知进行监听和销毁>
%hook NewSettingViewController
(void)viewDidLoad{
%orig;
[[NSNotificationCenter defaultCenter] addObserver:self selector:@selector(keyboardWillShow:) name:UIKeyboardWillShowNotification object:nil]; [[NSNotificationCenter defaultCenter] addObserver:self selector:@selector(keyboardWillHide:) name:UIKeyboardWillHideNotification object:nil]; }
(void)dealloc{ [[NSNotificationCenter defaultCenter] removeObserver:self name:UIKeyboardWillShowNotification object:nil]; [[NSNotificationCenter defaultCenter] removeObserver:self name:UIKeyboardWillHideNotification object:nil]; }
%end
> 实现键盘弹出方法>
%new
- (void)keyboardWillShow:(NSNotification *)notification { CGSize keyboardSize = [[[notification userInfo] objectForKey:UIKeyboardFrameEndUserInfoKey] CGRectValue].size; CGSize viewSize = self.view.frame.size; self.view.frame = CGRectMake(0, -keyboardSize.height, viewSize.width, viewSize.height); } ```
实现键盘收起方法
%new- (void)keyboardWillHide:(NSNotification *)notification {CGSize viewSize = self.view.frame.size;self.view.frame = CGRectMake(0, 0, viewSize.width, viewSize.height);}解决列表滑动,自动收起键盘问题
对
NewSettingViewController进行HOOK,修改viewDidLoad方法增加
UITableView.keyboardDismissMode属性的设置```
- (void)viewDidLoad{
%orig;
[[NSNotificationCenter defaultCenter] addObserver:self selector:@selector(keyboardWillShow:) name:UIKeyboardWillShowNotification object:nil]; [[NSNotificationCenter defaultCenter] addObserver:self selector:@selector(keyboardWillHide:) name:UIKeyboardWillHideNotification object:nil];
WCTableViewManager m_tableViewMgr = MSHookIvar<WCTableViewManager >(self, “m_tableViewMgr”);
[MSHookIvar
真机运行项目,优化后的
UI效果
总结
自动抢红包
UI搭建
- 使用
class-dump,导出目标App的头文件- 使用
MokeyDev重签名并运行App- 使用
Debug Viwe,快速定位目标控制器- 使用
Cycript,分析控制器中的视图、对象、数据源- 在对应的头文件中,找到关键的方法和属性
- 需要精准定位到注入点,不能影响其他功能
- 可以使用响应链条,找到控件与所属控制器的关联
- 需要自定义图标,直接将图片导入
App包即可- 添加的方法,方法名称加上自定义前缀,保证命名唯一
HOOK关键方法,完成界面与功能MSHookIvar:获取对象下的成员变量

若有收获,就点个赞吧
0 人点赞
