1. 内存分区模型
C++程序在执行时,将内存大方向划分为4个区域
- 代码区:存放函数体的二进制代码,由操作系统进行管理的
- 全局区:存放全局变量和静态变量以及常量
- 栈区:由编译器自动分配释放, 存放函数的参数值,局部变量等
- 堆区:由程序员分配和释放,若程序员不释放,程序结束时由操作系统回收
内存四区意义:不同区域存放的数据,赋予不同的生命周期, 给我们更大的灵活编程
1.1 程序运行前
代码区:
- 存放 CPU 执行的机器指令
- 代码区是共享的,共享的目的是对于频繁被执行的程序,只需要在内存中有一份代码即可
- 代码区是只读的,使其只读的原因是防止程序意外地修改了它的指令
全局区:
- 全局变量和静态变量存放在此.
- 全局区还包含了常量区, 字符串常量和其他常量也存放在此
- 该区域的数据在程序结束后由操作系统释放.
示例:
#include<iostream>using namespace std;//全局变量int g_a = 10;int g_b = 10;//全局常量const int c_g_a = 10;const int c_g_b = 10;int main(void){//局部变量int a = 10;int b = 10;//打印地址cout << "局部变量a地址为: " << (int)&a << endl;cout << "局部变量b地址为: " << (int)&b << endl;cout << "全局变量g_a地址为: " << (int)&g_a << endl;cout << "全局变量g_b地址为: " << (int)&g_b << endl;//静态变量static int s_a = 10;static int s_b = 10;cout << "静态变量s_a地址为: " << (int)&s_a << endl;cout << "静态变量s_b地址为: " << (int)&s_b << endl;cout << "字符串常量地址为: " << (int)&"hello world" << endl;cout << "字符串常量地址为: " << (int)&"hello world1" << endl;cout << "全局常量c_g_a地址为: " << (int)&c_g_a << endl;cout << "全局常量c_g_b地址为: " << (int)&c_g_b << endl;const int c_l_a = 10;const int c_l_b = 10;cout << "局部常量c_l_a地址为: " << (int)&c_l_a << endl;cout << "局部常量c_l_b地址为: " << (int)&c_l_b << endl;return 0;}
打印结果: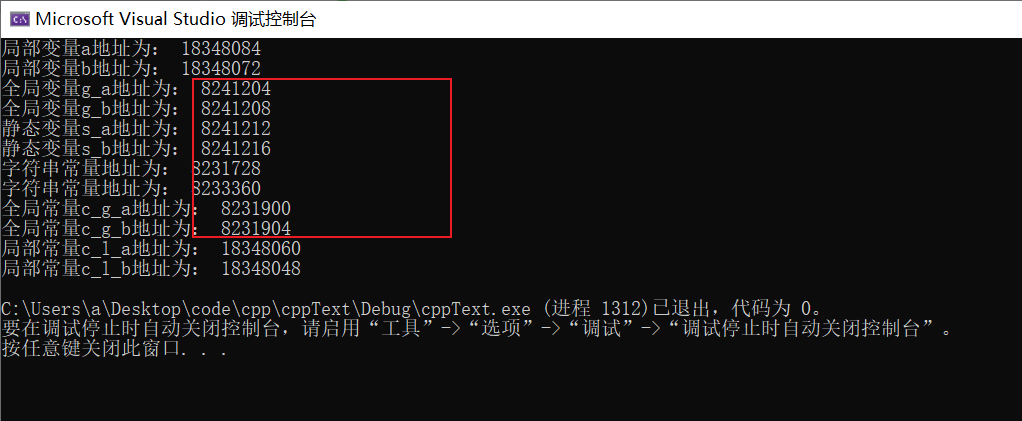
总结:
- C++中在程序运行前分为全局区和代码区
- 代码区特点是共享和只读
- 全局区中存放全局变量、静态变量、常量
- 常量区中存放 const修饰的全局常量 和 字符串常量
1.2 程序运行后
栈区:
- 由编译器自动分配释放, 存放函数的参数值,局部变量等
- 不要返回局部变量的地址,栈区开辟的数据由编译器自动释放
示例:
#include<iostream>using namespace std;int* func(){int a = 10;return &a;}int main() {int* p = func();cout << *p << endl;cout << *p << endl;return 0;}
打印结果:
堆区:
- 由程序员分配释放,若程序员不释放,程序结束时由操作系统回收
- 在C++中主要利用new在堆区开辟内存
总结:
- 堆区数据由程序员管理开辟和释放
- 堆区数据利用new关键字进行开辟内存
1.3 new操作符
C++中利用new操作符在堆区开辟数据
堆区开辟的数据,由程序员手动开辟,手动释放,释放利用操作符delete
语法:ElementType* VariableName = new ElementType([InitialValue])
数组:ElementType* ArrayName = new ElementType[ArrayLength]
删除释放数组时语法为:delete[] ArrayName
利用new创建的数据,会返回该数据对应的类型的指针
示例1: 基本语法
#include<iostream>using namespace std;int* func(){int* a = new int(10);return a;}int main() {int* p = func();cout << *p << endl;cout << *p << endl;//利用delete释放堆区数据delete p;//cout << *p << endl; //报错,释放的空间不可访问return 0;}
运行结果:
示例2:开辟数组
#include<iostream>using namespace std;//堆区开辟数组int main() {int* arr = new int[10];//为数组赋值for (int i = 0; i < 10; i++){arr[i] = i + 100;}//输出数组里的值for (int i = 0; i < 10; i++){cout << arr[i] << endl;}//释放数组 delete 后加 []delete[] arr;return 0;}
运行结果: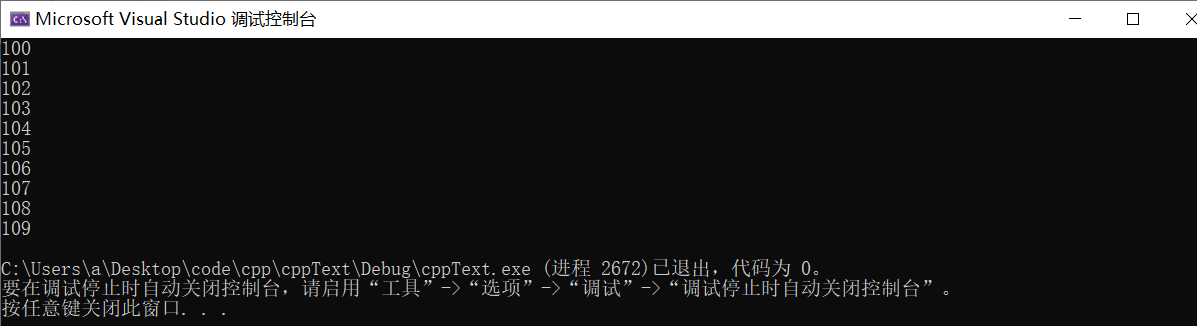
2. 引用
作用: 给变量起别名
2.1 引用的基本使用
语法:ElementType &Alias = VariableName
示例:
int a = 10;int &b = a;
2.2 引用注意事项
- 引用必须初始化
- 引用在初始化后,不可以改变
示例:
int a = 10;int b = 20;//int &c; //错误,引用必须初始化int &c = a; //一旦初始化后,就不可以更改c = b; //这是赋值操作,不是更改引用
2.3 引用做函数参数
作用:函数传参时,可以利用引用的技术让形参修饰实参
优点:可以简化指针修改实参
示例:
#include<iostream>using namespace std;//1. 值传递void mySwap01(int a, int b) {int temp = a;a = b;b = temp;}//2. 地址传递void mySwap02(int* a, int* b) {int temp = *a;*a = *b;*b = temp;}//3. 引用传递void mySwap03(int& a, int& b) {int temp = a;a = b;b = temp;}int main() {int a = 10;int b = 20;mySwap01(a, b);cout << "a:" << a << " b:" << b << endl;mySwap02(&a, &b);cout << "a:" << a << " b:" << b << endl;//此时 a = 20,b = 10 因为上面换了一次mySwap03(a, b);cout << "a:" << a << " b:" << b << endl;return 0;}
运行结果:
总结:通过引用参数产生的效果同按地址传递是一样的。
2.4 引用做函数返回值
- 不要返回局部变量的引用,与指针类似
示例:
#include<iostream>using namespace std;//返回局部变量引用int& test01() {int a = 10; //局部变量return a;}int main() {//不能返回局部变量的引用int& ref = test01();cout << "ref = " << ref << endl;cout << "ref = " << ref << endl;return 0;}
运行结果:
- 函数的调用可以作为左值
示例:
#include<iostream>using namespace std;//返回静态变量引用int& test02() {static int a = 20;return a;}int main() {//如果函数做左值,那么必须返回引用int& ref2 = test02();cout << "ref2 = " << ref2 << endl;cout << "ref2 = " << ref2 << endl;test02() = 1000;cout << "ref2 = " << ref2 << endl;cout << "ref2 = " << ref2 << endl;return 0;}
运行结果:
总结:
- 作用:引用是可以作为函数的返回值存在的
- 注意:不要返回局部变量引用
- 用法:函数调用作为左值
2.5 引用的本质
本质:引用的本质在c++内部实现是一个指针常量.
示例:
#include<iostream>using namespace std;//发现是引用,转换为 int* const ref = &a;void func(int& ref){ref = 100; // ref是引用,转换为*ref = 100}int main(){int a = 10;//自动转换为 int* const ref = &a; 指针常量是指针指向不可改,也说明为什么引用不可更改int& ref = a;//内部发现ref是引用,自动帮我们转换为: *ref = 20;ref = 20;cout << "a:" << a << endl;cout << "ref:" << ref << endl;func(a);return 0;}
运行结果:
结论:
C++推荐用引用技术,因为语法方便,引用本质是指针常量,但是所有的指针操作编译器都帮我们做了
2.6 常量引用
作用:常量引用主要用来修饰形参,防止误操作,在函数形参列表中,可以加const修饰形参,防止形参改变实参
示例:
#include<iostream>using namespace std;//引用使用的场景,通常用来修饰形参void showValue(const int& v) {//v += 10;cout << v << endl;}int main() {//int& ref = 10; 引用本身需要一个合法的内存空间,因此这行错误//加入const就可以了,编译器优化代码,int temp = 10; const int& ref = temp;const int& ref = 10;//ref = 100; //加入const后不可以修改变量cout << ref << endl;//函数中利用常量引用防止误操作修改实参int a = 10;showValue(a);return 0;}
3. 函数提高
3.1 函数默认参数
在C++中,函数的形参列表中的形参是可以有默认值的。
语法:ReturnType FunctionName ([ElementType parameter1 = DefaultValue1,...]){}
示例:
#include<iostream>using namespace std;int func(int a, int b = 10, int c = 10) {return a + b + c;}//1. 如果某个位置参数有默认值,那么从这个位置往后,从左向右,必须都要有默认值//错误:int funcx(int a = 10, int b);//2. 如果函数声明有默认值,函数实现的时候就不能有默认参数int func2(int a = 10, int b = 10);int func2(int a, int b) {return a + b;}int main() {cout << "ret = " << func(20, 20) << endl;cout << "ret = " << func(100) << endl;return 0;}
运行结果:
总结:
- 如果某个位置参数有默认值,那么从这个位置往后,从左向右,必须都要有默认值
错误写法:int funcx(int a = 10, int b)
- 函数声明与函数实现时只能有一个默认参数,不然会导致二义性
3.2 函数占位参数
注意:
- C++中函数的形参列表里可以有占位参数,用来做占位,调用函数时必须填补该位置
- 占位参数还可以有默认参数
语法:ReturnType FunctionName ([ElementType = DefaultValue1,...]){}
示例:
#include<iostream>using namespace std;//函数占位参数 ,占位参数也可以有默认参数void func1(int a, int) {cout << "this is func1" << endl;}void func2(int a, int = 20) {cout << "this is func2" << endl;}int main() {func1(10,10); //占位参数必须填补func2(10);return 0;}
3.3 函数重载
作用:函数名可以相同,提高复用性
函数重载满足条件:
- 同一个作用域下
- 函数名称相同
- 函数参数类型不同 或者 个数不同 或者 顺序不同
注意: 函数的返回值不可以作为函数重载的条件
示例:
#include<iostream>using namespace std;//函数重载需要函数都在同一个作用域下void func(){cout << "func 的调用!" << endl;}void func(int a){cout << "func (int a) 的调用!" << endl;}void func(double a){cout << "func (double a)的调用!" << endl;}void func(int a ,double b){cout << "func (int a ,double b) 的调用!" << endl;}void func(double a ,int b){cout << "func (double a ,int b)的调用!" << endl;}//函数返回值不可以作为函数重载条件//int func(double a, int b)//{// cout << "func (double a ,int b)的调用!" << endl;//}int main() {func();func(10);func(3.14);func(10,3.14);func(3.14 , 10);return 0;}
运行结果: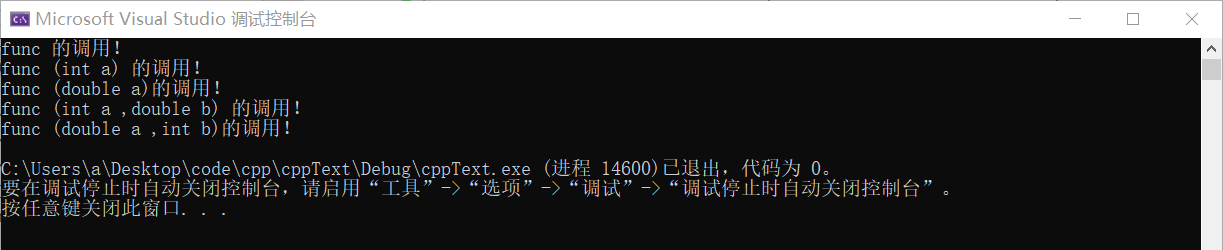
函数重载注意事项
- 引用作为重载条件
示例:
#include<iostream>using namespace std;//1、引用作为重载条件void func(int& a){cout << "func (int &a) 调用 " << endl;}void func(const int& a){cout << "func (const int &a) 调用 " << endl;}int main() {int b = 10;//若b为const int 类型,则调用func(const int& a),//若b为int 类型,则调用func(int& a)func(b);//只能调用后者,前者int& a = 120 有语法错误!func(120);//调用有constreturn 0;}
运行结果:
- 函数重载碰到函数默认参数
示例:
#include<iostream>using namespace std;void func2(int a, int b = 10){cout << "func2(int a, int b = 10) 调用" << endl;}void func2(int a){cout << "func2(int a) 调用" << endl;}int main() {//func2(10); //碰到默认参数产生歧义,需要避免func2(10, 10);//调用前者return 0;}

4. 类和对象
C++面向对象的三大特性为:封装、继承、多态
C++认为万事万物都皆为对象,对象上有其属性和行为
4.1 封装
4.1.1 封装的意义
- 将属性和行为作为一个整体,表现生活中的事物
- 将属性和行为加以权限控制
- 封装意义一:在设计类的时候,属性和行为写在一起,表现事物
语法: class 类名{ 访问权限: 属性 / 行为 };
示例1:设计一个圆类,求圆的周长
#include<iostream>using namespace std;//圆周率const double PI = 3.14;//1、封装的意义//将属性和行为作为一个整体,用来表现生活中的事物//封装一个圆类,求圆的周长//class代表设计一个类,后面跟着的是类名class Circle{public: //访问权限 公共的权限//属性int m_r;//半径//行为//获取到圆的周长double calculateZC(){//2 * pi * r//获取圆的周长return 2 * PI * m_r;}};int main() {//通过圆类,创建圆的对象// c1就是一个具体的圆Circle c1;c1.m_r = 10; //给圆对象的半径 进行赋值操作//2 * pi * 10 = = 62.8cout << "圆的周长为: " << c1.calculateZC() << endl;return 0;}
运行结果:
示例2:设计一个学生类,属性有姓名和学号,可以给姓名和学号赋值,可以显示学生的姓名和学号
#include<iostream>using namespace std;//学生类class Student {public:void setName(string name) {m_name = name;}void setID(int id) {m_id = id;}void showStudent() {cout << "name:" << m_name << " ID:" << m_id << endl;}public:string m_name;int m_id;};int main() {Student stu;stu.setName("德玛西亚");stu.setID(250);stu.showStudent();return 0;}
运行结果:
- 封装意义二:类在设计时,可以把属性和行为放在不同的权限下,加以控制
访问权限有三种:
- public 公共权限
- protected 保护权限
- private 私有权限
示例:
#include<iostream>using namespace std;//三种权限//公共权限 public 类内可以访问 类外可以访问//保护权限 protected 类内可以访问 类外不可以访问//私有权限 private 类内可以访问 类外不可以访问class Person{//姓名 公共权限public:string m_Name;//汽车 保护权限protected:string m_Car;//银行卡密码 私有权限private:int m_Password;public:void func(){m_Name = "张三";m_Car = "拖拉机";m_Password = 123456;}};int main() {Person p;p.m_Name = "李四";//p.m_Car = "奔驰"; //保护权限类外访问不到//p.m_Password = 123; //私有权限类外访问不到return 0;}
4.1.2 struct和class区别
在C++中 struct和class唯一的区别就在于 默认的访问权限不同
- struct 默认权限为公共
- class 默认权限为私有
示例:
#include<iostream>using namespace std;class C1{int m_A; //默认是私有权限};struct C2{int m_A; //默认是公共权限};int main() {C1 c1;c1.m_A = 10; //错误,访问权限是私有C2 c2;c2.m_A = 10; //正确,访问权限是公共return 0;}
4.1.3 成员属性设置为私有
优点:
- 将所有成员属性设置为私有,可以自己控制读写权限
- 对于写权限,我们可以检测数据的有效性
示例:
#include<iostream>#include<string>using namespace std;class Person {public://姓名设置可读可写void setName(string name) {m_Name = name;}string getName(){return m_Name;}//获取年龄int getAge() {return m_Age;}//设置年龄void setAge(int age) {if (age < 0 || age > 150) {cout << "你个老妖精!" << endl;return;}m_Age = age;}//情人设置为只写void setLover(string lover) {m_Lover = lover;}private:string m_Name; //可读可写 姓名int m_Age; //只读 年龄string m_Lover; //只写 情人};int main() {Person p;//姓名设置p.setName("张三");cout << "姓名: " << p.getName() << endl;//年龄设置p.setAge(50);cout << "年龄: " << p.getAge() << endl;//情人设置p.setLover("苍井");//cout << "情人: " << p.m_Lover << endl; //只写属性,不可以读取return 0;}
运行结果:
练习案例1:设计立方体类
设计立方体类(Cube),求出立方体的面积和体积,分别用全局函数和成员函数判断两个立方体是否相等。
参考代码:
#include<iostream>using namespace std;bool PanDuan(Cube temp){int a, b, c;temp.Get(a, b, c);if((a*b) == (l*w) && (a*b*c) == (l*w*h)){return true;}else{return false;}}class Cube {int l, w, h;public:bool Set(){cout << "请输入长宽高:" << endl;cin >> l >> w >> h;if((l >= 1) && (w >= 1) && (h >= 1)){return true;}else{cout << "输入错误!" << endl;return false;}}void Get(int& L, int& W, int& H){L = l; W = w; H =h;}int Area(){return l*w;}int Volume(){return l*w*h;}bool PanDuan(Cube temp){int a, b, c;temp.Get(a, b, c);if((a*b) == (l*w) && (a*b*c) == (l*w*h)){return true;}else{return false;}}}
练习案例2:点和圆的关系
设计一个圆形类(Circle),和一个点类(Point),计算点和圆的关系。
参考代码:
4.2 对象的初始化和清理
4.2.1 构造函数和析构函数
对象的初始化和清理也是两个非常重要的安全问题
一个对象或者变量没有初始状态,对其使用后果是未知
同样的使用完一个对象或变量,没有及时清理,也会造成一定的安全问题
编译器提供的构造函数和析构函数是空实现
- 构造函数:主要作用在于创建对象时为对象的成员属性赋值,构造函数由编译器自动调用,无须手动调用。
- 析构函数:主要作用在于对象销毁前系统自动调用,执行一些清理工作。
构造函数
语法:类名 (){}
- 构造函数,没有返回值也不写void
- 函数名称与类名相同
- 构造函数可以有参数,因此可以发生重载
- 程序在调用对象时会自动调用构造,无须手动调用,而且只会调用一次
析构函数
语法:~类名 (){}
- 析构函数,没有返回值也不写void
- 函数名称与类名相同,在名称前加上符号 ~
- 析构函数不可以有参数,因此不可以发生重载
- 程序在对象销毁前会自动调用析构,无须手动调用,而且只会调用一次
示例:
#include<iostream>using namespace std;class Person{public://构造函数Person(){cout << "Person的构造函数调用" << endl;}//析构函数~Person(){cout << "Person的析构函数调用" << endl;}};void test01(){Person p;}int main() {test01();return 0;}
4.2.2 构造函数的分类及调用
拷贝构造
语法:类名(const 类名& 变量)
按参数分为: 有参构造和无参构造
按类型分为: 普通构造和拷贝构造
示例:
#include<iostream>using namespace std;class Person {public://无参(默认)构造函数Person() {cout << "无参构造函数!" << endl;}//有参构造函数Person(int a) {age = a;cout << "有参构造函数!" << endl;}//拷贝构造函数Person(const Person& p) {age = p.age;cout << "拷贝构造函数!" << endl;}//析构函数~Person() {cout << "析构函数!" << endl;}public:int age;};
三种调用方式:
括号法
//2.1 括号法,常用Person p1(10);//Person p2();//注意1:调用无参构造函数不能加括号,如果加了编译器认为这是一个函数声明
运行结果:

显示法 ```cpp //2.2 显式法 Person p2 = Person(10); //有参构造 Person p3 = Person(p2);//拷贝构造 //Person(10); 匿名函数 //Person(10)单独写就是匿名对象 当前行结束之后,马上析构
//注意2:不能利用 拷贝构造函数 初始化匿名对象 编译器认为是对象声明,会重定义 //Person(p3) <===> Person p3;
运行结果:<br />3. 隐式转换法```cpp//2.3 隐式转换法Person p4 = 10; //< ==== > Person p4 = Person(10); 有参构造Person p5 = p4; //< ==== > Person p5 = Person(p4); 拷贝构造
运行结果:
*注:
- 调用无参构造函数不能加括号,如果加了编译器认为这是一个函数声明
//Person p2(); - 不能利用 拷贝构造函数 初始化匿名对象 编译器认为是对象声明,会重定义。
//Person(p3) <===> Person p3;
4.2.3 拷贝构造函数调用时机
- 使用一个已经创建完毕的对象来初始化一个新对象
- 值传递的方式给函数参数传值
- 以值方式返回局部对象
示例:
#include<iostream>using namespace std;class Person {public:Person() {cout << "无参构造函数!" << endl;mAge = 0;}Person(int age) {cout << "有参构造函数!" << endl;mAge = age;}Person(const Person& p) {cout << "拷贝构造函数!" << endl;mAge = p.mAge;}//析构函数在释放内存之前调用~Person() {cout << "析构函数!" << endl;}public:int mAge;};//1. 使用一个已经创建完毕的对象来初始化一个新对象void test01() {Person man(100); //p对象已经创建完毕Person newman(man); //调用拷贝构造函数Person newman2 = man; //拷贝构造//Person newman3;//newman3 = man; //不是调用拷贝构造函数,赋值操作}//2. 值传递的方式给函数参数传值//相当于Person p1 = p;void doWork(Person p1) {}void test02() {Person p; //无参构造函数doWork(p);}//3. 以值方式返回局部对象Person doWork2(){Person p1;cout << (int *)&p1 << endl;return p1;}void test03(){Person p = doWork2();cout << (int *)&p << endl;}int main() {test01();cout << "-----------------------------" << endl;test02();cout << "-----------------------------" << endl;test03();return 0;}
运行结果: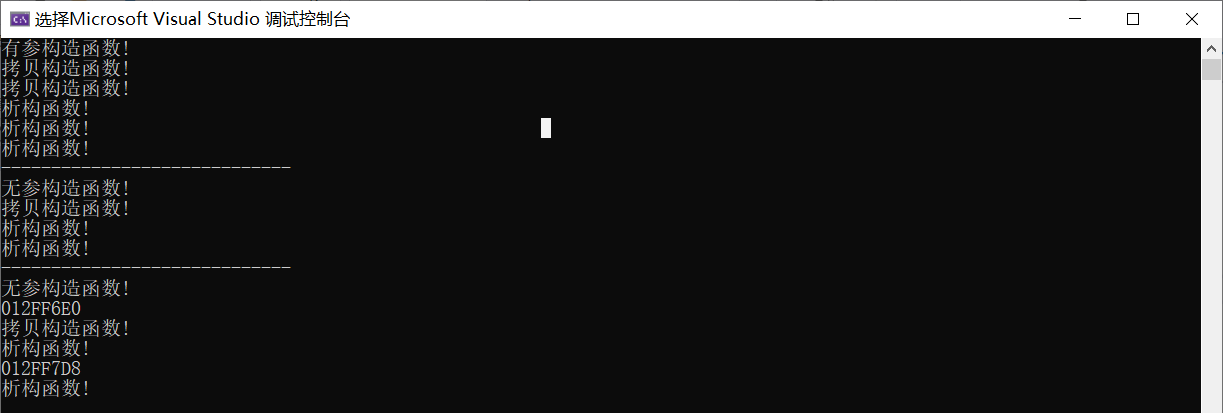
4.2.4 构造函数调用规则
默认情况下,c++编译器至少给一个类添加3个函数
1.默认构造函数(无参,函数体为空)
2.默认析构函数(无参,函数体为空)
3.默认拷贝构造函数,对属性进行值拷贝
构造函数调用规则如下:
- 如果用户定义有参构造函数,c++不在提供默认无参构造,但是会提供默认拷贝构造
- 如果用户定义拷贝构造函数,c++不会再提供其他构造函数(默认拷贝构造和默认无参构造)
示例:
#include<iostream>using namespace std;class Person {public://无参(默认)构造函数Person() {cout << "无参构造函数!" << endl;}//有参构造函数Person(int a) {age = a;cout << "有参构造函数!" << endl;}//拷贝构造函数Person(const Person& p) {age = p.age;cout << "拷贝构造函数!" << endl;}//析构函数~Person() {cout << "析构函数!" << endl;}public:int age;};void test01(){Person p1(18);//如果不写拷贝构造,编译器会自动添加拷贝构造,并且做浅拷贝操作Person p2(p1);cout << "p2的年龄为: " << p2.age << endl;}void test02(){//如果用户提供有参构造,编译器不会提供默认构造,会提供拷贝构造Person p1; //此时如果用户自己没有提供默认构造,会出错Person p2(10); //用户提供的有参Person p3(p2); //此时如果用户没有提供拷贝构造,编译器会提供//如果用户提供拷贝构造,编译器不会提供其他构造函数Person p4; //此时如果用户自己没有提供默认构造,会出错Person p5(10); //此时如果用户自己没有提供有参,会出错Person p6(p5); //用户自己提供拷贝构造}int main() {test01();return 0;}
运行结果:
4.2.5 深拷贝与浅拷贝
深浅拷贝是面试经典问题,也是常见的一个坑
浅拷贝:简单的赋值拷贝操作
深拷贝:在堆区重新申请空间,进行拷贝操作
示例:
#include<iostream>using namespace std;class Person {public://无参(默认)构造函数Person() {cout << "无参构造函数!" << endl;}//有参构造函数Person(int age ,int height) {cout << "有参构造函数!" << endl;m_age = age;m_height = new int(height);}//拷贝构造函数Person(const Person& p) {cout << "拷贝构造函数!" << endl;//如果不利用深拷贝在堆区创建新内存,会导致浅拷贝带来的重复释放堆区问题m_age = p.m_age;m_height = new int(*p.m_height);}//析构函数~Person() {cout << "析构函数!" << endl;if (m_height != NULL){delete m_height;}}public:int m_age;int* m_height;};void test01(){Person p1(18, 180);Person p2(p1);cout << "p1的年龄: " << p1.m_age << " 身高: " << *p1.m_height << endl;cout << "p2的年龄: " << p2.m_age << " 身高: " << *p2.m_height << endl;}int main() {test01();return 0;}
运行结果:
总结:如果属性有在堆区开辟的,一定要自己提供拷贝构造函数,如果不利用深拷贝在堆区创建新内存,会导致浅拷贝带来的重复释放堆区问题
4.2.6 初始化列表
作用:C++提供了初始化列表语法,用来初始化属性
语法:构造函数():属性1(值1),属性2(值2)... {}
示例:
#include<iostream>using namespace std;class Person {public://传统方式初始化//Person(int a, int b, int c) {// m_A = a;// m_B = b;// m_C = c;//}Person() :m_A(10), m_B(20), m_C(30) {}//初始化列表方式初始化Person(int a, int b, int c) :m_A(a), m_B(b), m_C(c) {}void PrintPerson() {cout << "mA:" << m_A << endl;cout << "mB:" << m_B << endl;cout << "mC:" << m_C << endl;}private:int m_A;int m_B;int m_C;};int main() {Person p(1, 2, 3);Person p2;p.PrintPerson();p2.PrintPerson();return 0;}
运行结果:
*注: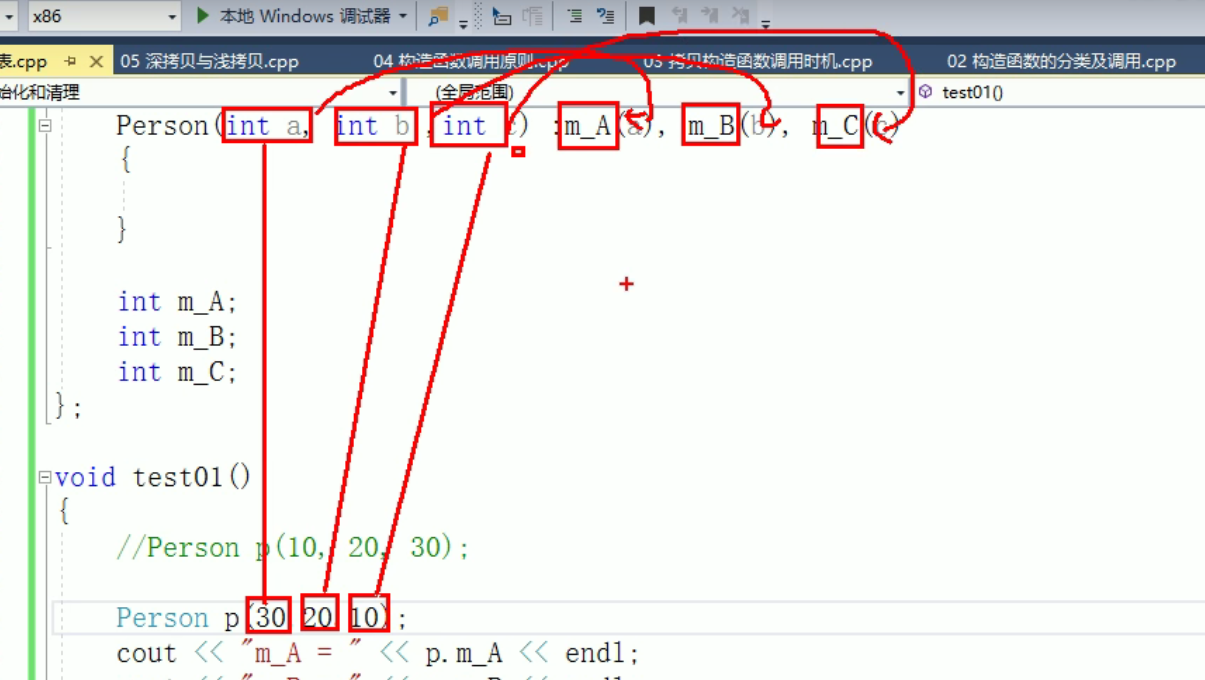
4.2.7 类对象作为类成员
C++类中的成员可以是另一个类的对象,我们称该成员为: 对象成员
例如:
class A {}class B{A a;}//B类中有对象A作为成员,A为对象成员
注:构造的顺序是 :先调用对象成员的构造,再调用本类构造,析构顺序与构造相反
*示例:
#include<iostream>#include<string>using namespace std;class Phone{public:Phone(string name){m_PhoneName = name;cout << "Phone构造" << endl;}~Phone(){cout << "Phone析构" << endl;}string m_PhoneName;};class Person{public://初始化列表可以告诉编译器调用哪一个构造函数Person(string name, string pName) :m_Name(name), m_Phone(pName){cout << "Person构造" << endl;}~Person(){cout << "Person析构" << endl;}void playGame(){cout << m_Name << " 使用" << m_Phone.m_PhoneName << " 牌手机! " << endl;}string m_Name;Phone m_Phone;};void test01(){//当类中成员是其他类对象时,我们称该成员为 对象成员//构造的顺序是 :先调用对象成员的构造,再调用本类构造//析构顺序与构造相反Person p("张三" , "苹果X");p.playGame();}int main() {test01();return 0;}
运行结果:
4.2.8 静态成员
静态成员就是在成员变量和成员函数前加上关键字static,称为:静态成员
静态成员分为:
静态成员变量
- 所有对象共享同一份数据
- 在编译阶段分配内存
- 类内声明,类外必须初始化
静态成员函数
- 所有对象共享同一个函数
- 静态成员函数只能访问静态成员变量
- 静态成员函数也是有访问权限的
静态成员变量两种访问方式:
- 通过对象
- 通过类名
示例:
#include<iostream>using namespace std;class Person{public:static int m_A; //静态成员变量//静态成员变量特点://1 在编译阶段分配内存//2 类内声明,类外初始化//3 所有对象共享同一份数据private:static int m_B; //静态成员变量也是有访问权限的};//类内声明,类外初始化int Person::m_A = 10;int Person::m_B = 10;void test01(){//静态成员变量两种访问方式//1、通过对象Person p1;p1.m_A = 100;cout << "p1.m_A = " << p1.m_A << endl;Person p2;p2.m_A = 200;cout << "p1.m_A = " << p1.m_A << endl; //共享同一份数据cout << "p2.m_A = " << p2.m_A << endl;//2、通过类名cout << "m_A = " << Person::m_A << endl;//cout << "m_B = " << Person::m_B << endl; //私有权限访问不到}int main() {test01();return 0;}
运行结果:
静态成员函数两种访问方式:
- 通过对象
- 通过类名
静态成员函数只能访问静态成员变量的原因:
静态成员函数在通过类名方式访问对象的非静态成员变量时,不知道该访问那个对象的成员,所以他只能访问类的成员变量,也就是静态成员变量。
示例2:
#include<iostream>using namespace std;class Person{public://静态成员函数特点://1 程序共享一个函数//2 静态成员函数只能访问静态成员变量static void func(){cout << "func调用" << endl;m_A = 100;//m_B = 100; //错误,不可以访问非静态成员变量}static int m_A; //静态成员变量int m_B; //private://静态成员函数也是有访问权限的static void func2(){cout << "func2调用" << endl;}};int Person::m_A = 10;void test01(){//静态成员变量两种访问方式//1、通过对象Person p1;p1.func();//2、通过类名Person::func();//Person::func2(); //私有权限访问不到}int main() {test01();return 0;}
4.3 C++对象模型和this指针
4.3.1 成员变量和成员函数分开存储
- 空对象占用内存空间为:1 ,C++编译器会给每个空对象也分配一个字节空间,是为了区分空对象占内存的位置,每个空对象也应该有一个独一无二的内存地址
- 在C++中,类内的成员变量和成员函数分开存储,只有非静态成员变量才属于对象
示例:
#include<iostream>using namespace std;class Person {};class Person2 {public:Person() {mA = 0;}int mA; //非静态成员变量占对象空间static int mB; //静态成员变量不占对象空间void func() { //非静态成员函数也不占对象空间,所有函数共享一个函数实例cout << "mA:" << this->mA << endl;}static void sfunc() { //静态成员函数也不占对象空间}};Person2::mB = 0;void test1(){Person p;cout << "空对象占用内存空间为:" << siezof(p) << endl;}void test2(){Person2 p;cout << "普通对象占用内存空间为:" << siezof(p) << endl;}int main() {test1();test2();return 0;}
运行结果:
4.3.2 this指针概念
每一个非静态成员函数只会诞生一份函数实例,也就是说多个同类型的对象会共用一块代码
cpp通过提供特殊的对象指针,this指针,解决上述问题。this指针指向被调用的成员函数所属的对象
this指针是隐含每一个非静态成员函数内的一种指针
this指针不需要定义,直接使用即可
this指针的本质 是指针常量 指针的指向是不可以修改的
this指针的用途:
- 当形参和成员变量同名时,可用this指针来区分
- 在类的非静态成员函数中返回对象本身,可使用
return *this
示例:
#include<iostream>using namespace std;class Person{public:Person(int age){//1、当形参和成员变量同名时,可用this指针来区分this->age = age;}Person& PersonAddPerson(Person p){this->age += p.age;//2、返回对象本身return *this;}int age;};void test01(){Person p1(10);cout << "p1.age = " << p1.age << endl;Person p2(10);p2.PersonAddPerson(p1).PersonAddPerson(p1).PersonAddPerson(p1);cout << "p2.age = " << p2.age << endl;}int main() {test01();return 0;}
4.3.3 空指针访问成员函数
C++中空指针也是可以调用成员函数的,但是也要注意有没有用到this指针
*注:如果用到this指针,需要加以判断保证代码的健壮性
示例:
#include<iostream>using namespace std;//空指针访问成员函数class Person {public:void ShowClassName() {// cout << this->mAge << endl; 错误 this == NULLcout << "我是Person类!" << endl;}void ShowPerson() {if (this == NULL) {return;}cout << mAge << endl;}public:int mAge;};void test01(){Person * p = NULL;p->ShowClassName(); //空指针,可以调用成员函数p->ShowPerson(); //但是如果成员函数中用到了this指针,就不可以了}int main() {test01();return 0;}
4.3.4 const修饰成员函数
常函数:
- 成员函数后加const后我们称为这个函数为常函数
- 常函数内不可以修改成员属性
- 成员属性声明时加关键字
mutable后,在常函数中依然可以修改
常对象:
- 声明对象前加const称该对象为常对象
- 常对象只能调用常函数
示例:
#include<iostream>using namespace std;class Person {public:Person() {m_A = 0;m_B = 0;}//this指针的本质是一个指针常量,指针的指向不可修改// const Person * const this;//如果想让指针指向的值也不可以修改,需要声明常函数void ShowPerson() const {//const Type* const pointer;//this = NULL; //不能修改指针的指向 Person* const this;//this->mA = 100; //但是this指针指向的对象的数据是可以修改的//const修饰成员函数,表示指针指向的内存空间的数据不能修改,除了mutable修饰的变量this->m_B = 100;}void MyFunc() const {//mA = 10000;}public:int m_A;mutable int m_B; //可修改 可变的};//const修饰对象 常对象void test01() {const Person person; //常量对象cout << person.m_A << endl;//person.mA = 100; //常对象不能修改成员变量的值,但是可以访问person.m_B = 100; //但是常对象可以修改mutable修饰成员变量//常对象访问成员函数person.MyFunc(); //常对象不能调用const的函数}int main() {test01();return 0;}
4.4 友元
友元的目的就是让一个函数或者类 访问另一个类中私有成员
友元的关键字为 friend
友元不是相互的,你把我当朋友,我不一定把你当朋友
友元的三种实现
- 全局函数做友元
- 类做友元
- 成员函数做友元
4.4.1 全局函数做友元
全局函数成为类的友元函数以后,可以访问类中的私有内容
示例:
#include<iostream>using namespace std;class Building{//告诉编译器 goodGay全局函数 是 Building类的好朋友,可以访问类中的私有内容//friend函数只要在类内即可,与访问权限无关friend void goodGay(Building * building);public:Building(){this->m_SittingRoom = "客厅";this->m_BedRoom = "卧室";}string m_SittingRoom; //客厅private:string m_BedRoom; //卧室};//全局函数void goodGay(Building * building){cout << "好基友正在访问: " << building->m_SittingRoom << endl;cout << "好基友正在访问: " << building->m_BedRoom << endl;}void test01(){Building b;goodGay(&b);}int main(){test01();return 0;}
运行结果:
4.4.2 类做友元
示例:
#include<iostream>using namespace std;class Building;class goodGay{public:goodGay();void visit();private:Building *building;};class Building{//告诉编译器 goodGay类是Building类的好朋友,可以访问到Building类中私有内容friend class goodGay;public:Building();public:string m_SittingRoom; //客厅private:string m_BedRoom;//卧室};Building::Building(){this->m_SittingRoom = "客厅";this->m_BedRoom = "卧室";}goodGay::goodGay(){building = new Building;}void goodGay::visit(){cout << "好基友正在访问" << building->m_SittingRoom << endl;cout << "好基友正在访问" << building->m_BedRoom << endl;}void test01(){goodGay gg;gg.visit();}int main(){test01();return 0;}
运行结果:
4.4.3 成员函数做友元
示例:
#include<iostream>using namespace std;class Building;class goodGay{public:goodGay();void visit(); //只让visit函数作为Building的好朋友,可以发访问Building中私有内容void visit2();private:Building *building;};class Building{//告诉编译器 goodGay类中的visit成员函数 是Building好朋友,可以访问私有内容friend void goodGay::visit();public:Building();public:string m_SittingRoom; //客厅private:string m_BedRoom;//卧室};Building::Building(){this->m_SittingRoom = "客厅";this->m_BedRoom = "卧室";}goodGay::goodGay(){building = new Building;}void goodGay::visit(){cout << "好基友正在访问" << building->m_SittingRoom << endl;cout << "好基友正在访问" << building->m_BedRoom << endl;}void goodGay::visit2(){cout << "好基友正在访问" << building->m_SittingRoom << endl;//cout << "好基友正在访问" << building->m_BedRoom << endl;}void test01(){goodGay gg;gg.visit();}int main(){test01();return 0;}
运行结果:
4.5 运算符重载
运算符重载概念:对已有的运算符重新进行定义,赋予其另一种功能,以适应不同的数据类型
*注:
- 运算符重载也可以发生函数重载
- 对于内置的数据类型的表达式的的运算符是不可能改变的
- 不要滥用运算符重载
运算符重载的两种方式:
- 通过成员函数重载
- 通过全局函数重载
重载的本质: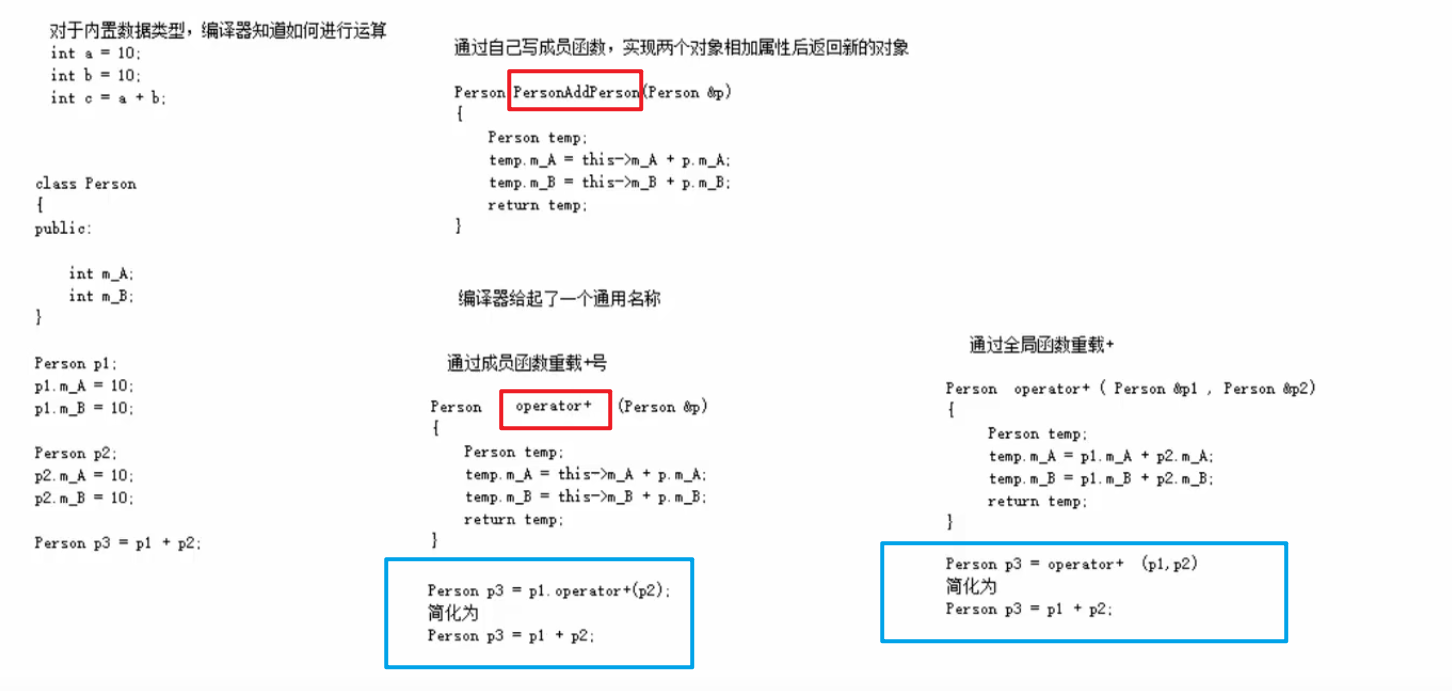
4.5.1 加号运算符重载
作用:实现两个自定义数据类型相加的运算
示例:
#include<iostream>using namespace std;class Person {public:Person() {};Person(int a, int b){this->m_A = a;this->m_B = b;}//成员函数实现 + 号运算符重载Person operator+(const Person& p) {Person temp;temp.m_A = this->m_A + p.m_A;temp.m_B = this->m_B + p.m_B;return temp;}public:int m_A;int m_B;};//全局函数实现 + 号运算符重载//Person operator+(const Person& p1, const Person& p2) {// Person temp(0, 0);// temp.m_A = p1.m_A + p2.m_A;// temp.m_B = p1.m_B + p2.m_B;// return temp;//}//运算符重载 可以发生函数重载Person operator+(const Person& p2, int val){Person temp;temp.m_A = p2.m_A + val;temp.m_B = p2.m_B + val;return temp;}void test() {Person p1(10, 10);Person p2(20, 20);//成员函数方式Person p3 = p2 + p1; //相当于 p2.operaor+(p1)cout << "mA:" << p3.m_A << " mB:" << p3.m_B << endl;Person p4 = p3 + 10; //相当于 operator+(p3,10)cout << "mA:" << p4.m_A << " mB:" << p4.m_B << endl;}int main() {test();return 0;}
运行结果:
4.5.2 左移运算符重载
作用:可以输出自定义数据类型
示例:
#include<iostream>using namespace std;class Person {friend ostream& operator<<(ostream& out, Person& p);public:Person(int a, int b){this->m_A = a;this->m_B = b;}//成员函数 实现不了 p << cout 不是我们想要的效果//void operator<<(Person& p){//}private:int m_A;int m_B;};//全局函数实现左移重载//ostream对象只能有一个 返回值必须返回引用才能满足链式编程ostream& operator<<(ostream& out, Person& p) {out << "a:" << p.m_A << " b:" << p.m_B;return out;}void test() {Person p1(10, 20);cout << p1 << "hello world" << endl; //链式编程}int main() {test();return 0;}
4.5.3 递增运算符重载
作用: 通过重载递增运算符,实现自己的整型数据
示例:
#include<iostream>using namespace std;class MyInteger {friend ostream& operator<<(ostream& out, MyInteger myint);public:MyInteger() {m_Num = 0;}//前置++MyInteger& operator++() {//先++m_Num++;//再返回return *this;}//后置++MyInteger operator++(int) {//先返回MyInteger temp = *this; //记录当前本身的值,然后让本身的值加1,但是返回的是以前的值,达到先返回后++;m_Num++;return temp;}private:int m_Num;};// 重载<<运算符ostream& operator<<(ostream& out, MyInteger myint) {out << myint.m_Num;return out;}//前置++ 先++ 再返回void test01() {MyInteger myInt;cout << ++myInt << endl;cout << myInt << endl;}//后置++ 先返回 再++void test02() {MyInteger myInt;cout << myInt++ << endl;cout << myInt << endl;}int main() {test01();test02();return 0;}
运行结果:
4.5.4 赋值运算符重载
c++编译器至少给一个类添加4个函数:
- 默认构造函数(无参,函数体为空)
- 默认析构函数(无参,函数体为空)
- 默认拷贝构造函数,对属性进行值拷贝
- 赋值运算符 operator=, 对属性进行值拷贝
*注: 如果类中有属性指向堆区,做赋值操作时也会出现深浅拷贝问题
示例:
#include<iostream>using namespace std;class Person{public:Person(int age){//将年龄数据开辟到堆区m_Age = new int(age);}//重载赋值运算符Person& operator=(Person &p){//应该先判断是否有属性在堆区,如果有先释放干净,然后再深拷贝if (m_Age != NULL){delete m_Age;m_Age = NULL;}//编译器提供的代码是浅拷贝//m_Age = p.m_Age;//提供深拷贝 解决浅拷贝的问题m_Age = new int(*p.m_Age);//返回自身return *this;}~Person(){if (m_Age != NULL){delete m_Age;m_Age = NULL;}}//年龄的指针int *m_Age;};void test01(){Person p1(18);Person p2(20);Person p3(30);p3 = p2 = p1; //赋值操作cout << "p1的年龄为:" << *p1.m_Age << endl;cout << "p2的年龄为:" << *p2.m_Age << endl;cout << "p3的年龄为:" << *p3.m_Age << endl;}int main() {test01();//int a = 10;//int b = 20;//int c = 30;//c = b = a;//cout << "a = " << a << endl;//cout << "b = " << b << endl;//cout << "c = " << c << endl;return 0;}
运行结果:
4.5.5 关系运算符重载
作用:重载关系运算符,可以让两个自定义类型对象进行对比操作
示例:
#include<iostream>using namespace std;class Person{public:Person(string name, int age){this->m_Name = name;this->m_Age = age;};bool operator==(Person & p){if (this->m_Name == p.m_Name && this->m_Age == p.m_Age){return true;}else{return false;}}bool operator!=(Person & p){if (this->m_Name == p.m_Name && this->m_Age == p.m_Age){return false;}else{return true;}}string m_Name;int m_Age;};void test01(){//int a = 0;//int b = 0;Person a("孙悟空", 18);Person b("孙悟空", 18);if (a == b){cout << "a和b相等" << endl;}else{cout << "a和b不相等" << endl;}if (a != b){cout << "a和b不相等" << endl;}else{cout << "a和b相等" << endl;}}int main() {test01();return 0;}
运行结果:
4.5.6 函数调用运算符重载
- 函数调用运算符 () 也可以重载
- 由于重载后使用的方式非常像函数的调用,因此称为仿函数
- 仿函数没有固定写法,非常灵活
重载的()操作符 也称为仿函数
示例:
#include<iostream>using namespace std;class MyPrint{public:void operator()(string text){cout << text << endl;}};void test01(){//重载的()操作符 也称为仿函数MyPrint myFunc;myFunc("hello world");}class MyAdd{public:int operator()(int v1, int v2){return v1 + v2;}};void test02(){MyAdd add;int ret = add(10, 10);cout << "ret = " << ret << endl;//匿名对象调用重载()函数cout << "MyAdd()(100,100) = " << MyAdd()(100, 100) << endl;}int main() {test01();test02();return 0;}
运行结果:
4.6 继承
继承是面向对象三大特性之一
继承的好处:可以减少重复的代码
4.6.1 继承的基本语法
语法:class A : 继承方式 B; A 类称为子类 或 派生类 B 类称为父类 或 基类
派生类中的成员,包含两大部分:
- 一类是从基类继承过来的。
- 一类是自己增加的成员。
从基类继承过来的表现其共性,而新增的成员体现了其个性。
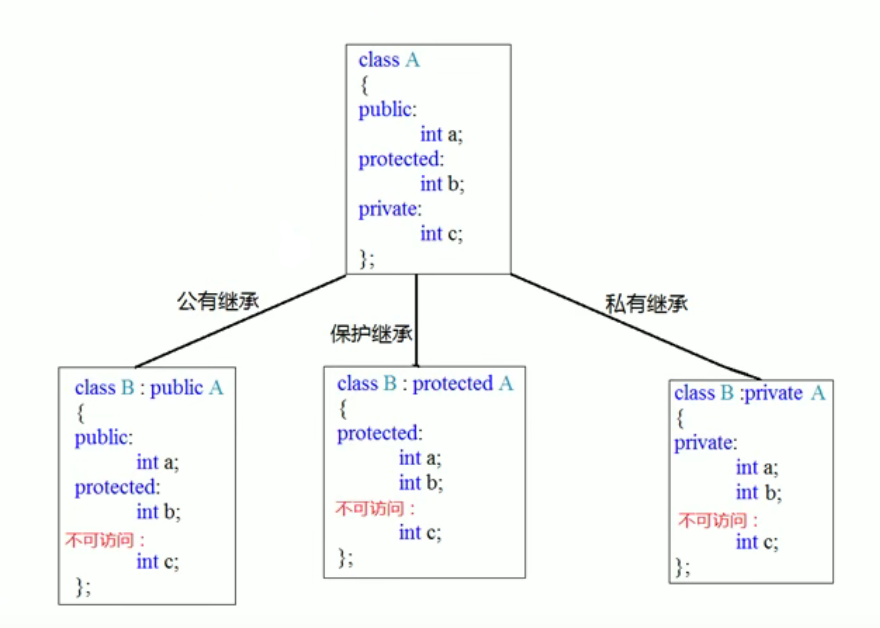
4.6.2 继承方式
继承方式一共有三种:
- 公共继承
- 保护继承
- 私有继承
示例:
#include<iostream>using namespace std;class Base1{public:int m_A;protected:int m_B;private:int m_C;};//公共继承class Son1 :public Base1{public:void func(){m_A; //可访问 public权限m_B; //可访问 protected权限//m_C; //不可访问}};void myClass(){Son1 s1;s1.m_A; //其他类只能访问到公共权限}//保护继承class Base2{public:int m_A;protected:int m_B;private:int m_C;};class Son2:protected Base2{public:void func(){m_A; //可访问 protected权限m_B; //可访问 protected权限//m_C; //不可访问}};void myClass2(){Son2 s;//s.m_A; //不可访问}//私有继承class Base3{public:int m_A;protected:int m_B;private:int m_C;};class Son3:private Base3{public:void func(){m_A; //可访问 private权限m_B; //可访问 private权限//m_C; //不可访问}};class GrandSon3 :public Son3{public:void func(){//Son3是私有继承,所以继承Son3的属性在GrandSon3中都无法访问到//m_A;//m_B;//m_C;}};
4.6.3 继承中的对象模型
问题:从父类继承过来的成员,哪些属于子类对象中?
利用工具查看:
- 打开工具窗口后,定位到当前CPP文件的盘符
- 输入:
cl /d1 reportSingleClassLayout查看的类名 所属文件名
结论: 父类中私有成员也是被子类继承下去了,只是由编译器给隐藏后访问不到
示例:
#include<iostream>using namespace std;class Base{public:int m_A;protected:int m_B;private:int m_C; //私有成员只是被隐藏了,但是还是会继承下去};//公共继承class Son :public Base{public:int m_D;};void test01(){cout << "sizeof Son = " << sizeof(Son) << endl;}int main() {test01();return 0;}
运行结果:
4.6.4 继承中构造和析构顺序
子类继承父类后,当创建子类对象,也会调用父类的构造函数
继承中 先调用父类构造函数,再调用子类构造函数,析构顺序与构造相反
示例:
#include<iostream>using namespace std;class Base{public:Base(){cout << "Base构造函数!" << endl;}~Base(){cout << "Base析构函数!" << endl;}};class Son : public Base{public:Son(){cout << "Son构造函数!" << endl;}~Son(){cout << "Son析构函数!" << endl;}};void test01(){//继承中 先调用父类构造函数,再调用子类构造函数,析构顺序与构造相反Son s;}int main() {test01();return 0;}
运行结果:
4.6.5 继承同名成员处理方式
问题:当子类与父类出现同名的成员,如何通过子类对象,访问到子类或父类中同名的数据呢?
总结:
- 子类对象可以直接访问到子类中同名成员
- 子类对象加作用域可以访问到父类同名成员
- 当子类与父类拥有同名的成员函数,子类会隐藏父类中同名成员函数,加作用域可以访问到父类中同名函数
示例:
#include<iostream>using namespace std;class Base {public:Base(){m_A = 100;}void func(){cout << "Base - func()调用" << endl;}void func(int a){cout << "Base - func(int a)调用" << endl;}public:int m_A;};class Son : public Base {public:Son(){m_A = 200;}//当子类与父类拥有同名的成员函数,子类会隐藏父类中所有版本的同名成员函数//如果想访问父类中被隐藏的同名成员函数,需要加父类的作用域void func(){cout << "Son - func()调用" << endl;}public:int m_A;};void test01(){Son s;cout << "Son下的m_A = " << s.m_A << endl;cout << "Base下的m_A = " << s.Base::m_A << endl;s.func();s.Base::func();s.Base::func(10);}int main() {test01();return 0;}
运行结果:
4.6.6 继承同名静态成员处理方式
问题:继承中同名的静态成员在子类对象上如何进行访问?
静态成员和非静态成员出现同名,处理方式一致
- 访问子类同名成员 直接访问即可
- 访问父类同名成员 需要加作用域
- 子类会隐藏掉父类中所有同名成员函数,需要加作作用域访问
总结:同名静态成员处理方式和非静态处理方式一样,只不过有两种访问的方式(通过对象 和 通过类名)
示例:
#include<iostream>using namespace std;class Base {public:static void func(){cout << "Base - static void func()" << endl;}static void func(int a){cout << "Base - static void func(int a)" << endl;}static int m_A;};int Base::m_A = 100;class Son : public Base {public:static void func(){cout << "Son - static void func()" << endl;}static int m_A;};int Son::m_A = 200;//同名成员属性void test01(){cout << "同名成员属性访问: " << endl;//通过对象访问cout << "通过对象访问: " << endl;Son s;cout << "Son 下 m_A = " << s.m_A << endl;cout << "Base 下 m_A = " << s.Base::m_A << endl;//通过类名访问cout << "通过类名访问: " << endl;cout << "Son 下 m_A = " << Son::m_A << endl;cout << "Base 下 m_A = " << Son::Base::m_A << endl;}//同名成员函数void test02(){cout << "同名成员函数访问: " << endl;//通过对象访问cout << "通过对象访问: " << endl;Son s;s.func();s.Base::func();//通过类名访问cout << "通过类名访问: " << endl;Son::func();Son::Base::func();//出现同名,子类会隐藏掉父类中所有同名成员函数,需要加作作用域访问Son::Base::func(100);}int main() {test01();test02();return 0;}
运行结果:
4.6.7 多继承语法
C++允许一个类继承多个类,多继承可能会引发父类中有同名成员出现,需要加作用域区分
语法:class 子类 :继承方式 父类1 , 继承方式 父类2...
C++实际开发中不建议用多继承
示例:
#include<iostream>using namespace std;class Base1 {public:Base1(){m_A = 100;}public:int m_A;};class Base2 {public:Base2(){m_A = 200; //开始是m_B 不会出问题,但是改为mA就会出现不明确}public:int m_A;};//语法:class 子类:继承方式 父类1 ,继承方式 父类2class Son : public Base2, public Base1{public:Son(){m_C = 300;m_D = 400;}public:int m_C;int m_D;};//多继承容易产生成员同名的情况//通过使用类名作用域可以区分调用哪一个基类的成员void test01(){Son s;cout << "sizeof Son = " << sizeof(s) << endl;cout << s.Base1::m_A << endl;cout << s.Base2::m_A << endl;}int main() {test01();return 0;}
运行结果:
4.6.8 菱形继承
菱形继承概念:
两个派生类继承同一个基类
又有某个类同时继承者两个派生类
这种继承被称为菱形继承,或者钻石继承
典型的菱形继承案例: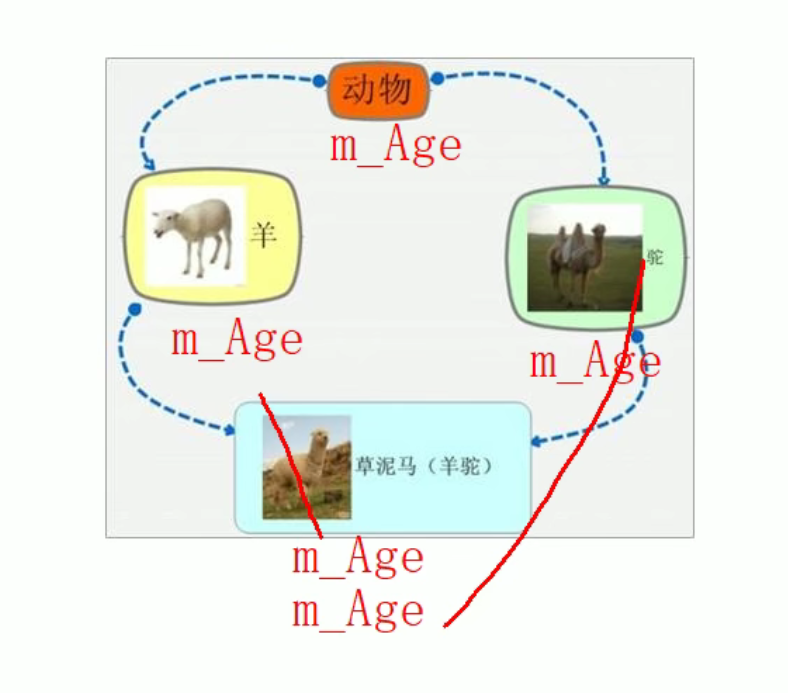
菱形继承问题:
- 羊继承了动物的数据,驼同样继承了动物的数据,当草泥马使用数据时,就会产生二义性。
- 草泥马继承自动物的数据继承了两份,其实我们应该清楚,这份数据我们只需要一份就可以。
示例:
#include<iostream>using namespace std;class Animal{public:int m_Age;};//继承前加virtual关键字后,变为虚继承//此时公共的父类Animal称为虚基类class Sheep : virtual public Animal {};class Tuo : virtual public Animal {};class SheepTuo : public Sheep, public Tuo {};void test01(){SheepTuo st;st.Sheep::m_Age = 100;st.Tuo::m_Age = 200;cout << "st.Sheep::m_Age = " << st.Sheep::m_Age << endl;cout << "st.Tuo::m_Age = " << st.Tuo::m_Age << endl;cout << "st.m_Age = " << st.m_Age << endl;}int main() {test01();return 0;}
运行结果:
继承前加virtual关键字后,变为虚继承,虚继承下来的是虚基类指针,而指针最后都指向虚基类表的同一个位置,所以他们的值都相同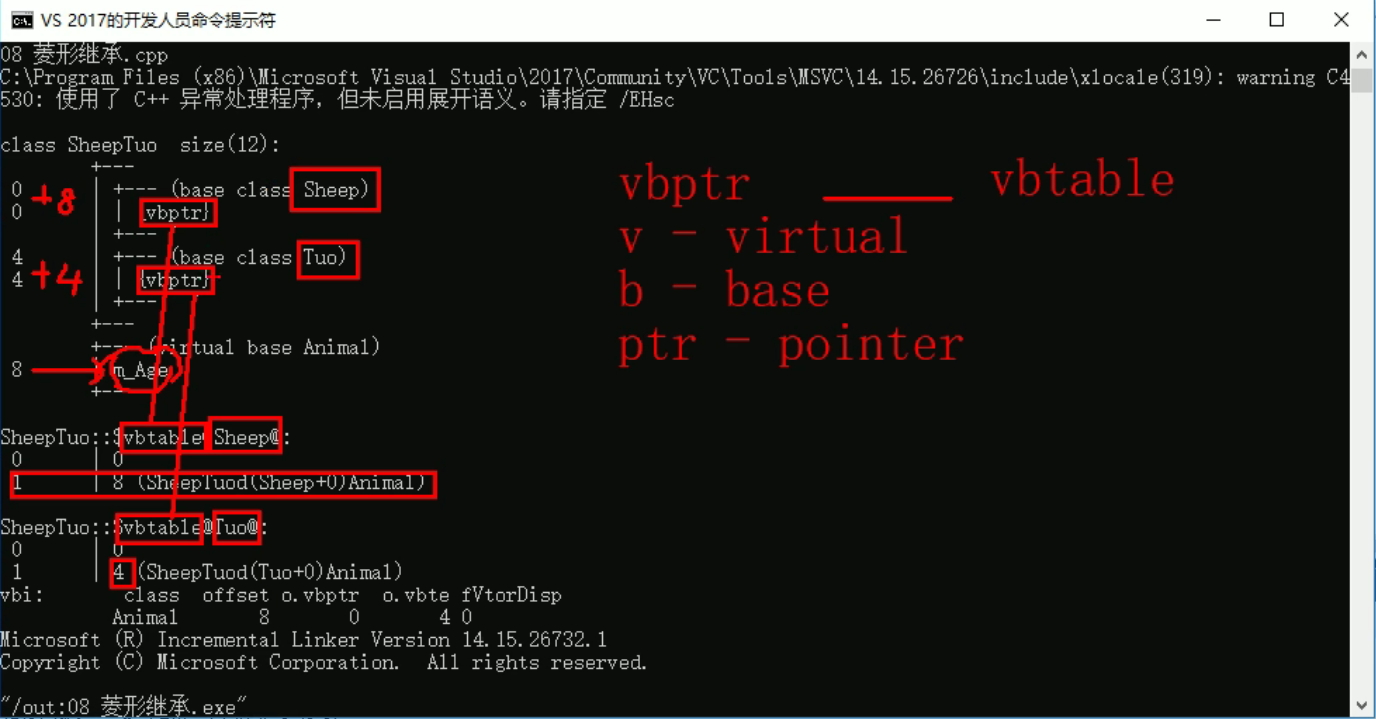
总结:
- 菱形继承带来的主要问题是子类继承两份相同的数据,导致资源浪费以及毫无意义
- 利用虚继承可以解决菱形继承问题
4.7 多态
4.7.1 多态的基本概念
多态是C++面向对象三大特性之一
多态分为两类
- 静态多态: 函数重载 和 运算符重载属于静态多态,复用函数名
- 动态多态: 派生类和虚函数实现运行时多态
静态多态和动态多态区别:
- 静态多态的函数地址早绑定 - 编译阶段确定函数地址
- 动态多态的函数地址晚绑定 - 运行阶段确定函数地址
示例:
#include<iostream>using namespace std;class Animal{public://Speak函数就是虚函数//函数前面加上virtual关键字,变成虚函数,那么编译器在编译的时候就不能确定函数调用了。virtual void speak(){cout << "动物在说话" << endl;}};class Cat :public Animal{public:void speak(){cout << "小猫在说话" << endl;}};class Dog :public Animal{public:void speak(){cout << "小狗在说话" << endl;}};//我们希望传入什么对象,那么就调用什么对象的函数//如果函数地址在编译阶段就能确定,那么静态联编//如果函数地址在运行阶段才能确定,就是动态联编void DoSpeak(Animal & animal){animal.speak();}////多态满足条件://1、有继承关系//2、子类重写父类中的虚函数//多态使用://父类指针或引用指向子类对象void test01(){Cat cat;DoSpeak(cat);Dog dog;DoSpeak(dog);}int main() {test01();return 0;}
运行结果:
多态满足条件:
- 有继承关系
- 子类重写父类中的虚函数
多态使用条件
- 父类指针或引用指向子类对象
重写:函数返回值类型 函数名 参数列表 完全一致称为重写
4.7.2 多态案例一-计算器类
案例描述:
分别利用普通写法和多态技术,设计实现两个操作数进行运算的计算器类
多态的优点:
- 代码组织结构清晰
- 可读性强
- 利于前期和后期的扩展以及维护
示例:
#include<iostream>using namespace std;//普通实现class Calculator {public:int getResult(string oper){if (oper == "+") {return m_Num1 + m_Num2;}else if (oper == "-") {return m_Num1 - m_Num2;}else if (oper == "*") {return m_Num1 * m_Num2;}//如果要提供新的运算,需要修改源码}public:int m_Num1;int m_Num2;};void test01(){//普通实现测试Calculator c;c.m_Num1 = 10;c.m_Num2 = 10;cout << c.m_Num1 << " + " << c.m_Num2 << " = " << c.getResult("+") << endl;cout << c.m_Num1 << " - " << c.m_Num2 << " = " << c.getResult("-") << endl;cout << c.m_Num1 << " * " << c.m_Num2 << " = " << c.getResult("*") << endl;}//多态实现//抽象计算器类//多态优点:代码组织结构清晰,可读性强,利于前期和后期的扩展以及维护class AbstractCalculator{public :virtual int getResult(){return 0;}int m_Num1;int m_Num2;};//加法计算器class AddCalculator :public AbstractCalculator{public:int getResult(){return m_Num1 + m_Num2;}};//减法计算器class SubCalculator :public AbstractCalculator{public:int getResult(){return m_Num1 - m_Num2;}};//乘法计算器class MulCalculator :public AbstractCalculator{public:int getResult(){return m_Num1 * m_Num2;}};void test02(){//创建加法计算器AbstractCalculator *abc = new AddCalculator;abc->m_Num1 = 10;abc->m_Num2 = 10;cout << abc->m_Num1 << " + " << abc->m_Num2 << " = " << abc->getResult() << endl;delete abc; //用完了记得销毁//创建减法计算器abc = new SubCalculator;abc->m_Num1 = 10;abc->m_Num2 = 10;cout << abc->m_Num1 << " - " << abc->m_Num2 << " = " << abc->getResult() << endl;delete abc;//创建乘法计算器abc = new MulCalculator;abc->m_Num1 = 10;abc->m_Num2 = 10;cout << abc->m_Num1 << " * " << abc->m_Num2 << " = " << abc->getResult() << endl;delete abc;}int main() {//test01();test02();return 0;}
总结:C++开发提倡利用多态设计程序架构,因为多态优点很多
4.7.3 纯虚函数和抽象类
在多态中,通常父类中虚函数的实现是毫无意义的,主要都是调用子类重写的内容
因此可以将虚函数改为纯虚函数
纯虚函数语法:virtual 返回值类型 函数名 (参数列表)= 0 ;
当类中有了纯虚函数,这个类也称为抽象类
抽象类特点:
- 无法实例化对象
- 子类必须重写抽象类中的纯虚函数,否则也属于抽象类
示例:
#include<iostream>using namespace std;class Base{public://纯虚函数//类中只要有一个纯虚函数就称为抽象类//抽象类无法实例化对象//子类必须重写父类中的纯虚函数,否则也属于抽象类virtual void func() = 0;};class Son :public Base{public:virtual void func(){cout << "func调用" << endl;};};void test01(){Base * base = NULL;//base = new Base; // 错误,抽象类无法实例化对象base = new Son;base->func();delete base;//记得销毁}int main() {test01();return 0;}
4.7.4 虚析构和纯虚析构
多态使用时,如果子类中有属性开辟到堆区,那么父类指针在释放时无法调用到子类的析构代码
解决方式:将父类中的析构函数改为虚析构或者纯虚析构
虚析构和纯虚析构共性:
- 可以解决父类指针释放子类对象
- 都需要有具体的函数实现
虚析构和纯虚析构区别:
- 如果是纯虚析构,该类属于抽象类,无法实例化对象
虚析构语法:virtual ~类名(){}
纯虚析构语法:
virtual ~类名() = 0;类名::~类名(){}
示例:
#include<iostream>using namespace std;class Animal {public:Animal(){cout << "Animal 构造函数调用!" << endl;}virtual void Speak() = 0;//析构函数加上virtual关键字,变成虚析构函数//virtual ~Animal()//{// cout << "Animal虚析构函数调用!" << endl;//}virtual ~Animal() = 0;};Animal::~Animal(){cout << "Animal 纯虚析构函数调用!" << endl;}//和包含普通纯虚函数的类一样,包含了纯虚析构函数的类也是一个抽象类。不能够被实例化。class Cat : public Animal {public:Cat(string name){cout << "Cat构造函数调用!" << endl;m_Name = new string(name);}virtual void Speak(){cout << *m_Name << "小猫在说话!" << endl;}~Cat(){cout << "Cat析构函数调用!" << endl;if (this->m_Name != NULL) {delete m_Name;m_Name = NULL;}}public:string *m_Name;};void test01(){Animal *animal = new Cat("Tom");animal->Speak();//通过父类指针去释放,会导致子类对象可能清理不干净,造成内存泄漏//怎么解决?给基类增加一个虚析构函数//虚析构函数就是用来解决通过父类指针释放子类对象delete animal;}int main() {test01();return 0;}
5. 文件操作
程序运行时产生的数据都属于临时数据,程序一旦运行结束都会被释放
通过文件可以将数据持久化
C++中对文件操作需要包含头文件 < fstream >
文件类型分为两种:
- 文本文件 - 文件以文本的ASCII码形式存储在计算机中
- 二进制文件 - 文件以文本的二进制形式存储在计算机中,用户一般不能直接读懂它们
操作文件的三大类:
- ofstream:写操作
- ifstream: 读操作
- fstream : 读写操作
5.1文本文件
5.1.1写文件
写文件步骤如下:
- 包含头文件
#include <fstream> - 创建流对象
ofstream ofs; - 打开文件
ofs.open(“文件路径”,打开方式); - 写数据
ofs << “写入的数据”; - 关闭文件
ofs.close();
文件打开方式:
| 打开方式 | 作用 |
|---|---|
| ios::in | 为读文件而打开文件 |
| ios::out | 为写文件而打开文件 |
| ios::ate | 初始位置:文件尾 |
| ios::app | 追加方式写文件 |
| ios::trunc | 如果文件存在先删除,再创建 |
| ios::binary | 二进制方式 |
注意: 文件打开方式可以配合使用 | 操作符
例:用二进制方式写文件: ios::binary | ios:: out
#include <iostream>#include <fstream>using namespace std;void test01(){ofstream ofs;ofs.open("test.txt", ios::out);ofs << "姓名:张三" << endl;ofs << "性别:男" << endl;ofs << "年龄:18" << endl;ofs.close();}int main() {test01();return 0;}
总结:
- 文件操作必须包含头文件 fstream
- 读文件可以利用 ofstream ,或者fstream类
- 打开文件时候需要指定操作文件的路径,以及打开方式
- 利用 << 可以向文件中写数据
- 操作完毕,要关闭文件
5.1.2读文件
读文件步骤如下:
- 包含头文件
#include <fstream> - 创建流对象
ifstream ifs(“文件路径”,打开方式); - 判断文件是否打开成功
ifs.is_open() - 读数据四种方式读取
- 关闭文件
ifs.close();
示例:
#include <fstream>#include <string>void test01(){ifstream ifs;ifs.open("test.txt", ios::in);if (!ifs.is_open()){cout << "文件打开失败" << endl;return;}//第一种方式//char buf[1024] = { 0 };//while (ifs >> buf)//{// cout << buf << endl;//}//第二种//char buf[1024] = { 0 };//while (ifs.getline(buf,sizeof(buf)))//{// cout << buf << endl;//}//第三种//string buf;//while (getline(ifs, buf))//{// cout << buf << endl;//}char c;while ((c = ifs.get()) != EOF){cout << c;}ifs.close();}int main() {test01();return 0;}
总结:
- 读文件可以利用 ifstream ,或者fstream类
- 利用
is_open()函数可以判断文件是否打开成功 - close() 关闭文件
5.2 二进制文件
以二进制的方式对文件进行读写操作
打开方式要指定为 ios::binary
5.2.1 写文件
二进制方式写文件主要利用流对象调用成员函数write()
函数原型 :ostream& write(const char * buffer,int len);
- 参数一是字符指针buffer指向内存中一段存储空间
- 参数二len是读写的字节数
示例:
#include <fstream>#include <string>class Person{public:char m_Name[64];int m_Age;};//二进制文件 写文件void test01(){//1、包含头文件//2、创建输出流对象ofstream ofs("person.txt", ios::out | ios::binary);//3、打开文件//ofs.open("person.txt", ios::out | ios::binary);Person p = {"张三" , 18};//4、写文件ofs.write((const char *)&p, sizeof(p));//5、关闭文件ofs.close();}int main() {test01();return 0;}
总结:
- 文件输出流对象 可以通过write函数,以二进制方式写数据
5.2.2 读文件
二进制方式读文件主要利用流对象调用成员函数read()
函数原型:istream& read(char *buffer,int len);
- 参数一是字符指针buffer指向内存中一段存储空间
- 参数二len是读写的字节数
示例:
#include <fstream>#include <string>class Person{public:char m_Name[64];int m_Age;};void test01(){ifstream ifs("person.txt", ios::in | ios::binary);if (!ifs.is_open()){cout << "文件打开失败" << endl;}Person p;ifs.read((char *)&p, sizeof(p));cout << "姓名: " << p.m_Name << " 年龄: " << p.m_Age << endl;}int main() {test01();return 0;}

若有收获,就点个赞吧
0 人点赞
