一、项目介绍
本实验是利用Zookeeper分布式协调应用程序、Kafka分布式日志文件系统、Nginx服务器以及后端jar包部署商城应用服务。
二、组件介绍
Kafka
Kafka是最初由Linkedin公司开发,是一个分布式、分区的、多副本的、多订阅者,基于zookeeper协调的分布式日志系统(也可以当做MQ系统),常见可以用于web/nginx日志、访问日志,消息服务等等,Linkedin于2010年贡献给了Apache基金会并成为顶级开源项目。
消息系统
一个消息系统负责将数据从一个应用传递到另外一个应用,应用只需关注于数据,无需关注数据在两个或多个应用间是如何传递的。分布式消息传递基于可靠的消息队列,在客户端应用和消息系统之间异步传递消息。有两种主要的消息传递模式:点对点传递模式、发布-订阅模式。大部分的消息系统选用发布-订阅模式。Kafka就是一种发布-订阅模式。
点对点消息传播
在点对点消息系统中,消息持久化到一个队列中。此时,将有一个或多个消费者消费队列中的数据。但是一条消息只能被消费一次。当一个消费者消费了队列中的某条数据之后,该条数据则从消息队列中删除。该模式即使有多个消费者同时消费数据,也能保证数据处理的顺序。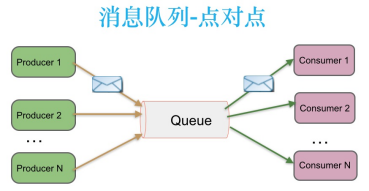
与发布-订阅消息传递模式
在发布-订阅消息系统中,消息被持久化到一个topic中。与点对点消息系统不同的是,消费者可以订阅一个或多个topic,消费者可以消费该topic中所有的数据,同一条数据可以被多个消费者消费,数据被消费后不会立马删除。在发布-订阅消息系统中,消息的生产者称为发布者,消费者称为订阅者。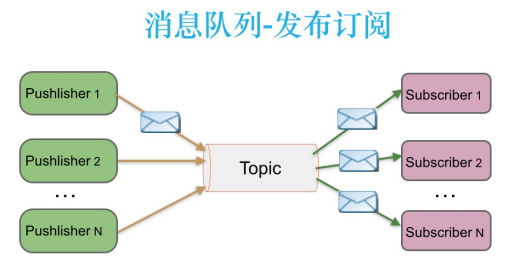
Zookeeper介绍
ZooKeeper是一个分布式的,开放源码的分布式应用程序协调服务,是Google的Chubby一个开源的实现,是Hadoop和Hbase的重要组件。它是一个为分布式应用提供一致性服务的软件,提供的功能包括:配置维护、域名服务、分布式同步、组服务等。ZooKeeper的目标就是封装好复杂易出错的关键服务,将简单易用的接口和性能高效、功能稳定的系统提供给用户。ZooKeeper包含一个简单的原语集,提供Java和C的接口。
ZooKeeper的基本运转流程:
1、选举Leader。
2、同步数据。
3、选举Leader过程中算法有很多,但要达到的选举标准是一致的。
4、Leader要具有最高的执行ID,类似root权限。
5、集群中大多数的机器得到响应并接受选出的Leader。
Redis服务介绍
Redis(Remote Dictionary Server ),即远程字典服务,是一个开源的使用ANSI C语言编写、支持网络、可基于内存亦可持久化的日志型、Key-Value数据库,并提供多种语言的API。
Elasticsearch介绍
Elasticsearch 是一个分布式、高扩展、高实时的搜索与数据分析引擎。它能很方便的使大量数据具有搜索、分析和探索的能力。充分利用Elasticsearch的水平伸缩性,能使数据在生产环境变得更有价值。Elasticsearch 的实现原理主要分为以下几个步骤,首先用户将数据提交到Elasticsearch 数据库中,再通过分词控制器去将对应的语句分词,将其权重和分词结果一并存入数据,当用户搜索数据时候,再根据权重将结果排名,打分,再将返回结果呈现给用户。
三、案例部署
1、修改主机名
[root@local ~]# hostnamectl set-hostname mall //修改主机名,修改完成使用ctrl+d退出登录
2、添加主机名映射文件
[root@mall ~]# cat /etc/hosts127.0.0.1 localhost localhost.localdomain localhost4 localhost4.localdomain4::1 localhost localhost.localdomain localhost6 localhost6.localdomain6192.168.100.11 mall192.168.100.11 redis.mall192.168.100.11 kafka.mall192.168.100.11 zookeeper.mall192.168.100.11 mysql.mall[root@mall ~]#
3、配置Yum源
[root@mall ~]# cat /etc/yum.repos.d/local.repo[centos]name=centosbaseurl=file:///opt/centosgpgcheck=0enabled=1[gpmall]name=gpmallbaseurl=file:///root/gpmall-cloud/gpmall-repogpgcheck=0enabled=1[root@mall ~]#
4、安装服务
[root@mall ~]# yum install -y java-1.8.0-openjdk java-1.8.0-openjdk-devel redis nginx mariadb mariadb-server //安装jdk、数据库、缓存、nginx服务
5、关闭防火墙以及selinux
[root@mall ~]# systemctl stop firewalld && systemctl disable firewalld //关闭防火墙并设置开机不自启Removed symlink /etc/systemd/system/dbus-org.fedoraproject.FirewallD1.service.Removed symlink /etc/systemd/system/basic.target.wants/firewalld.service.[root@mall ~]# setenforce 0 //临时关闭selinux
6、查看jdk版本
[root@mall ~]# java -versionopenjdk version "1.8.0_222"OpenJDK Runtime Environment (build 1.8.0_222-b10)OpenJDK 64-Bit Server VM (build 25.222-b10, mixed mode)[root@mall ~]#
7、配置zookeeper服务
[root@mall ~]# cd gpmall-cloud[root@mall gpmall-cloud]# tar -zxvf zookeeper-3.4.14.tar.gz //解压zookeeper压缩包[root@mall gpmall-cloud]# cd zookeeper-3.4.14/conf/ //进入zookeeper/conf目录下[root@mall conf]# mv zoo_sample.cfg zoo.cfg //给zoo_sample文件改名[root@mall conf]# cd ../bin/ //进入到zookeeper/bin目录下[root@mall bin]# ./zkServer.sh start //启动zookeeper服务ZooKeeper JMX enabled by defaultUsing config: /root/zookeeper-3.4.14/bin/../conf/zoo.cfgStarting zookeeper ... STARTED[root@mall bin]# ./zkServer.sh status //查看zookeeper服务状态ZooKeeper JMX enabled by defaultUsing config: /root/zookeeper-3.4.14/bin/../conf/zoo.cfgMode: standalone
8、配置kafka
[root@mall ~]# cd gpmall-cloud[root@mall gpmall-cloud]# tar -zxvf kafka_2.11-1.1.1.tgz //解压kafka压缩包[root@mall ~]# cd kafka_2.11-1.1.1/bin/ //进入bin目录[root@mall bin]# ./kafka-server-start.sh -daemon ../config/server.properties //启动kafka服务[root@mall bin]# cd //进入root目录[root@mall ~]# jps //使用命令查看进程,有kafka服务证明启动无误3456 QuorumPeerMain3771 Kafka3836 Jps[root@mall ~]# yum -y install net-tools //安装net-tools(此工具用来查看端口号)[root@mall ~]# netstat -ntpl //查询到端口9092,对应的服务为kafkaActive Internet connections (only servers)Proto Recv-Q Send-Q Local Address Foreign Address State PID/Program nametcp 0 0 0.0.0.0:22 0.0.0.0:* LISTEN 1467/sshdtcp 0 0 127.0.0.1:25 0.0.0.0:* LISTEN 1970/mastertcp6 0 0 :::36141 :::* LISTEN 3456/javatcp6 0 0 :::22 :::* LISTEN 1467/sshdtcp6 0 0 ::1:25 :::* LISTEN 1970/mastertcp6 0 0 :::47043 :::* LISTEN 3771/javatcp6 0 0 :::9092 :::* LISTEN 3771/javatcp6 0 0 :::2181 :::* LISTEN 3456/java
9、配置数据库
[root@mall gpmall-cloud]# vi /etc/my.cnf[mysqld]datadir=/var/lib/mysqlsocket=/var/lib/mysql/mysql.sock# Disabling symbolic-links is recommended to prevent assorted security riskssymbolic-links=0# Settings user and group are ignored when systemd is used.# If you need to run mysqld under a different user or group,# customize your systemd unit file for mariadb according to the# instructions in http://fedoraproject.org/wiki/Systemd[mysqld_safe]log-error=/var/log/mariadb/mariadb.logpid-file=/var/run/mariadb/mariadb.pid## include all files from the config directory#!includedir /etc/my.cnf.d[mysqld] //添加这块init_connect='SET collation_connection = utf8_unicode_ci'init_connect='SET NAMES utf8'character-set-server=utf8collation-server=utf8_unicode_ciskip-character-set-client-handshake[root@mall ~]# systemctl restart mariadb //重启数据库服务[root@mall ~]# systemctl enable mariadb //设置数据库开机自启[root@mall ~]# mysql_secure_installation //初始化数据库服务,使用此命令必须保证数据库已经启动否则无效NOTE: RUNNING ALL PARTS OF THIS SCRIPT IS RECOMMENDED FOR ALL MariaDBSERVERS IN PRODUCTION USE! PLEASE READ EACH STEP CAREFULLY!In order to log into MariaDB to secure it, we'll need the currentpassword for the root user. If you've just installed MariaDB, andyou haven't set the root password yet, the password will be blank,so you should just press enter here.Enter current password for root (enter for none):OK, successfully used password, moving on...Setting the root password ensures that nobody can log into the MariaDBroot user without the proper authorisation.Set root password? [Y/n] yNew password: //设置密码为123456,必须设置为123456,否则后面对接jar包不成功,造成商城页面不可弹出Re-enter new password: //再输入一遍123456Password updated successfully!Reloading privilege tables..... Success!By default, a MariaDB installation has an anonymous user, allowing anyoneto log into MariaDB without having to have a user account created forthem. This is intended only for testing, and to make the installationgo a bit smoother. You should remove them before moving into aproduction environment.Remove anonymous users? [Y/n] y //询问是否移除匿名用户--y... Success!Normally, root should only be allowed to connect from 'localhost'. Thisensures that someone cannot guess at the root password from the network.Disallow root login remotely? [Y/n] n //询问是否禁止远程登陆--n... skipping.By default, MariaDB comes with a database named 'test' that anyone canaccess. This is also intended only for testing, and should be removedbefore moving into a production environment.Remove test database and access to it? [Y/n] y //询问是否移除匿名用户--y- Dropping test database...... Success!- Removing privileges on test database...... Success!Reloading the privilege tables will ensure that all changes made so farwill take effect immediately.Reload privilege tables now? [Y/n] y //询问是否刷新权限--y... Success!Cleaning up...All done! If you've completed all of the above steps, your MariaDBinstallation should now be secure.Thanks for using MariaDB![root@mall ~]# mysql -uroot -p123456 //登录数据库,用户为root,密码为123456Welcome to the MariaDB monitor. Commands end with ; or \g.Your MariaDB connection id is 15Server version: 10.3.18-MariaDB MariaDB ServerCopyright (c) 2000, 2018, Oracle, MariaDB Corporation Ab and others.Type 'help;' or '\h' for help. Type '\c' to clear the current input statement.MariaDB [(none)]> grant all privileges on *.* to root@localhost identified by '123456' with grant option; //授权所有用户拥有本地数据库的所有权限Query OK, 0 rows affected (0.000 sec)MariaDB [(none)]> grant all privileges on *.* to root@"%" identified by '123456' with grant option; //赋予任何远程主机用root用户连接到mysql 所有库的权限,密码为123456Query OK, 0 rows affected (0.000 sec)MariaDB [(none)]> create database gpmall; //创建数据库,名为gpmallQuery OK, 1 row affected (0.000 sec)MariaDB [(none)]> use gpmall; //进入数据库Database changedMariaDB [gpmall]> source /root/gpmall-cloud/gpmall-single/gpmall.sql //将本地数据导入到数据库中MariaDB [(none)]> Bye[root@mall ~]#
10、配置redis服务
[root@mall ~]# vi /etc/redis.conf //编辑redis配置文件进入文件后,不要做任何操作,直接输入:set nu显示行号,然后将文本改为插入模式,将第61行前加#进行注释,再将第80行中的yes改为no,最后保存退出[root@mall ~]# systemctl restart redis //更改文件后,重启redis服务[root@mall ~]# systemctl enable redis //设置redis服务开机自启[root@mall ~]# netstat -ntpl //查看端口号,找到6379端口,对应的服务为redisActive Internet connections (only servers)Proto Recv-Q Send-Q Local Address Foreign Address State PID/Program nametcp 0 0 0.0.0.0:6379 0.0.0.0:* LISTEN 10797/redis-servertcp 0 0 0.0.0.0:22 0.0.0.0:* LISTEN 893/sshdtcp 0 0 127.0.0.1:25 0.0.0.0:* LISTEN 1141/mastertcp6 0 0 :::9092 :::* LISTEN 10192/javatcp6 0 0 :::2181 :::* LISTEN 9869/javatcp6 0 0 :::3306 :::* LISTEN 10688/mysqldtcp6 0 0 :::6379 :::* LISTEN 10797/redis-servertcp6 0 0 :::35279 :::* LISTEN 10192/javatcp6 0 0 :::41905 :::* LISTEN 9869/javatcp6 0 0 :::22 :::* LISTEN 893/sshdtcp6 0 0 ::1:25 :::* LISTEN 1141/master
11、配置nginx服务
[root@mall ~]# rm -rf /usr/share/nginx/html/* //删除Nginx服务站点目录下所有内容[root@mall ~]# cp -rvf gpmall-single/dist/* /usr/share/nginx/html/ //将本地web包拷贝到站点目录下[root@mall ~]# vi /etc/nginx/conf.d/default.conf //编辑nginx的配置文件进入配置文件后找到第一个location,将下面内容添加进去location /user {proxy_pass http://127.0.0.1:8082;}location /shopping {proxy_pass http://127.0.0.1:8081;}location /cashier {proxy_pass http://127.0.0.1:8083;}[root@mall ~]# systemctl restart nginx //添加完成后重启nginx服务,如果遇到服务报错,则检查Nginx配置文件是否正确[root@mall ~]# netstat -ntpl //查看端口号,有无80端口暴露,对应服务为nginxActive Internet connections (only servers)Proto Recv-Q Send-Q Local Address Foreign Address State PID/Program nametcp 0 0 0.0.0.0:6379 0.0.0.0:* LISTEN 10797/redis-servertcp 0 0 0.0.0.0:80 0.0.0.0:* LISTEN 10829/nginx: mastertcp 0 0 0.0.0.0:22 0.0.0.0:* LISTEN 893/sshdtcp 0 0 127.0.0.1:25 0.0.0.0:* LISTEN 1141/mastertcp6 0 0 :::9092 :::* LISTEN 10192/javatcp6 0 0 :::2181 :::* LISTEN 9869/javatcp6 0 0 :::3306 :::* LISTEN 10688/mysqldtcp6 0 0 :::6379 :::* LISTEN 10797/redis-servertcp6 0 0 :::35279 :::* LISTEN 10192/javatcp6 0 0 :::41905 :::* LISTEN 9869/javatcp6 0 0 :::22 :::* LISTEN 893/sshdtcp6 0 0 ::1:25 :::* LISTEN 1141/master
12、部署后端jar包
[root@mall ~]# cd gpmall-cloud/gpmall-single/ //进入存放后端jar包文件目录[root@mall gpmall-single]# lsdistgpmall-shopping-0.0.1-SNAPSHOT.jargpmall.sqlgpmall-user-0.0.1-SNAPSHOT.jarnohup.outshopping-provider-0.0.1-SNAPSHOT.jaruser-provider-0.0.1-SNAPSHOT.jar[root@mall gpmall-single]#[root@mall ~]# gpmall-single]# nohup java -jar shopping-provider-0.0.1-SNAPSHOT.jar & //分别在后台,启动下面四个jar包[root@mall ~]# gpmall-single]# nohup java -jar user-provider-0.0.1-SNAPSHOT.jar &[root@mall ~]# gpmall-single]# nohup java -jar gpmall-shopping-0.0.1-SNAPSHOT.jar &[root@mall ~]# gpmall-single]# nohup java -jar gpmall-user-0.0.1-SNAPSHOT.jar &[root@mall gpmall-single]# jobs[1] Running nohup java -jar shopping-provider-0.0.1-SNAPSHOT.jar &[2] Running nohup java -jar user-provider-0.0.1-SNAPSHOT.jar &[3]- Running nohup java -jar gpmall-shopping-0.0.1-SNAPSHOT.jar &[4]+ Running nohup java -jar gpmall-user-0.0.1-SNAPSHOT.jar &[root@mall gpmall-single]# jps10192 Kafka10835 jar10932 jar10869 jar10902 jar10969 Jps9869 QuorumPeerMain注意:如果在命令启动过程中遇到EXIT字样,则为jar包出现闪退,检查前面所部署的服务是否运行正常,以及主机名映射文件是否书写正确
13、浏览器登录验证
如果前面每个服务都运行正常,且jar包没有出现闪退,那么使用浏览器输入192.168.100.11进行验证,如果发现有图片并且有文字出现,则gpmall商城部署正常。
14、将gpmall前端页面使用命令获取
[root@mall ~]# curl http://192.168.100.11/#/home<!DOCTYPE html><html><head><meta charset=utf-8><title>1+x-示例项目</title><meta name=keywords content=""><meta name=description content=""><meta http-equiv=X-UA-Compatible content="IE=Edge"><meta name=wap-font-scale content=no><link rel="shortcut icon " type=images/x-icon href=/static/images/favicon.ico><link href=/static/css/app.8d4edd335a61c46bf5b6a63444cd855a.css rel=stylesheet></head><body><div id=app></div><script type=text/javascript src=/static/js/manifest.2d17a82764acff8145be.js></script><script type=text/javascript src=/static/js/vendor.4f07d3a235c8a7cd4efe.js></script><script type=text/javascript src=/static/js/app.81180cbb92541cdf912f.js></script></body></html><style>body{min-width:1250px;}</style>[root@mall ~]#

若有收获,就点个赞吧
0 人点赞
