配置前先修改一下配置文件
/最后添加一行[root@lnmp nginx-1.17.8]# vim /usr/local/nginx/conf/nginx.conf/把server那一段删了,加入这一句 include vhost/*.conf;user nobody nobody;worker_processes 2;error_log /usr/local/nginx/logs/nginx_error.log crit;pid /usr/local/nginx/logs/nginx.pid;worker_rlimit_nofile 51200;events{use epoll;worker_connections 6000;}http{include mime.types;default_type application/octet-stream;server_names_hash_bucket_size 3526;server_names_hash_max_size 4096;log_format combined_realip '$remote_addr $http_x_forwarded_for [$time_local]'' $host "$request_uri" $status'' "$http_referer" "$http_user_agent"';sendfile on;tcp_nopush on;keepalive_timeout 30;client_header_timeout 3m;client_body_timeout 3m;send_timeout 3m;connection_pool_size 256;client_header_buffer_size 1k;large_client_header_buffers 8 4k;request_pool_size 4k;output_buffers 4 32k;postpone_output 1460;client_max_body_size 10m;client_body_buffer_size 256k;client_body_temp_path /usr/local/nginx/client_body_temp;proxy_temp_path /usr/local/nginx/proxy_temp;fastcgi_temp_path /usr/local/nginx/fastcgi_temp;fastcgi_intercept_errors on;tcp_nodelay on;gzip on;gzip_min_length 1k;gzip_buffers 4 8k;gzip_comp_level 5;gzip_http_version 1.1;gzip_types text/plain application/x-javascript text/css text/htmapplication/xml;include vhost/*.conf;}[root@lnmp nginx-1.17.8]# mkdir /usr/local/nginx/conf/vhost[root@lnmp nginx-1.17.8]# cd /usr/local/nginx/conf/vhost/[root@lnmp vhost]# /usr/local/nginx/sbin/nginx -tnginx: the configuration file /usr/local/nginx/conf/nginx.conf syntax is oknginx: configuration file /usr/local/nginx/conf/nginx.conf test is successful[root@lnmp vhost]# /usr/local/nginx/sbin/nginx -s reload
一、默认虚拟主机
1.配置
[root@lnmp vhost]# pwd/usr/local/nginx/conf/vhost[root@lnmp vhost]# vim default.confserver{listen 80 default_server;server_name aaa.com;index index.html index.htm index.php;root /data/nginx/default;}

[root@lnmp vhost]# /usr/local/nginx/sbin/nginx -tnginx: the configuration file /usr/local/nginx/conf/nginx.conf syntax is oknginx: configuration file /usr/local/nginx/conf/nginx.conf test is successful[root@lnmp vhost]# /usr/local/nginx/sbin/nginx -s reload
2.测试
[root@lnmp vhost]# mkdir -p /data/nginx/default[root@lnmp vhost]# echo " default server! " > /data/nginx/default/index.html# dingyi的为aaa.com[root@lnmp vhost]# curl -x127.0.0.1:80 bbb.comdefault server![root@lnmp vhost]# curl -x127.0.0.1:80 aaa.comdefault server!
二、用户认证
1、整个域名认证
1.1、配置
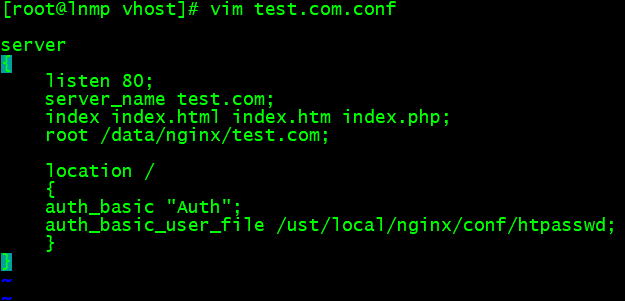
[root@lnmp ~]# cd /usr/local/nginx/conf/vhost/[root@lnmp vhost]# lsdefault.conf[root@lnmp vhost]# vim test.com.confserver{listen 80;server_name test.com;index index.html index.htm index.php;root /data/nginx/test.com;location /{auth_basic "Auth";auth_basic_user_file /usr/local/nginx/conf/htpasswd;}}

[root@lnmp vhost]# yum install -y httpd[root@lnmp vhost]# htpasswd -c /usr/local/nginx/conf/htpasswd sxbNew password:Re-type new password:Adding password for user sxb[root@lnmp vhost]#[root@lnmp vhost]# /usr/local/nginx/sbin/nginx -s reload[root@lnmp vhost]# mkdir /data/nginx/test.com[root@lnmp vhost]# echo "test.com" > /data/nginx/test.com/index.html
1.2、测试
[root@lnmp vhost]# /usr/local/nginx/sbin/nginx -tnginx: the configuration file /usr/local/nginx/conf/nginx.conf syntax is oknginx: configuration file /usr/local/nginx/conf/nginx.conf test is successful[root@lnmp vhost]# /usr/local/nginx/sbin/nginx -s reload
在自己电脑修改hosts文件
C:\Windows\System32\drivers\etc
网页输入
test.com
[root@lnmp vhost]# curl -x127.0.0.1:80 test.com<html><head><title>401 Authorization Required</title></head><body><center><h1>401 Authorization Required</h1></center><hr><center>nginx/1.17.8</center></body></html>[root@lnmp vhost]# curl -usxb -x127.0.0.1:80 test.comEnter host password for user 'sxb':<html><head><title>403 Forbidden</title></head><body><center><h1>403 Forbidden</h1></center><hr><center>nginx/1.17.8</center></body></html>[root@lnmp vhost]#
2、针对目录认证
2.1配置
针对目录做用户认证要修改location后面的路径
[root@lnmp vhost]# vim test.com.confserver{listen 80;server_name test.com;index index.html index.htm index.php;root /data/nginx/test.com;location /admin/{auth_basic "Auth";auth_basic_user_file /usr/local/nginx/conf/htpasswd;}}[root@lnmp vhost]# mkdir /data/nginx/test.com/admin[root@lnmp vhost]# echo "asdfadmin" > /data/nginx/test.com/admin/index.html[root@lnmp vhost]# /usr/local/nginx/sbin/nginx -tnginx: the configuration file /usr/local/nginx/conf/nginx.conf syntax is oknginx: configuration file /usr/local/nginx/conf/nginx.conf test is successful[root@lnmp vhost]# /usr/local/nginx/sbin/nginx -s reload
2.2测试
3、URL认证
3.1配置
[root@lnmp vhost]# vim test.com.confserver{listen 80;server_name test.com;index index.html index.htm index.php;root /data/nginx/test.com;location ~ admin.php{auth_basic "Auth";auth_basic_user_file /usr/local/nginx/conf/htpasswd;}}
3.2测试
[root@lnmp vhost]# /usr/local/nginx/sbin/nginx -tnginx: the configuration file /usr/local/nginx/conf/nginx.conf syntax is oknginx: configuration file /usr/local/nginx/conf/nginx.conf test is successful[root@lnmp vhost]# /usr/local/nginx/sbin/nginx -s reload[root@lnmp vhost]# curl -x127.0.0.1:80 test.com/admin.php<html><head><title>401 Authorization Required</title></head><body><center><h1>401 Authorization Required</h1></center><hr><center>nginx/1.17.8</center></body></html>
三、域名重定向
1、配置
[root@lnmp vhost]# vim test.com.confserver{listen 80;server_name test.com test2.com test3.com;index index.html index.htm index.php;root /data/nginx/test.com;if ($host != 'test.com' ){rewrite ^(.*)$ http://test.com/$1 permanent;}}
2、测试
[root@lnmp vhost]# /usr/local/nginx/sbin/nginx -tnginx: the configuration file /usr/local/nginx/conf/nginx.conf syntax is oknginx: configuration file /usr/local/nginx/conf/nginx.conf test is successful[root@lnmp vhost]# /usr/local/nginx/sbin/nginx -s reload/状态码301就是域名重定向[root@lnmp vhost]# curl -x127.0.0.1:80 test2.com<html><head><title>301 Moved Permanently</title></head><body><center><h1>301 Moved Permanently</h1></center><hr><center>nginx/1.17.8</center></body></html>[root@lnmp vhost]# curl -x127.0.0.1:80 test2.com -IHTTP/1.1 301 Moved PermanentlyServer: nginx/1.17.8Date: Wed, 11 Aug 2021 10:09:23 GMTContent-Type: text/htmlContent-Length: 169Connection: keep-aliveLocation: http://test.com//
在windows上测试需要将两个域名都写入hosts文件,并使用没有缓存的浏览器。
四、nginx访问日志
1、配置
nginx 默认格式[root@lnmp vhost]# grep -A2 log_format /usr/local/nginx/conf/nginx.conflog_format combined_realip '$remote_addr $http_x_forwarded_for [$time_local]'' $host "$request_uri" $status'' "$http_referer" "$http_user_agent"';# combined_realip为日志格式名字,$remote_addr为网站的用户的出口IP;# $http_x_forwarded_for 为代理服务器的IP,如果使用了代理,则会记录IP# $time_local为当前时间;$host为主机名;$request_uri为访问的URL地址# $status为状态码,$http_referer为referer地址,$http_user_agent为user_agent[root@lnmp vhost]# vim test.com.confserver{listen 80;server_name test.com;index index.html index.htm index.php;root /data/nginx/test.com;access_log /tmp/1.log combined_realip;}
2、测试
[root@lnmp vhost]# /usr/local/nginx/sbin/nginx -tnginx: the configuration file /usr/local/nginx/conf/nginx.conf syntax is oknginx: configuration file /usr/local/nginx/conf/nginx.conf test is successful[root@lnmp vhost]# /usr/local/nginx/sbin/nginx -s reload[root@lnmp vhost]# curl -x127.0.0.1:80 test.comtest.com[root@lnmp vhost]# cat /tmp/1.log127.0.0.1 - [06/Sep/2021:14:44:48 +0800] test.com "/" 200 "-" "curl/7.29.0"[root@lnmp vhost]#
五、nginx日志切割
自己写一个脚本,[root@lnmp ~]# vim /usr/local/sbin/nginx_log_rotate.sh#!/bin/bash##假设nignx的日志存放路径为/data/logs/d=`date -d "-1 day" +%Y%m%d`logdir="/tmp/"nginx_pid="/usr/local/nginx/logs/nginx.pid"cd $logdirfor log in `ls *.log`domv $log $log-$ddone/bin/kill -HUP `cat $nginx_pid`[root@lnmp ~]# chmod 755 /usr/local/sbin/nginx_log_rotate.sh[root@lnmp ~]# crontab -e0 0 * * * /bin/bash /usr/local/sbin/nginx_log_rotate.sh[root@lnmp ~]# ls /tmp/1.log systemd-private-6caddee1099545f282b31885c5e591f4-chronyd.service-X0RZZJmysql.sock vmware-root_650-2696943027pear vmware-root_659-4013788787php-fcgi.sock[root@lnmp ~]# sh -x /usr/local/sbin/nginx_log_rotate.sh++ date -d '-1 day' +%Y%m%d+ d=20210816+ logdir=/tmp/+ nginx_pid=/usr/local/nginx/logs/nginx.pid+ cd /tmp/++ ls 1.log+ for log in '`ls *.log`'+ mv 1.log 1.log-20210816++ cat /usr/local/nginx/logs/nginx.pid+ /bin/kill -HUP 1606[root@lnmp ~]# ls /tmp/1.log1.log-20210905mysql.sockpearphp-fcgi.socksystemd-private-6caddee1099545f282b31885c5e591f4-chronyd.service-X0RZZJvmware-root_650-2696943027vmware-root_659-4013788787[root@lnmp ~]#
六、配置静态文件不记录日志并添加过期时间
和LAMP一样,配置静态文件不记录日志,并添加过期时间。 目的是为了减少记录不必要的日志文件。缓存文件为了下次访问速度变快。
[root@lnmp ~]# vim /usr/local/nginx/conf/vhost/test.com.confserver{listen 80;server_name test.com test1.com test2.com;index index.html index.htm index.php;root /data/nginx/test.com;if ($host != 'test.com' ) {rewrite ^/(.*)$ http://test.com/$1 permanent;}location ~ .*\.(gif|jpg|jpeg|png|bmp|swf)${expires 7d;access_log off;}location ~ .*\.(js|css)${expires 12h;}access_log /tmp/1.log combined_realip;}[root@lnmp ~]# echo '111' > /data/nginx/test.com/1.js[root@lnmp ~]# echo '222' > /data/nginx/test.com/2.jpg[root@lnmp ~]# touch /data/nginx/test.com/1.jss[root@lnmp ~]# /usr/local/nginx/sbin/nginx -tnginx: the configuration file /usr/local/nginx/conf/nginx.conf syntax is oknginx: configuration file /usr/local/nginx/conf/nginx.conf test is successful[root@lnmp ~]# /usr/local/nginx/sbin/nginx -s reload[root@lnmp ~]# echo > /tmp/1.log[root@lnmp ~]# curl -I -x127.0.0.1:80 test.com/1.jsHTTP/1.1 200 OKServer: nginx/1.17.8Date: Tue, 17 Aug 2021 10:37:13 GMTContent-Type: application/javascriptContent-Length: 4Last-Modified: Tue, 17 Aug 2021 09:46:43 GMTConnection: keep-aliveETag: "611b8583-4"Expires: Tue, 17 Aug 2021 22:37:13 GMTCache-Control: max-age=43200Accept-Ranges: bytes[root@lnmp ~]# curl -I -x127.0.0.1:80 test.com/2.jpgHTTP/1.1 200 OKServer: nginx/1.17.8Date: Tue, 17 Aug 2021 10:37:23 GMTContent-Type: image/jpegContent-Length: 4Last-Modified: Tue, 17 Aug 2021 09:47:12 GMTConnection: keep-aliveETag: "611b85a0-4"Expires: Tue, 24 Aug 2021 10:37:23 GMTCache-Control: max-age=604800Accept-Ranges: bytes[root@lnmp ~]# curl -I -x127.0.0.1:80 test.com/1.jssHTTP/1.1 200 OKServer: nginx/1.17.8Date: Tue, 17 Aug 2021 10:37:32 GMTContent-Type: application/octet-streamContent-Length: 0Last-Modified: Tue, 17 Aug 2021 10:02:04 GMTConnection: keep-aliveETag: "611b891c-0"Accept-Ranges: bytes[root@lnmp ~]# cat /tmp/1.log127.0.0.1 - [06/Sep/2021:14:52:48 +0800] test.com "/1.js" 200 "-" "curl/7.29.0"192.168.100.1 - [06/Sep/2021:14:53:12 +0800] test.com "/1.js" 200 "-" "Mozilla/5.0 (Windows NT 10.0; WOW64) AppleWebKit/537.36 (KHTML, like Gecko) Chrome/80.0.3987.87 Safari/537.36 SE 2.X MetaSr 1.0"127.0.0.1 - [06/Sep/2021:14:55:17 +0800] test.com "/1.jss" 200 "-" "curl/7.29.0"192.168.100.1 - [06/Sep/2021:14:55:28 +0800] test.com "/1.jss" 200 "-" "Mozilla/5.0 (Windows NT 10.0; WOW64) AppleWebKit/537.36 (KHTML, like Gecko) Chrome/80.0.3987.87 Safari/537.36 SE 2.X MetaSr 1.0"[root@lnmp ~]#


七、Nginx防盗链
[root@lnmp ~]# vim /usr/local/nginx/conf/vhost/test.com.confserver{listen 80;server_name test.com test1.com test2.com;index index.html index.htm index.php;root /data/nginx/test.com;if ($host != 'test.com' ) {rewrite ^/(.*)$ http://test.com/$1 permanent;}location ~* ^.+\.(gif|jpg|png|swf|flv|rar|zip|doc|pdf|gz|bz2|jpeg|bmp|xls)${expires 7d;valid_referers none blocked server_names *.test.com ;if ($invalid_referer) {return 403;}access_log off;}}[root@lnmp ~]# /usr/local/nginx/sbin/nginx -tnginx: the configuration file /usr/local/nginx/conf/nginx.conf syntax is oknginx: configuration file /usr/local/nginx/conf/nginx.conf test is successful[root@lnmp ~]# /usr/local/nginx/sbin/nginx -s reload[root@lnmp ~]# curl -x127.0.0.1:80 -e "http://aaa.com/1.txt" test.com/2.jpg -IHTTP/1.1 403 ForbiddenServer: nginx/1.17.8Date: Mon, 06 Sep 2021 06:58:17 GMTContent-Type: text/htmlContent-Length: 153Connection: keep-alive[root@lnmp ~]# curl -x127.0.0.1:80 -e "http://test.com/1.txt" test.com/2.jpg -IHTTP/1.1 200 OKServer: nginx/1.17.8Date: Mon, 06 Sep 2021 06:58:30 GMTContent-Type: image/jpegContent-Length: 4Last-Modified: Mon, 06 Sep 2021 06:52:04 GMTConnection: keep-aliveETag: "6135ba94-4"Expires: Mon, 13 Sep 2021 06:58:30 GMTCache-Control: max-age=604800Accept-Ranges: bytes[root@lnmp ~]#
八、访问控制
1、针对目录进行访问控制
1.1 配置
[root@lnmp ~]# vim /usr/local/nginx/conf/vhost/test.com.confserver{listen 80;server_name test.com test1.com test2.com;index index.html index.htm index.php;root /data/nginx/test.com;access_log /tmp/1.log combined_realip;location /admin/ {allow 192.168.100.1;allow 192.168.100.10;allow 127.0.0.1;deny all;}}[root@lnmp ~]# /usr/local/nginx/sbin/nginx -tnginx: the configuration file /usr/local/nginx/conf/nginx.conf syntax is oknginx: configuration file /usr/local/nginx/conf/nginx.conf test is successful[root@lnmp ~]# /usr/local/nginx/sbin/nginx -s reload
1.2 测试
[root@lnmp ~]# echo "1234" > /data/nginx/test.com/admin/1.html# 测试 可以把配置文件改为192.168.100.10允许访问,使用浏览器测试[root@lnmp ~]# curl -x127.0.0.1:80 test.com/admin/1.html1234[root@lnmp ~]# curl -x192.168.100.10:80 test.com/admin/1.html -IHTTP/1.1 200 OKServer: nginx/1.17.8Date: Mon, 06 Sep 2021 07:45:45 GMTContent-Type: text/htmlContent-Length: 5Last-Modified: Mon, 06 Sep 2021 07:29:53 GMTConnection: keep-aliveETag: "6135c371-5"Accept-Ranges: bytes[root@lnmp ~]#
网页输入
http://test.com/admin/1.html
九、nginx解析PHP
配置
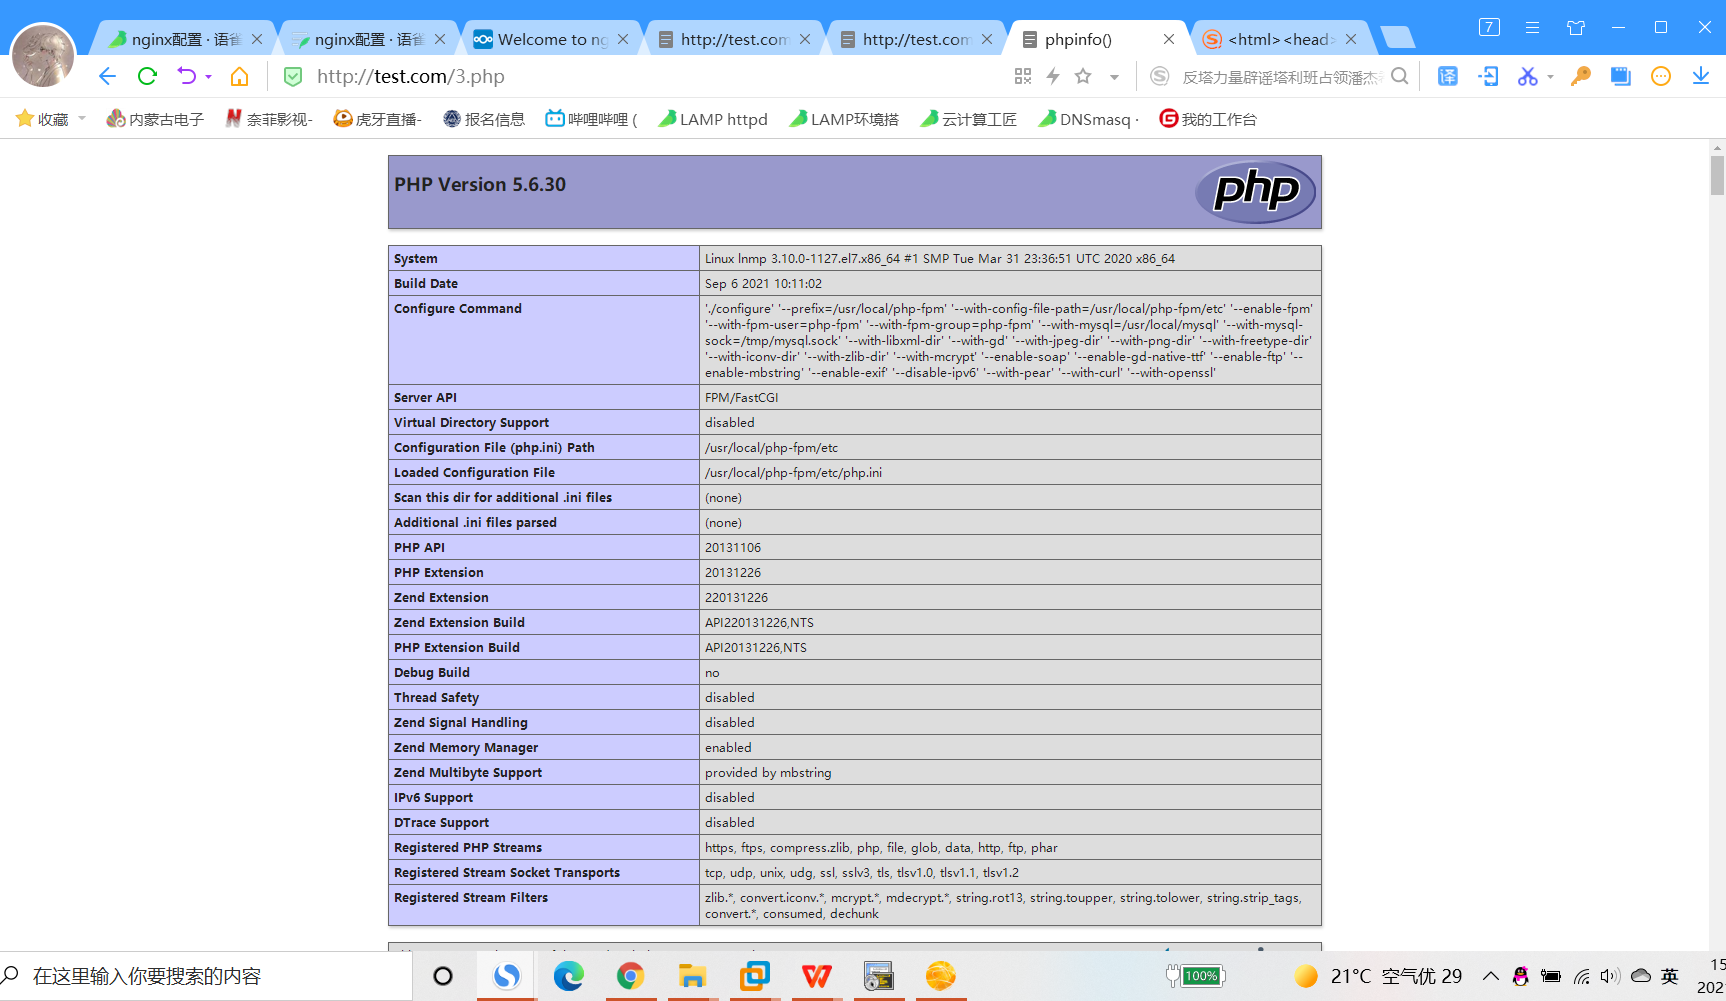
[root@lnmp ~]# vim /usr/local/nginx/conf/vhost/test.com.confserver{listen 80;server_name test.com test1.com test2.com;index index.html index.htm index.php;root /data/nginx/test.com;access_log /tmp/1.log combined_realip;location ~ \.php$ {include fastcgi_params;fastcgi_pass unix:/tmp/php-fcgi.sock;fastcgi_index index.php;fastcgi_param SCRIPT_FILENAME /data/nginx/test.com$fastcgi_script_name;}}[root@lnmp ~]# vim /data/nginx/test.com/3.php<?phpphpinfo();?># fastcgi_pass用来指定php-fpm的地址 路径如果错误,则报错502# 路径在这个配置文件中[root@lnmp ~]# cat /usr/local/php-fpm/etc/php-fpm.conf[global]pid = /usr/local/php-fpm/var/run/php-fpm.piderror_log = /usr/local/php-fpm/var/log/php-fpm.log[www]listen = /tmp/php-fcgi.sock# listen = 127.0.0.1:9000 # 也可以这样配置,但是他们的配置文件要对应。listen.mode = 666user = php-fpmgroup = php-fpmpm = dynamicpm.max_children = 50pm.start_servers = 20pm.min_spare_servers = 5pm.max_spare_servers = 35pm.max_requests = 500rlimit_files = 1024# 注意一下这三行的配置文件与nginx配置文件的关系listen = /tmp/php-fcgi.sock# listen = 127.0.0.1:9000 # 也可以这样配置,但是他们的配置文件要对应。listen.mode = 666
测试
[root@lnmp ~]# curl -x127.0.0.1:80 test.com/3.php<?phpphpinfo();?>[root@lnmp ~]# /usr/local/nginx/sbin/nginx -tnginx: the configuration file /usr/local/nginx/conf/nginx.conf syntax is oknginx: configuration file /usr/local/nginx/conf/nginx.conf test is successful[root@lnmp ~]# /usr/local/nginx/sbin/nginx -s reload
网页输入
test.com/3.php
十、Nginx代理
一个没有公网IP的服务器要提供web服务,可以通过代理实现。
配置
[root@lnmp ~]# vim /usr/local/nginx/conf/vhost/proxy.confserver{listen 80;server_name ask.apelearn.com;location /{proxy_pass http://47.104.7.242/;proxy_set_header Host $host;proxy_set_header X-Real-IP $remote_addr;proxy_set_header X-Forwarded-For $proxy_add_x_forwarded_for;}}
测试
[root@lnmp ~]# curl -x127.0.0.1:80 ask.apelearn.com/robots.txt<html><head><title>404 Not Found</title></head><body><center><h1>404 Not Found</h1></center><hr><center>nginx/1.17.8</center></body></html>[root@lnmp ~]# /usr/local/nginx/sbin/nginx -tnginx: the configuration file /usr/local/nginx/conf/nginx.conf syntax is oknginx: configuration file /usr/local/nginx/conf/nginx.conf test is successful[root@lnmp ~]# /usr/local/nginx/sbin/nginx -s reload[root@lnmp ~]# curl -x127.0.0.1:80 ask.apelearn.com/robots.txt## robots.txt for MiWen#User-agent: *Disallow: /?/admin/Disallow: /?/people/Disallow: /?/question/Disallow: /account/Disallow: /app/Disallow: /cache/Disallow: /install/Disallow: /models/Disallow: /crond/run/Disallow: /search/Disallow: /static/Disallow: /setting/Disallow: /system/Disallow: /tmp/Disallow: /themes/Disallow: /uploads/Disallow: /url-*Disallow: /views/Disallow: /*/ajax/[root@lnmp ~]#
十一、负载均衡
1、配置
/.安装dig命令[root@lnmp ~]# yum install -y bind-utils通过dig命令获取相应域名的地址这里是拿百度的做测试[root@lnmp ~]# dig www.baidu.com; <<>> DiG 9.11.4-P2-RedHat-9.11.4-26.P2.el7_9.5 <<>> www.baidu.com;; global options: +cmd;; Got answer:;; ->>HEADER<<- opcode: QUERY, status: NOERROR, id: 23817;; flags: qr rd ra; QUERY: 1, ANSWER: 3, AUTHORITY: 0, ADDITIONAL: 1;; OPT PSEUDOSECTION:; EDNS: version: 0, flags:; udp: 512;; QUESTION SECTION:;www.baidu.com. IN A;; ANSWER SECTION:www.baidu.com. 33 IN CNAME www.a.shifen.com.www.a.shifen.com. 129 IN A 220.181.38.149www.a.shifen.com. 129 IN A 220.181.38.150;; Query time: 31 msec;; SERVER: 114.114.114.114#53(114.114.114.114);; WHEN: Wed Aug 18 19:12:15 CST 2021;; MSG SIZE rcvd: 101[root@lnmp ~]# vim /usr/local/nginx/conf/vhost/load.confupstream baidu{ip_hash;server 220.181.38.149:80;server 220.181.38.150:80;}server{listen 80;server_name www.baidu.com;location /{proxy_pass http://baidu;proxy_set_header Host $host;proxy_set_header X-Real-IP $remote_addr;proxy_set_header X-Forwarded-For $proxy_add_x_forwarded_for;}}upstream来指定多个web serverupstream后面的名字要和proxy_pass后面的名字相同
测试
[root@lnmp ~]# curl -x127.0.0.1:80 www.baidu.comdefault server![root@lnmp ~]# /usr/local/nginx/sbin/nginx -tnginx: the configuration file /usr/local/nginx/conf/nginx.conf syntax is oknginx: configuration file /usr/local/nginx/conf/nginx.conf test is successful[root@lnmp ~]# /usr/local/nginx/sbin/nginx -s reload[root@lnmp ~]# curl -x127.0.0.1:80 www.baidu.com<!DOCTYPE html><!--STATUS OK--><html> <head><meta http-equiv=content-type content=text/html;charset=utf-8><meta http-equiv=X-UA-Compatible content=IE=Edge><meta content=always name=referrer><link rel=stylesheet type=text/css href=http://s1.bdstatic.com/r/www/cache/bdorz/baidu.min.css><title>百度一下,你就知道</title></head> <body link=#0000cc> <div id=wrapper> <div id=head> <div class=head_wrapper> <div class=s_form> <div class=s_form_wrapper> <div id=lg> <img hidefocus=true src=//www.baidu.com/img/bd_logo1.png width=270 height=129> </div> <form id=form name=f action=//www.baidu.com/s class=fm> <input type=hidden name=bdorz_come value=1> <input type=hidden name=ie value=utf-8> <input type=hidden name=f value=8> <input type=hidden name=rsv_bp value=1> <input type=hidden name=rsv_idx value=1> <input type=hidden name=tn value=baidu><span class="bg s_ipt_wr"><input id=kw name=wd class=s_ipt value maxlength=255 autocomplete=off autofocus></span><span class="bg s_btn_wr"><input type=submit id=su value=百度一下 class="bg s_btn"></span> </form> </div> </div> <div id=u1> <a href=http://news.baidu.com name=tj_trnews class=mnav>新闻</a> <a href=http://www.hao123.com name=tj_trhao123 class=mnav>hao123</a> <a href=http://map.baidu.com name=tj_trmap class=mnav>地图</a> <a href=http://v.baidu.com name=tj_trvideo class=mnav>视频</a> <a href=http://tieba.baidu.com name=tj_trtieba class=mnav>贴吧</a> <noscript> <a href=http://www.baidu.com/bdorz/login.gif?login&tpl=mn&u=http%3A%2F%2Fwww.baidu.com%2f%3fbdorz_come%3d1 name=tj_login class=lb>登录</a> </noscript> <script>document.write('<a href="http://www.baidu.com/bdorz/login.gif?login&tpl=mn&u='+ encodeURIComponent(window.location.href+ (window.location.search === "" ? "?" : "&")+ "bdorz_come=1")+ '" name="tj_login" class="lb">登录</a>');</script> <a href=//www.baidu.com/more/ name=tj_briicon class=bri style="display: block;">更多产品</a> </div> </div> </div> <div id=ftCon> <div id=ftConw> <p id=lh> <a href=http://home.baidu.com>关于百度</a> <a href=http://ir.baidu.com>About Baidu</a> </p> <p id=cp>©2017 Baidu <a href=http://www.baidu.com/duty/>使用百度前必读</a> <a href=http://jianyi.baidu.com/ class=cp-feedback>意见反馈</a> 京ICP证030173号 <img src=//www.baidu.com/img/gs.gif> </p> </div> </div> </div> </body> </html>[root@lnmp ~]#
十二、SSL
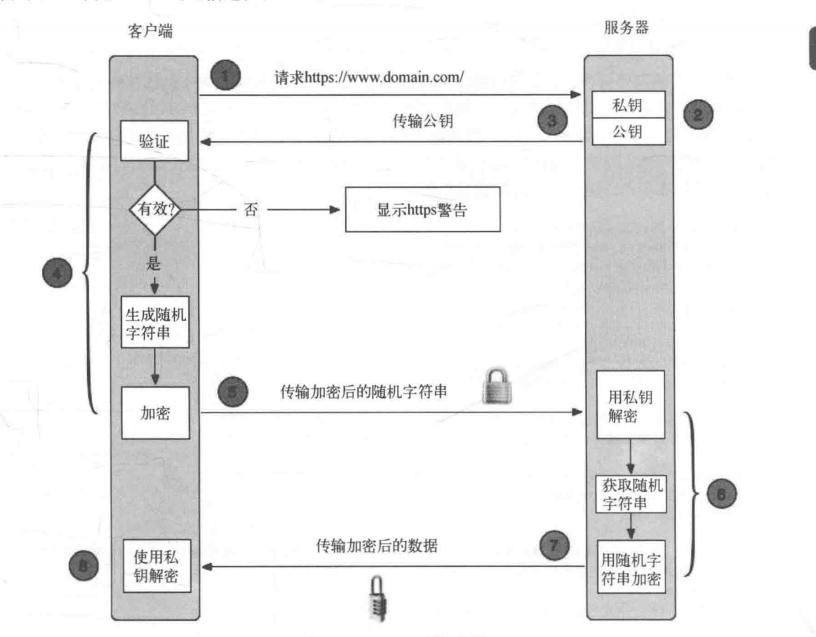
我们通常访问的网站有http和https 其中https就是和ssl证书有关。
SSL工作流程
十二、SSL
我们通常访问的网站有http和https 其中https就是和ssl证书有关。
SSL工作流程


生成ssl密钥对
[root@lnmp ~]# rpm -qa opensslopenssl-1.0.2k-21.el7_9.x86_64[root@lnmp ~]# cd /usr/local/nginx/conf/[root@lnmp conf]# openssl genrsa -des3 -out tmp.key 2048Generating RSA private key, 2048 bit long modulus.....................................................................................+++..............................+++e is 65537 (0x10001)Enter pass phrase for tmp.key:Verifying - Enter pass phrase for tmp.key:[root@lnmp conf]# openssl rsa -in tmp.key -out aminglinux.keyEnter pass phrase for tmp.key:writing RSA key[root@lnmp conf]# lsaminglinux.key koi-win tmp.keyfastcgi.conf mime.types uwsgi_paramsfastcgi.conf.default mime.types.default uwsgi_params.defaultfastcgi_params nginx.conf vhostfastcgi_params.default nginx.conf.default win-utfhtpasswd scgi_paramskoi-utf scgi_params.default[root@lnmp conf]# rm -rf tmp.key[root@lnmp conf]# openssl req -new -key aminglinux.key -out aminglinux.csrYou are about to be asked to enter information that will be incorporatedinto your certificate request.What you are about to enter is what is called a Distinguished Name or a DN.There are quite a few fields but you can leave some blankFor some fields there will be a default value,If you enter '.', the field will be left blank.-----Country Name (2 letter code) [XX]:66State or Province Name (full name) []:bjLocality Name (eg, city) [Default City]:bjOrganization Name (eg, company) [Default Company Ltd]:cnOrganizational Unit Name (eg, section) []:cnCommon Name (eg, your name or your server's hostname) []:cnEmail Address []:sxb@163.comPlease enter the following 'extra' attributesto be sent with your certificate requestA challenge password []:123456An optional company name []:123456[root@lnmp conf]# openssl x509 -req -days 365 -in aminglinux.csr -signkey aminglinux.key -out aminglinux.crtSignature oksubject=/C=66/ST=bj/L=bj/O=cn/OU=cn/CN=cn/emailAddress=wsw@163.comGetting Private key
配置SSL
[root@lnmp conf]# vim /usr/local/nginx/conf/vhost/ssl.confserver{listen 443;server_name 1234.com;index index.html index.php;root /data/wwwroot/1234.com;ssl on;ssl_certificate aminglinux.crt;ssl_certificate_key aminglinux.key;ssl_protocols TLSv1 TLSv1.1 TLSv1.2;}[root@lnmp conf]# /usr/local/nginx/sbin/nginx -tnginx: [emerg] unknown directive "ssl" in /usr/local/nginx/conf/vhost/ssl.conf:7nginx: configuration file /usr/local/nginx/conf/nginx.conf test failed# 重新编译安装nginx[root@lnmp conf]# cd /usr/local/src/[root@lnmp src]# lsmysql-5.6.47-linux-glibc2.12-x86_64.tar.gz php-5.6.30nginx-1.17.8 php-5.6.30.tar.gznginx-1.17.8.tar.gz[root@lnmp src]# cd nginx-1.17.8[root@lnmp nginx-1.17.8]# lsauto CHANGES.ru configure html Makefile objs srcCHANGES conf contrib LICENSE man README[root@lnmp nginx-1.17.8]# ./configure --help |grep ssl--with-http_ssl_module enable ngx_http_ssl_module--with-mail_ssl_module enable ngx_mail_ssl_module--with-stream_ssl_module enable ngx_stream_ssl_module--with-stream_ssl_preread_module enable ngx_stream_ssl_preread_module--with-openssl=DIR set path to OpenSSL library sources--with-openssl-opt=OPTIONS set additional build options for OpenSSL[root@lnmp nginx-1.17.8]# ./configure --prefix=/usr/local/nginx --with-http_ssl_module[root@lnmp nginx-1.17.8]# make && make install[root@lnmp nginx-1.17.8]# /etc/init.d/nginx restartRestarting nginx (via systemctl): [ 确定 ][root@lnmp nginx-1.17.8]# netstat -ntlpActive Internet connections (only servers)Proto Recv-Q Send-Q Local Address Foreign Address State PID/Program nametcp 0 0 0.0.0.0:80 0.0.0.0:* LISTEN 30052/nginx: mastertcp 0 0 0.0.0.0:22 0.0.0.0:* LISTEN 941/sshdtcp 0 0 127.0.0.1:25 0.0.0.0:* LISTEN 1188/mastertcp 0 0 0.0.0.0:443 0.0.0.0:* LISTEN 30052/nginx: mastertcp6 0 0 :::3306 :::* LISTEN 25697/mysqldtcp6 0 0 :::22 :::* LISTEN 941/sshdtcp6 0 0 ::1:25 :::* LISTEN 1188/master[root@lnmp nginx-1.17.8]#[root@lnmp nginx-1.17.8]# mkdir -p /data/nginx/1234.com[root@lnmp nginx-1.17.8]# echo "ssl test" > /data/nginx/1234.com/index.html
在hosts
文件中加入 对应的域名 测试


