一、服务介绍
Samba是在[Linux](https://baike.baidu.com/item/Linux/27050)和[UNIX](https://baike.baidu.com/item/UNIX/219943)系统上实现[SMB协议](https://baike.baidu.com/item/SMB%E5%8D%8F%E8%AE%AE)的一个自由软件服务,属于C/S架构。[SMB](https://baike.baidu.com/item/SMB)(Server Messages Block,信息服务块)是一种在[局域网](https://baike.baidu.com/item/%E5%B1%80%E5%9F%9F%E7%BD%91)上共享文件和打印机的一种[通信协议](https://baike.baidu.com/item/%E9%80%9A%E4%BF%A1%E5%8D%8F%E8%AE%AE/3351624),它为局域网内的不同计算机之间提供文件及打印机等资源的共享服务。[SMB协议](https://baike.baidu.com/item/SMB%E5%8D%8F%E8%AE%AE/3770892)是客户机/服务器型协议,客户机通过该协议可以访问服务器上的共享文件系统、打印机及其他资源。通过设置“NetBIOS over TCP/IP”使得Samba不但能与局域网络主机分享资源,还能与全世界的电脑分享资源。<br />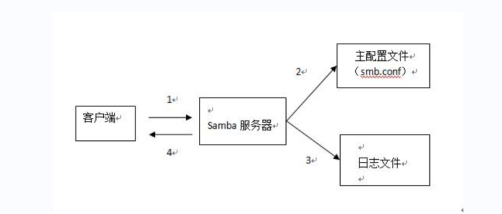
二、服务的发展
在早期的网络中,数据的传输一般都是在FTP服务器上进行的传输,虽然FTP服务子啊传输数据时比较方便,但是却有一个缺点,那就是用户无法直接修改主机上的数据,也就是说我们如果想去对一个数据做修改那么只能通过在服务端上将源数据下载到客户端之后才可以进行修改,因此数据需要在服务端和客户端上都有存在,这样的话就会有一个问题,如果说某一次修改了数据之后但是没有及时的上传会服务端,过了一阵后就无法确定哪个数据是最新的数据。
那么这个时候就需要有一种文件系统,直接满足在客户端就可以修改存储数据,那么只要保证我们的服务端拥有这套数据就可以,后来就引用了NFS文件系统,那么在Windows下也有这种文件系统那就是CIFS,但是这种服务仅可以让Windows之间来进行共享,不可以错系统的进行数据共享,这就是一个问题。
1991 年一个名叫安德鲁的大学生就有这样的困扰,他手上有三部机器,分别是跑DOS的个人计算机、DEC公司的 Digital Unix 系统以及Sun的 Unix 系统。在当时,DEC 公司有发展出一套称为 PATHWORKS 的软件,这套软件可以用来分享 DEC 的Unix 与个人计算机的DOS这两个操作系统的档案数据,可惜让他觉得较困扰的是,Sun的 Unix 无法藉由这个软件来达到数据分享的目的。这个时候哥们就想说既然这两部系统可以相互沟通,没道理Sun 就必需这么苦命吧?可不可以将这两部系统的运作原理找出来,然后让 Sun这部机器也能够分享档案数据呢?,为了解决这样的的问题,这老兄就自行写了个程序去侦测当 DOS 与 DEC 的 Unix 系统在进行数据分享传送时所使用到的通讯协议信息,然后将这些重要的信息撷取下来,并且基于上述所找到的通讯协议而开发出ServerMessage Block (SMB) 这个档案系统,而就是这套SMB软件能够让Unix与DOS互相的分享数据!
因此哥们就去申请了 SMBServer ( Server Message Block 的简写 )这个名字来做为他撰写的这个软件的商标,可惜的是,因为SMB 是没有意义的文字,因此没有办法达成注册。既然如此的话,那么能不能在字典里面找到相关的字词可以做为商标来注册呢?翻了老半天,呵呵!这个SAMBA刚好含有 SMB ,又是热情有劲的拉丁舞蹈的名称。
Samba有两个守护进程:smb和nmb(139、445端口)
三、实现Linux与Windows之间共享
开始配置
配置本地yum 源[root@localhost ~]# cd /etc/yum.repos.d/[root@localhost yum.repos.d]# rm -rf *[root@localhost yum.repos.d]# vi local.repo[centos]name=centosbaseurl=file:///opt/centosgpgcheck=0enabled=1[root@localhost yum.repos.d]# yum clean allLoaded plugins: fastestmirrorCleaning repos: centosCleaning up everythingMaybe you want: rm -rf /var/cache/yum, to also free up space taken by orphaned data from disabled or removed reposCleaning up list of fastest mirrors[root@localhost yum.repos.d]# yum repolistLoaded plugins: fastestmirrorDetermining fastest mirrorscentos | 3.6 kB 00:00(1/2): centos/group_gz | 166 kB 00:00(2/2): centos/primary_db | 3.1 MB 00:00repo id repo name statuscentos centos 3,971repolist: 3,971[root@localhost yum.repos.d]#[root@localhost yum.repos.d]# yum install -y vsftpd[root@localhost yum.repos.d]# vi /etc/vsftpd/vsftpd.conf //修改配置文件anon_root=/opt# Example config file /etc/vsftpd/vsftpd.conf[root@localhost yum.repos.d]# systemctl restart vsftpd //重启服务
命令如下
[root@localhost ~]# yum -y install samba net-tools vim //安装服务[root@localhost ~]# vi /etc/samba/smb.conf# See smb.conf.example for a more detailed config file or# read the smb.conf manpage.# Run 'testparm' to verify the config is correct after# you modified it.[global]workgroup = SAMBAsecurity = userpassdb backend = tdbsamprinting = cups //修改以下的printcap name = /dev/nullprintcap name = lpststload printers = nocups options = rawdisable spoolss = yes[homes]comment = Home Directoriesvalid users = %S, %D%w%Sbrowseable = Noread only = Noinherit acls = Yes[printers]comment = All Printerspath = /var/tmpprintable = Yescreate mask = 0600browseable = No[print$]comment = Printer Driverspath = /var/lib/samba/driverswrite list = @printadmin rootforce group = @printadmincreate mask = 0664[share] //新添加的path = /opt/sharebrowseable = yespublic = yeswritable = yes
参数详解:
[global] samba服务器的全局设置,对整个服务器有效
load printers = no //是否启用打印机。
cups options = raw //打印系统,建立文件时所给的权限
printcap name = /dev/null //设置获取打印机描述信息的文件位置
printcap name = lpstat
printing = bsd
//定义打印机的系统类型,可选项有:bsd、sysv、plp、lprng、aix、hpux、qnx、cups
disable spoolss = yes //新增,禁用打印机共享
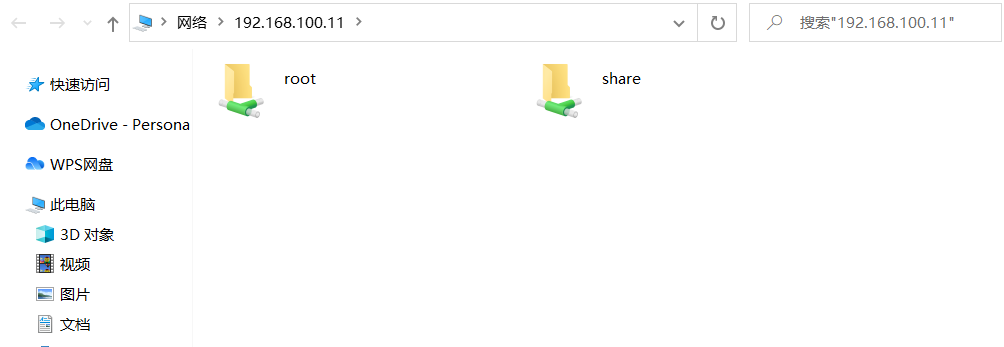
[root@localhost ~]# mkdir /opt/share //创建共享目录[root@localhost ~]# chmod 777 /opt/share 赋与 共享目录所有权限[root@localhost ~]# systemctl start smb[root@localhost ~]# systemctl start nmb //启动samba守护进程[root@localhost ~]# netstat -ntpl //查找139、445端口Active Internet connections (only servers)Proto Recv-Q Send-Q Local Address Foreign Address State PID/Program nametcp 0 0 0.0.0.0:445 0.0.0.0:* LISTEN 1959/smbdtcp 0 0 0.0.0.0:139 0.0.0.0:* LISTEN 1959/smbdtcp 0 0 0.0.0.0:22 0.0.0.0:* LISTEN 906/sshdtcp 0 0 127.0.0.1:25 0.0.0.0:* LISTEN 1179/mastertcp6 0 0 :::445 :::* LISTEN 1959/smbdtcp6 0 0 :::139 :::* LISTEN 1959/smbdtcp6 0 0 :::21 :::* LISTEN 11884/vsftpdtcp6 0 0 :::22 :::* LISTEN 906/sshdtcp6 0 0 ::1:25 :::* LISTEN 1179/master[root@localhost ~]#[root@localhost ~]# smbapasswd -a root //创建samba用户密码完成之后Windows下访问验证win+r 输入\\192.168.100.11 按回车
四、实现Linux之间共享
命令如下
第二台虚拟机配置ftp yum源[root@localhost ~]# cd /etc/yum.repos.d/[root@localhost yum.repos.d]# rm -rf *[root@localhost yum.repos.d]# vi ftp.repo[ftp]name=ftpbaseurl=ftp://192.168.100.11/centosgpgcheck=0enabled=1~[root@localhost yum.repos.d]# yum clean allLoaded plugins: fastestmirrorCleaning repos: ftpCleaning up everythingMaybe you want: rm -rf /var/cache/yum, to also free up space taken by orphaned data from disabled or removed reposCleaning up list of fastest mirrors[root@localhost yum.repos.d]# yum repolistLoaded plugins: fastestmirrorDetermining fastest mirrorsftp | 3.6 kB 00:00(1/2): ftp/group_gz | 166 kB 00:00(2/2): ftp/primary_db | 3.1 MB 00:00repo id repo name statusftp ftp 3,971repolist: 3,971[root@localhost ~]# yum install samba-client cifs-utils -y //客户端安装[root@localhost ~]# smbclient -L 192.168.100.11 -U rootEnter SAMBA\root's password:Sharename Type Comment--------- ---- -------print$ Disk Printer Driversshare DiskIPC$ IPC IPC Service (Samba 4.7.1)root Disk Home DirectoriesReconnecting with SMB1 for workgroup listing.Server Comment--------- -------Workgroup Master--------- -------SAMBA LOCALHOST[root@localhost yum.repos.d]# mount -t cifs //192.168.100.11/share /mntPassword for root@//192.168.100.11/share: ******[root@localhost yum.repos.d]# df -hFilesystem Size Used Avail Use% Mounted on/dev/mapper/centos-root 70G 1.2G 69G 2% /devtmpfs 1.9G 0 1.9G 0% /devtmpfs 1.9G 0 1.9G 0% /dev/shmtmpfs 1.9G 12M 1.9G 1% /runtmpfs 1.9G 0 1.9G 0% /sys/fs/cgroup/dev/sda1 1014M 142M 873M 14% /boottmpfs 378M 0 378M 0% /run/user/0/dev/sr0 4.2G 4.2G 0 100% /opt/centos//192.168.100.11/share 70G 1.3G 69G 2% /mnt

若有收获,就点个赞吧
0 人点赞
