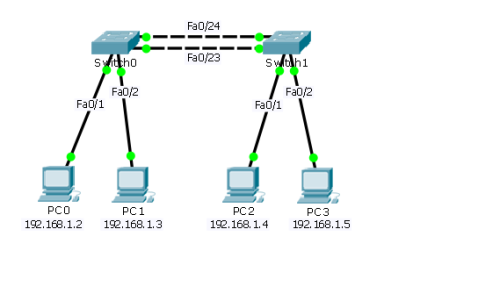
交换机的端口安全配置(基于PT5.3)
技术原理:
Cisco交换机端口默认处于可取模式(指当检测到其他交换机连接时,端口倾向于中继连接),因此要保证交换机端口安全功能的正常工作,必须先将端口模式修改为接入端口或中继端口(3层交换机上须指定封装类型)。
安全地址表项配置:交换机内有mac-address-table表,表示端口与MAC地址的对应关系,当设备接入时,交换机可学习到设备的MAC地址,并加入该表中。
- 动态MAC地址:交换机主动学习MAC地址,当端口状态改变时,将重新学习并更新MAC地址表
- 静态MAC地址:人为将”端口与MAC地址“进行绑定,并加入表中,该端口不再主动学习
- 粘性MAC地址:首次主动学习MAC地址并绑定,当端口状态再次改变时,该端口不再主动学习
当端口接收到未经允许的MAC地址流量时,交换机会执行以下违规动作:
- 保护(Protect):丢弃未允许的MAC地址流量,但不会创建日志消息。
- 限制(Restrict):丢弃未允许的MAC地址流量,创建日志消息并发送SNMP Trap消息
- 关闭(Shutdown):默认选项,将端口置于err-disabled状态,创建日志消息并发送SNMP Trap消息。
若要重新开启该端口,需要”先关闭再打开”端口或使用errdisable recovery命令。后者在模拟器上无法使用。
实验步骤:
- 开启交换机的端口安全功能;
- 配置交换机的最大连接数限制;
- 查看主机的IP和MAC地址信息;
- 配置交换机的地址绑定;
- 查看交换机上端口安全配置
注意:模拟器上,无法在3层交换机上使用show port-security命令
路由器IP访问控制列表ACL配置(基于PT5.3)
(1)新建Cisco PT 拓扑图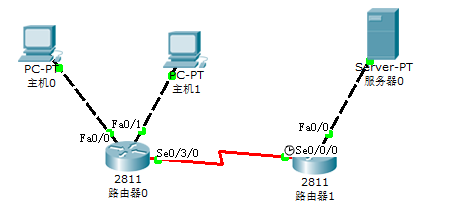
(2)为各PC及Server设置IP及网关地址,其中网关地址分别为路由接口的IP地址
(3)对各Router进行相关配置(接口IP、时钟频率等)
(4)为各Router配置静态路由和默认路由
(5)测试并确保各终端(PC、Server)之间的互通性
(6)在Router0上配置基于编号的IP标准ACL
(7)在Router1上配置基于命名的IP扩展ACL
(8)查看路由器上访问控制列表的配置信息
(9)验证不同局域网PC、Server之间的相互通信
PC0 设置192.168.1.2//子网掩码和网关255.255.255.0192.168.1.1
PC1 设置192.168.2.2//子网掩码和网关255.255.255.0192.168.2.1
Server0 设置192.168.3.2//子网掩码和网关255.255.255.0192.168.3.1
/*=Part1 Router0 基本配置 */Router>enableRouter#conf tRouter(config)#inter f0/0 //进入第0模块第0端口(快速以太网接口)Router(config-if)#ip address 192.168.1.1 255.255.255.0 //配置f0/0接口IPRouter(config-if)#no shutdown //开启端口Router(config-if)#exitRouter(config)#inter f1/0 //进入第1模块第0端口(快速以太网接口)Router(config-if)#ip address 192.168.2.1 255.255.255.0 //配置f1/0接口IPRouter(config-if)#no shutdown //开启端口Router(config-if)#exitRouter(config)#interface serial 2/0 //进入第2模块第0端口(串行接口)Router(config-if)#ip address 10.10.254.1 255.255.255.0 //配置s2/0接口IPRouter(config-if)#clock rate 64000 //必须配置时钟才可通信Router(config-if)#no shutdown //开启端口Router(config-if)#exit/*=Part2 静态路由配置 */Router(config)#ip route 192.168.3.0 255.255.255.0 10.254.10.2/*=Part3 IP标准ACL配置 */Router(config)#access-list 20 permit 192.168.1.0 0.0.0.255//允许192.168.1.0网段内的数据包通过Router(config)#access-list 20 deny 192.168.2.2 0.0.0.0//拒绝特定192.168.2.2的数据包通过Router(config)#access-list 20 permit any//一般在ACL列表末尾需配置permit any语句,否则任何没有匹配到的数据包都会被丢弃Router(config)#inter s2/0Router(config-if)#ip access-group 20 out//在s2/0接口的出站规则上启用此ACL列表Router(config-if)#^ZRouter#show rRouter#show access-lists
/*=Part1 Router1 基本配置 */Router>enableRouter#conf tRouter(config)#inter f0/0 //进入第0模块第0端口(快速以太网接口)Router(config-if)#ip address 192.168.3.1 255.255.255.0 //配置f0/0接口IPRouter(config-if)#no shutdown //开启端口Router(config-if)#exitRouter(config)#interface serial 2/0 //进入第2模块第0端口(串行接口)Router(config-if)#ip address 10.10.254.2 255.255.255.0 //配置s2/0接口IPRouter(config-if)#no shutdown //开启端口Router(config-if)#exit/*=Part2 静态路由配置 */Router(config)#ip route 0.0.0.0 0.0.0.0 10.254.10.1/*=Part3 IP扩展ACL配置 */Router(config)#ip access-list extended ACL001Router(config-ext-nacl)#deny icmp 192.168.1.0 0.0.0.255 any echo-replyRouter(config-ext-nacl)#deny tcp 192.168.1.2 0.0.0.0 any eq telnetRouter(config-ext-nacl)#deny tcp host 192.168.1.2 any eq ftpRouter(config-ext-nacl)#permit ip any anyRouter(config-ext-nacl)#permit tcp any anyRouter(config)#inter s2/0Router(config-if)#ip access-group ACL001 out//在s2/0接口的出站规则上启用此ACL列表Router(config-if)#^ZRouter#show rRouter#show access-lists
# PC0 ACL测试ping 192.168.1.1 //链路通ping 10.254.10.2 //链路通ping 192.168.3.2 //链路不通访问 http://192.168.3.2 //访问成功# PC1 ACL测试ping 192.168.2.1 //链路通ping 10.254.10.1 //链路不通ping 192.168.3.2 //链路不通访问 http://192.168.3.2 //访问失败
注:实验失败,跨路由器不通,需进一步寻找原因。
待完成
- 交换机ACL配置
- 用户绑定/IP源防护
- 单臂路由
- SNMP
-
参考文献
- Cisco PT模拟实验(7) 交换机的端口安全配置
- Cisco Packet Tracer中配置链路聚合
- Cisco PT模拟实验(17) 路由器IP访问控制列表ACL配置
- Cisco Packet Tracer(配置ACL)
- Cisco单臂路由配置,图文实例详解
- 使用Cisco Packet Tracer配置标准ACL的应用实验,提供实验文件!
- Cisco Packet Tracer中配置TELNET
-
拓展阅读
- 返回主页狙击手 ▄︻┻═┳一 - 随笔分类 - 1-Cisco
- 重庆交通大学计算机网络实验教学
附录一:思科交换机常用命令及配置
switch> 用户模式
1:进入特权模式enable
switch> enable
switch#
2:进入全局配置模式configure terminal
switch> enable
switch#configure terminal
switch(conf)#
3:交换机命名hostname name 以cisco001 为例
switch> enable
switch#c onfigure terminal
switch(conf)#hostname cisco001
cisco001(conf)#
4:配置使能口令(未加密)enable password cisco 以cisco 为例
switch> enable
switch#configure terminal
cisco001(conf)# enable password cisco
5:配置使能密码(加密)enable secret ciscolab 以cicsolab 为例
switch> enable
switch#configure terminal
switch(conf)# enable secret ciscolab
6:设置虚拟局域网vlan 1 interface vlan 1
switch> enable
switch#configure terminal
switch(conf)# interface vlan 1
switch(conf)# ip address 192.168.1.1 255.255.255.0 配置交换机端口ip 和子网掩码
switch (conf-if)#no shut 激活端口
switch (conf-if)#exit
switch (conf)#ip default-gateway 192.168.254 设置网关地址
7:进入交换机某一端口interface fastehernet 0/17 以17 端口为例
switch> enable
switch#configure terminal
switch(conf)# interface fastehernet 0/17
switch(conf-if)#
8:查看命令show
switch> enable
switch# show version 察看系统中的所有版本信息
show interface vlan 1 查看交换机有关ip 协议的配置信息
show running-configure 查看交换机当前起作用的配置信息
show interface fastethernet 0/1 察看交换机1 接口具体配置和统计信息
show mac-address-table 查看mac 地址表
9:交换机恢复出厂默认恢复命令
switch> enable
switch# erase startup-configure
switch# reload
10:交换机的密码恢复
拔下交换机电源线。
用手按着交换机的MODE 键,插上电源线
在switch:后执行flash_ini 命令:switch: flash_ini
查看flash 中的文件: switch: dir flash:
把“config.text”文件改名为“config.old”: switch: rename flash: config.text flash: config.old
执行boot: switch: boot
交换机进入是否进入配置的对话,执行no :
进入特权模式察看flash 里的文件: show flash :
把“config.old”文件改名为“config.text”: switch: rename flash: config.old flash: config.text
把“ config.text ” 拷入系统的“ running-configure ”: copy flash: config.text system :
running-configure
重新设置密码并保存。
11.交换机telnet 远程登录设置:
switch>en
switch#configure terminal
swich(conf)#enable password cisco 以cisco 为特权模式密码
swich(conf)#interface vlan 1 以vlan 1端口作为远程登录的接口,其他端口亦可
swich(conf-if)#ip address 192.168.1.1 255.255.255.0
swich(conf-if)#no shut
swich(conf-if)#exit
swich(conf)line vty 0 4 设置0-4 个用户可以telnet 远程登陆
swich(conf-line)#login
swich(conf-line)#password 123456
12.交换机ssh远程登录设置:
a.设定一个非默认的hostname
Switch(config)#hostname cisco
b.配置域名:
cisco(config)#ip domain-name test
c.指定加密长度:
cisco(config)#crypto key generate rsa
How many bits in the modulus [512]: 1024
% Generating 1024 bit RSA keys, keys will be non-exportable…[OK]
d.将vty线路下的登录方式改为 ssh
cisco(config)#line vty 0 4
cisco(config-line)#transport in ssh
13.配置vtp同步
说明:VTP(VLAN Trunking Protocol):是VLAN中继协议,它是思科私有协议。作用是同步各个交换机之间的VLAN信息。
要使用VTP,首先必须建立一个VTP管理域,在同一个管理域中交换机共享vlan信息,并且一个交换机只能参加一个管理域,交换机之间使用trunk口连接。
附录二:思科交换机命令模式
Vlan
- 交换机的命令行VLAN模式包括:
- VLAN子模式 Switch(vlan)#
- VLAN配置模式 Switch(config-vlan)#
- VLAN接口(SVI)模式 Switch(config-if)#

若有收获,就点个赞吧
0 人点赞
