概述
入门程序
/*Netty实现一个服务器*/public class HelloServer {public static void main(String[] args) {// 1.启动器,组装netty组件,启动服务器ServerBootstrap bootstrap = new ServerBootstrap()// 2.循环 监听事件.group(new NioEventLoopGroup()) // 可监听多种事件,accpet read等// 3.选择服务器的 ServerSocketChannel.channel(NioServerSocketChannel.class)// 4.添加处理器handler.childHandler(// 5.通道初始化器,用来添加额外的handlernew ChannelInitializer<NioSocketChannel>() {@Overrideprotected void initChannel(NioSocketChannel ch) throws Exception {ch.pipeline().addLast(new StringDecoder());// 内置Handler,将ByteBuf 装换为字符串ch.pipeline().addLast(new ChannelInboundHandlerAdapter() { // 自定义handler,Inbound为入站handler// 读事件@Overridepublic void channelRead(ChannelHandlerContext ctx, Object msg) throws Exception {super.channelRead(ctx, msg);// 将上一步中的转换好的字符串输出System.out.println(msg);}});}});// 7.绑定端口bootstrap.bind(8080);}}
Netty组件
EventLoop
EventLoop
事件循环对象
本质是一个单线程执行器,维护了一个Selector,有一个run()方法处理Channel上源源不断的io事件。
采用了两个基本的API:并发和网络编程
一条线继承j.u.c.ScheduledExecutorService(此接口指定以一个parent()方法,用于放回当前EventLoop实现的实例所属的EventLoopGroup的引用)
另一条线继承自netty的OrderedEventExecutor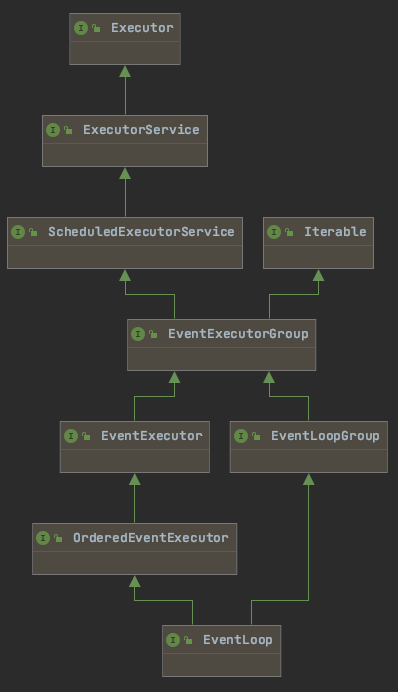
EventLoop的任务调度
Netty线程模型的卓越性能取决于对于当前执行的 Thread 的身份的确定
通过调用 EventLoop 的 inEventLoop(Thread)方法实现(接口EventExecutor中定义了
boolean inEventLoop(_Thread thread)_方法)
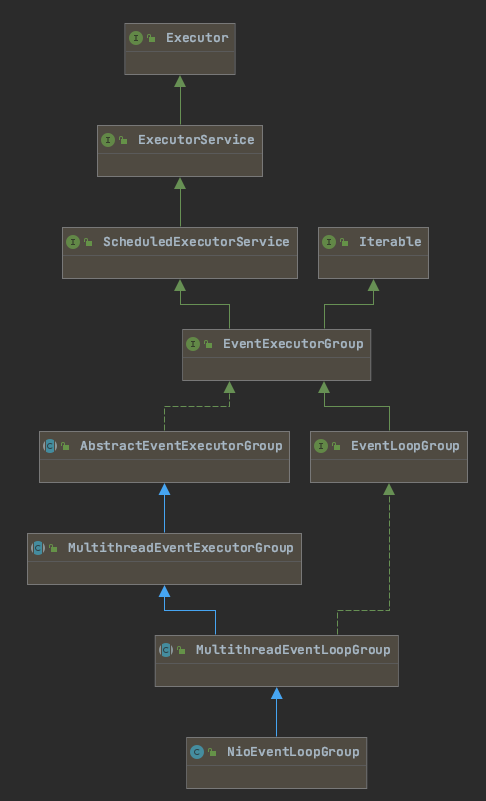
EventLoopGroup
时间循环对象组
维护了一组EventLoop。
new NioEventLoopGroup():处理IO任务、普通任务、定时任务
new DefaultEventLoopGroup():普通任务、定时任务
方法与属性
NioEventLoopGroup group = new NioEventLoopGroup() 构造方法;
创建默认个数的EventLoop 默认个数如何确定?默认个数为 主动设置的eventLoopThreads系统参数,或物理内核数的两倍 nThreads == 0 ? DEFAULT_EVENT_LOOP_THREADS private static final int DEFAULT_EVENT_LOOP_THREADS = Math.max(1, SystemPropertyUtil.getInt(“io.netty.eventLoopThreads”, NettyRuntime.availableProcessors() * 2));
NioEventLoopGroup eventExecutors = new NioEventLoopGroup(2);
创建指定个数的EventLoop
group.next()
获取下一个事件循环对象
// 循环遍历group中的EventLoopDefaultEventLoopGroup group = new DefaultEventLoopGroup(2);System.out.println(group.next());System.out.println(group.next());System.out.println(group.next());
执行任务:IO任务、普通任务、定时任务
执行普通任务
- 可以异步执行任务
```java
NioEventLoopGroup group = new NioEventLoopGroup();
}); log.debug(“main2”);log.debug("main1");group.next().submit(() -> {Thread.sleep(1000);log.debug("submit finished");
// 结果: 14:42:15.787 [main] DEBUG com.sky.netty.ch03.TestEventLoop - main1 14:42:15.840 [main] DEBUG com.sky.netty.ch03.TestEventLoop - main2 14:42:16.847 [nioEventLoopGroup-2-1] DEBUG com.sky.netty.ch03.TestEventLoop - submit finished
<a name="WCrYW"></a>
#### 执行定时任务
```java
// 每秒钟打印一次 ok
group.next().scheduleAtFixedRate(()->{
    log.debug("ok");
},0,1, TimeUnit.SECONDS);
执行IO任务
演示代码:
// Server端
public class EventLoopServer {
    public static void main(String[] args) {
        new ServerBootstrap()
                .group(new NioEventLoopGroup(),new NioEventLoopGroup())
                .channel(NioServerSocketChannel.class)
                .childHandler(new ChannelInitializer<NioSocketChannel>() {
                    @Override
                    protected void initChannel(NioSocketChannel ch) throws Exception {
                        ch.pipeline().addLast(new ChannelInboundHandlerAdapter(){
                            @Override
                            public void channelRead(ChannelHandlerContext ctx, Object msg) throws Exception {
                                ByteBuf buf = (ByteBuf) msg;
                                String res = buf.toString(Charset.defaultCharset());
                                log.debug("服务端收到:"+res);
                            }
                        });
                    }
                })
        .bind(8080);
    }
}

// 客户端
public class EventLoopClient {
    public static void main(String[] args) throws InterruptedException {
        Channel channel = new Bootstrap()
                .group(new NioEventLoopGroup())
                .channel(NioSocketChannel.class)
                .handler(new ChannelInitializer<NioSocketChannel>() {
                    @Override
                    protected void initChannel(NioSocketChannel ch) throws Exception {
                        ch.pipeline().addLast(new StringEncoder());
                    }
                }).connect(new InetSocketAddress("localhost", 8080))
                .sync()
                .channel();
        System.out.println(channel);
    }
}
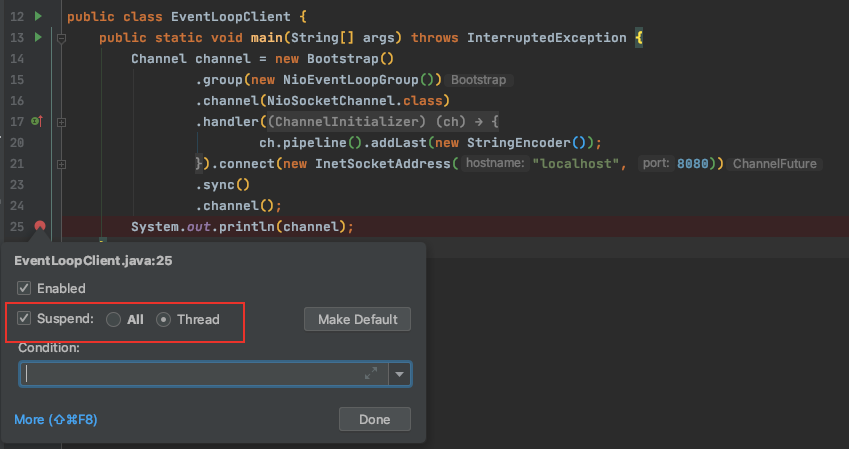
演示步骤:
- 启动服务器
- 设置客户端应用
Allow Parallel Run,这样可以启多个同样的客户端
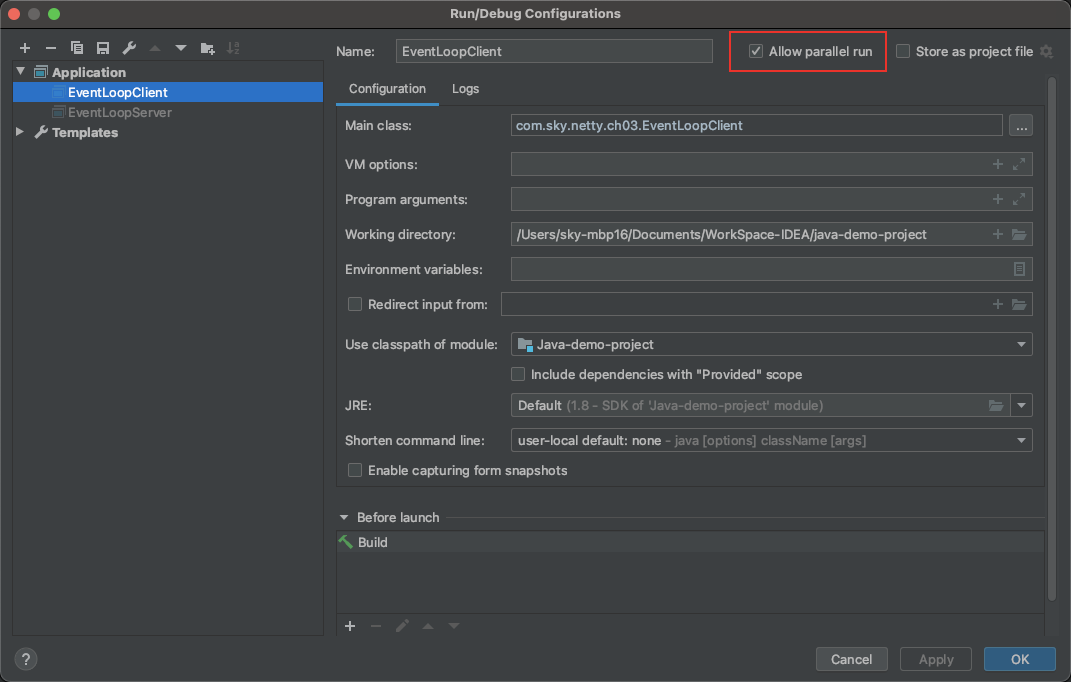
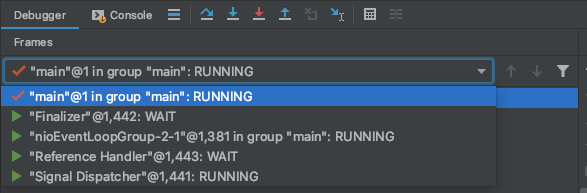
- 客户端拦截断点后,执行代码
channel.writeAndFlush("1"),可以向服务端发送数据客户端断点类型需要设置Thread: 这样断点只拦截main线程,不拦截netty维护的nioEventLoopGroup线程(此线程用来进行网络IO通信)
分工细化
上面演示的服务端只有一个EventLoopGroup
Channel
常用方法:
- close() 关闭channel
- closeFuture() 用来处理channel的关闭
- write() 将数据写入缓冲区
- writerAndFlush() 将数据写入缓冲区并发送
channelFuture
处理结果
connect()方法返回ChannelFuture对象。
有同步、异步两种方式处理结果
    public static void main(String[] args) throws InterruptedException {
        ChannelFuture channelFuture = new Bootstrap()
                .group(new NioEventLoopGroup())
                .channel(NioSocketChannel.class)
                .handler(new ChannelInitializer<NioSocketChannel>() {
                    @Override
                    protected void initChannel(NioSocketChannel ch) throws Exception {
                        ch.pipeline().addLast(new StringEncoder());
                    }
                })
                // 1.连接到服务器
                // 异步非阻塞
                // main线程发起连接调用,真正执行connect的是nio线程
                .connect(new InetSocketAddress("localhost", 8080));
        // 方式一:使用sync同步处理结果
        // sync()的作用: 阻塞住当前线程,等nio线程 connect()方法异步执行完后再执行后面的方法
        channelFuture.sync();
        Channel channel = channelFuture.channel();
        // 2. 向服务器发送数据
        channel.writeAndFlush("hello");

        /*
         方式二:
         使用addListener 方法异步处理结果
         */
        channelFuture.addListener(new ChannelFutureListener() {
            @Override
            public void operationComplete(ChannelFuture future) throws Exception {
                // nio线程连接建立好后,会调用 operationComplete
                Channel channel1 = future.channel();
                log.debug("{}",channel1);
                channel1.writeAndFlush("from channel1");
            }
        });

    }
处理关闭
public static void main(String[] args) throws InterruptedException {
        ChannelFuture channelFuture = new Bootstrap()
                .group(new NioEventLoopGroup())
                .channel(NioSocketChannel.class)
                .handler(new ChannelInitializer<NioSocketChannel>() {
                    @Override
                    protected void initChannel(NioSocketChannel ch) throws Exception {
                        ch.pipeline().addLast(new LoggingHandler(LogLevel.DEBUG));
                        ch.pipeline().addLast(new StringEncoder());
                    }
                })
                .connect(new InetSocketAddress("localhost", 8080));
        channelFuture.sync();
        Channel channel = channelFuture.channel();
        log.debug("{}",channel);
        new Thread(()->{
            Scanner scanner = new Scanner(System.in);
            while (true){
                String nextLine = scanner.nextLine();
                if ("q".equals(nextLine)){
                    channel.close();
                    break;
                }else {
                    channel.writeAndFlush(nextLine);
                }
            }
        }).start();


        ChannelFuture closeFuture = channel.closeFuture();
        System.out.println("等待关闭");
        closeFuture.sync();
        log.debug("处理关闭后的操作");

        closeFuture.addListener(new ChannelFutureListener() {
            @Override
            public void operationComplete(ChannelFuture future) throws Exception {
                log.debug("关闭后的操作");
            }
        });

    }
同步方式关闭channel
ChannelFuture closeFuture = channel.closeFuture();
// sync 方法会 阻塞住当前线程,直到channel.close()结束
closeFuture.sync();
log.debug("处理关闭后的操作");


// 日志
14:07:39.076 [nioEventLoopGroup-2-1] DEBUG io.netty.handler.logging.LoggingHandler - [id: 0x21db7584, L:/127.0.0.1:52195 - R:localhost/127.0.0.1:8080] CLOSE
14:07:39.077 [main] DEBUG com.sky.netty.ch04_channel.TestChannelClose - 处理关闭后的操作
可以看到,最后这一行,打印日志从操作是main线程执行的
异步方式关闭channel
添加一个异步的监听器,channel.close()执行后会回调此监听
        ChannelFuture closeFuture = channel.closeFuture();
        closeFuture.addListener(new ChannelFutureListener() {
            @Override
            public void operationComplete(ChannelFuture future) throws Exception {
                log.debug("关闭后的操作");
            }
        });

//
14:13:39.864 [nioEventLoopGroup-2-1] DEBUG io.netty.handler.logging.LoggingHandler - [id: 0xcce04947, L:/127.0.0.1:53484 - R:localhost/127.0.0.1:8080] CLOSE
14:13:39.866 [nioEventLoopGroup-2-1] DEBUG com.sky.netty.ch04_channel.TestChannelClose - 关闭后的操作
14:13:39.867 [nioEventLoopGroup-2-1] DEBUG io.netty.handler.logging.LoggingHandler - [id: 0xcce04947, L:/127.0.0.1:53484 ! R:localhost/127.0.0.1:8080] INACTIVE
14:13:39.867 [nioEventLoopGroup-2-1] DEBUG io.netty.handler.logging.LoggingHandler - [id: 0xcce04947, L:/127.0.0.1:53484 ! R:localhost/127.0.0.1:8080] UNREGISTERED
第二行可以看到,打印日志操作时在nioEventLoopGroup-2-1线程执行的
问题:以上示例,在channel.close()后,java程序仍然没有停止?
NioEventLoopGroup的线程仍然没有结束,需要手动调用group.shutdownGracefully()
ChannelFuture closeFuture = channel.closeFuture();
        closeFuture.addListener(new ChannelFutureListener() {
            @Override
            public void operationComplete(ChannelFuture future) throws Exception {
                log.debug("关闭后的操作");
                // 关闭nio线程
                group.shutdownGracefully();
            }
        });


14:21:06.351 [nioEventLoopGroup-2-1] DEBUG io.netty.handler.logging.LoggingHandler - [id: 0x4d9bf82a, L:/127.0.0.1:54970 - R:localhost/127.0.0.1:8080] CLOSE
14:21:06.353 [nioEventLoopGroup-2-1] DEBUG com.sky.netty.ch04_channel.TestChannelClose - 关闭后的操作
14:21:06.364 [nioEventLoopGroup-2-1] DEBUG io.netty.handler.logging.LoggingHandler - [id: 0x4d9bf82a, L:/127.0.0.1:54970 ! R:localhost/127.0.0.1:8080] INACTIVE
14:21:06.365 [nioEventLoopGroup-2-1] DEBUG io.netty.handler.logging.LoggingHandler - [id: 0x4d9bf82a, L:/127.0.0.1:54970 ! R:localhost/127.0.0.1:8080] UNREGISTERED
14:21:08.459 [nioEventLoopGroup-2-1] DEBUG io.netty.buffer.PoolThreadCache - Freed 1 thread-local buffer(s) from thread: nioEventLoopGroup-2-1
Disconnected from the target VM, address: '127.0.0.1:54961', transport: 'socket'
Future & Promise
Handler & Pipline
ChannelHandler 用来处理Channel上的各种事件,分为入站、出站。所有ChannelHandler连成一串就是Pipline。ChannelInboundHandlerAdapter: 入站handler,所有handler按顺序执行ChannelOutboundHandlerAdapter: 出站handler,服务器对外写数据时,按逆序执行
ByteBuf
创建
- 创建池化基于堆的ByteBuf
基于堆的可以受GC管控,自动进行垃圾回收
ByteBuf buf1 = ByteBufAllocator.DEFAULT.heapBuffer(10);
- 创建池化基于直接内存的ByteBuf
直接内存创建和销毁的代价昂贵,但读写性能高(少一次内存复制),适合配合池化功能一起用
ByteBuf buf2 = ByteBufAllocator.DEFAULT.directBuffer(10);
池化 VS 非池化
池化的最大意义在于可以重用 ByteBuf,优点有
- 没有池化,则每次都得创建新的 ByteBuf 实例,这个操作对直接内存代价昂贵,就算是堆内存,也会增加 GC 压力
- 有了池化,则可以重用池中 ByteBuf 实例,并且采用了与 jemalloc 类似的内存分配算法提升分配效率
- 高并发时,池化功能更节约内存,减少内存溢出的可能
池化功能是否开启,可以通过下面的系统环境变量来设置 -Dio.netty.allocator.type={unpooled|pooled}
结构
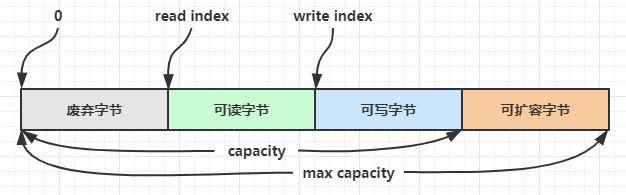 `
`
扩容
扩容规则
- 如何写入后数据大小未超过 512字节,则选择下一个 16 的整数倍,例如写入后大小为 12 ,则扩容后 capacity 是 16
- 如果写入后数据大小超过 512字节,则选择下一个 2^n,例如写入后大小为 513,则扩容后 capacity 是
210 =1024,(29 = 512 已经不够了)
retain & release
由于 Netty 中有堆外内存的 ByteBuf 实现,堆外内存最好是手动来释放,而不是等 GC 垃圾回收。不同的实现需要不同方法回收
- UnpooledHeapByteBuf 使用的是 JVM 内存,只需等 GC 回收内存即可
- UnpooledDirectByteBuf 使用的就是直接内存了,需要特殊的方法来回收内存
- PooledByteBuf 和它的子类使用了池化机制,需要更复杂的规则来回收内存
Netty采用引用计数法来控制回收内存,每个ByteBuf都实现了ReferenceCounted接口。
此接口提供了引用计数相关的方法
- 每个ByteBuf对象的初始计数为1
- 调用 release 方法计数减 1,如果计数为 0,ByteBuf 内存被回收
- 调用 retain 方法计数加 1,表示调用者没用完之前,其它 handler 即使调用了 release 也不会造成回收
当计数为 0 时,底层内存会被回收,这时即使 ByteBuf 对象还在,其各个方法均无法正常使用
ByteBuf由谁释放?
ByteBuf在Pipline中各个处理器之间传递,由最后使用的处理器释放。Pipline中有Head、Tail两个默认处理器,由他们俩个释放 ```java public class DefaultChannelPipeline implements ChannelPipeline {
final class HeadContext extends AbstractChannelHandlerContext
  implements ChannelOutboundHandler, ChannelInboundHandler {
  ......
  @Override
  public void write(ChannelHandlerContext ctx, Object msg, ChannelPromise promise) {
      // 此方法中判断是否释放内存
      unsafe.write(msg, promise);
  }
  ......
}
final class TailContext extends AbstractChannelHandlerContext implements ChannelInboundHandler {
    ......
    @Override
    public void channelRead(ChannelHandlerContext ctx, Object msg) {
        // 此方法中判断是否释放内存
        onUnhandledInboundMessage(ctx, msg);
    }
    ......

}
}
<a name="rd1k4"></a>
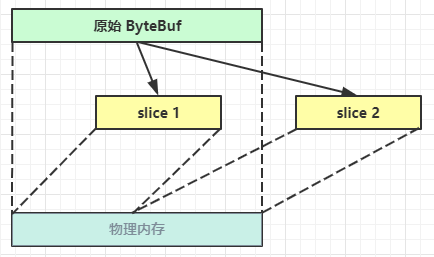
### slice 切割
<a name="eZIgC"></a>
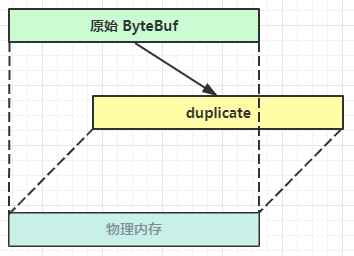
### duplicate 复制
<a name="ozZBE"></a>
### copy 拷贝
开辟一块新的内存,将数据进行深拷贝,读写操作都与原数据无关。
<a name="pKxTy"></a>
### CompositeByteBuf 合并
将多个ByteBuf **逻辑**上合并为一个,实际上并没有发生内存复制,数据还是存储在原内存中
```java
CompositeByteBuf compositeByteBuf = ByteBufAllocator.DEFAULT.compositeBuffer();
compositeByteBuf.addComponents(buf1,buf2);
ByteBuf 优势总结
- 池化 - 可以重用池中 ByteBuf 实例,更节约内存,减少内存溢出的可能
- 读写指针分离,不需要像 ByteBuffer 一样切换读写模式
- 可以自动扩容
- 支持链式调用,使用更流畅
- 很多地方体现零拷贝,例如 slice、duplicate、CompositeByteBuf
BootStrap 引导类
Netty通过引导将各个组件结合在一个并启用。Netty的处理方式可以使网络层和应用程序相隔离。
Bootstrap 类
AbstractBootstrap
具体的引导类分别看作用于服务器和客户端的引导;
- 两种应用程序类型之间通用的引导步骤由 AbstractBootstrap 处理
- 服务器通过ServerBootStrap引导。服务器程序创建一个父 Channel 来接受来自客户端的连接,并创建子 Channel 以用于它们之间的通信
- 客户端通过BootStrap引导。只需要一个 单独的、没有父 Channel 的 Channel 来用于所有的网络交互。
为什么引导类是 Cloneable 的? 有时需要创建多个类似配置的Channel。在一个已经配置完成的引导类实例上调用 clone() 方法将返回另一个可以立即使用的引 导类实例。这种方式只会创建引导类实例的 EventLoopGroup 的一个浅拷贝,所以,这个EventLoopGroup将在所有克 隆的 Channel 实例之间共享。这是可以接受的,因为通常这些克隆的 Channel 的生命周期都很短暂,一 个典型的场景是——创建一个 Channel 以进行一次HTTP请求。
引导客户端
引导的过程中,调用bind()或者connect()前,必须配置以下组件:
- group(),配置EventLoopGroup;
- channel()或者channelFactory(),配置channle实现类
- handler(),配置用于处理Channel I/O事件的处理器
引导服务器
netty程序:
启动器+初始化器+处理器

若有收获,就点个赞吧
0 人点赞
