RPC概述
RPC(Remote Procedure Call)即远程过程调用,是一种通过网络从远程计算机程序上请求服务的协议。RPC允许本地程序像调用本地方法一样调用远程计算机上的应用程序,其使用常见的网络传输协议(如TCP或UDP)传递RPC请求以及相应信息,使得分布式程序的开发更加容易。Hadoop作为分布式存储系统, 各个节点之间的通信和交互是必不可少的, 所以需要实现一套节点间的通信交互机制
Hadoop实现了一套自己的RPC框架。采用了JavaNIO、Java动态代理以及protobuf等基础技术
RPC采用客户端/服务器模式,请求程序就是一个客户端,而服务提供程序就是一个服务器。客户端首先会发送一个有参数的调用请求到服务器,然后等待服务器发回响应信息。在服务器端,服务提供程序会保持睡眠状态直到有调用请求到达为止。当一个调用请求到达后,服务提供程序会执行调用请求,计算结果,向客户端发送响应信息,然后等待下一个调用请求。最后,客户端成功地接收服务器发回的响应信息,一个远程调用结束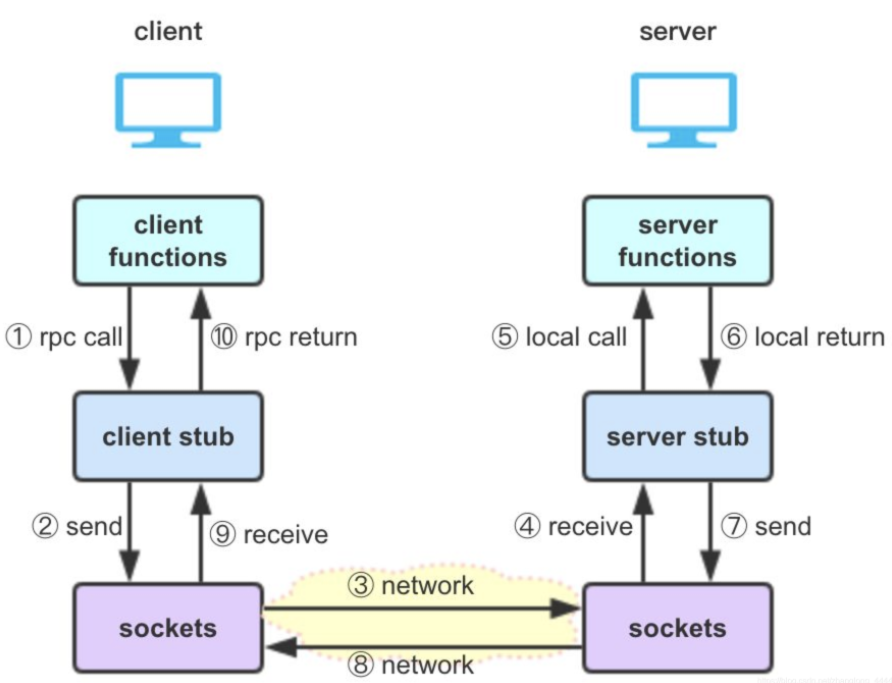
client functions
- 请求程序,会像调用本地方法一样调用客户端stub程序(如图中①),然后接受stub程序的响应信息(如图中⑩)
client stub
- 客户端stub程序,表现得就像本地程序一样,但底层却会调用请求和参数序列化并通过通信模块发送给服务器(如图中②);客户端stub程序也会等待服务器的响应信息(如图中⑨),将响应信息反序列化并返回给请求程序(如图中⑩)
序列化:将对象写入IO流,目的是使对象可以脱离程序的运行而独立存在
- 客户端stub程序,表现得就像本地程序一样,但底层却会调用请求和参数序列化并通过通信模块发送给服务器(如图中②);客户端stub程序也会等待服务器的响应信息(如图中⑨),将响应信息反序列化并返回给请求程序(如图中⑩)
sockets
- 网络通信模块,用于传输RPC请求和响应(如图中的③⑧),可以基于TCP或UDP协议
server stub
- 服务端stub程序,会接收客户端发送的请求和参数(如图中④)并反序列化,根据调用信息触发对应的服务程序(如图中⑤),然后将服务程序的响应信息(如图⑥),并序列化并发回给客户端(如图中⑦)
server functions
- 服务程序,会接收服务端stub程序的调用请求(如图中⑤),执行对应的逻辑并返回执行结果(如图中⑥)
Hadoop RPC使用
Hadoop RPC框架主要由三个类组成: RPC、 Client和Server类
RPC类用于对外提供一个使用Hadoop RPC框架的接口
Client类用于实现RPC客户端功能
Server类则用于实现RPC服务器端功能
首先写一个demo来测试一下效果,然后再说RPC理论。这个demo采用的是hadoop默认的RPC Engine : WritableRpcEngine。采用proto协议在定义接口协议&实现方面会不一样,后面会有这两个rpc engine的调度实例
定义接口协议
/*** 协议接口*/public interface ClicentNameNodeProtocol {//1. 定义协议的IDpublic static final long versionID = 1L;/*** 拿到元数据方法,协议通信前会访问元数据*/public String getMetaData(String path);}
实现接口协议
/*** 实现协议结构*/public class ClicentNameNodeImpl implements ClicentNameNodeProtocol {public String getMetaData(String path) {// 数据存放的路径,有多少块,块大小,校验和,存储在哪一台机器上return path + ":3 - {BLOCK_1,BLOCK_2,BLOCK_3....";}}
创建Server服务,并注册协议,启动RPC服务
/*** 启动RPC服务*/public class Server {public static void main(String[] args) throws IOException {//1. 构建RPC框架RPC.Builder builder = new RPC.Builder(new Configuration());//2. 绑定地址builder.setBindAddress("localhost");//3. 绑定端口builder.setPort(7777);//4. 绑定协议builder.setProtocol(ClicentNameNodeProtocol.class);//5. 调用协议实现类builder.setInstance(new ClicentNameNodeImpl());//6. 创建服务RPC.Server server = builder.build();//7. 启动服务server.start();}}
创建Client服务,请求数据接口
/*** 访问RPC服务*/public class Client {public static void main(String[] args) throws IOException {//1. 拿到RPC协议ClicentNameNodeProtocol proxy = RPC.getProxy(ClicentNameNodeProtocol.class, 1L,new InetSocketAddress("localhost", 7777), new Configuration());//2. 发送请求String metaData = proxy.getMetaData("/meta");//3. 打印元数据System.out.println(metaData);}}
Hadoop RPC原理
定义接口协议
根据业务需要定义接口协议
/*** 协议接口*/public interface ClicentNameNodeProtocol {//1. 定义协议的IDpublic static final long versionID = 1L;/*** 拿到元数据方法,协议通信前会访问元数据*/public String getMetaData(String path);}
实现接口协议
根据接口创建一个实现类,用的时候注册到Server服务中即可
/*** 实现协议结构*/public class ClicentNameNodeImpl implements ClicentNameNodeProtocol {public String getMetaData(String path) {// 数据存放的路径,有多少块,块大小,校验和,存储在哪一台机器上return path + ":3 - {BLOCK_1,BLOCK_2,BLOCK_3....";}}
RPC Server 处理流程
Server架构图
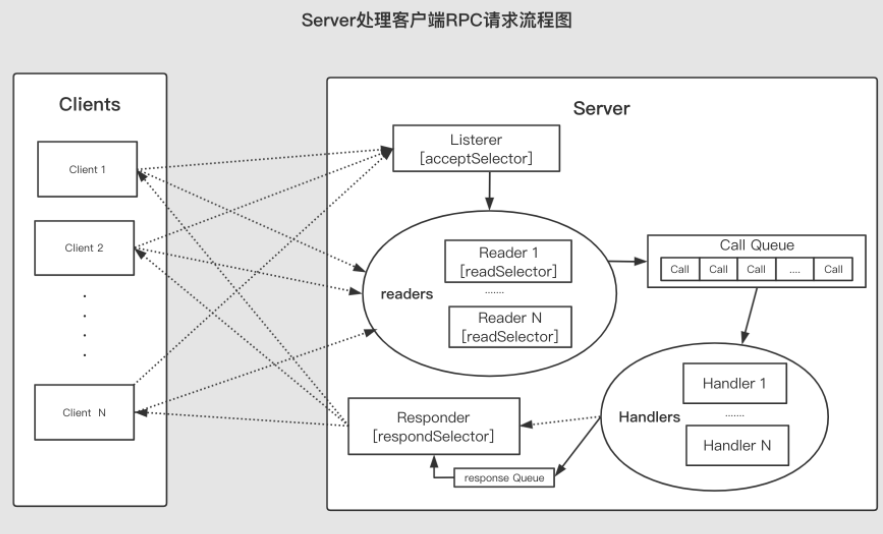
Server 组件
Listener:
- Listener对象中存在一个Selector对象
acceptSelector,负责监听来自客户端的Socket连接请求。当acceptSelector监听到连接请求后,Listener对象会初始化这个连接,之后采用轮询的方式从readers线程池中选出一个Reader线程处理RPC请求的读取操作
- Listener对象中存在一个Selector对象
Reader:
- 用于读取RPC请求。Reader线程类中存在一个Selector对象
readSelector,类似于Reactor模式中的readReactor,这个对象用于监听网络中是否有可以读取的RPC请求。 当readSelector监听到有可读的RPC请求后, 会唤醒Reader线程读取这个请求, 并将请求封装在一个Call对象中, 然后将这个Call对象放入共享队列CallQueue中
- 用于读取RPC请求。Reader线程类中存在一个Selector对象
Handler:
- 用于处理RPC请求并发回响应。Handler对象会从CallQueue中不停地取出RPC请求,然后执行RPC请求对应的本地函数,最后封装响应并将响应发回客户端。为了能够并发地处理RPC请求,Server中会存在多个Handler对象
Responder:
- 用于向客户端发送RPC响应。响应很大或者网络条件不佳等情况下,Handler线程很难将完整的响应发回客户端,这就会造成Handler线程阻塞,从而影响RPC请求的处理效率。所以Handler在没能够将完整的RPC响应发回客户端时,会在Responder内部的
respondSelector上注册一个写响应事件,这里的respondSelector与Reactor模式的respondSelector概念相同,当respondSelector监听到网络情况具备写响应的条件时, 会通知Responder将剩余响应发回客户端
- 用于向客户端发送RPC响应。响应很大或者网络条件不佳等情况下,Handler线程很难将完整的响应发回客户端,这就会造成Handler线程阻塞,从而影响RPC请求的处理效率。所以Handler在没能够将完整的RPC响应发回客户端时,会在Responder内部的
Server组件代码
Server服务是用RPC.Builder类中的build()方法构建的
/*** 构建Server代码*/public class Server {public static void main(String[] args) throws IOException {//1. 构建RPC框架RPC.Builder builder = new RPC.Builder(new Configuration());//2. 绑定地址builder.setBindAddress("localhost");//3. 绑定端口builder.setPort(7777);//4. 绑定协议builder.setProtocol(ClicentNameNodeProtocol.class);//5. 调用协议实现类builder.setInstance(new ClicentNameNodeImpl());//6. 创建服务RPC.Server server = builder.build();//7. 启动服务server.start();}}
其实就是通过RPC.Builder构建一个Server对象.
Builder构建对象中包含构建Server的各种属性,一个builder只能绑定一个协议和实现类
当Builder中的各种属性填充完,满足构建Server的条件之后,就会构建Server对象,并且调用Server的start方法,启动Server
public static class Builder {//设置协议private Class<?> protocol = null;//设置协议的实例private Object instance = null;//设置绑定地址private String bindAddress = "0.0.0.0";//设置端口private int port = 0;//这是处理任务的hadnler数量private int numHandlers = 1;//设置读取任务的线程数量private int numReaders = -1;private int queueSizePerHandler = -1;private boolean verbose = false;private final Configuration conf;private SecretManager<? extends TokenIdentifier> secretManager = null;private String portRangeConfig = null;private AlignmentContext alignmentContext = null;public Builder(Configuration conf) {this.conf = conf;}}
最核心的代码是创建Server服务
RPC.Server server = builder.build();
我们来分析一下这行代码做了什么,通过怎样的方式来构建了一个Server服务
/*** Build the RPC Server.* @throws IOException on error* @throws HadoopIllegalArgumentException when mandatory fields are not set*/public Server build() throws IOException, HadoopIllegalArgumentException {if (this.conf == null) {throw new HadoopIllegalArgumentException("conf is not set");}if (this.protocol == null) {throw new HadoopIllegalArgumentException("protocol is not set");}if (this.instance == null) {throw new HadoopIllegalArgumentException("instance is not set");}// 调用getProtocolEngine()获取当前RPC类配置的RpcEngine对象// 在NameNodeRpcServer的构造方法中已将当前RPC类的RpcEngine对象设置为ProtobufRpcEngine// 获取了ProtobufRpcEngine对象之后,build()方法会在// ProtobufRpcEngine对象上调用getServer()方法来获取一个RPC Server对象的引用return getProtocolEngine(this.protocol, this.conf).getServer(this.protocol, this.instance, this.bindAddress, this.port,this.numHandlers, this.numReaders, this.queueSizePerHandler,this.verbose, this.conf, this.secretManager, this.portRangeConfig,this.alignmentContext);}
其实最主要的是**getProtocolEngine**方法,获取RpcEngine,此方法加了Synchronized关键字,是同步方法
// return the RpcEngine configured to handle a protocolstatic synchronized RpcEngine getProtocolEngine(Class<?> protocol,Configuration conf) {// 从缓存中获取RpcEngineRpcEngine engine = PROTOCOL_ENGINES.get(protocol);if (engine == null) {//获取RpcEngine实现Class<?> impl = conf.getClass(ENGINE_PROP+"."+protocol.getName(),WritableRpcEngine.class);engine = (RpcEngine)ReflectionUtils.newInstance(impl, conf);PROTOCOL_ENGINES.put(protocol, engine);}return engine;}
RpcEngine有两种ProtobufRpcEngine和WritableRpcEngine,默认是WritableRpcEngine
WritableRpcEngine获取Server
/* Construct a server for a protocol implementation instance listening on a* port and address. */@Overridepublic RPC.Server getServer(Class<?> protocolClass,Object protocolImpl, String bindAddress, int port,int numHandlers, int numReaders, int queueSizePerHandler,boolean verbose, Configuration conf,SecretManager<? extends TokenIdentifier> secretManager,String portRangeConfig, AlignmentContext alignmentContext)throws IOException {return new Server(protocolClass, protocolImpl, conf, bindAddress, port,numHandlers, numReaders, queueSizePerHandler, verbose, secretManager,portRangeConfig, alignmentContext);}
ProtobufRpcEngine获取Server
@Overridepublic RPC.Server getServer(Class<?> protocol,Object protocolImpl,String bindAddress, int port,int numHandlers, int numReaders, int queueSizePerHandler,boolean verbose, Configuration conf,SecretManager<? extends TokenIdentifier> secretManager,String portRangeConfig, AlignmentContext alignmentContext)throws IOException {return new Server(protocol, protocolImpl, conf, bindAddress, port,numHandlers, numReaders, queueSizePerHandler, verbose, secretManager,portRangeConfig, alignmentContext);}
这两个类型的RpcEngine都会调用父类的初始化,比如初始化listener、handlers、responder、connectionManager等等
protected Server(String bindAddress, int port,Class<? extends Writable> rpcRequestClass, int handlerCount,int numReaders, int queueSizePerHandler, Configuration conf,String serverName, SecretManager<? extends TokenIdentifier> secretManager,String portRangeConfig)throws IOException {this.bindAddress = bindAddress;this.conf = conf;this.portRangeConfig = portRangeConfig;this.port = port;this.rpcRequestClass = rpcRequestClass;this.handlerCount = handlerCount;this.socketSendBufferSize = 0;this.serverName = serverName;this.auxiliaryListenerMap = null;this.maxDataLength = conf.getInt(CommonConfigurationKeys.IPC_MAXIMUM_DATA_LENGTH,CommonConfigurationKeys.IPC_MAXIMUM_DATA_LENGTH_DEFAULT);if (queueSizePerHandler != -1) {this.maxQueueSize = handlerCount * queueSizePerHandler;} else {this.maxQueueSize = handlerCount * conf.getInt(CommonConfigurationKeys.IPC_SERVER_HANDLER_QUEUE_SIZE_KEY,CommonConfigurationKeys.IPC_SERVER_HANDLER_QUEUE_SIZE_DEFAULT);}this.maxRespSize = conf.getInt(CommonConfigurationKeys.IPC_SERVER_RPC_MAX_RESPONSE_SIZE_KEY,CommonConfigurationKeys.IPC_SERVER_RPC_MAX_RESPONSE_SIZE_DEFAULT);if (numReaders != -1) {this.readThreads = numReaders;} else {this.readThreads = conf.getInt(CommonConfigurationKeys.IPC_SERVER_RPC_READ_THREADS_KEY,CommonConfigurationKeys.IPC_SERVER_RPC_READ_THREADS_DEFAULT);}this.readerPendingConnectionQueue = conf.getInt(CommonConfigurationKeys.IPC_SERVER_RPC_READ_CONNECTION_QUEUE_SIZE_KEY,CommonConfigurationKeys.IPC_SERVER_RPC_READ_CONNECTION_QUEUE_SIZE_DEFAULT);// Setup appropriate callqueuefinal String prefix = getQueueClassPrefix();this.callQueue = new CallQueueManager<Call>(getQueueClass(prefix, conf),getSchedulerClass(prefix, conf),getClientBackoffEnable(prefix, conf), maxQueueSize, prefix, conf);this.secretManager = (SecretManager<TokenIdentifier>) secretManager;this.authorize =conf.getBoolean(CommonConfigurationKeys.HADOOP_SECURITY_AUTHORIZATION,false);// configure supported authenticationsthis.enabledAuthMethods = getAuthMethods(secretManager, conf);this.negotiateResponse = buildNegotiateResponse(enabledAuthMethods);// Start the listener here and let it bind to the portlistener = new Listener(port);// set the server port to the default listener port.this.port = listener.getAddress().getPort();connectionManager = new ConnectionManager();this.rpcMetrics = RpcMetrics.create(this, conf);this.rpcDetailedMetrics = RpcDetailedMetrics.create(this.port);this.tcpNoDelay = conf.getBoolean(CommonConfigurationKeysPublic.IPC_SERVER_TCPNODELAY_KEY,CommonConfigurationKeysPublic.IPC_SERVER_TCPNODELAY_DEFAULT);this.setLogSlowRPC(conf.getBoolean(CommonConfigurationKeysPublic.IPC_SERVER_LOG_SLOW_RPC,CommonConfigurationKeysPublic.IPC_SERVER_LOG_SLOW_RPC_DEFAULT));// Create the responder hereresponder = new Responder();if (secretManager != null || UserGroupInformation.isSecurityEnabled()) {SaslRpcServer.init(conf);saslPropsResolver = SaslPropertiesResolver.getInstance(conf);}this.exceptionsHandler.addTerseLoggingExceptions(StandbyException.class);}
最后调用start方法,开启Server服务
/** Starts the service. Must be called before any calls will be handled. */public synchronized void start() {responder.start();listener.start();if (auxiliaryListenerMap != null && auxiliaryListenerMap.size() > 0) {for (Listener newListener : auxiliaryListenerMap.values()) {newListener.start();}}handlers = new Handler[handlerCount];for (int i = 0; i < handlerCount; i++) {handlers[i] = new Handler(i);handlers[i].start();}}
Client实现
先看一下client调用server端的代码样例,其实就是通过RPC.getProxy方法获取server端的代理对象,然后再通过代理对象调用具体的方法,代理对象根据方法,请求server端,获取数据,最终将数据返回给客户端
/*** 访问RPC服务*/public class Client {public static void main(String[] args) throws IOException {//1. 拿到RPC协议ClicentNameNodeProtocol proxy = RPC.getProxy(ClicentNameNodeProtocol.class, 1L,new InetSocketAddress("localhost", 7777), new Configuration());//2. 发送请求String metaData = proxy.getMetaData("/meta");//3. 打印元数据System.out.println(metaData);}}
首先,看一下如何获取代理对象
/*** Get a protocol proxy that contains a proxy connection to a remote server* and a set of methods that are supported by the server** @param protocol protocol* @param clientVersion client's version* @param addr server address* @param ticket security ticket* @param conf configuration* @param factory socket factory* @param rpcTimeout max time for each rpc; 0 means no timeout* @param connectionRetryPolicy retry policy* @param fallbackToSimpleAuth set to true or false during calls to indicate if* a secure client falls back to simple auth* @return the proxy* @throws IOException if any error occurs*/public static <T> ProtocolProxy<T> getProtocolProxy(Class<T> protocol,long clientVersion,InetSocketAddress addr,UserGroupInformation ticket,Configuration conf,SocketFactory factory,int rpcTimeout,RetryPolicy connectionRetryPolicy,AtomicBoolean fallbackToSimpleAuth)throws IOException {if (UserGroupInformation.isSecurityEnabled()) {SaslRpcServer.init(conf);}return getProtocolEngine(protocol, conf).getProxy(protocol, clientVersion,addr, ticket, conf, factory, rpcTimeout, connectionRetryPolicy,fallbackToSimpleAuth, null);}
根据上面的方法,先通过getProtocolEngine(protocol, conf)这个方法,获取到RpcEngine(对象),然后调用getProxy 获取对应的对象
这个是getProxy 的接口定义,根据RpcEngine 的不同,实现方式也不同
/** Construct a client-side proxy object. */<T> ProtocolProxy<T> getProxy(Class<T> protocol,long clientVersion, InetSocketAddress addr,UserGroupInformation ticket, Configuration conf,SocketFactory factory, int rpcTimeout,RetryPolicy connectionRetryPolicy,AtomicBoolean fallbackToSimpleAuth,AlignmentContext alignmentContext) throws IOException;
拿到代理对象之后,可以像本地一样调用里面的方法

若有收获,就点个赞吧
0 人点赞
