以 ProtobufRpcEngine 为实例
Client端架构
Client 类只有一个入口,就是 call() 方法。代理类会调用 Client.call() 方法将 RPC 请求发送到远程服务器,然后等待远程服务器的响应。如果远程服务器响应请求时出现异常,则在 call() 方法中抛出异常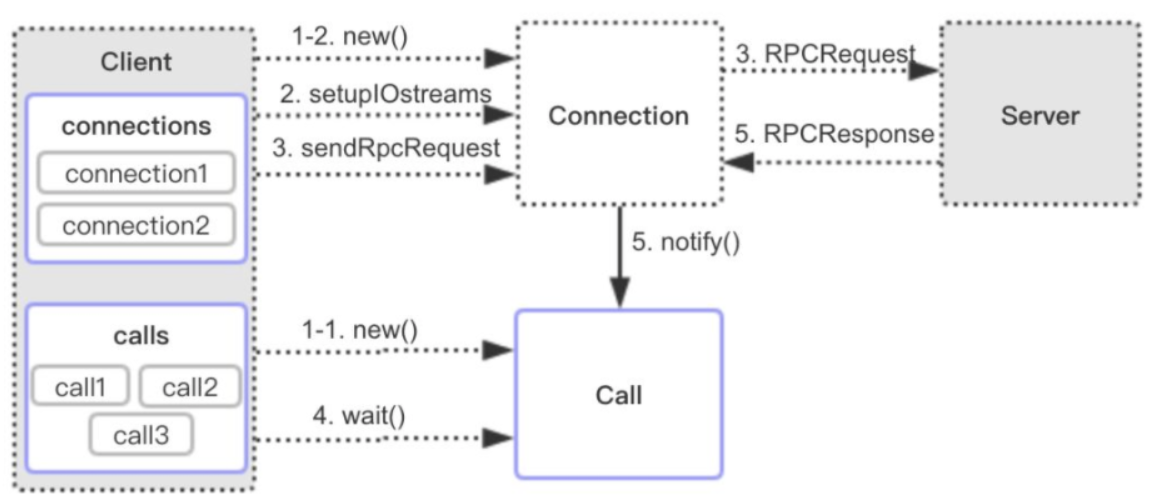
基本流程:
在 call 方法中先将远程调用信息封装成一个 Client.Call 对象(保存了完成标志、返回信息、异常信息等),然后得到 connection 对象用于管理 Client 与 Server 的 Socket 连接
getConnection 方法中通过 setupIOstreams 建立与 Server 的 socket 连接,启动 Connection 线程,监听 socket 读取 server 响应
call() 方法发送 RPC 请求
call() 方法调用 Call.wait() 在 Call 对象上等待 Server 响应信息
Connection 线程收到响应信息设置 Call 对象返回信息字段,并调用 Call.notify() 唤醒 call() 方法线程读取 Call 对象返回值
Client端创建流程
此处协议采用 proto,所以产生的 RpcEngine 是 ProtobufRpcEngine
public static void main(String[] args) throws Exception {//1. 构建配置对象Configuration conf = new Configuration();//2. 设置协议的RpcEngine为ProtobufRpcEngine .RPC.setProtocolEngine(conf, Server.MetaInfoProtocol.class,ProtobufRpcEngine.class);//3. 拿到代理对象Server.MetaInfoProtocol proxy = RPC.getProxy(Server.MetaInfoProtocol.class, 1L,new InetSocketAddress("localhost", 7777), conf);//4. 构建发送请求对象CustomProtos.GetMetaInfoRequestProto obj = CustomProtos.GetMetaInfoRequestProto.newBuilder().setPath("/meta").build();//5. 将请求对象传入, 获取响应信息CustomProtos.GetMetaInfoResponseProto metaData = proxy.getMetaInfo(null, obj);//6. 输出数据System.out.println(metaData.getInfo());}
此处代码分为三个主要部分:
构建配置对象并且设置 RpcEngine 引擎
获取代理对象
设置请求参数以及通过代理对象请求
处理结果
第一条和第二条就是使用 proto 定义一个协议,绑定到 RPC.Builder 的实现对象里面
获取代理对象
Server.MetaInfoProtocol proxy = RPC.getProxy(Server.MetaInfoProtocol.class, 1L,new InetSocketAddress("localhost", 7777), conf);
也是就是通过 RPC.getProxy 方法获取协议的代理对象
/*** Construct a client-side proxy object with the default SocketFactory* @param <T>** @param protocol 协议* @param clientVersion 客户端的版本* @param addr 请求地址* @param conf 配置文件* @return a proxy instance* @throws IOException*/public static <T> T getProxy(Class<T> protocol,long clientVersion,InetSocketAddress addr, Configuration conf)throws IOException {return getProtocolProxy(protocol, clientVersion, addr, conf).getProxy();}
/*** Get a protocol proxy that contains a proxy connection to a remote server* and a set of methods that are supported by the server** @param protocol protocol* @param clientVersion client's version* @param addr server address* @param ticket security ticket* @param conf configuration* @param factory socket factory* @param rpcTimeout max time for each rpc; 0 means no timeout* @param connectionRetryPolicy retry policy* @param fallbackToSimpleAuth set to true or false during calls to indicate if* a secure client falls back to simple auth* @return the proxy* @throws IOException if any error occurs*/public static <T> ProtocolProxy<T> getProtocolProxy(Class<T> protocol,long clientVersion,InetSocketAddress addr,UserGroupInformation ticket,Configuration conf,SocketFactory factory,int rpcTimeout,RetryPolicy connectionRetryPolicy,AtomicBoolean fallbackToSimpleAuth)throws IOException {if (UserGroupInformation.isSecurityEnabled()) {SaslRpcServer.init(conf);}return getProtocolEngine(protocol, conf).getProxy(protocol, clientVersion,addr, ticket, conf, factory, rpcTimeout, connectionRetryPolicy,fallbackToSimpleAuth, null);}
核心代码为 getProtocolProxy 的返回值
return getProtocolEngine(protocol, conf).getProxy(protocol, clientVersion,addr, ticket, conf, factory, rpcTimeout, connectionRetryPolicy,fallbackToSimpleAuth, null);
首先通过 getProtocolEngine 获取 RPC Engine —— ProtobufRpcEngine
// return the RpcEngine configured to handle a protocolstatic synchronized RpcEngine getProtocolEngine(Class<?> protocol,Configuration conf) {// 从缓存中获取RpcEngine ,// 这个是提前设置的// 通过RPC.setProtocolEngine(conf, MetaInfoProtocol.class,ProtobufRpcEngine.class);RpcEngine engine = PROTOCOL_ENGINES.get(protocol);if (engine == null) {//通过这里 获取RpcEngine的实现类 , 这里我们获取的是 ProtobufRpcEngine.classClass<?> impl = conf.getClass(ENGINE_PROP+"."+protocol.getName(),WritableRpcEngine.class);// impl : org.apache.hadoop.ipc.ProtobufRpcEngineengine = (RpcEngine)ReflectionUtils.newInstance(impl, conf);PROTOCOL_ENGINES.put(protocol, engine);}return engine;}
然后再调用 ProtobufRpcEngine 的 getProxy 方法,将协议、客户端的版本号、socket地址、ticket、配置文件、socket 的创建工厂对象(StandardSocketFactory)、PRC 服务的超时时间、connetion 的重试策略、以及权限等信息传入
@Override@SuppressWarnings("unchecked")public <T> ProtocolProxy<T> getProxy(Class<T> protocol, long clientVersion,InetSocketAddress addr, UserGroupInformation ticket, Configuration conf,SocketFactory factory, int rpcTimeout, RetryPolicy connectionRetryPolicy,AtomicBoolean fallbackToSimpleAuth, AlignmentContext alignmentContext)throws IOException {// 构造一个实现了 InvocationHandler 接口的invoker 对象final Invoker invoker = new Invoker(protocol, addr, ticket, conf, factory,rpcTimeout, connectionRetryPolicy, fallbackToSimpleAuth,alignmentContext);//然后调用Proxy.newProxylnstance()获取动态代理对象,并通过ProtocolProxy返回return new ProtocolProxy<T>(protocol, (T) Proxy.newProxyInstance(protocol.getClassLoader(), new Class[]{protocol}, invoker), false);}
构造一个实现了 InvocationHandler 接口的 invoker 对象 (动态代理机制中的InvocationHandler对象会在invoke()方法中代理所有目标接口上的调用,用户可以在invoke()方法中添加代理操作
调用 Proxy.newProxylnstance() 获取动态代理对象,并通过 ProtocolProxy 返回
Invoker 的创建
private Invoker(Class<?> protocol, InetSocketAddress addr,UserGroupInformation ticket, Configuration conf, SocketFactory factory,int rpcTimeout, RetryPolicy connectionRetryPolicy,AtomicBoolean fallbackToSimpleAuth, AlignmentContext alignmentContext)throws IOException {this(protocol,Client.ConnectionId.getConnectionId(addr, protocol, ticket, rpcTimeout,connectionRetryPolicy, conf), conf, factory);this.fallbackToSimpleAuth = fallbackToSimpleAuth;this.alignmentContext = alignmentContext;}
重点在于
this(protocol,Client.ConnectionId.getConnectionId(addr, protocol, ticket, rpcTimeout,connectionRetryPolicy, conf), conf, factory);
首先来看
Client.ConnectionId.getConnectionId(addr, protocol, ticket, rpcTimeout,connectionRetryPolicy, conf), conf, factory)
这里会调用 getConnectionId 方法构建一个 Client.ConnectionId 对象
ConnectionId:这个类持有请求地址和用户的 ticketclient 连接 server 的唯一凭证:[remoteAddress, protocol, ticket]
/*** Returns a ConnectionId object.* @param addr Remote address for the connection.* @param protocol Protocol for RPC.* @param ticket UGI* @param rpcTimeout timeout* @param conf Configuration object* @return A ConnectionId instance* @throws IOException*/static ConnectionId getConnectionId(InetSocketAddress addr,Class<?> protocol, UserGroupInformation ticket, int rpcTimeout,RetryPolicy connectionRetryPolicy, Configuration conf) throws IOException {//构建重试策略if (connectionRetryPolicy == null) {// 设置最大重试次数默认值: 10final int max = conf.getInt(CommonConfigurationKeysPublic.IPC_CLIENT_CONNECT_MAX_RETRIES_KEY,CommonConfigurationKeysPublic.IPC_CLIENT_CONNECT_MAX_RETRIES_DEFAULT);// 设置重试间隔: 1 秒final int retryInterval = conf.getInt(CommonConfigurationKeysPublic.IPC_CLIENT_CONNECT_RETRY_INTERVAL_KEY,CommonConfigurationKeysPublic.IPC_CLIENT_CONNECT_RETRY_INTERVAL_DEFAULT);// 创建重试策略实例 RetryUpToMaximumCountWithFixedSleep// 重试10次, 每次间隔1秒connectionRetryPolicy = RetryPolicies.retryUpToMaximumCountWithFixedSleep(max, retryInterval, TimeUnit.MILLISECONDS);}// 创建ConnectionId:// 这个类持有请求地址和用户的ticket// client 连接 server 的唯一凭证: [remoteAddress, protocol, ticket]return new ConnectionId(addr, protocol, ticket, rpcTimeout,connectionRetryPolicy, conf);}
在 getConnectionId 这个方法里面会做两件事:
- 创建一个重试策略 RetryUpToMaximumCountWithFixedSleep
构建一个 ConnectionId 对象
ConnectionId(InetSocketAddress address, Class<?> protocol,UserGroupInformation ticket, int rpcTimeout,RetryPolicy connectionRetryPolicy, Configuration conf) {// 协议this.protocol = protocol;// 请求地址this.address = address;// 用户ticketthis.ticket = ticket;// 设置超时时间this.rpcTimeout = rpcTimeout;// 设置重试策略 默认: 重试10次, 每次间隔1秒this.connectionRetryPolicy = connectionRetryPolicy;// 单位 10秒this.maxIdleTime = conf.getInt(CommonConfigurationKeysPublic.IPC_CLIENT_CONNECTION_MAXIDLETIME_KEY,CommonConfigurationKeysPublic.IPC_CLIENT_CONNECTION_MAXIDLETIME_DEFAULT);// sasl client最大重试次数 5 次this.maxRetriesOnSasl = conf.getInt(CommonConfigurationKeys.IPC_CLIENT_CONNECT_MAX_RETRIES_ON_SASL_KEY,CommonConfigurationKeys.IPC_CLIENT_CONNECT_MAX_RETRIES_ON_SASL_DEFAULT);//指示客户端将在套接字超时时进行重试的次数,以建立服务器连接。 默认值: 45this.maxRetriesOnSocketTimeouts = conf.getInt(CommonConfigurationKeysPublic.IPC_CLIENT_CONNECT_MAX_RETRIES_ON_SOCKET_TIMEOUTS_KEY,CommonConfigurationKeysPublic.IPC_CLIENT_CONNECT_MAX_RETRIES_ON_SOCKET_TIMEOUTS_DEFAULT);//使用TCP_NODELAY标志绕过Nagle的算法传输延迟。 默认值: truethis.tcpNoDelay = conf.getBoolean(CommonConfigurationKeysPublic.IPC_CLIENT_TCPNODELAY_KEY,CommonConfigurationKeysPublic.IPC_CLIENT_TCPNODELAY_DEFAULT);// 从客户端启用低延迟连接默认 falsethis.tcpLowLatency = conf.getBoolean(CommonConfigurationKeysPublic.IPC_CLIENT_LOW_LATENCY,CommonConfigurationKeysPublic.IPC_CLIENT_LOW_LATENCY_DEFAULT);// 启用从RPC客户端到服务器的ping操作默认值: truethis.doPing = conf.getBoolean(CommonConfigurationKeys.IPC_CLIENT_PING_KEY,CommonConfigurationKeys.IPC_CLIENT_PING_DEFAULT);// 设置ping操作的间隔, 默认值 : 1分钟this.pingInterval = (doPing ? Client.getPingInterval(conf) : 0);this.conf = conf;}
回到之前的调用 Invoker 另一个构造方法,但是入参会变
/*** This constructor takes a connectionId, instead of creating a new one.*/private Invoker(Class<?> protocol, Client.ConnectionId connId,Configuration conf, SocketFactory factory) {this.remoteId = connId;this.client = CLIENTS.getClient(conf, factory, RpcWritable.Buffer.class);this.protocolName = RPC.getProtocolName(protocol);this.clientProtocolVersion = RPC.getProtocolVersion(protocol);}
这个是 Invoker 真正的构建方法,这里面会将刚刚构建好的 ConnectionId 赋值给 remoteId 字段
并且创建一个 Client 对象
// 获取、创建客户端this.client = CLIENTS.getClient(conf, factory, RpcWritable.Buffer.class);
getClient 方法,会先尝试从缓存中获取 client 对象,如果没有的话,再自己创建一个,并且加到缓存中
为什么会放到缓存中呢?? 当 client 和 server 再次通讯的时候,可以复用这个 client
/*** 如果没有缓存的client存在的话* 根据用户提供的SocketFactory构造或者缓存一个IPC客户端** Construct & cache an IPC client with the user-provided SocketFactory* if no cached client exists.** @param conf Configuration* @param factory SocketFactory for client socket* @param valueClass Class of the expected response* @return an IPC client*/public synchronized Client getClient(Configuration conf,SocketFactory factory, Class<? extends Writable> valueClass) {// Construct & cache client.//// The configuration is only used for timeout,// and Clients have connection pools. So we can either// (a) lose some connection pooling and leak sockets, or// (b) use the same timeout for all configurations.//// Since the IPC is usually intended globally, notper-job, we choose (a).// 从缓存中获取ClientClient client = clients.get(factory);if (client == null) {//client在缓存中不存在, 创建一个.client = new Client(valueClass, conf, factory);//缓存创建的clientclients.put(factory, client);} else {//client的引用计数+1client.incCount();}if (Client.LOG.isDebugEnabled()) {Client.LOG.debug("getting client out of cache: " + client);}// 返回clientreturn client;}
到这里 Invoker 对象就创建完了。回到 ProtobufRpcEngine 的 getProxy 方法
//然后调用Proxy.newProxylnstance()获取动态代理对象,并通过ProtocolProxy返回return new ProtocolProxy<T>(protocol, (T) Proxy.newProxyInstance(protocol.getClassLoader(), new Class[]{protocol}, invoker), false);
构建一个 ProtocolProxy 对象返回
/*** Constructor** @param protocol protocol class* @param proxy its proxy* @param supportServerMethodCheck If false proxy will never fetch server* methods and isMethodSupported will always return true. If true,* server methods will be fetched for the first call to* isMethodSupported.*/public ProtocolProxy(Class<T> protocol, T proxy,boolean supportServerMethodCheck) {this.protocol = protocol;this.proxy = proxy;this.supportServerMethodCheck = supportServerMethodCheck;}
创建 client 端的第四步,根据proto协议,构建一个请求对象,这里是 proto 自动生成的,我们只需要创建了一下
//4. 构建发送请求对象CustomProtos.GetMetaInfoRequestProto obj = CustomProtos.GetMetaInfoRequestProto.newBuilder().setPath("/meta").build();
第五步,将请求对象传入,获取响应信息
//5. 将请求对象传入, 获取响应信息CustomProtos.GetMetaInfoResponseProto metaData = proxy.getMetaInfo(null, obj);
最后一步,输出响应信息
//6. 输出数据System.out.println(metaData.getInfo());
请求 Server 端的代码、请求是如何发出去的、如何拿到响应信息
采用动态代理。首先看 ProtobufRpcEngine 的 getProxy 方法
return new ProtocolProxy<T>(protocol, (T) Proxy.newProxyInstance(protocol.getClassLoader(), new Class[]{protocol}, invoker), false);
重点在于
(T) Proxy.newProxyInstance(protocol.getClassLoader(), new Class[]{protocol}, invoker)
public static Object newProxyInstance(ClassLoader loader,Class<?>[] interfaces,InvocationHandler h) {undefined........................}
这个方法的作用就是创建一个代理类对象,它接收三个参数,我们来看下几个参数的含义:
loader:一个 classloader 对象,定义了由哪个 classloader 对象对生成的代理类进行加载
interfaces:一个 interface 对象数组,表示我们将要给我们的代理对象提供一组什么样的接口,如果我们提供了这样一个接口对象数组,那么也就是声明了代理类实现了这些接口,代理类就可以调用接口中声明的所有方法
h:一个 InvocationHandler 对象,表示的是当动态代理对象调用方法的时候会关联到哪一个InvocationHandler 对象上,并最终由其调用
ProtobufRpcEngine.Invoker.invoker
/**** ProtobufRpcEngine.Invoker.invoker()方法主要做了三件事情:* 1.构造请求头域,* 使用protobuf将请求头序列化,这个请求头域记录了当前RPC调用是什么接口的什么方法上的* 调用;* 2.通过RPC.Client类发送请求头以及序列化好的请求参数。* 请求参数是在ClientNamenodeProtocolPB调用时就已经序列化好的,* 调用Client.call()方法时,* 需要将请求头以及请求参数使用一个RpcRequestWrapper对象封装;* 3.获取响应信息,序列化响应信息并返回。*** This is the client side invoker of RPC method. It only throws* ServiceException, since the invocation proxy expects only* ServiceException to be thrown by the method in case protobuf service.** ServiceException has the following causes:* <ol>* <li>Exceptions encountered on the client side in this method are* set as cause in ServiceException as is.</li>* <li>Exceptions from the server are wrapped in RemoteException and are* set as cause in ServiceException</li>* </ol>** Note that the client calling protobuf RPC methods, must handle* ServiceException by getting the cause from the ServiceException. If the* cause is RemoteException, then unwrap it to get the exception thrown by* the server.*/@Overridepublic Message invoke(Object proxy, final Method method, Object[] args)throws ServiceException {long startTime = 0;if (LOG.isDebugEnabled()) {startTime = Time.now();}// pb接口的参数只有两个,即RpcController + Messageif (args.length != 2) { // RpcController + Messagethrow new ServiceException("Too many or few parameters for request. Method: ["+ method.getName() + "]" + ", Expected: 2, Actual: "+ args.length);}if (args[1] == null) {throw new ServiceException("null param while calling Method: ["+ method.getName() + "]");}// if Tracing is on then start a new span for this rpc.// guard it in the if statement to make sure there isn't// any extra string manipulation.// todo 这个是啥Tracer tracer = Tracer.curThreadTracer();TraceScope traceScope = null;if (tracer != null) {traceScope = tracer.newScope(RpcClientUtil.methodToTraceString(method));}//构造请求头域,标明在什么接口上调用什么方法RequestHeaderProto rpcRequestHeader = constructRpcRequestHeader(method);if (LOG.isTraceEnabled()) {LOG.trace(Thread.currentThread().getId() + ": Call -> " +remoteId + ": " + method.getName() +" {" + TextFormat.shortDebugString((Message) args[1]) + "}");}//获取请求调用的参数,例如RenameRequestProtofinal Message theRequest = (Message) args[1];final RpcWritable.Buffer val;try {//调用RPC.Client发送请求val = (RpcWritable.Buffer) client.call(RPC.RpcKind.RPC_PROTOCOL_BUFFER,new RpcProtobufRequest(rpcRequestHeader, theRequest), remoteId,fallbackToSimpleAuth, alignmentContext);} catch (Throwable e) {if (LOG.isTraceEnabled()) {LOG.trace(Thread.currentThread().getId() + ": Exception <- " +remoteId + ": " + method.getName() +" {" + e + "}");}if (traceScope != null) {traceScope.addTimelineAnnotation("Call got exception: " +e.toString());}throw new ServiceException(e);} finally {if (traceScope != null) traceScope.close();}if (LOG.isDebugEnabled()) {long callTime = Time.now() - startTime;LOG.debug("Call: " + method.getName() + " took " + callTime + "ms");}if (Client.isAsynchronousMode()) {final AsyncGet<RpcWritable.Buffer, IOException> arr= Client.getAsyncRpcResponse();final AsyncGet<Message, Exception> asyncGet= new AsyncGet<Message, Exception>() {@Overridepublic Message get(long timeout, TimeUnit unit) throws Exception {return getReturnMessage(method, arr.get(timeout, unit));}@Overridepublic boolean isDone() {return arr.isDone();}};ASYNC_RETURN_MESSAGE.set(asyncGet);return null;} else {return getReturnMessage(method, val);}}
重点在以下四个方面:
构造请求头域,标明在什么接口上调用什么方法
获取请求调用的参数
调用 RPC.Client 发送请求
获取响应信息
构造请求头域,标明在什么接口上调用什么方法
RequestHeaderProto rpcRequestHeader = constructRpcRequestHeader(method);
这里很简单,就是根据协议定义,将协议名称、调用的方法名称、版本号三个值传入,来构建一个消息头
private RequestHeaderProto constructRpcRequestHeader(Method method) {RequestHeaderProto.Builder builder = RequestHeaderProto.newBuilder();builder.setMethodName(method.getName());builder.setDeclaringClassProtocolName(protocolName);builder.setClientProtocolVersion(clientProtocolVersion);return builder.build();}
获取请求调用的参数
// 通过参数传进来的.// 例如 GetMetaInfoRequestProtofinal Message theRequest = (Message) args[1];
调用 RPC.Client 发送请求(核心)
这一步骤是核心
//调用RPC.Client发送请求val = (RpcWritable.Buffer) client.call(RPC.RpcKind.RPC_PROTOCOL_BUFFER,new RpcProtobufRequest(rpcRequestHeader, theRequest), remoteId,fallbackToSimpleAuth, alignmentContext);
Client是在 ProtobufRpcEngine.Invoker 构造方法里面创建的
/*** This constructor takes a connectionId, instead of creating a new one.*/private Invoker(Class<?> protocol, Client.ConnectionId connId,Configuration conf, SocketFactory factory) {// 设置ConnectionId, ConnectionId里面保存着Client连接Server的信息this.remoteId = connId;// 获取、创建客户端this.client = CLIENTS.getClient(conf, factory, RpcWritable.Buffer.class);// 获取协议的名称this.protocolName = RPC.getProtocolName(protocol);// 获取协议的版本 versionthis.clientProtocolVersion = RPC.getProtocolVersion(protocol);}
Client.call()方法
这里重点关注 Client.call() 方法,主要从一下四个方面来说:
创建 Call 对象
获取&建立连接
发送RPC请求
获取响应 ```java /*
- Make a call, passing
rpcRequest, to the IPC server defined by remoteId, returning the rpc response. *- @param rpcKind
- @param rpcRequest - contains serialized method and method parameters
- @param remoteId - the target rpc server
- @param serviceClass - service class for RPC
- @param fallbackToSimpleAuth - set to true or false during this method to
- indicate if a secure client falls back to simple auth
- @param alignmentContext - state alignment context
- @return the rpc response
- Throws exceptions if there are network problems or if the remote code
threw an exception. */ Writable call(RPC.RpcKind rpcKind, Writable rpcRequest,
ConnectionId remoteId, int serviceClass,AtomicBoolean fallbackToSimpleAuth, AlignmentContext alignmentContext)
throws IOException {
/**
- 创建 Call 对象
- Client.call()方法将RPC请求封装成一个Call对象,
- Call对象中保存了RPC调用的完成标志、返回值信息以及异常信息;
- 随后,Client.cal()方法会创建一个Connection对象,
Connection对象用于管理Client与Server的Socket连接 */ final Call call = createCall(rpcKind, rpcRequest);
call.setAlignmentContext(alignmentContext);
// 获取&建立连接 // 用ConnectionId作为key, // 将新建的Connection对象放入Client.connections字段中保存 // (对于Connection对象, // 由于涉及了与Server建立Socket连接,会比较耗费资 源, // 所以Client类使用一个HashTable对象connections保存那些没有过期的 Connection, // 如果可以复用,则复用这些Connection对象); // 以callId作为key,将构造的Call对象放入Connection.calls字段中保存。
final Connection connection = getConnection(remoteId, call, serviceClass,
fallbackToSimpleAuth);
try { //检测是否是异步请求. checkAsyncCall(); try {
//发送RPC请求connection.sendRpcRequest(call); // send the rpc request
} catch (RejectedExecutionException e) {throw new IOException("connection has been closed", e);} catch (InterruptedException ie) {Thread.currentThread().interrupt();IOException ioe = new InterruptedIOException("Interrupted waiting to send RPC request to server");ioe.initCause(ie);throw ioe;}} catch(Exception e) {if (isAsynchronousMode()) {releaseAsyncCall();}throw e;}if (isAsynchronousMode()) {final AsyncGet<Writable, IOException> asyncGet= new AsyncGet<Writable, IOException>() {@Overridepublic Writable get(long timeout, TimeUnit unit)throws IOException, TimeoutException{boolean done = true;try {final Writable w = getRpcResponse(call, connection, timeout, unit);if (w == null) {done = false;throw new TimeoutException(call + " timed out "+ timeout + " " + unit);}return w;} finally {if (done) {releaseAsyncCall();}}}@Overridepublic boolean isDone() {synchronized (call) {return call.done;}}};ASYNC_RPC_RESPONSE.set(asyncGet);return null;} else {//服务器成功发回响应信息,返回RPC响应return getRpcResponse(call, connection, -1, null);}
}
<a name="ZX7d8"></a>##### 创建 Call 对象```java/*** 创建 Call 对象* Client.call()方法将RPC请求封装成一个Call对象,* Call对象中保存了RPC调用的完成标志、返回值信息以及异常信息;* 随后,Client.cal()方法会创建一个 Connection对象,* Connection对象用于管理Client与Server的Socket连接*/final Call call = createCall(rpcKind, rpcRequest);
/**** @param rpcKind rpcKind参数用于描述RPC请求的序列化工具类型* @param rpcRequest rpcRequest参数则用于记录序列化后的RPC请求* @return*/Call createCall(RPC.RpcKind rpcKind, Writable rpcRequest) {return new Call(rpcKind, rpcRequest);}
这里就是构造方法, 生成一个唯一的 callId , 进行初始化
private Call(RPC.RpcKind rpcKind, Writable param) {this.rpcKind = rpcKind;this.rpcRequest = param;//获取 callIdfinal Integer id = callId.get();if (id == null) {// AtomicInteger callIdCounter 自增this.id = nextCallId();} else {callId.set(null);this.id = id;}final Integer rc = retryCount.get();if (rc == null) {this.retry = 0;} else {this.retry = rc;}// 设置异常处理类this.externalHandler = EXTERNAL_CALL_HANDLER.get();}
获取&建立连接
用 ConnectionId 作为key,将新建的 Connection 对象放入 Client.connections 字段中保存(对于 Connection 对象,由于涉及了与 Server 建立 Socket 连接,会比较耗费资源,所以 Client 类使用一个 ConcurrentMap 对象connections 保存那些没有过期的 Connection,如果可以复用,则复用这些Connection对象);以 callId 作为key,将构造的 Call 对象放入 Connection.calls 字段中保存
final Connection connection = getConnection(remoteId, call, serviceClass,fallbackToSimpleAuth);
/** Get a connection from the pool, or create a new one and add it to the* pool. Connections to a given ConnectionId are reused.* 获取连接** */private Connection getConnection(ConnectionId remoteId,Call call, int serviceClass, AtomicBoolean fallbackToSimpleAuth)throws IOException {if (!running.get()) {// the client is stoppedthrow new IOException("The client is stopped");}Connection connection;/* we could avoid this allocation for each RPC by having a* connectionsId object and with set() method. We need to manage the* refs for keys in HashMap properly. For now its ok.*/while (true) {// These lines below can be shorten with computeIfAbsent in Java8// 首先尝试从Client.connections队列中获取Connection对象connection = connections.get(remoteId);if (connection == null) {// 如果connections队列中没有保存,则构造新的对象connection = new Connection(remoteId, serviceClass);// putIfAbsent 如果对应的 key 已经有值了,// 则忽略本次操作,直接返回旧值Connection existing = connections.putIfAbsent(remoteId, connection);if (existing != null) {connection = existing;}}// 将待发送请求对应的Call对象放入Connection.calls队列if (connection.addCall(call)) {break;} else {// This connection is closed, should be removed. But other thread could// have already known this closedConnection, and replace it with a new// connection. So we should call conditional remove to make sure we only// remove this closedConnection.connections.remove(remoteId, connection);}}// If the server happens to be slow, the method below will take longer to// establish a connection.// 调用setupIOstreams()方法,初始化Connection对象并获取IO流connection.setupIOstreams(fallbackToSimpleAuth);return connection;}
里面创建 connection 就不细说了,其实就是创建 connection 对象,然后做一下请求地址和请求参数的设置。并没有和server端进行请求
//如果connections队列中没有保存,则构造新的对象connection = new Connection(remoteId, serviceClass);
connection.setupIOstreams 这个才是建立连接的关键方法
// 调用setupIOstreams()方法,初始化Connection对象并获取IO流connection.setupIOstreams(fallbackToSimpleAuth);
/*** Connect to the server and set up the I/O streams. It then sends* a header to the server and starts* the connection thread that waits for responses.** Client.call()方法调用 Connection.setupIOstreams() 方法建立与Server的Socket连接。* setupIOstreams()方法还会启动Connection线程,* Connection线程会监听Socket并读取Server发回的响应信息。*/private synchronized void setupIOstreams( AtomicBoolean fallbackToSimpleAuth) {if (socket != null || shouldCloseConnection.get()) {return;}UserGroupInformation ticket = remoteId.getTicket();if (ticket != null) {final UserGroupInformation realUser = ticket.getRealUser();if (realUser != null) {ticket = realUser;}}try {connectingThread.set(Thread.currentThread());if (LOG.isDebugEnabled()) {LOG.debug("Connecting to "+server);}Span span = Tracer.getCurrentSpan();if (span != null) {span.addTimelineAnnotation("IPC client connecting to " + server);}short numRetries = 0;Random rand = null;while (true) {// 建立到Server的Socket连接,// 并且在这个Socket连接上获得InputStream和OutputStream对象。setupConnection(ticket);ipcStreams = new IpcStreams(socket, maxResponseLength);// 调用writeConnectionHeader()方法在连接建立时发送连接头域。writeConnectionHeader(ipcStreams);if (authProtocol == AuthProtocol.SASL) {try {authMethod = ticket.doAs(new PrivilegedExceptionAction<AuthMethod>() {@Overridepublic AuthMethod run()throws IOException, InterruptedException {return setupSaslConnection(ipcStreams);}});} catch (IOException ex) {if (saslRpcClient == null) {// whatever happened -it can't be handled, so rethrowthrow ex;}// otherwise, assume a connection problemauthMethod = saslRpcClient.getAuthMethod();if (rand == null) {rand = new Random();}handleSaslConnectionFailure(numRetries++, maxRetriesOnSasl, ex,rand, ticket);continue;}if (authMethod != AuthMethod.SIMPLE) {// Sasl connect is successful. Let's set up Sasl i/o streams.ipcStreams.setSaslClient(saslRpcClient);// for testingremoteId.saslQop =(String)saslRpcClient.getNegotiatedProperty(Sasl.QOP);LOG.debug("Negotiated QOP is :" + remoteId.saslQop);if (fallbackToSimpleAuth != null) {fallbackToSimpleAuth.set(false);}} else if (UserGroupInformation.isSecurityEnabled()) {if (!fallbackAllowed) {throw new IOException("Server asks us to fall back to SIMPLE " +"auth, but this client is configured to only allow secure " +"connections.");}if (fallbackToSimpleAuth != null) {fallbackToSimpleAuth.set(true);}}}if (doPing) {ipcStreams.setInputStream(new PingInputStream(ipcStreams.in));}//调用writeConnectionContext()方法写入连接上下文。writeConnectionContext(remoteId, authMethod);// update last activity time//调用touch()方法更新上次活跃时间。touch();span = Tracer.getCurrentSpan();if (span != null) {span.addTimelineAnnotation("IPC client connected to " + server);}// 开启接收线程// 调用start()方法启动Connection线程监听并接收Server发回的响应信息。start();return;}} catch (Throwable t) {if (t instanceof IOException) {markClosed((IOException)t);} else {markClosed(new IOException("Couldn't set up IO streams: " + t, t));}close();} finally {connectingThread.set(null);}}
在这个方法中通过 setupConnection(ticket) 方法与 server 端建立连接
// 建立到Server的Socket连接,// 并且在这个Socket连接上 获得InputStream和OutputStream对象。setupConnection(ticket);
调用 writeConnectionHeader() 方法在连接建立时发送连接头信息
writeConnectionHeader(ipcStreams);
/* Write the connection context header for each connection* Out is not synchronized because only the first thread does this.*/private void writeConnectionContext(ConnectionId remoteId,AuthMethod authMethod)throws IOException {// Write out the ConnectionHeaderIpcConnectionContextProto message = ProtoUtil.makeIpcConnectionContext(RPC.getProtocolName(remoteId.getProtocol()),remoteId.getTicket(),authMethod);RpcRequestHeaderProto connectionContextHeader = ProtoUtil.makeRpcRequestHeader(RpcKind.RPC_PROTOCOL_BUFFER,OperationProto.RPC_FINAL_PACKET, CONNECTION_CONTEXT_CALL_ID,RpcConstants.INVALID_RETRY_COUNT, clientId);// do not flush. the context and first ipc call request must be sent// together to avoid possibility of broken pipes upon authz failure.// see writeConnectionHeaderfinal ResponseBuffer buf = new ResponseBuffer();connectionContextHeader.writeDelimitedTo(buf);message.writeDelimitedTo(buf);synchronized (ipcStreams.out) {ipcStreams.sendRequest(buf.toByteArray());}}
开启接收线程调用 start() 方法启动 Connection 线程监听并接收 Server发回的响应信息
// 开启接收线程// 调用start()方法启动Connection线程监听并接收Server发回的响应信息。start();
在这里会调用Connection里面的 run() 方法,接收并处理返回消息
@Overridepublic void run() {if (LOG.isDebugEnabled())LOG.debug(getName() + ": starting, having connections "+ connections.size());try {while (waitForWork()) {//wait here for work - read or close connection//接收到返回信息receiveRpcResponse();}} catch (Throwable t) {// This truly is unexpected, since we catch IOException in receiveResponse// -- this is only to be really sure that we don't leave a client hanging// forever.LOG.warn("Unexpected error reading responses on connection " + this, t);markClosed(new IOException("Error reading responses", t));}close();if (LOG.isDebugEnabled())LOG.debug(getName() + ": stopped, remaining connections "+ connections.size());}
/*** 接收到返回信息* Receive a response.* Because only one receiver, so no synchronization on in.* receiveRpcResponse()方法接收RPC响应。* receiveRpcResponse()方法会从输入流中读取序列化对象RpcResponseHeaderProto,* 然后根据RpcResponseHeaderProto 中记录的callid字段获取对应的Call的对象。** 接下来receiveRpcResponse()方法会从输入流中 读取响应消息,* 然后调用Call.setRpcResponse()将响应消息保存在Call对象中。* 如果服务器 在处理RPC请求时抛出异常,* 则receiveRpcResponse()会从输入流中读取异常信息,并构造 异常对象,* 然后调用Call.setException()将异常保存在Call对象中。**/private void receiveRpcResponse() {if (shouldCloseConnection.get()) {return;}// 更新请求时间touch();try {// 通过 ipcStreams 获取响应对象ByteBuffer bb = ipcStreams.readResponse();// 将响应对象,采用RpcWritable 进行包装RpcWritable.Buffer packet = RpcWritable.Buffer.wrap(bb);// 获取响应的响应头RpcResponseHeaderProto header = packet.getValue(RpcResponseHeaderProto.getDefaultInstance());// 检测头信息.checkResponse(header);// 获取call唯一标识callIdint callId = header.getCallId();if (LOG.isDebugEnabled())LOG.debug(getName() + " got value #" + callId);// 获取头信息里面的响应状态.RpcStatusProto status = header.getStatus();// 如果调用成功,则读取响应消息,在call实例中设置if (status == RpcStatusProto.SUCCESS) {// 构建实例Writable value = packet.newInstance(valueClass, conf);// 将Call 从正在执行的calls缓存队列中移除final Call call = calls.remove(callId);// 将Call设置请求信息call.setRpcResponse(value);if (call.alignmentContext != null) {call.alignmentContext.receiveResponseState(header);}}// verify that packet length was correctif (packet.remaining() > 0) {throw new RpcClientException("RPC response length mismatch");}// RPC调用失败if (status != RpcStatusProto.SUCCESS) { // Rpc Request failed// 取出响应中的异常消息final String exceptionClassName = header.hasExceptionClassName() ?header.getExceptionClassName() :"ServerDidNotSetExceptionClassName";final String errorMsg = header.hasErrorMsg() ?header.getErrorMsg() : "ServerDidNotSetErrorMsg" ;final RpcErrorCodeProto erCode =(header.hasErrorDetail() ? header.getErrorDetail() : null);if (erCode == null) {LOG.warn("Detailed error code not set by server on rpc error");}RemoteException re = new RemoteException(exceptionClassName, errorMsg, erCode);// 在Call对象中设置异常if (status == RpcStatusProto.ERROR) {final Call call = calls.remove(callId);call.setException(re);} else if (status == RpcStatusProto.FATAL) {// Close the connectionmarkClosed(re);}}} catch (IOException e) {markClosed(e);}}
发送RPC请求
先构造 RPC 请求头,将请求头和 RPC 请求,在另外一个线程池 sendParamsExecutor 的 run 方法中使用ipcStreams.sendRequest(buf.toByteArray()) 发送出去
//发送RPC请求connection.sendRpcRequest(call); // send the rpc request
/**** 发送RPC请求到Server** Initiates a rpc call by sending the rpc request to the remote server.* Note: this is not called from the Connection thread, but by other* threads.* @param call - the rpc request** RPC发送请求线程会调用Connection.sendRpcRequest()方法发送RPC请求到Server,* 这里要特别注意,这个方法不是由Connection线程调用的,而是由发起RPC请求的线程调用的**/public void sendRpcRequest(final Call call)throws InterruptedException, IOException {if (shouldCloseConnection.get()) {return;}// Serialize the call to be sent. This is done from the actual// caller thread, rather than the sendParamsExecutor thread,// so that if the serialization throws an error, it is reported// properly. This also parallelizes the serialization.//// Format of a call on the wire:// 0) Length of rest below (1 + 2)// 1) RpcRequestHeader - is serialized Delimited hence contains length// 2) RpcRequest//// Items '1' and '2' are prepared here.// 先构造RPC请求头RpcRequestHeaderProto header = ProtoUtil.makeRpcRequestHeader(call.rpcKind, OperationProto.RPC_FINAL_PACKET, call.id, call.retry,clientId, call.alignmentContext);final ResponseBuffer buf = new ResponseBuffer();// 将RPC请求头写入输出流 ResponseBufferheader.writeDelimitedTo(buf);// 将RPC请求(包括请求元数据和请求参数)封装成ProtobufWrapper,写入输出流RpcWritable.wrap(call.rpcRequest).writeTo(buf);// 这里使用 线程池 将请求发送出去,// 请求包括三个部分:// 1.长度;// 2.RPC请求头;// 3.RPC请求(包括 请求元数据以及请求参数)synchronized (sendRpcRequestLock) {Future<?> senderFuture = sendParamsExecutor.submit(new Runnable() {@Overridepublic void run() {try {synchronized (ipcStreams.out) {if (shouldCloseConnection.get()) {return;}if (LOG.isDebugEnabled()) {LOG.debug(getName() + " sending #" + call.id+ " " + call.rpcRequest);}// RpcRequestHeader + RpcRequestipcStreams.sendRequest(buf.toByteArray());ipcStreams.flush();}} catch (IOException e) {// exception at this point would leave the connection in an// unrecoverable state (eg half a call left on the wire).// So, close the connection, killing any outstanding calls// 如果发生发送异常,则直接关闭连接markClosed(e);} finally {// the buffer is just an in-memory buffer, but it is still polite to// close early// 之前申请的buffer给关闭了,比较优雅IOUtils.closeStream(buf);}}});try {senderFuture.get();} catch (ExecutionException e) {Throwable cause = e.getCause();// cause should only be a RuntimeException as the Runnable above// catches IOExceptionif (cause instanceof RuntimeException) {throw (RuntimeException) cause;} else {throw new RuntimeException("unexpected checked exception", cause);}}}}
获取响应
//服务器成功发回响应信息,返回RPC响应return getRpcResponse(call, connection, -1, null);
在这里,会不断轮询 call 的状态,如果状态为 done 则代表数据已经处理完,并且已经获取到响应信息
响应信息由 connection 中的 run 方法进行处理
/** @return the rpc response or, in case of timeout, null. */private Writable getRpcResponse(final Call call, final Connection connection,final long timeout, final TimeUnit unit) throws IOException {synchronized (call) {while (!call.done) {try {//等待RPC响应AsyncGet.Util.wait(call, timeout, unit);if (timeout >= 0 && !call.done) {return null;}} catch (InterruptedException ie) {Thread.currentThread().interrupt();throw new InterruptedIOException("Call interrupted");}}if (call.error != null) {if (call.error instanceof RemoteException) {call.error.fillInStackTrace();throw call.error;} else { // local exceptionInetSocketAddress address = connection.getRemoteAddress();throw NetUtils.wrapException(address.getHostName(),address.getPort(),NetUtils.getHostname(),0,call.error);}} else {return call.getRpcResponse();}}
处理Client端的响应信息
Client 获取响应信息,不论是同步还是异步获取响应信息,都会调用这个方法 getReturnMessage(method, val)
getReturnMessage(method, val);
private Message getReturnMessage(final Method method,final RpcWritable.Buffer buf) throws ServiceException {Message prototype = null;try {//获取返回参数prototype = getReturnProtoType(method);} catch (Exception e) {throw new ServiceException(e);}Message returnMessage;try {// 序列化响应信息returnMessage = buf.getValue(prototype.getDefaultInstanceForType());if (LOG.isTraceEnabled()) {LOG.trace(Thread.currentThread().getId() + ": Response <- " +remoteId + ": " + method.getName() +" {" + TextFormat.shortDebugString(returnMessage) + "}");}} catch (Throwable e) {throw new ServiceException(e);}//返回结果return returnMessage;}

若有收获,就点个赞吧
0 人点赞
