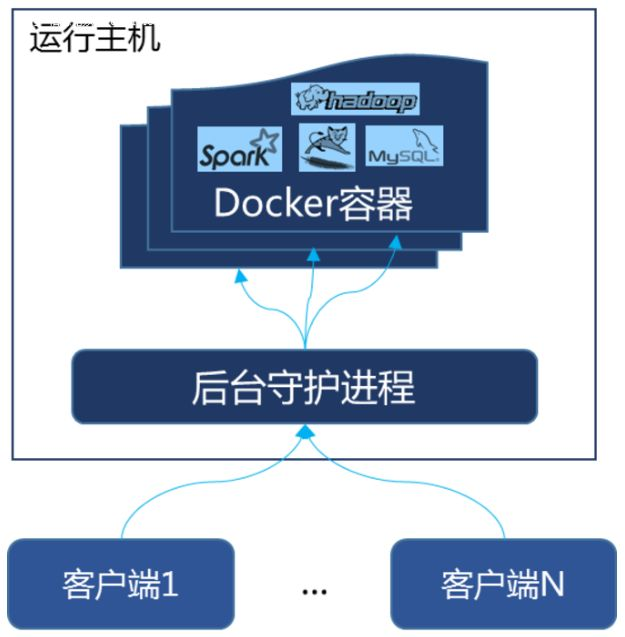
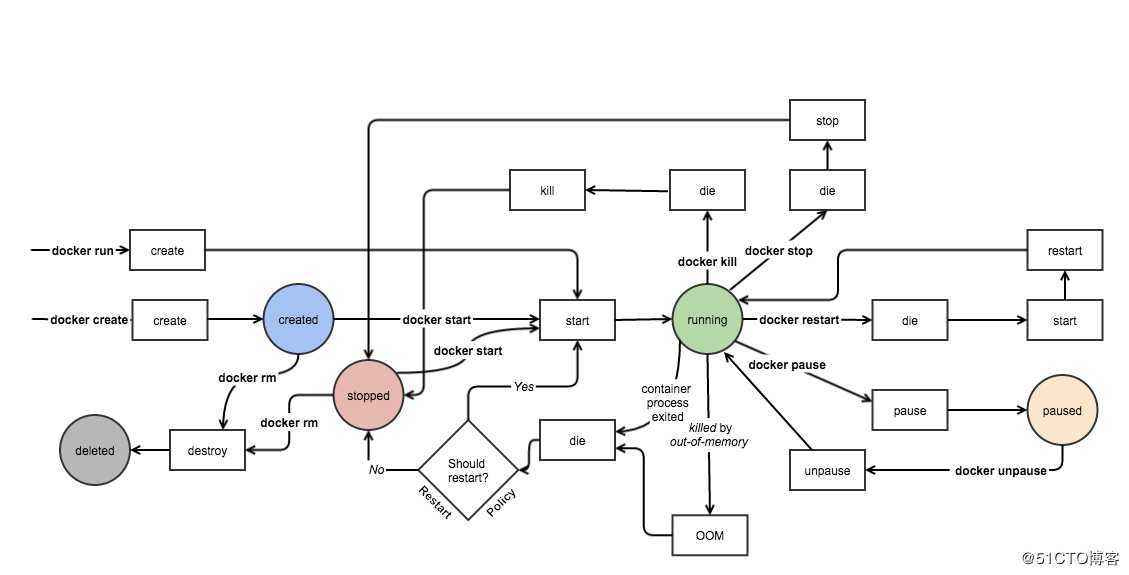
1 Docker 核心概念
1.1 为什么要用容器?
- 上线流程繁琐
开发 → 测试 → 申请资源 → 审批 → 部署 → 测试等环节
- 资源利用率低
普遍服务器利用率低,造成过多浪费[ 传统的虚拟化,利用率也是较低的,也不能一直将服务器的利用率一直占满 ]
- 扩容/缩容不及时
业务高峰期扩容流程繁琐,上线不及时
- 服务器环境臃肿
服务器越来越臃肿,对维护、迁移带来困难[ 需要对服务器集群环境进行治理 ]
- 环境不一致性
测试环境,开发环境,线上环境
:::color1 (1)已知的业务承载量
(2)未知的业务承载量
- 业务机器增加承载量,可以应对一些突发,30%
- 弹性伸缩,HPA
:::
1.2 Docker 是什么
- 使用最广泛的开源容器引擎
- 一种操作系统级的虚拟化技术[ 沙盒技术 ]
- 依赖于Linux内核特性:Namespace( 资源隔离 )和Cgroups( 资源限制 )
| NameSpace | 系统调用参数 | 隔离内容 |
|---|---|---|
| UTS | CLONE_NEWUTS | 主机和域名 |
| IPC | CLONE_NEWIPC | 进程信号量、消息队列和共享内存 |
| PID | CLONE_NEWPID | 进程编号 |
| Network | CLONE_NEWNET | 网络设备、网络栈、端口等 |
| Mount | CLONE_NEWNS | 挂载点(文件系统) |
| User | CLONE_NEWUSER | 用户和用户组 |
CGroups 资源控制系统,每种子系统独立地控制一种资源。功能如下
| 子系统 | 功能 |
|---|---|
| cpu | 使用调度程序控制任务对CPU的使用。 |
| cpuacct(CPU Accounting) | 自动生成cgroup中任务对CPU资源使用情况的报告。 |
| cpuset | 为cgroup中的任务分配独立的CPU(多处理器系统时)和内存。 |
| devices | 开启或关闭cgroup中任务对设备的访问 |
| freezer | 挂起或恢复cgroup中的任务 |
| memory | 设定cgroup中任务对内存使用量的限定,并生成这些任务对内存资源使用 情况的报告 |
| perf_event(Linux CPU性能探测器) | 使cgroup中的任务可以进行统一的性能测试 |
| net_cls(Docker未使用) | 通过等级识别符标记网络数据包,从而允许Linux流量监控程序(Trawic Controller)识别从具体cgroup中生成的数据包 |
- 一个简单的应用程序打包工具
1.3 Docker 设计目标
- 提供简单的应用程序打包工具
- 开发人员和运维人员职责逻辑分离
- 开发人员:
- 1、开发项目
- 2、打包项目环境 + 代码成镜像
- 3、部署到容器平台
- 运维人员:怎么高效去管理容器
- 1、运维人员节省人工成本
- 2、持续发布有问题更快解决
- 开发人员:
- 多环境保持一致性,标准化
1.4 Docker 基本组成

:::color1
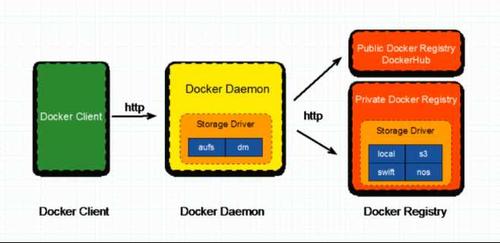
Client 客户端,Docker Host 宿主机,Docker Registry 仓库。Docker 可以一种客户端连接到 Docker Host主机后台程序进行操作。- Docker 引擎会查看本地是否拥有Images镜像,若本地有镜像,则可以直接运行成Containers容器实例,根据镜像的不同,运行出的容器实例也各不相同
- 若本地没有镜像,则会通过网络向公有Registry仓库或者私有仓库拉取镜像后,再来运行成容器。
 :::
:::color1
整体架构及底层通信原理简述:
:::
:::color1
整体架构及底层通信原理简述:
 Docker 是一个 C/S(Client/Server) 结构的系统,后端是一个松耦合架构,众多模块各司其职。
Docker 运行的基本流程为:
1. 用户是使用 Docker Client(Docker CLI 命令行窗口) 与 Docker Daemon 建立通信,并发送请求给后者。
2. Docker Daemon 作为 Docker 架构中的主体部分,首先提供 Docker Server 的功能使其可以接受 Docker Client 的请求。
3. Docker Engine 执行 Docker 内部的一系列工作,每一项工作都是以一个Job的形式的存在。
4. Job 的运行过程中,当需要容器镜像时,则从 Docker Registry 中下载镜像,并通过镜像管理驱动 Graph Driver 将下载镜像以 Graph 的形式存储。
5. 当需要为 Docker 创建网络环境时,通过网络管理驱动 Network Driver 创建并配置 Docker 容器网络环境。
6. 当需要限制 Docker 容器运行资源或者执行用户指令等操作时,则通过 Exec Driver 来完成。
7. Libcontainer 是一项独立的容器管理包,Network Driver 以及 Exec Driver 都是通过 Libcontainer 来实现具体对容器进行操作。
8. rootfs = Linux 根文件系统,各发行版建立在 Linux内核文件系统 之上的底层系统
:::
## 1.5 容器 VS 虚拟机
Docker 是一个 C/S(Client/Server) 结构的系统,后端是一个松耦合架构,众多模块各司其职。
Docker 运行的基本流程为:
1. 用户是使用 Docker Client(Docker CLI 命令行窗口) 与 Docker Daemon 建立通信,并发送请求给后者。
2. Docker Daemon 作为 Docker 架构中的主体部分,首先提供 Docker Server 的功能使其可以接受 Docker Client 的请求。
3. Docker Engine 执行 Docker 内部的一系列工作,每一项工作都是以一个Job的形式的存在。
4. Job 的运行过程中,当需要容器镜像时,则从 Docker Registry 中下载镜像,并通过镜像管理驱动 Graph Driver 将下载镜像以 Graph 的形式存储。
5. 当需要为 Docker 创建网络环境时,通过网络管理驱动 Network Driver 创建并配置 Docker 容器网络环境。
6. 当需要限制 Docker 容器运行资源或者执行用户指令等操作时,则通过 Exec Driver 来完成。
7. Libcontainer 是一项独立的容器管理包,Network Driver 以及 Exec Driver 都是通过 Libcontainer 来实现具体对容器进行操作。
8. rootfs = Linux 根文件系统,各发行版建立在 Linux内核文件系统 之上的底层系统
:::
## 1.5 容器 VS 虚拟机

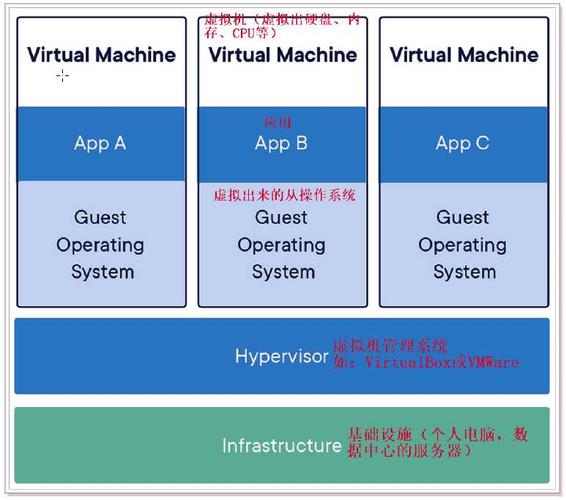
 ### 1.5.1 虚拟机
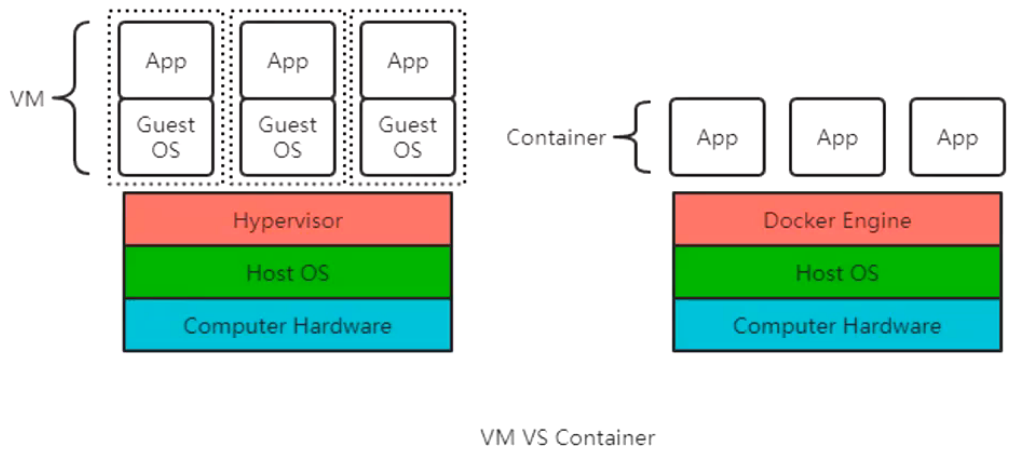
虚拟机(Virtual Machine)就是带环境安装的一种解决方案。
虚拟机可以在一种操作系统里面运行另一种操作系统,比如在 Windows 10系统里面运行Linux镜像CentOS 7。应用程序对此毫无感知,因为虚拟机看上去跟真实系统一模一样,而对于底层操作系统来说,虚拟机就是一个普通文件,不需要了就删除,对其他部分毫无影响。这些虚拟机完美的运行了另一套操作系统,能够使应用程序,操作系统和硬件三者之间的逻辑不变。
> Windows10 —> VMware —> CentOS 7 —> 各种CPU,内存网络配置+各种软件 —> 虚拟机实例
>
传统虚拟机技术基于安装在主操作系统上的虚拟机管理系统(如:VirtualBox 和 VMware等),创建虚拟机(虚拟出各种硬件),在虚拟机上安装从操作系统,在从操作系统中安装各种应用。
### 1.5.1 虚拟机
虚拟机(Virtual Machine)就是带环境安装的一种解决方案。
虚拟机可以在一种操作系统里面运行另一种操作系统,比如在 Windows 10系统里面运行Linux镜像CentOS 7。应用程序对此毫无感知,因为虚拟机看上去跟真实系统一模一样,而对于底层操作系统来说,虚拟机就是一个普通文件,不需要了就删除,对其他部分毫无影响。这些虚拟机完美的运行了另一套操作系统,能够使应用程序,操作系统和硬件三者之间的逻辑不变。
> Windows10 —> VMware —> CentOS 7 —> 各种CPU,内存网络配置+各种软件 —> 虚拟机实例
>
传统虚拟机技术基于安装在主操作系统上的虚拟机管理系统(如:VirtualBox 和 VMware等),创建虚拟机(虚拟出各种硬件),在虚拟机上安装从操作系统,在从操作系统中安装各种应用。
 传统虚拟机技术缺点:
1. 资源占用多
2. 冗余步骤多
3. 启动速度慢
### 1.5.2 容器
由于前面虚拟机存在某些缺点,Linux发展出了另一种虚拟化容器:
传统虚拟机技术缺点:
1. 资源占用多
2. 冗余步骤多
3. 启动速度慢
### 1.5.2 容器
由于前面虚拟机存在某些缺点,Linux发展出了另一种虚拟化容器:
<font style="color:#E8323C;">Linux容器(Linux Containers),缩写为 LXC</font>
<font style="color:#E8323C;">Linux容器不是模拟一个完整的操作系统而是对进程进行隔离</font>。有了容器,就可以将软件运行所需的所有资源打包到一个隔离的容器中。<font style="color:#E8323C;">容器与虚拟机不同,不需要捆绑一整套操作系统</font>,只需要软件工作所需的库资源和设置。系统因此而变得高效轻量并且保证部署在任何环境中的软件都能始终如一的运行。
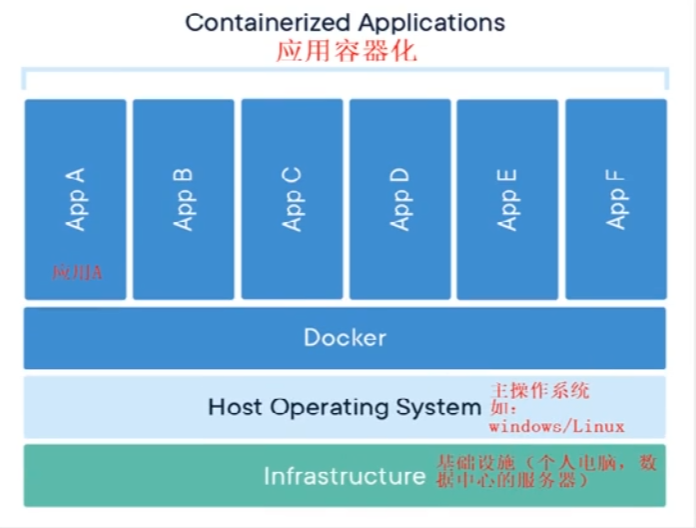
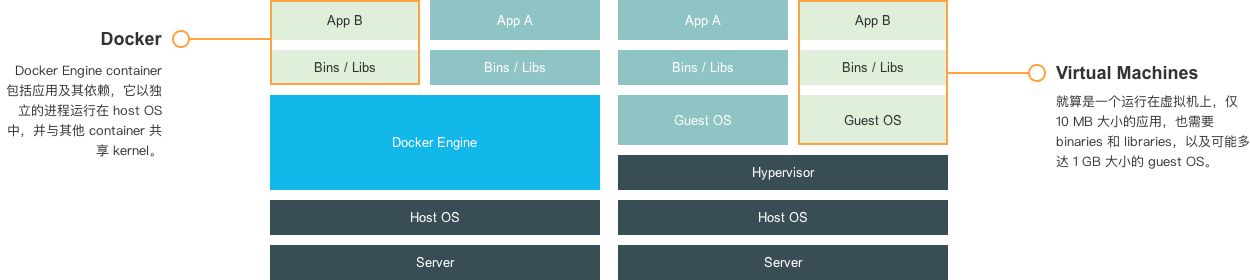
Docker 容器是在操作系统层面上实现虚拟化,直接复用本地主机的操作系统,而传统虚拟机则是在硬件层面实现虚拟化。与传统的虚拟机相比,<font style="color:#E8323C;">Docker 优势体现为启动速度快,占用体积小</font>。
1.5.3 容器 VS 虚拟机对比

比较了 Docker 和传统虚拟化方式的不同之处:
- 传统虚拟机技术是虚拟出一套硬件后,在其之上运行一个完整的操作系统,在该系统上再运行所需的应用进程。
- 容器内的应用进程直接运行于宿主机的内核,容器内没有自己的内核并
<font style="color:#E8323C;">且也没有进行硬件虚拟</font>。因此容器比传统虚拟机更为轻便。 - 每个容器之间互相隔离,每个容器有自己的文件系统,容器之间进程不会互相影响,能区分计算资源。
| Container | VM | |
|---|---|---|
| 启动速度 | 秒级 | 分钟级 |
| 运行性能 | 接近原生 | 5% 左右损失 |
| 磁盘占用 | MB | GB |
| 数量 | 成百上千 | 一般几十台 |
| 隔离性 | 进程级 | 系统级( 更彻底 ) |
| 操作系统 | 主要支持Linux | 几乎所有 |
| 封装程度 | 只打包项目代码和依赖关系,共享宿主机内核 | 完整的操作系统 |
:::color1 容器:
- 提供一个基本的独立环境,实现容器隔离,资源限制
- 主要解决应用层面的问题,应用快速部署,高效管理
虚拟机:
- 提升服务器资源利用率
- 提供一个完全隔离的环境
:::
1.6 Docker 应用场景
- 应用程序打包和发布
- 应用程序隔离
- 持续集成
- 部署微服务
- 快速搭建测试环境
- 提供PaaS产品( 平台即服务 )
1.7 Linux 安装 Docker
:::color1 Docker版本:
社区版 ( Community Edition , CE )
企业版 ( Enterprise Edition , EE )
支持平台:
- Linux (CentOS, Debian, Fedora, Oracle Linux, RHEL, SUSE 和 Ubuntu)
- Mac
- Windows
:::
1.7.1 CentOS 部署 Docker
安装依赖包
yum install -y yum-utils
添加Docker软件包源
yum-config-manager \--add-repo \https://download.docker.com/linux/centos/docker-ce.repo
安装Docker CE
yum install -y docker-ce
启动Docker服务并设置开机启动
systemctl enable --now docker
Docker官方二进制文档:https://docs.docker.com/engine/install/binaries/
阿里云源:http://mirrors.aliyun.com/docker-ce/linux/centos/docker-ce.repo
范例:CentOS 部署 Docker 脚本
#!/bin/bash# Shell ENVDOCKER_VERSION="20.10.7"CONTAINERD_VERSION="1.4.6"# step 1: 安装必要的一些系统工具echo -e "==> 安装必要的系统工具"sudo yum install -y yum-utils device-mapper-persistent-data lvm2# Step 2: 添加软件源信息echo -e "==> 添加软件源信息"sudo yum-config-manager --add-repo https://mirrors.aliyun.com/docker-ce/linux/centos/docker-ce.repo# Step 3echo -e "==> 修改配置文件"sudo sed -i 's+download.docker.com+mirrors.aliyun.com/docker-ce+' /etc/yum.repos.d/docker-ce.repo# Step 4: 更新并安装Docker-CEecho -e "==> 安装更新Docker"sudo yum makecache fast# containerd.io Docker运行时环境sudo yum -y install docker-ce-${DOCKER_VERSION} docker-ce-cli-${DOCKER_VERSION} containerd.io-${CONTAINERD_VERSION}# Step 5: 配置加速器以及docker参数echo -e "==> 配置加速器以及docker参数"sudo mkdir -p /etc/dockersudo tee /etc/docker/daemon.json <<-'EOF'{"registry-mirrors": ["https://po13h3y1.mirror.aliyuncs.com","http://hub-mirror.c.163.com","https://mirror.ccs.tencentyun.com","http://f1361db2.m.daocloud.io"],"exec-opts": ["native.cgroupdriver=systemd"],"log-driver": "json-file","log-opts": {"max-size": "100m"},"storage-driver": "overlay2"}EOF# Step 6: 加载服务echo -e "==> 加载服务"sudo systemctl daemon-reloadsudo systemctl restart dockersudo systemctl enable docker# Step 7: 查看Docker服务信息echo -e "==> 查看Docker服务信息"docker info
1.7.2 Ubuntu 部署 Docker
#!/bin/bash#Description: ubuntu1804系统安装docker-compose编排工具COLOR="echo -e \\033[1;31m"END="\033[m"DOCKER_VERSION="5:19.03.5~3-0~ubuntu-bionic"install_docker(){${COLOR}"开始安装 Docker....."${END}sleep 1apt updateapt -y install apt-transport-https ca-certificates curl software-properties-commoncurl -fsSL https://mirrors.aliyun.com/docker-ce/linux/ubuntu/gpg | sudo apt-key add -add-apt-repository "deb [arch=amd64] https://mirrors.aliyun.com/docker-ce/linux/ubuntu $(lsb_release -cs) stable"apt update${COLOR}"Docker有以下版本:"${END}sleep 2apt-cache madison docker-ce${COLOR}"5秒后即将安装: docker-"${DOCKER_VERSION}" 版本....."${END}${COLOR}"如果想安装其它Docker版本,请按ctrl+c键退出,修改版本再执行"${END}sleep 5apt -y install docker-ce=${DOCKER_VERSION} docker-ce-cli=${DOCKER_VERSION}mkdir -p /etc/dockertee /etc/docker/daemon.json <<-'EOF'{"registry-mirrors": ["https://po13h3y1.mirror.aliyuncs.com","http://hub-mirror.c.163.com","https://mirror.ccs.tencentyun.com","http://f1361db2.m.daocloud.io"],"exec-opts": ["native.cgroupdriver=systemd"],"log-driver": "json-file","log-opts": {"max-size": "100m"},"storage-driver": "overlay2"}EOFsystemctl daemon-reloadsystemctl restart dockerdocker version && ${COLOR}"Docker 安装完成"${END} || ${COLOR}"Docker 安装失败"${END}}install_docker_compose(){${COLOR}"开始安装 Docker compose....."${END}sleep 1curl -L https://github.com/docker/compose/releases/download/1.25.3/docker-compose-`uname -s`-`uname -m` -o /usr/local/bin/docker-composechmod +x /usr/local/bin/docker-composedocker-compose --version && ${COLOR}"Docker Compose 安装完成"${END} || ${COLOR}"Docker compose 安装失败"${END}}dpkg -s docker-ce &> /dev/null && ${COLOR}"Docker已安装"${END} || install_dockerdocker-compose --version &> /dev/null && ${COLOR}"Docker Compose已安装"${END} || install_docker_compose
1.7.3 运行 hello-world 容器
$ docker run hello-worldUnable to find image 'hello-world:latest' locallylatest: Pulling from library/hello-world2db29710123e: Pull completeDigest: sha256:2498fce14358aa50ead0cc6c19990fc6ff866ce72aeb5546e1d59caac3d0d60fStatus: Downloaded newer image for hello-world:latestHello from Docker!This message shows that your installation appears to be working correctly.To generate this message, Docker took the following steps:1. The Docker client contacted the Docker daemon.2. The Docker daemon pulled the "hello-world" image from the Docker Hub.(amd64)3. The Docker daemon created a new container from that image which runs theexecutable that produces the output you are currently reading.4. The Docker daemon streamed that output to the Docker client, which sent itto your terminal.To try something more ambitious, you can run an Ubuntu container with:$ docker run -it ubuntu bashShare images, automate workflows, and more with a free Docker ID:https://hub.docker.com/For more examples and ideas, visit:https://docs.docker.com/get-started/# Docker 环境搭建成功
2 Docker 镜像管理
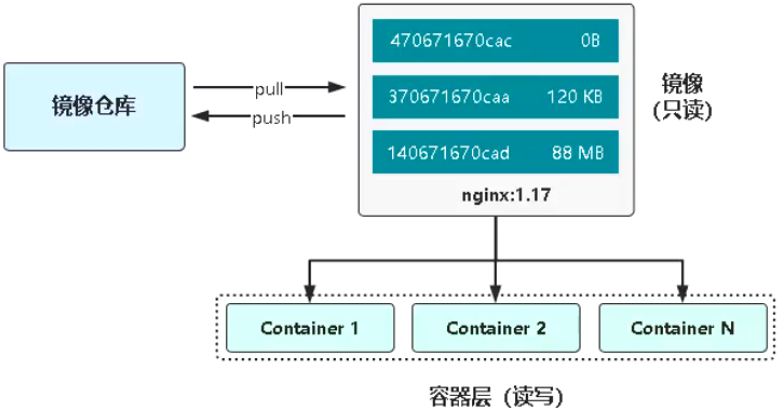
2.1 什么是镜像
- 一个分层存储的文件
- 一个软件的环境
- 一个镜像可以创建N个容器
- 一种标准化的交付
- 一个不包含Linux内核而又精简的Linux操作系统
- 镜像不是一个单一的文件,而是有多层构成
2.2 镜像从哪里来?
Docker Hub是由Docker公司负责维护的公共注册中心,包含大量的容器镜像,Docker工具默认从这个公共镜像库下载镜像。
Docker Hub地址: https://hub.docker.com
1、Docker命令最后一个是指定镜像
2、默认镜像版本latest
3、分层下载
配置镜像加速器:
mkdir -p /etc/dockertee /etc/docker/daemon.json <<-'EOF'{"registry-mirrors": ["https://po13h3y1.mirror.aliyuncs.com","http://hub-mirror.c.163.com","https://mirror.ccs.tencentyun.com","http://f1361db2.m.daocloud.io"],"exec-opts": ["native.cgroupdriver=systemd"],"log-driver": "json-file","log-opts": {"max-size": "100m"},"storage-driver": "overlay2"}EOF
2.3 镜像与容器联系

当启动一个新的容器时,Docker会加载只读镜像,并在其之上添加一个读写层,即容器层。
/var/lib/docker/containers/:容器元数据信息目录/var/lib/docker/overlay2/ :镜像目录
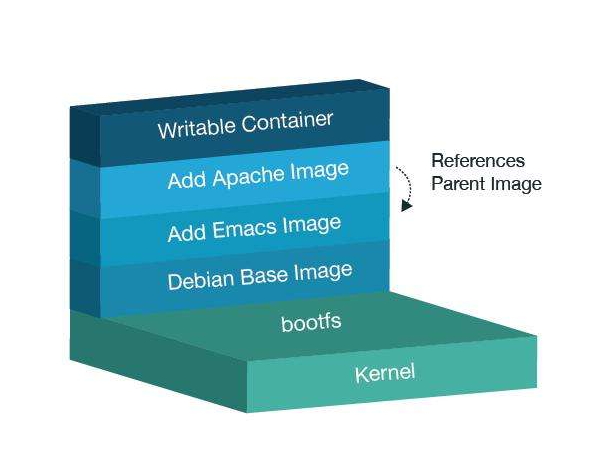
rootfs:根文件系统bootfs:引导文件系统,引导程序和内核,容器是共享宿主机的内核
2.4 镜像常用管理命令
| 指令 | 描述 |
|---|---|
| ls | 列出镜像 |
| build | 构建镜像来自Dockerfile |
| history | 查看镜像历史 |
| inspect | 显示一个或多个镜像详细信息 |
| pull | 从镜像仓库拉取镜像 |
| push | 推送一个镜像到镜像仓库 |
| rm | 移除一个或多个镜像 |
| prune | 移除没有被标记[ 虚悬镜像(dangling Image) ]或者没有被任何容器引用的镜像 |
| tag | 创建一个引用源镜像标记目标镜像 |
| export | 导出容器文件系统到tar归档文件 |
| import | 导入容器文件系统tar归档文件创建镜像 |
| save | 保存一个或多个镜像到一个tar归档文件 |
| load | 加载镜像来自tar归档或标准输入 |
:::color1 commit:将运行的容器直接提交为镜像。
export:将容器(运行或不运行)打包成tar包,再由import将tar包提交为镜像。
save:将镜像打包成tar包,再有load将tar包提交为镜像。
:::
# 导出容器文件系统到tar归档文件$ docker run -it -d --name nginx-node1 nginx:latest$ docker export nginx-node1 -o nginx.tar$ tar -tf nginx.tar# 导入容器文件系统tar归档文件创建镜像$ docker import nginx.tar# 保存一个或多个镜像到一个tar归档文件$ docker save -o nginx.tar nginx:latest# 加载镜像来自tar归档或标准输入$ docker load -i nginx.tar# 将运行的容器直接提交为镜像~ docker run -itd --name c1 centos /bin/bash~ docker exec -it c1 /bin/bash$ rm -rf /etc/yum.repos.d/CentOS-Linux-*$ curl -o /etc/yum.repos.d/CentOS-Base.repo https://mirrors.aliyun.com/repo/Centos-vault-8.5.2111.repo$ yum update ; yum install -y vim ; yum clean all$ vim --versionVIM - Vi IMproved 8.0 (2016 Sep 12, compiled Sep 22 2021 11:10:49)$ exit~ docker commit -a "zhongzhiwei <935523993@qq.com>" -m "添加VIM软件" c1 kubesphere-centos:1.0~ docker images kubesphere-centos:1.0REPOSITORY TAG IMAGE ID CREATED SIZEkubesphere-centos 1.0 7f36413d0ef3 4 seconds ago 271MB# 运行添加VIM的新镜像~ docker run -it --name kc1 kubesphere-centos:1.0 /bin/bash$ vim --versionVIM - Vi IMproved 8.0 (2016 Sep 12, compiled Sep 22 2021 11:10:49)#########################################################################################################~ docker run -itd --name u1 ubuntu /bin/bash~ docker exec -it u1 /bin/bash$ apt update ; apt install -y vim$ vim --versionVIM - Vi IMproved 8.0 (2016 Sep 12, compiled Sep 22 2021 11:10:49)$ exit~ docker commit -a "zhongzhiwei <935523993@qq.com>" -m "添加VIM软件" c1 kubesphere-ubuntu:1.0~ docker images kubesphere-ubuntu:1.0REPOSITORY TAG IMAGE ID CREATED SIZEkubesphere-ubuntu 1.0 7f36413d0ef3 4 seconds ago 178MB# 运行添加VIM的新镜像~ docker run -it --name ku1 kubesphere-ubuntu:1.0 /bin/bash$ vim --versionVIM - Vi IMproved 8.0 (2016 Sep 12, compiled Sep 22 2021 11:10:49)
2.5 镜像存储核心技术:联合文件系统 (UnionFS)
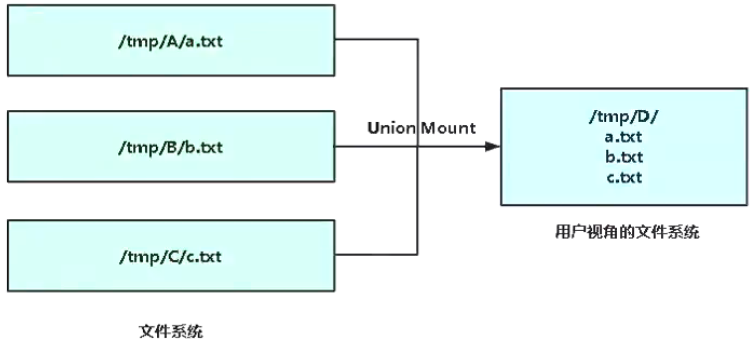
镜像怎么高效存储?
难道像虚拟机那样一个容器对应一个独立的镜像文件?这样对于密集型容器,磁盘占用率太大!
答:引入联合文件系统,将镜像多层文件联合挂载到容器文件系统
:::color1 容器层(读写):提供一个独立的运行环境
:::
2.6 镜像存储核心技术:写时复制 (COW)
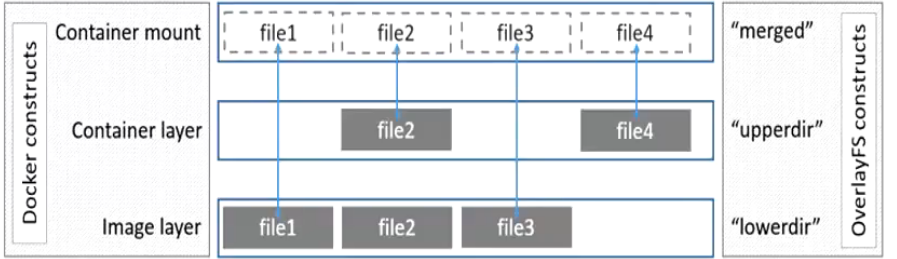
了解联合文件系统后,我们知道,镜像是只读的,类似共享形式让多个容器使用,如果要在容器里修改文件,即镜像里的文件,那该怎么办呢?
答:引入写时复制(copy-on-write),需要修改文件操作时,会先从镜像里把要写的文件复制到自己的文件系统中进行修改[ 该逻辑在用户视觉层面是屏蔽的 ]。
# 默认挂载宿主机的三个文件hostname --hostnamehosts --dnsresolv.conf --add-host
:::color1 读文件:容器层 → 镜像层
修改文件:容器层 → 镜像层
Storage Driver: overlay2 ( aufs 、overlay、devicemapper )

:::
优化建议
使用SSD固态硬盘
使用卷作为频繁读写文件的工作目录,绕过存储驱动,减少抽象的开销
2.7 Docker 打包成镜像
docker commit 将容器提交成镜像
- docker export 将容器打包成 tar 包
docker export
-o .tar 根据容器的大小,打包的效率也会随之变化
- docker import 将 tar 包提交为镜像
docker import
.tar : 根据Tar包的大小,提交镜像的效率也会随之变化
- docker save 将镜像打包成 tar 包
docker save
: -o .tar 根据镜像的大小,打包的效率也会随之变化
- docker load 将 tar 包提交为镜像
docker load -i
.tar 根据Tar包的大小,提交镜像的效率也会随之变化
以及使用 Dockerfile 编写镜像脚本
docker build -t ImageName:[Tag] -f Dockerfile .
2.8 容器文件存储解析
2.8.1 容器运行时的 UpperDir 目录结构
#~ touch /data/docker/overlay2/<UpperDir>/container_upperdir.txt~ echo "Welcome to container_upperdir" >> /data/docker/overlay2/<UpperDir>/container_upperdir.txt#在进入到容器操作查看~ docker exec -it jdk8-node01 /bin/bash~ cat /container_upperdir.txt
2.8.2 Work目录
work目录用于联合挂载指定的工作目录,在overlay 把文件挂载到 upperdir后, work内容会被清空,且在使用过程中(为空)其内容用户不可见。
2.8.3 用户视角层 Merged
最后给用户展示的层,一般看到为一个完整的操作系统文件系统结构
~ ls -l /data/docker/overlay2/<Merged>/
2.8.4 Lower 层
#Lower 包括两个层:- a:系统的 init (docker 容器启动后自动挂载)
- b:容器的镜像层
~ cat /data/docker/overlay2/<LowerDir>-init/lowerl/BYHA4RECHA4CPGWNIZLPAN7HCD:l/JGA2WPDQWQI3IKC3JSFPHFBMDA:#init层 :/ 容器镜像层
:::color1 docker 容器管理工具即做了资源隔离,挂载,分配一个网段。
:::
2.8.4.1 查看init层地址指向
容器在启动的过程中, Lower 会自动挂载init的一些文件
~ ls -l /data/docker/overlay2/<LowerDir>-init/diff/etc/total 0-rwxr-xr-x 1 root root 0 Jun 28 21:15 hostname-rwxr-xr-x 1 root root 0 Jun 28 21:15 hostslrwxrwxrwx 1 root root 12 Jun 28 21:15 mtab -> /proc/mounts-rwxr-xr-x 1 root root 0 Jun 28 21:15 resolv.conf
:::color1 需求:同一个域名,在公网解析成另一个公网IP地址,在内网解析成另一个内网IP地址。
在修改 容器的hosts文件的时候,需要将整个镜像全部构建完毕后,在启动脚本中修改 hosts 文件,需要在最后一个步骤才能进行修改,因为会在容器挂载的时候覆盖掉该文件。
在将来绑定 hosts 的时候需要知道在 init 层进行绑定
:::
2.8.4.2 init层主要内容是什么?
init 层是以一个uuid+-init结尾表示,放在只读层(Lower)和读写层(upperdir)之间,作用只是存放 /etc/hosts、/etc/resolv.conf 等文件。
2.8.4.3 为什么需要init层?
1)容器在启动以后, 默认情况下lower层是不能够修改内容的, 但是用户有需求需要修改主机名与域名地址, 那么就需要添加init层中的文件(hostname, resolv.conf), 用于解决此类问题。
2) 修改的内容只对当前的容器生效,而在docker commit提交为镜像时候,并不会将init层提交。
3) init 文件存放的目录为/var/lib/docker/overlay2/
2.8.4.4 查看init层文件
hostname与resolv.conf 全部为空文件, 在系统启动以后由系统写入。
~ ls -l /data/docker/overlay2/<LowerDir>-init/diff/etc/total 0-rwxr-xr-x 1 root root 0 Jun 28 21:15 hostname-rwxr-xr-x 1 root root 0 Jun 28 21:15 hostslrwxrwxrwx 1 root root 12 Jun 28 21:15 mtab -> /proc/mounts-rwxr-xr-x 1 root root 0 Jun 28 21:15 resolv.conf
2.8.5 总结
1) 镜像所挂载的目录层为 Lower 层,然后通过 Merged 展示所有的文件目录与文件。用户写入的所有文件都是在 UpperDir 目录,并且会在 UpperDir 建立于 Merged 层展示的文件目录结构, 所以用户就可以看到写入的文件。并且底层的镜像是不能被修改(如果挂载目录为 UpperDir,则可以修改源镜像)。
2) 在下次重新启动已经停止的容器的时候, 如果容器的 ID 没有发生改变, 那么所写入的文件是存在物理系统中的; 反之就会是一个新的容器,之前手工创建的文件是不存在的。
3) 基于容器创建的镜像,就相当于容器的快照, 可以删除原来的容器, 但是不能删除原来的镜像
4) 基于镜像创建的镜像,原来的镜像就是新镜像的 low 层 (build), tag 则是没有区别
5) 容器启动以后,镜像就存在于容器的 lower 层,所有的写入都是在 upper
3 Docker 容器管理
3.1 创建容器常用选项
# 查看创建容器的帮助文档docker run --help
命令格式:docker run [OPTIONS] IMAGE [COMMAND] [ARGS……]
| 选项 | 描述 |
|---|---|
| -i, —interactive | 交互式 |
| -t , —tty | 分配一个伪终端 |
| -d, —detachr | 运行容器到后台 |
| -e,—env | 设置环境变量 |
| -p,—publish list | 发布容器端口到主机 |
| -P,—publish-all | 发布容器所有EXPOSE的端口到宿主机随机端口 |
| —name string | 指定容器名称 |
| -h, —hostname | 设置容器主机名 |
| —ip string | 指定容器IP,只能用于自定义网络 |
| —network | 连接容器到一个网络 |
| —mount mount(新方式) | 将文件系统附加到容器 |
| -v,—volume list | 绑定挂载一个卷 |
| —restart string | 容器退出时重启策略,默认no,可选值:[always l on-failure] |
# Step 1: 进入到容器的系统内部# 启动一个Ubuntu容器,操作系统类容器需要有进程夯筑容器运行$ docker run -it -d --name ubuntu-node ubuntu /bin/bash$ docker exec -it ubuntu-node /bin/bash | docker attach ubuntu-node# 查看容器的版本(ubuntu)root@9650093ce0c2:/# cat /etc/os-releaseNAME="Ubuntu"VERSION="20.04.3 LTS (Focal Fossa)"ID=ubuntuID_LIKE=debianPRETTY_NAME="Ubuntu 20.04.3 LTS"VERSION_ID="20.04"HOME_URL="https://www.ubuntu.com/"SUPPORT_URL="https://help.ubuntu.com/"BUG_REPORT_URL="https://bugs.launchpad.net/ubuntu/"PRIVACY_POLICY_URL="https://www.ubuntu.com/legal/terms-and-policies/privacy-policy"VERSION_CODENAME=focalUBUNTU_CODENAME=focal# 查看容器的进程root@9650093ce0c2:/# psPID TTY TIME CMD27 pts/3 00:00:00 bash35 pts/3 00:00:00 ps# Step 2: 启动Nginx容器,并暴露80端口映射到宿主机的8080端口docker run -d --name nginx-node -p 8080:80 --restart=always nginxsudo curl localhost:8080# Step 3: 测试多个容器参数$ docker run -it -d -e env=prod --name container-nginx \-p 8088:80 --restart=always -h nginx-node nginx# 查看最新创建的容器信息$ docker ps -lCONTAINER ID IMAGE COMMAND CREATED STATUS PORTS NAMES1dcbec1b129c nginx "/docker-entrypoint.…" 6 seconds ago Up 5 seconds 0.0.0.0:8088->80/tcp, :::8088->80/tcp container-nginx$ sudo curl localhost:8088# 进入到container-nginx容器中$ docker exec -it container-nginx /bin/bash # docker container exec -it container-nginx /bin/bashroot@nginx-node:/# hostnamenginx-noderoot@nginx-node:/# echo $envprodroot@nginx-node:/# echo "Hello Nginx Container" > /usr/share/nginx/html/index.htmlroot@nginx-node:/# curl localhostHello Nginx Containerroot@nginx-node:/# exit# Step 4: 重启Docker服务后该容器会自动启动(--restart=always)$ systemctl restart docker$ docker psCONTAINER ID IMAGE COMMAND CREATED STATUS PORTS NAMES1dcbec1b129c nginx "/docker-entrypoint.…" 4 minutes ago Up 9 seconds 0.0.0.0:8088->80/tcp, :::8088->80/tcp container-nginx$ docker top container-nginxUID PID PPID C STIME TTY TIME CMDroot 17541 17512 0 02:52 ? 00:00:00 nginx: master process nginx -g daemon off;systemd+ 17595 17541 0 02:52 ? 00:00:00 nginx: worker processsystemd+ 17596 17541 0 02:52 ? 00:00:00 nginx: worker process# Step 5: 查看容器的详细信息显示$ docker inspect container-nginx# Step 6: 查看容器的进程$ docker run -itd --name centos-node1 centos:centos7.9.2009 /bin/bash$ docker top centos-node1UID PID PPID C STIME TTY TIME CMDroot 17393 17357 3 02:51 ? 00:00:00 /bin/bash
:::color1 Docker 容器需要用阻塞进程夯筑进程,使得Docker 容器持续运行!
:::
3.2 容器资源限制
默认创建的容器使用宿主机所有资源。
命令格式:docker run [OPTIONS] IMAGE [COMMAND] [ARGS……]
| 选项 | 描述 |
|---|---|
| -m,—memory | 容器可以使用的最大内存量 |
| —memory-swap | 允许交换到磁盘的内存量 |
| —memory-swappiness=<0-100> | 容器使用SWAP分区交换的百分比(0-100,默认为-1) |
| —oom-kill-disable | 禁用OOM Killer |
| —cpus | 可以使用的CPU数量 |
| —cpuset-cpus | 限制容器使用特定的CPU核心,如(0-3 , 0 , 1) |
| —cpu-shares | CPU共享(相对权重) |
范例:创建容器资源限制
# -m="300m" 使用300M内存# --cpus="1" 使用一颗CPU$ docker run -it -d --name ubuntu-container -m="300m" --cpus="1" ubuntu /bin/bash# 查看容器的资源$ docker stats --no-stream ubuntu-containerCONTAINER ID NAME CPU % MEM USAGE / LIMIT MEM % NET I/O BLOCK I/O PIDSd74184890bae ubuntu-container 0.00% 540KiB / 300MiB 0.18% 656B / 0B 0B / 0B 1
示例:
# 内存限额# 允许容器最多使用500M内存和600M的Swarp,并且禁用OOM Killerdocker run -it -d --name nginx-limit1 --memory="500m" --memory-swap="600m" --oom-kill-disable nginx# CPU限额# 允许容器最多使用一个半的CPUdocker run -it -d --name nginx-cpu1 --cpus="1.5" nginx# 允许容器最多使用50%的CPUdocker run -it -d --name nginx-cpu2 --cpus=".5" nginx
:::color1
linux oom机制(out of memory)linux内核根据应用程序的需求来分配内存,但通常来说应用程序使用不完,为了提高性能,会把没用完的这部分留作他用,每个进程都能够使用。
但是内核直接回收会比较麻烦,所以选择了一种过度分配机制,间接利用这部分没用完的内存。但是如果大多数应用程序都把自己的内存消耗完了,会导致所有内存使用数加起来超过了本来有的内存,包括swap。这是就必须杀掉一些进程来腾出内存空间,保证系统正常运行。 杀掉进程的过程可以参考linux/mm/oom_kill.c 大致为给每一个进程打分,得分最高的被oom-killer杀掉 可以通过修改 /proc/sys/vm/panic_on_oom 文件来调整oom-killer的行为,禁止杀掉进程,但这会触发kernal panic(重要!!!如果遇到panic 也可以考虑往这方面排错查看)
当该文件为1时,直接panic;为0时,将通过oom-killer杀掉部分进程(默认值为0)
也可使用此命令,效果相同
<font style="color:rgb(51, 51, 51);">sysctl -w vm.panic_on_oom=1 && sysctl -p</font>
也可以通过修改一些内核参数来避免系统一直不停的杀进程。
也可以不允许过度分配内存,这样也就不会出现oom的问题(非常不推荐,内存浪费严重)
sysctl -w vm.overcommit_memory=2 三个取值 0 1 2 默认值为00表示当用户请求更多内存时,内核尝试估算剩余的可用内存,计算方式为sqp总量加slab中可释放的总量+NR_FILE_PAGES总量 如果申请的内存超过这个数值,再进行一次计算(这里不懂),还是超过就分配失败
1表示允许超量使用内存,直到用完为止,主要用于科学计算
2表示绝不过量使用内存,即整个系统内存地址空间不能超过sqp分区+50%的ram值 查看进程的oom_score /proc/PID/oom_score中 当得分为0时禁止杀掉该进程
另外两个文件 oom_score_adj 惩罚机制,计算得分时会额外计算这个文件中的数值,越大计算出来的得分就越大 取值范围正副1000 默认值0
oom_adj 取值范围-17-15 -17表示永不杀死这个进程 默认值0
:::
3.3 容器资源配额扩容
docker update # 在线更新容器配置$ docker update --helpUsage: docker update [OPTIONS] CONTAINER [CONTAINER...]Update configuration of one or more containersOptions:--blkio-weight uint16 Block IO (relative weight), between 10 and 1000, or 0 to disable (default 0)--cpu-period int Limit CPU CFS (Completely Fair Scheduler) period 限制CPU CFS(完全公平调度程序)周期--cpu-quota int Limit CPU CFS (Completely Fair Scheduler) quota 限制CPU CFS(完全公平调度程序)配额--cpu-rt-period int Limit the CPU real-time period in microseconds 将CPU实时周期限制在微秒内--cpu-rt-runtime int Limit the CPU real-time runtime in microseconds 将CPU实时运行时限制在微秒内-c, --cpu-shares int CPU shares (relative weight) CPU份额(相对权重)--cpus decimal Number of CPUs cpu个数--cpuset-cpus string CPUs in which to allow execution (0-3, 0,1) 允许执行的cpu (0- 3,0,1)--cpuset-mems string MEMs in which to allow execution (0-3, 0,1) 允许执行(0- 3,0,1)的MEMs--kernel-memory bytes Kernel memory limit 内核内存限制-m, --memory bytes Memory limit 内存限制--memory-reservation bytes Memory soft limit 内存软限制--memory-swap bytes Swap limit equal to memory plus swap: '-1' to enable unlimited swap 交换限制等于内存加交换:'-1'以启用无限交换--pids-limit int Tune container pids limit (set -1 for unlimited) 调优容器pid限制(设置-1表示无限制)--restart string Restart policy to apply when a container exits
3.4 管理容器常用命令
命令格式:docker container COMMAND
| 选项 | 描述 |
|---|---|
| ls | 列出容器 |
| inspect | 查看一个或多个容器详细信息 |
| exec | 在运行容器中执行命令 |
| commit | 创建—个新镜像来自—个容器 |
| cp | 拷贝文件/文件夹到一个容器 |
| logs | 获取一个容器日志 |
| port | 列出或指定容器端口映射 |
| top | 显示一个容器运行的进程 |
| stats | 显示容器资源使用统计 |
| stop / start / restart | 停止/启动一个或多个容器 |
| rm | 删除─个或多个容器 |
| prune | 移除已停止的容器 |
范例:常用管理命令
# Step 1: 列出当前DockerHost容器$ docker psCONTAINER ID IMAGE COMMAND CREATED STATUS PORTS NAMESd74184890bae ubuntu "/bin/bash" 3 minutes ago Up 3 minutes ubuntu-container1dcbec1b129c nginx "/docker-entrypoint.…" 14 minutes ago Up 10 minutes 0.0.0.0:8088->80/tcp, :::8088->80/tcp container-nginx# 列出当前DockerHost所有容器$ docker ps -a# 列出最新创建的容器$ docker ps -l# Step 2: 查看容器的详细信息显示$ docker inspect [Container_ID|Container_Name]# Step 3: 进入到容器或者直接在DockerHost执行容器命令$ docker exec -it ubuntu-container /bin/bash$ docker exec ubuntu-container cat /etc/os-releaseNAME="Ubuntu"VERSION="20.04.3 LTS (Focal Fossa)"ID=ubuntuID_LIKE=debianPRETTY_NAME="Ubuntu 20.04.3 LTS"VERSION_ID="20.04"HOME_URL="https://www.ubuntu.com/"SUPPORT_URL="https://help.ubuntu.com/"BUG_REPORT_URL="https://bugs.launchpad.net/ubuntu/"PRIVACY_POLICY_URL="https://www.ubuntu.com/legal/terms-and-policies/privacy-policy"VERSION_CODENAME=focalUBUNTU_CODENAME=focal# Step 4: 查看容器日志docker logs container-nginx# Step 5: 将容器提交成一个镜像$ docker exec -it container-nginx /bin/bashroot@nginx-node:/# echo "Hello Nginx Container" > /usr/share/nginx/html/index.htmlroot@nginx-node:/# exit$ docker commit -a "zhongzw <zhongzhiwei@kubesphere.com>" -m "修改nginx默认页面" container-nginx mynginx:1.1.0$ docker imagesREPOSITORY TAG IMAGE ID CREATED SIZEmynginx 1.1.0 20cad473dbf9 13 seconds ago 141MB$ docker image history mynginx:1.1.0IMAGE CREATED CREATED BY SIZE COMMENT20cad473dbf9 27 seconds ago nginx -g daemon off; 1.12kB 修改nginx默认页面605c77e624dd 8 months ago /bin/sh -c #(nop) CMD ["nginx" "-g" "daemon… 0B<missing> 8 months ago /bin/sh -c #(nop) STOPSIGNAL SIGQUIT 0B<missing> 8 months ago /bin/sh -c #(nop) EXPOSE 80 0B<missing> 8 months ago /bin/sh -c #(nop) ENTRYPOINT ["/docker-entr… 0B<missing> 8 months ago /bin/sh -c #(nop) COPY file:09a214a3e07c919a… 4.61kB<missing> 8 months ago /bin/sh -c #(nop) COPY file:0fd5fca330dcd6a7… 1.04kB<missing> 8 months ago /bin/sh -c #(nop) COPY file:0b866ff3fc1ef5b0… 1.96kB<missing> 8 months ago /bin/sh -c #(nop) COPY file:65504f71f5855ca0… 1.2kB<missing> 8 months ago /bin/sh -c set -x && addgroup --system -… 61.1MB<missing> 8 months ago /bin/sh -c #(nop) ENV PKG_RELEASE=1~bullseye 0B<missing> 8 months ago /bin/sh -c #(nop) ENV NJS_VERSION=0.7.1 0B<missing> 8 months ago /bin/sh -c #(nop) ENV NGINX_VERSION=1.21.5 0B<missing> 9 months ago /bin/sh -c #(nop) LABEL maintainer=NGINX Do… 0B<missing> 9 months ago /bin/sh -c #(nop) CMD ["bash"] 0B<missing> 9 months ago /bin/sh -c #(nop) ADD file:09675d11695f65c55… 80.4MB# 将新镜像运行成容器docker run -it -d --name mynginx-container --restart=always -p 8888:80 mynginx:1.1.0sudo curl localhost:8888# Step 5: 容器与宿主机之间的文件拷贝Usage: docker cp [OPTIONS] CONTAINER:SRC_PATH DEST_PATH|-docker cp [OPTIONS] SRC_PATH|- CONTAINER:DEST_PATH$ echo "hello docker" > docker.txt$ docker cp docker.txt ubuntu-container:/tmp$ docker exec ubuntu-container cat /tmp/docker.txthello docker$ docker cp ubuntu-container:/etc/passwd /tmp$ cat /tmp/passwd# Step 7: 查看容器暴露的端口$ docker port mynginx-container80/tcp -> 0.0.0.0:888880/tcp -> :::8888# Step 8: 容器运行的进程$ docker top mynginx-container# Step 9: 查看容器的资源利用率$ docker stats mynginx-container$ docker stats --no-stream mynginx-container# Step 10: 删除容器$ docker rm -f mynginx-container# 只查看容器的ID$ docker ps -q# 删除所有容器(-f 强制删除;-a 全部容器)$ docker rm -f $(docker ps -qa)# Step 11: 移除已经停止的容器$ docker container prune# 容器名称是不能重复的
3.5 容器实现核心技术: Namespace
在容器化中,一台物理计算机可以运行多个不同操作系统,那就需要解决”隔离性”,彼此感知不到对方存在,有问题互不影响。
Linux内核从<font style="color:#E8323C;">2.4.19</font>版本开始引入了namespace概念,其目的是将特定的全局系统资源通过抽象方法使得namespace中的进程看起来拥有自己隔离的资源。Docker就是借助这个机制实现了容器资源隔离。
Linux的Namespace机制提供了6种不同命名空间:
+ IPC:隔离进程间通信
+ MOUNT:隔离文件系统挂载点
+ NET:隔离网络协议栈
+ PID:隔离进程号,进程命名空间是一个父子结构,子空间对父空间可见
+ USER:隔离用户
+ UTS:隔离主机名和域名
bash
# $$ 显示当前进程号
$ ll /proc/$$/ns
total 0
lrwxrwxrwx 1 root root 0 Nov 30 13:17 ipc -> ipc:[4026531839]
lrwxrwxrwx 1 root root 0 Nov 30 13:17 mnt -> mnt:[4026531840]
lrwxrwxrwx 1 root root 0 Nov 30 13:17 net -> net:[4026531956]
lrwxrwxrwx 1 root root 0 Nov 30 13:17 pid -> pid:[4026531836]
lrwxrwxrwx 1 root root 0 Nov 30 13:17 user -> user:[4026531837]
lrwxrwxrwx 1 root root 0 Nov 30 13:17 uts -> uts:[4026531838]

# 创建Busybox容器
$ docker run -it -d --name busybox-node1 busybox /bin/sh
# 隔离网络协议栈
/ # ip addr
1: lo: <LOOPBACK,UP,LOWER_UP> mtu 65536 qdisc noqueue qlen 1000
    link/loopback 00:00:00:00:00:00 brd 00:00:00:00:00:00
    inet 127.0.0.1/8 scope host lo
       valid_lft forever preferred_lft forever
588: eth0@if589: <BROADCAST,MULTICAST,UP,LOWER_UP,M-DOWN> mtu 1500 qdisc noqueue
    link/ether 02:42:ac:11:00:0f brd ff:ff:ff:ff:ff:ff
    inet 172.17.0.15/16 brd 172.17.255.255 scope global eth0
       valid_lft forever preferred_lft forever
# 隔离进程号,进程命名空间是一个父子结构,子空间对父空间可见
/ # ps -ef
PID   USER     TIME  COMMAND
    1 root      0:00 /bin/sh
    7 root      0:00 /bin/sh
   14 root      0:00 ps -ef
# 隔离用户
/ # cat /etc/passwd
root:x:0:0:root:/root:/bin/sh
daemon:x:1:1:daemon:/usr/sbin:/bin/false
bin:x:2:2:bin:/bin:/bin/false
sys:x:3:3:sys:/dev:/bin/false
sync:x:4:100:sync:/bin:/bin/sync
mail:x:8:8:mail:/var/spool/mail:/bin/false
www-data:x:33:33:www-data:/var/www:/bin/false
operator:x:37:37:Operator:/var:/bin/false
nobody:x:65534:65534:nobody:/home:/bin/false
# 隔离主机名和域名
/ # hostname
264a7a3e091d

$ docker run -it -d --name busybox-node2 busybox /bin/sh
/ # ip addr
1: lo: <LOOPBACK,UP,LOWER_UP> mtu 65536 qdisc noqueue qlen 1000
    link/loopback 00:00:00:00:00:00 brd 00:00:00:00:00:00
    inet 127.0.0.1/8 scope host lo
       valid_lft forever preferred_lft forever
590: eth0@if591: <BROADCAST,MULTICAST,UP,LOWER_UP,M-DOWN> mtu 1500 qdisc noqueue
    link/ether 02:42:ac:11:00:10 brd ff:ff:ff:ff:ff:ff
    inet 172.17.0.16/16 brd 172.17.255.255 scope global eth0
       valid_lft forever preferred_lft forever
## 3.6 容器实现核心技术: CGroups
Docker利用namespace实现了容器之间资源隔离,但是namespace不能对容器资源限制,比如CPU、内存。
如果某一个容器属于CPU密集型任务,那么会影响其他容器使用CPU,导致多个容器相互影响并且抢占资源。
如何对多个容器的资源使用进行限制就成了容器化的主要问题。
答:引入Control Groups(简称CGroups),限制容器资源
CGroups:所有的任务就是运行在系统中的一个进程,而CGroups以某种标准讲一组进程为目标进行资源分配和控制。例如CPU、内存、带宽等,并且可以<font style="color:#E8323C;">动态配置</font>。
CGroups主要功能:
- 限制进程组使用的资源数量 ( Resource limitation ) : 可以为进程组设定资源使用上限,例如内存
- 进程组优先级控制( Prioritization ) : 可以为进程组分配特定CPU、磁盘IO吞吐量
- 记录进程组使用的资源数量 ( Accounting ) : 例如使用记录某个进程组使用的CPU时间
- 进程组控制 ( Control ) : 可以将进程组挂起和恢复
ls /sys/fs/cgroup/ -l查看cgroups可控制的资源:
- blkio : 对快设备的IO进行限制。
- cpu : 限制CPU时间片的分配,与cpuacct挂载同一目录。
- cpuacct : 生成cgroup中的任务占用CPU资源的报告,与cpu挂载同一目录。
- cpuset : 给cgroup中的任务分配独立的CPU(多核处理器)和内存节点。
- devices : 允许或者拒绝cgroup 中的任务访问设备。
- freezer : 暂停/恢复cgroup 中的任务。
- hugetlb : 限制使用的内存页数量。
- memory : 对cgroup中任务的可用内存进行限制,并自动生成资源占用报告。
- net cls : 使用等级识别符(classid)标记网络数据包,这让 Linux流量控制程序(tc)可以识别来自特定从cgroup任务的数据包,并进行网络限制。
- net_prio : 允许基于cgroup设置网络流量的优先级。
- perf_event : 允许使用perf工具来监控cgroup。
- pids:限制任务的数量。
容器实际资源限制位置:
/sys/fs/cgroup/<资源名>/docker/<容器ID>
3.7 Docker核心组件之间关系
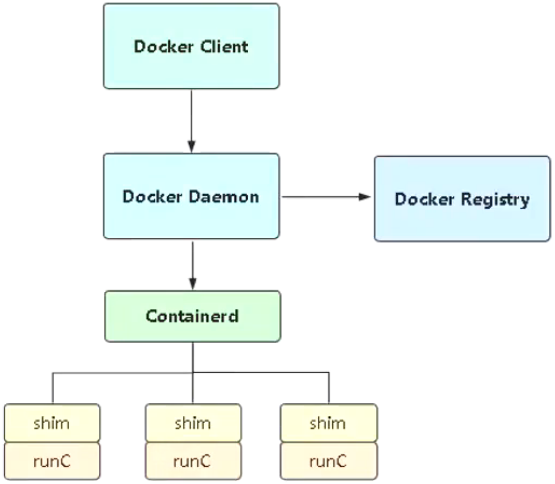
Docker Daemon:Docker守护进程,负责与Docker Clinet交互,并管理镜像、容器。
Containerd:是一个简单的守护进程[ 为了兼容OCI标准 ],向上给Docker Daemon提供接口,向下通过containerd-shim结合runC管理容器。
runC:一个命令行工具,它根据OCI标准来创建和运行容器[ 由lib-Container剥离出来 ]。

总结:
:::color1 Namespace
命名空间,Linux内核提供的一种对进程资源隔离的机制,例如进程、网络、挂载点等资源。
CGroups
控制组,Linux内核提供的一种对进程组限制资源的机制;例如CPU、内存等资源。
UnionFS
联合文件系统,支持将不同位置的目录挂载到同一虚拟文件系统,形成一种分层的模型。
:::
4 Docker 容器数据持久化
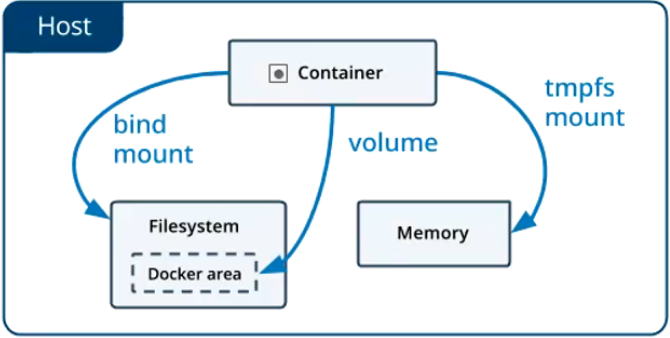
4.1 将数据从宿主机挂载到容器中的三种方式
Docker提供三种方式将数据从宿主机挂载到容器中:
- volumes:Docker管理宿主机文件系统的一部分(/var/lib/docker/volumes)。保存数据的最佳方式。
- bind mounts:将宿主机上的任意位置的文件或者目录挂载到容器中。
- tmpfs:挂载存储在主机系统的内存中,而不会写入主机的文件系统。如果不希望将数据持久存储在任何位置,可以使用tmpfs,同时避免写入容器可写层提高性能。[ 使用场景很少 ]
4.2 Volume
管理卷:
$ docker volume create nginx-vol$ docker volume ls$ docker volume inspect nginx-vol[{"CreatedAt": "2022-11-30T14:16:36+08:00","Driver": "local","Labels": {},"Mountpoint": "/var/lib/docker/volumes/nginx-vol/_data","Name": "nginx-vol","Options": {},"Scope": "local"}]
用卷创建一个容器:
$ docker run -d --name=nginx-test --mount src=nginx-vol,dst=/usr/share/nginx/html nginx$ docker run -d --name=nginx-test -v nginx-vol:/usr/share/nginx/html nginx# 使用匿名卷$ docker run -d --name nginx-volume -v /usr/share/nginx/html/ nginx
清理:
$ docker stop nginx-test$ docker rm nginx-test$ docker volume rm nginx-vol
注意:
- 如果没有指定卷,自动创建。
4.3 Bind Mounts
用卷创建一个容器:
$ docker run -d --name=nginx-test --mount type=bind,src=/app/wwwroot,dst=/usr/share/nginx/html nginx$ docker run -d --name=nginx-test -v /app/wwwroot:/usr/share/nginx/html nginx
验证绑定:
$ docker inspect nginx-test
清理:
$ docker stop nginx-test$ docker rm nginx-test
注意:
- 如果源文件/目录没有存在如果挂载目标在容器中非空目录,则该目录现有内容将被隐藏。
- 不会自动创建,会抛出一个错误。[ 新版的Docker会自动创建 ]
5 Docker 容器网络
5.1 四种网络模式
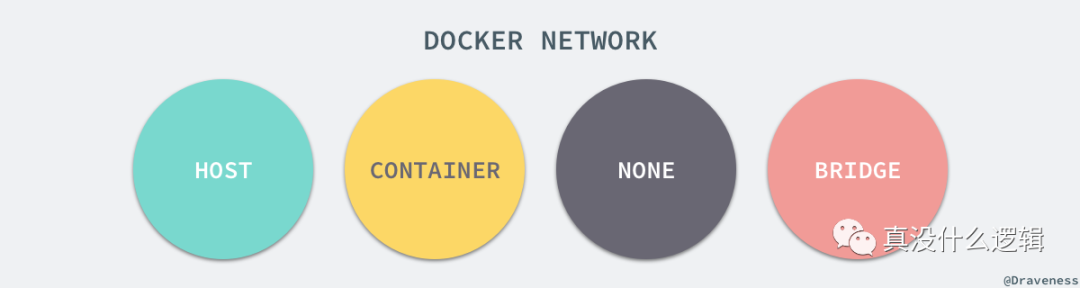
- bridge
—net=bridge
默认网络,Docker启动后创建一个docker0网桥,默认创建的容器也是添加到这个网桥中。也可以自定义网络,相比默认的具备内部DNS发现,可以通过容器名容器之间网络通信。
- host
—net=host
容器不会获得一个独立的network namespace,而是与宿主机共用一个。这就意味着容器不会有自己的网卡信息,而是使用宿主机的。容器除了网络,其他都是隔离的。
- none
—net=none
获取独立的network namespace,但不为容器进行任何网络配置,需要我们手动配置。
- container
—net=container:Name/ID
与指定的容器使用同一个network namespace,具有同样的网络配置信息,两个容器除了网络,其他都还是隔离的。
| 网络模式 | 配置 | 说明 |
|---|---|---|
| host | —network host | 容器和宿主机共享 Network namespace |
| container | —network container:NAME_OR_ID | 容器和另外一个容器共享 Network namespace |
| none | —network none | 容器有独立的 Network namespace,但并没有对其进行任何网络设置,如分配 veth pair 和网桥连接,配置 IP 等 |
| bridge | —network | bridge 默认模式 |
$ yum install -y bridge-utils$ brctl showbridge name bridge id STP enabled interfacesdocker0 8000.0242c776c496 no vethfff7deb$ docker psCONTAINER ID IMAGE COMMAND CREATED STATUS PORTS NAMES4c85101b19d3 centos:centos7.9.2009 "/bin/bash" 6 hours ago Up 6 hours centos-node1# 创建Docker测试网络$ docker network create test_network# 使用该测试网络创建容器$ docker run -it -d --name nginx-node1 --network test_network nginx$ docker inspect -f "{{.NetworkSettings.Networks.test_network.IPAddress}}" nginx-node1172.18.0.2# 默认使用bridge网络(IP地址可以通信,不能使用主机名通信)$ docker run -it -d --name busybox-node1 --hostname busybox-node1 busybox$ docker run -it -d --name busybox-node2 --hostname busybox-node2 busybox$ docker exec -it busybox-node1 ip addr1: lo: <LOOPBACK,UP,LOWER_UP> mtu 65536 qdisc noqueue qlen 1000link/loopback 00:00:00:00:00:00 brd 00:00:00:00:00:00inet 127.0.0.1/8 scope host lovalid_lft forever preferred_lft forever22: eth0@if23: <BROADCAST,MULTICAST,UP,LOWER_UP,M-DOWN> mtu 1500 qdisc noqueuelink/ether 02:42:ac:11:00:02 brd ff:ff:ff:ff:ff:ffinet 172.17.0.2/16 brd 172.17.255.255 scope global eth0valid_lft forever preferred_lft forever$ docker exec -it busybox-node2 ip addr1: lo: <LOOPBACK,UP,LOWER_UP> mtu 65536 qdisc noqueue qlen 1000link/loopback 00:00:00:00:00:00 brd 00:00:00:00:00:00inet 127.0.0.1/8 scope host lovalid_lft forever preferred_lft forever24: eth0@if25: <BROADCAST,MULTICAST,UP,LOWER_UP,M-DOWN> mtu 1500 qdisc noqueuelink/ether 02:42:ac:11:00:03 brd ff:ff:ff:ff:ff:ffinet 172.17.0.3/16 brd 172.17.255.255 scope global eth0valid_lft forever preferred_lft forever# IP地址可以通信,主机名无法通信$ docker exec -it busybox-node1 ping -c 1 -W 1 172.17.0.3PING 172.17.0.3 (172.17.0.3): 56 data bytes64 bytes from 172.17.0.3: seq=0 ttl=64 time=0.300 ms--- 172.17.0.3 ping statistics ---1 packets transmitted, 1 packets received, 0% packet loss$ docker exec -it busybox-node1 ping -c 1 -W 1 busybox-node2ping: bad address 'busybox-node2'# 使用自定义网络(桥接)内部会有DNS解析,做了IP地址和主机名的绑定关系
范例:自定义网络
$ docker run -it -d --name busybox-node-test1 --hostname busybox-node-test1 --network test_network busybox$ docker run -it -d --name busybox-node-test2 --hostname busybox-node-test2 --network test_network busybox$ docker exec -it busybox-node-test1 ip addr1: lo: <LOOPBACK,UP,LOWER_UP> mtu 65536 qdisc noqueue qlen 1000link/loopback 00:00:00:00:00:00 brd 00:00:00:00:00:00inet 127.0.0.1/8 scope host lovalid_lft forever preferred_lft forever26: eth0@if27: <BROADCAST,MULTICAST,UP,LOWER_UP,M-DOWN> mtu 1500 qdisc noqueuelink/ether 02:42:ac:12:00:03 brd ff:ff:ff:ff:ff:ffinet 172.18.0.3/16 brd 172.18.255.255 scope global eth0valid_lft forever preferred_lft forever$ docker exec -it busybox-node-test2 ip addr1: lo: <LOOPBACK,UP,LOWER_UP> mtu 65536 qdisc noqueue qlen 1000link/loopback 00:00:00:00:00:00 brd 00:00:00:00:00:00inet 127.0.0.1/8 scope host lovalid_lft forever preferred_lft forever28: eth0@if29: <BROADCAST,MULTICAST,UP,LOWER_UP,M-DOWN> mtu 1500 qdisc noqueuelink/ether 02:42:ac:12:00:04 brd ff:ff:ff:ff:ff:ffinet 172.18.0.4/16 brd 172.18.255.255 scope global eth0valid_lft forever preferred_lft forever$ docker exec -it busybox-node-test2 ping -c 1 -W 1 172.18.0.4PING 172.18.0.4 (172.18.0.4): 56 data bytes64 bytes from 172.18.0.4: seq=0 ttl=64 time=0.132 ms--- 172.18.0.4 ping statistics ---1 packets transmitted, 1 packets received, 0% packet lossround-trip min/avg/max = 0.132/0.132/0.132 ms$ docker exec -it busybox-node-test2 ping -c 1 -W 1 busybox-node-test2PING busybox-node-test2 (172.18.0.4): 56 data bytes64 bytes from 172.18.0.4: seq=0 ttl=64 time=0.104 ms--- busybox-node-test2 ping statistics ---1 packets transmitted, 1 packets received, 0% packet lossround-trip min/avg/max = 0.104/0.104/0.104 ms
范例:使用 host 网络模式
$ docker run -it --network host --name busybox-host --hostname busybox-host busybox# 共享宿主机的网络命名空间/ # ifconfigdocker0 Link encap:Ethernet HWaddr 02:42:C7:76:C4:96inet addr:172.17.0.1 Bcast:172.17.255.255 Mask:255.255.0.0inet6 addr: fe80::42:c7ff:fe76:c496/64 Scope:LinkUP BROADCAST RUNNING MULTICAST MTU:1500 Metric:1RX packets:9 errors:0 dropped:0 overruns:0 frame:0TX packets:17 errors:0 dropped:0 overruns:0 carrier:0collisions:0 txqueuelen:0RX bytes:516 (516.0 B) TX bytes:2016 (1.9 KiB)eth0 Link encap:Ethernet HWaddr 00:0C:29:0F:DD:0Cinet addr:10.0.0.100 Bcast:10.0.0.255 Mask:255.255.255.0inet6 addr: fe80::20c:29ff:fe0f:dd0c/64 Scope:LinkUP BROADCAST RUNNING MULTICAST MTU:1500 Metric:1RX packets:119699 errors:0 dropped:0 overruns:0 frame:0TX packets:46469 errors:0 dropped:0 overruns:0 carrier:0collisions:0 txqueuelen:1000RX bytes:161358423 (153.8 MiB) TX bytes:3476608 (3.3 MiB)lo Link encap:Local Loopbackinet addr:127.0.0.1 Mask:255.0.0.0inet6 addr: ::1/128 Scope:HostUP LOOPBACK RUNNING MTU:65536 Metric:1RX packets:995 errors:0 dropped:0 overruns:0 frame:0TX packets:995 errors:0 dropped:0 overruns:0 carrier:0collisions:0 txqueuelen:1000RX bytes:91025 (88.8 KiB) TX bytes:91025 (88.8 KiB)# ...省略部分输出...
范例:使用 Container 网络
$ docker run -it --network container:busybox-node1 -d --name busybox-container1 busybox$ docker exec busybox-node1 ip addr1: lo: <LOOPBACK,UP,LOWER_UP> mtu 65536 qdisc noqueue qlen 1000link/loopback 00:00:00:00:00:00 brd 00:00:00:00:00:00inet 127.0.0.1/8 scope host lovalid_lft forever preferred_lft forever22: eth0@if23: <BROADCAST,MULTICAST,UP,LOWER_UP,M-DOWN> mtu 1500 qdisc noqueuelink/ether 02:42:ac:11:00:02 brd ff:ff:ff:ff:ff:ffinet 172.17.0.2/16 brd 172.17.255.255 scope global eth0valid_lft forever preferred_lft forever$ docker exec -it busybox-container1 ip addr1: lo: <LOOPBACK,UP,LOWER_UP> mtu 65536 qdisc noqueue qlen 1000link/loopback 00:00:00:00:00:00 brd 00:00:00:00:00:00inet 127.0.0.1/8 scope host lovalid_lft forever preferred_lft forever22: eth0@if23: <BROADCAST,MULTICAST,UP,LOWER_UP,M-DOWN> mtu 1500 qdisc noqueuelink/ether 02:42:ac:11:00:02 brd ff:ff:ff:ff:ff:ffinet 172.17.0.2/16 brd 172.17.255.255 scope global eth0valid_lft forever preferred_lft forever# 这是Kubernetes Pod最小调度单位默认的网络模式
范例:none 网络模式
$ docker run -it --name busybox-none --network none --hostname busybox-none busybox /bin/sh/ # ip addr1: lo: <LOOPBACK,UP,LOWER_UP> mtu 65536 qdisc noqueue qlen 1000link/loopback 00:00:00:00:00:00 brd 00:00:00:00:00:00inet 127.0.0.1/8 scope host lovalid_lft forever preferred_lft forever
:::color1 应用场景:
bridge :Docker 默认桥接网络
host :希望使用宿主机网络
none :手动配置容器网络,对接公司的IPAM
container :希望容器与另一个容器在一个网络命名空间,LNMP
:::
5.2 Docker网络模型容器
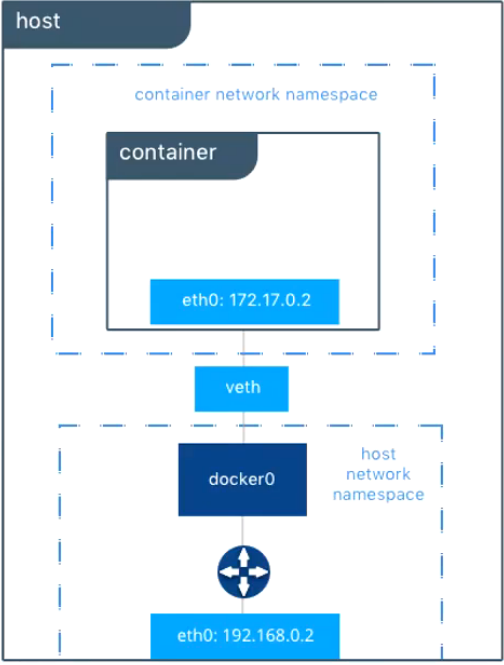
veth pair:成对出现的一种虚拟网络设备,数据从一端进,从另一端出。用于解决网络命名空间之间隔离。
docker0:网桥是一个二层网络设备,通过网桥可以将Linux支持的不同的端口连接起来,并实现类似交换机那样的多对多的通信。
5.3 网络访问原理
# docker 启动后会产生一个 docker0 的桥接设备# docker0 可以理解为是一个交换机,是将容器接入到交换机中,实现容器与容器之间的通信# 并且可以将数据包传递到宿主机处理。$ ifconfig docker0docker0: flags=4163<UP,BROADCAST,RUNNING,MULTICAST> mtu 1500inet 172.17.0.1 netmask 255.255.0.0 broadcast 172.17.255.255inet6 fe80::42:45ff:fe1c:2b38 prefixlen 64 scopeid 0x20<link>ether 02:42:45:1c:2b:38 txqueuelen 0 (Ethernet)RX packets 32 bytes 3436 (3.3 KiB)RX errors 0 dropped 0 overruns 0 frame 0TX packets 47 bytes 3446 (3.3 KiB)TX errors 0 dropped 0 overruns 0 carrier 0 collisions 0
Docker 使用 iptables 实现网络通信
- 外部访问容器:

iptables -t nat -vnL DOCKER
- 容器访问外部:
范例:外部访问容器
iptables -t nat -vnL POSTROUTING
bash
# 查看宿主机容器进程
$ docker ps
CONTAINER ID   IMAGE     COMMAND                  CREATED              STATUS              PORTS                               NAMES                                  busybox-node
ec4e0869e87a   nginx     "/docker-entrypoint.…"   25 minutes ago       Up 25 minutes       0.0.0.0:88->80/tcp, :::88->80/tcp   web01
# 外部访问容器(iptables-DNAT)
$ iptables -t nat -vnL DOCKER
Chain DOCKER (2 references)
 pkts bytes target     prot opt in     out     source               destination
    0     0 RETURN     all  --  docker0 *       0.0.0.0/0            0.0.0.0/0
    0     0 DNAT       tcp  --  !docker0 *       0.0.0.0/0            0.0.0.0/0            tcp dpt:88 to:172.17.0.2:80
# iptables 判断本机的88端口要转发到172.17.0.2:80端口
# 宿主机会判断路由表信息
$ route -n
Kernel IP routing table
Destination     Gateway         Genmask         Flags Metric Ref    Use Iface
0.0.0.0         10.0.0.2        0.0.0.0         UG    100    0        0 eth0
10.0.0.0        0.0.0.0         255.255.255.0   U     100    0        0 eth0
172.17.0.0      0.0.0.0         255.255.0.0     U     0      0        0 docker0
# 数据包会转发到docker0网桥,docker0又是一个二层交换机。
# docker0 会发送ARP广播,找到172.17.0.2的容器,就可以基于MAC地址进行通信

### 所以在外部访问容器中关键在于 DNAT,路由表
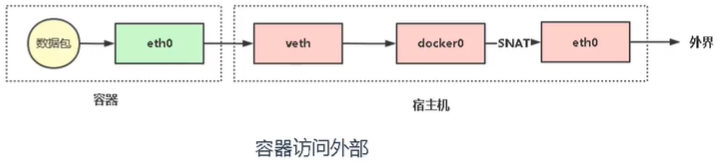
范例:容器访问外部
$ docker run -it -d --name busybox-node busybox$ docker exec -it busybox-node /bin/sh# 可以访问外网/ # ping -c 1 -W 1 www.baidu.comPING www.baidu.com (183.232.231.174): 56 data bytes64 bytes from 183.232.231.174: seq=0 ttl=127 time=15.140 ms--- www.baidu.com ping statistics ---1 packets transmitted, 1 packets received, 0% packet lossround-trip min/avg/max = 15.140/15.140/15.140 ms# 查看网卡信息/ # ifconfigeth0 Link encap:Ethernet HWaddr 02:42:AC:11:00:04inet addr:172.17.0.4 Bcast:172.17.255.255 Mask:255.255.0.0UP BROADCAST RUNNING MULTICAST MTU:1500 Metric:1RX packets:13 errors:0 dropped:0 overruns:0 frame:0TX packets:5 errors:0 dropped:0 overruns:0 carrier:0collisions:0 txqueuelen:0RX bytes:1100 (1.0 KiB) TX bytes:328 (328.0 B)lo Link encap:Local Loopbackinet addr:127.0.0.1 Mask:255.0.0.0UP LOOPBACK RUNNING MTU:65536 Metric:1RX packets:0 errors:0 dropped:0 overruns:0 frame:0TX packets:0 errors:0 dropped:0 overruns:0 carrier:0collisions:0 txqueuelen:1000RX bytes:0 (0.0 B) TX bytes:0 (0.0 B)# 查看容器路由表/ # route -nKernel IP routing tableDestination Gateway Genmask Flags Metric Ref Use Iface0.0.0.0 172.17.0.1 0.0.0.0 UG 0 0 0 eth0172.17.0.0 0.0.0.0 255.255.0.0 U 0 0 0 eth0# 查看宿主机容器进程$ docker psCONTAINER ID IMAGE COMMAND CREATED STATUS PORTS NAMES8d12c3faadd3 busybox "sh" 8 minutes ago Up 8 minutes busybox-nodeec4e0869e87a nginx "/docker-entrypoint.…" 32 minutes ago Up 32 minutes 0.0.0.0:88->80/tcp, :::88->80/tcp web01# 可以判断到容器的下一跳就是docker0网桥设备,并且将数据包丢到docker0# docker0 设备将数据包转发到宿主机,# 例如容器ping百度,源IP:容器IP,目的IP:百度IP# 宿主机会查找路由表$ route -nKernel IP routing tableDestination Gateway Genmask Flags Metric Ref Use Iface0.0.0.0 10.0.0.2 0.0.0.0 UG 100 0 0 eth010.0.0.0 0.0.0.0 255.255.255.0 U 100 0 0 eth0172.17.0.0 0.0.0.0 255.255.0.0 U 0 0 0 docker0# 容器访问外部(iptables-SNAT)$ iptables -t nat -vnL POSTROUTINGChain POSTROUTING (policy ACCEPT 0 packets, 0 bytes)pkts bytes target prot opt in out source destination3 202 MASQUERADE all -- * !docker0 172.17.0.0/16 0.0.0.0/0 # SNAT策略0 0 MASQUERADE tcp -- * * 172.17.0.2 172.17.0.2 tcp dpt:80# 经过iptables的策略,将数据包的源IP改成为宿主机的IP发送出去# 经过宿主机的网关,发送到互联网中
5.4 容器网络实现核心技术:lptables
5.4.1 四表五链
:::color1 netfilter:IP包过滤;iptables:用户态工具
:::
5.4.2 操作命令
:::color1 Linux IP信息包过滤原理
:::
Docker 主要通过 <font style="color:#DF2A3F;">netfilter/iptables</font> 实现网络通信。
iptables由netfilter和iptables组成,netfilter组件是Linux内核集成的信息包过滤系统,它维护一个信息包过滤表,这个表用于控制信息包过滤处理的规则集。而iptables只是一个在用户空间的工具,用于增删改查这个过滤表的规则。发送方对数据进行TCP/IP封装,接收方则对数据进行TCP/IP的解封装。
参考文献:[ https://blog.csdn.net/weixin_45186298/article/details/122910466 ]
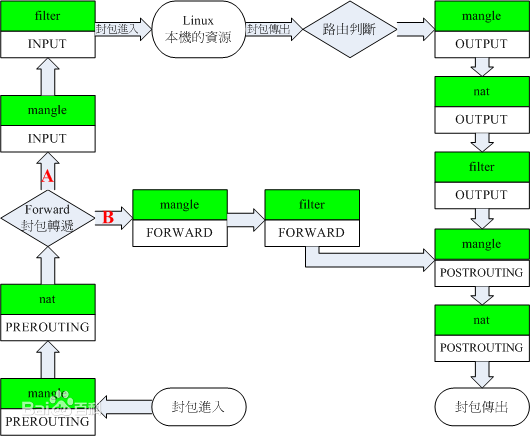
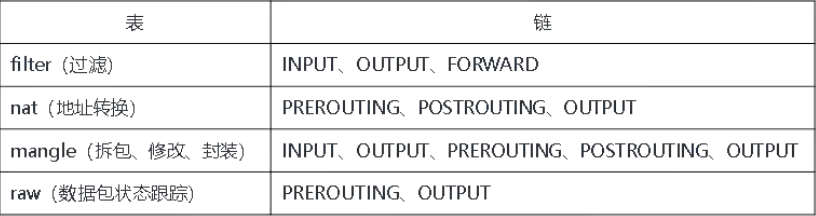
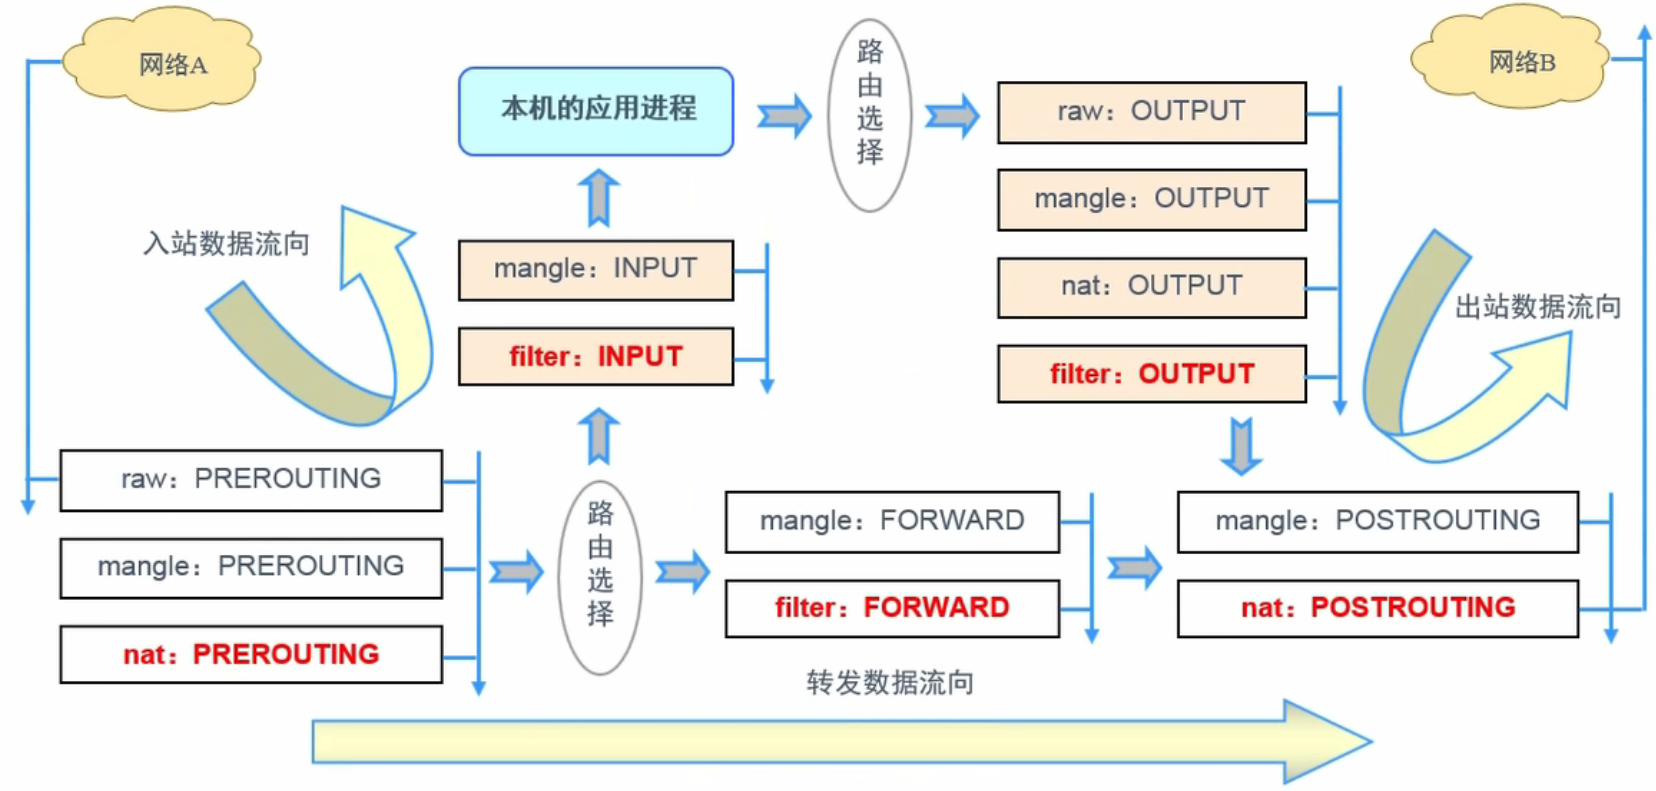
四表五链功能性介绍
iptables是(4张)表的集合:filter、nat、mangle、raw
表是(5条)链的集合:PREROUTING、INPUT、OUTPUT、FORWARD、POSTROUTING
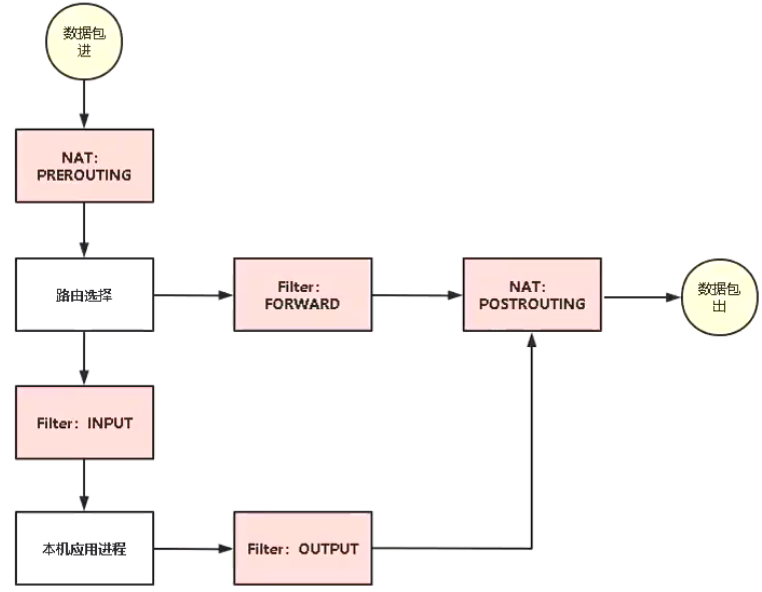
- INPUT
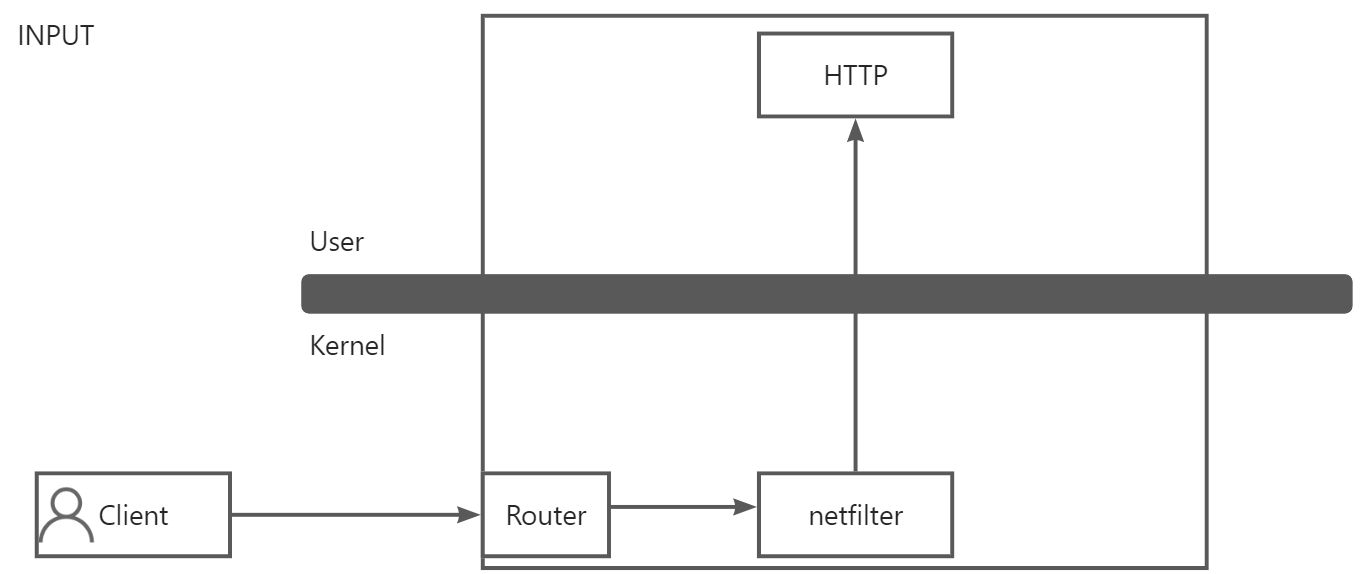
:::warning 客户端发起连接到Apache服务器的时候,数据报文到服务器的网卡处,首先判断 Router Table 的路由表信息,判断该用户的请求是不是本机的,如果不是则丢弃;如果是本机就会交给 netfilter 进行下一步处理。netfilter 会寻找匹配相应的规则,例如:如果目标端口是80的话,就允许放行,这样用户的数据报文就可以到 Http 应用进行处理并得到响应数据报文。
即 INPUT (入站)链。iptables 的规则就是写在 链上的。可以理解为所有入站的数据报文都要经过 iptables 的 INPUT 链,才能到达上层的用户空间。这就要看 INPUT 链的规则是如何编写的,需要匹配规则,如果是放行就放行,如果是拒绝就是拒绝。
:::
- OUTPUT
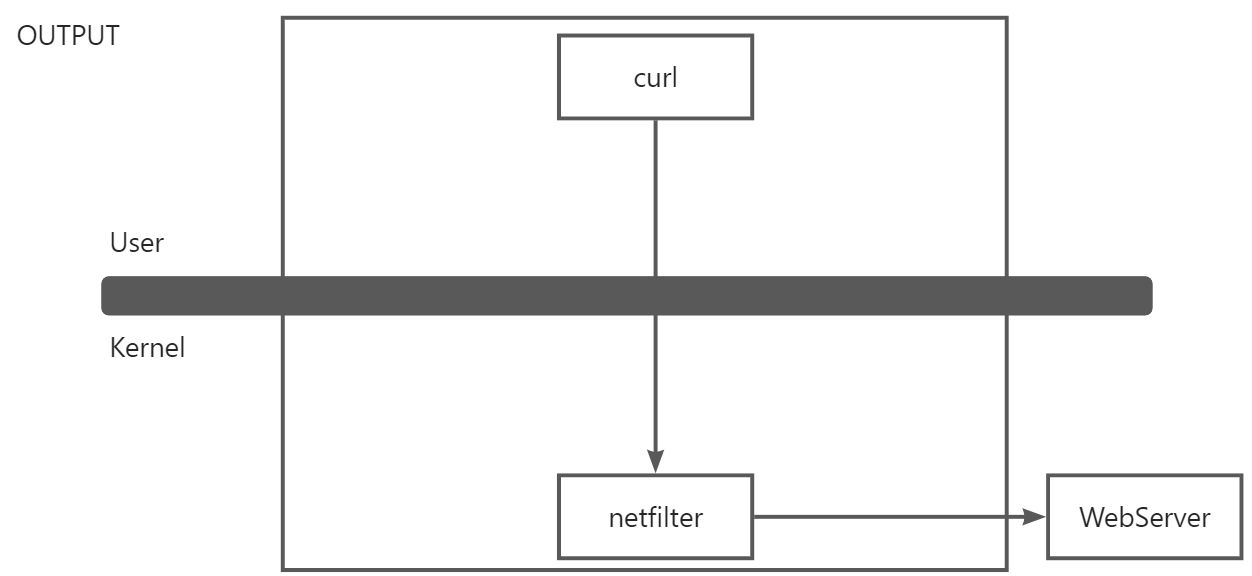
:::warning 当用户在服务器上操作时,执行 curl 命令请求到 WebServer 的时候,数据报文会向到 netfilter 进行处理,netfilter 将数据报文先后转发到服务器的网卡处,通过 Router Table 路由表中进行转发到 WebServer 进行处理。则 netfilter 的 OUTPUT 链就是用来处理出站的规则匹配。
OUTPUT (出站)链的主要功能就是对机器出去的数据报文进行对应的过滤操作。
:::
- FORWORD
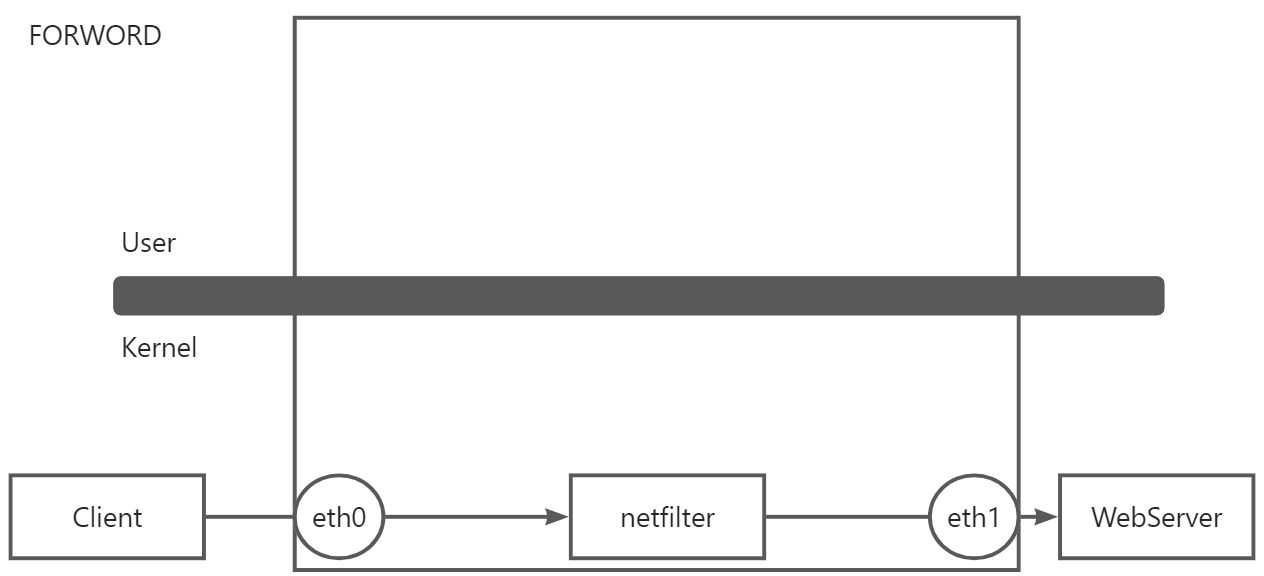
:::info 将Linux服务器充当是路由器。并且Linux 服务器开启 net.ipv4.ip_forward = 1 路由转发功能,当 Client 客户端发起请求到目标地址是 WebServer,Client 发送的数据包会到路由器(Linux服务器)eth0网卡,因为开启了路由转发功能,所以会将数据包转发到 eth1网卡。只要涉及到转发,那么就会经过 netfilter 的 FORWORD 链。
FORWORD (转发)链的主要功能就是处理机器的转发数据报文进行规则匹配。
:::
- PREROUTING
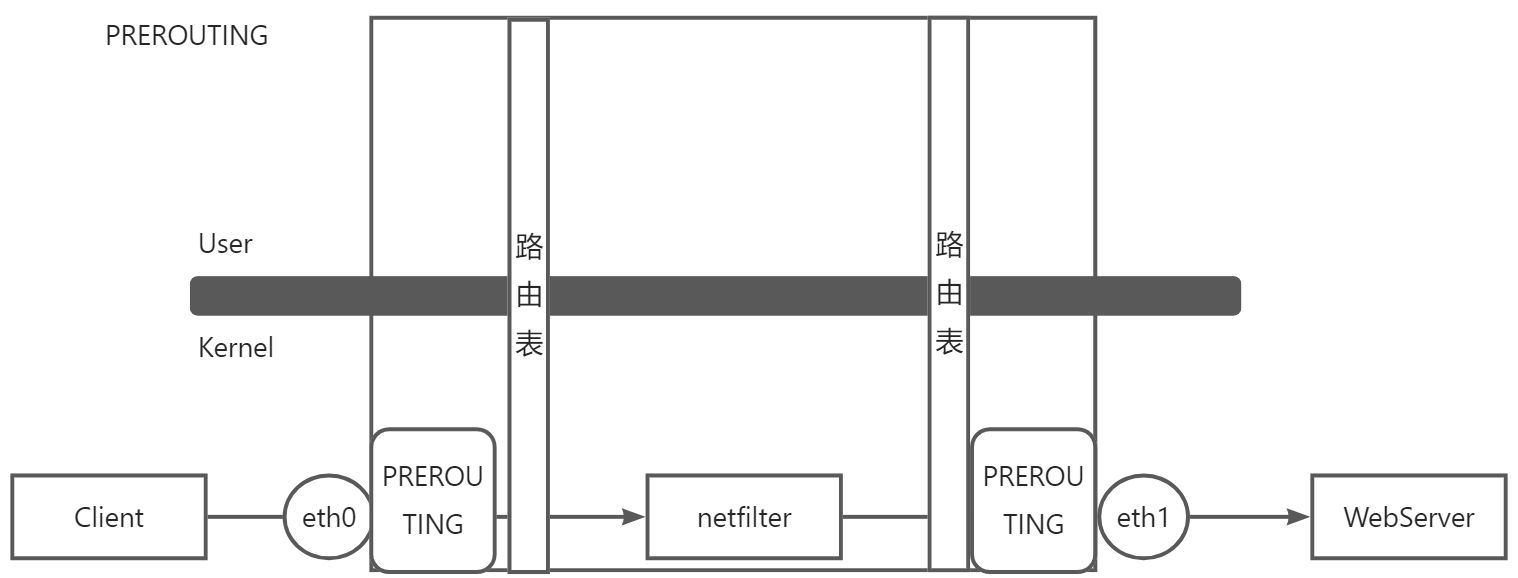
:::info PREROUTING 链在还没有路由表判断之前就对数据报文进行对应的修改。
PREROUTING (路由前)链翻译过来就是路由表之前对数据报文处理的一个接口
:::
- POSTROUTING
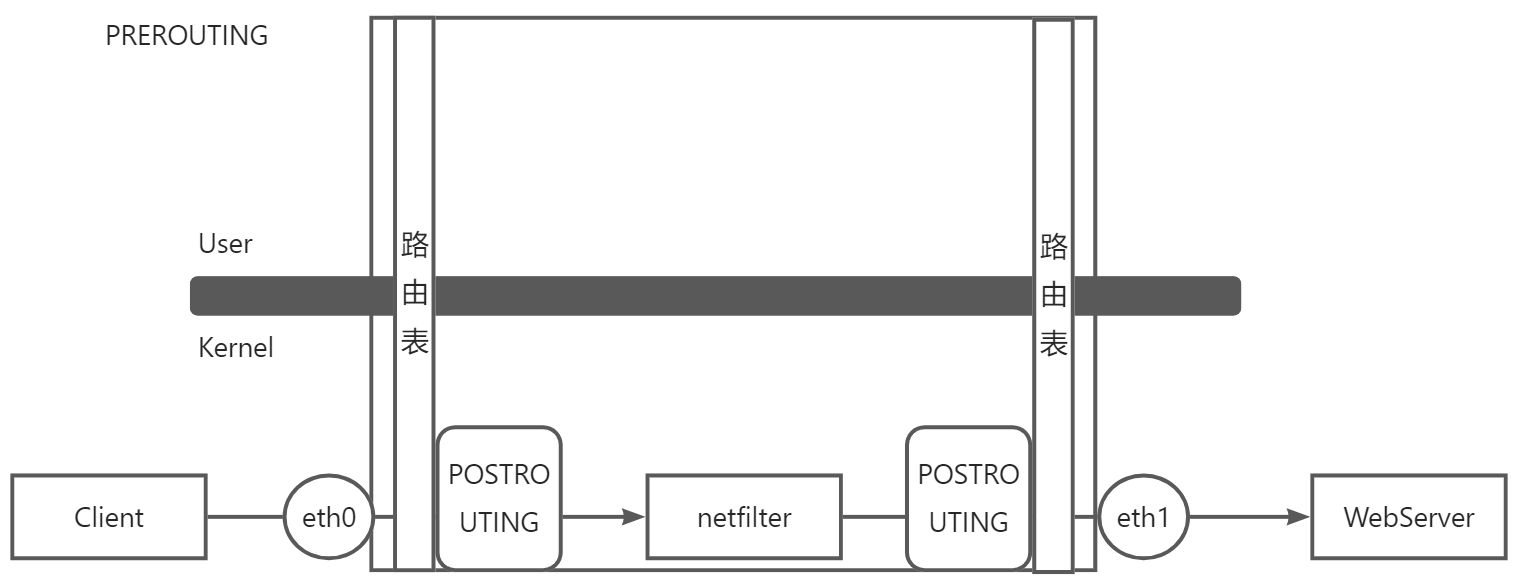
:::info POSTROUTING 是先经过路由表判断之后,才到POSTROUTING 进行下一步的处理。
POSTROUTING (路由后)链翻译过来就是路由表之后对数据报文处理的一个接口
:::
:::info 链的作用是承载防火墙的规则,链则是存放在表中。
:::
规则链:承载防火墙规则
处理入站数据包:INPUT
处理出站数据包:OUTPUT
处理转发数据包:FORWARD
在进行路由选择前应用规则(处理数据包):修改目标地址 PREROUTING
在进行路由选择后应用规则(处理数据包):修改源地址 POSTROUTING
规则表:承载防火墙链
raw 表:确定是否对该数据包进行状态跟踪
- 一旦我们的数据包经过防火墙以后,正常情况下会对数据包进行跟踪,跟踪会消耗资源。可以通过 raw 表将这些数据包进行跳出,不进行状态跟踪。
mangle 表:为数据包设置标记,例如:TTL MARK
- 可以在数据包打上固定标签的 mangle 表
- 功能可以有端口映射,SNAT,DNAT
- 基础类防火墙最主要的表,会对数据包进行过滤
:::info 主要的是 nat 表和 filter 表,raw 表和mangle 表的使用较少。
:::
防火墙链表结构
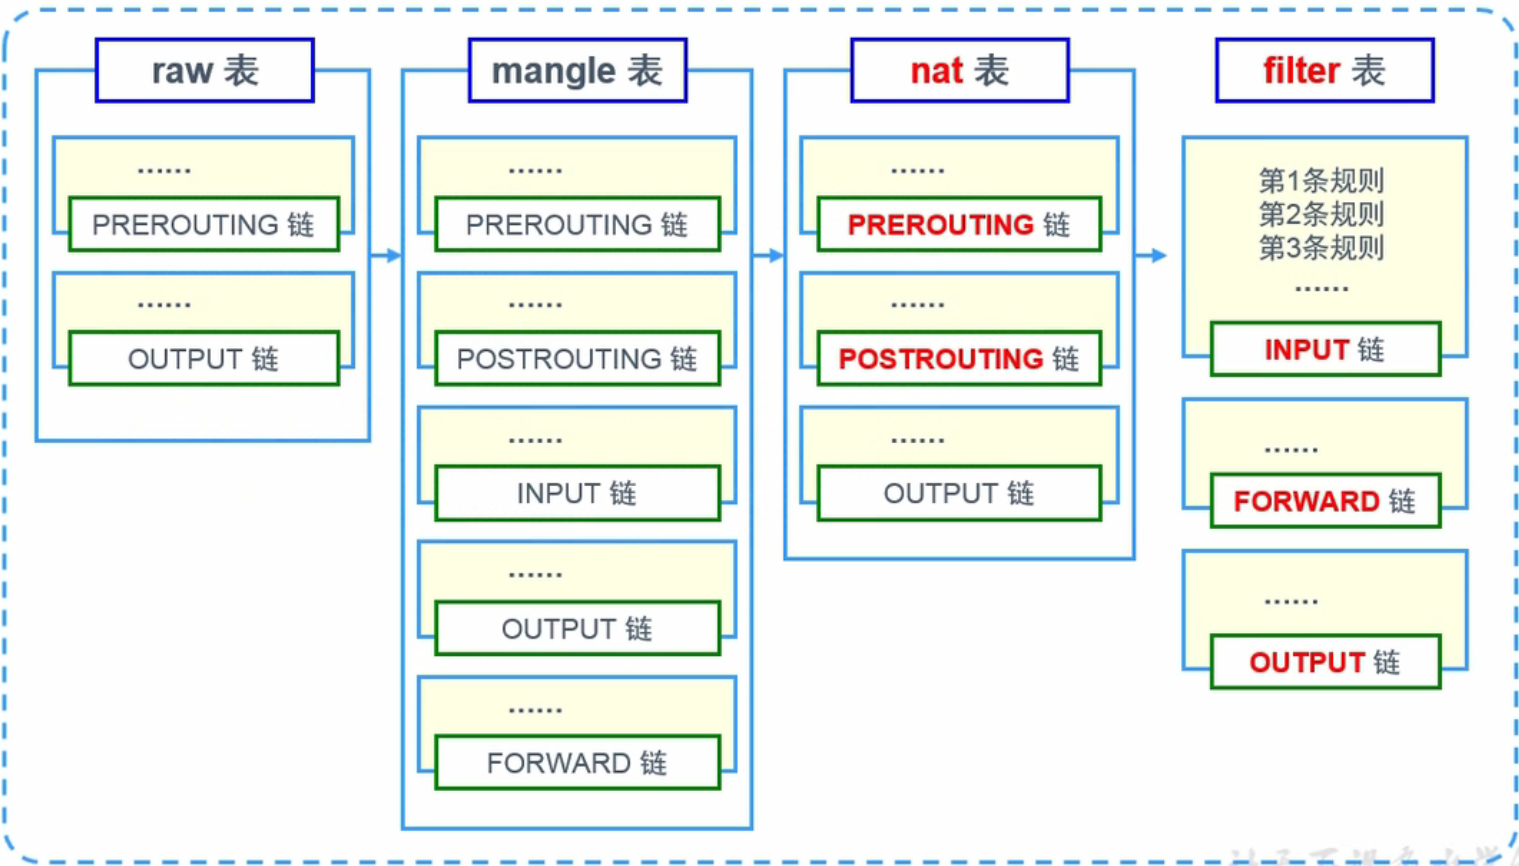
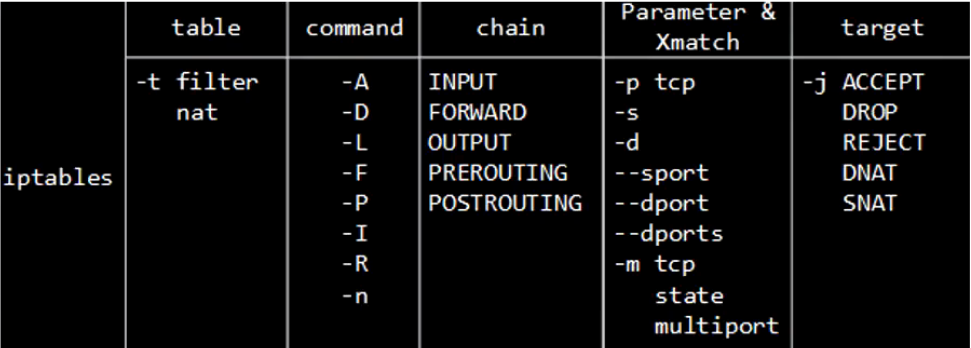
不同表下面拥有的链也是不同的。只要知道要做的防火墙规则是怎么样的,只需要匹配对应的功能,再来选择对应的入站和出站。这样就知道 netfilter 的规则是写在哪张表的哪条链上。(红色标记是重点),例如在NAT表中的PREROUTING 链和 POSTROUTING 链是各自实现SNAT和DNAT的功能。

| 类别 | 选项 | 用途 |
|---|---|---|
| 添加新的规则 | -A | 在链的末尾追加一条规则 |
| -I | 在链的开头(或者指定序号)插入一条规则 | |
| 查看规则列表 | -L | 列出所有的规则条目 |
| -n | 以数字形式形式地址,端口等信息 | |
| -v | 以更加详细的方式显示规则信息(显示当前过滤的数据包和过滤的字节数) | |
| —line-numbers | 查看规则时,显示规则的序号 | |
| 删除、清空规则 | -D | 删除链内指定序号(或者内容)的一条规则 |
| -F | 清空所有的规则 | |
| 设置默认策略 | -P | 为指定的链设置默认规则 |
:::color1 容器访问外部,外部访问容器
:::
# 9443 端口是 HTTPS# --restart=always 在Docker重启服务之后会自动启动$ docker run -d -p 8000:8000 -p 9000:9000 -p 9443:9443 --name portainer \--restart=always \-v /var/run/docker.sock:/var/run/docker.sock \-v portainer_data:/data \portainer/portainer$ docker psCONTAINER ID IMAGE COMMAND CREATED STATUS PORTS NAMES5f0ef6e5cb9d portainer/portainer "/portainer" 7 days ago Up 10 hours 0.0.0.0:8000->8000/tcp, :::8000->8000/tcp, 0.0.0.0:9000->9000/tcp, :::9000->9000/tcp, 0.0.0.0:9443->9443/tcp, :::9443->9443/tcp portainer$ docker port portainer8000/tcp -> 0.0.0.0:80008000/tcp -> :::80009000/tcp -> 0.0.0.0:90009000/tcp -> :::90009443/tcp -> 0.0.0.0:94439443/tcp -> :::9443$ iptables -vnL -t nat# 容器访问外部Chain POSTROUTING (policy ACCEPT 767 packets, 50988 bytes)pkts bytes target prot opt in out source destination0 0 MASQUERADE tcp -- * * 172.17.0.2 172.17.0.2 tcp dpt:94430 0 MASQUERADE tcp -- * * 172.17.0.2 172.17.0.2 tcp dpt:90000 0 MASQUERADE tcp -- * * 172.17.0.2 172.17.0.2 tcp dpt:8000# 外部访问容器Chain DOCKER (2 references)pkts bytes target prot opt in out source destination5 204 DNAT tcp -- !docker0 * 0.0.0.0/0 0.0.0.0/0 tcp dpt:9443 to:172.17.0.2:944356 2988 DNAT tcp -- !docker0 * 0.0.0.0/0 0.0.0.0/0 tcp dpt:9000 to:172.17.0.2:900014 688 DNAT tcp -- !docker0 * 0.0.0.0/0 0.0.0.0/0 tcp dpt:8000 to:172.17.0.2:8000# 可以访问 Portainer 的页面# ● 第一次登录需创建admin,访问地址:IP地址:9000 <http://IP:9000/#/init/admin># ● 设置admin用户和密码后首次登录
5.4.3 IPtables 工作流程
INPUT链:接收的数据包是本机(入站)时,应用此链中的规则。
OUTPUT链:本机向外发送数据包(出站)时,应用此链中的规则。
FORWARD链:需要通过防火墙中转发送给其他地址的数据包(转发)时,应用测链中的规则。
PREROUTING链:在对数据包做路由选择之前,应用此链中的规则。<font style="color:#E8323C;">SNAT</font>
POSTROUTING链:在对数据包做路由选择之后,应用此链中的规则。<font style="color:#E8323C;">DNAT</font>
MASQUERADE 动态源地址转换SNAT 固定IP地址# SNAT 修改源IP地址为宿主机IP向外发出容器访问外部-A POSTROUTING -s 172.17.0.0/16 ! -o docker0 -j MASQUERADE# 所有数据包来源IP来自 172.17.0.0/16 这个网段都要做源地址转换# DNAT 目标地址转换,修改数据包目标IP地址外部访问容器-A DOCKER ! -i docker0 -p tcp -m tcp --dport 80 -j DNAT --to-destination 172.17.0.5:80# 生产环境中不会轻易手动修改iptables转发规则
5.5 跨主机网络:实现Docker主机容器通信
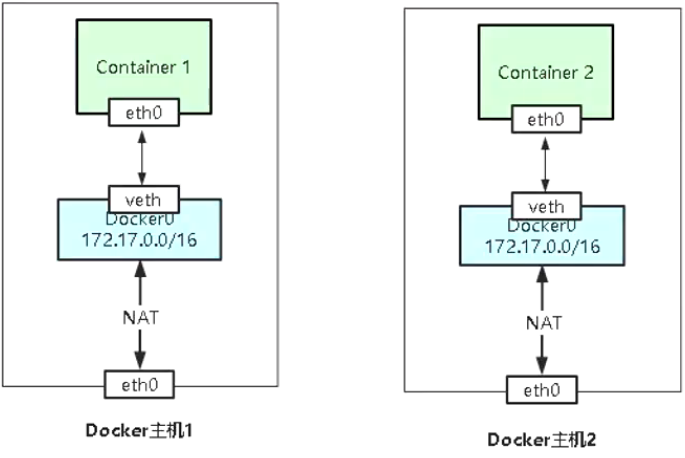
Flannel是CoreOS维护的一个网络组件,在每个主机上运行守护进程负责维护本地路由转发,Flannel使用ETCD来存储容器网络与主机之前的关系。
其他主流容器跨主机网络方案:
- 桥接宿主机网络
- 端口映射
- Docker网络驱动
- Overlay:基于VXLAN封装实现Docker原生Overlay网络
- Macvlan:Docker主机网卡接口逻辑上分为多个子接口,每个子接口标识一个VLAN。容器接口直接连接Docker主机网卡接口,通过路由策略转发到另一台Docker主机[ 是Docker做了一定的实现,是利用Linux内核的Macvlan的模块 ]
- 第三方网络项目
- 隧道方案
Flannel:支持UDP和VXLAN封装传输方式- Weave:支持UDP (
sleeve模式)和VXLAN(优先fastdp模式) - OpenvSwitch:是一种虚拟的二层交换机,支持VXLAN和GRE协议
- 路由方案
Calico:支持BGP协议和IPIP隧道。每台宿住主机作为虚拟路由,通过BGP协议实现不同主机容器间通信
- 隧道方案
5.5.1 Flannel实现Docker主机容器通信
1、etcd安装并配置
# etcd 部署一台即可$ yum install etcd -y$ vi /etc/etcd/etcd.confETCD_DATA_DIR="/var/lib/etcd/default.etcd"ETCD_LISTEN_CLIENT_URLS= "http://10.0.0.54:2379"ETCD_NAME="default"ETCD_ADVERTISE_CLIENT_URLS="http://10.0.0.54:2379"$ systemctl enable --now etcd
2、flanneld安装并配置
# 所有节点执行$ yum install flannel -y$ vi /etc/sysconfig/flanneldFLANNEL_ETCD_ENDPOINTS="http://10.0.0.54:2379"FLANNEL_ETCD_PREFIX="/atomic.io/network"# 以下步骤可省略$ mkdir -pv /atomic.io/network$ systemctl enable --now flanneld
3、向etcd写入子网
$ etcdctl --endpoints="http://10.0.0.54:2379" set /atomic.io/network/config '{"Network": "172.17.0.0/16","Backend": {"Type": "vxlan"}}'# 查看Flannel日志$ cat /var/run/flannel/dockerDOCKER_OPT_BIP="--bip=172.17.92.1/24"DOCKER_OPT_IPMASQ="--ip-masq=true"DOCKER_OPT_MTU="--mtu=1450"DOCKER_NETWORK_OPTIONS=" --bip=172.17.92.1/24 --ip-masq=true --mtu=1450"
4、配置Docker使用flannel生成的网络信息
# vi /usr/lib/systemd/system/docker.serviceEnvironmentFile=/run/flannel/dockerExecStart=/usr/bin/dockerd -H fd:// --containerd=/run/containerd/containerd.sock $DOCKER_NETWORK_OPTIONS
5、启动所有服务并设置开机启动
$ systemctl daemon-reload && systemctl restart docker# systemctl start docker$ systemctl enable --now docker$ ps -ef | grep dockerroot 3015 1 0 22:06 ? 00:00:00 /usr/bin/dockerd -H fd:// --containerd=/run/containerd/containerd.sock --bip=172.17.92.1/24 --ip-masq=true --mtu=1450root 3158 1679 0 22:06 pts/0 00:00:00 grep --color=auto docker# 从节点会同步flanneld配置$ cat /var/run/flannel/dockerDOCKER_OPT_BIP="--bip=172.17.95.1/24"DOCKER_OPT_IPMASQ="--ip-masq=true"DOCKER_OPT_MTU="--mtu=1450"DOCKER_NETWORK_OPTIONS=" --bip=172.17.95.1/24 --ip-masq=true --mtu=1450"$ vi /usr/lib/systemd/system/docker.serviceEnvironmentFile=/run/flannel/dockerExecStart=/usr/bin/dockerd -H fd:// --containerd=/run/containerd/containerd.sock $DOCKER_NETWORK_OPTIONS$ systemctl daemon-reload && systemctl restart docker$ ps -ef | grep dockerroot 2588 1 1 22:09 ? 00:00:00 /usr/bin/dockerd -H fd:// --containerd=/run/containerd/containerd.sock --bip=172.17.95.1/24 --ip-masq=true --mtu=1450root 2724 2383 0 22:09 pts/1 00:00:00 grep --color=auto docker
6、将两台主机防火墙关闭以及iptables放通
# FORWAD 设置 ACCEPT 允许iptables -P FORWARD ACCEPT# iptables -I FORWARD --dst 172.17.0.0/16 -j ACCEPT# 要先启动flanneld 再启动docker$ systemctl restart flanneld && systemctl restart docker
7、在两台主机创建容器相互ping验证
# Docker-Node1$ docker run -it --name busybox-node1 --hostname busybox-node1 -d busybox/ # ip addr1: lo: <LOOPBACK,UP,LOWER_UP> mtu 65536 qdisc noqueue qlen 1000link/loopback 00:00:00:00:00:00 brd 00:00:00:00:00:00inet 127.0.0.1/8 scope host lovalid_lft forever preferred_lft forever9: eth0@if10: <BROADCAST,MULTICAST,UP,LOWER_UP,M-DOWN> mtu 1450 qdisc noqueuelink/ether 02:42:ac:11:5c:02 brd ff:ff:ff:ff:ff:ffinet 172.17.92.2/24 brd 172.17.92.255 scope global eth0valid_lft forever preferred_lft forever/ # ping -c 2 -W 1 172.17.95.2PING 172.17.95.2 (172.17.95.2): 56 data bytes64 bytes from 172.17.95.2: seq=0 ttl=62 time=1.851 ms64 bytes from 172.17.95.2: seq=1 ttl=62 time=0.509 ms--- 172.17.95.2 ping statistics ---2 packets transmitted, 2 packets received, 0% packet lossround-trip min/avg/max = 0.509/1.180/1.851 ms# Docker-Node2$ docker run -it --name busybox-node2 --hostname busybox-node2 -d busybox/ # ip addr1: lo: <LOOPBACK,UP,LOWER_UP> mtu 65536 qdisc noqueue qlen 1000link/loopback 00:00:00:00:00:00 brd 00:00:00:00:00:00inet 127.0.0.1/8 scope host lovalid_lft forever preferred_lft forever9: eth0@if10: <BROADCAST,MULTICAST,UP,LOWER_UP,M-DOWN> mtu 1450 qdisc noqueuelink/ether 02:42:ac:11:5f:02 brd ff:ff:ff:ff:ff:ffinet 172.17.95.2/24 brd 172.17.95.255 scope global eth0valid_lft forever preferred_lft forever/ # ping -c 2 -W 1 172.17.92.2PING 172.17.92.2 (172.17.92.2): 56 data bytes64 bytes from 172.17.92.2: seq=0 ttl=62 time=0.493 ms64 bytes from 172.17.92.2: seq=1 ttl=62 time=0.600 ms--- 172.17.92.2 ping statistics ---2 packets transmitted, 2 packets received, 0% packet lossround-trip min/avg/max = 0.493/0.546/0.600 ms
5.5.2 Weave 部署实现Docker主机容器通信
官方文档: https://www.weave.works/docs/net/latest/install/installing-weave
使用前提:
- 确保
Linux内核版本3.8+,Docker1.10+。 - 节点之间如果有防火墙时,必须彼此放行
TCP 6783和UDP 6783/6784端口,这是Weave控制和数据端口。 主机名不能相同,通过主机名标识子网。
部署:
安装Docker
# step 1: 安装必要的一些系统工具sudo apt-get updatesudo apt-get -y install apt-transport-https ca-certificates curl software-properties-common# step 2: 安装GPG证书curl -fsSL https://mirrors.aliyun.com/docker-ce/linux/ubuntu/gpg | sudo apt-key add -# Step 3: 写入软件源信息sudo add-apt-repository "deb [arch=amd64] https://mirrors.aliyun.com/docker-ce/linux/ubuntu $(lsb_release -cs) stable"# Step 4: 更新并安装Docker-CEsudo apt-get -y updatesudo apt-get -y install docker-ce# 安装指定版本的Docker-CE:# Step 1: 查找Docker-CE的版本:# apt-cache madison docker-ce# docker-ce | 17.03.1~ce-0~ubuntu-xenial | https://mirrors.aliyun.com/docker-ce/linux/ubuntu xenial/stable amd64 Packages# docker-ce | 17.03.0~ce-0~ubuntu-xenial | https://mirrors.aliyun.com/docker-ce/linux/ubuntu xenial/stable amd64 Packages# Step 2: 安装指定版本的Docker-CE: (VERSION例如上面的17.03.1~ce-0~ubuntu-xenial)# sudo apt-get -y install docker-ce=[VERSION]sudo mkdir -p /etc/dockersudo tee /etc/docker/daemon.json <<-'EOF'{"registry-mirrors": ["https://po13h3y1.mirror.aliyuncs.com","http://hub-mirror.c.163.com","https://mirror.ccs.tencentyun.com","http://f1361db2.m.daocloud.io"],"exec-opts": ["native.cgroupdriver=systemd"],"log-driver": "json-file","log-opts": {"max-size": "100m"},"storage-driver": "overlay2"}EOFsudo systemctl daemon-reload && sudo systemctl restart docker
- 安装 Weave
sudo curl -L git.io/weave -o /usr/local/bin/weavesudo chmod a+x /usr/local/bin/weave
- 启动并与其他主机建立连接
# 10.0.0.100weave-01:~# weave launch 10.0.0.101# 10.0.0.101# 格式: weave launch <ip address>weave-02:~# weave launch 10.0.0.100# 查看 weave 进程(Docker 和 相同)$ docker ps -aCONTAINER ID IMAGE COMMAND CREATED STATUS PORTS NAMESa0cdadd6af76 weaveworks/weave:2.8.1 "/home/weave/weaver …" 2 minutes ago Up 2 minutes weave6c99e03d4cbc weaveworks/weaveexec:2.8.1 "data-only" 2 minutes ago Created weavevolumes-2.8.19df415d01bfc weaveworks/weavedb:latest "data-only" 2 minutes ago Created weavedb$ ps -ef | grep weaveroot 9051 9033 0 12:32 ? 00:00:00 /home/weave/weaver --port 6783 --nickname ubuntu-cluster01 --host-root=/host --docker-bridge docker0 --weave-bridge weave --datapath datapath --ipalloc-range 10.32.0.0/12 --dns-listen-address 172.17.0.1:53 --http-addr 127.0.0.1:6784 --status-addr 127.0.0.1:6782 --resolv-conf /var/run/weave/etc/stub-resolv.conf -H unix:///var/run/weave/weave.sock --plugin --proxy 10.0.0.101root 9641 1372 0 12:35 pts/0 00:00:00 grep --color=auto weave# 查看Weave状态$ weave status connections<- 10.0.0.101:36825 established fastdp be:df:a6:58:c4:5b(ubuntu-cluster02) mtu=1376$ weave statusVersion: 2.8.1 (up to date; next check at 2022/11/26 17:31:37)Service: routerProtocol: weave 1..2Name: 62:31:18:ff:de:8a(ubuntu-cluster01)Encryption: disabledPeerDiscovery: enabledTargets: 1Connections: 1 (1 established)Peers: 2 (with 2 established connections)TrustedSubnets: noneService: ipamStatus: idleRange: 10.32.0.0/12DefaultSubnet: 10.32.0.0/12Service: dnsDomain: weave.local.Upstream: noneTTL: 1Entries: 0Service: proxyAddress: unix:///var/run/weave/weave.sockService: plugin (legacy)DriverName: weave# 查看Docker Network$ docker network lsNETWORK ID NAME DRIVER SCOPE56ae06b199c5 bridge bridge local79fd1c4f4207 host host local7ed85ed91100 none null local2670edf4b724 weave weavemesh local
- 使用Weave网络创建容器
# 方式1:eval $(weave env) # 所有节点执行,创建的容器默认会添加到 Weave 网络中# ubuntu-cluster01 执行$ docker run -it busybox/ # ip addr1: lo: <LOOPBACK,UP,LOWER_UP> mtu 65536 qdisc noqueue qlen 1000link/loopback 00:00:00:00:00:00 brd 00:00:00:00:00:00inet 127.0.0.1/8 scope host lovalid_lft forever preferred_lft forever20: eth0@if21: <BROADCAST,MULTICAST,UP,LOWER_UP,M-DOWN> mtu 1500 qdisc noqueuelink/ether 02:42:ac:11:00:02 brd ff:ff:ff:ff:ff:ffinet 172.17.0.2/16 brd 172.17.255.255 scope global eth0valid_lft forever preferred_lft forever22: ethwe@if23: <BROADCAST,MULTICAST,UP,LOWER_UP,M-DOWN> mtu 1376 qdisc noqueuelink/ether 22:61:ef:5a:96:77 brd ff:ff:ff:ff:ff:ffinet 10.32.0.2/12 brd 10.47.255.255 scope global ethwevalid_lft forever preferred_lft forever# 容器连通性测试/ # ping -c 1 -W 1 10.40.0.1PING 10.40.0.1 (10.40.0.1): 56 data bytes64 bytes from 10.40.0.1: seq=0 ttl=64 time=1.490 ms--- 10.40.0.1 ping statistics ---1 packets transmitted, 1 packets received, 0% packet lossround-trip min/avg/max = 1.490/1.490/1.490 ms# 容器可以连通宿主机外网/ # ping -c 1 -W 1 www.baidu.comPING www.baidu.com (183.232.231.174): 56 data bytes64 bytes from 183.232.231.174: seq=0 ttl=127 time=30.830 ms--- www.baidu.com ping statistics ---1 packets transmitted, 1 packets received, 0% packet lossround-trip min/avg/max = 30.830/30.830/30.830 ms# ubuntu-cluster02 执行$ docker run -it busybox/ # ip addr1: lo: <LOOPBACK,UP,LOWER_UP> mtu 65536 qdisc noqueue qlen 1000link/loopback 00:00:00:00:00:00 brd 00:00:00:00:00:00inet 127.0.0.1/8 scope host lovalid_lft forever preferred_lft forever17: eth0@if18: <BROADCAST,MULTICAST,UP,LOWER_UP,M-DOWN> mtu 1500 qdisc noqueuelink/ether 02:42:ac:11:00:02 brd ff:ff:ff:ff:ff:ffinet 172.17.0.2/16 brd 172.17.255.255 scope global eth0valid_lft forever preferred_lft forever19: ethwe@if20: <BROADCAST,MULTICAST,UP,LOWER_UP,M-DOWN> mtu 1376 qdisc noqueuelink/ether 6a:bb:65:d3:80:f0 brd ff:ff:ff:ff:ff:ffinet 10.40.0.1/12 brd 10.47.255.255 scope global ethwevalid_lft forever preferred_lft forever######################################################################################################################### 所有节点执行# 方式2:docker run -it -d --net=weave busybox# Weave 要比 Flannel 更加的强大# ubuntu-cluster01 执行$ docker psCONTAINER ID IMAGE COMMAND CREATED STATUS PORTS NAMESd6c7802450de busybox "sh" 2 minutes ago Up 2 minutes funny_sahaa0cdadd6af76 weaveworks/weave:2.8.1 "/home/weave/weaver …" 10 minutes ago Up 10 minutes weave$ docker exec -it funny_saha /bin/sh/ # ip addr1: lo: <LOOPBACK,UP,LOWER_UP> mtu 65536 qdisc noqueue qlen 1000link/loopback 00:00:00:00:00:00 brd 00:00:00:00:00:00inet 127.0.0.1/8 scope host lovalid_lft forever preferred_lft forever15: ethwe0@if16: <BROADCAST,MULTICAST,UP,LOWER_UP,M-DOWN> mtu 1376 qdisc noqueuelink/ether 52:fc:49:07:dc:40 brd ff:ff:ff:ff:ff:ffinet 10.32.0.1/12 brd 10.47.255.255 scope global ethwe0valid_lft forever preferred_lft forever18: eth0@if19: <BROADCAST,MULTICAST,UP,LOWER_UP,M-DOWN> mtu 1500 qdisc noqueuelink/ether 02:42:ac:12:00:02 brd ff:ff:ff:ff:ff:ffinet 172.18.0.2/16 brd 172.18.255.255 scope global eth0valid_lft forever preferred_lft forever# 容器连通性测试/ # ping -c 1 -W 1 10.40.0.0PING 10.40.0.0 (10.40.0.0): 56 data bytes64 bytes from 10.40.0.0: seq=0 ttl=64 time=2.450 ms--- 10.40.0.0 ping statistics ---1 packets transmitted, 1 packets received, 0% packet lossround-trip min/avg/max = 2.450/2.450/2.450 ms# ubuntu-cluster02 执行$ docker psCONTAINER ID IMAGE COMMAND CREATED STATUS PORTS NAMES24fa2ba12eb7 busybox "sh" 2 minutes ago Up 2 minutes keen_wozniak198bba761658 weaveworks/weave:2.8.1 "/home/weave/weaver …" 9 minutes ago Up 9 minutes weave$ docker exec -it keen_wozniak /bin/sh/ # ip addr1: lo: <LOOPBACK,UP,LOWER_UP> mtu 65536 qdisc noqueue qlen 1000link/loopback 00:00:00:00:00:00 brd 00:00:00:00:00:00inet 127.0.0.1/8 scope host lovalid_lft forever preferred_lft forever12: ethwe0@if13: <BROADCAST,MULTICAST,UP,LOWER_UP,M-DOWN> mtu 1376 qdisc noqueuelink/ether 16:c7:c5:66:81:08 brd ff:ff:ff:ff:ff:ffinet 10.40.0.0/12 brd 10.47.255.255 scope global ethwe0valid_lft forever preferred_lft forever15: eth0@if16: <BROADCAST,MULTICAST,UP,LOWER_UP,M-DOWN> mtu 1500 qdisc noqueuelink/ether 02:42:ac:12:00:02 brd ff:ff:ff:ff:ff:ffinet 172.18.0.2/16 brd 172.18.255.255 scope global eth0valid_lft forever preferred_lft forever
- 查看Weave的信息
# 查看当前分配的容器$ weave psweave:expose 62:31:18:ff:de:8a3be8f8e8f68a 22:61:ef:5a:96:77 10.32.0.2/12d6c7802450de 52:fc:49:07:dc:40 10.32.0.1/12# 查看weave相互之间节点建立的关系$ weave status peers62:31:18:ff:de:8a(ubuntu-cluster01)<- 10.0.0.101:36825 be:df:a6:58:c4:5b(ubuntu-cluster02) establishedbe:df:a6:58:c4:5b(ubuntu-cluster02)-> 10.0.0.100:6783 62:31:18:ff:de:8a(ubuntu-cluster01) established# 查看weave版本$ weave versionweave script 2.8.1weave 2.8.1# 查看网桥信息$ apt install -y bridge-utils$ brctl showbridge name bridge id STP enabled interfacesdocker0 8000.0242cc4c48a4 no vethdc43521docker_gwbridge 8000.0242b455ce02 no vetha714a91weave 8000.623118ffde8a no vethwe-bridgevethwepl11240vethwlb3b8944d3
5.5.2.1 Weave 命令
# 安装weavecurl -L git.io/weave -o /usr/local/bin/weave# 通过weave setup预先将weave相关的容器Image下载到各个节点weave setup# 启动跨多节点(peer) weave networkweave launch –no-dns 192.168.56.7 192.168.59# 查看节点weave之间的连接状态:weave status connections# weave网络的整体状态:weave status# 查看状态详情weave status connections# 查看weave相互之间节点建立的关系weave status peers# 查看当前分配的容器weave ps# 查看weave当前版本weave version# 启动并与其他主机建立连接,启动weave并下载镜像weave launch# 进行连接 IP连接对端服务器weave launch# 使用weave代理weave env# 执行输出|来自weave env的输出export DOCKER_HOST=unix:///var/run/weave/weave.sock# 关闭weaveweave stop# 关闭weave env代理export DOCKER=OPTS=
5.5.2.2 Weave 工作原理
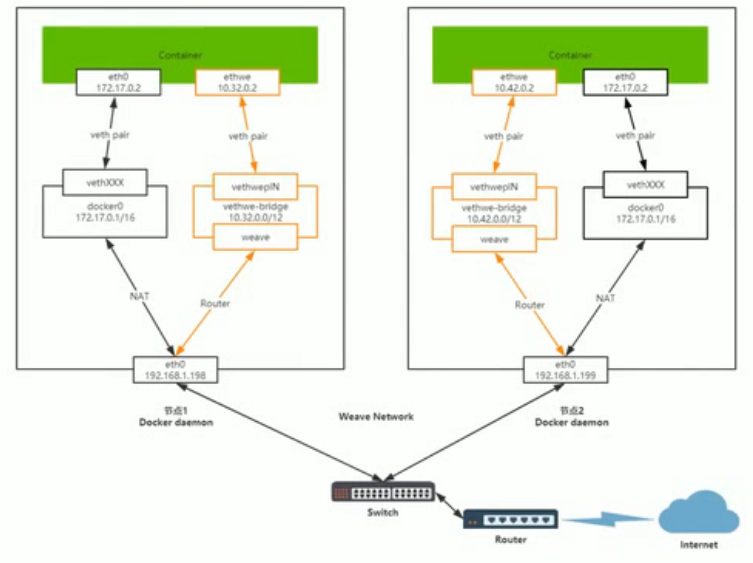
1、ethwe 会将数据包发送给vethwe-bridge网桥。
2、vethwe-bridge接收到数据包后由weave去处理这个数据,通过UDP6783数据端口依照weave的路由表转发到下一路由节点。
3、如果该节点就是目的地,本地weave会把信息转发到内核的TCP协议站,再转发到目的节点。
weave通过在docker集群的每个主机上启动虚拟路由器,将主机作为路由器,形成互联互通的网络拓扑,在此基础上,实现容器的跨主机通信。其主机网络拓扑参见下图:
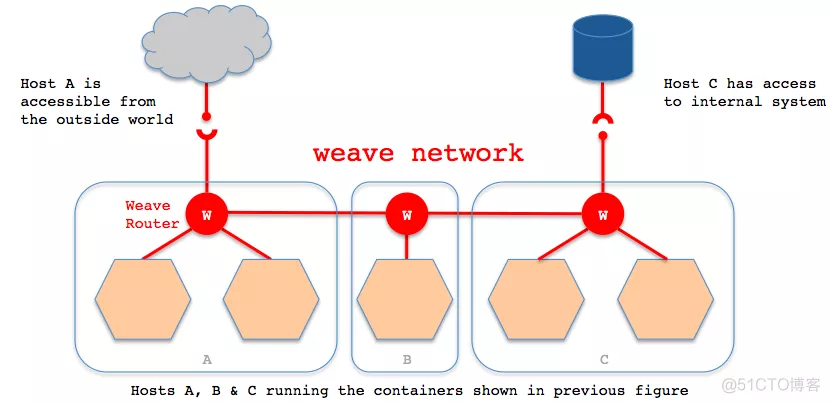
如上图所示,在每一个部署Docker的主机(可能是物理机也可能是虚拟机)上都部署有一个W(即weave router,它本身也可以以一个容器的形式部署)。weave网络是由这些weave routers组成的对等端点(peer)构成,并且可以通过weave命令行定制网络拓扑。
每个部署了weave router的主机之间都会建立TCP和UDP两个连接,保证weave router之间控制面流量和数据面流量的通过。控制面由weave routers之间建立的TCP连接构成,通过它进行握手和拓扑关系信息的交换通信。控制面的通信可以被配置为加密通信。而数据面由weave routers之间建立的UDP连接构成,这些连接大部分都会加密。这些连接都是全双工的,并且可以穿越防火墙。 当容器通过weave进行跨主机通信时,其网络通信模型可以参考下图:
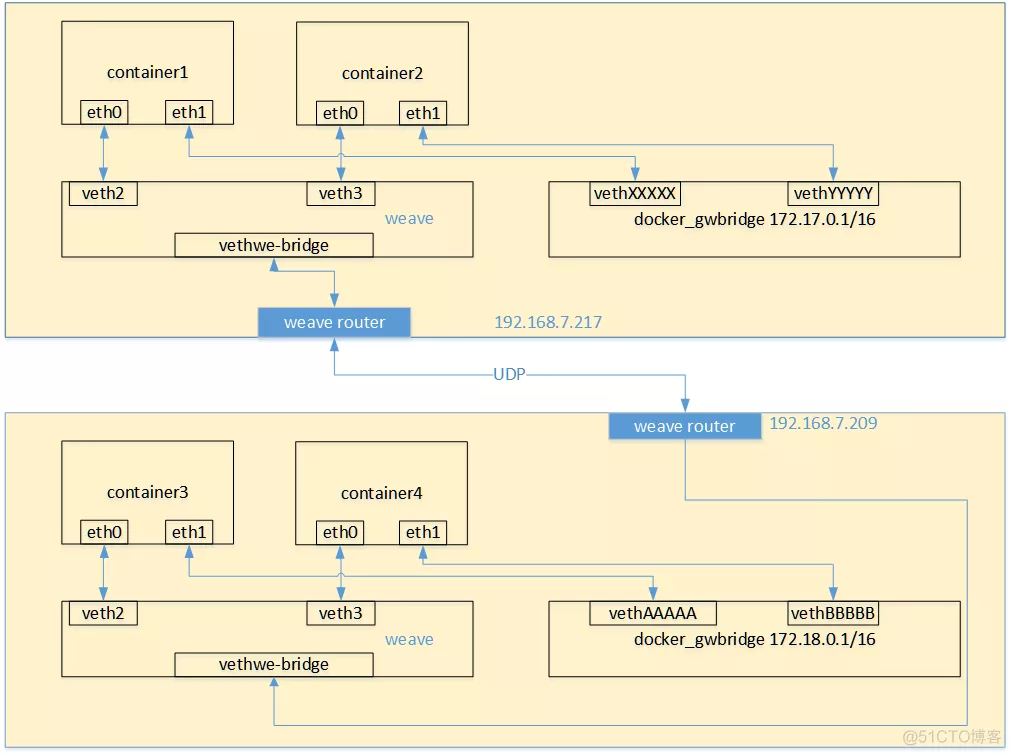
从上面的网络模型图中可以看出,对每一个weave网络中的容器,weave都会创建一个网桥,并且在网桥和每个容器之间创建一个veth pair,一端作为容器网卡加入到容器的网络命名空间中,并为容器网卡配置ip和相应的掩码,一端连接在网桥上,最终通过宿主机上weave router将流量转发到对端主机上。
其基本过程如下:
1)容器流量通过veth pair到达宿主机上weave router网桥上。
2)weave router在混杂模式下使用pcap在网桥上截获网络数据包,并排除由内核直接通过网桥转发的数据流量,例如本子网内部、本地容器之间的数据以及宿主机和本地容器之间的流量。捕获的包通过UDP转发到所其他主机的weave router端。
3)在接收端,weave router通过pcap将包注入到网桥上的接口,通过网桥的上的veth pair,将流量分发到容器的网卡上。weave默认基于UDP承载容器之间的数据包,并且可以完全自定义整个集群的网络拓扑,但从性能和使用角度来看,还是有比较大的缺陷的:
→ weave自定义容器数据包的封包解包方式,不够通用,传输效率比较低,性能上的损失也比较大。
→ 集群配置比较负载,需要通过weave命令行来手工构建网络拓扑,在大规模集群的情况下,加重了管理员的负担。
5.5.2.3 Weave 其他功能
- IP地址管理(IPAM)
Weave 自动为容器分配唯一的IP地址。可通过weave ps查看命名和发现
- 命名的容器
自动会注册到Weave DNS中,并可以通过容器名称访问。
# ubuntu-cluster01 执行$ docker run -itd --name busybox-node1 busybox$ docker exec -it busybox-node1 /bin/sh/ # ip addr1: lo: <LOOPBACK,UP,LOWER_UP> mtu 65536 qdisc noqueue qlen 1000link/loopback 00:00:00:00:00:00 brd 00:00:00:00:00:00inet 127.0.0.1/8 scope host lovalid_lft forever preferred_lft forever30: eth0@if31: <BROADCAST,MULTICAST,UP,LOWER_UP,M-DOWN> mtu 1500 qdisc noqueuelink/ether 02:42:ac:11:00:03 brd ff:ff:ff:ff:ff:ffinet 172.17.0.3/16 brd 172.17.255.255 scope global eth0valid_lft forever preferred_lft forever32: ethwe@if33: <BROADCAST,MULTICAST,UP,LOWER_UP,M-DOWN> mtu 1376 qdisc noqueuelink/ether da:87:cf:3d:95:0d brd ff:ff:ff:ff:ff:ffinet 10.32.0.3/12 brd 10.47.255.255 scope global ethwevalid_lft forever preferred_lft forever# ubuntu-cluster02 执行$ docker run -itd --name busybox-node2 busybox$ docker exec -it busybox-node2 /bin/sh/ # ping -c 1 -W 1 busybox-node1PING busybox-node1 (10.32.0.3): 56 data bytes64 bytes from 10.32.0.3: seq=0 ttl=64 time=1.232 ms--- busybox-node1 ping statistics ---1 packets transmitted, 1 packets received, 0% packet lossround-trip min/avg/max = 1.232/1.232/1.232 ms
- 负载均衡
允许注册多个相同名称的容器(不同服务器的相同容器名),Weave DNS随机为每个请求返回地址,提供基本的负载均衡功能。
# 所有节点执行$ docker run -itd --name busybox1 busybox# 其中一个节点执行$ docker run -it --name busybox-cmd busybox/ # ping -c 1 -W 1 busybox1PING busybox1 (10.32.0.4): 56 data bytes64 bytes from 10.32.0.4: seq=0 ttl=64 time=1.560 ms--- busybox1 ping statistics ---1 packets transmitted, 1 packets received, 0% packet lossround-trip min/avg/max = 1.560/1.560/1.560 ms/ # ping -c 1 -W 1 busybox1PING busybox1 (10.40.0.3): 56 data bytes64 bytes from 10.40.0.3: seq=0 ttl=64 time=0.197 ms--- busybox1 ping statistics ---1 packets transmitted, 1 packets received, 0% packet lossround-trip min/avg/max = 0.197/0.197/0.197 ms# 会响应两个容器的IP地址,实现基本的负载均衡功能
- 手动指定IP地址
docker run -it -e WEAVE_CIDR=10.32.0.100/24 busybox
- 动态拓扑
可以在不停止或重新配置剩余Docker主机的情况下添加主机到Weave网络中或从Weave网络中删除
- 容错
weave peer不断交换拓扑信息,监视和建立与其他peer的网络连接。如果有主机或网络出现故障,Weave会绕过这个主机,保证两边容器可以继续通信,当恢复时,恢复完全连接。
:::color1 这也是 Weave 比 Flannel 功能强大的原因。实现的效果类似,只不过 Weave 从部署到功能上要比 Flannel 强大。
:::
6 使用 Dockerfile 定制容器镜像
6.1 Dockerfile介绍
Docker通过Dockerfile自动构建镜像,Dockerfile是一个包含用于组建镜像的文本文件,由一条一条的指令组成。

6.2 Dockerfile常用指令
一个镜像或者容器就是运行一个服务,不要当成虚拟机使用
| 指令 | 描述 |
|---|---|
| FROM | 构建新镜像是基于哪个镜像 |
| LABEL | 标签 |
| RUN | 构建镜像时运行的Shell命令 |
| COPY | 拷贝文件或目录到镜像中 |
| ADD | 解压压缩包并拷贝 |
| ENV | 设置环境变量 |
| USER | 为RUN、CMD和ENTRYPOINT执行命令指定运行用户 |
| EXPOSE | 声明容器运行的服务端口 |
| WORKDIR | 为RUN、CMD、ENTRYPOINT、COPY和ADD设置工作目录 |
| CMD | 运行容器时默认执行,如果有多个CMD指令,最后一个生效 |
| ENTRYPOINT | 如果与CMD一起用,CMD将作为ENTRYPOINT的默认参数,如果如果有多个ENTRYPOINT指令,最后一个生效 |
:::color1 镜像分类:
- 基础镜像:例如CentOS,Ubuntu,Alpine
- 环境镜像:例如Java,PHP,Go
- 项目镜像:将项目与环境镜像打包一起
:::
范例:创建Dockerfile
$ mkdir -pv dockerfile/dockerfile-centos && cd dockerfile/dockerfile-centos$ vim DockerfileFROM centos:centos7.9.2009LABEL maintainer <zhongzhiwei zhongzhiwei@kubesphere.io># 设置容器环境变量ENV OS="centos"# 指定工作目录WORKDIR /tmpCOPY hello.txt /tmpRUN yum install -y vimEXPOSE 8080CMD [ "sleep","3600" ]$ echo "Hello Dockerfile World" > hello.txt
$ docker build -t centos-test:v1.0 -f Dockerfile .$ docker images centos-testREPOSITORY TAG IMAGE ID CREATED SIZEcentos-test v1.0 38ae2bb8aeb8 About a minute ago 448MB# 将镜像运行成容器$ docker run -it --name centos-vim --rm centos-test:v1.0 /bin/bash[root@b730624cd590 tmp]# which vim/usr/bin/vim[root@b730624cd590 tmp]# pwd/tmp[root@b730624cd590 tmp]# cat hello.txtHello Dockerfile World
6.3 docker build构建镜像
Usage: docker build [OPTIONS] PATH |URL / - [flags]Options:-t, --tag list # 镜像名称-f, --file string # 指定Dockerfile文件位置# docker build -t shykes/myapp .# docker build -t shykes/myapp -f /path/Dockerfile/path# docker build -t shykes/myapp http://www.example.com/Dockerfile
6.4 CMD与ENTRYPOINT区别
CMD用法:
- CMD [ “executable”, “param1”, “param2” ]:exec形式 ( 首选 ) [ 不能直接調用环境变量 ]
- CMD [ “param1”, “param2”]:作为ENTRYPOINT的默认参数
- CMD command param1 param2: Shell形式
ENTRYPOINT用法:
- ENTRYPOINT [ “executable” , “param1” , “param2” ]
- ENTRYPOINT command param1 param2
范例:CMD用法
$ vim dockerfile-cmd/run.sh#!/bin/bashecho ${1}sleep 36000$ chmod +x dockerfile-cmd/run.sh$ vim dockerfile-cmd/DockerfileFROM centos:centos7.9.2009LABEL maintainer <zhongzhiwei zhongzhiwei@kubesphere.io>COPY run.sh /usr/bin/CMD [ "run.sh","KubeSphere" ]# CMD [ "/bin/sh","-c","/usr/bin/run.sh KubeSphere" ]$ docker build -t centos-test:v1.0 -f Dockerfile .$ docker run -it -d centos-test:v1.0$ docker psCONTAINER ID IMAGE COMMAND CREATED STATUS PORTS NAMESdeecf9094d01 centos-test:v1.0 "run.sh KubeSphere" 27 seconds ago Up 25 seconds hopeful_turing$ docker logs hopeful_turingKubeSphere
$ vim dockerfile-cmd/run.sh#!/bin/bashecho ${1}sleep 36000$ chmod +x dockerfile-cmd/run.sh$ vim dockerfile-cmd/DockerfileFROM centos:centos7.9.2009LABEL maintainer <zhongzhiwei zhongzhiwei@kubesphere.io>COPY run.sh /usr/bin/CMD run.sh KubeSphere$ cd dockerfile-cmd$ docker build -t centos-test:v2.0 -f Dockerfile .$ docker run -it -d centos-test:v2.0$ docker psCONTAINER ID IMAGE COMMAND CREATED STATUS PORTS NAMES0d6af53d047a centos-test:v2.0 "/bin/sh -c 'run.sh …" 4 seconds ago Up 3 seconds sad_cannon$ docker logs sad_cannonKubeSphere# CMD 会被docker run最后的COMMAND覆盖
范例:ENTRYPOINT用法
$ vim dockerfile-cmd/run.sh#!/bin/bashecho ${1}sleep 36000$ chmod +x dockerfile-cmd/run.sh$ vim dockerfile-entrypoint/DockerfileFROM centos:centos7.9.2009LABEL maintainer <zhongzhiwei zhongzhiwei@kubesphere.io>ENV NAME=kubepshereCOPY run.sh /usr/bin/ENTRYPOINT /usr/bin/run.sh $NAME$ cd dockerfile-entrypoint$ docker build -t centos-entrypoint:v1.0 -f Dockerfile .$ docker run -it -d centos-entrypoint:v1.0$ docker psCONTAINER ID IMAGE COMMAND CREATED STATUS PORTS NAMESa255c579d2ce centos-entrypoint:v1.0 "/bin/sh -c '/usr/bi…" 2 seconds ago Up 1 second eloquent_montalcini$ docker logs eloquent_montalcinikubepshere# ENTRYPOINT 的参数需要 --entrypoint 替换
$ vim DockerfileFROM centos:centos7.9.2009LABEL maintainer <zhongzhiwei zhongzhiwei@kubesphere.io>ENV NAME=kubepshereCOPY run.sh /usr/bin/ENTRYPOINT [ "echo" ]CMD [ "hello" ]# [ENTRYPOINT] [CMD]$ docker build -t centos-entrypoint:v2.0 -f Dockerfile .$ docker run -it --name centos-entrypoint -d centos-entrypoint:v2.0$ docker logs centos-entrypointhello
:::color1 小结:
CMD和ENTRYPOINT指令都可以用来定义运行容器时所使用的默认命令- Dockerfile至少指定一个
CMD或ENTRYPOINT - CMD可以用作ENTRYPOINT默认参数,或者用作容器的默认命令
- docker run指定
<command>时,将会覆盖CMD - 如果是可执行文件,希望运行时传参,应该使用
ENTRYPOINT
:::
6.5 前端项目镜像构建与部署:Nginx
$ vim DockerfileFROM centos:centos7.9.2009LABEL maintainer www.kubesphere.io# 设置阿里云Yum源环境# RUN curl -o /etc/yum.repos.d/CentOS-Base.repo https://mirrors.aliyun.com/repo/Centos-7.repo && \# curl -o /etc/yum.repos.d/epel.repo https://mirrors.aliyun.com/repo/epel-7.repoRUN yum install -y gcc gcc-c++ make \openssl-devel pcre-devel gd-devel \iproute net-tools telnet wget curl && \yum clean all && \rm -rf /var/cache/yum/*# http://nginx.org/download/nginx-1.21.1.tar.gz 下载到Dockerfile同级目录ADD nginx-1.21.1.tar.gz /RUN cd nginx-1.21.1 && \./configure --prefix=/usr/local/nginx \--with-http_ssl_module \--with-http_stub_status_module && \make -j 4 && make install && \mkdir /usr/local/nginx/conf/vhost && \cd / && rm -rf nginx* && \ln -sf /usr/share/zoneinfo/Asia/Shanghai /etc/localtime && \useradd nginx# 设置环境变量ENV PATH $PATH:/usr/local/nginx/sbin# 拷贝配置文件COPY nginx.conf /usr/local/nginx/conf/nginx.conf# 设置工作目录WORKDIR /usr/local/nginxEXPOSE 80CMD ["nginx", "-g", "daemon off;"]$ vim nginx.confuser nginx;worker_processes auto;error_log logs/error.log info;pid logs/nginx.pid;events {worker_connections 1024;}http {log_format main '$remote_addr - $remote_user [$time_local] "$request" ''$status $body_bytes_sent "$http_referer" ''"$http_user_agent" "$http_x_forwarded_for"';access_log logs/access.log main;sendfile on;tcp_nopush on;tcp_nodelay on;keepalive_timeout 65;types_hash_max_size 2048;include mime.types;default_type application/octet-stream;include /etc/nginx/conf.d/*.conf;server {listen 80 default_server;listen [::]:80 default_server;server_name _;root /usr/share/nginx/html;include /usr/local/nginx/conf/vhost/*.conf;location / {root html;index index.html index.htm;}# location ~* \.php$ {# root html;# fastcgi_pass php:9000;# fastcgi_param SCRIPT_FILENAME $document_root$fastcgi_script_name;# include fastcgi_params;# }# error_page 404 /404.html;# location = /40x.html {# }# error_page 500 502 503 504 /50x.html;# location = /50x.html {# }}}
$ docker build -t centos-nginx:v1.0 -f Dockerfile .$ docker run -it -d -p 10880:80 --name centos-nginx-node1 centos-nginx:v1.0# 查看Docker运行状态$ docker ps -lCONTAINER ID IMAGE COMMAND CREATED STATUS PORTS NAMES438a2806319d centos-nginx:v1.0 "nginx -g 'daemon of…" 22 seconds ago Up 21 seconds 0.0.0.0:10880->80/tcp, :::10880->80/tcp centos-nginx-node1$ curl 127.0.0.1:10880<!DOCTYPE html><html><head><title>Welcome to nginx!</title><style>body {width: 35em;margin: 0 auto;font-family: Tahoma, Verdana, Arial, sans-serif;}</style></head><body><h1>Welcome to nginx!</h1><p>If you see this page, the nginx web server is successfully installed andworking. Further configuration is required.</p><p>For online documentation and support please refer to<a href="http://nginx.org/">nginx.org</a>.<br/>Commercial support is available at<a href="http://nginx.com/">nginx.com</a>.</p><p><em>Thank you for using nginx.</em></p></body></html># 浏览器访问:http://<IP地址>:10880
$ docker run -it -d -p 10990:80 --name centos-nginx-node2 -v /opt/wwwroot:/usr/local/nginx/html centos-nginx:v1.0$ docker ps -lCONTAINER ID IMAGE COMMAND CREATED STATUS PORTS NAMES03ff752bf295 centos-nginx:v1.0 "nginx -g 'daemon of…" 22 seconds ago Up 21 seconds 0.0.0.0:10990->80/tcp, :::10990->80/tcp centos-nginx-node2$ echo "<h1>Hello NGINX Docker</h1>" > /opt/wwwroot/index.html$ curl 127.0.0.1:10990<h1>Hello NGINX Docker</h1># 浏览器访问:http://<IP地址>:10990

6.6 PHP项目镜像构建:PHP
FROM centos:centos7.9.2009MAINTAINER zhongzhiwei www.kubespehre.ioRUN yum install epel-release -y && \yum install -y gcc gcc-c++ make gd-devel libxml2-devel \libcurl-devel libjpeg-devel libpng-devel openssl-devel \libmcrypt-devel libxslt-devel libtidy-devel autoconf \iproute net-tools telnet wget curl && \yum clean all &&\rm -rf /var/cache/yum/*# wget http://cn2.php.net/get/php-5.6.36.tar.gz/from/this/mirror -O php-5.6.36.tar.gzADD php-5.6.36.tar.gz /RUN cd php-5.6.36 && \./configure --prefix=/usr/local/php \--with-config-file-path=/usr/local/php/etc \--enable-fpm --enable-opcache \--with-mysql --with-mysqli --with-pdo-mysql \--with-openssl --with-zlib --with-curl --with-gd \--with-jpeg-dir --with-png-dir --with-freetype-dir \--enable-mbstring --with-mcrypt --enable-hash && \make -j 4 && make install && \cp php.ini-production /usr/local/php/etc/php.ini && \cp sapi/fpm/php-fpm.conf /usr/local/php/etc/php-fpm.conf && \sed -i "90a \daemonize = no" /usr/local/php/etc/php-fpm.conf && \mkdir -p /usr/local/php/log && \cd / && rm -rf php* && \ln -sf /usr/share/zoneinfo/Asia/Shanghai /etc/localtimeENV PATH $PATH:/usr/local/php/sbinCOPY php.ini /usr/local/php/etc/COPY php-fpm.conf /usr/local/php/etc/# 设置工作目录WORKDIR /usr/local/phpEXPOSE 9000CMD ["php-fpm"]
范例:PHP 配置文件示例
cat > php-fpm.conf <<-'EOF';;;;;;;;;;;;;;;;;;;;;; FPM Configuration ;;;;;;;;;;;;;;;;;;;;;;; All relative paths in this configuration file are relative to PHP's install; prefix (/usr/local/php). This prefix can be dynamically changed by using the; '-p' argument from the command line.; Include one or more files. If glob(3) exists, it is used to include a bunch of; files from a glob(3) pattern. This directive can be used everywhere in the; file.; Relative path can also be used. They will be prefixed by:; - the global prefix if it's been set (-p argument); - /usr/local/php otherwise;include=etc/fpm.d/*.conf;;;;;;;;;;;;;;;;;;; Global Options ;;;;;;;;;;;;;;;;;;;[global]; Pid file; Note: the default prefix is /usr/local/php/var; Default Value: none;pid = run/php-fpm.pid; Error log file; If it's set to "syslog", log is sent to syslogd instead of being written; in a local file.; Note: the default prefix is /usr/local/php/var; Default Value: log/php-fpm.log;error_log = log/php-fpm.log; syslog_facility is used to specify what type of program is logging the; message. This lets syslogd specify that messages from different facilities; will be handled differently.; See syslog(3) for possible values (ex daemon equiv LOG_DAEMON); Default Value: daemon;syslog.facility = daemon; syslog_ident is prepended to every message. If you have multiple FPM; instances running on the same server, you can change the default value; which must suit common needs.; Default Value: php-fpm;syslog.ident = php-fpm; Log level; Possible Values: alert, error, warning, notice, debug; Default Value: notice;log_level = notice; If this number of child processes exit with SIGSEGV or SIGBUS within the time; interval set by emergency_restart_interval then FPM will restart. A value; of '0' means 'Off'.; Default Value: 0;emergency_restart_threshold = 0; Interval of time used by emergency_restart_interval to determine when; a graceful restart will be initiated. This can be useful to work around; accidental corruptions in an accelerator's shared memory.; Available Units: s(econds), m(inutes), h(ours), or d(ays); Default Unit: seconds; Default Value: 0;emergency_restart_interval = 0; Time limit for child processes to wait for a reaction on signals from master.; Available units: s(econds), m(inutes), h(ours), or d(ays); Default Unit: seconds; Default Value: 0;process_control_timeout = 0; The maximum number of processes FPM will fork. This has been design to control; the global number of processes when using dynamic PM within a lot of pools.; Use it with caution.; Note: A value of 0 indicates no limit; Default Value: 0; process.max = 128; Specify the nice(2) priority to apply to the master process (only if set); The value can vary from -19 (highest priority) to 20 (lower priority); Note: - It will only work if the FPM master process is launched as root; - The pool process will inherit the master process priority; unless it specified otherwise; Default Value: no set; process.priority = -19; Send FPM to background. Set to 'no' to keep FPM in foreground for debugging.; Default Value: yes;daemonize = yesdaemonize = no; Set open file descriptor rlimit for the master process.; Default Value: system defined value;rlimit_files = 1024; Set max core size rlimit for the master process.; Possible Values: 'unlimited' or an integer greater or equal to 0; Default Value: system defined value;rlimit_core = 0; Specify the event mechanism FPM will use. The following is available:; - select (any POSIX os); - poll (any POSIX os); - epoll (linux >= 2.5.44); - kqueue (FreeBSD >= 4.1, OpenBSD >= 2.9, NetBSD >= 2.0); - /dev/poll (Solaris >= 7); - port (Solaris >= 10); Default Value: not set (auto detection);events.mechanism = epoll; When FPM is build with systemd integration, specify the interval,; in second, between health report notification to systemd.; Set to 0 to disable.; Available Units: s(econds), m(inutes), h(ours); Default Unit: seconds; Default value: 10;systemd_interval = 10;;;;;;;;;;;;;;;;;;;;; Pool Definitions ;;;;;;;;;;;;;;;;;;;;;; Multiple pools of child processes may be started with different listening; ports and different management options. The name of the pool will be; used in logs and stats. There is no limitation on the number of pools which; FPM can handle. Your system will tell you anyway :); Start a new pool named 'www'.; the variable $pool can we used in any directive and will be replaced by the; pool name ('www' here)[www]; Per pool prefix; It only applies on the following directives:; - 'access.log'; - 'slowlog'; - 'listen' (unixsocket); - 'chroot'; - 'chdir'; - 'php_values'; - 'php_admin_values'; When not set, the global prefix (or /usr/local/php) applies instead.; Note: This directive can also be relative to the global prefix.; Default Value: none;prefix = /path/to/pools/$pool; Unix user/group of processes; Note: The user is mandatory. If the group is not set, the default user's group; will be used.user = nobodygroup = nobody; The address on which to accept FastCGI requests.; Valid syntaxes are:; 'ip.add.re.ss:port' - to listen on a TCP socket to a specific IPv4 address on; a specific port;; '[ip:6:addr:ess]:port' - to listen on a TCP socket to a specific IPv6 address on; a specific port;; 'port' - to listen on a TCP socket to all IPv4 addresses on a; specific port;; '[::]:port' - to listen on a TCP socket to all addresses; (IPv6 and IPv4-mapped) on a specific port;; '/path/to/unix/socket' - to listen on a unix socket.; Note: This value is mandatory.listen = 127.0.0.1:9000; Set listen(2) backlog.; Default Value: 65535 (-1 on FreeBSD and OpenBSD);listen.backlog = 65535; Set permissions for unix socket, if one is used. In Linux, read/write; permissions must be set in order to allow connections from a web server. Many; BSD-derived systems allow connections regardless of permissions.; Default Values: user and group are set as the running user; mode is set to 0660;listen.owner = nobody;listen.group = nobody;listen.mode = 0660; When POSIX Access Control Lists are supported you can set them using; these options, value is a comma separated list of user/group names.; When set, listen.owner and listen.group are ignored;listen.acl_users =;listen.acl_groups =; List of addresses (IPv4/IPv6) of FastCGI clients which are allowed to connect.; Equivalent to the FCGI_WEB_SERVER_ADDRS environment variable in the original; PHP FCGI (5.2.2+). Makes sense only with a tcp listening socket. Each address; must be separated by a comma. If this value is left blank, connections will be; accepted from any ip address.; Default Value: any;listen.allowed_clients = 127.0.0.1; Specify the nice(2) priority to apply to the pool processes (only if set); The value can vary from -19 (highest priority) to 20 (lower priority); Note: - It will only work if the FPM master process is launched as root; - The pool processes will inherit the master process priority; unless it specified otherwise; Default Value: no set; process.priority = -19; Set the process dumpable flag (PR_SET_DUMPABLE prctl) even if the process user; or group is differrent than the master process user. It allows to create process; core dump and ptrace the process for the pool user.; Default Value: no; process.dumpable = yes; Choose how the process manager will control the number of child processes.; Possible Values:; static - a fixed number (pm.max_children) of child processes;; dynamic - the number of child processes are set dynamically based on the; following directives. With this process management, there will be; always at least 1 children.; pm.max_children - the maximum number of children that can; be alive at the same time.; pm.start_servers - the number of children created on startup.; pm.min_spare_servers - the minimum number of children in 'idle'; state (waiting to process). If the number; of 'idle' processes is less than this; number then some children will be created.; pm.max_spare_servers - the maximum number of children in 'idle'; state (waiting to process). If the number; of 'idle' processes is greater than this; number then some children will be killed.; ondemand - no children are created at startup. Children will be forked when; new requests will connect. The following parameter are used:; pm.max_children - the maximum number of children that; can be alive at the same time.; pm.process_idle_timeout - The number of seconds after which; an idle process will be killed.; Note: This value is mandatory.pm = dynamic; The number of child processes to be created when pm is set to 'static' and the; maximum number of child processes when pm is set to 'dynamic' or 'ondemand'.; This value sets the limit on the number of simultaneous requests that will be; served. Equivalent to the ApacheMaxClients directive with mpm_prefork.; Equivalent to the PHP_FCGI_CHILDREN environment variable in the original PHP; CGI. The below defaults are based on a server without much resources. Don't; forget to tweak pm.* to fit your needs.; Note: Used when pm is set to 'static', 'dynamic' or 'ondemand'; Note: This value is mandatory.pm.max_children = 5; The number of child processes created on startup.; Note: Used only when pm is set to 'dynamic'; Default Value: min_spare_servers + (max_spare_servers - min_spare_servers) / 2pm.start_servers = 2; The desired minimum number of idle server processes.; Note: Used only when pm is set to 'dynamic'; Note: Mandatory when pm is set to 'dynamic'pm.min_spare_servers = 1; The desired maximum number of idle server processes.; Note: Used only when pm is set to 'dynamic'; Note: Mandatory when pm is set to 'dynamic'pm.max_spare_servers = 3; The number of seconds after which an idle process will be killed.; Note: Used only when pm is set to 'ondemand'; Default Value: 10s;pm.process_idle_timeout = 10s;; The number of requests each child process should execute before respawning.; This can be useful to work around memory leaks in 3rd party libraries. For; endless request processing specify '0'. Equivalent to PHP_FCGI_MAX_REQUESTS.; Default Value: 0;pm.max_requests = 500; The URI to view the FPM status page. If this value is not set, no URI will be; recognized as a status page. It shows the following informations:; pool - the name of the pool;; process manager - static, dynamic or ondemand;; start time - the date and time FPM has started;; start since - number of seconds since FPM has started;; accepted conn - the number of request accepted by the pool;; listen queue - the number of request in the queue of pending; connections (see backlog in listen(2));; max listen queue - the maximum number of requests in the queue; of pending connections since FPM has started;; listen queue len - the size of the socket queue of pending connections;; idle processes - the number of idle processes;; active processes - the number of active processes;; total processes - the number of idle + active processes;; max active processes - the maximum number of active processes since FPM; has started;; max children reached - number of times, the process limit has been reached,; when pm tries to start more children (works only for; pm 'dynamic' and 'ondemand');; Value are updated in real time.; Example output:; pool: www; process manager: static; start time: 01/Jul/2011:17:53:49 +0200; start since: 62636; accepted conn: 190460; listen queue: 0; max listen queue: 1; listen queue len: 42; idle processes: 4; active processes: 11; total processes: 15; max active processes: 12; max children reached: 0;; By default the status page output is formatted as text/plain. Passing either; 'html', 'xml' or 'json' in the query string will return the corresponding; output syntax. Example:; http://www.foo.bar/status; http://www.foo.bar/status?json; http://www.foo.bar/status?html; http://www.foo.bar/status?xml;; By default the status page only outputs short status. Passing 'full' in the; query string will also return status for each pool process.; Example:; http://www.foo.bar/status?full; http://www.foo.bar/status?json&full; http://www.foo.bar/status?html&full; http://www.foo.bar/status?xml&full; The Full status returns for each process:; pid - the PID of the process;; state - the state of the process (Idle, Running, ...);; start time - the date and time the process has started;; start since - the number of seconds since the process has started;; requests - the number of requests the process has served;; request duration - the duration in µs of the requests;; request method - the request method (GET, POST, ...);; request URI - the request URI with the query string;; content length - the content length of the request (only with POST);; user - the user (PHP_AUTH_USER) (or '-' if not set);; script - the main script called (or '-' if not set);; last request cpu - the %cpu the last request consumed; it's always 0 if the process is not in Idle state; because CPU calculation is done when the request; processing has terminated;; last request memory - the max amount of memory the last request consumed; it's always 0 if the process is not in Idle state; because memory calculation is done when the request; processing has terminated;; If the process is in Idle state, then informations are related to the; last request the process has served. Otherwise informations are related to; the current request being served.; Example output:; ************************; pid: 31330; state: Running; start time: 01/Jul/2011:17:53:49 +0200; start since: 63087; requests: 12808; request duration: 1250261; request method: GET; request URI: /test_mem.php?N=10000; content length: 0; user: -; script: /home/fat/web/docs/php/test_mem.php; last request cpu: 0.00; last request memory: 0;; Note: There is a real-time FPM status monitoring sample web page available; It's available in: /usr/local/php/share/php/fpm/status.html;; Note: The value must start with a leading slash (/). The value can be; anything, but it may not be a good idea to use the .php extension or it; may conflict with a real PHP file.; Default Value: not set;pm.status_path = /status; The ping URI to call the monitoring page of FPM. If this value is not set, no; URI will be recognized as a ping page. This could be used to test from outside; that FPM is alive and responding, or to; - create a graph of FPM availability (rrd or such);; - remove a server from a group if it is not responding (load balancing);; - trigger alerts for the operating team (24/7).; Note: The value must start with a leading slash (/). The value can be; anything, but it may not be a good idea to use the .php extension or it; may conflict with a real PHP file.; Default Value: not set;ping.path = /ping; This directive may be used to customize the response of a ping request. The; response is formatted as text/plain with a 200 response code.; Default Value: pong;ping.response = pong; The access log file; Default: not set;access.log = log/$pool.access.log; The access log format.; The following syntax is allowed; %%: the '%' character; %C: %CPU used by the request; it can accept the following format:; - %{user}C for user CPU only; - %{system}C for system CPU only; - %{total}C for user + system CPU (default); %d: time taken to serve the request; it can accept the following format:; - %{seconds}d (default); - %{miliseconds}d; - %{mili}d; - %{microseconds}d; - %{micro}d; %e: an environment variable (same as $_ENV or $_SERVER); it must be associated with embraces to specify the name of the env; variable. Some exemples:; - server specifics like: %{REQUEST_METHOD}e or %{SERVER_PROTOCOL}e; - HTTP headers like: %{HTTP_HOST}e or %{HTTP_USER_AGENT}e; %f: script filename; %l: content-length of the request (for POST request only); %m: request method; %M: peak of memory allocated by PHP; it can accept the following format:; - %{bytes}M (default); - %{kilobytes}M; - %{kilo}M; - %{megabytes}M; - %{mega}M; %n: pool name; %o: output header; it must be associated with embraces to specify the name of the header:; - %{Content-Type}o; - %{X-Powered-By}o; - %{Transfert-Encoding}o; - ....; %p: PID of the child that serviced the request; %P: PID of the parent of the child that serviced the request; %q: the query string; %Q: the '?' character if query string exists; %r: the request URI (without the query string, see %q and %Q); %R: remote IP address; %s: status (response code); %t: server time the request was received; it can accept a strftime(3) format:; %d/%b/%Y:%H:%M:%S %z (default); %T: time the log has been written (the request has finished); it can accept a strftime(3) format:; %d/%b/%Y:%H:%M:%S %z (default); %u: remote user;; Default: "%R - %u %t \"%m %r\" %s";access.format = "%R - %u %t \"%m %r%Q%q\" %s %f %{mili}d %{kilo}M %C%%"; The log file for slow requests; Default Value: not set; Note: slowlog is mandatory if request_slowlog_timeout is set;slowlog = log/$pool.log.slow; The timeout for serving a single request after which a PHP backtrace will be; dumped to the 'slowlog' file. A value of '0s' means 'off'.; Available units: s(econds)(default), m(inutes), h(ours), or d(ays); Default Value: 0;request_slowlog_timeout = 0; The timeout for serving a single request after which the worker process will; be killed. This option should be used when the 'max_execution_time' ini option; does not stop script execution for some reason. A value of '0' means 'off'.; Available units: s(econds)(default), m(inutes), h(ours), or d(ays); Default Value: 0;request_terminate_timeout = 0; Set open file descriptor rlimit.; Default Value: system defined value;rlimit_files = 1024; Set max core size rlimit.; Possible Values: 'unlimited' or an integer greater or equal to 0; Default Value: system defined value;rlimit_core = 0; Chroot to this directory at the start. This value must be defined as an; absolute path. When this value is not set, chroot is not used.; Note: you can prefix with '$prefix' to chroot to the pool prefix or one; of its subdirectories. If the pool prefix is not set, the global prefix; will be used instead.; Note: chrooting is a great security feature and should be used whenever; possible. However, all PHP paths will be relative to the chroot; (error_log, sessions.save_path, ...).; Default Value: not set;chroot =; Chdir to this directory at the start.; Note: relative path can be used.; Default Value: current directory or / when chroot;chdir = /var/www; Redirect worker stdout and stderr into main error log. If not set, stdout and; stderr will be redirected to /dev/null according to FastCGI specs.; Note: on highloaded environement, this can cause some delay in the page; process time (several ms).; Default Value: no;catch_workers_output = yes; Clear environment in FPM workers; Prevents arbitrary environment variables from reaching FPM worker processes; by clearing the environment in workers before env vars specified in this; pool configuration are added.; Setting to "no" will make all environment variables available to PHP code; via getenv(), $_ENV and $_SERVER.; Default Value: yes;clear_env = no; Limits the extensions of the main script FPM will allow to parse. This can; prevent configuration mistakes on the web server side. You should only limit; FPM to .php extensions to prevent malicious users to use other extensions to; exectute php code.; Note: set an empty value to allow all extensions.; Default Value: .php;security.limit_extensions = .php .php3 .php4 .php5; Pass environment variables like LD_LIBRARY_PATH. All $VARIABLEs are taken from; the current environment.; Default Value: clean env;env[HOSTNAME] = $HOSTNAME;env[PATH] = /usr/local/bin:/usr/bin:/bin;env[TMP] = /tmp;env[TMPDIR] = /tmp;env[TEMP] = /tmp; Additional php.ini defines, specific to this pool of workers. These settings; overwrite the values previously defined in the php.ini. The directives are the; same as the PHP SAPI:; php_value/php_flag - you can set classic ini defines which can; be overwritten from PHP call 'ini_set'.; php_admin_value/php_admin_flag - these directives won't be overwritten by; PHP call 'ini_set'; For php_*flag, valid values are on, off, 1, 0, true, false, yes or no.; Defining 'extension' will load the corresponding shared extension from; extension_dir. Defining 'disable_functions' or 'disable_classes' will not; overwrite previously defined php.ini values, but will append the new value; instead.; Note: path INI options can be relative and will be expanded with the prefix; (pool, global or /usr/local/php); Default Value: nothing is defined by default except the values in php.ini and; specified at startup with the -d argument;php_admin_value[sendmail_path] = /usr/sbin/sendmail -t -i -f www@my.domain.com;php_flag[display_errors] = off;php_admin_value[error_log] = /var/log/fpm-php.www.log;php_admin_flag[log_errors] = on;php_admin_value[memory_limit] = 32MEOFcat > php.ini <<-'EOF'[PHP];;;;;;;;;;;;;;;;;;;; About php.ini ;;;;;;;;;;;;;;;;;;;;; PHP's initialization file, generally called php.ini, is responsible for; configuring many of the aspects of PHP's behavior.; PHP attempts to find and load this configuration from a number of locations.; The following is a summary of its search order:; 1. SAPI module specific location.; 2. The PHPRC environment variable. (As of PHP 5.2.0); 3. A number of predefined registry keys on Windows (As of PHP 5.2.0); 4. Current working directory (except CLI); 5. The web server's directory (for SAPI modules), or directory of PHP; (otherwise in Windows); 6. The directory from the --with-config-file-path compile time option, or the; Windows directory (C:\windows or C:\winnt); See the PHP docs for more specific information.; http://php.net/configuration.file; The syntax of the file is extremely simple. Whitespace and lines; beginning with a semicolon are silently ignored (as you probably guessed).; Section headers (e.g. [Foo]) are also silently ignored, even though; they might mean something in the future.; Directives following the section heading [PATH=/www/mysite] only; apply to PHP files in the /www/mysite directory. Directives; following the section heading [HOST=www.example.com] only apply to; PHP files served from www.example.com. Directives set in these; special sections cannot be overridden by user-defined INI files or; at runtime. Currently, [PATH=] and [HOST=] sections only work under; CGI/FastCGI.; http://php.net/ini.sections; Directives are specified using the following syntax:; directive = value; Directive names are *case sensitive* - foo=bar is different from FOO=bar.; Directives are variables used to configure PHP or PHP extensions.; There is no name validation. If PHP can't find an expected; directive because it is not set or is mistyped, a default value will be used.; The value can be a string, a number, a PHP constant (e.g. E_ALL or M_PI), one; of the INI constants (On, Off, True, False, Yes, No and None) or an expression; (e.g. E_ALL & ~E_NOTICE), a quoted string ("bar"), or a reference to a; previously set variable or directive (e.g. ${foo}); Expressions in the INI file are limited to bitwise operators and parentheses:; | bitwise OR; ^ bitwise XOR; & bitwise AND; ~ bitwise NOT; ! boolean NOT; Boolean flags can be turned on using the values 1, On, True or Yes.; They can be turned off using the values 0, Off, False or No.; An empty string can be denoted by simply not writing anything after the equal; sign, or by using the None keyword:; foo = ; sets foo to an empty string; foo = None ; sets foo to an empty string; foo = "None" ; sets foo to the string 'None'; If you use constants in your value, and these constants belong to a; dynamically loaded extension (either a PHP extension or a Zend extension),; you may only use these constants *after* the line that loads the extension.;;;;;;;;;;;;;;;;;;;; About this file ;;;;;;;;;;;;;;;;;;;;; PHP comes packaged with two INI files. One that is recommended to be used; in production environments and one that is recommended to be used in; development environments.; php.ini-production contains settings which hold security, performance and; best practices at its core. But please be aware, these settings may break; compatibility with older or less security conscience applications. We; recommending using the production ini in production and testing environments.; php.ini-development is very similar to its production variant, except it is; much more verbose when it comes to errors. We recommend using the; development version only in development environments, as errors shown to; application users can inadvertently leak otherwise secure information.; This is php.ini-production INI file.;;;;;;;;;;;;;;;;;;;; Quick Reference ;;;;;;;;;;;;;;;;;;;;; The following are all the settings which are different in either the production; or development versions of the INIs with respect to PHP's default behavior.; Please see the actual settings later in the document for more details as to why; we recommend these changes in PHP's behavior.; display_errors; Default Value: On; Development Value: On; Production Value: Off; display_startup_errors; Default Value: Off; Development Value: On; Production Value: Off; error_reporting; Default Value: E_ALL & ~E_NOTICE & ~E_STRICT & ~E_DEPRECATED; Development Value: E_ALL; Production Value: E_ALL & ~E_DEPRECATED & ~E_STRICT; html_errors; Default Value: On; Development Value: On; Production value: On; log_errors; Default Value: Off; Development Value: On; Production Value: On; max_input_time; Default Value: -1 (Unlimited); Development Value: 60 (60 seconds); Production Value: 60 (60 seconds); output_buffering; Default Value: Off; Development Value: 4096; Production Value: 4096; register_argc_argv; Default Value: On; Development Value: Off; Production Value: Off; request_order; Default Value: None; Development Value: "GP"; Production Value: "GP"; session.gc_divisor; Default Value: 100; Development Value: 1000; Production Value: 1000; session.hash_bits_per_character; Default Value: 4; Development Value: 5; Production Value: 5; short_open_tag; Default Value: On; Development Value: Off; Production Value: Off; track_errors; Default Value: Off; Development Value: On; Production Value: Off; url_rewriter.tags; Default Value: "a=href,area=href,frame=src,form=,fieldset="; Development Value: "a=href,area=href,frame=src,input=src,form=fakeentry"; Production Value: "a=href,area=href,frame=src,input=src,form=fakeentry"; variables_order; Default Value: "EGPCS"; Development Value: "GPCS"; Production Value: "GPCS";;;;;;;;;;;;;;;;;;;;; php.ini Options ;;;;;;;;;;;;;;;;;;;;;; Name for user-defined php.ini (.htaccess) files. Default is ".user.ini";user_ini.filename = ".user.ini"; To disable this feature set this option to empty value;user_ini.filename =; TTL for user-defined php.ini files (time-to-live) in seconds. Default is 300 seconds (5 minutes);user_ini.cache_ttl = 300;;;;;;;;;;;;;;;;;;;;; Language Options ;;;;;;;;;;;;;;;;;;;;;; Enable the PHP scripting language engine under Apache.; http://php.net/engineengine = On; This directive determines whether or not PHP will recognize code between; <? and ?> tags as PHP source which should be processed as such. It is; generally recommended that <?php and ?> should be used and that this feature; should be disabled, as enabling it may result in issues when generating XML; documents, however this remains supported for backward compatibility reasons.; Note that this directive does not control the <?= shorthand tag, which can be; used regardless of this directive.; Default Value: On; Development Value: Off; Production Value: Off; http://php.net/short-open-tagshort_open_tag = Off; Allow ASP-style <% %> tags.; http://php.net/asp-tagsasp_tags = Off; The number of significant digits displayed in floating point numbers.; http://php.net/precisionprecision = 14; Output buffering is a mechanism for controlling how much output data; (excluding headers and cookies) PHP should keep internally before pushing that; data to the client. If your application's output exceeds this setting, PHP; will send that data in chunks of roughly the size you specify.; Turning on this setting and managing its maximum buffer size can yield some; interesting side-effects depending on your application and web server.; You may be able to send headers and cookies after you've already sent output; through print or echo. You also may see performance benefits if your server is; emitting less packets due to buffered output versus PHP streaming the output; as it gets it. On production servers, 4096 bytes is a good setting for performance; reasons.; Note: Output buffering can also be controlled via Output Buffering Control; functions.; Possible Values:; On = Enabled and buffer is unlimited. (Use with caution); Off = Disabled; Integer = Enables the buffer and sets its maximum size in bytes.; Note: This directive is hardcoded to Off for the CLI SAPI; Default Value: Off; Development Value: 4096; Production Value: 4096; http://php.net/output-bufferingoutput_buffering = 4096; You can redirect all of the output of your scripts to a function. For; example, if you set output_handler to "mb_output_handler", character; encoding will be transparently converted to the specified encoding.; Setting any output handler automatically turns on output buffering.; Note: People who wrote portable scripts should not depend on this ini; directive. Instead, explicitly set the output handler using ob_start().; Using this ini directive may cause problems unless you know what script; is doing.; Note: You cannot use both "mb_output_handler" with "ob_iconv_handler"; and you cannot use both "ob_gzhandler" and "zlib.output_compression".; Note: output_handler must be empty if this is set 'On' !!!!; Instead you must use zlib.output_handler.; http://php.net/output-handler;output_handler =; Transparent output compression using the zlib library; Valid values for this option are 'off', 'on', or a specific buffer size; to be used for compression (default is 4KB); Note: Resulting chunk size may vary due to nature of compression. PHP; outputs chunks that are few hundreds bytes each as a result of; compression. If you prefer a larger chunk size for better; performance, enable output_buffering in addition.; Note: You need to use zlib.output_handler instead of the standard; output_handler, or otherwise the output will be corrupted.; http://php.net/zlib.output-compressionzlib.output_compression = Off; http://php.net/zlib.output-compression-level;zlib.output_compression_level = -1; You cannot specify additional output handlers if zlib.output_compression; is activated here. This setting does the same as output_handler but in; a different order.; http://php.net/zlib.output-handler;zlib.output_handler =; Implicit flush tells PHP to tell the output layer to flush itself; automatically after every output block. This is equivalent to calling the; PHP function flush() after each and every call to print() or echo() and each; and every HTML block. Turning this option on has serious performance; implications and is generally recommended for debugging purposes only.; http://php.net/implicit-flush; Note: This directive is hardcoded to On for the CLI SAPIimplicit_flush = Off; The unserialize callback function will be called (with the undefined class'; name as parameter), if the unserializer finds an undefined class; which should be instantiated. A warning appears if the specified function is; not defined, or if the function doesn't include/implement the missing class.; So only set this entry, if you really want to implement such a; callback-function.unserialize_callback_func =; When floats & doubles are serialized store serialize_precision significant; digits after the floating point. The default value ensures that when floats; are decoded with unserialize, the data will remain the same.serialize_precision = 17; open_basedir, if set, limits all file operations to the defined directory; and below. This directive makes most sense if used in a per-directory; or per-virtualhost web server configuration file.; http://php.net/open-basedir;open_basedir =; This directive allows you to disable certain functions for security reasons.; It receives a comma-delimited list of function names.; http://php.net/disable-functionsdisable_functions =; This directive allows you to disable certain classes for security reasons.; It receives a comma-delimited list of class names.; http://php.net/disable-classesdisable_classes =; Colors for Syntax Highlighting mode. Anything that's acceptable in; <span style="color: ???????"> would work.; http://php.net/syntax-highlighting;highlight.string = #DD0000;highlight.comment = #FF9900;highlight.keyword = #007700;highlight.default = #0000BB;highlight.html = #000000; If enabled, the request will be allowed to complete even if the user aborts; the request. Consider enabling it if executing long requests, which may end up; being interrupted by the user or a browser timing out. PHP's default behavior; is to disable this feature.; http://php.net/ignore-user-abort;ignore_user_abort = On; Determines the size of the realpath cache to be used by PHP. This value should; be increased on systems where PHP opens many files to reflect the quantity of; the file operations performed.; http://php.net/realpath-cache-size;realpath_cache_size = 16k; Duration of time, in seconds for which to cache realpath information for a given; file or directory. For systems with rarely changing files, consider increasing this; value.; http://php.net/realpath-cache-ttl;realpath_cache_ttl = 120; Enables or disables the circular reference collector.; http://php.net/zend.enable-gczend.enable_gc = On; If enabled, scripts may be written in encodings that are incompatible with; the scanner. CP936, Big5, CP949 and Shift_JIS are the examples of such; encodings. To use this feature, mbstring extension must be enabled.; Default: Off;zend.multibyte = Off; Allows to set the default encoding for the scripts. This value will be used; unless "declare(encoding=...)" directive appears at the top of the script.; Only affects if zend.multibyte is set.; Default: "";zend.script_encoding =;;;;;;;;;;;;;;;;;; Miscellaneous ;;;;;;;;;;;;;;;;;;; Decides whether PHP may expose the fact that it is installed on the server; (e.g. by adding its signature to the Web server header). It is no security; threat in any way, but it makes it possible to determine whether you use PHP; on your server or not.; http://php.net/expose-phpexpose_php = On;;;;;;;;;;;;;;;;;;;; Resource Limits ;;;;;;;;;;;;;;;;;;;;; Maximum execution time of each script, in seconds; http://php.net/max-execution-time; Note: This directive is hardcoded to 0 for the CLI SAPImax_execution_time = 30; Maximum amount of time each script may spend parsing request data. It's a good; idea to limit this time on productions servers in order to eliminate unexpectedly; long running scripts.; Note: This directive is hardcoded to -1 for the CLI SAPI; Default Value: -1 (Unlimited); Development Value: 60 (60 seconds); Production Value: 60 (60 seconds); http://php.net/max-input-timemax_input_time = 60; Maximum input variable nesting level; http://php.net/max-input-nesting-level;max_input_nesting_level = 64; How many GET/POST/COOKIE input variables may be accepted; max_input_vars = 1000; Maximum amount of memory a script may consume (128MB); http://php.net/memory-limitmemory_limit = 128M;;;;;;;;;;;;;;;;;;;;;;;;;;;;;;; Error handling and logging ;;;;;;;;;;;;;;;;;;;;;;;;;;;;;;;; This directive informs PHP of which errors, warnings and notices you would like; it to take action for. The recommended way of setting values for this; directive is through the use of the error level constants and bitwise; operators. The error level constants are below here for convenience as well as; some common settings and their meanings.; By default, PHP is set to take action on all errors, notices and warnings EXCEPT; those related to E_NOTICE and E_STRICT, which together cover best practices and; recommended coding standards in PHP. For performance reasons, this is the; recommend error reporting setting. Your production server shouldn't be wasting; resources complaining about best practices and coding standards. That's what; development servers and development settings are for.; Note: The php.ini-development file has this setting as E_ALL. This; means it pretty much reports everything which is exactly what you want during; development and early testing.;; Error Level Constants:; E_ALL - All errors and warnings (includes E_STRICT as of PHP 5.4.0); E_ERROR - fatal run-time errors; E_RECOVERABLE_ERROR - almost fatal run-time errors; E_WARNING - run-time warnings (non-fatal errors); E_PARSE - compile-time parse errors; E_NOTICE - run-time notices (these are warnings which often result; from a bug in your code, but it's possible that it was; intentional (e.g., using an uninitialized variable and; relying on the fact it is automatically initialized to an; empty string); E_STRICT - run-time notices, enable to have PHP suggest changes; to your code which will ensure the best interoperability; and forward compatibility of your code; E_CORE_ERROR - fatal errors that occur during PHP's initial startup; E_CORE_WARNING - warnings (non-fatal errors) that occur during PHP's; initial startup; E_COMPILE_ERROR - fatal compile-time errors; E_COMPILE_WARNING - compile-time warnings (non-fatal errors); E_USER_ERROR - user-generated error message; E_USER_WARNING - user-generated warning message; E_USER_NOTICE - user-generated notice message; E_DEPRECATED - warn about code that will not work in future versions; of PHP; E_USER_DEPRECATED - user-generated deprecation warnings;; Common Values:; E_ALL (Show all errors, warnings and notices including coding standards.); E_ALL & ~E_NOTICE (Show all errors, except for notices); E_ALL & ~E_NOTICE & ~E_STRICT (Show all errors, except for notices and coding standards warnings.); E_COMPILE_ERROR|E_RECOVERABLE_ERROR|E_ERROR|E_CORE_ERROR (Show only errors); Default Value: E_ALL & ~E_NOTICE & ~E_STRICT & ~E_DEPRECATED; Development Value: E_ALL; Production Value: E_ALL & ~E_DEPRECATED & ~E_STRICT; http://php.net/error-reportingerror_reporting = E_ALL & ~E_DEPRECATED & ~E_STRICT; This directive controls whether or not and where PHP will output errors,; notices and warnings too. Error output is very useful during development, but; it could be very dangerous in production environments. Depending on the code; which is triggering the error, sensitive information could potentially leak; out of your application such as database usernames and passwords or worse.; For production environments, we recommend logging errors rather than; sending them to STDOUT.; Possible Values:; Off = Do not display any errors; stderr = Display errors to STDERR (affects only CGI/CLI binaries!); On or stdout = Display errors to STDOUT; Default Value: On; Development Value: On; Production Value: Off; http://php.net/display-errorsdisplay_errors = Off; The display of errors which occur during PHP's startup sequence are handled; separately from display_errors. PHP's default behavior is to suppress those; errors from clients. Turning the display of startup errors on can be useful in; debugging configuration problems. We strongly recommend you; set this to 'off' for production servers.; Default Value: Off; Development Value: On; Production Value: Off; http://php.net/display-startup-errorsdisplay_startup_errors = Off; Besides displaying errors, PHP can also log errors to locations such as a; server-specific log, STDERR, or a location specified by the error_log; directive found below. While errors should not be displayed on productions; servers they should still be monitored and logging is a great way to do that.; Default Value: Off; Development Value: On; Production Value: On; http://php.net/log-errorslog_errors = On; Set maximum length of log_errors. In error_log information about the source is; added. The default is 1024 and 0 allows to not apply any maximum length at all.; http://php.net/log-errors-max-lenlog_errors_max_len = 1024; Do not log repeated messages. Repeated errors must occur in same file on same; line unless ignore_repeated_source is set true.; http://php.net/ignore-repeated-errorsignore_repeated_errors = Off; Ignore source of message when ignoring repeated messages. When this setting; is On you will not log errors with repeated messages from different files or; source lines.; http://php.net/ignore-repeated-sourceignore_repeated_source = Off; If this parameter is set to Off, then memory leaks will not be shown (on; stdout or in the log). This has only effect in a debug compile, and if; error reporting includes E_WARNING in the allowed list; http://php.net/report-memleaksreport_memleaks = On; This setting is on by default.;report_zend_debug = 0; Store the last error/warning message in $php_errormsg (boolean). Setting this value; to On can assist in debugging and is appropriate for development servers. It should; however be disabled on production servers.; Default Value: Off; Development Value: On; Production Value: Off; http://php.net/track-errorstrack_errors = Off; Turn off normal error reporting and emit XML-RPC error XML; http://php.net/xmlrpc-errors;xmlrpc_errors = 0; An XML-RPC faultCode;xmlrpc_error_number = 0; When PHP displays or logs an error, it has the capability of formatting the; error message as HTML for easier reading. This directive controls whether; the error message is formatted as HTML or not.; Note: This directive is hardcoded to Off for the CLI SAPI; Default Value: On; Development Value: On; Production value: On; http://php.net/html-errorshtml_errors = On; If html_errors is set to On *and* docref_root is not empty, then PHP; produces clickable error messages that direct to a page describing the error; or function causing the error in detail.; You can download a copy of the PHP manual from http://php.net/docs; and change docref_root to the base URL of your local copy including the; leading '/'. You must also specify the file extension being used including; the dot. PHP's default behavior is to leave these settings empty, in which; case no links to documentation are generated.; Note: Never use this feature for production boxes.; http://php.net/docref-root; Examples;docref_root = "/phpmanual/"; http://php.net/docref-ext;docref_ext = .html; String to output before an error message. PHP's default behavior is to leave; this setting blank.; http://php.net/error-prepend-string; Example:;error_prepend_string = "<span style='color: #ff0000'>"; String to output after an error message. PHP's default behavior is to leave; this setting blank.; http://php.net/error-append-string; Example:;error_append_string = "</span>"; Log errors to specified file. PHP's default behavior is to leave this value; empty.; http://php.net/error-log; Example:;error_log = php_errors.log; Log errors to syslog (Event Log on Windows).;error_log = syslog;windows.show_crt_warning; Default value: 0; Development value: 0; Production value: 0;;;;;;;;;;;;;;;;;; Data Handling ;;;;;;;;;;;;;;;;;;; The separator used in PHP generated URLs to separate arguments.; PHP's default setting is "&".; http://php.net/arg-separator.output; Example:;arg_separator.output = "&"; List of separator(s) used by PHP to parse input URLs into variables.; PHP's default setting is "&".; NOTE: Every character in this directive is considered as separator!; http://php.net/arg-separator.input; Example:;arg_separator.input = ";&"; This directive determines which super global arrays are registered when PHP; starts up. G,P,C,E & S are abbreviations for the following respective super; globals: GET, POST, COOKIE, ENV and SERVER. There is a performance penalty; paid for the registration of these arrays and because ENV is not as commonly; used as the others, ENV is not recommended on productions servers. You; can still get access to the environment variables through getenv() should you; need to.; Default Value: "EGPCS"; Development Value: "GPCS"; Production Value: "GPCS";; http://php.net/variables-ordervariables_order = "GPCS"; This directive determines which super global data (G,P & C) should be; registered into the super global array REQUEST. If so, it also determines; the order in which that data is registered. The values for this directive; are specified in the same manner as the variables_order directive,; EXCEPT one. Leaving this value empty will cause PHP to use the value set; in the variables_order directive. It does not mean it will leave the super; globals array REQUEST empty.; Default Value: None; Development Value: "GP"; Production Value: "GP"; http://php.net/request-orderrequest_order = "GP"; This directive determines whether PHP registers $argv & $argc each time it; runs. $argv contains an array of all the arguments passed to PHP when a script; is invoked. $argc contains an integer representing the number of arguments; that were passed when the script was invoked. These arrays are extremely; useful when running scripts from the command line. When this directive is; enabled, registering these variables consumes CPU cycles and memory each time; a script is executed. For performance reasons, this feature should be disabled; on production servers.; Note: This directive is hardcoded to On for the CLI SAPI; Default Value: On; Development Value: Off; Production Value: Off; http://php.net/register-argc-argvregister_argc_argv = Off; When enabled, the ENV, REQUEST and SERVER variables are created when they're; first used (Just In Time) instead of when the script starts. If these; variables are not used within a script, having this directive on will result; in a performance gain. The PHP directive register_argc_argv must be disabled; for this directive to have any affect.; http://php.net/auto-globals-jitauto_globals_jit = On; Whether PHP will read the POST data.; This option is enabled by default.; Most likely, you won't want to disable this option globally. It causes $_POST; and $_FILES to always be empty; the only way you will be able to read the; POST data will be through the php://input stream wrapper. This can be useful; to proxy requests or to process the POST data in a memory efficient fashion.; http://php.net/enable-post-data-reading;enable_post_data_reading = Off; Maximum size of POST data that PHP will accept.; Its value may be 0 to disable the limit. It is ignored if POST data reading; is disabled through enable_post_data_reading.; http://php.net/post-max-sizepost_max_size = 8M; Automatically add files before PHP document.; http://php.net/auto-prepend-fileauto_prepend_file =; Automatically add files after PHP document.; http://php.net/auto-append-fileauto_append_file =; By default, PHP will output a media type using the Content-Type header. To; disable this, simply set it to be empty.;; PHP's built-in default media type is set to text/html.; http://php.net/default-mimetypedefault_mimetype = "text/html"; PHP's default character set is set to UTF-8.; http://php.net/default-charsetdefault_charset = "UTF-8"; PHP internal character encoding is set to empty.; If empty, default_charset is used.; http://php.net/internal-encoding;internal_encoding =; PHP input character encoding is set to empty.; If empty, default_charset is used.; http://php.net/input-encoding;input_encoding =; PHP output character encoding is set to empty.; If empty, default_charset is used.; See also output_buffer.; http://php.net/output-encoding;output_encoding =; Always populate the $HTTP_RAW_POST_DATA variable. PHP's default behavior is; to disable this feature and it will be removed in a future version.; If post reading is disabled through enable_post_data_reading,; $HTTP_RAW_POST_DATA is *NOT* populated.; http://php.net/always-populate-raw-post-data;always_populate_raw_post_data = -1;;;;;;;;;;;;;;;;;;;;;;;;;; Paths and Directories ;;;;;;;;;;;;;;;;;;;;;;;;;;; UNIX: "/path1:/path2";include_path = ".:/php/includes";; Windows: "\path1;\path2";include_path = ".;c:\php\includes";; PHP's default setting for include_path is ".;/path/to/php/pear"; http://php.net/include-path; The root of the PHP pages, used only if nonempty.; if PHP was not compiled with FORCE_REDIRECT, you SHOULD set doc_root; if you are running php as a CGI under any web server (other than IIS); see documentation for security issues. The alternate is to use the; cgi.force_redirect configuration below; http://php.net/doc-rootdoc_root =; The directory under which PHP opens the script using /~username used only; if nonempty.; http://php.net/user-diruser_dir =; Directory in which the loadable extensions (modules) reside.; http://php.net/extension-dir; extension_dir = "./"; On windows:; extension_dir = "ext"; Directory where the temporary files should be placed.; Defaults to the system default (see sys_get_temp_dir); sys_temp_dir = "/tmp"; Whether or not to enable the dl() function. The dl() function does NOT work; properly in multithreaded servers, such as IIS or Zeus, and is automatically; disabled on them.; http://php.net/enable-dlenable_dl = Off; cgi.force_redirect is necessary to provide security running PHP as a CGI under; most web servers. Left undefined, PHP turns this on by default. You can; turn it off here AT YOUR OWN RISK; **You CAN safely turn this off for IIS, in fact, you MUST.**; http://php.net/cgi.force-redirect;cgi.force_redirect = 1; if cgi.nph is enabled it will force cgi to always sent Status: 200 with; every request. PHP's default behavior is to disable this feature.;cgi.nph = 1; if cgi.force_redirect is turned on, and you are not running under Apache or Netscape; (iPlanet) web servers, you MAY need to set an environment variable name that PHP; will look for to know it is OK to continue execution. Setting this variable MAY; cause security issues, KNOW WHAT YOU ARE DOING FIRST.; http://php.net/cgi.redirect-status-env;cgi.redirect_status_env =; cgi.fix_pathinfo provides *real* PATH_INFO/PATH_TRANSLATED support for CGI. PHP's; previous behaviour was to set PATH_TRANSLATED to SCRIPT_FILENAME, and to not grok; what PATH_INFO is. For more information on PATH_INFO, see the cgi specs. Setting; this to 1 will cause PHP CGI to fix its paths to conform to the spec. A setting; of zero causes PHP to behave as before. Default is 1. You should fix your scripts; to use SCRIPT_FILENAME rather than PATH_TRANSLATED.; http://php.net/cgi.fix-pathinfo;cgi.fix_pathinfo=1; if cgi.discard_path is enabled, the PHP CGI binary can safely be placed outside; of the web tree and people will not be able to circumvent .htaccess security.; http://php.net/cgi.dicard-path;cgi.discard_path=1; FastCGI under IIS (on WINNT based OS) supports the ability to impersonate; security tokens of the calling client. This allows IIS to define the; security context that the request runs under. mod_fastcgi under Apache; does not currently support this feature (03/17/2002); Set to 1 if running under IIS. Default is zero.; http://php.net/fastcgi.impersonate;fastcgi.impersonate = 1; Disable logging through FastCGI connection. PHP's default behavior is to enable; this feature.;fastcgi.logging = 0; cgi.rfc2616_headers configuration option tells PHP what type of headers to; use when sending HTTP response code. If set to 0, PHP sends Status: header that; is supported by Apache. When this option is set to 1, PHP will send; RFC2616 compliant header.; Default is zero.; http://php.net/cgi.rfc2616-headers;cgi.rfc2616_headers = 0; cgi.check_shebang_line controls whether CGI PHP checks for line starting with #!; (shebang) at the top of the running script. This line might be needed if the; script support running both as stand-alone script and via PHP CGI<. PHP in CGI; mode skips this line and ignores its content if this directive is turned on.; http://php.net/cgi.check-shebang-line;cgi.check_shebang_line=1;;;;;;;;;;;;;;;;; File Uploads ;;;;;;;;;;;;;;;;;; Whether to allow HTTP file uploads.; http://php.net/file-uploadsfile_uploads = On; Temporary directory for HTTP uploaded files (will use system default if not; specified).; http://php.net/upload-tmp-dir;upload_tmp_dir =; Maximum allowed size for uploaded files.; http://php.net/upload-max-filesizeupload_max_filesize = 2M; Maximum number of files that can be uploaded via a single requestmax_file_uploads = 20;;;;;;;;;;;;;;;;;;; Fopen wrappers ;;;;;;;;;;;;;;;;;;;; Whether to allow the treatment of URLs (like http:// or ftp://) as files.; http://php.net/allow-url-fopenallow_url_fopen = On; Whether to allow include/require to open URLs (like http:// or ftp://) as files.; http://php.net/allow-url-includeallow_url_include = Off; Define the anonymous ftp password (your email address). PHP's default setting; for this is empty.; http://php.net/from;from="john@doe.com"; Define the User-Agent string. PHP's default setting for this is empty.; http://php.net/user-agent;user_agent="PHP"; Default timeout for socket based streams (seconds); http://php.net/default-socket-timeoutdefault_socket_timeout = 60; If your scripts have to deal with files from Macintosh systems,; or you are running on a Mac and need to deal with files from; unix or win32 systems, setting this flag will cause PHP to; automatically detect the EOL character in those files so that; fgets() and file() will work regardless of the source of the file.; http://php.net/auto-detect-line-endings;auto_detect_line_endings = Off;;;;;;;;;;;;;;;;;;;;;;; Dynamic Extensions ;;;;;;;;;;;;;;;;;;;;;;;; If you wish to have an extension loaded automatically, use the following; syntax:;; extension=modulename.extension;; For example, on Windows:;; extension=msql.dll;; ... or under UNIX:;; extension=msql.so;; ... or with a path:;; extension=/path/to/extension/msql.so;; If you only provide the name of the extension, PHP will look for it in its; default extension directory.;; Windows Extensions; Note that ODBC support is built in, so no dll is needed for it.; Note that many DLL files are located in the extensions/ (PHP 4) ext/ (PHP 5); extension folders as well as the separate PECL DLL download (PHP 5).; Be sure to appropriately set the extension_dir directive.;;extension=php_bz2.dll;extension=php_curl.dll;extension=php_fileinfo.dll;extension=php_gd2.dll;extension=php_gettext.dll;extension=php_gmp.dll;extension=php_intl.dll;extension=php_imap.dll;extension=php_interbase.dll;extension=php_ldap.dll;extension=php_mbstring.dll;extension=php_exif.dll ; Must be after mbstring as it depends on it;extension=php_mysql.dll;extension=php_mysqli.dll;extension=php_oci8_12c.dll ; Use with Oracle Database 12c Instant Client;extension=php_openssl.dll;extension=php_pdo_firebird.dll;extension=php_pdo_mysql.dll;extension=php_pdo_oci.dll;extension=php_pdo_odbc.dll;extension=php_pdo_pgsql.dll;extension=php_pdo_sqlite.dll;extension=php_pgsql.dll;extension=php_shmop.dll; The MIBS data available in the PHP distribution must be installed.; See http://www.php.net/manual/en/snmp.installation.php;extension=php_snmp.dll;extension=php_soap.dll;extension=php_sockets.dll;extension=php_sqlite3.dll;extension=php_sybase_ct.dll;extension=php_tidy.dll;extension=php_xmlrpc.dll;extension=php_xsl.dll;;;;;;;;;;;;;;;;;;;; Module Settings ;;;;;;;;;;;;;;;;;;;;[CLI Server]; Whether the CLI web server uses ANSI color coding in its terminal output.cli_server.color = On[Date]; Defines the default timezone used by the date functions; http://php.net/date.timezone;date.timezone =; http://php.net/date.default-latitude;date.default_latitude = 31.7667; http://php.net/date.default-longitude;date.default_longitude = 35.2333; http://php.net/date.sunrise-zenith;date.sunrise_zenith = 90.583333; http://php.net/date.sunset-zenith;date.sunset_zenith = 90.583333[filter]; http://php.net/filter.default;filter.default = unsafe_raw; http://php.net/filter.default-flags;filter.default_flags =[iconv]; Use of this INI entry is deprecated, use global input_encoding instead.; If empty, default_charset or input_encoding or iconv.input_encoding is used.; The precedence is: default_charset < intput_encoding < iconv.input_encoding;iconv.input_encoding =; Use of this INI entry is deprecated, use global internal_encoding instead.; If empty, default_charset or internal_encoding or iconv.internal_encoding is used.; The precedence is: default_charset < internal_encoding < iconv.internal_encoding;iconv.internal_encoding =; Use of this INI entry is deprecated, use global output_encoding instead.; If empty, default_charset or output_encoding or iconv.output_encoding is used.; The precedence is: default_charset < output_encoding < iconv.output_encoding; To use an output encoding conversion, iconv's output handler must be set; otherwise output encoding conversion cannot be performed.;iconv.output_encoding =[intl];intl.default_locale =; This directive allows you to produce PHP errors when some error; happens within intl functions. The value is the level of the error produced.; Default is 0, which does not produce any errors.;intl.error_level = E_WARNING;intl.use_exceptions = 0[sqlite3];sqlite3.extension_dir =[Pcre];PCRE library backtracking limit.; http://php.net/pcre.backtrack-limit;pcre.backtrack_limit=100000;PCRE library recursion limit.;Please note that if you set this value to a high number you may consume all;the available process stack and eventually crash PHP (due to reaching the;stack size limit imposed by the Operating System).; http://php.net/pcre.recursion-limit;pcre.recursion_limit=100000[Pdo]; Whether to pool ODBC connections. Can be one of "strict", "relaxed" or "off"; http://php.net/pdo-odbc.connection-pooling;pdo_odbc.connection_pooling=strict;pdo_odbc.db2_instance_name[Pdo_mysql]; If mysqlnd is used: Number of cache slots for the internal result set cache; http://php.net/pdo_mysql.cache_sizepdo_mysql.cache_size = 2000; Default socket name for local MySQL connects. If empty, uses the built-in; MySQL defaults.; http://php.net/pdo_mysql.default-socketpdo_mysql.default_socket=[Phar]; http://php.net/phar.readonly;phar.readonly = On; http://php.net/phar.require-hash;phar.require_hash = On;phar.cache_list =[mail function]; For Win32 only.; http://php.net/smtpSMTP = localhost; http://php.net/smtp-portsmtp_port = 25; For Win32 only.; http://php.net/sendmail-from;sendmail_from = me@example.com; For Unix only. You may supply arguments as well (default: "sendmail -t -i").; http://php.net/sendmail-path;sendmail_path =; Force the addition of the specified parameters to be passed as extra parameters; to the sendmail binary. These parameters will always replace the value of; the 5th parameter to mail().;mail.force_extra_parameters =; Add X-PHP-Originating-Script: that will include uid of the script followed by the filenamemail.add_x_header = On; The path to a log file that will log all mail() calls. Log entries include; the full path of the script, line number, To address and headers.;mail.log =; Log mail to syslog (Event Log on Windows).;mail.log = syslog[SQL]; http://php.net/sql.safe-modesql.safe_mode = Off[ODBC]; http://php.net/odbc.default-db;odbc.default_db = Not yet implemented; http://php.net/odbc.default-user;odbc.default_user = Not yet implemented; http://php.net/odbc.default-pw;odbc.default_pw = Not yet implemented; Controls the ODBC cursor model.; Default: SQL_CURSOR_STATIC (default).;odbc.default_cursortype; Allow or prevent persistent links.; http://php.net/odbc.allow-persistentodbc.allow_persistent = On; Check that a connection is still valid before reuse.; http://php.net/odbc.check-persistentodbc.check_persistent = On; Maximum number of persistent links. -1 means no limit.; http://php.net/odbc.max-persistentodbc.max_persistent = -1; Maximum number of links (persistent + non-persistent). -1 means no limit.; http://php.net/odbc.max-linksodbc.max_links = -1; Handling of LONG fields. Returns number of bytes to variables. 0 means; passthru.; http://php.net/odbc.defaultlrlodbc.defaultlrl = 4096; Handling of binary data. 0 means passthru, 1 return as is, 2 convert to char.; See the documentation on odbc_binmode and odbc_longreadlen for an explanation; of odbc.defaultlrl and odbc.defaultbinmode; http://php.net/odbc.defaultbinmodeodbc.defaultbinmode = 1;birdstep.max_links = -1[Interbase]; Allow or prevent persistent links.ibase.allow_persistent = 1; Maximum number of persistent links. -1 means no limit.ibase.max_persistent = -1; Maximum number of links (persistent + non-persistent). -1 means no limit.ibase.max_links = -1; Default database name for ibase_connect().;ibase.default_db =; Default username for ibase_connect().;ibase.default_user =; Default password for ibase_connect().;ibase.default_password =; Default charset for ibase_connect().;ibase.default_charset =; Default timestamp format.ibase.timestampformat = "%Y-%m-%d %H:%M:%S"; Default date format.ibase.dateformat = "%Y-%m-%d"; Default time format.ibase.timeformat = "%H:%M:%S"[MySQL]; Allow accessing, from PHP's perspective, local files with LOAD DATA statements; http://php.net/mysql.allow_local_infilemysql.allow_local_infile = On; Allow or prevent persistent links.; http://php.net/mysql.allow-persistentmysql.allow_persistent = On; If mysqlnd is used: Number of cache slots for the internal result set cache; http://php.net/mysql.cache_sizemysql.cache_size = 2000; Maximum number of persistent links. -1 means no limit.; http://php.net/mysql.max-persistentmysql.max_persistent = -1; Maximum number of links (persistent + non-persistent). -1 means no limit.; http://php.net/mysql.max-linksmysql.max_links = -1; Default port number for mysql_connect(). If unset, mysql_connect() will use; the $MYSQL_TCP_PORT or the mysql-tcp entry in /etc/services or the; compile-time value defined MYSQL_PORT (in that order). Win32 will only look; at MYSQL_PORT.; http://php.net/mysql.default-portmysql.default_port =; Default socket name for local MySQL connects. If empty, uses the built-in; MySQL defaults.; http://php.net/mysql.default-socketmysql.default_socket =; Default host for mysql_connect() (doesn't apply in safe mode).; http://php.net/mysql.default-hostmysql.default_host =; Default user for mysql_connect() (doesn't apply in safe mode).; http://php.net/mysql.default-usermysql.default_user =; Default password for mysql_connect() (doesn't apply in safe mode).; Note that this is generally a *bad* idea to store passwords in this file.; *Any* user with PHP access can run 'echo get_cfg_var("mysql.default_password"); and reveal this password! And of course, any users with read access to this; file will be able to reveal the password as well.; http://php.net/mysql.default-passwordmysql.default_password =; Maximum time (in seconds) for connect timeout. -1 means no limit; http://php.net/mysql.connect-timeoutmysql.connect_timeout = 60; Trace mode. When trace_mode is active (=On), warnings for table/index scans and; SQL-Errors will be displayed.; http://php.net/mysql.trace-modemysql.trace_mode = Off[MySQLi]; Maximum number of persistent links. -1 means no limit.; http://php.net/mysqli.max-persistentmysqli.max_persistent = -1; Allow accessing, from PHP's perspective, local files with LOAD DATA statements; http://php.net/mysqli.allow_local_infile;mysqli.allow_local_infile = On; Allow or prevent persistent links.; http://php.net/mysqli.allow-persistentmysqli.allow_persistent = On; Maximum number of links. -1 means no limit.; http://php.net/mysqli.max-linksmysqli.max_links = -1; If mysqlnd is used: Number of cache slots for the internal result set cache; http://php.net/mysqli.cache_sizemysqli.cache_size = 2000; Default port number for mysqli_connect(). If unset, mysqli_connect() will use; the $MYSQL_TCP_PORT or the mysql-tcp entry in /etc/services or the; compile-time value defined MYSQL_PORT (in that order). Win32 will only look; at MYSQL_PORT.; http://php.net/mysqli.default-portmysqli.default_port = 3306; Default socket name for local MySQL connects. If empty, uses the built-in; MySQL defaults.; http://php.net/mysqli.default-socketmysqli.default_socket =; Default host for mysql_connect() (doesn't apply in safe mode).; http://php.net/mysqli.default-hostmysqli.default_host =; Default user for mysql_connect() (doesn't apply in safe mode).; http://php.net/mysqli.default-usermysqli.default_user =; Default password for mysqli_connect() (doesn't apply in safe mode).; Note that this is generally a *bad* idea to store passwords in this file.; *Any* user with PHP access can run 'echo get_cfg_var("mysqli.default_pw"); and reveal this password! And of course, any users with read access to this; file will be able to reveal the password as well.; http://php.net/mysqli.default-pwmysqli.default_pw =; Allow or prevent reconnectmysqli.reconnect = Off[mysqlnd]; Enable / Disable collection of general statistics by mysqlnd which can be; used to tune and monitor MySQL operations.; http://php.net/mysqlnd.collect_statisticsmysqlnd.collect_statistics = On; Enable / Disable collection of memory usage statistics by mysqlnd which can be; used to tune and monitor MySQL operations.; http://php.net/mysqlnd.collect_memory_statisticsmysqlnd.collect_memory_statistics = Off; Records communication from all extensions using mysqlnd to the specified log; file.; http://php.net/mysqlnd.debug;mysqlnd.debug =; Defines which queries will be logged.; http://php.net/mysqlnd.log_mask;mysqlnd.log_mask = 0; Default size of the mysqlnd memory pool, which is used by result sets.; http://php.net/mysqlnd.mempool_default_size;mysqlnd.mempool_default_size = 16000; Size of a pre-allocated buffer used when sending commands to MySQL in bytes.; http://php.net/mysqlnd.net_cmd_buffer_size;mysqlnd.net_cmd_buffer_size = 2048; Size of a pre-allocated buffer used for reading data sent by the server in; bytes.; http://php.net/mysqlnd.net_read_buffer_size;mysqlnd.net_read_buffer_size = 32768; Timeout for network requests in seconds.; http://php.net/mysqlnd.net_read_timeout;mysqlnd.net_read_timeout = 31536000; SHA-256 Authentication Plugin related. File with the MySQL server public RSA; key.; http://php.net/mysqlnd.sha256_server_public_key;mysqlnd.sha256_server_public_key =[OCI8]; Connection: Enables privileged connections using external; credentials (OCI_SYSOPER, OCI_SYSDBA); http://php.net/oci8.privileged-connect;oci8.privileged_connect = Off; Connection: The maximum number of persistent OCI8 connections per; process. Using -1 means no limit.; http://php.net/oci8.max-persistent;oci8.max_persistent = -1; Connection: The maximum number of seconds a process is allowed to; maintain an idle persistent connection. Using -1 means idle; persistent connections will be maintained forever.; http://php.net/oci8.persistent-timeout;oci8.persistent_timeout = -1; Connection: The number of seconds that must pass before issuing a; ping during oci_pconnect() to check the connection validity. When; set to 0, each oci_pconnect() will cause a ping. Using -1 disables; pings completely.; http://php.net/oci8.ping-interval;oci8.ping_interval = 60; Connection: Set this to a user chosen connection class to be used; for all pooled server requests with Oracle 11g Database Resident; Connection Pooling (DRCP). To use DRCP, this value should be set to; the same string for all web servers running the same application,; the database pool must be configured, and the connection string must; specify to use a pooled server.;oci8.connection_class =; High Availability: Using On lets PHP receive Fast Application; Notification (FAN) events generated when a database node fails. The; database must also be configured to post FAN events.;oci8.events = Off; Tuning: This option enables statement caching, and specifies how; many statements to cache. Using 0 disables statement caching.; http://php.net/oci8.statement-cache-size;oci8.statement_cache_size = 20; Tuning: Enables statement prefetching and sets the default number of; rows that will be fetched automatically after statement execution.; http://php.net/oci8.default-prefetch;oci8.default_prefetch = 100; Compatibility. Using On means oci_close() will not close; oci_connect() and oci_new_connect() connections.; http://php.net/oci8.old-oci-close-semantics;oci8.old_oci_close_semantics = Off[PostgreSQL]; Allow or prevent persistent links.; http://php.net/pgsql.allow-persistentpgsql.allow_persistent = On; Detect broken persistent links always with pg_pconnect().; Auto reset feature requires a little overheads.; http://php.net/pgsql.auto-reset-persistentpgsql.auto_reset_persistent = Off; Maximum number of persistent links. -1 means no limit.; http://php.net/pgsql.max-persistentpgsql.max_persistent = -1; Maximum number of links (persistent+non persistent). -1 means no limit.; http://php.net/pgsql.max-linkspgsql.max_links = -1; Ignore PostgreSQL backends Notice message or not.; Notice message logging require a little overheads.; http://php.net/pgsql.ignore-noticepgsql.ignore_notice = 0; Log PostgreSQL backends Notice message or not.; Unless pgsql.ignore_notice=0, module cannot log notice message.; http://php.net/pgsql.log-noticepgsql.log_notice = 0[Sybase-CT]; Allow or prevent persistent links.; http://php.net/sybct.allow-persistentsybct.allow_persistent = On; Maximum number of persistent links. -1 means no limit.; http://php.net/sybct.max-persistentsybct.max_persistent = -1; Maximum number of links (persistent + non-persistent). -1 means no limit.; http://php.net/sybct.max-linkssybct.max_links = -1; Minimum server message severity to display.; http://php.net/sybct.min-server-severitysybct.min_server_severity = 10; Minimum client message severity to display.; http://php.net/sybct.min-client-severitysybct.min_client_severity = 10; Set per-context timeout; http://php.net/sybct.timeout;sybct.timeout=;sybct.packet_size; The maximum time in seconds to wait for a connection attempt to succeed before returning failure.; Default: one minute;sybct.login_timeout=; The name of the host you claim to be connecting from, for display by sp_who.; Default: none;sybct.hostname=; Allows you to define how often deadlocks are to be retried. -1 means "forever".; Default: 0;sybct.deadlock_retry_count=[bcmath]; Number of decimal digits for all bcmath functions.; http://php.net/bcmath.scalebcmath.scale = 0[browscap]; http://php.net/browscap;browscap = extra/browscap.ini[Session]; Handler used to store/retrieve data.; http://php.net/session.save-handlersession.save_handler = files; Argument passed to save_handler. In the case of files, this is the path; where data files are stored. Note: Windows users have to change this; variable in order to use PHP's session functions.;; The path can be defined as:;; session.save_path = "N;/path";; where N is an integer. Instead of storing all the session files in; /path, what this will do is use subdirectories N-levels deep, and; store the session data in those directories. This is useful if; your OS has problems with many files in one directory, and is; a more efficient layout for servers that handle many sessions.;; NOTE 1: PHP will not create this directory structure automatically.; You can use the script in the ext/session dir for that purpose.; NOTE 2: See the section on garbage collection below if you choose to; use subdirectories for session storage;; The file storage module creates files using mode 600 by default.; You can change that by using;; session.save_path = "N;MODE;/path";; where MODE is the octal representation of the mode. Note that this; does not overwrite the process's umask.; http://php.net/session.save-path;session.save_path = "/tmp"; Whether to use strict session mode.; Strict session mode does not accept uninitialized session ID and regenerate; session ID if browser sends uninitialized session ID. Strict mode protects; applications from session fixation via session adoption vulnerability. It is; disabled by default for maximum compatibility, but enabling it is encouraged.; https://wiki.php.net/rfc/strict_sessionssession.use_strict_mode = 0; Whether to use cookies.; http://php.net/session.use-cookiessession.use_cookies = 1; http://php.net/session.cookie-secure;session.cookie_secure =; This option forces PHP to fetch and use a cookie for storing and maintaining; the session id. We encourage this operation as it's very helpful in combating; session hijacking when not specifying and managing your own session id. It is; not the be-all and end-all of session hijacking defense, but it's a good start.; http://php.net/session.use-only-cookiessession.use_only_cookies = 1; Name of the session (used as cookie name).; http://php.net/session.namesession.name = PHPSESSID; Initialize session on request startup.; http://php.net/session.auto-startsession.auto_start = 0; Lifetime in seconds of cookie or, if 0, until browser is restarted.; http://php.net/session.cookie-lifetimesession.cookie_lifetime = 0; The path for which the cookie is valid.; http://php.net/session.cookie-pathsession.cookie_path = /; The domain for which the cookie is valid.; http://php.net/session.cookie-domainsession.cookie_domain =; Whether or not to add the httpOnly flag to the cookie, which makes it inaccessible to browser scripting languages such as JavaScript.; http://php.net/session.cookie-httponlysession.cookie_httponly =; Handler used to serialize data. php is the standard serializer of PHP.; http://php.net/session.serialize-handlersession.serialize_handler = php; Defines the probability that the 'garbage collection' process is started; on every session initialization. The probability is calculated by using; gc_probability/gc_divisor. Where session.gc_probability is the numerator; and gc_divisor is the denominator in the equation. Setting this value to 1; when the session.gc_divisor value is 100 will give you approximately a 1% chance; the gc will run on any give request.; Default Value: 1; Development Value: 1; Production Value: 1; http://php.net/session.gc-probabilitysession.gc_probability = 1; Defines the probability that the 'garbage collection' process is started on every; session initialization. The probability is calculated by using the following equation:; gc_probability/gc_divisor. Where session.gc_probability is the numerator and; session.gc_divisor is the denominator in the equation. Setting this value to 1; when the session.gc_divisor value is 100 will give you approximately a 1% chance; the gc will run on any give request. Increasing this value to 1000 will give you; a 0.1% chance the gc will run on any give request. For high volume production servers,; this is a more efficient approach.; Default Value: 100; Development Value: 1000; Production Value: 1000; http://php.net/session.gc-divisorsession.gc_divisor = 1000; After this number of seconds, stored data will be seen as 'garbage' and; cleaned up by the garbage collection process.; http://php.net/session.gc-maxlifetimesession.gc_maxlifetime = 1440; NOTE: If you are using the subdirectory option for storing session files; (see session.save_path above), then garbage collection does *not*; happen automatically. You will need to do your own garbage; collection through a shell script, cron entry, or some other method.; For example, the following script would is the equivalent of; setting session.gc_maxlifetime to 1440 (1440 seconds = 24 minutes):; find /path/to/sessions -cmin +24 -type f | xargs rm; Check HTTP Referer to invalidate externally stored URLs containing ids.; HTTP_REFERER has to contain this substring for the session to be; considered as valid.; http://php.net/session.referer-checksession.referer_check =; How many bytes to read from the file.; http://php.net/session.entropy-length;session.entropy_length = 32; Specified here to create the session id.; http://php.net/session.entropy-file; Defaults to /dev/urandom; On systems that don't have /dev/urandom but do have /dev/arandom, this will default to /dev/arandom; If neither are found at compile time, the default is no entropy file.; On windows, setting the entropy_length setting will activate the; Windows random source (using the CryptoAPI);session.entropy_file = /dev/urandom; Set to {nocache,private,public,} to determine HTTP caching aspects; or leave this empty to avoid sending anti-caching headers.; http://php.net/session.cache-limitersession.cache_limiter = nocache; Document expires after n minutes.; http://php.net/session.cache-expiresession.cache_expire = 180; trans sid support is disabled by default.; Use of trans sid may risk your users' security.; Use this option with caution.; - User may send URL contains active session ID; to other person via. email/irc/etc.; - URL that contains active session ID may be stored; in publicly accessible computer.; - User may access your site with the same session ID; always using URL stored in browser's history or bookmarks.; http://php.net/session.use-trans-sidsession.use_trans_sid = 0; Select a hash function for use in generating session ids.; Possible Values; 0 (MD5 128 bits); 1 (SHA-1 160 bits); This option may also be set to the name of any hash function supported by; the hash extension. A list of available hashes is returned by the hash_algos(); function.; http://php.net/session.hash-functionsession.hash_function = 0; Define how many bits are stored in each character when converting; the binary hash data to something readable.; Possible values:; 4 (4 bits: 0-9, a-f); 5 (5 bits: 0-9, a-v); 6 (6 bits: 0-9, a-z, A-Z, "-", ","); Default Value: 4; Development Value: 5; Production Value: 5; http://php.net/session.hash-bits-per-charactersession.hash_bits_per_character = 5; The URL rewriter will look for URLs in a defined set of HTML tags.; form/fieldset are special; if you include them here, the rewriter will; add a hidden <input> field with the info which is otherwise appended; to URLs. If you want XHTML conformity, remove the form entry.; Note that all valid entries require a "=", even if no value follows.; Default Value: "a=href,area=href,frame=src,form=,fieldset="; Development Value: "a=href,area=href,frame=src,input=src,form=fakeentry"; Production Value: "a=href,area=href,frame=src,input=src,form=fakeentry"; http://php.net/url-rewriter.tagsurl_rewriter.tags = "a=href,area=href,frame=src,input=src,form=fakeentry"; Enable upload progress tracking in $_SESSION; Default Value: On; Development Value: On; Production Value: On; http://php.net/session.upload-progress.enabled;session.upload_progress.enabled = On; Cleanup the progress information as soon as all POST data has been read; (i.e. upload completed).; Default Value: On; Development Value: On; Production Value: On; http://php.net/session.upload-progress.cleanup;session.upload_progress.cleanup = On; A prefix used for the upload progress key in $_SESSION; Default Value: "upload_progress_"; Development Value: "upload_progress_"; Production Value: "upload_progress_"; http://php.net/session.upload-progress.prefix;session.upload_progress.prefix = "upload_progress_"; The index name (concatenated with the prefix) in $_SESSION; containing the upload progress information; Default Value: "PHP_SESSION_UPLOAD_PROGRESS"; Development Value: "PHP_SESSION_UPLOAD_PROGRESS"; Production Value: "PHP_SESSION_UPLOAD_PROGRESS"; http://php.net/session.upload-progress.name;session.upload_progress.name = "PHP_SESSION_UPLOAD_PROGRESS"; How frequently the upload progress should be updated.; Given either in percentages (per-file), or in bytes; Default Value: "1%"; Development Value: "1%"; Production Value: "1%"; http://php.net/session.upload-progress.freq;session.upload_progress.freq = "1%"; The minimum delay between updates, in seconds; Default Value: 1; Development Value: 1; Production Value: 1; http://php.net/session.upload-progress.min-freq;session.upload_progress.min_freq = "1"[MSSQL]; Allow or prevent persistent links.mssql.allow_persistent = On; Maximum number of persistent links. -1 means no limit.mssql.max_persistent = -1; Maximum number of links (persistent+non persistent). -1 means no limit.mssql.max_links = -1; Minimum error severity to display.mssql.min_error_severity = 10; Minimum message severity to display.mssql.min_message_severity = 10; Compatibility mode with old versions of PHP 3.0.mssql.compatibility_mode = Off; Connect timeout;mssql.connect_timeout = 5; Query timeout;mssql.timeout = 60; Valid range 0 - 2147483647. Default = 4096.;mssql.textlimit = 4096; Valid range 0 - 2147483647. Default = 4096.;mssql.textsize = 4096; Limits the number of records in each batch. 0 = all records in one batch.;mssql.batchsize = 0; Specify how datetime and datetim4 columns are returned; On => Returns data converted to SQL server settings; Off => Returns values as YYYY-MM-DD hh:mm:ss;mssql.datetimeconvert = On; Use NT authentication when connecting to the servermssql.secure_connection = Off; Specify max number of processes. -1 = library default; msdlib defaults to 25; FreeTDS defaults to 4096;mssql.max_procs = -1; Specify client character set.; If empty or not set the client charset from freetds.conf is used; This is only used when compiled with FreeTDS;mssql.charset = "ISO-8859-1"[Assertion]; Assert(expr); active by default.; http://php.net/assert.active;assert.active = On; Issue a PHP warning for each failed assertion.; http://php.net/assert.warning;assert.warning = On; Don't bail out by default.; http://php.net/assert.bail;assert.bail = Off; User-function to be called if an assertion fails.; http://php.net/assert.callback;assert.callback = 0; Eval the expression with current error_reporting(). Set to true if you want; error_reporting(0) around the eval().; http://php.net/assert.quiet-eval;assert.quiet_eval = 0[COM]; path to a file containing GUIDs, IIDs or filenames of files with TypeLibs; http://php.net/com.typelib-file;com.typelib_file =; allow Distributed-COM calls; http://php.net/com.allow-dcom;com.allow_dcom = true; autoregister constants of a components typlib on com_load(); http://php.net/com.autoregister-typelib;com.autoregister_typelib = true; register constants casesensitive; http://php.net/com.autoregister-casesensitive;com.autoregister_casesensitive = false; show warnings on duplicate constant registrations; http://php.net/com.autoregister-verbose;com.autoregister_verbose = true; The default character set code-page to use when passing strings to and from COM objects.; Default: system ANSI code page;com.code_page=[mbstring]; language for internal character representation.; This affects mb_send_mail() and mbstrig.detect_order.; http://php.net/mbstring.language;mbstring.language = Japanese; Use of this INI entry is deprecated, use global internal_encoding instead.; internal/script encoding.; Some encoding cannot work as internal encoding. (e.g. SJIS, BIG5, ISO-2022-*); If empty, default_charset or internal_encoding or iconv.internal_encoding is used.; The precedence is: default_charset < internal_encoding < iconv.internal_encoding;mbstring.internal_encoding =; Use of this INI entry is deprecated, use global input_encoding instead.; http input encoding.; mbstring.encoding_traslation = On is needed to use this setting.; If empty, default_charset or input_encoding or mbstring.input is used.; The precedence is: default_charset < intput_encoding < mbsting.http_input; http://php.net/mbstring.http-input;mbstring.http_input =; Use of this INI entry is deprecated, use global output_encoding instead.; http output encoding.; mb_output_handler must be registered as output buffer to function.; If empty, default_charset or output_encoding or mbstring.http_output is used.; The precedence is: default_charset < output_encoding < mbstring.http_output; To use an output encoding conversion, mbstring's output handler must be set; otherwise output encoding conversion cannot be performed.; http://php.net/mbstring.http-output;mbstring.http_output =; enable automatic encoding translation according to; mbstring.internal_encoding setting. Input chars are; converted to internal encoding by setting this to On.; Note: Do _not_ use automatic encoding translation for; portable libs/applications.; http://php.net/mbstring.encoding-translation;mbstring.encoding_translation = Off; automatic encoding detection order.; "auto" detect order is changed according to mbstring.language; http://php.net/mbstring.detect-order;mbstring.detect_order = auto; substitute_character used when character cannot be converted; one from another; http://php.net/mbstring.substitute-character;mbstring.substitute_character = none; overload(replace) single byte functions by mbstring functions.; mail(), ereg(), etc are overloaded by mb_send_mail(), mb_ereg(),; etc. Possible values are 0,1,2,4 or combination of them.; For example, 7 for overload everything.; 0: No overload; 1: Overload mail() function; 2: Overload str*() functions; 4: Overload ereg*() functions; http://php.net/mbstring.func-overload;mbstring.func_overload = 0; enable strict encoding detection.; Default: Off;mbstring.strict_detection = On; This directive specifies the regex pattern of content types for which mb_output_handler(); is activated.; Default: mbstring.http_output_conv_mimetype=^(text/|application/xhtml\+xml);mbstring.http_output_conv_mimetype=[gd]; Tell the jpeg decode to ignore warnings and try to create; a gd image. The warning will then be displayed as notices; disabled by default; http://php.net/gd.jpeg-ignore-warning;gd.jpeg_ignore_warning = 0[exif]; Exif UNICODE user comments are handled as UCS-2BE/UCS-2LE and JIS as JIS.; With mbstring support this will automatically be converted into the encoding; given by corresponding encode setting. When empty mbstring.internal_encoding; is used. For the decode settings you can distinguish between motorola and; intel byte order. A decode setting cannot be empty.; http://php.net/exif.encode-unicode;exif.encode_unicode = ISO-8859-15; http://php.net/exif.decode-unicode-motorola;exif.decode_unicode_motorola = UCS-2BE; http://php.net/exif.decode-unicode-intel;exif.decode_unicode_intel = UCS-2LE; http://php.net/exif.encode-jis;exif.encode_jis =; http://php.net/exif.decode-jis-motorola;exif.decode_jis_motorola = JIS; http://php.net/exif.decode-jis-intel;exif.decode_jis_intel = JIS[Tidy]; The path to a default tidy configuration file to use when using tidy; http://php.net/tidy.default-config;tidy.default_config = /usr/local/lib/php/default.tcfg; Should tidy clean and repair output automatically?; WARNING: Do not use this option if you are generating non-html content; such as dynamic images; http://php.net/tidy.clean-outputtidy.clean_output = Off[soap]; Enables or disables WSDL caching feature.; http://php.net/soap.wsdl-cache-enabledsoap.wsdl_cache_enabled=1; Sets the directory name where SOAP extension will put cache files.; http://php.net/soap.wsdl-cache-dirsoap.wsdl_cache_dir="/tmp"; (time to live) Sets the number of second while cached file will be used; instead of original one.; http://php.net/soap.wsdl-cache-ttlsoap.wsdl_cache_ttl=86400; Sets the size of the cache limit. (Max. number of WSDL files to cache)soap.wsdl_cache_limit = 5[sysvshm]; A default size of the shared memory segment;sysvshm.init_mem = 10000[ldap]; Sets the maximum number of open links or -1 for unlimited.ldap.max_links = -1[mcrypt]; For more information about mcrypt settings see http://php.net/mcrypt-module-open; Directory where to load mcrypt algorithms; Default: Compiled in into libmcrypt (usually /usr/local/lib/libmcrypt);mcrypt.algorithms_dir=; Directory where to load mcrypt modes; Default: Compiled in into libmcrypt (usually /usr/local/lib/libmcrypt);mcrypt.modes_dir=[dba];dba.default_handler=[opcache]; Determines if Zend OPCache is enabled;opcache.enable=0; Determines if Zend OPCache is enabled for the CLI version of PHP;opcache.enable_cli=0; The OPcache shared memory storage size.;opcache.memory_consumption=64; The amount of memory for interned strings in Mbytes.;opcache.interned_strings_buffer=4; The maximum number of keys (scripts) in the OPcache hash table.; Only numbers between 200 and 100000 are allowed.;opcache.max_accelerated_files=2000; The maximum percentage of "wasted" memory until a restart is scheduled.;opcache.max_wasted_percentage=5; When this directive is enabled, the OPcache appends the current working; directory to the script key, thus eliminating possible collisions between; files with the same name (basename). Disabling the directive improves; performance, but may break existing applications.;opcache.use_cwd=1; When disabled, you must reset the OPcache manually or restart the; webserver for changes to the filesystem to take effect.;opcache.validate_timestamps=1; How often (in seconds) to check file timestamps for changes to the shared; memory storage allocation. ("1" means validate once per second, but only; once per request. "0" means always validate);opcache.revalidate_freq=2; Enables or disables file search in include_path optimization;opcache.revalidate_path=0; If disabled, all PHPDoc comments are dropped from the code to reduce the; size of the optimized code.;opcache.save_comments=1; If disabled, PHPDoc comments are not loaded from SHM, so "Doc Comments"; may be always stored (save_comments=1), but not loaded by applications; that don't need them anyway.;opcache.load_comments=1; If enabled, a fast shutdown sequence is used for the accelerated code;opcache.fast_shutdown=0; Allow file existence override (file_exists, etc.) performance feature.;opcache.enable_file_override=0; A bitmask, where each bit enables or disables the appropriate OPcache; passes;opcache.optimization_level=0xffffffff;opcache.inherited_hack=1;opcache.dups_fix=0; The location of the OPcache blacklist file (wildcards allowed).; Each OPcache blacklist file is a text file that holds the names of files; that should not be accelerated. The file format is to add each filename; to a new line. The filename may be a full path or just a file prefix; (i.e., /var/www/x blacklists all the files and directories in /var/www; that start with 'x'). Line starting with a ; are ignored (comments).;opcache.blacklist_filename=; Allows exclusion of large files from being cached. By default all files; are cached.;opcache.max_file_size=0; Check the cache checksum each N requests.; The default value of "0" means that the checks are disabled.;opcache.consistency_checks=0; How long to wait (in seconds) for a scheduled restart to begin if the cache; is not being accessed.;opcache.force_restart_timeout=180; OPcache error_log file name. Empty string assumes "stderr".;opcache.error_log=; All OPcache errors go to the Web server log.; By default, only fatal errors (level 0) or errors (level 1) are logged.; You can also enable warnings (level 2), info messages (level 3) or; debug messages (level 4).;opcache.log_verbosity_level=1; Preferred Shared Memory back-end. Leave empty and let the system decide.;opcache.preferred_memory_model=; Protect the shared memory from unexpected writing during script execution.; Useful for internal debugging only.;opcache.protect_memory=0; Validate cached file permissions.; opcache.validate_permission=0; Prevent name collisions in chroot'ed environment.; opcache.validate_root=0[curl]; A default value for the CURLOPT_CAINFO option. This is required to be an; absolute path.;curl.cainfo =[openssl]; The location of a Certificate Authority (CA) file on the local filesystem; to use when verifying the identity of SSL/TLS peers. Most users should; not specify a value for this directive as PHP will attempt to use the; OS-managed cert stores in its absence. If specified, this value may still; be overridden on a per-stream basis via the "cafile" SSL stream context; option.;openssl.cafile=; If openssl.cafile is not specified or if the CA file is not found, the; directory pointed to by openssl.capath is searched for a suitable; certificate. This value must be a correctly hashed certificate directory.; Most users should not specify a value for this directive as PHP will; attempt to use the OS-managed cert stores in its absence. If specified,; this value may still be overridden on a per-stream basis via the "capath"; SSL stream context option.;openssl.capath=; Local Variables:; tab-width: 4; End:EOF
范例:运行镜像
$ docker build -t centos-php:v1.0 -f Dockerfile .
# php:
# 1.使用镜像跑定时任务
# 2.nginx+php-fpm跑网站
$ docker images centos-php
REPOSITORY   TAG       IMAGE ID       CREATED         SIZE
centos-php   v1.0      6878df16217a   9 minutes ago   634MB

$ docker run -it -p 19000:9000 --name centos-php-node1 -d centos-php:v1.0
$ docker ps -l
CONTAINER ID   IMAGE             COMMAND     CREATED          STATUS          PORTS                                         NAMES
d173650742cb   centos-php:v1.0   "php-fpm"   16 seconds ago   Up 15 seconds   0.0.0.0:19000->9000/tcp, :::19000->9000/tcp   centos-php-node1
6.7 案例:容器化搭建个人博客系统

1、自定义网络
docker network create lnmp
2、创建Mysql容器
docker run -d \
      --name lnmp_mysql \
      --net lnmp \
      --mount src=mysql-vol,dst=/var/lib/mysql \
      -e MYSQL_ROOT_PASSWORD=123456 \
      -e MYSQL_DATABASE=wordpress \
      mysql:5.7 --character-set-server=utf8
3、创建PHP容器
docker run -d --name lnmp_php \
      --net lnmp \
      --mount src=wwwroot,dst=/wwwroot \
      centos-php:v1.0
4、创建Nginx容器
# docker run -d --name lnmp_nginx \
#         --net lnmp -p 10880:80 \
#         --mount src=wwwroot,dst=/wwwroot \
#         --mount type=bind,src=$PWD/php.conf,dst=/usr/local/nginx/conf/vhost/php.conf \
#         centos-nginx:v1.0

docker run -d --name lnmp_nginx \
        --net lnmp -p 10880:80 \
        --mount src=wwwroot,dst=/usr/local/nginx/html \
        --mount type=bind,src=$PWD/php.conf,dst=/usr/local/nginx/conf/vhost/php.conf \
        centos-nginx:v1.0
范例:php.conf 配置文件示例
server {
    listen 80;
    server_name example.kubesphere.com;
    index index.php index.html;

    access_log logs/www.kubesphere.com_access.log;
    error_log logs/www.kubesphere.com_error.log;

    location / {
        root /wwwroot;
    }
    location ~* \.php$ {
        root /wwwroot;
        fastcgi_pass lnmp _php:9000;
        fastcgi_param SCRIPT_FILENAME $document_root$fastcgi_script_name;
        include fastcgi_params;
    }
}
5、以wordpress博客为例
$ docker volume inspect wwwroot
[
    {
        "CreatedAt": "2022-12-01T02:54:38Z",
        "Driver": "local",
        "Labels": null,
        "Mountpoint": "/var/lib/docker/volumes/wwwroot/_data",
        "Name": "wwwroot",
        "Options": null,
        "Scope": "local"
    }
]
$ echo "<?php phpinfo();?>" > /var/lib/docker/volumes/wwwroot/_data/index.php
$ curl 127.0.0.1:10880/index.php
<?php phpinfo();?>

https://cn.wordpress.org/wordpress-4.9.4-zh_CN.tar.gz
Docker 容器需要用阻塞进程将容器一直运行中。
范例:start.sh 脚本示例
cat > start.sh <<-'EOF'
#!/bin/bash
service httpd start
service mysqld start
mysqladmin -uroot -p${MYSQL_ROOT_PASSWORD}
tail -f
EOF
范例:Dockerfile 示例
FROM centos:6
MAINTAINER <zhongzhiwei zhongzhiwei@kubesphere.io>

RUN curl -o /etc/yum.repos.d/CentOS-Base.repo https://mirrors.aliyun.com/repo/Centos-vault-6.10.repo
RUN yum install -y httpd php php-gd php-mysql mysql mysql-server
ENV MYSQL_ROOT_PASSWORD 123456

RUN echo "<?php phpinfo();?>" > /var/www/html/index.php

# cat start.sh
# #!/bin/bash
# service httpd start
# service mysqld start
# mysqladmin -uroot -p${MYSQL_ROOT_PASSWORD}
# tail -f
ADD start.sh /start.sh
RUN chmod +x /start.sh

# wget https://cn.wordpress.org/wordpress-4.7.4-zh_CN.tar.gz
ADD https://cn.wordpress.org/wordpress-4.7.4-zh_CN.tar.gz /var/www/html/
RUN cd /var/www/html/ && tar -zxvf wordpress-4.7.4-zh_CN.tar.gz
COPY wp-config.php /var/www/html/wordpress

VOLUME [ "/var/lib/mysql" ]
CMD /start.sh

EXPOSE 80 3306
范例:wp-config.php 示例
<?php
/**
 * WordPress基础配置文件。
 *
 * 这个文件被安装程序用于自动生成wp-config.php配置文件,
 * 您可以不使用网站,您需要手动复制这个文件,
 * 并重命名为“wp-config.php”,然后填入相关信息。
 *
 * 本文件包含以下配置选项:
 *
 * * MySQL设置
 * * 密钥
 * * 数据库表名前缀
 * * ABSPATH
 *
 * @link https://codex.wordpress.org/zh-cn:%E7%BC%96%E8%BE%91_wp-config.php
 *
 * @package WordPress
 */

// ** MySQL 设置 - 具体信息来自您正在使用的主机 ** //
/** WordPress数据库的名称 */
define('DB_NAME', 'test');

/** MySQL数据库用户名 */
define('DB_USER', 'root');

/** MySQL数据库密码 */
define('DB_PASSWORD', '密码');

/** MySQL主机 */
define('DB_HOST', 'localhost');

/** 创建数据表时默认的文字编码 */
define('DB_CHARSET', 'utf8');

/** 数据库整理类型。如不确定请勿更改 */
define('DB_COLLATE', '');

/**#@+
 * 身份认证密钥与盐。
 *
 * 修改为任意独一无二的字串!
 * 或者直接访问{@link https://api.wordpress.org/secret-key/1.1/salt/
 * WordPress.org密钥生成服务}
 * 任何修改都会导致所有cookies失效,所有用户将必须重新登录。
 *
 * @since 2.6.0
 */
define('AUTH_KEY',         '(Qc8jjvhi}r7w|N+fZ+5x;~:mTun!08=2f+vn#5m@<OH#q !0H_;PteVL/:a@1e_');
define('SECURE_AUTH_KEY',  '!{5p&%:CeG8Wi4q)FkjmEtYU8n3v*K/i01R-{~/7t7lKe?j=fs$!!K>lgw`8%|`E');
define('LOGGED_IN_KEY',    '779<wSUu<7Y#=:,,9>c@D{)p+i}0t=F/US}Be/=j)?2!l!Cd4_:cL)3&N,-ls?^X');
define('NONCE_KEY',        'FT{nC1?}qnP@)[JuENB3a%11w;vPp<@YxzbbFBfW5JPZN0wBVN|FVB`q!)f[H(/e');
define('AUTH_SALT',        '|Y]}.eZX$S~$#su_{hS0c24:dm@[a..jWav@:bSH)Y6PF)Qk@a;CP*4Cv=-Dpv3W');
define('SECURE_AUTH_SALT', '`!R:FNc{{kdkm;zQ1x2?{fIpbc-Am&UysZrYFHF?u~.N:;Rhy-?YZNnuOa(KE+0o');
define('LOGGED_IN_SALT',   '%h>+r06#a^6{Wk3/=8oH2`<p4ub0&d+N;tSeBY+iw(i.Ug9>X]A)rPRS/T.Rslg(');
define('NONCE_SALT',       '?Dvzn,,<r4;82^rIx5%+9/fNR?i3sG9^]pHR{+eV@pQP!L~CRFcrXz?&s^ZgWJJ2');

/**#@-*/

/**
 * WordPress数据表前缀。
 *
 * 如果您有在同一数据库内安装多个WordPress的需求,请为每个WordPress设置
 * 不同的数据表前缀。前缀名只能为数字、字母加下划线。
 */
$table_prefix  = 'wp_';

/**
 * 开发者专用:WordPress调试模式。
 *
 * 将这个值改为true,WordPress将显示所有用于开发的提示。
 * 强烈建议插件开发者在开发环境中启用WP_DEBUG。
 *
 * 要获取其他能用于调试的信息,请访问Codex。
 *
 * @link https://codex.wordpress.org/Debugging_in_WordPress
 */
define('WP_DEBUG', false);

/**
 * zh_CN本地化设置:启用ICP备案号显示
 *
 * 可在设置→常规中修改。
 * 如需禁用,请移除或注释掉本行。
 */
define('WP_ZH_CN_ICP_NUM', true);

/* 好了!请不要再继续编辑。请保存本文件。使用愉快! */

/** WordPress目录的绝对路径。 */
if ( !defined('ABSPATH') )
    define('ABSPATH', dirname(__FILE__) . '/');

/** 设置WordPress变量和包含文件。 */
require_once(ABSPATH . 'wp-settings.php');
范例:构建 Docker 镜像
docker build -t php:v1.0 -f Dockerfile .
:::color1 Container 容器是最精简版的 Linux 操作系统。
:::
$ docker images
REPOSITORY                TAG              IMAGE ID       CREATED          SIZE
php                       v1.0             14ebabe2d1c4   12 minutes ago   547MB
$ docker run -itd --name wordpress -p 88:80 php:v1.0
$ docker ps -l
CONTAINER ID   IMAGE      COMMAND                  CREATED         STATUS         PORTS                                         NAMES
69dfab550ca6   php:v1.0   "/bin/sh -c /start.sh"   2 seconds ago   Up 2 seconds   3306/tcp, 0.0.0.0:88->80/tcp, :::88->80/tcp   wordpress
浏览器访问 http://<IP地址>:88
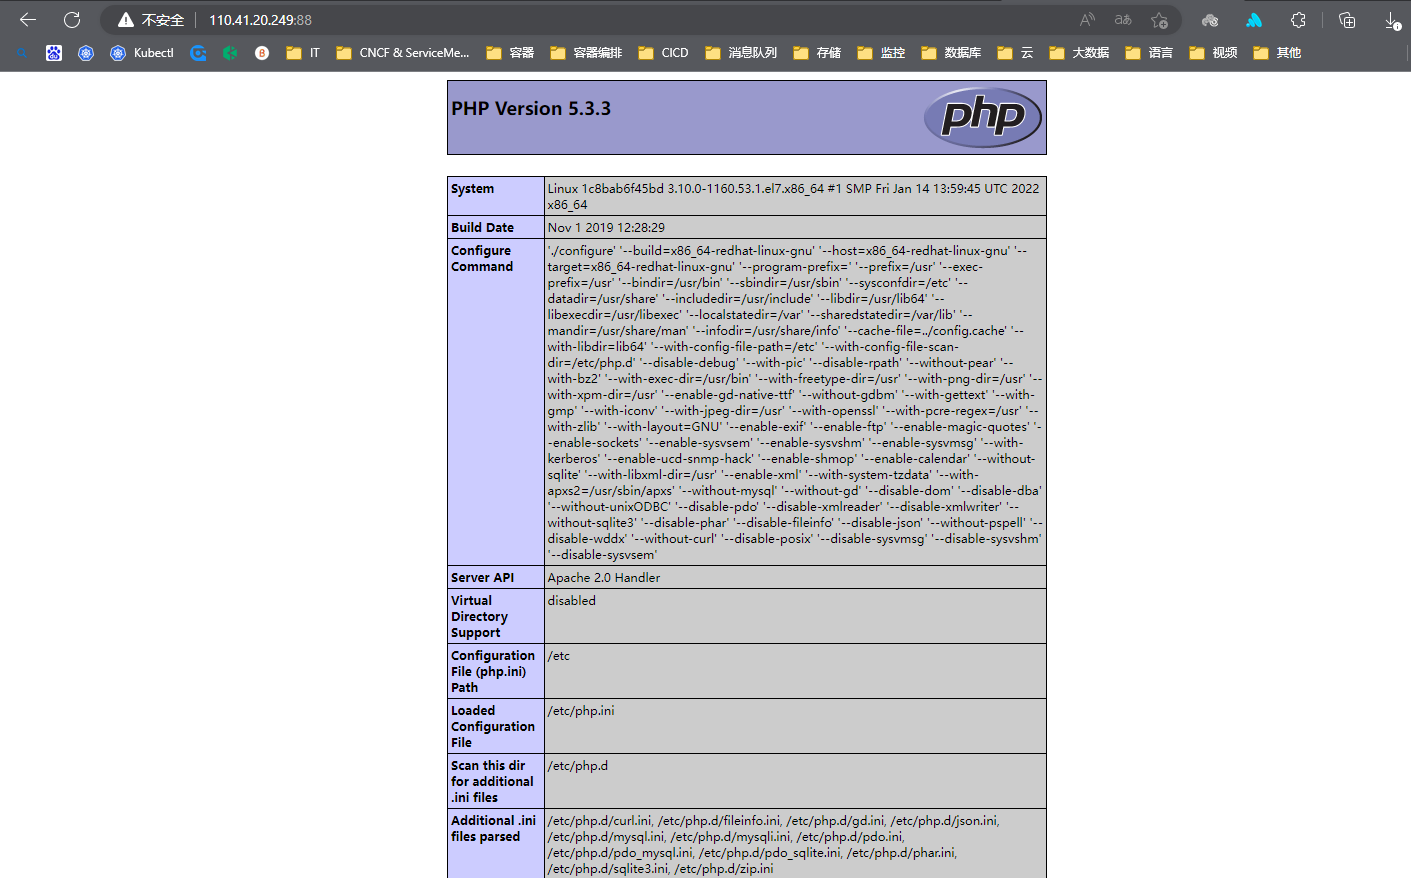
浏览器访问 http://<IP地址>:88/wordpress
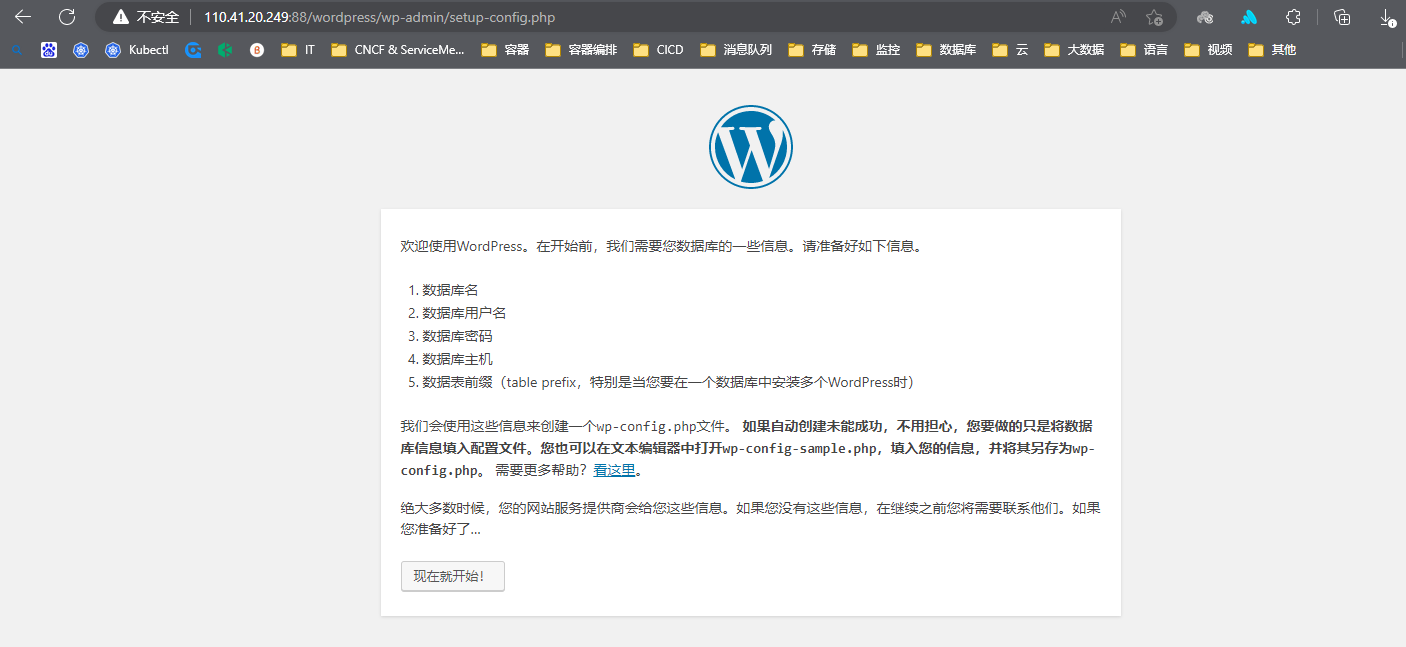
$ docker exec -it wordpress /bin/bash
[root@1c8bab6f45bd /]# echo $MYSQL_ROOT_PASSWORD
123456
[root@404042e7bfc8 /]# vi /etc/my.cnf
[mysqld]
datadir=/var/lib/mysql
socket=/var/lib/mysql/mysql.sock
user=mysql
# Disabling symbolic-links is recommended to prevent assorted security risks
symbolic-links=0
skip-grant-tables

[mysqld_safe]
log-error=/var/log/mysqld.log
pid-file=/var/run/mysqld/mysqld.pid
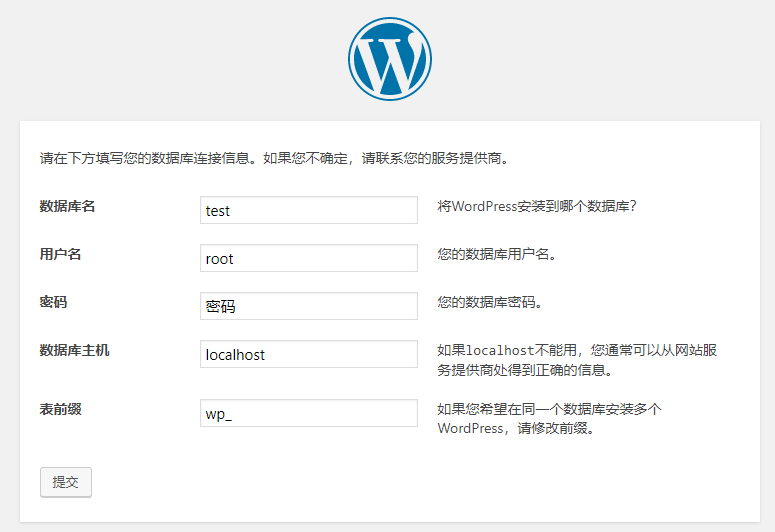
安装 Wordpress 就可以实现了!
Wordpress 后台管理系统。
6.8 JAVA项目镜像构建:Tomcat
FROM centos:centos7.9.2009
LABEL maintainer www.kubesphere.io

ENV VERSION=8.5.84

RUN yum install java-1.8.0-openjdk wget curl unzip iproute net-tools -y && \
    yum clean all && \
    rm -rf /var/cache/yum/*
# wget https://dlcdn.apache.org/tomcat/tomcat-8/v8.5.84/bin/apache-tomcat-8.5.84.tar.gz
ADD apache-tomcat-${VERSION}.tar.gz /usr/local/
RUN mv /usr/local/apache-tomcat-${VERSION} /usr/local/tomcat && \
    sed -i '1a JAVA_OPTS="-Djava.security.egd=file:/dev/./urandom"' /usr/local/tomcat/bin/catalina.sh && \
    ln -sf /usr/share/zoneinfo/Asia/Shanghai /etc/localtime

ENV PATH $PATH:/usr/local/tomcat/bin

WORKDIR /usr/local/tomcat

EXPOSE 8080

CMD ["catalina.sh", "run"]
$ docker build -t centos-tomcat:v1.0 -f Dockerfile .
$ docker images centos-tomcat
REPOSITORY      TAG       IMAGE ID       CREATED              SIZE
centos-tomcat   v1.0      d84e8bc7a8a4   About a minute ago   462MB

$ docker run -it -d -p 18080:8080 --name centos-tomcat centos-tomcat:v1.0
$ docker ps -l
CONTAINER ID   IMAGE                COMMAND             CREATED         STATUS        PORTS                                         NAMES
2086996297dc   centos-tomcat:v1.0   "catalina.sh run"   2 seconds ago   Up 1 second   0.0.0.0:18080->8080/tcp, :::18080->8080/tcp   centos-tomcat
$ curl 127.0.0.1:18080

# 浏览器访问:http://<IP地址>:18080
6.9 JAVA微服务镜像构建:Jar
FROM java:8-jdk-alpine
LABEL maintainer www.kubesphere.com

ENV JAVA_OPTS="$JAVA_OPTS -Dfile.encoding=UTF8-Duser.timezone=GMT+08"

RUN sed -i 's/dl-cdn.alpinelinux.org/mirrors.aliyun.com/g' /etc/apk/repositories && \
    apk add -U tzdata && \
    ln -sf /usr/share/zoneinfo/Asia/Shanghai /etc/localtime

# 需要有一个hello.jar包文件
COPY hello.jar /
# 暴露端口
EXPOSE 8888

CMD ["/bin/sh", "-c", "java -jar $JAVA_OPTS /hello.jar"]
# 构建镜像
$ docker build -t alpine-jar:v1.0 -f Dockerfile .
范例:Apline-Openjdk-1.8
$ vim Dockerfile
FROM alpine

MAINTAINER zhongzhiwei <zhongzhiwei@kubesphere.io>
LABEL name="zhongzhiwei"
LABEL email="zhongzhiwei@kubesphere.io"

ENV MYPATH /usr/local/
WORKDIR ${MYPATH}

# 修改APT为清华源
RUN sed -i 's/dl-cdn.alpinelinux.org/mirrors.tuna.tsinghua.edu.cn/g' /etc/apk/repositories

# 安装VIM编辑器
RUN apk add vim

# 安装ifconfig查看网络IP
RUN apk add net-tools

# 安装OpenJDK 和 bash
RUN apk add bash openjdk8

# 配置java环境变量
ENV JAVA_HOME=/usr/lib/jvm/java-1.8-openjdk
ENV PATH="$JAVA_HOME/bin:${PATH}"

EXPOSE 80
RUN echo "WORKDIR=${MYPATH}"
RUN java -version
RUN echo "Success-----------------OK"
CMD [ "/bin/bash" ]
范例:CentOS7-JDK1.8
FROM centos:centos7.9.2009

MAINTAINER zhongzhiwei <zhongzhiwei@kubesphere.io>
LABEL name="zhongzhiwei"
LABEL email="zhongzhiwei@kubesphere.io"

ENV MYPATH /usr/local
WORKDIR ${MYPATH}

# 安装VIM编辑器
RUN yum install -y vim

# 安装ifconfig查看网络IP
RUN yum install -y net-tools

# 安装java8以及lib库
RUN yum install -y glibc.i686

# ADD 是相对路径 jar,把jdk-8u301-linux-x64.tar.gz添加到容器中,安装包必须要和Dockerfile文件在同一位置
ADD jdk-8u301-linux-x64.tar.gz /usr/local/
RUN ln -s /usr/local/jdk1.8.0_301 /usr/local/java

# 配置java环境变量
ENV JAVA_HOME /usr/local/java
ENV JRE_HOME ${JAVA_HOME}/jre
ENV CLASSPATH $JAVA_HOME/lib/dt.jar:$JAVA_HOME/lib/tools.jar:$JRE_HOME/lib:$CLASSPATH
ENV PATH $JAVA_HOME/bin:$PATH

EXPOSE 80
RUN echo "WORKDIR=${MYPATH}"
RUN echo "Success-----------------OK"
CMD [ "/bin/bash" ]
范例:Ubuntu-JDK1.8
FROM ubuntu

MAINTAINER zhongzhiwei <935523993@qq.com>

ENV MY_PATH=/usr/local
WORKDIR ${MY_PATH}

# 更新APT源仓库
RUN apt update -y
# 安装 ifconfig 命令查看网络IP
RUN apt install -y net-tools
# 安装 ip addr
RUN apt install -y iproute2
# 安装 ping
RUN apt install -y inetutils-ping
# 安装基本软件
RUN apt install -y wget bzip2 glibc-headers bison

# 安装 Java 8 以及 lib 库
# 1.安装 GNU MAKE-Version:4.2.1 软件路径:https://ftp.gnu.org/gnu/make/
RUN wget https://ftp.gnu.org/gnu/make/make-4.2.1.tar.gz && tar -xf make-4.2.1.tar.gz && cd make-4.2.1 && mkdir -p build && cd build
# 编译安装
RUN /usr/local/make-4.2.1/configure --prefix=/usr && sh build.sh && make install

# 2.安装 GCC-Version:8.2.0 软件路径:https://mirrors.tuna.tsinghua.edu.cn/gnu/gcc
RUN wget -c -P /opt/software/ https://mirrors.tuna.tsinghua.edu.cn/gnu/gcc/gcc-9.2.0/gcc-8.2.0.tar.gz && cd /opt/software/ && tar -zxvf gcc-8.2.0.tar.gz && /opt/software/gcc-8.2.0/contrib/download_prerequisites
RUN mkdir build && cd build && /opt/software/gcc-8.2.0/configure --enable-checking=release --enable-languages=c,c++ --disable-multilib
RUN make -j 4 && make install

# 3.安装 Glibc-Version:2.28 软件路径:https://ftp.gnu.org/gnu/glibc/
RUN wget http://ftp.gnu.org/gnu/glibc/glibc-2.28.tar.gz && tar -xf glibc-2.28.tar.gz && cd glibc-2.28 && mkdir build && cd build
# 编译安装
RUN /usr/local/glibc-2.28/configure --prefix=/usr --disable-profile --enable-add-ons --with-headers=/usr/include --with-binutils=/usr/bin && make -j 4 && make install

# ADD 是相对路径 jar,把jdk-8u301-linux-x64.tar.gz添加到容器中,安装包必须要和Dockerfile文件在同一位置
ADD jdk-8u301-linux-x64.tar.gz /usr/local/java

# 配置java环境变量
ENV JAVA_HOME=/usr/local/java/jdk1.8.0_301
ENV JRE_HOME=${JAVA_HOME}/jre
ENV CLASSPATH=${JAVA_HOME}/lib/dt.jar:${JAVA_HOME}/lib/tools.jar:${JRE_HOME}/lib:$CLASSPATH
ENV PATH=${JAVA_HOME}/bin:${PATH}

EXPOSE 80
CMD echo "${MY_PATH}"
CMD echo "Success-----------------OK"
CMD /bin/bash
6.10 编写Dockerfile最佳实践
- 减少镜像层:一次RUN指令形成新的一层,尽量Shell命令都写在一行,减少镜像层。Docker 默认的限制镜像层为 127 层。
- 优化镜像大小:一次RUN形成新的一层,如果没有在同一层删除,无论文件是否最后删除,都会带到下一层,所以要在每一层清理对应的残留数据,减小镜像大小。
- 减少网络传输时间:例如软件包、mvn仓库等。
- 多阶段构建:代码编译、部署在一个Dockerfile完成,只会保留部署阶段产生数据。
:::color1 编译构建 Dockerfile1 → 部署,打项目镜像 Dockerfile2
多阶段构建使用比较少,使用场景不多。
:::
- 选择最小的基础镜像:例如( alpine & slim )。快速的拉取,拉取的部署等。
- 学习更多Dockerfile的写法 Reference:https://github.com/docker-library/

若有收获,就点个赞吧
0 人点赞
