创建微服务子系统
1、右键【qingfeng-server】->New->Module…
2、选择Maven,新建maven子模块项目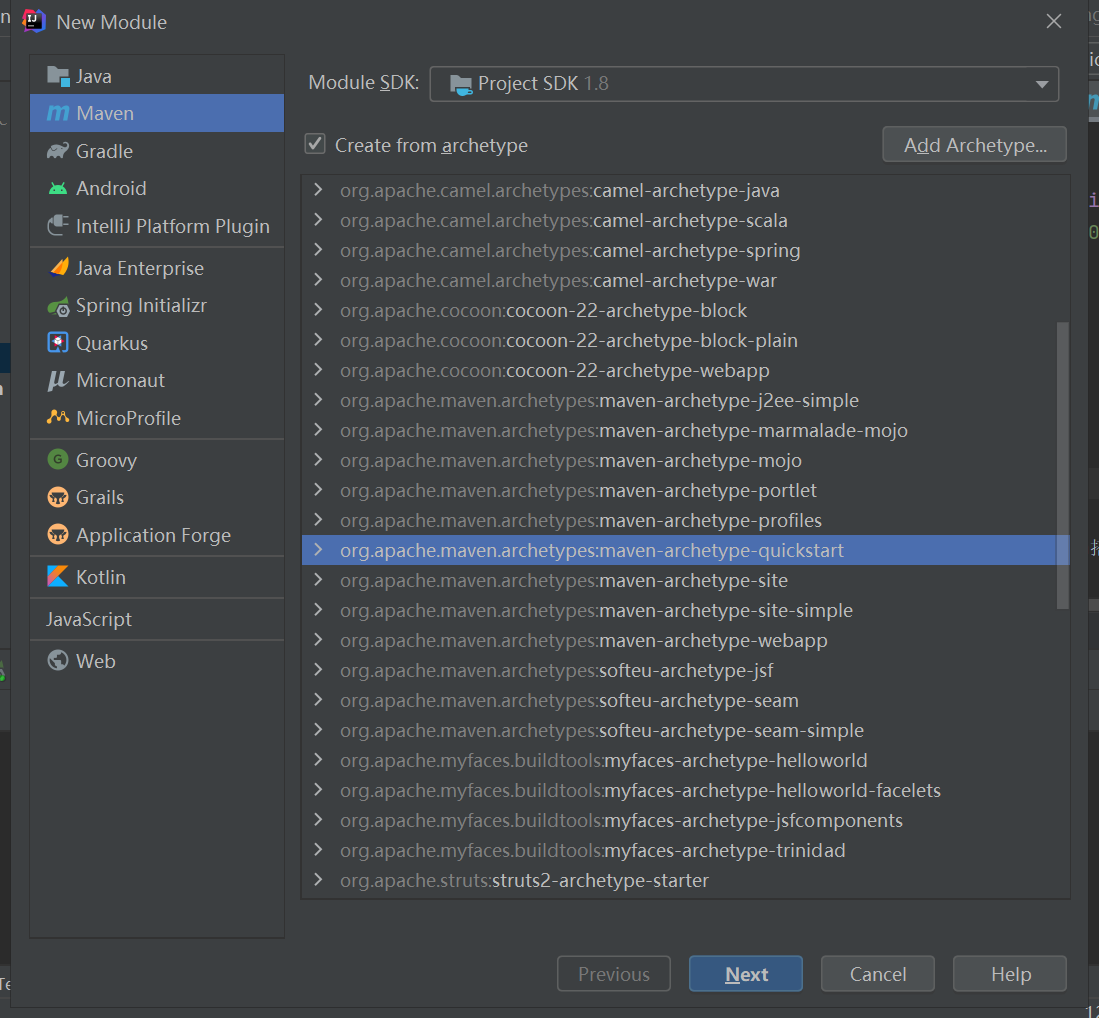
3、父节点选择:qingfeng-server,子模块名称:qingfeng-server-hello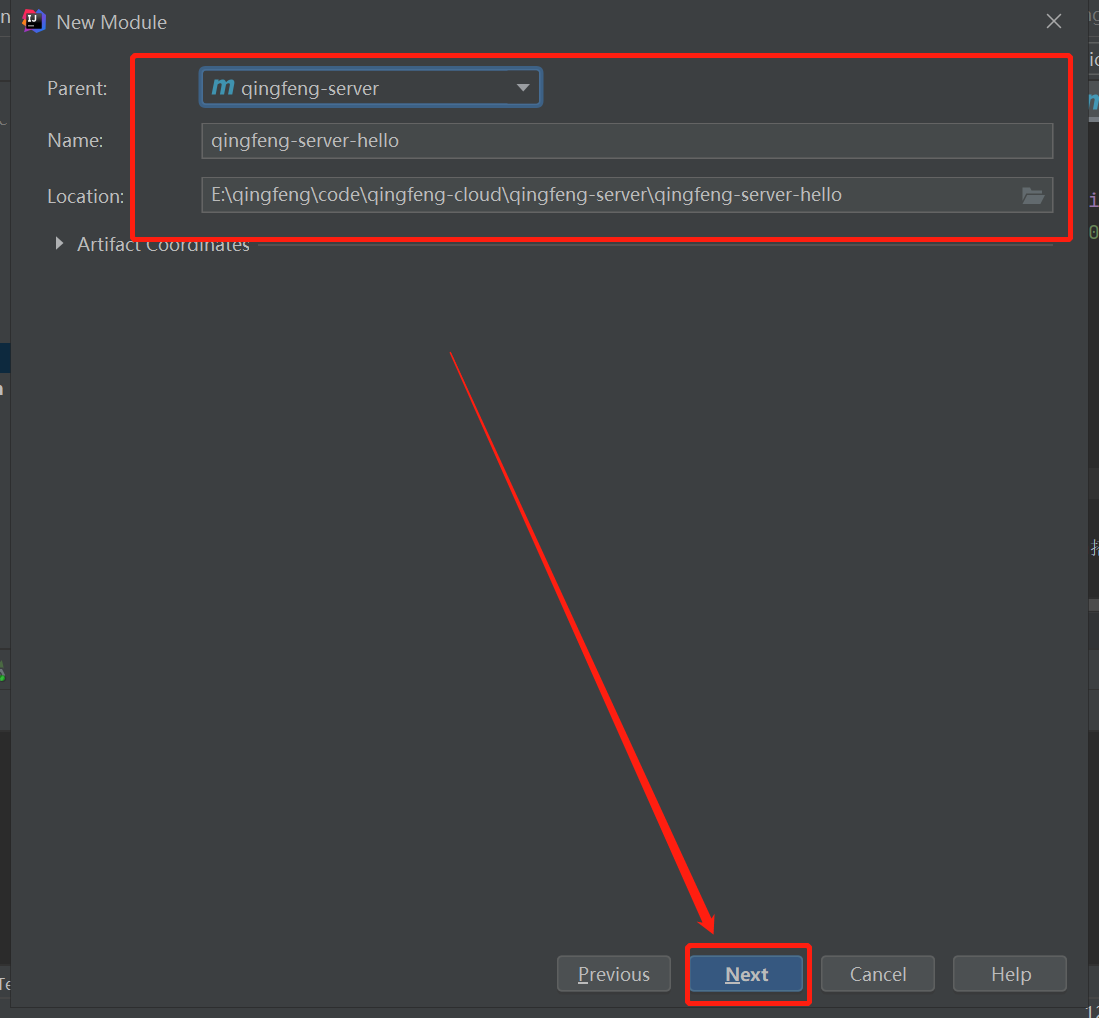
4、选择本地的maven安装地址及相关配置,点击完成。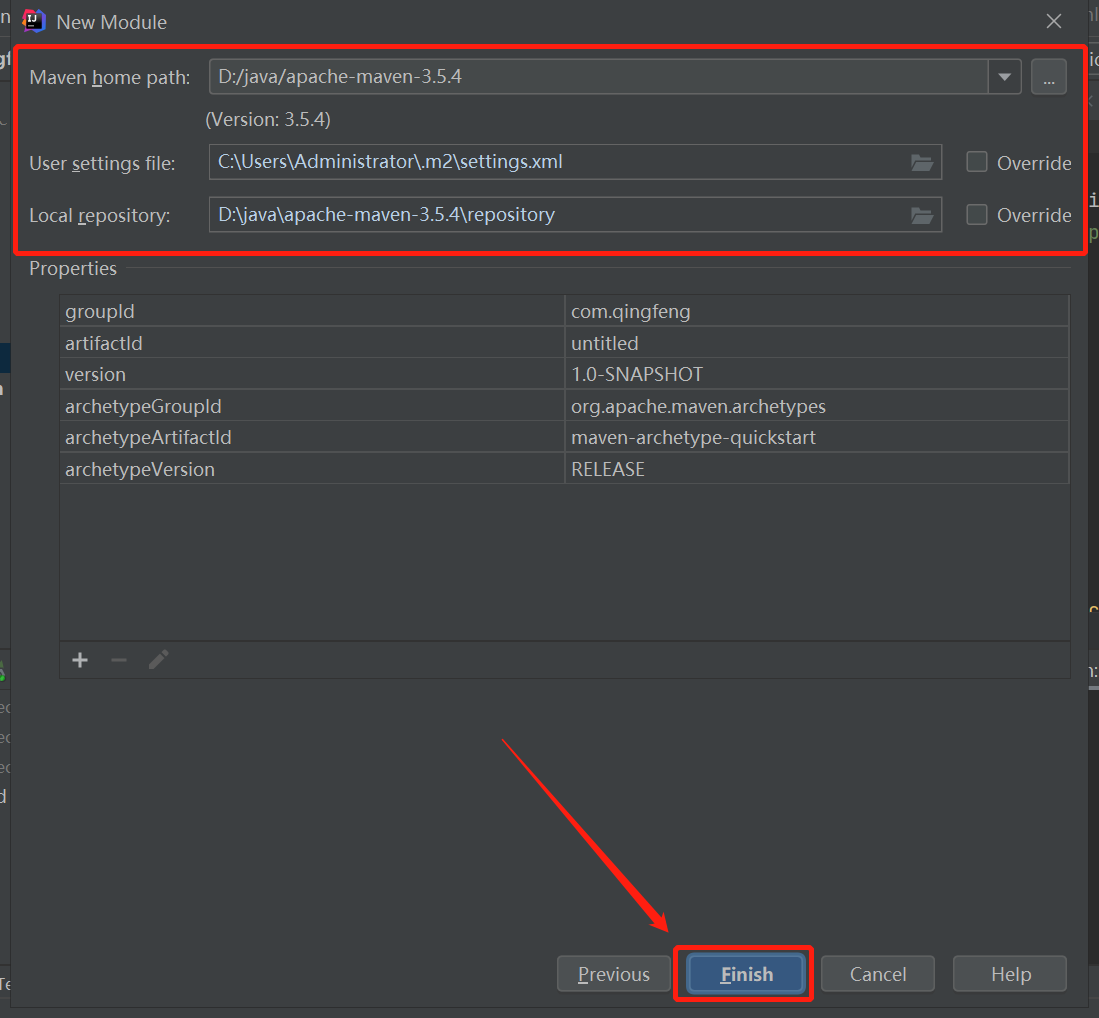
5、创建完成后会在qingfeng-server中显示刚刚创建的子业务系统:qingfeng-server-hello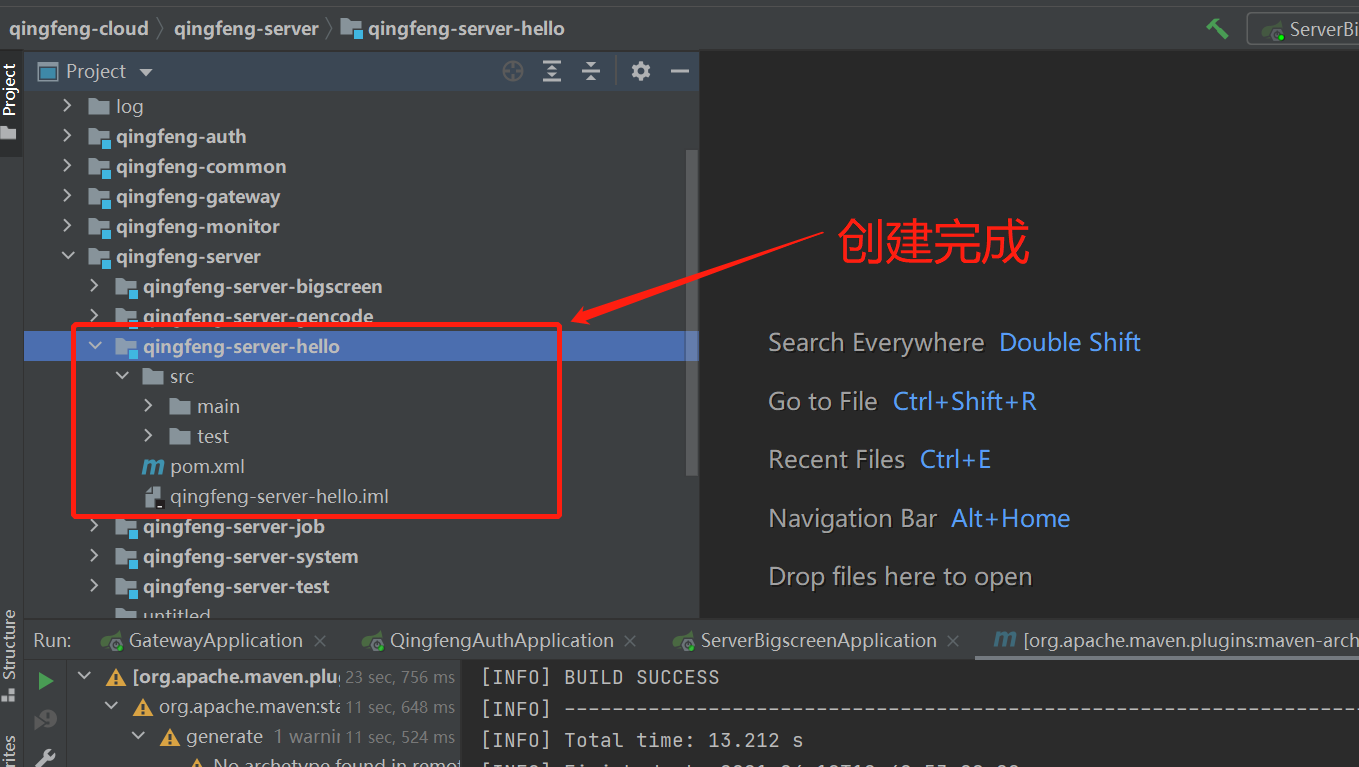
完善微服务子系统
1、基础调整
删除test下的AppTest.java ,在src/main下新建:resources 文件夹。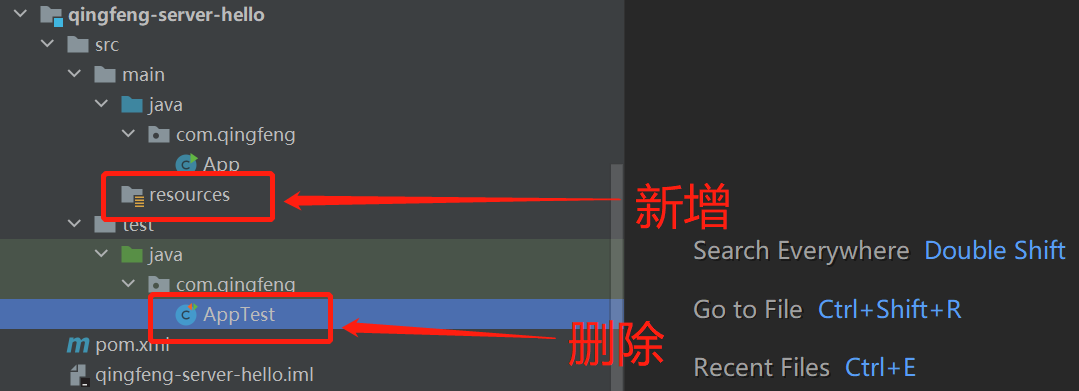
2、配置pom.xml
因为qingfeng-server-hello继承与qingfeng-server父模块,在父模块中的配置的jar会继承到子模块中,所以子模块设置如下:
<?xml version="1.0" encoding="UTF-8"?><project xmlns="http://maven.apache.org/POM/4.0.0" xmlns:xsi="http://www.w3.org/2001/XMLSchema-instance"xsi:schemaLocation="http://maven.apache.org/POM/4.0.0 http://maven.apache.org/xsd/maven-4.0.0.xsd"><parent><artifactId>qingfeng-server</artifactId><groupId>com.qingfeng</groupId><version>1.0-SNAPSHOT</version></parent><modelVersion>4.0.0</modelVersion><artifactId>qingfeng-server-hello</artifactId><name>qingfeng-server-hello</name><description>qingfeng-Server-Hello案例服务模块</description><build><plugins><plugin><groupId>org.springframework.boot</groupId><artifactId>spring-boot-maven-plugin</artifactId></plugin></plugins></build></project>
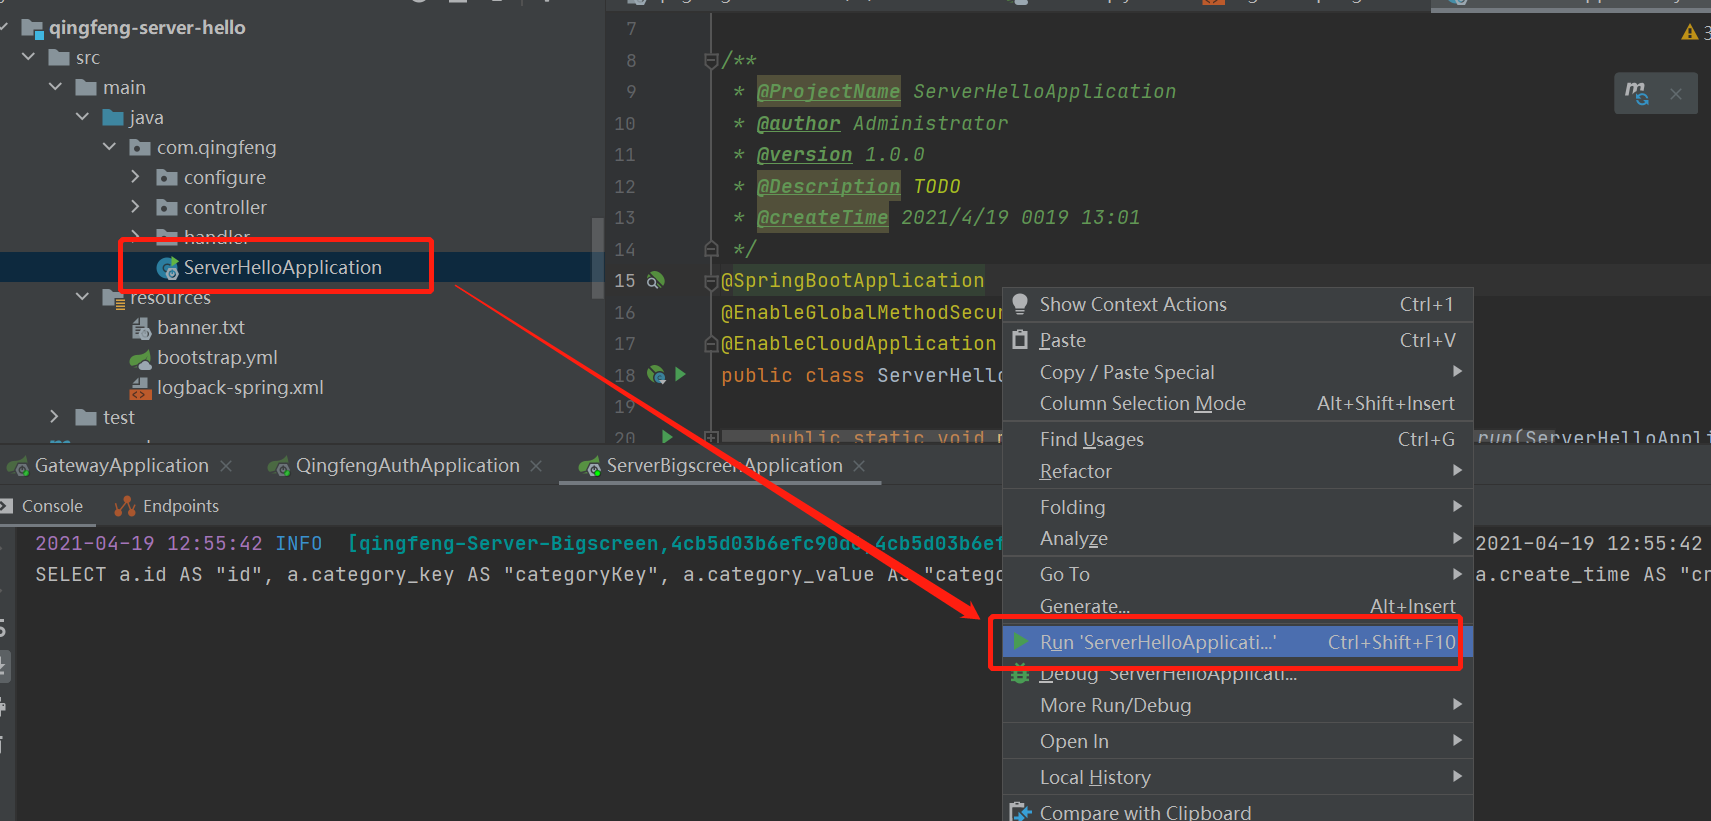
3、修改主入口文件
将App.java ,修改成:ServerHelloApplication.java
@SpringBootApplication
@EnableGlobalMethodSecurity(prePostEnabled = true)
开启springsecurity
@EnableCloudApplication #自定义注入集合,如下图:
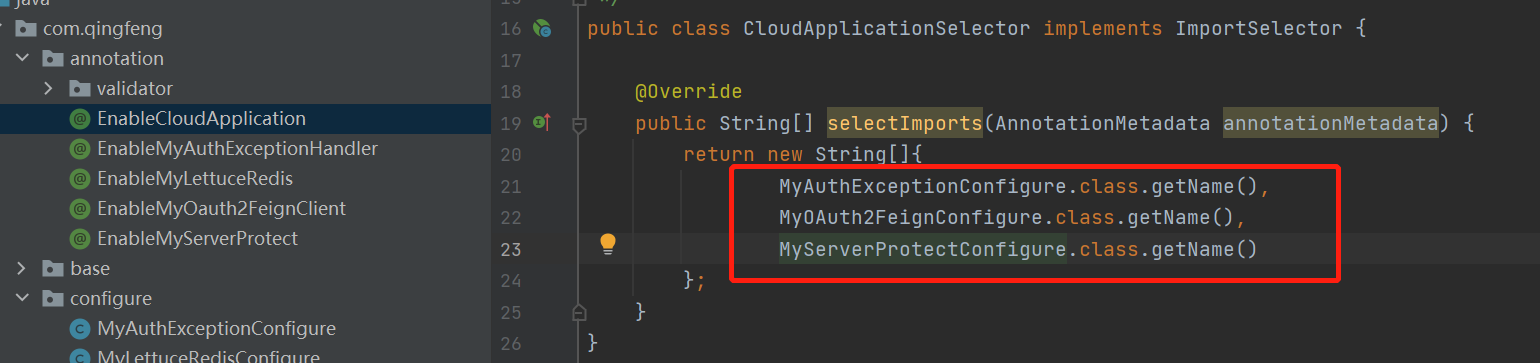
package com.qingfeng;import com.qingfeng.annotation.EnableCloudApplication;import org.springframework.boot.SpringApplication;import org.springframework.boot.autoconfigure.SpringBootApplication;import org.springframework.security.config.annotation.method.configuration.EnableGlobalMethodSecurity;/*** @ProjectName ServerHelloApplication* @author Administrator* @version 1.0.0* @Description TODO* @createTime 2021/4/19 0019 12:49*/@SpringBootApplication@EnableGlobalMethodSecurity(prePostEnabled = true)@EnableCloudApplicationpublic class ServerHelloApplication {public static void main(String[] args) {SpringApplication.run(ServerHelloApplication.class, args);}}
4、新建ServerHelloResourceServerConfigure
在com.qingfeng下新建:configure目录,新增:ServerHelloResourceServerConfigure.java (权限配置)
package com.qingfeng.configure;import com.qingfeng.handler.MyAccessDeniedHandler;import com.qingfeng.handler.MyAuthExceptionEntryPoint;import org.springframework.beans.factory.annotation.Autowired;import org.springframework.context.annotation.Configuration;import org.springframework.security.config.annotation.web.builders.HttpSecurity;import org.springframework.security.oauth2.config.annotation.web.configuration.EnableResourceServer;import org.springframework.security.oauth2.config.annotation.web.configuration.ResourceServerConfigurerAdapter;import org.springframework.security.oauth2.config.annotation.web.configurers.ResourceServerSecurityConfigurer;/*** @ProjectName ServerHelloResourceServerConfigure* @author Administrator* @version 1.0.0* @Description TODO* @createTime 2021/4/19 0019 12:54*/@Configuration@EnableResourceServerpublic class ServerHelloResourceServerConfigure extends ResourceServerConfigurerAdapter {@Autowiredprivate MyAccessDeniedHandler accessDeniedHandler;@Autowiredprivate MyAuthExceptionEntryPoint exceptionEntryPoint;@Overridepublic void configure(HttpSecurity http) throws Exception {http.csrf().disable().requestMatchers().antMatchers("/**").and().authorizeRequests().antMatchers("/actuator/**").permitAll().and().authorizeRequests().antMatchers("/**").authenticated();}@Overridepublic void configure(ResourceServerSecurityConfigurer resources) {resources.authenticationEntryPoint(exceptionEntryPoint).accessDeniedHandler(accessDeniedHandler);}}
5、新建GlobalExceptionHandler
新建handler目录,新增:GlobalExceptionHandler.java (全局异常配置)
package com.qingfeng.handler;import org.springframework.core.Ordered;import org.springframework.core.annotation.Order;import org.springframework.web.bind.annotation.RestControllerAdvice;/*** @ProjectName GlobalExceptionHandler* @author Administrator* @version 1.0.0* @Description TODO* @createTime 2021/4/19 0019 12:57*/@RestControllerAdvice@Order(value = Ordered.HIGHEST_PRECEDENCE)public class GlobalExceptionHandler extends BaseExceptionHandler {}
6、新建HelloController
新建controller目录,新增HelloController.java 测试。
package com.qingfeng.controller;import lombok.extern.slf4j.Slf4j;import org.springframework.security.access.prepost.PreAuthorize;import org.springframework.web.bind.annotation.GetMapping;import org.springframework.web.bind.annotation.RestController;import java.security.Principal;/*** @ProjectName TestController* @author qingfeng* @version 1.0.0* @Description TODO* @createTime 2021/4/3 0003 20:29*/@Slf4j@RestControllerpublic class HelloController {/*** @title index* @description 首页* @author Administrator* @updateTime 2021/4/19 0019 13:00*/@GetMapping("index")public String hello(String name){log.info("青锋欢迎您!!!");System.out.println("青锋hello模块");return "青锋欢迎您!!!";}/*** @title userAdd* @description 权限测试* @author Administrator* @updateTime 2021/4/19 0019 13:00*/@GetMapping("userAdd")@PreAuthorize("hasAnyAuthority('user:add')")public String userAdd(){return "拥有'user:add'权限";}/*** @title user* @description 获取当前登录用户* @author Administrator* @updateTime 2021/4/19 0019 13:00*/@GetMapping("user")public Principal user(Principal principal) {return principal;}}
7、新建banner.txt
在resources 下新建:banner.txt
____ _ ______/ __ \ (_) | ____|| | | | _ _ __ __ _ | |__ ___ _ __ __ _| | | || || '_ \ / _` || __|/ _ \| '_ \ / _` || |__| || || | | || (_| || | | __/| | | || (_| |\___\_\|_||_| |_| \__, ||_| \___||_| |_| \__, |__/ | __/ ||___/ |___/青锋剑在手-天下任你走 2020-V1.0${spring.application.name}Spring-Boot: ${spring-boot.version}
8、新建bootstrap.yml
在resources下新建:bootstrap.yml
spring:application:name: qingfeng-Server-Hellocloud:nacos:discovery:server-addr: localhost:8001config:server-addr: localhost:8001group: DEFAULT_GROUPprefix: qingfeng-server-hellofile-extension: yamllogging:level:com:alibaba:cloud:nacos:client:NacosPropertySourceBuilder: error
9、新建logback-spring.xml
在resources下新建:logback-spring.xml
<?xml version="1.0" encoding="UTF-8"?><configuration scan="true" scanPeriod="60 seconds" debug="false"><contextName>qingfeng</contextName><springProperty scope="context" name="springAppName" source="spring.application.name"/><property name="log.path" value="log/qingfeng-server-hello" /><property name="log.maxHistory" value="15" /><property name="log.colorPattern" value="%magenta(%d{yyyy-MM-dd HH:mm:ss}) %highlight(%-5level) %boldCyan([${springAppName:-},%X{X-B3-TraceId:-},%X{X-B3-SpanId:-},%X{X-Span-Export:-}]) %yellow(%thread) %green(%logger) %msg%n"/><property name="log.pattern" value="%d{yyyy-MM-dd HH:mm:ss} %-5level [${springAppName:-},%X{X-B3-TraceId:-},%X{X-B3-SpanId:-},%X{X-Span-Export:-}] %thread %logger %msg%n"/><!--输出到控制台--><appender name="console" class="ch.qos.logback.core.ConsoleAppender"><encoder><pattern>${log.colorPattern}</pattern></encoder></appender><!--输出到文件--><appender name="file_info" class="ch.qos.logback.core.rolling.RollingFileAppender"><rollingPolicy class="ch.qos.logback.core.rolling.TimeBasedRollingPolicy"><fileNamePattern>${log.path}/info/info.%d{yyyy-MM-dd}.log</fileNamePattern><MaxHistory>${log.maxHistory}</MaxHistory></rollingPolicy><encoder><pattern>${log.pattern}</pattern></encoder><filter class="ch.qos.logback.classic.filter.LevelFilter"><level>INFO</level><onMatch>ACCEPT</onMatch><onMismatch>DENY</onMismatch></filter></appender><appender name="file_error" class="ch.qos.logback.core.rolling.RollingFileAppender"><rollingPolicy class="ch.qos.logback.core.rolling.TimeBasedRollingPolicy"><fileNamePattern>${log.path}/error/error.%d{yyyy-MM-dd}.log</fileNamePattern></rollingPolicy><encoder><pattern>${log.pattern}</pattern></encoder><filter class="ch.qos.logback.classic.filter.LevelFilter"><level>ERROR</level><onMatch>ACCEPT</onMatch><onMismatch>DENY</onMismatch></filter></appender><root level="debug"><appender-ref ref="console" /></root><root level="info"><appender-ref ref="file_info" /><appender-ref ref="file_error" /></root></configuration>
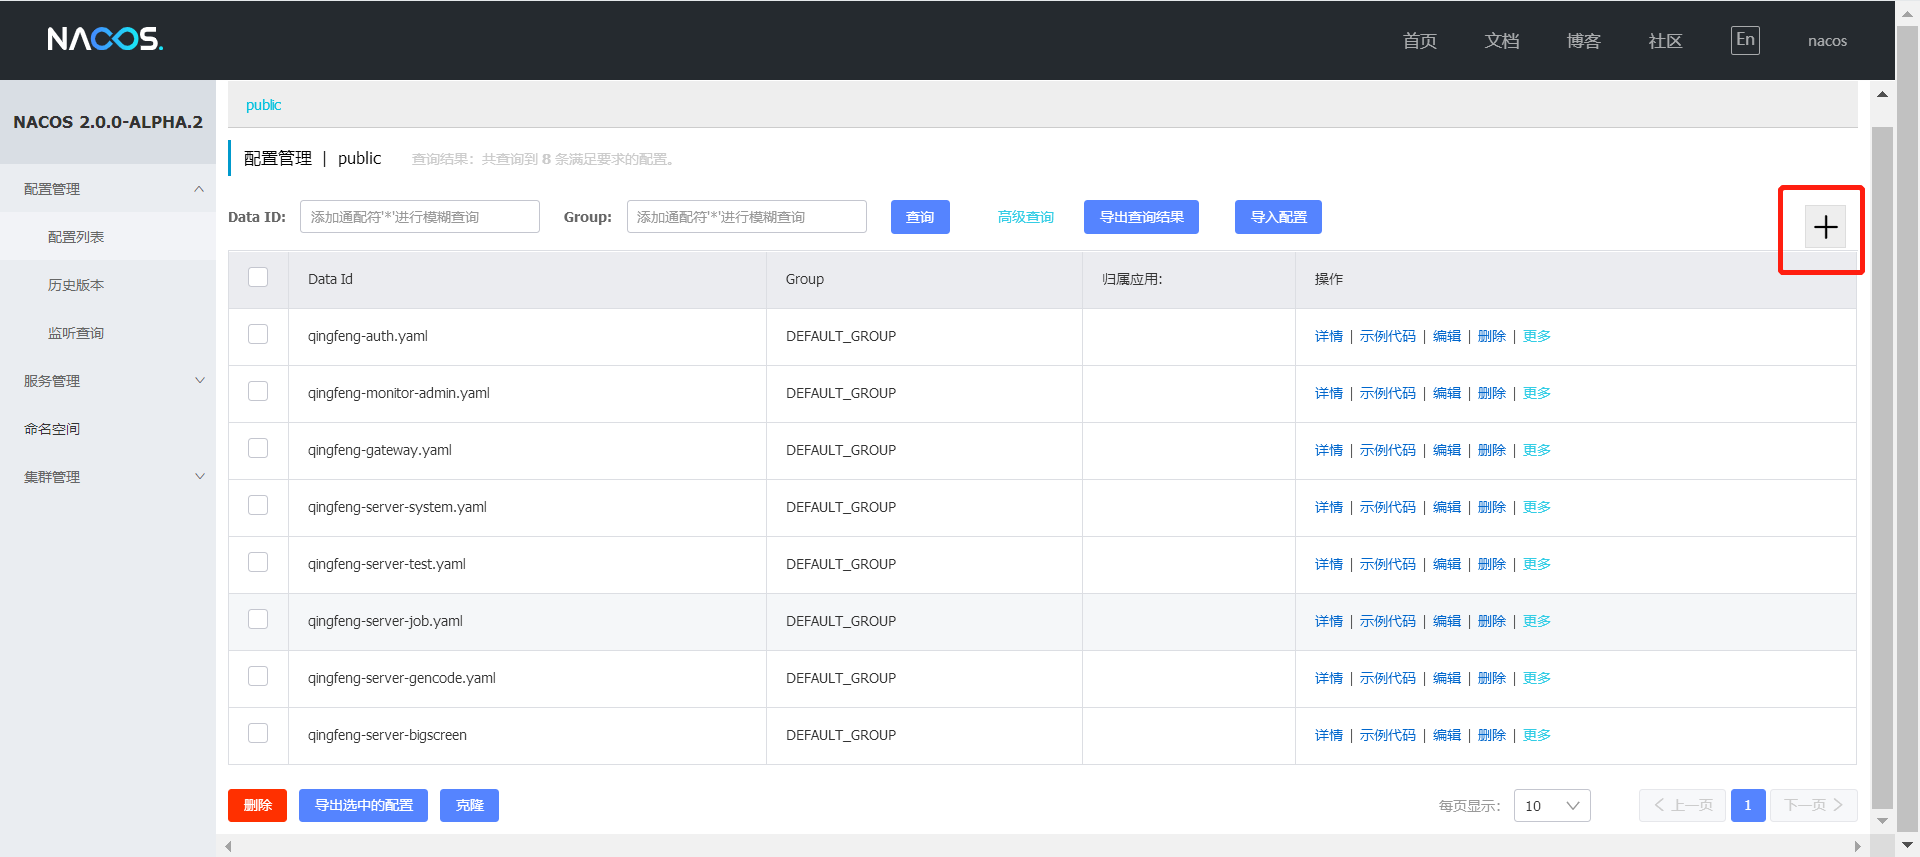
10、配置Nacos ,新增qingfeng-server-hello
server:port: 8206spring:boot:admin:client:url: http://localhost:8401username: qingfengpassword: 123456zipkin:sender:type: rabbitsleuth:sampler:probability: 1rabbitmq:host: localhostport: 5672username: qingfengpassword: 123456autoconfigure:exclude: org.springframework.boot.autoconfigure.jdbc.DataSourceAutoConfiguration,com.baomidou.dynamic.datasource.spring.boot.autoconfigure.DynamicDataSourceAutoConfigurationsecurity:oauth2:resource:id: ${spring.application.name}user-info-uri: http://localhost:8301/auth/userfeign:hystrix:enabled: truehystrix:shareSecurityContext: trueinfo:app:name: ${spring.application.name}description: "@project.description@"version: "@project.version@"management:endpoints:web:exposure:include: '*'endpoint:health:show-details: ALWAYSlogging:level:com.alibaba.nacos.client: error
11、修改qingfeng-gateway.yaml
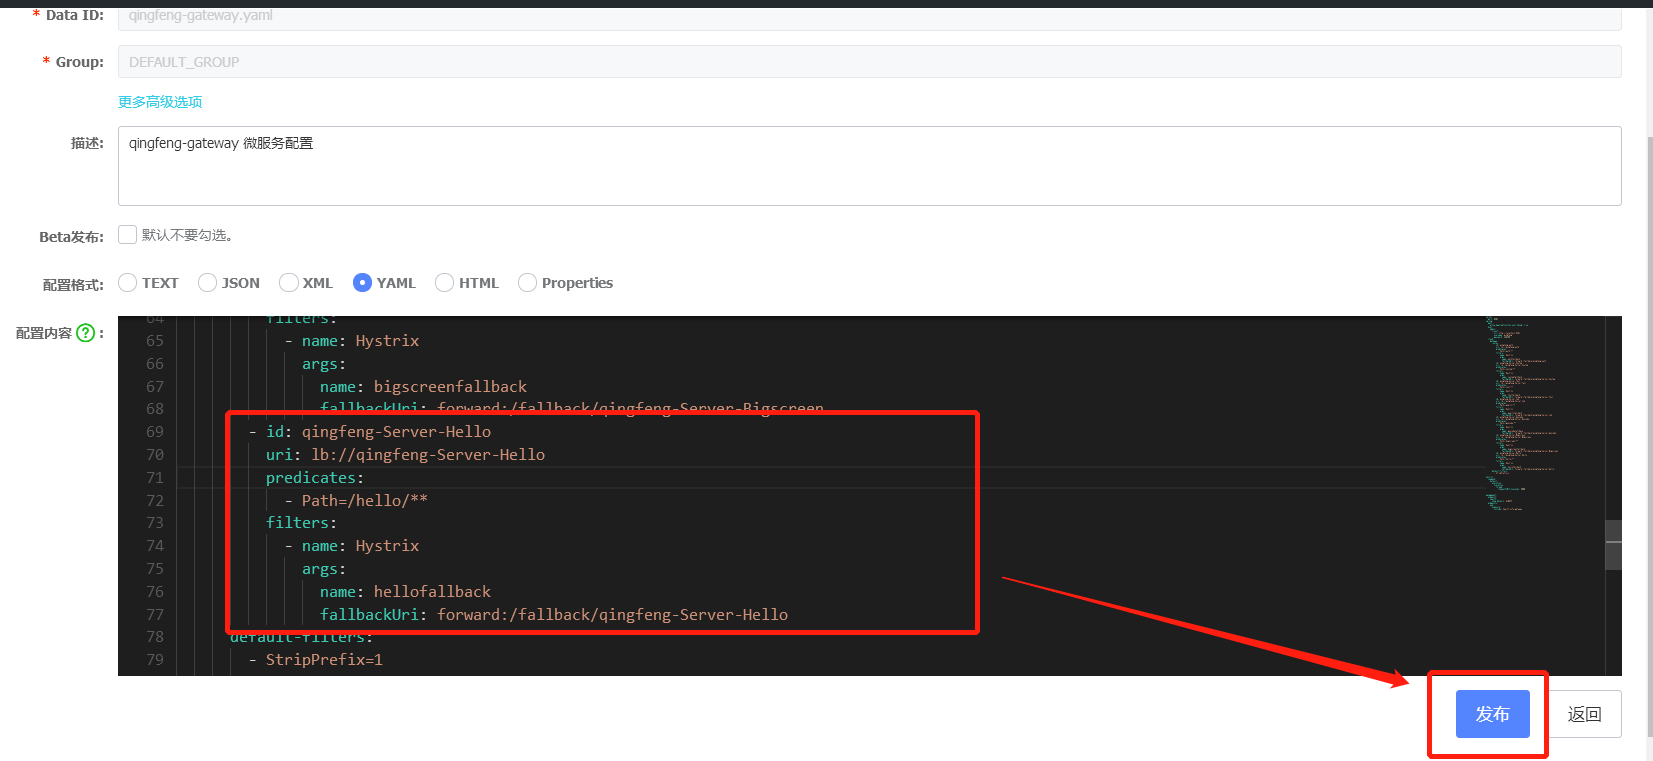
- id: qingfeng-Server-Hellouri: lb://qingfeng-Server-Hellopredicates:- Path=/hello/**filters:- name: Hystrixargs:name: hellofallbackfallbackUri: forward:/fallback/qingfeng-Server-Hello
启动微服务子系统
项目启动
获取验证码
http://localhost:8301/auth/captcha?key=qingfeng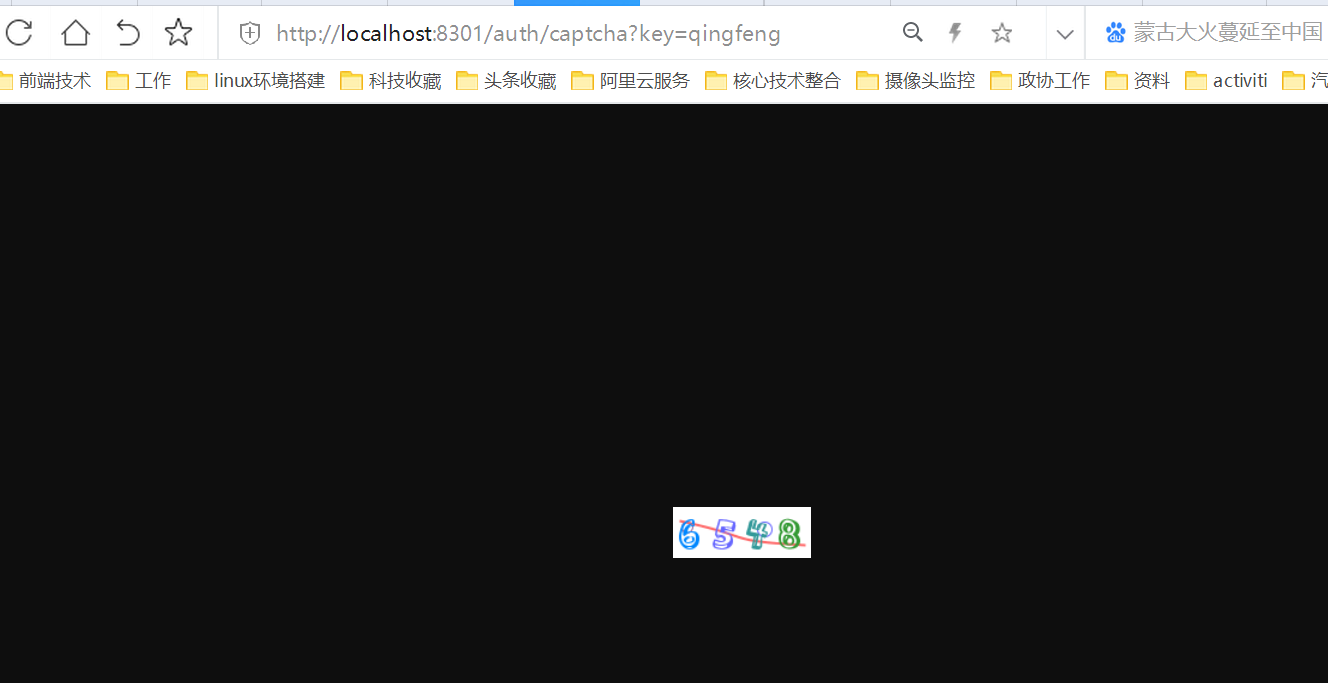
获取access_token
http://localhost:8301/auth/oauth/token?grant_type=password&username=admin&password=123456&key=qingfeng&code=6548
值为Basic加空格加client_id:client_secret(就是在AuthorizationServerConfigure类configure(ClientDetailsServiceConfigurer clients)方法中定义的client和secret)经过base64加密后的值(可以使用http://tool.oschina.net/encrypt?type=3):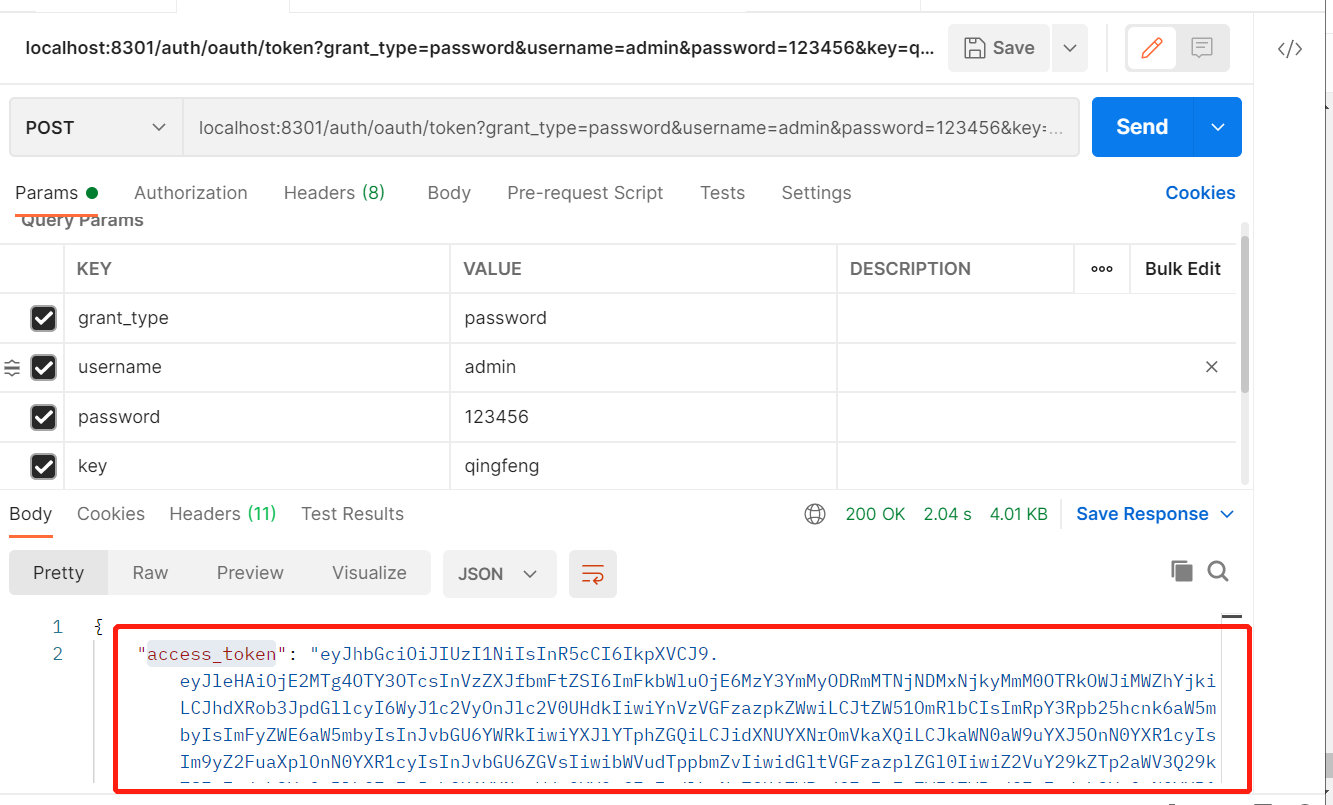
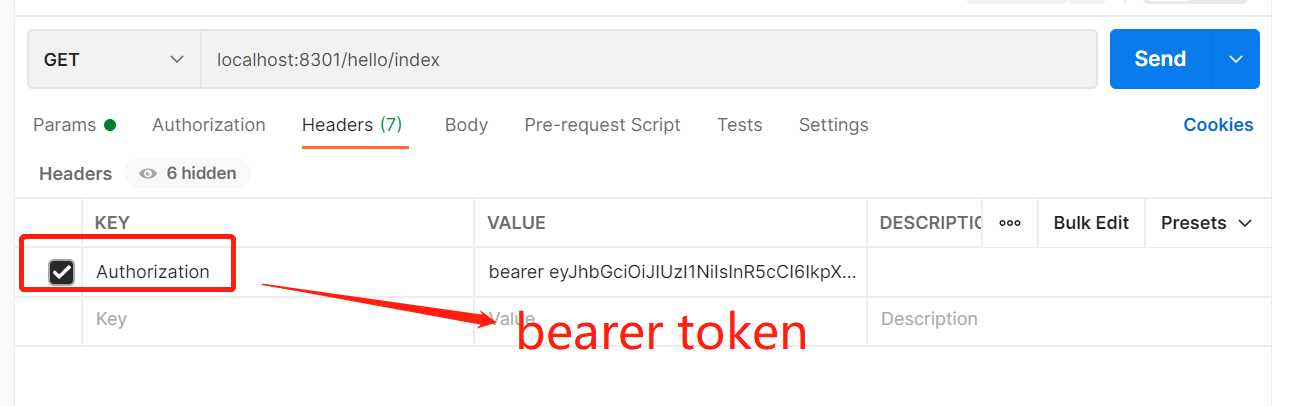
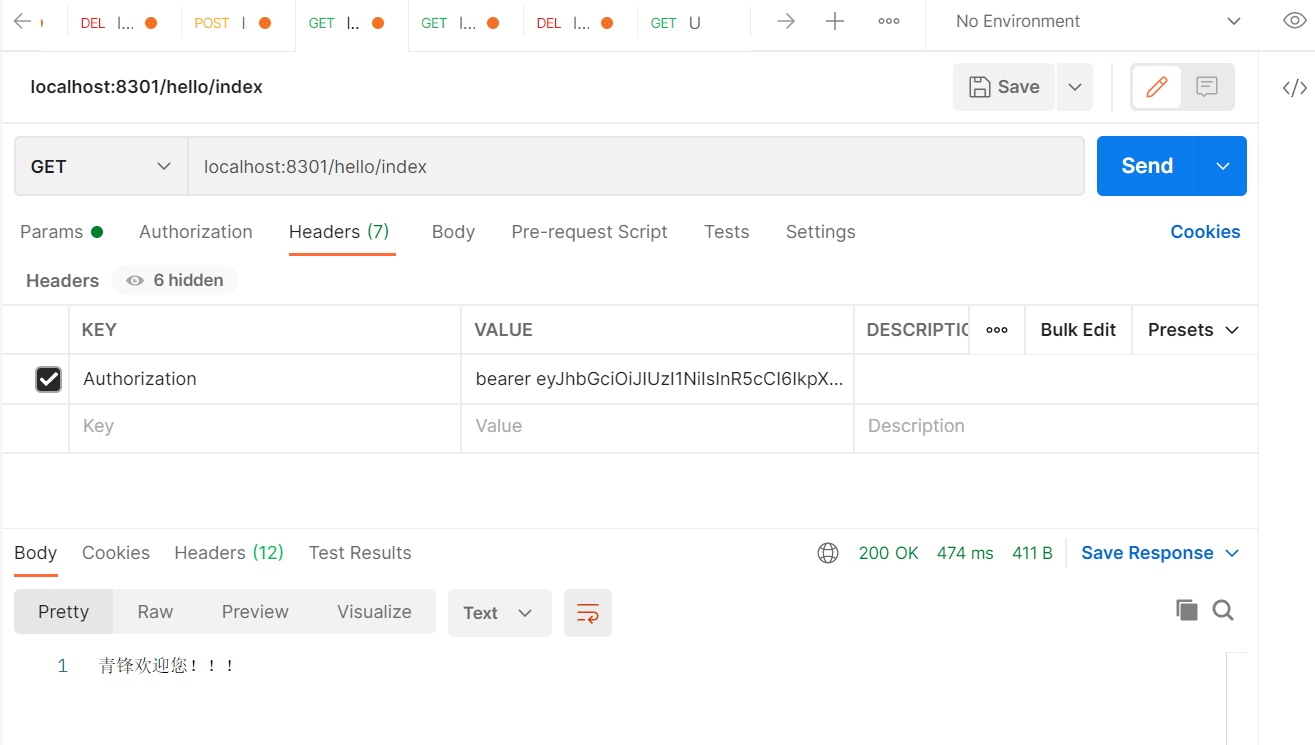
测试index
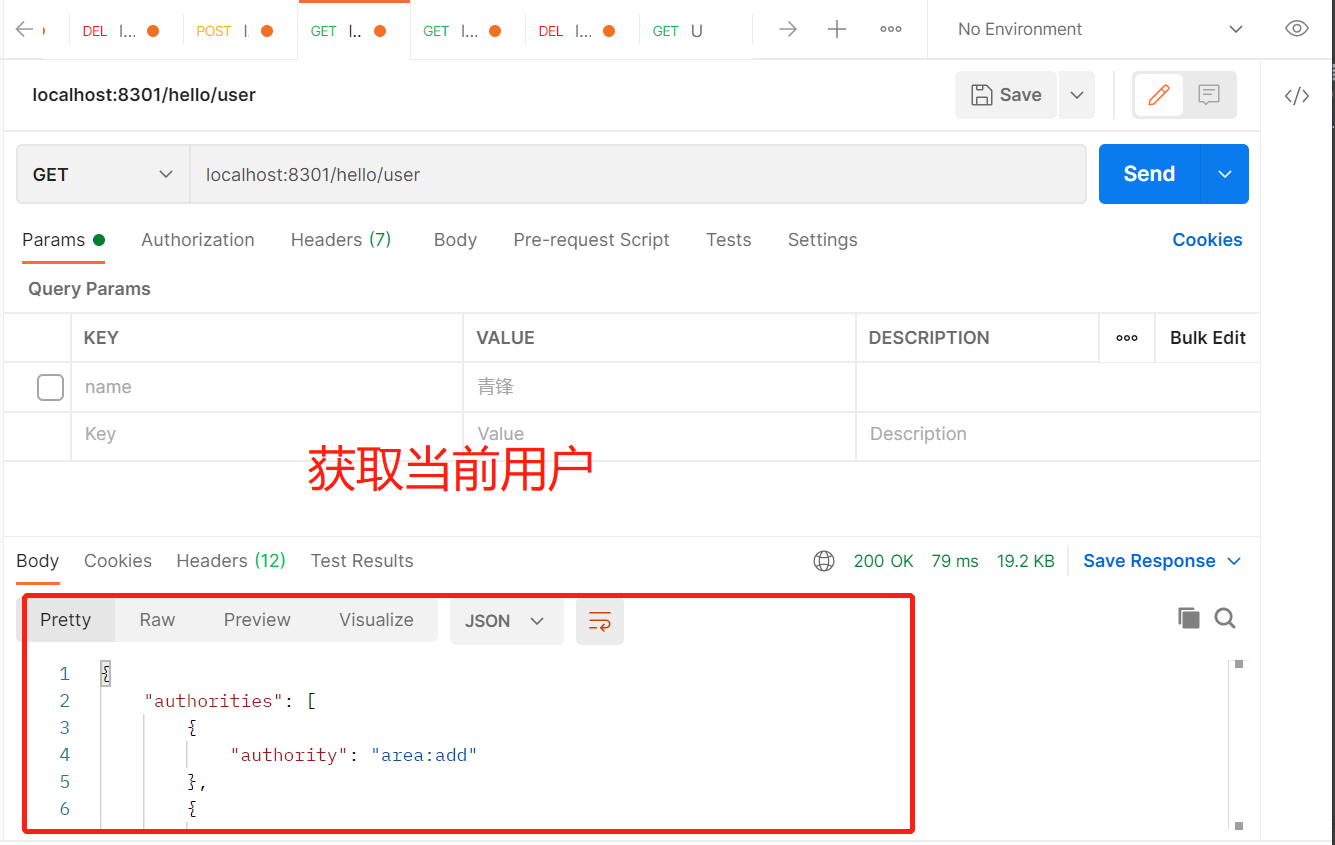
获取当前用户

若有收获,就点个赞吧
0 人点赞
