这一章主要介绍的是Spock Specification
术语
这个Specification翻译成中文是说明书,Spock想要做的就是对被测试系统中的特性进行描述:在什么样的情况下,给待测试的特性方法以什么样的输入,他就能完成什么样的返回。也就是 Given-When-Then的语义,如果这样的描述都准确,那么其实我们的测试工作也完成了。
Specification 说明书
Specification就是要描述当前系统的特性,这个系统可以是一个特定的类,也可以是整个系统。
import spock.lang.* // spock.lang 这个包包含了大多数写Specification所需的组件class MyFirstSpecification extends Specification {// fields// fixture methods// feature methods// helper methods}
自定义的 Specification 继承了 spock.lang.Specification, 建议取名字的时候尽量和系统名字相关。Specification 可以通过 Sputnik 来命令Junit 跑 Specification
交代几个名词
- Feature Methods 特性方法就是一个描述系统特性的过程,其实就是检验被测对象或者被测方法的测试方法
- Fixture method 框架提供的几个固定方法,在特性方法前后按顺序执行,帮助完成环境的构建和清理工作
固定方法
先来讲固定方法 Fixture Methods
def setupSpec() {} // runs once - before the first feature method 只在第一个特性方法之前跑一次def setup() {} // runs before every feature method 在每个特性方法之前都会跑一次def cleanup() {} // runs after every feature method 在每个特性方法之后都会跑一次def cleanupSpec() {} // runs once - after the last feature method 在最后一个特性方法运行完之后跑一次
固定方法的作用就是
- 测试开始前,初始化环境
- 测试完成之后,清理环境
当一个子类sub继承了Specification的时候,方法的执行顺序如下
- super.setupSpec
- sub.setupSpec
- super.setup
- sub.setup
- feature method // 也就是我们的测试方法
- sub.cleanup
- super.cleanup
- sub.cleanupSpec
- super.cleanupSpec
值得注意的是,子类复写了setup()方法时,不需要显式调用super.setup(),spock会自动调用父类Specification中的 setup()方法,cleanup()方法同理
属性
Specification 中的属性,就是是我们需要用到的实体对象
def obj = new ClassUnderSpecification()def coll = new Collaborator()
在 Specification 中的属性,建议在声明的时候就初始化。语义上相当于在 setup() 方法的第一行初始化这些属性。需要注意的是,这些对象是不会在特性方法间共享的。因为每个特性方法之前都会运行setup(),所以每个特性方法使用的实例对象都是新的,这也符合特性方法的数据隔离的诉求。
但有时候,我们需要在各个特性方法间共享一个对象,就可以用@Share注解:
@Shared res = new VeryExpensiveResource()
使用@Share注解的原因是,可能每次都重新初始化这个对象成本很高,也可能需要对象在不同的特性方法间交互。在语义上就是在 setupSpec() 方法的第一行初始化这些对象。
setupSpec() 和 cleanupSpec() 方法也只能操作带 @Share 注解的属性
static final PI = 3.141592654
建议只在定义常量的时候声明为静态属性,其他需要共享的对象都用@Share注解,这在语义上更加明确
特性方法
Feature Methods 即特性方法
def "pushing an element on the stack"() {// blocks go here}
Feature Methods 是 Specification 的核心所在,他们是对被测系统的特性的描述!所以叫 Feature Methods嘛。方法的名字可以随便起,而且可以用任何字符。
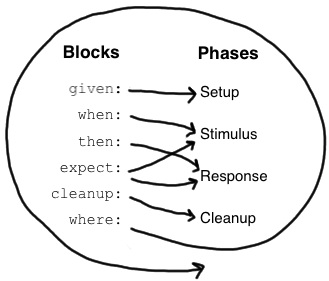
概念上讲,一个 Feature Method 包括以下四个步骤:
- setup 起环境
- stimulus 输入
- response 期望返回
- clanup 清理环境
第一步和第四步是可选,第二步和第三步都会出现,而且可能重复出现多次
代码块
我们的特性方法是由代码块组成的,spock 提供了六种代码块的语义:
- given
- when
- then
- expect
- cleanup
- where
下图是对代码块分别对应到四个步骤中示意图:
given
代码块以标签开始,到下一个代码块的标签之前为止。下面这段代码的标签就是given:
given:def stack = new Stack()def elem = "push me"
given描述当前特性所需要初始化的环境,其他的代码块都要放在 given 之后,只能出现一次。一开始作者想要用 setup 作为代码块的名字,但是在一份 Specification 中,given 读起来更加通顺,给定XX条件嘛。
When and Then
when: // stimulusthen: // response
when 和 then 通常一起出现,分别描述的是输入和预期返回
when 代码块可以写任意的代码,但是then 代码块中的代码是有限制的,只能在以下几种类型之内:
Condition 条件
可以理解为 JUnit中的 assertion,但不需要 Assert API!直接 == 做判断就好了!
when:stack.push(elem)then:!stack.emptystack.size() == 1stack.peek() == elem
注意 then 代码快中的 condition 最好不超过5个,否则就要反思一下,这个特性是不是可以拆分成更小的特性单元
在 then 代码块中的包含 == 的表达式被称为隐式condition,如果在其他的代码块中也需要声明 condition 则需要显示声明 assert,例如在 setup() 方法中:
def setup() {stack = new Stack()assert stack.empty}
Exception Conditions 异常条件
执行 when 代码中,对会不会抛出异常的校验
when:stack.pop()then:def e = thrown(EmptyStackException)e.cause == null
thrown() 方法来描述执行 when 代码块时抛出的异常,与之对应的还有 notThrown() 来声明不会抛出某种异常
Interactions 交互
def "events are published to all subscribers"() {given:def subscriber1 = Mock(Subscriber)def subscriber2 = Mock(Subscriber)def publisher = new Publisher()publisher.add(subscriber1)publisher.add(subscriber2)when:publisher.fire("event")then:1 * subscriber1.receive("event")1 * subscriber2.receive("event")}
- Condition 描述的是对象的状态,
- Interaction 描述的是对象之间是如何交互的。
Expect
expect 适合在触发动作和预期返回可以在一个表达式中描述完成的情况
比如这个 when - then
when:def x = Math.max(1, 2)then:x == 2
完全可以用一个 expect 代替
expect:Math.max(1, 2) == 2
而在这样的情况下,鼓励使用Expect
As a guideline, use when-then to describe methods with side effects, and expect to describe purely functional methods.
但是使用 expect,就无法使用 Exception Condition,例如thrown(EmptyStackException)这样的异常条件
Cleanup
顾名思义用来清理环境,例如释放资源
Where
变量表,总是作为特性方法中最后一个代码块出现
def "computing the maximum of two numbers"() {expect:Math.max(a, b) == cwhere:a << [5, 3]b << [1, 9]c << [5, 9]}
上面的这种格式,第一列是第一组变量,第二列是第二组变量。where block体现的是测试驱动开发的思想,会在后面用单独一章来讲
With && VerifyAll
举个栗子,我们有如下的一个特性方法,测试的购买的pc的相关配置是否符合预期:
def "offered PC matches preferred configuration"() {when:def pc = shop.buyPc()then:pc.vendor == "Sunny"pc.clockRate >= 2333pc.ram >= 4096pc.os == "Linux"}
我们可以看到 then: 代码块中,我们都是围绕 pc 这个对象在做校验,因此可以使用 with(target, closure) 方法来做代替:
def "offered PC matches preferred configuration"() {when:def pc = shop.buyPc()then:with(pc) {vendor == "Sunny"clockRate >= 2333ram >= 406os == "Linux"}}// 注意因为with 方法的最后一个入参是 closure,所以可以将closure移到小括号外面
不过在 with 方法中,如果第一个 == 都不满足,那么剩下的都不会做判断了。如果需要对所有的判断条件都执行,可以用 verifyAll() 方法, 使用的姿势和 with()长得一样:
def "offered PC matches preferred configuration"() {when:def pc = shop.buyPc()then:verifyAll(pc) {vendor == "Sunny"clockRate >= 2333ram >= 406os == "Linux"}}

