一. MyBatis 简介
概述
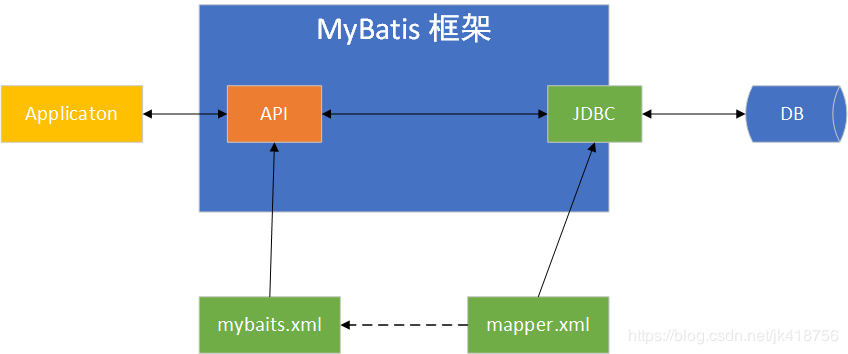
MyBatis 是一个优秀的基于 Java 的持久层框架,它内部封装了 JDBC,使开发者只需关注 SQL 语句本身,而不用再花费精力去处理诸如注册驱动、创建 Connection、配置 Statement 等繁杂过程。
Mybatis 通过 xml 或注解的方式将要执行的各种 Statement(Statement、PreparedStatement 等)配置起来,并通过 Java 对象和 Statement 中 SQL 的动态参数进行映射生成最终执行的 SQL 语句,最后由 MyBatis 框架执行 SQL 并将结果映射成 Java 对象并返回。
MyBatis 与 Hibernate
Hibernate框架是提供了全面的数据库封装机制的“全自动”ORM,即实现了 POJO 和数据库表之间的映射,以及 SQL 的自动生成和执行。
相对于此,MyBatis 只能算作是“半自动” ORM。其着力点,是在 POJO 类与 SQL 语句之间的映射关系。也就是说,MyBatis 并不会为程序员自动生成 SQL 语句。具体的 SQL 需要程序员自己编写,然后通过 SQL 语句映射文件,将 SQL 所需的参数,以及返回的结果字段映射到指定 POJO。因此,MyBatis 成为了“全自动”ORM 的一种有益补充。
MyBatis 的特点
- 在 XML 文件中配置 SQL 语句,实现了 SQL 语句与代码的分离,给程序的维护带来了很大便利。
- 因为需要程序员自己去编写 SQL 语句,程序员可以结合数据库自身的特点灵活控制 SQL 语句,因此能够实现比 Hibernate 等全自动 ORM 框架更高的查询效率,能够完成复杂查询。
- 简单,易于学习,易于使用,上手快。
二. Druid 简介
概述
Druid 是阿里巴巴开源平台上的一个项目,整个项目由数据库连接池、插件框架和 SQL 解析器组成。该项目主要是为了扩展 JDBC 的一些限制,可以让程序员实现一些特殊的需求,比如向密钥服务请求凭证、统计 SQL 信息、SQL 性能收集、SQL 注入检查、SQL 翻译等,程序员可以通过定制来实现自己需要的功能。
各种连接池性能对比测试
测试执行申请归还连接 1,000,000(一百万)次总耗时性能对比。
测试环境
| 环境 | 版本 |
|---|---|
| OS | OS X 10.8.2 |
| CPU | Intel i7 2GHz 4 Core |
| JVM | Java Version 1.7.0_05 |
基准测试结果
| Jdbc Connection Pool | 1 thread | 2 threads | 5 threads | 10 threads | 20 threads | 50 threads |
|---|---|---|---|---|---|---|
| Druid | 898 | 1,191 | 1,324 | 1,362 | 1,325 | 1,459 |
| tomcat-jdbc | 1,269 | 1,378 | 2,029 | 2,103 | 1,879 | 2,025 |
| DBCP | 2,324 | 5,055 | 5,446 | 5,471 | 5,524 | 5 ,415 |
| BoneCP | 3 ,738 | 3,150 | 3,194 | 5,681 1 | 1,018 | 23,125 |
| jboss-datasource | 4,377 | 2,988 | 3,680 | 3,980 | 32,708 | 37,742 |
| C3P0 | 10,841 | 13,637 | 10,682 | 11,055 | 14,497 | 20,351 |
| Proxool | 16,337 | 16,187 | 18,310(Exception) | 25,945 | 33,706(Exception) | 39,501 (Exception) |
结论
- Druid 是性能最好的数据库连接池,tomcat-jdbc 和 druid 性能接近。
- proxool 在激烈并发时会抛异常,完全不靠谱。
- c3p0 和 proxool 都相当慢,慢到影响 sql 执行效率的地步。
- bonecp 性能并不优越,采用 LinkedTransferQueue 并没有能够获得性能提升。
- 除了 bonecp,其他的在 JDK 7 上跑得比 JDK 6 上快
- jboss-datasource 虽然稳定,但是性能很糟糕
三. Spring 整合 Druid
POM
在pom.xml文件中新增com.alibaba:druid和mysql:mysql-connector-java依赖<dependency><groupId>com.alibaba</groupId><artifactId>druid</artifactId><version>1.1.6</version></dependency><dependency><groupId>mysql</groupId><artifactId>mysql-connector-java</artifactId><version>5.1.46</version></dependency>
配置数据库连接
配置数据库连接jdbc.properties,配置代码如下:# JDBC# MySQL 8.x: com.mysql.cj.jdbc.Driverjdbc.driverClass=com.mysql.jdbc.Driverjdbc.connectionURL=jdbc:mysql://192.168.75.134:3306/myshop?useUnicode=true&characterEncoding=utf-8&useSSL=falsejdbc.username=rootjdbc.password=123456# JDBC Pooljdbc.pool.init=1jdbc.pool.minIdle=3jdbc.pool.maxActive=20# JDBC Testjdbc.testSql=SELECT 'x' FROM DUAL
Spring 集成 Druid
创建一个名为spring-context-druid.xml的Spring配置文件,内容如下:<?xml version="1.0" encoding="UTF-8"?><beans xmlns="http://www.springframework.org/schema/beans" xmlns:xsi="http://www.w3.org/2001/XMLSchema-instance"xmlns:context="http://www.springframework.org/schema/context"xsi:schemaLocation="http://www.springframework.org/schema/beans http://www.springframework.org/schema/beans/spring-beans.xsd http://www.springframework.org/schema/context http://www.springframework.org/schema/context/spring-context.xsd"><!-- 加载配置属性文件 --><context:property-placeholder ignore-unresolvable="true" location="classpath:jdbc.properties"/><!-- 数据源配置, 使用 Druid 数据库连接池 --><bean id="dataSource" class="com.alibaba.druid.pool.DruidDataSource" init-method="init" destroy-method="close"><!-- 数据源驱动类可不写,Druid默认会自动根据URL识别DriverClass --><property name="driverClassName" value="${jdbc.driverClass}"/><!-- 基本属性 url、user、password --><property name="url" value="${jdbc.connectionURL}"/><property name="username" value="${jdbc.username}"/><property name="password" value="${jdbc.password}"/><!-- 配置初始化大小、最小、最大 --><property name="initialSize" value="${jdbc.pool.init}"/><property name="minIdle" value="${jdbc.pool.minIdle}"/><property name="maxActive" value="${jdbc.pool.maxActive}"/><!-- 配置获取连接等待超时的时间 --><property name="maxWait" value="60000"/><!-- 配置间隔多久才进行一次检测,检测需要关闭的空闲连接,单位是毫秒 --><property name="timeBetweenEvictionRunsMillis" value="60000"/><!-- 配置一个连接在池中最小生存的时间,单位是毫秒 --><property name="minEvictableIdleTimeMillis" value="300000"/><property name="validationQuery" value="${jdbc.testSql}"/><property name="testWhileIdle" value="true"/><property name="testOnBorrow" value="false"/><property name="testOnReturn" value="false"/><!-- 配置监控统计拦截的filters --><property name="filters" value="stat"/></bean></beans>
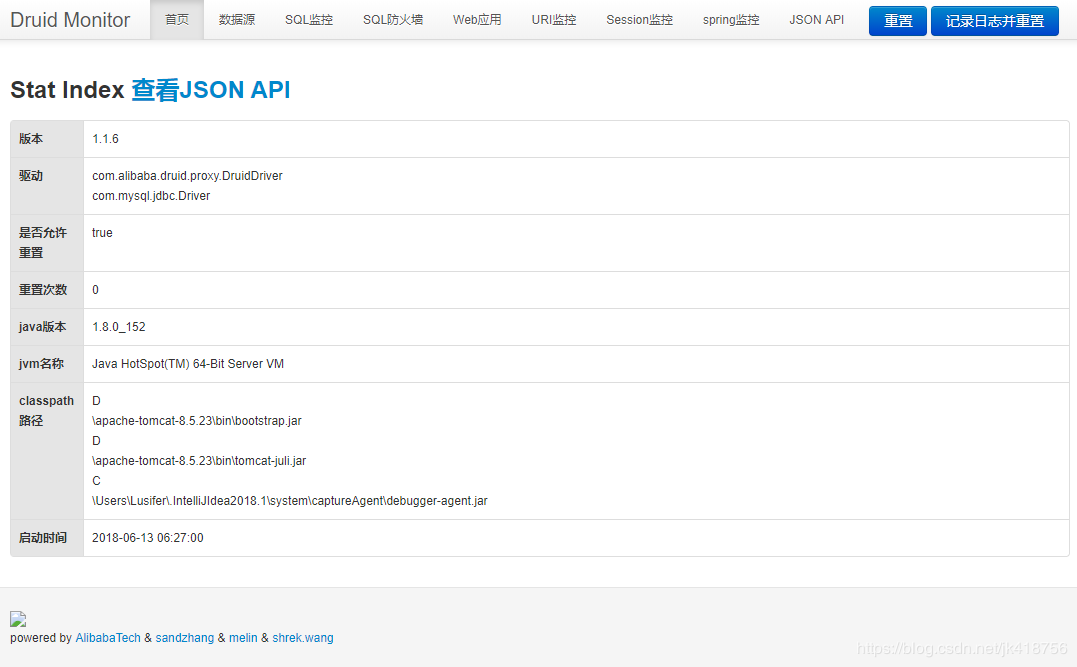
配置 Druid 监控中心
Druid 提供了大量的监控数据,只需要在web.xml中配置一个Servlet就可以方便的查看这些信息。
修改web.xml配置文件,增加 Druid 提供的 Servlet
打开浏览器,输入:http://localhost:8080/druid/index.html 浏览器显示效果如下:<servlet><servlet-name>DruidStatView</servlet-name><servlet-class>com.alibaba.druid.support.http.StatViewServlet</servlet-class></servlet><servlet-mapping><servlet-name>DruidStatView</servlet-name><url-pattern>/druid/*</url-pattern></servlet-mapping>
四. Spring 整合 MyBatis
POM
在pom.xml文件中增加 MyBatis 相关依赖:
<dependency><groupId>org.mybatis</groupId><artifactId>mybatis</artifactId><version>3.2.8</version></dependency><dependency><groupId>org.mybatis</groupId><artifactId>mybatis-spring</artifactId><version>1.3.1</version></dependency><dependency><groupId>org.springframework</groupId><artifactId>spring-jdbc</artifactId><version>4.3.17.RELEASE</version></dependency>
主要增加了 3 个依赖,分别为 org.mybatis:mybatis、org.mybatis:mybatis-spring、org.springframework:spring-jdbc
创建 MyBatis 配置文件
创建一个名为mybatis-config.xml的配置文件,内容如下:
<?xml version="1.0" encoding="UTF-8"?><!DOCTYPE configuration PUBLIC "-//mybatis.org//DTD Config 3.0//EN" "http://mybatis.org/dtd/mybatis-3-config.dtd"><configuration><!-- 全局参数 --><settings><!-- 打印 SQL 语句 --><setting name="logImpl" value="STDOUT_LOGGING" /><!-- 使全局的映射器启用或禁用缓存。 --><setting name="cacheEnabled" value="false"/><!-- 全局启用或禁用延迟加载。当禁用时,所有关联对象都会即时加载。 --><setting name="lazyLoadingEnabled" value="true"/><!-- 当启用时,有延迟加载属性的对象在被调用时将会完全加载任意属性。否则,每种属性将会按需要加载。 --><setting name="aggressiveLazyLoading" value="true"/><!-- 是否允许单条 SQL 返回多个数据集 (取决于驱动的兼容性) default:true --><setting name="multipleResultSetsEnabled" value="true"/><!-- 是否可以使用列的别名 (取决于驱动的兼容性) default:true --><setting name="useColumnLabel" value="true"/><!-- 允许 JDBC 生成主键。需要驱动器支持。如果设为了 true,这个设置将强制使用被生成的主键,有一些驱动器不兼容不过仍然可以执行。 default:false --><setting name="useGeneratedKeys" value="false"/><!-- 指定 MyBatis 如何自动映射 数据基表的列 NONE:不映射 PARTIAL:部分 FULL:全部 --><setting name="autoMappingBehavior" value="PARTIAL"/><!-- 这是默认的执行类型 (SIMPLE: 简单; REUSE: 执行器可能重复使用prepared statements语句;BATCH: 执行器可以重复执行语句和批量更新) --><setting name="defaultExecutorType" value="SIMPLE"/><!-- 使用驼峰命名法转换字段。 --><setting name="mapUnderscoreToCamelCase" value="true"/><!-- 设置本地缓存范围 session:就会有数据的共享 statement:语句范围 (这样就不会有数据的共享 ) defalut:session --><setting name="localCacheScope" value="SESSION"/><!-- 设置 JDBC 类型为空时,某些驱动程序 要指定值, default:OTHER,插入空值时不需要指定类型 --><setting name="jdbcTypeForNull" value="NULL"/></settings></configuration>
Spring 集成 MyBatis
创建一个名为spring-context-mybatis.xml的 Spring 配置文件,内容如下:
<?xml version="1.0" encoding="UTF-8"?><beans xmlns="http://www.springframework.org/schema/beans" xmlns:xsi="http://www.w3.org/2001/XMLSchema-instance"xsi:schemaLocation="http://www.springframework.org/schema/beans http://www.springframework.org/schema/beans/spring-beans.xsd http://www.springframework.org/schema/tx http://www.springframework.org/schema/tx/spring-tx.xsd"><!-- 配置 SqlSession --><bean id="sqlSessionFactory" class="org.mybatis.spring.SqlSessionFactoryBean"><!-- 配置数据源 --><property name="dataSource" ref="dataSource"/><!-- 用于配置对应实体类所在的包,多个 package 之间可以用 ',' 号分割 --><property name="typeAliasesPackage" value="com.funtl.my.shop.domain"/><!-- 用于配置对象关系映射配置文件所在目录 --><property name="mapperLocations" value="classpath:/mapper/**/*.xml"/><!-- mybatis配置文件 --><property name="configLocation" value="classpath:/mybatis-config.xml"></property></bean><!-- 扫描 Mapper --><bean class="org.mybatis.spring.mapper.MapperScannerConfigurer"><property name="basePackage" value="com.funtl.my.shop.web.admin.dao" /></bean></beans>
五. 第一个 MyBatis 对象关系映射
POM
编写完相关代码后,我们可以使用单元测试查看 MyBatis 的执行效果,需要增加单元测试相关依赖,配置如下:
<dependency><groupId>org.springframework</groupId><artifactId>spring-test</artifactId><version>4.3.17.RELEASE</version></dependency><dependency><groupId>junit</groupId><artifactId>junit</artifactId><version>4.12</version></dependency>
导入 SQL
git地址
https://github.com/JSONCat/demo-java/tree/master/sql
创建通用基类BaseMeta
使用commons-long3下的ReflectionToStringBuilder来生成toString()方法,并实现序列化
public class BaseMeta implements Serializable {/************* 转化成string*/public String toString(){return ReflectionToStringBuilder.toString(this);}}
定义实体类
以 tb_user表为例,实体类代码如下:
public class TbUser extends BaseMeta {private Long id;private String username;private String password;private String phone;private String email;private Date created;private Date update;public Long getId() {return id;}public void setId(Long id) {this.id = id;}public String getUsername() {return username;}public void setUsername(String username) {this.username = username;}public String getPassword() {return password;}public void setPassword(String password) {this.password = password;}public String getPhone() {return phone;}public void setPhone(String phone) {this.phone = phone;}public String getEmail() {return email;}public void setEmail(String email) {this.email = email;}public Date getCreated() {return created;}public void setCreated(Date created) {this.created = created;}public Date getUpdate() {return update;}public void setUpdate(Date update) {this.update = update;}}
定义数据访问接口
注意:Spring 集成 MyBatis 后,不需要手动实现 DAO 层的接口,所有的 SQL 执行语句都写在对应的关系映射配置文件中。
package com.funtl.my.shop.web.admin.dao;import com.funtl.my.shop.domain.TbUser;import org.springframework.stereotype.Repository;import java.util.List;@Repositorypublic interface TbUserDao {/*** 查询全部用户信息* @return*/public List<TbUser> selectAll();}
定义业务逻辑接口
package com.funtl.my.shop.web.admin.service;import com.funtl.my.shop.domain.TbUser;import java.util.List;public interface TbUserService {/*** 查询全部用户信息* @return*/public List<TbUser> selectAll();}
实现业务逻辑接口
package com.funtl.my.shop.web.admin.service.impl;import com.funtl.my.shop.domain.TbUser;import com.funtl.my.shop.web.admin.dao.TbUserDao;import com.funtl.my.shop.web.admin.service.TbUserService;import org.springframework.beans.factory.annotation.Autowired;import org.springframework.stereotype.Service;import java.util.List;@Servicepublic class TbUserServiceImpl implements TbUserService {@Autowiredprivate TbUserDao tbUserDao;@Overridepublic List<TbUser> selectAll() {return tbUserDao.selectAll();}}
定义映射文件
映射文件,简称为 Mapper,主要完成 DAO 层中 SQL 语句的映射。映射文件名随意,一般放在 src/resources/mapper 文件夹中。这里映射文件名称定为 TbUserMapper.xml。
<?xml version="1.0" encoding="UTF-8" ?><!DOCTYPE mapper PUBLIC "-//mybatis.org//DTD Mapper 3.0//EN" "http://mybatis.org/dtd/mybatis-3-mapper.dtd"><mapper namespace="com.funtl.my.shop.web.admin.dao.TbUserDao"><select id="selectAll" resultType="TbUser">SELECTa.id,a.username,a.password,a.phone,a.email,a.created,a.updatedFROMtb_user AS a</select></mapper>
创建单元测试
所有工作准备就绪,我们就可以测试 MyBatis 是否能够正常执行了。创建一个单元测试类,代码如下:
package com.funtl.my.shop.web.admin.service.test;import com.funtl.my.shop.domain.TbUser;import com.funtl.my.shop.web.admin.dao.TbUserDao;import org.junit.Test;import org.junit.runner.RunWith;import org.springframework.beans.factory.annotation.Autowired;import org.springframework.test.context.ContextConfiguration;import org.springframework.test.context.junit4.SpringJUnit4ClassRunner;import java.util.List;@RunWith(SpringJUnit4ClassRunner.class)@ContextConfiguration({"classpath:spring-context.xml", "classpath:spring-context-druid.xml", "classpath:spring-context-mybatis.xml"})public class TbUserServiceTest {@Autowiredprivate TbUserDao tbUserDao;@Testpublic void testSelectAll() {List<TbUser> tbUsers = tbUserDao.selectAll();for (TbUser tbUser : tbUsers) {System.out.println(tbUser.getUsername());}}}
六. MyBatis 单表 CRUD 操作
INSERT
继续以 tb_user 表为例,修改映射文件,增加如下配置:
<insert id="insert">INSERT INTO tb_user (id,username,password,phone,email,created,updated)VALUES(#{id},#{username},#{password},#{phone},#{email},#{created},#{update})</insert>
单元测试代码如下:
@Testpublic void testInsert() {TbUser tbUser = new TbUser();tbUser.setEmail("admin@admin.com");tbUser.setPassword("admin");tbUser.setPhone("15888888888");tbUser.setUsername("Lusifer");tbUser.setCreated(new Date());tbUser.setUpdate(new Date());tbUserDao.insert(tbUser);}
DELETE
继续以tb_user表为例,修改映射文件,增加如下配置:
<delete id="delete">DELETE FROM tb_user WHERE id = #{id}</delete>
单元测试代码如下:
@Testpublic void testDelete() {TbUser tbUser = new TbUser();tbUser.setId(37L);tbUserDao.delete(tbUser);}
查询单个对象
继续以 tb_user 表为例,修改映射文件,增加如下配置:
<select id="getById" resultType="TbUser">SELECTa.id,a.username,a.password,a.phone,a.email,a.created,a.updated AS "update"FROMtb_user AS aWHEREa.id = #{id}</select>
单元测试代码如下:
@Testpublic void testGetById() {TbUser tbUser = tbUserDao.getById(36L);System.out.println(tbUser.getUsername());}
UPDATE
继续以 tb_user 表为例,修改映射文件,增加如下配置:
<update id="update">UPDATEtb_userSETusername = #{username},password = #{password},phone = #{phone},email = #{email},created = #{created},updated = #{update}WHERE id = #{id}</update>
单元测试代码如下:
@Testpublic void testUpdate() {TbUser tbUser = tbUserDao.getById(36L);tbUser.setUsername("Lusifer");tbUserDao.update(tbUser);}
使用模糊查询
继续以tb_user 表为例,修改映射文件,增加如下配置:
<select id="selectByName" resultType="TbUser">SELECTa.id,a.username,a.password,a.phone,a.email,a.created,a.updated AS "update"FROMtb_user AS aWHEREa.username LIKE CONCAT ('%', #{username}, '%')</select>
在进行模糊查询时,需要进行字符串的拼接。SQL 中的字符串的拼接使用的是函数concat(arg1, arg2, …)。注意不能使用 Java 中的字符串连接符 +。
单元测试代码如下:
@Testpublic void testSelectByName() {List<TbUser> tbUsers = tbUserDao.selectByName("uni");for (TbUser tbUser : tbUsers) {System.out.println(tbUser.getUsername());}}
七. MyBatis 动态 SQL
动态 SQL,主要用于解决查询条件不确定的情况:在程序运行期间,根据用户提交的查询条件进行查询。提交的查询条件不同,执行的 SQL 语句不同。若将每种可能的情况均逐一列出,对所有条件进行排列组合,将会出现大量的 SQL 语句。此时,可使用动态 SQL 来解决这样的问题。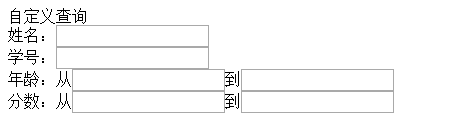
动态 SQL,即通过 MyBatis 提供的各种标签对条件作出判断以实现动态拼接 SQL 语句。
这里的条件判断使用的表达式为 OGNL 表达式。常用的动态 SQL 标签有 <if>、<where>、<choose>、<foreach>等。
注意事项
在 mapper 的动态 SQL 中若出现大于号(>)、小于号(<)、大于等于号(>=),小于等于号(<=)等符号,最好将其转换为实体符号。否则,XML 可能会出现解析出错问题。
特别是对于小于号(<),在 XML 中是绝对不能出现的。否则,一定出错。
if 标签
对于该标签的执行,当 test 的值为 true 时,会将其包含的 SQL 片断拼接到其所在的 SQL 语句中。
本例实现的功能是:查询出满足用户提交查询条件的所有学生。用户提交的查询条件可以包含一个姓名的模糊查询,同时还可以包含一个年龄的下限。当然,用户在提交表单时可能两个条件均做出了设定,也可能两个条件均不做设定,也可以只做其中一项设定。
这引发的问题是,查询条件不确定,查询条件依赖于用户提交的内容。此时,就可使用动态 SQL 语句,根据用户提交内容对将要执行的 SQL 进行拼接。
定义映射文件
为了解决两个条件均未做设定的情况,在 where 后添加了一个“1=1”的条件。这样就不至于两个条件均未设定而出现只剩下一个 where,而没有任何可拼接的条件的不完整 SQL 语句。
<?xml version="1.0" encoding="UTF-8" ?><!DOCTYPE mapper PUBLIC "-//mybatis.org//DTD Mapper 3.0//EN" "http://mybatis.org/dtd/mybatis-3-mapper.dtd"><mapper namespace="com.lusifer.mybatis.dao.DynamicStudentDao"><!-- if --><select id="selectByIf" resultType="com.lusifer.mybatis.entity.Student">SELECTid,name,age,scoreFROMstudentWHERE 1 = 1<if test="name != null and name != ''">AND name LIKE concat('%', #{name}, '%')</if><if test="age != null and age > 0">AND age > #{age}</if></select></mapper>
where 标签
<if/> 标签的中存在一个比较麻烦的地方:需要在 where后手工添加1=1的子句。因为,若where后的所有 <if/>条件均为false,而 where 后若又没有1=1子句,则 SQL 中就会只剩下一个空的where,SQL 出错。所以,在 where 后,需要添加永为真子句1=1,以防止这种情况的发生。但当数据量很大时,会严重影响查询效率。
定义映射文件
SELECT id, name, age, score FROM student AND name LIKE concat(‘%’, #{name}, ‘%’) AND age > #{age} ## choose 标签 该标签中只可以包含 `,可以包含多个 `与一个 ``。它们联合使用,完成 Java 中的开关语句 switch..case 功能。
本例要完成的需求是,若姓名不空,则按照姓名查询;若姓名为空,则按照年龄查询;若没有查询条件,则没有查询结果。
定义映射文件
<!-- choose --><select id="selectByChoose" resultType="com.lusifer.mybatis.entity.Student">SELECTid,name,age,scoreFROMstudent<where><choose><when test="name != null and name != ''">AND name LIKE concat('%', #{name}, '%')</when><when test="age != null and age > 0">AND age > #{age}</when><otherwise>AND 1 != 1</otherwise></choose></where></select>
foreach 标签-遍历数组
<foreach/>标签用于实现对于数组与集合的遍历。对其使用,需要注意:
collection表示要遍历的集合类型,这里是数组,即 array。open、close、separator为对遍历内容的 SQL 拼接。
本例实现的需求是,查询出 id 为 2 与 4 的学生信息。
定义映射文件
动态 SQL 的判断中使用的都是 OGNL 表达式。OGNL 表达式中的数组使用 array表示,数组长度使用 array.length 表示。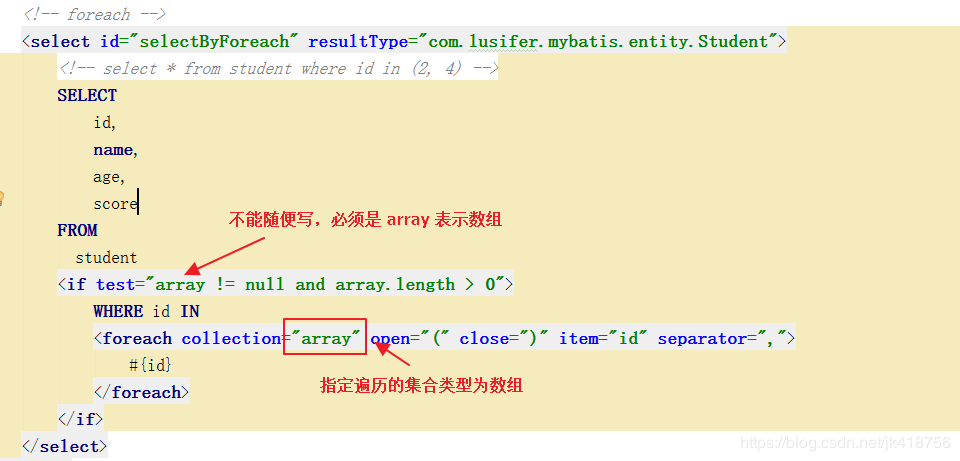
<!-- foreach --><select id="selectByForeach" resultType="com.lusifer.mybatis.entity.Student"><!-- select * from student where id in (2, 4) -->SELECTid,name,age,scoreFROMstudent<if test="array != null and array.length > 0">WHERE id IN<foreach collection="array" open="(" close=")" item="id" separator=",">#{id}</foreach></if></select>
foreach 标签-遍历集合
遍历集合的方式与遍历数组的方式相同,只不过是将 array 替换成了 list
遍历泛型为基本类型的 List
定义 DAO 接口
/*** 使用 foreach 标签以 list 基本类型的形式查询* @param ids* @return*/public List<Student> selectByForeachWithListBase(List<Long> ids);
定义映射文件
<!-- foreach --><select id="selectByForeachWithListBase" resultType="com.lusifer.mybatis.entity.Student"><!-- select * from student where id in (2, 4) -->SELECTid,name,age,scoreFROMstudent<if test="list != null and list.size > 0">WHERE id IN<foreach collection="list" open="(" close=")" item="id" separator=",">#{id}</foreach></if></select>
遍历泛型为自定义类型的 List
定义 DAO 接口
/*** 使用 foreach 标签以 list 自定义类型的形式查询* @param students* @return*/public List<Student> selectByForeachWithListCustom(List<Student> students);
定义映射文件
<!-- foreach --><select id="selectByForeachWithListCustom" resultType="com.lusifer.mybatis.entity.Student"><!-- select * from student where id in (2, 4) -->SELECTid,name,age,scoreFROMstudent<if test="list != null and list.size > 0">WHERE id IN<foreach collection="list" open="(" close=")" item="student" separator=",">#{student.id}</foreach></if></select>
sql 标签
<sql/>标签用于定义 SQL 片断,以便其它 SQL 标签复用。而其它标签使用该 SQL 片断, 需要使用 <include/>子标签。该 <sql/>标签可以定义 SQL 语句中的任何部分,所以<include/>子标签可以放在动态 SQL 的任何位置。
修改映射文件
<sql id="select">SELECTid,name,age,scoreFROMstudent</sql><!-- foreach --><select id="selectByForeachWithListCustom" resultType="com.lusifer.mybatis.entity.Student"><!-- select * from student where id in (2, 4) --><include refid="select" /><if test="list != null and list.size > 0">WHERE id IN<foreach collection="list" open="(" close=")" item="student" separator=",">#{student.id}</foreach></if></select>

若有收获,就点个赞吧
0 人点赞
