一、配置清单
1、硬件
- 树莓派 4B x 1 台
- 四针脚 0.96 寸 12468 屏幕 x 1 块
- 母对母杜邦线 x 4 条
2、硬件链接

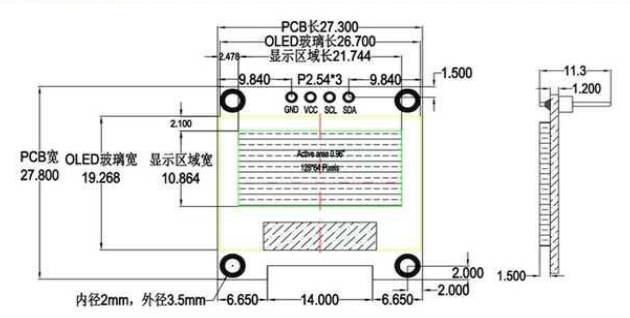
二、引脚定义及连接方法
| 屏幕针脚 | 含义 | 连接树莓派针脚位置 |
|---|---|---|
| VCC | 电源 (3.3V~5V) | 左一 |
| GND | 地 | 左五 |
| SCL | IIC 时钟信号 | 左三 |
| SDA | IIC 数据信号 | 左二 |
二、树莓派配置
通过命令我们来安装屏幕所需要的驱动:
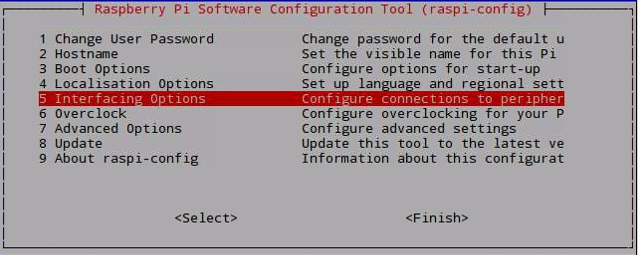
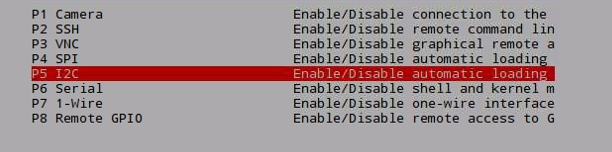
1、开启 i2C 功能
sudo apt-get install -y python-smbussudo apt-get install -y i2c-toolssudo raspi-config
2、查看 i2c 地址
sudo apt-get install -y python-smbussudo apt-get install -y i2c-toolssudo raspi-config

3、安装 Adafruit_Python_SSD1306 库
sudo apt-get updatesudo apt-get install build-essential python-dev python-pipsudo pip install RPi.GPIOsudo apt-get install python-imaging python-smbussudo apt-get install gitgit clone https://github.com/adafruit/Adafruit_Python_SSD1306.gitcd Adafruit_Python_SSD1306sudo python setup.py install
python 如果是 3.x 版本,pip 需要改成 pip3
屏幕显示
安装好 Adafruit_Python_SSD1306 库后,cd examples 进入例程目录,ls 查看文件。
下面以 shapes.py 例程说明。
import timeimport Adafruit_GPIO.SPI as SPIimport Adafruit_SSD1306import Imageimport ImageDrawimport ImageFont# Raspberry Pi pin configuration:RST = 24# Note the following are only used with SPI:DC = 23SPI_PORT = 0SPI_DEVICE = 0# Beaglebone Black pin configuration:# RST = 'P9_12'# Note the following are only used with SPI:# DC = 'P9_15'# SPI_PORT = 1# SPI_DEVICE = 0# 128x32 display with hardware I2C:disp = Adafruit_SSD1306.SSD1306_128_32(rst=RST)# 128x64 display with hardware I2C:# disp = Adafruit_SSD1306.SSD1306_128_64(rst=RST)# Alternatively you can specify an explicit I2C bus number, for example# with the 128x32 display you would use:# disp = Adafruit_SSD1306.SSD1306_128_32(rst=RST, i2c_bus=2)# 128x32 display with hardware SPI:# disp = Adafruit_SSD1306.SSD1306_128_32(rst=RST, dc=DC, spi=SPI.SpiDev(SPI_PORT, SPI_DEVICE, max_speed_hz=8000000))# 128x64 display with hardware SPI:# disp = Adafruit_SSD1306.SSD1306_128_64(rst=RST, dc=DC, spi=SPI.SpiDev(SPI_PORT, SPI_DEVICE, max_speed_hz=8000000))# Alternatively you can specify a software SPI implementation by providing# digital GPIO pin numbers for all the required display pins. For example# on a Raspberry Pi with the 128x32 display you might use:# disp = Adafruit_SSD1306.SSD1306_128_32(rst=RST, dc=DC, sclk=18, din=25, cs=22)# Initialize library.disp.begin()# Clear display.disp.clear()disp.display()# Create blank image for drawing.# Make sure to create image with mode '1' for 1-bit color.width = disp.widthheight = disp.heightimage = Image.new('1', (width, height))# Get drawing object to draw on image.draw = ImageDraw.Draw(image)# Draw a black filled box to clear the image.draw.rectangle((0,0,width,height), outline=0, fill=0)# Draw some shapes.# First define some constants to allow easy resizing of shapes.padding = 2shape_width = 20top = paddingbottom = height-padding# Move left to right keeping track of the current x position for drawing shapes.x = padding# Draw an ellipse.draw.ellipse((x, top , x+shape_width, bottom), outline=255, fill=0)x += shape_width+padding# Draw a rectangle.draw.rectangle((x, top, x+shape_width, bottom), outline=255, fill=0)x += shape_width+padding# Draw a triangle.draw.polygon([(x, bottom), (x+shape_width/2, top), (x+shape_width, bottom)], outline=255, fill=0)x += shape_width+padding# Draw an X.draw.line((x, bottom, x+shape_width, top), fill=255)draw.line((x, top, x+shape_width, bottom), fill=255)x += shape_width+padding# Load default font.font = ImageFont.load_default()# Alternatively load a TTF font.# Some other nice fonts to try: http://www.dafont.com/bitmap.php#font = ImageFont.truetype('Minecraftia.ttf', 8)# Write two lines of text.draw.text((x, top), 'Hello', font=font, fill=255)draw.text((x, top+20), 'World!', font=font, fill=255)# Display image.disp.image(image)disp.display()
按照你的 oled 屏修改代码,程序默认是 12832 的,你的 oled 屏是这个就不用改直接运行就 OK。
如果是 12864 的 I2C 就像下面那样修改,把 12832 加 #注释,12864# 注释去掉保存。
# 128x32 display with hardware I2C:#disp = Adafruit_SSD1306.SSD1306_128_32(rst=RST)# 128x64 display with hardware I2C:disp = Adafruit_SSD1306.SSD1306_128_64(rst=RST)
终端输入 sudo python shapes.py 或用 Python 打开文件运行就能看到 OLED 屏有显示了。
三、运行程序

参考资料

若有收获,就点个赞吧
0 人点赞
