- 表格布局的两种方式
- 一、HTML Table
- 二、CSS Table
- 2.1 CSS Table 和 HTML Table的关键区别
- 2.2 文字怎么贴着块级元素的下边沿
- 2.3 利用vertical-align:middle垂直居中
- 2.4 动态垂直居中对齐
- 父级设置display: table-cell;vertical-align: middle;text-align: center;
子级设置display: inline-block; - vertical-align: middle; 行内元素的基线相对于该元素所在行的基线的垂直对齐
- 父级给相对定位,子级给绝对定位,设置left和top为50%,再向左和向上移动负的子级一半
- 父级给相对定位,子级给绝对定位,margin设置为auto,上下左右值设为0
- 父级设置display:flex;justify-content: cneter;align-items: center;
- 使用 display: -webkit-box 属性
- 父级设置display: table-cell;vertical-align: middle;text-align: center;
- 2.5 动态水平居中对齐
使用表格布局一直是一个敏感的话题。一般情况下,Web开发人员考虑基于表格布局是禁忌。20世纪初期绝大多数电脑都是使用表格布局,随着新技术的发展,表格布局被淘汰,现在开发布局应避免使用表格布局,即使是表格数据驱动表格视图
表格布局的两种方式
- HTML Table(原生标签)
- CSS Table(display:table等相关属性)
- th 元素内部的文本通常会呈现为居中的粗体文本
- 而 td 元素内的文本通常是左对齐的普通文本
| 属性property | 描述description | |
| —- | —- | —- |
| align | 规定当前单元格内容的水平对齐方式,
left:表格左对齐
center:居中对齐
right:右对齐
justify
char | HTML5中不支持 | | rowspan | 规定单元格可横跨的行数,类型:number | | | colspan | 设置单元格可横跨的列数,类型:number | | | | 规定表格行的背景颜色
- rgb(x,x,x)
- #xxxxxx
- colorname
| | | width | 规定表格单元格的宽度,单位:pixels % | 不赞成使用,请使用样式取而代之 | | height | 规定表格单元格的高度,单位:pixels % | 不赞成使用,请使用样式取而代之 | | headers | 规定与单元格相关的表头,值header_cells’_id | | | char | 规定根据哪个字符来进行内容的对齐,类型:character | | | bgcolor |
- rgb(x,x,x)
- #xxxxxx
- colorname
| 不赞成使用,请使用样式取而代之 | | nowrap | 规定单元格中的内容是否折行 | | | scope | 定义将表头数据与单元数据相关联的方法
- col
- colgroup
- row
- rowgroup
| | | abbr | 规定单元格中内容的缩写版本,类型:text | | | valign | 规定单元格内容的垂直排列方式
- top
- middle
- bottom
- baseline
| | - table中使用 <tbody> 可以起到优化显示的作用。当你表格很长,使用tbody分段能让部分部分的显示出来,减少用户的等待
- 使用了<thead> <tbody> <tfoot>它们,表格的显示一定为从头到脚,不管你写的标签代码顺序如何排
- 表格布局不同于div布局,不能随便的控制各个标签的宽度。
- 表格布局是一种结构,布局时想象该结构会很有帮助
- 宏观把控整个表格布局,有必要事先确定你表格最大的列数colspan,以及每列的大致宽度(px或百分比)
- 最好着重布局其中一个tr内的所有td的宽度,其它tr内的td都使用colspan来确定占有的单元格数
- 保持每个tr的colspan属性之和保持一致,没有该属性的td默认为1
- rowspan会占有它跨越的所有tr的colspan例如:某td的rowspan为2,并且该td的colspan为3,则计算下一个tr的colspan之和时需要加上3
一、HTML Table
HTML Table是指使用原生的
1.1 table标签
| 属性property | 描述description | |
|---|---|---|
| align | 规定表格相对周围元素的对齐方式 left:表格左对齐 center:居中对齐 right:右对齐 |
不赞成使用,请使用样式代替 |
| width | 表格的宽度 | |
| height | 表格的高度 | |
| background | 表格的背景颜色或背景图片 | 不赞成使用,请使用样式代替 |
| border | 表格边框的宽度,这属性会应用到每个单元格 默认为1px,当值修改时(>1),只会影响table表格的外边框 |
|
| cellspacing | 指单元格之间的间距,为0px表格间是无间距的 | |
| cellpadding | 单元格边界与单元格内容之间的间距,默认为0px | |
| frame | 指定表格外侧边框的那个部分是否可见 void:外侧边框 不显示 box:所有的外侧边框都显示 border:所有的外侧边框都显示,等同于box,没有任何区别 above:显示外侧边框的上侧 below显示外侧边框的下侧 lhs:显示外侧边框的下部左侧 rhs:显示外侧边框的下部右侧 hsides:显示外侧边框的上下侧 vsides:显示外侧边框的左右侧 |
|
| rules | none:不显示内线条 all:显示全部内线条 rows:显示行之间的线条 cols:显示列之间的线条 groups:显示行组和列组之间的线条 |
|
| summary | 规定表格的摘要(text文本) |
1.2 tr标签
| 属性property | 描述description | |
|---|---|---|
| align | 规定表格相对周围元素的对齐方式 left:表格左对齐 center:居中对齐 right:右对齐 justify:两端对齐 char:表格行中的内容相对某个字符为基准对齐 |
HTML5中不支持 |
| bgcolor | 规定表格行的背景颜色 - rgb(x,x,x) - #xxxxxx - colorname |
不赞成使用。请使用样式取而代之 |
| char | 规定根据哪个字符来进行文本对齐 类型:character |
|
| charoff | 规定第一个对齐字符的偏移量,类型:number | |
| valign | 规定表格纵向对齐方式 - top - middle - bottom - baseline |
1.3 单元格th/td标签
th和td区别:
1.4 不推荐使用的thead、tbody、tfoot标签,使用tr和样式替代即可
文档里是这样注释的:thead、tbody 以及 tfoot 很少被使用,这是因为糟糕的浏览器支持。我们期望在 XHTML 的未来版本中这种情况会发生变化
表格布局要点
表格布局使用场景
在你布局时只要有类似表的结构,就可以使用表格布局,如常在form表单以及后台数据对象的显示上
二、CSS Table
CSS Table是指用CSS属性模仿HTML 表格的模型
table { display: table }table { display: inline-table }tr { display: table-row }td, th { display: table-cell }thead { display: table-header-group }tbody { display: table-row-group }tfoot { display: table-footer-group }col { display: table-column }colgroup { display: table-column-group }caption { display: table-caption }
显而易见 HTML Table 使用标签<table> <tr> <td> 等标签,就是使用 CSS Table 的相关属性来实现的;从上面 HTML4 的默认样式表中可以看,出他们的使用对于CSS属性的情况:
- table 指定对象作为块元素级的表格。类同于(CSS2)html标签<table>
- inline-table 指定对象作为内联元素级的表格。类同于(CSS2)html标签<table>
- table-row 指定对象作为表格行。类同于(CSS2)html标签<tr>
- table-cell 指定对象作为表格单元格。类同于(CSS2)html标签<td>
- table-header-group 指定对象作为表格标题组。类同于(CSS2)html标签<thead>
- table-row-group 指定对象作为表格行组。类同于(CSS2)html标签<tbody>
- table-footer-group 指定对象作为表格脚注组。类同于(CSS2)html标签<tfoot>
- table-column 指定对象作为表格列。类同于(CSS2)html标签<col>
- table-column-group 指定对象作为表格列组显示。类同于(CSS2)html标签<colgroup>
- table-caption 指定对象作为表格标题。类同于(CSS2)html标签<caption>
2.1 CSS Table 和 HTML Table的关键区别
HTML Table 布局麻烦,而 CSS Table 只要适当地调整CSS属性,就能做到许多 HTML Table 不能做的事情,属性可以择优使用
- 动态垂直居中对齐
- 动态水平居中对齐
2.2 文字怎么贴着块级元素的下边沿
使用 line-height,前提要知道字体大小和容器高度
<style>
div {
  height: 500px;
  background-color: azure;
}

.text {
  font-size: 12px;
  height: 70px;
  line-height: 120px;
}
</style>
<div class="text">文字怎么贴着块级元素的下边沿</div>
使用 display: table-cell+vertical-align: bottom
<style>
div {
  height: 500px;
  background-color: azure;
}

.text {
  font-size: 12px;
  width: 400px;
  height: 70px;
  padding: 0 20px;
  display: table-cell;
  vertical-align: bottom;
}
</style>
<div class="text">文字怎么贴着块级元素的下边沿</div>
2.3 利用vertical-align:middle垂直居中
<style>
    .wrapper {
        width: 300px;
        height: 300px;
        background-color: pink;
        text-align: center;
    }

    .box {
        width: 100px;
        height: 100px;
        background-color: deepskyblue;
        display: inline-block;
        vertical-align: middle;
        margin: 0 auto;
    }
</style>

<div class="wrapper">
    <div class="box"></div>
</div>
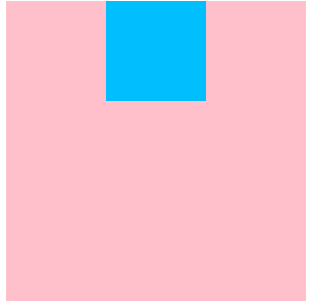
以前总是以为 vertical-align 与 text-align 是同样的道理
- 一个是垂直居中
- 一个是水平居中
结果在这里一点效果也没有。事实上 vertical-align 与 text-align 完全不一样,vertical-align不能这样用
vertical-align 属性设置元素的垂直对齐方式。该属性定义行内元素的基线相对于该元素所在行的基线的垂直对齐。允许指定负长度值和百分比值。这会使元素降低而不是升高。在表单元格中,这个属性会设置单元格框中的单元格内容的对齐方式
- 第一种用法,先看后面一句“在表单元格中,这个属性会设置单元格框中的单元格内容的对齐方式。”这很容易理解,如果给一个表格的td加一个vertical-align:middle的样式,表格里面的内容会垂直居中,同样的如果给一个vertical-align:bottom就会底部对齐,如果给一个vertical-align:top就会顶部对齐。
- 第二种用法,该属性定义行内元素的基线相对于该元素所在行的基线的垂直对齐。假设有两个行内元素a和b,a和b都是div当a加了一个vertical-align:middle样式之后,b的底部(基线)就会对齐a的中间位置,如下图:
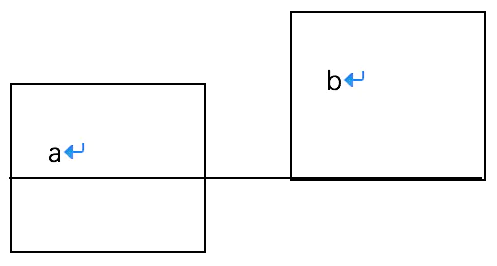
如果a和b都加了一个vertical-align:middle样式,那么就互相对齐了对方的中间位置,也就是它们在垂直方向上的中线对齐了,如下图: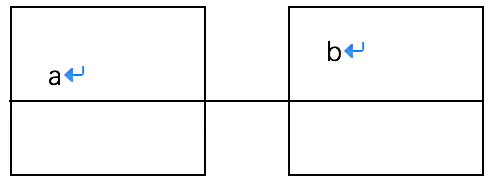
现在我要让class=”box”的div在class=”wrapper”的div里面垂直居中,我可以在class=”wrapper”的div里面加一个div空标签,把它的高度设为100%,宽度设置为0,再给它一个vertical-align:middle样式,同样的给class=”box”的div一个vertical-align:middle样式,那么box就可以在div里面垂直居中了。
<style>
    .wrapper {
        width: 300px;
        height: 300px;
        background-color: pink;

        text-align: center;
    }

    .box {
        width: 100px;
        height: 100px;
        background-color: deepskyblue;

        display: inline-block;
        vertical-align: middle;
        margin: 0 auto;
    }

    .help {
        width: 0;
        height: 100%;
        display: inline-block;
        vertical-align: middle;
    }
</style>

<div class="wrapper">
    <div class="box"></div>
    <div class="help"></div>
</div>
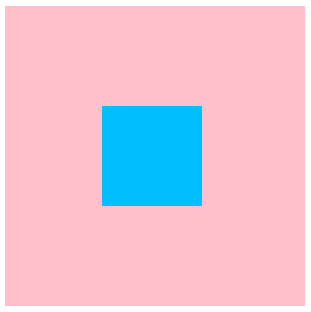
2.4 动态垂直居中对齐
- line-height: height
- absolute + transform
- flex + align-items: center
- table
父级设置display: table-cell;vertical-align: middle;text-align: center;子级设置display: inline-block;
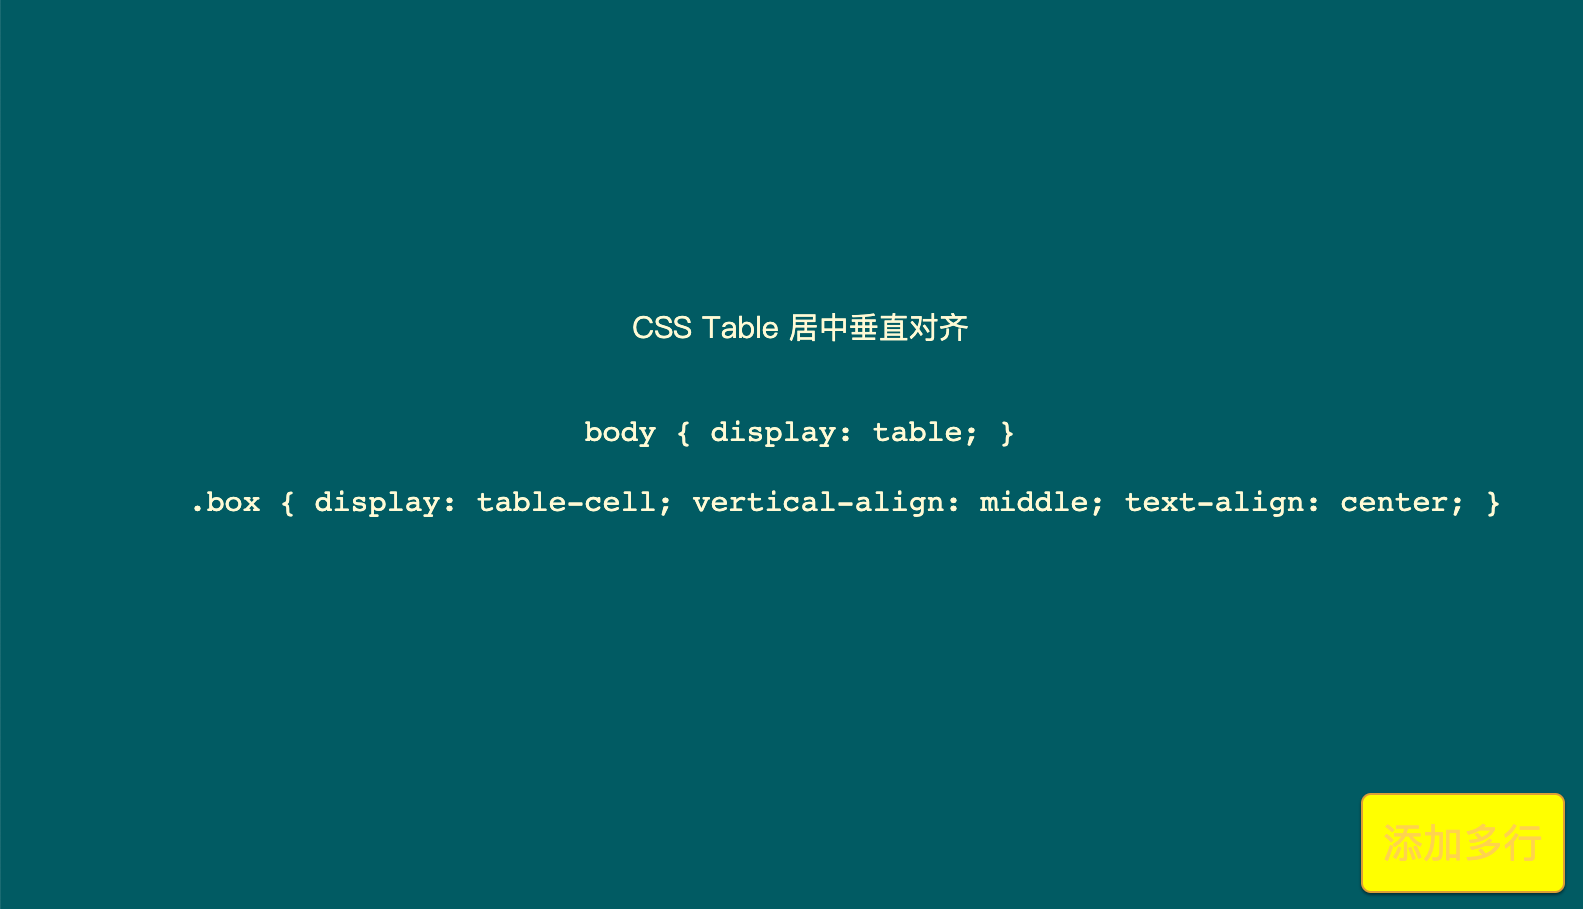
<button>添加多行</button>

<div class="box">
  <p style="font-size: 30px;">CSS Table 居中垂直对齐</p>
  <pre lang='CSS' contenteditable style="font-size: 20px;">
    <div class="fromDivSetBodyCSS" onclick="handleChange()"> body { display: table; } </div>
    <span onclick="Date.now()%2==0?alert('现在时间是偶数'+Date.now()):alert('现在时间是奇数'+Date.now())"> .box { display: table-cell; vertical-align: middle; text-align: center; }
  </span>
  </pre>
</div>

<style>
  *, html,
  body {
    margin: 0;
    padding: 0;
    height: 100%;
  }


  body {
    color: #FFFAD5;
    background: #105B63;
    display: table;
    width: 100%;
    height: 100%;
  }

  .box {
    display: table-cell;
    vertical-align: middle;
    text-align: center;
  }


  button {
    padding: 20px 20px;
    font-size: 40px;
    position: absolute;
    bottom: 20px;
    right: 20px;
    display: block;
    -webkit-appearance: none;
    background: yellow;
    outline: none;
    border: 2px solid #DB9E36;
    color: #FFD34E;
    border-radius: 10px;
    box-shadow: 0 2px 3px rgba(0, 0, 0, 0.5);
    cursor: pointer;
  }

  button:active {
    border-color: #FFFAD5;
    color: #FFFAD5;
  }
</style>

<script>
  document.querySelector("button").addEventListener("click", function () {
    var element = document.createElement("p");
    element.innerText = "额外添加的行";
    document.querySelector(".box").appendChild(element);
  });
  function handleChange() {
    var fromDivSetBodyCSSText = document.querySelector(".fromDivSetBodyCSS").innerText
    alert(fromDivSetBodyCSSText)
  }
</script>
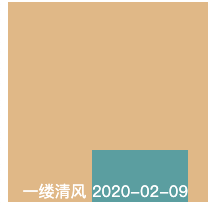
vertical-align: middle; 行内元素的基线相对于该元素所在行的基线的垂直对齐
<style>
  div {
    width: 200px;
    height: 200px;
    background-color: burlywood;
    text-align: center;
    color: #ffffff;
  }

  .time {
    padding-top: 30px;
    background-color: cadetblue;
    display: inline-block;
    vertical-align: top;
  }

  span:nth-child(2) {
    width: 0;
    height: 100%;
    display: inline-block;
    vertical-align: middle;
  }
</style>

<div class="wrap">
  <span class="time">2020-02-09</span>
  一缕清风
  <span></span>
</div>
父级给相对定位,子级给绝对定位,设置left和top为50%,再向左和向上移动负的子级一半
<div class="wrapper">
       <div class="demo">text</div>
    </div>
 </body>

<style>
  .wrapper {
    width: 500px;
    height: 500px;
    border: 1px solid #bbb;
    /*给父元素设置相对定位*/
    position: relative;

  }

  .demo {
    width: 200px;
    height: 200px;
    background: #ff6700;
    position: absolute;
    /*给子元素设置绝对定位*/
    top: 50%;
    margin-top: -100px;
    left: 50%;
    margin-left: -100px;
  }
</style>
父级给相对定位,子级给绝对定位,margin设置为auto,上下左右值设为0
<div class="parent">
       <div class="sub"></div>
</div>


<style>
  .parent {
    width: 500px;
    height: 500px;
    border: 1px solid #bbb;
    /*给父元素设置相对定位*/
    position: relative;

  }

  .sub {
    width: 200px;
    height: 200px;
    background: #ff6700;
    position: absolute;
    margin: auto;
    top: 0;
    bottom: 0;
    left: 0;
    right: 0;
  }
</style>
父级设置display:flex;justify-content: cneter;align-items: center;
<div class="parent">
       <div class="sub"></div>
</div>


<style>
  .parent {
    width: 500px;
    height: 500px;
    border: 1px solid #bbb;
    display: flex;
    justify-content: center;
    align-items: center;

  }

  .sub {
    width: 200px;
    height: 200px;
    background: #ff6700;
    position: absolute;
    margin: auto;
    top: 0;
    bottom: 0;
    left: 0;
    right: 0;
  }
</style>
使用 display: -webkit-box 属性
<style>
    body {
        display: flex;
        justify-content: center;
    }

    .box {
        width: 400px;
        height: 500px;
        border: 1px solid #999;
        line-height: 200px;
        font-size: 60px;
        color: #fff;
        text-align: center;
        display: -webkit-box;
        -webkit-box-orient: vertical;
        -webkit-box-align: center;
        -webkit-box-pack: center;
        /*-webkit-box-direction: normal;*/
        /* -webkit-box-direction: reverse; */
    }

    .a { width: 200px; height: 200px; background: red; }
</style>

<body>
    <div class="box">
        <div class="a">aaa</div>
    </div>
</body>
- display: -webkit-box; CSS3新盒模型,与 display:flex 相似
- -webkit-box-orient: vertical; 子元素排列方向:
- 纵向 vertical
- 横向 horizontal 默认
- -webkit-box-align: center; 子元素横向排列方式:
- 居中 center
- 靠左 start
- 靠右 end
- 靠基线 baseline
- -webkit-box-pack: center; 子元素纵向排列方式:
- 居中 center
- 靠上 start
- 靠下 end
- -webkit-box-direction: reverse; 子元素排列顺序:
- 倒序 reverse
- 正常 normal 默认
2.5 动态水平居中对齐
- 行内元素使用 text-align: center 水平居中
- margin: 0 auto 可以使有固定宽度的块级元素水平居中
- 使用 display: flex; justify-content: center 水平居中
- display: table; margin: auto 水平居中
- absolute + transform
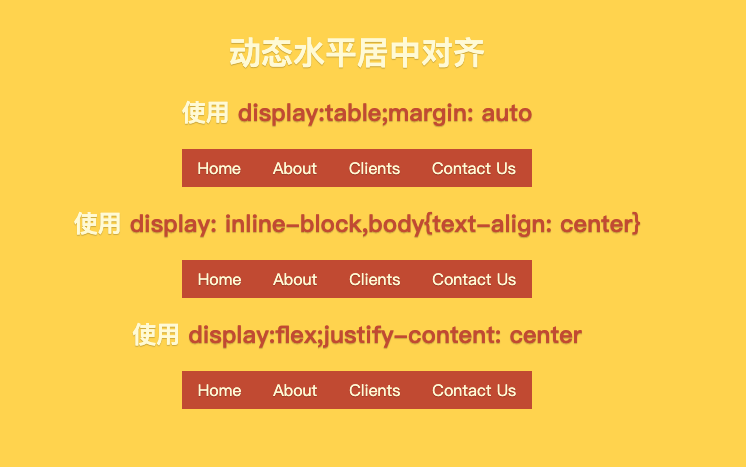
<h1>动态水平居中对齐</h1>
<h2>使用 <span class="orange">display:table</span></h2>
<kimenlement role='navigation' class="nav-table">
  <ul>
    <li><a href="#">Home</a></li>
    <li><a href="#">About</a></li>
    <li><a href="#">Clients</a></li>
    <li><a href="#">Contact Us</a></li>
  </ul>
</kimenlement>

<h2>使用 <span class="orange">display: inline-block,body{text-align: center}</span></h2>
<nav role='navigation' class="nav-inline-block">
  <ul>
    <li><a href="#">Home</a></li>
    <li><a href="#">About</a></li>
    <li><a href="#">Clients</a></li>
    <li><a href="#">Contact Us</a></li>
  </ul>
</nav>

<style>
  body,ul,ol,li,a{
    list-style: none;
    text-decoration: none;
    margin: 0;
    padding: 0;
  }

  .nav-table {
    display: table;
    margin: auto
  }

  .nav-inline-block{
    display: inline-block;
  }

  .orange {
    color: #BD4932;
  }

  body {
    padding: 40px;
    text-align: center;
    background: #FFD34E;
    color: #FFFAD5;
    text-shadow: 0 1px 1px rgba(0, 0, 0, 0.2);
  }


  li {
    float: left;
    background-color: #BD4932;
  }

  li a {
    display: block;
    padding: .5em 1em;
    color: #FFFAD5;
  }
</style>
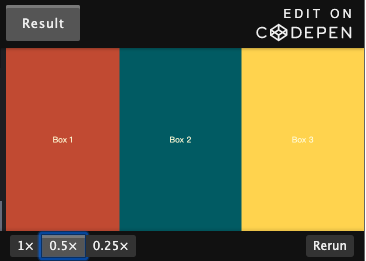
2.6 CSS Table结合响应式布局
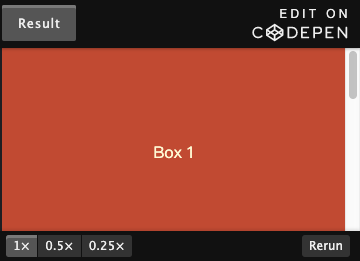
<head> <meta name="viewport" content="width=device-width, initial-scale=1.0"> </head>

</body>
</html>
<div class="boxes">
  <div class="box box1">Box 1</div>
  <div class="box box2">Box 2</div>
  <div class="box box3">Box 3</div>
</div>

<style>

  *,
  html,
  body {
    color: #FFFAD5;
    margin: 0;
    padding: 0;
  }

  .boxes {
    display: table;
    width:100%;
    height: 50ex;
  }

  .box {
    display: table-cell;
    text-align: center;
    vertical-align: middle;
    line-height: 13em;
  }

  .box1 { background: #BD4932; }
  .box2 { background: #105B63; }
  .box3 { background: #FFD34E; }

  @media (max-width: 420px) {
    .box {
      display: block;
      width: 100%;
    }
  }

</style>
2.7 动态高度的页脚贴在页面底部
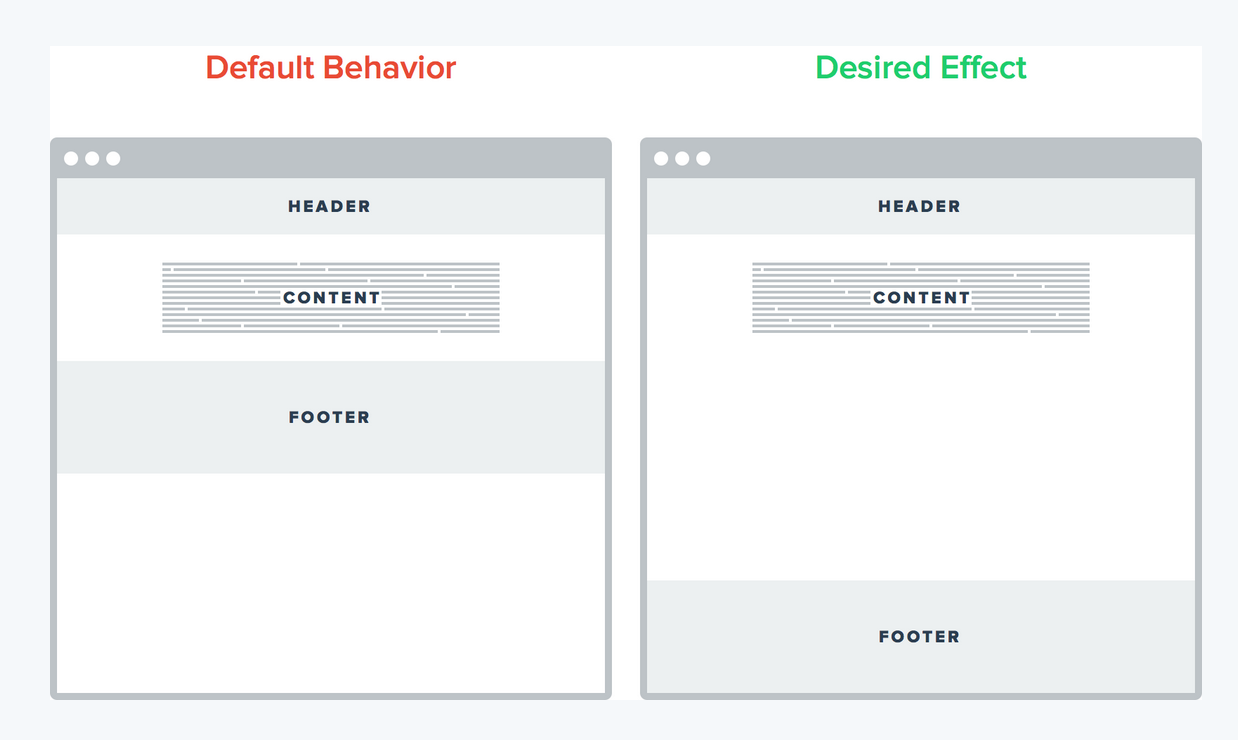
页脚动态贴在底部需要满足以下两个条件
- 当主体的内容高度不超过可视区域高度的时候,页脚贴在页面底部
- 当主体的内容高度超过可视区域高度的时候,页脚将按正常布局
CSS Table方法
<div class="main">
  <button class="button1">添加内容到主体区域</button>
  <button class="button2">添加内容到底部</button>
  <h1>动态高度的页脚贴在页面底部</h1>
  <h2>with Fixed Footer Height</h2>
</div>
<div class="footer">这里是底部</div>

<style>
  * { margin: 0; padding: 0; }
  html, body { height: 100%; }

  body {
    display: table;
    background: #FFFAD5;
    color: #BD4932;
    width: 100%;
  }

  button {
    padding: 5px 10px;
    position: absolute;
    top: 20px;
    right: 20px;
    display: block;
    -webkit-appearance: none;
    background: #BD4932;
    outline: none;
    border: 2px solid #DB9E36;
    color: #FFFAD5;
    border-radius: 10px;
    box-shadow: 0 2px 3px rgba(0, 0, 0, 0.5);
    cursor: pointer;
  }

  .button2 {top: 60px;}

  button:active { border-color: #FFFAD5; color: #FFFAD5; }

  .main {height: 100%;}

  .footer {
    display: table-row;
    height: 1px; /*原本高只有1px的,加了这个就撑开了*/
    background: #105B63;
    color: #FFFAD5;
  }
</style>

<script>
  document.querySelector(".button1").addEventListener("click", function () {
    var element = document.createElement("div");
    element.innerHTML = "<p>额外添加的行</p><p>额外添加的行</p><p>额外添加的行</p>";
    document.querySelector(".main").appendChild(element);
  });

  document.querySelector(".button2").addEventListener("click", function () {
    var element = document.createElement("div");
    element.innerHTML = "<p>额外添加到底部的行</p><p>额外添加到底部的行</p><p>额外添加到底部的行</p>";
    document.querySelector(".footer").appendChild(element);
  });
</script>
margin-bottom
<div class="page-wrap">
  <h1>动态高度的页脚贴在页面底部</h1>
  <h2>with Fixed Footer Height</h2>
  <button id="page-wrap-add">Add Content</button>
</div>

<footer class="site-footer">
足部
<button id="site-footer-add">Add Content</button>
</footer>

<style>
* { margin: 0; }
html, body { height: 100%; }
.page-wrap {
  min-height: 100%;
  /* equal to footer height */
  margin-bottom: -142px;
}
.page-wrap:after { content: ""; display: block; }
.site-footer, .page-wrap:after { min-height: 142px; }
.site-footer { background: orange; }
</style>

<script>
document.querySelector("#page-wrap-add").addEventListener("click", function(){
    var element = document.createElement("div");
    element.innerHTML = "<p>额外添加的行</p><p>额外添加的行</p><p>额外添加的行</p>";
  document.querySelector(".page-wrap").appendChild(element);
});

document.querySelector("#site-footer-add").addEventListener("click", function(){
    var element = document.createElement("div");
    element.innerHTML = "<p>额外添加的行</p><p>额外添加的行</p><p>额外添加的行</p>";
  document.querySelector(".site-footer").appendChild(element);
});
</script>
Flex 方法
<div class="page-wrap">
  <h1>动态高度的页脚贴在页面底部</h1>
  <h2>with Fixed Footer Height</h2>
  <button id="page-wrap-add">Add Content</button>
</div>
<footer class="site-footer">
  足部
  <button id="site-footer-add">Add Content</button>
</footer>

<style>
* { margin: 0; }
html, body { height: 100%; display: flex;flex-direction: column;}
.page-wrap {flex:auto}
.site-footer { background: orange;height: 200px;}
</style>

<script>
document.querySelector("#page-wrap-add").addEventListener("click", function(){
    var element = document.createElement("div");
    element.innerHTML = "<p>顶部额外添加的行</p><p>顶部额外添加的行</p><p>顶部额外添加的行</p>";
  document.querySelector(".page-wrap").append(element);
});

document.querySelector("#site-footer-add").addEventListener("click", function(){
    var element = document.createElement("div");
    element.innerHTML = "<p>足部额外添加的行</p><p>足部额外添加的行</p><p>足部额外添加的行</p>";
  document.querySelector(".site-footer").prepend(element)
});
</script>
2.8 使用display:table实现的圣杯布局
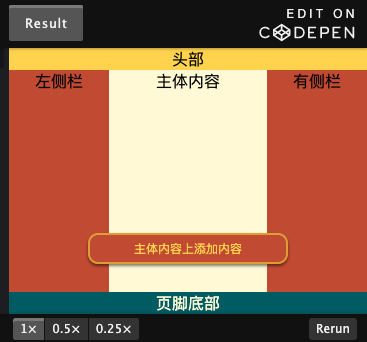
<button class="button1">主体内容上添加内容</button>

<div class="wrapper">
  <div class="header">头部</div>
  <div class="main">
    <div class="box sidebar">左侧栏</div>
    <div class="box content">主体内容</div>
    <div class="box sidebar">有侧栏</div>
  </div>
  <div class="footer">页脚底部</div>
</div>

<style>
  * { margin: 0; padding: 0; }

  html, body { height: 100%; }

  body { background: #FFFAD5; color: black; }

  .wrapper {
    height: 100%;
    display: table;
    width: 100%;
    text-align: center;
  }

  .header {
    display: table-row;
    height: 50px;
    line-height: 50px;
    background: #FFD34E;
  }

  .main {
    height: 100%;
    display: table;
    width: 100%;
  }

  .box { display: table-cell; }

  .sidebar {
    width: 100px;
    background: #BD4932;
  }

  .footer {
    display: table-row;
    height: 1px;
    background: #FFFAD5;
    color: #FFFAD5;
  }

  button {
    padding: 5px 10px;
    position: fixed;
    bottom: 50px;
    right: 0px;
    left: 0px;
    margin: auto;
    width: 200px;
    display: block;
    -webkit-appearance: none;
    background: #BD4932;
    outline: none;
    border: 2px solid #DB9E36;
    color: #FFD34E;
    border-radius: 10px;
    box-shadow: 0 2px 3px rgba(0, 0, 0, 0.5);
    cursor: pointer;
  }

  button:active { border-color: #FFFAD5; color: #FFFAD5; }
</style>

<script>
  document.querySelector(".button1").addEventListener("click", function () {
    var element = document.createElement("div");
    element.innerHTML = "<p>Additional Line</p><p>Additional Line</p><p>Additional Line</p>";
    document.querySelector(".content").appendChild(element);
  });
</script>
如果 搜索引擎优化 不是非常重要的话,display:table 将相对容易地实现圣杯布局
2.9 注意
设置了
position: absolute
display: xxx
float
会导致
display: table
之类的失效

