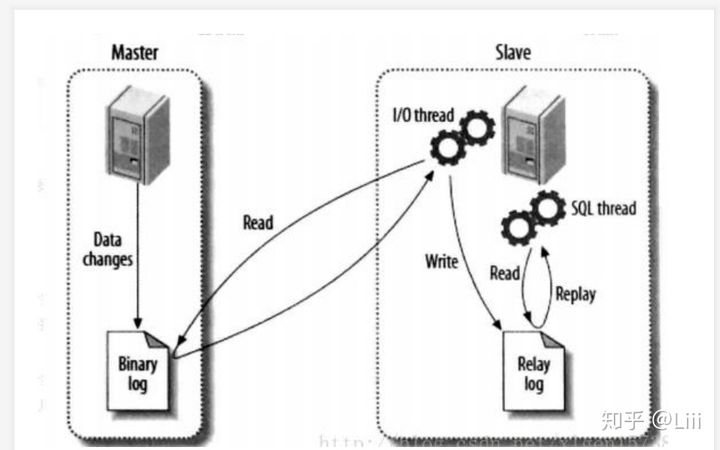
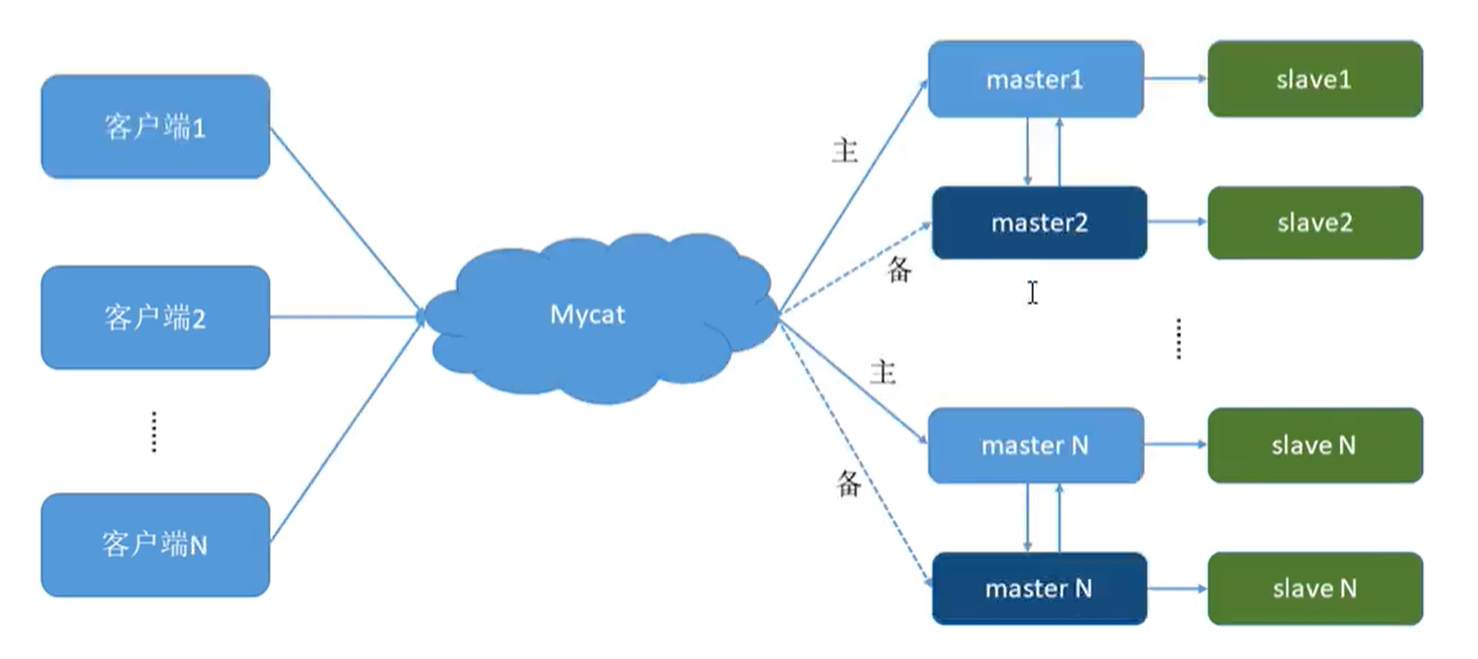
单主单从
| name | ip | |
|---|---|---|
| node1 | 192.168.44.100 | 安装mycat |
| node5 | 192.168.44.33 | 主 |
| node3 | 192.168.44.11 | 从 |
读写分离的前提是首先要先将数据库搭建成主从模式!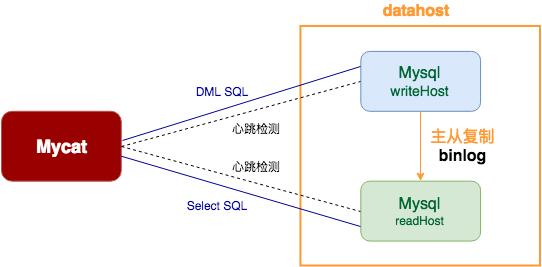
实现目标
实现在两台数据库主机上安装数据库实现主从并在另一台主机上搭建mycat组件实现读写分离
搭建主从
1.安装并初始化操作
在两台主机上安装数据库并初始化
[root@node3 ~]# yum install -y mariadb mariadb-server[root@node5 ~]# yum install -y mariadb mariadb-server
初始化数据库
#####两台主机同样操作[root@node5 ~]# systemctl start mariadb ####首先要开启才能初始化[root@node5 ~]# mysql_secure_installation/usr/bin/mysql_secure_installation: line 379: find_mysql_client: command not foundNOTE: RUNNING ALL PARTS OF THIS SCRIPT IS RECOMMENDED FOR ALL MariaDBSERVERS IN PRODUCTION USE! PLEASE READ EACH STEP CAREFULLY!In order to log into MariaDB to secure it, we'll need the currentpassword for the root user. If you've just installed MariaDB, andyou haven't set the root password yet, the password will be blank,so you should just press enter here.Enter current password for root (enter for none): #默认按回车OK, successfully used password, moving on...Setting the root password ensures that nobody can log into the MariaDBroot user without the proper authorisation.Set root password? [Y/n] yNew password: #输入数据库root密码000000Re-enter new password: #重复输入密码000000Password updated successfully!Reloading privilege tables..... Success!By default, a MariaDB installation has an anonymous user, allowing anyoneto log into MariaDB without having to have a user account created forthem. This is intended only for testing, and to make the installationgo a bit smoother. You should remove them before moving into aproduction environment.Remove anonymous users? [Y/n] y... Success!Normally, root should only be allowed to connect from 'localhost'. Thisensures that someone cannot guess at the root password from the network.Disallow root login remotely? [Y/n] n ###在这个要n... skipping.By default, MariaDB comes with a database named 'test' that anyone canaccess. This is also intended only for testing, and should be removedbefore moving into a production environment.Remove test database and access to it? [Y/n] y- Dropping test database...... Success!- Removing privileges on test database...... Success!Reloading the privilege tables will ensure that all changes made so farwill take effect immediately.Reload privilege tables now? [Y/n] y... Success!Cleaning up...All done! If you've completed all of the above steps, your MariaDBinstallation should now be secure.Thanks for using MariaDB!
2.修改配置文件
主从的配置文件 /etc/my.cnf
###主节点###[root@node5 ~]# vim /etc/my.cnf[mysqld]server_id=33 #id随意两台id不同即可log_bin=mysql-bin
###从节点##[root@node3 ~]# vi /etc/my.cnf[mysqld]server_id=11log_bin=mysql-bin
重启所有节点数据库systemctl restart mariadb
一:配置主从
1:添加用来链接的用户
在主与从的链接过程中需要有一个用户进行链接,这个用户也可以是root用户不过使用root链接不安全
[root@node5 ~]# mysql -uroot -p000000Welcome to the MariaDB monitor. Commands end with ; or \g.........MariaDB [(none)]> create user user001;Query OK, 0 rows affected (0.018 sec)
2:给链接用户授权
为了试验这里赋予所有权限,生产环境不适合
MariaDB [(none)]> grant all privileges on *.* to 'user001'@'%' identified by '000000' ;Query OK, 0 rows affected (0.013 sec)MariaDB [(none)]> grant replication slave on *.* to 'user001'@'%' identified by '000000' ;Query OK, 0 rows affected (0.003 sec)
3:从链接主
首先在主上查看bin-log文件和接入点
MariaDB [(none)]> show master status ;+------------------+----------+--------------+------------------+| File | Position | Binlog_Do_DB | Binlog_Ignore_DB |+------------------+----------+--------------+------------------+| mysql-bin.000004 | 2299 | | |+------------------+----------+--------------+------------------+1 row in set (0.000 sec)
到从节点改变“主”人
MariaDB [(none)]> change master to master_user='user001',master_host='192.168.44.33',master_password='000000',master_log_file='mysql-bin.000004',master_log_pos2209;Query OK, 0 rows affected (0.003 sec)
在从节点中开启从属的功能
MariaDB [(none)]> start slave;Query OK, 0 rows affected, 1 warning (0.000 sec)
查看状态
MariaDB [(none)]> start slave;Query OK, 0 rows affected, 1 warning (0.000 sec)MariaDB [(none)]> show slave status \G*************************** 1. row ***************************Slave_IO_State: Waiting for master to send eventMaster_Host: 192.168.44.33Master_User: rootMaster_Port: 3306Connect_Retry: 60Master_Log_File: mysql-bin.000004Read_Master_Log_Pos: 2299Relay_Log_File: node3-relay-bin.000007Relay_Log_Pos: 2413Relay_Master_Log_File: mysql-bin.000004Slave_IO_Running: Yes ##此处两处都为yes才行Slave_SQL_Running: YesReplicate_Do_DB:
可能用到的命令:
slave的命令:RESET SLAVESHOW SLAVE HOSTSSHOW SLAVE STATUSSTART SLAVESTOP SLAVEmaster的命令:CHANGE MASTER TOPURGE BINARY LOGSRESET MASTERSHOW BINARY LOGSSHOW MASTER STATUS
4:验证
二:配置mycat插件
实现读写分离的关键就是将mycat插件与主从相连然后实现读写分离
MyCat 是目前最流行的基于 java 语言编写的数据库中间件,是一个实现了 MySQL 协议 的服务器,前端用户可以把它看作是一个数据库代理,用 MySQL 客户端工具和命令行访问,而其后端可以用 MySQL 原生协议与多个 MySQL 服务器通信,也可以用 JDBC 协议与大多数主流数据库服务器通信,其核心功能是分库分表。配合数据库的主从模式还可实现读写分离。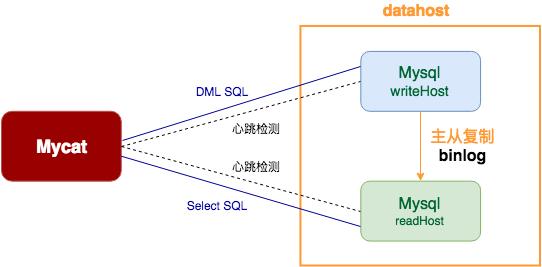
1.安装mycat
mycat是由Java写的所以在安装启动前需要安装一下Java依赖
[root@mall ~]# yum install -y java-1.8.0-openjdk java-1.8.0-openjdk-devel...[root@mall ~]# java -versionopenjdk version "1.8.0_222"OpenJDK Runtime Environment (build 1.8.0_222-b10)OpenJDK 64-Bit Server VM (build 25.222-b10, mixed mode)
安装mycat的方式有很多种这里采用上传安装包的方式安装
解压到/usr/local下面并授权
[root@node1 ~]# tar -xzvf Mycat-server-1.6-RELEASE-20161028204710-linux.tar.gz -C /usr/local/[root@node1 ~]# chmod -R 777 /usr/local/mycat/
2.修改schema.xml文件
schema.xml文件在mycat目录下的conf(/usr/local/mycat/conf)目录下
schema.xml文件是来决定呢些主机进行读写分离和逻辑数据表的
删除多余部分仅留这部分即可
[root@node1 conf]# vim schema.xml<?xml version="1.0"?><!DOCTYPE mycat:schema SYSTEM "schema.dtd"><mycat:schema xmlns:mycat="http://io.mycat/"><schema name="CHINA" checkSQLschema="true" sqlMaxLimit="100" dataNode="dn1"></schema><dataNode name="dn1" dataHost="host1" database="cr7" /><dataHost name="host1" maxCon="1000" minCon="10" balance="2"writeType="0" dbType="mysql" dbDriver="native" switchType="1" slaveThreshold="100"><heartbeat>select user()</heartbeat><!-- can have multi write hosts --><writeHost host="hostM1" url="192.168.44.33:3306" user="root"password="000000"><!-- can have multi read hosts --><readHost host="hostS1" url="192.168.44.11:3306" user="root" password="000000" /></writeHost></dataHost></mycat:schema>

在开启mycat之前先验证一下主从这两个数据库能否用远程登录上
###如果不能登录上去将root用户授权即可[root@node1 ~]# mysql -uroot -p000000 -h192.168.44.11 -P 3306Welcome to the MariaDB monitor. Commands end with ; or \g........MariaDB [(none)]> EXIT;Bye[root@node1 ~]# mysql -uroot -p000000 -h192.168.44.33 -P 3306Welcome to the MariaDB monitor. Commands end with ; or \g........MariaDB [(none)]> EXIT;Bye
3.修改server.xml文件
server.xml文件是编辑mycat的访问用户,能修改root用户访问的密码和逻辑数据库
在配置文件最后部分修改如下
<user name="root"><property name="password">000000</property><property name="schemas">CHINA</property></user>
删除以下部分
<user name="root"><property name="password">user</property><property name="schemas">TESTDB</property><property name="readOnly">true</property></user>
4.启动mycat
启动mycat到/usr/local/mycat/bin目录下找到mycat
[root@node1 bin]# mycat -hUsage: /usr/local/mycat/bin/mycat { console | start | stop | restart | status | dump }[root@node1 bin]# mycat startStarting Mycat-server...Mycat-server is already running.
过命令启动mycat数据库中间件服务,启动后通过netstat -ntpl命令查看虚拟机端口开放情况,如果有开放8066和9066端口说明服务正常启动(记得做域名解析)
在mycat的主机上安装mariadb-client服务登陆mycat的数据库查看逻辑数据库健康情况
[root@node1 ~]# mysql -uroot -p000000 -h127.0.0.1 -P8066Welcome to the MariaDB monitor. Commands end with ; or \g.Your MySQL connection id is 3Server version: 5.6.29-mycat-1.6-RELEASE-20161028204710 MyCat Server (OpenCloundDB)Copyright (c) 2000, 2018, Oracle, MariaDB Corporation Ab and others.Type 'help;' or '\h' for help. Type '\c' to clear the current input statement.MySQL [(none)]> SHOW DATABASES;+----------+| DATABASE |+----------+| CHINA |+----------+1 row in set (0.000 sec)
5.验证mycat对读写分离操作
进入mycat端的数据库
###通过8066端口进入mycat端的数据库[root@node1 ~]# mysql -uroot -p000000 -h127.0.0.1 -P8066
[root@node1 ~]# mysql -uroot -p000000 -h127.0.0.1 -P8066Welcome to the MariaDB monitor. Commands end with ; or \g.Your MySQL connection id is 14Server version: 5.6.29-mycat-1.6-RELEASE-20161028204710 MyCat Server (OpenCloundDB)Copyright (c) 2000, 2018, Oracle, MariaDB Corporation Ab and others.Type 'help;' or '\h' for help. Type '\c' to clear the current input statement.MySQL [(none)]> show databases;+----------+| DATABASE |+----------+| CHINA |+----------+1 row in set (0.000 sec)MySQL [(none)]> use CHINA;Reading table information for completion of table and column namesYou can turn off this feature to get a quicker startup with -ADatabase changedMySQL [CHINA]> SELECT * FROM cluo;+------+-----------+| id | name |+------+-----------+| 333 | node3 || 1 | xianggang || 2 | aomen || 3 | taiwan |+------+-----------+4 rows in set (0.002 sec)MySQL [CHINA]> insert into cluo values(0,'china');Query OK, 1 row affected (0.015 sec)MySQL [CHINA]> SELECT * FROM cluo;+------+-----------+| id | name |+------+-----------+| 333 | node3 || 1 | xianggang || 2 | aomen || 3 | taiwan || 0 | china |+------+-----------+5 rows in set (0.002 sec)
在mycat虚拟机节点使用mysql命令通过9066端口查询对数据库读写操作的分离信息。可以看到所有的写入操作WRITE_LOAD数都在db1主数据库节点上,所有的读取操作READ_LOAD数都在db2主数据库节点上。由此可见数据库读写操作已经分离到db1和db2节点上了
mysql -u root -p000000 -h127.0.0.1 -P9066 -e ‘show @@datasource’ #9066管理端口
上面的操作都会进行分流###通过查看数据来源来验证###[root@node1 bin]# mysql -u root -p000000 -h127.0.0.1 -P9066 -e 'show @@datasource'+----------+--------+-------+---------------+------+------+--------+------+------+---------+-----------+------------+| DATANODE | NAME | TYPE | HOST | PORT | W/R | ACTIVE | IDLE | SIZE | EXECUTE | READ_LOAD | WRITE_LOAD |+----------+--------+-------+---------------+------+------+--------+------+------+---------+-----------+------------+| dn1 | hostM1 | mysql | 192.168.44.33 | 3306 | W | 0 | 10 | 1000 | 31 | 0 | 2 || dn1 | hostS1 | mysql | 192.168.44.11 | 3306 | R | 0 | 4 | 1000 | 35 | 13 | 0 |+----------+--------+-------+---------------+------+------+--------+------+------+---------+-----------+------------+READ_LOAD 读的次数WRITE_LOAD 写的次数
可以发现当从mycat端进入后对数据库的操作会自动分发到指定的读写分离服务器上
双主双从
环境介绍
| name | ip | |
|---|---|---|
| node5 | 192.168.44.33 | master1 |
| node2 | 192.168.44.200 | slave1 |
| node3 | 192.168.44.11 | master2 |
| node4 | 192.168.44.22 | slave2 |
搭建双主双从其实就是在单主单从的基础上 扩展一点
原理:
当node2作为从的时候master是node5,这样node2技术node5的从可用在node5进行同步数据,这种情况node5现在的身份是主,当然node5也可以是从呀互不冲突的,当node5作为从的时候将node3作为主这样node5就可以与node3同步数据,实现双主双从的原理就是将两个互相认主将对方当做主机来获取对方的数据。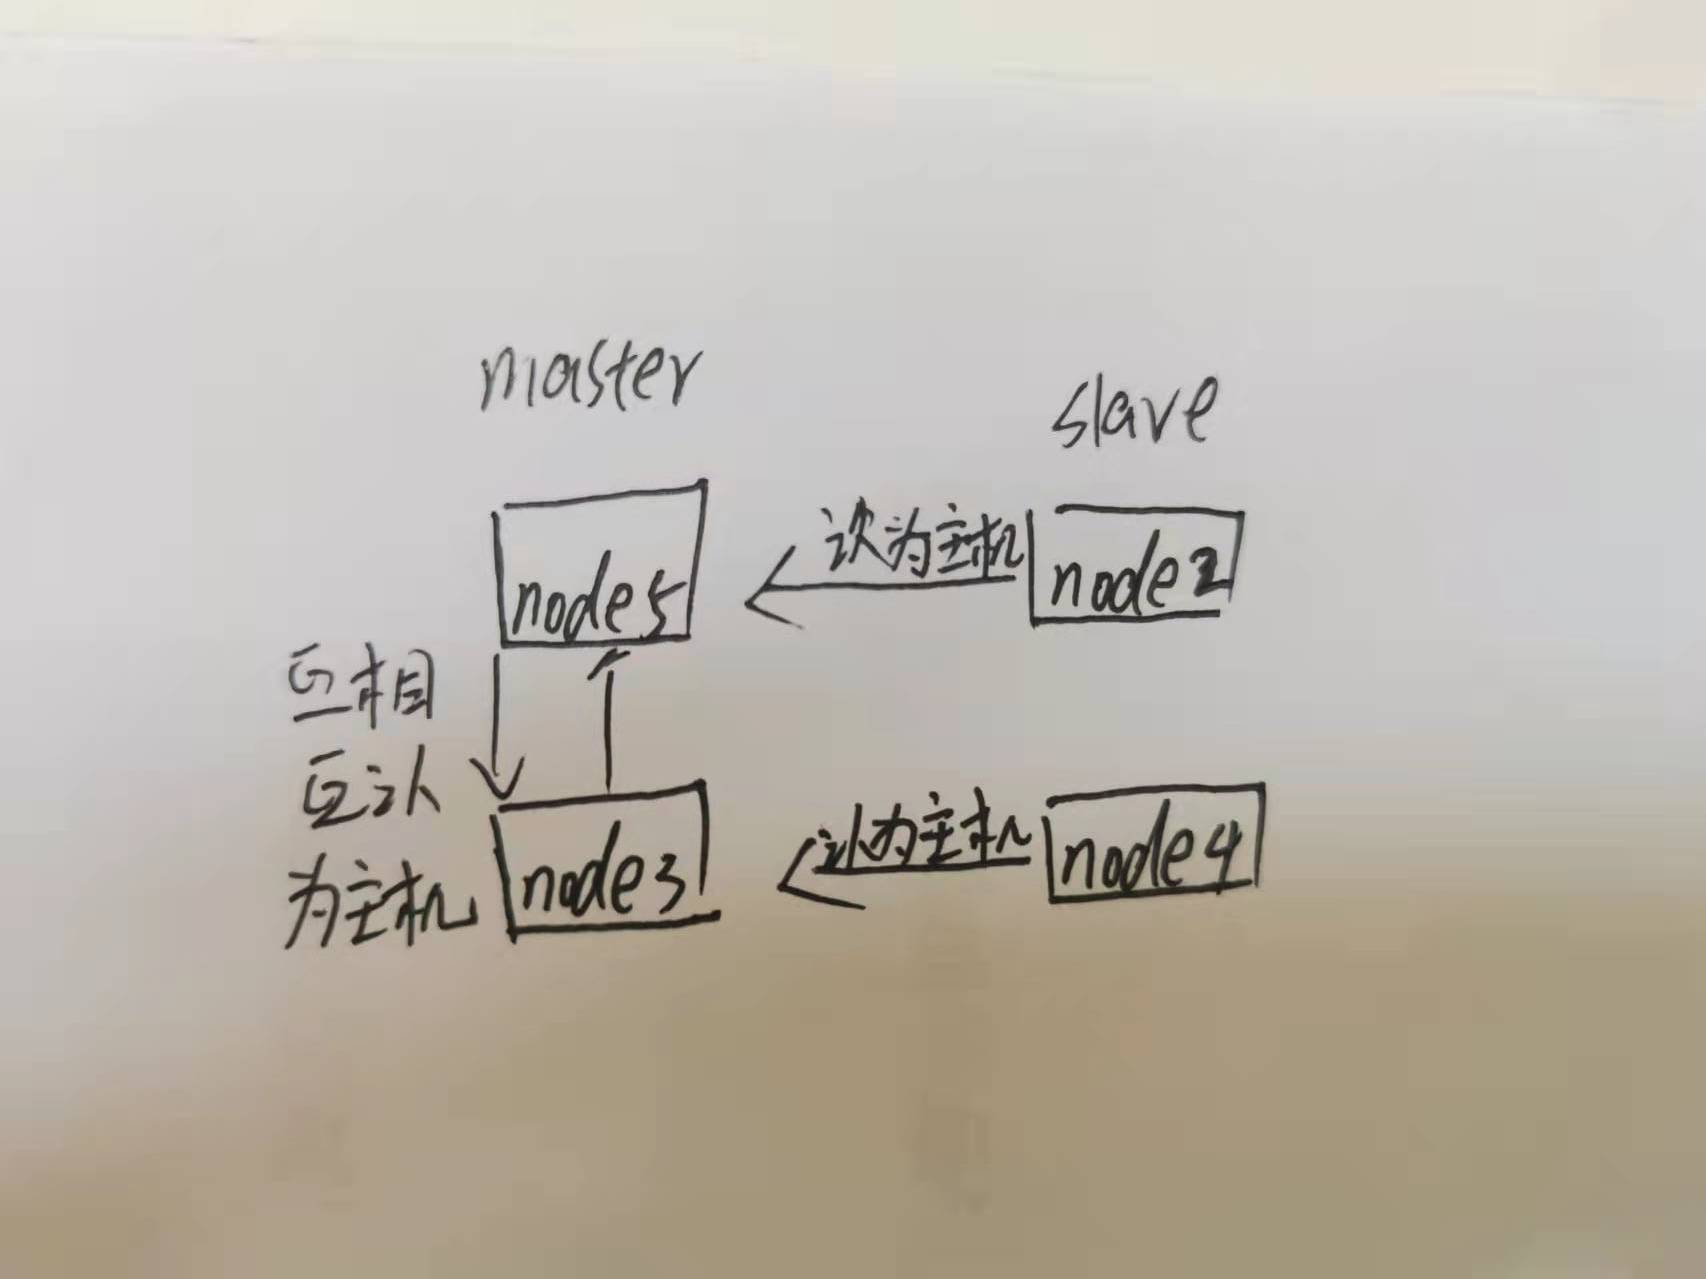
一:配置双主双从
1.修改配置文件
当master主机即作为主机时也作为从机在配置文件中就要特别声明:
master主机配置文件:
###node5配置文件####[mysqld]server_id=33log_bin=mysql-binlog-slave-updates #作为从库的时候有写入操作也要更新二进制日志文件auto-increment-increment=2 #表示自增字段每次递增的量,auto-increment-offset=1 #表示自增字段从哪个数开始指字段一次递增多少(要与另一台master不同)
###node3文件###[mysqld]server_id=11log_bin=mysql-binlog-slave-updatesauto-increment-increment=2auto-increment-offset=2
salve主机:
node4主机:
[mysqld]server_id=22log_bin=mysql-bin
node2主机:
[mysqld]server_id=200log_bin=mysql-bin
修改完配置文件后重启服务
# systemctl restart mariadb
2.配置master与node
先将两两做成主从(node5与node2,node3与node4),然后再将两台master主机互相认主(node3与node5)
一下演示node5与node2,node3与node4与这相同
查看node5的主信息:
# node5 查看主信息MariaDB [(none)]> show master status ;+------------------+----------+--------------+------------------+| File | Position | Binlog_Do_DB | Binlog_Ignore_DB |+------------------+----------+--------------+------------------+| mysql-bin.000004 | 5843 | | |+------------------+----------+--------------+------------------+1 row in set (0.000 sec)
node2认主并开启slave
MariaDB [(none)]> change master to master_user='root',master_password='000000',master_host='192.168.44.33',master_log_file='mysql-bin.000004',master_log_pos=5843;Query OK, 0 rows affected (0.013 sec)MariaDB [(none)]> start slave;Query OK, 0 rows affected (0.001 sec)
查看slave链接情况
MariaDB [(none)]> show slave status \G*************************** 1. row ***************************一下两项为yes就OKSlave_IO_Running: YesSlave_SQL_Running: Yes
3.配置master与master
由于我们在配置文件中添加了相应的信息所以master节点既可以作主也可以作为从
查看node5节点主信息:
###node5节点信息MariaDB [(none)]> show master status ;+------------------+----------+--------------+------------------+| File | Position | Binlog_Do_DB | Binlog_Ignore_DB |+------------------+----------+--------------+------------------+| mysql-bin.000004 | 5843 | | |+------------------+----------+--------------+------------------+1 row in set (0.000 sec)
node3认node5作为主
###node3节点MariaDB [(none)]> change master to master_user='root',master_host='192.168.44.33',master_password='000000',master_log_file='mysql-bin.000004',master_log_pos=5483;Query OK, 0 rows affected (0.011 sec)MariaDB [(none)]> start slave;Query OK, 0 rows affected (0.010 sec)###查看slave情况MariaDB [(none)]> show slave status \G*************************** 1. row ***************************一下两项为yes就OKSlave_IO_Running: YesSlave_SQL_Running: Yes
目前只是node3认node5为主了,这样node5上面的信息会同步到node3上但node3主机上面的无法到node5上面所以还要反向认一下。
查看node3主信息:
MariaDB [(none)]> show master status;+------------------+----------+--------------+------------------+| File | Position | Binlog_Do_DB | Binlog_Ignore_DB |+------------------+----------+--------------+------------------+| mysql-bin.000002 | 1129 | | |+------------------+----------+--------------+------------------+1 row in set (0.001 sec)
node5认node3为主
affected (0.009 sec)MariaDB [(none)]> start slave;Query OK, 0 rows affected (0.011 sec)MariaDB [(none)]> show slave status \G*************************** 1. row ***************************###一下里两项为yes就OK了Slave_IO_Running: YesSlave_SQL_Running: Yes
4.验证
当两个master互相认主后呢么谁便在一台 master主机上创建个数据库就可以在任意一台主机上查看到
###在master(node3)节点上创建一个库MariaDB [(none)]> create database chainskill;Query OK, 1 row affected (0.006 sec)MariaDB [(none)]> show databases;+-----------------------------------------+| Database |+-----------------------------------------+| chainskill || information_schema || mysql |+-----------------------------------------+14 rows in set (0.007 sec)
在其他master和salve上查看
### 在salve(node4)节点上查看已经出现MariaDB [(none)]> show databases;+-----------------------------------------+| Database |+-----------------------------------------+| chainskill || cr7 || information_schema || mysql |+-----------------------------------------+13 rows in set (0.018 sec)
………..最终在每台机子上都可看到
二:配置mycat插件
mycat的schema.xml文件中将读写部分在添加一份
[root@node1 conf]# vim schema.xml<?xml version="1.0"?><!DOCTYPE mycat:schema SYSTEM "schema.dtd"><mycat:schema xmlns:mycat="http://io.mycat/"><schema name="CHINA" checkSQLschema="true" sqlMaxLimit="100" dataNode="dn1"></schema><dataNode name="dn1" dataHost="host1" database="cr7" /><dataHost name="host1" maxCon="1000" minCon="10" balance="3"writeType="0" dbType="mysql" dbDriver="native" switchType="1" slaveThreshold="100"><heartbeat>select user()</heartbeat><!-- can have multi write hosts --><writeHost host="hostM1" url="192.168.44.33:3306" user="root"password="000000"><!-- can have multi read hosts --><readHost host="hostS1" url="192.168.44.200:3306" user="root" password="000000" /></writeHost><writeHost host="hostM2" url="192.168.44.11:3306" user="root"password="000000"><!-- can have multi read hosts --><readHost host="hostS2" url="192.168.44.22:3306" user="root" password="000000" /></writeHost></dataHost></mycat:schema>
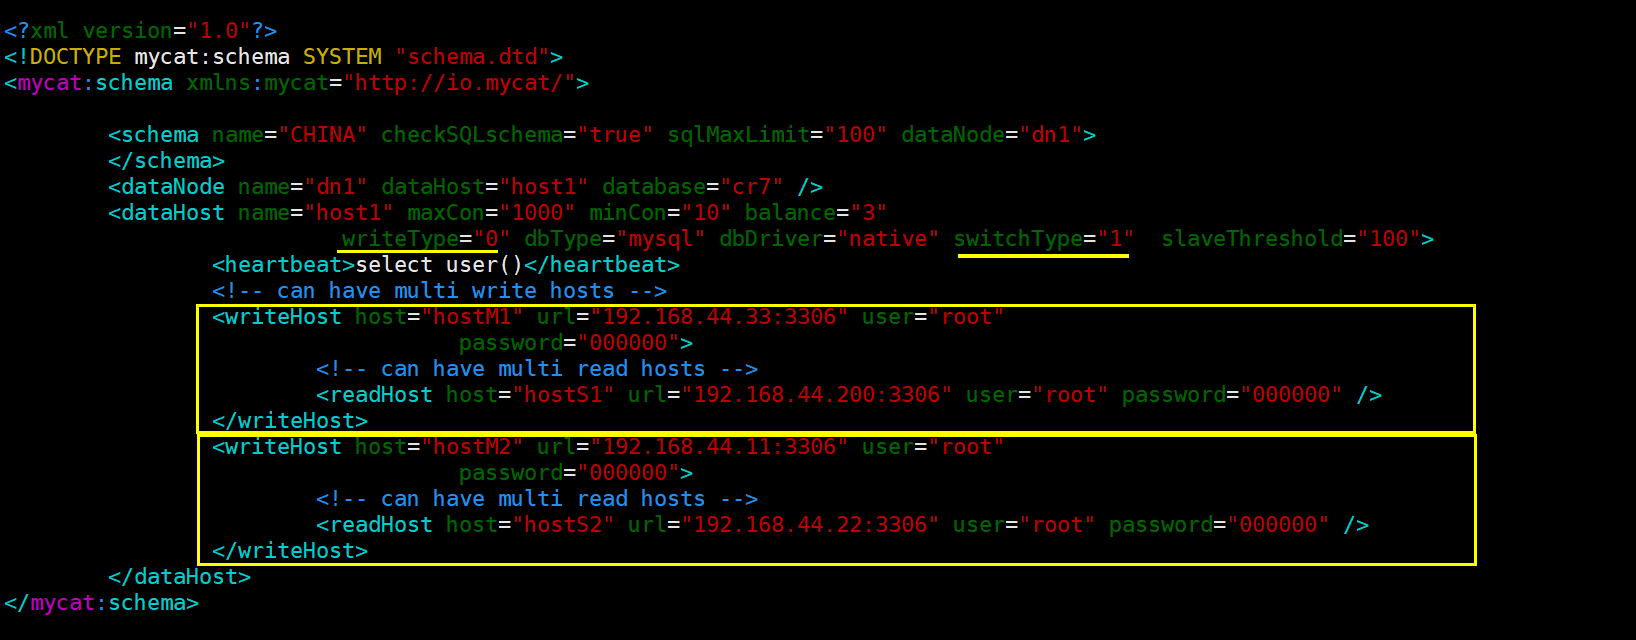
修改完后要想保证mycat正常启动并运行要检查各个主机的IO与SQL状态是否都为yes
在mycat的bin目录下用前台启动查看是否成功
[root@node1 bin]# mycat consoleRunning Mycat-server...wrapper | --> Wrapper Started as Consolewrapper | Launching a JVM...................jvm 1 | MyCAT Server startup successfully. see logs in logs/mycat.log已经正常启动了

这样就完成操作了但是这四台数据库服务器到底是是怎么协同工作的呢?
正常情况下master1承担写的操作其余三台都是承担读的操作,当master1有问题后master2才起到写的作用
1.验证读写分离情况
查看读写分离情况[root@node1 bin]# mysql -u root -p000000 -h127.0.0.1 -P9066 -e 'show @@datasource'+----------+--------+-------+----------------+------+------+--------+------+------+---------+-----------+------------+| DATANODE | NAME | TYPE | HOST | PORT | W/R | ACTIVE | IDLE | SIZE | EXECUTE | READ_LOAD | WRITE_LOAD |+----------+--------+-------+----------------+------+------+--------+------+------+---------+-----------+------------+| dn1 | hostM1 | mysql | 192.168.44.33 | 3306 | W | 0 | 10 | 1000 | 849 | 0 | 0 || dn1 | hostM2 | mysql | 192.168.44.11 | 3306 | W | 0 | 1 | 1000 | 839 | 0 | 0 || dn1 | hostS1 | mysql | 192.168.44.200 | 3306 | R | 0 | 8 | 1000 | 850 | 4 | 0 || dn1 | hostS2 | mysql | 192.168.44.22 | 3306 | R | 0 | 8 | 1000 | 852 | 5 | 0 |+----------+--------+-------+----------------+------+------+--------+------+------+---------+-----------+------------+
