okhttp 脱离了Android很早之前的HttpUrlConnection,全部重写,目前已经被Android官方进行收录,是公认的最佳方案。
在这之前,需要了解网络基础、加密与解密、HTTP/HTTPS 以及TCP/IP的原理,你才能真正的读懂OkHttp.
网络 | 你必须会的网络基础
网络 | TCP/IP 协议族
网络 | HTTPS 原理
在之前我写过一篇OkHttp的设计思想,详细讲解了OKhttp的责任链模式,以及执行流程。之前讲的不是很清楚,既然本文章是OkHttp全解析,肯定是要详细讲解,所以本文会重新讲解一遍从0到1. 本文采用线路图的思路去解析源码(在之前写的Retrofit 全面解析 就是采用线路图的方式,这也是我推荐的一种阅读源码的方式)
OkHttp的官方地址:https://square.github.io/okhttp/,okhttp的使用不需要在多说了吧,直接看官方文档即可。
当前使用的版本:implementation 'com.squareup.okhttp3:okhttp:4.9.1'
val client = OkHttpClient.Builder().build()val request = Request.Builder().url("https://api.github.com/users/octocat/repos").build()client.newCall(request).enqueue(object :okhttp3.Callback{override fun onFailure(call: okhttp3.Call, e: IOException) {TODO("Not yet implemented")}override fun onResponse(call: okhttp3.Call, response: okhttp3.Response) {println(response.body.toString())}})
执行流程
在上述的代码中,OkHttp开始执行请求是调用了newCall方法,request是请求的一些配置信息。
override fun newCall(request: Request): Call = RealCall(this, request, forWebSocket = false)
newCall返回了RealCall的对象,并将Request实例作为参数传递,显然RealCall必然实现了Call接口。下面有了两天线路,先看线路1RealCall做了什么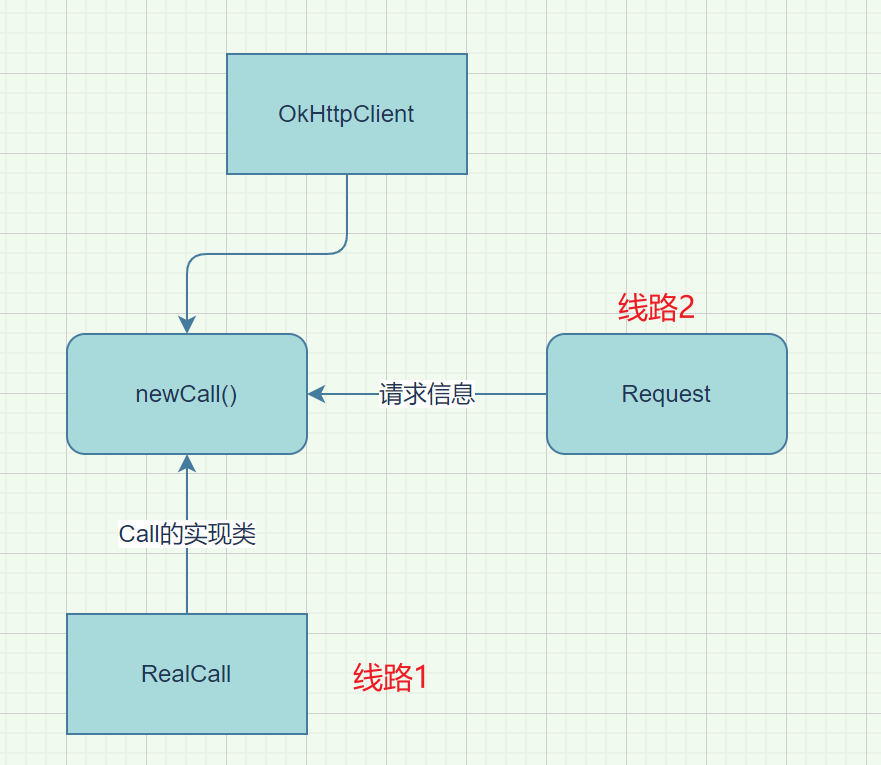
线路1:RealCall
代码如下:RealCall果然实现了Call接口,构造函数中有几个参数,一个是OkHttpClient,Request以及forWebSocket(forWebSocket默认是FALSE,通过WebSocket进行通信,一般一些股票的APP会用到实时刷新等功能)。
class RealCall(val client: OkHttpClient,/** The application's original request unadulterated by redirects or auth headers. */val originalRequest: Request,val forWebSocket: Boolean // 频繁刷新数据,一般不会使用,例如:股票实时刷新等功能 通过webSocket) : Call
从Call的接口可以看出RealCall主要实现了几个方法,最主要:execute(同步执行网络请求)、enqueue(异步执行网络请求)、cancel(取消网络请求)
interface Call : Cloneable {fun request(): Request@Throws(IOException::class)fun execute(): Responsefun enqueue(responseCallback: Callback)fun cancel()fun isExecuted(): Booleanfun isCanceled(): Booleanfun timeout(): Timeoutpublic override fun clone(): Callfun interface Factory {fun newCall(request: Request): Call}}
我们继续看线路图:多了三条主要的线路,按照线路图阅读源码的思路,只看一条线路,首先看线路3 enqueue的异步网络请求的实现。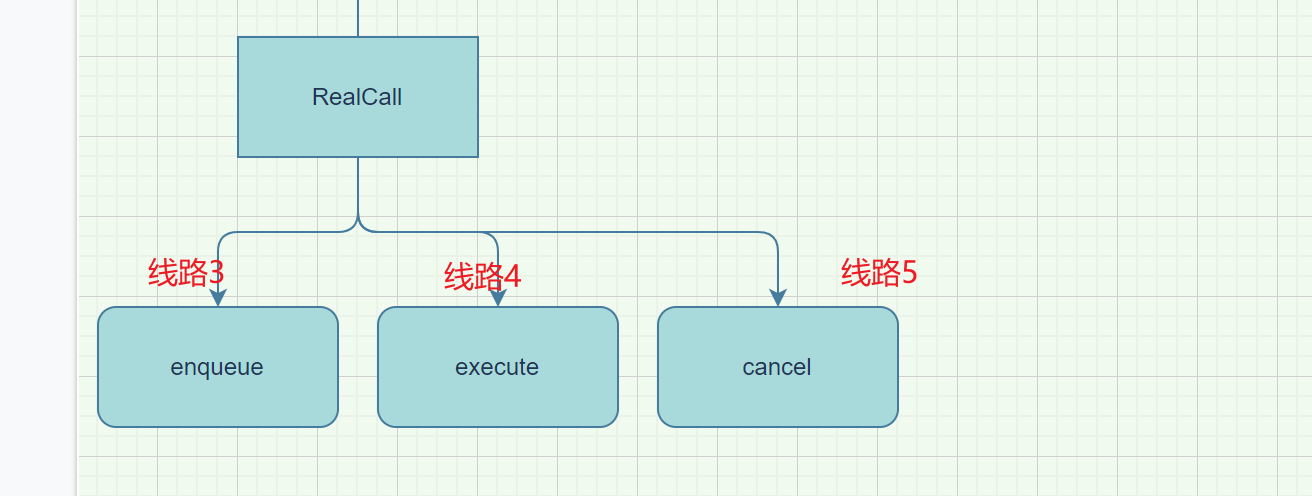
线路3 enqueue
Dispatcher 负责线程调度,通过ExecutorService负责线程管理
maxRequests = 64 最大的同时请求进行,如果超过这个数,后面的请求需要进行等待maxRequestsPerHost = 5 主机的最大的同时请求数据
代码如下:其实就做了一件事,调用Dispathcher的enqueue方法
override fun enqueue(responseCallback: Callback) {.....client.dispatcher.enqueue(AsyncCall(responseCallback))}
AsyncCall是RealCall的内部类,实现了Runnable接口,作为线程的执行类
Dispatcher做线程调度的,内部维护了一个线程池多个线程管理,在后台线程执行网络请求,其实就是执行AsyncCall
internal fun enqueue(call: AsyncCall) {synchronized(this) {// 将准备要执行的call,放入准备队列中,准备执行readyAsyncCalls.add(call)//记录perHost主机数if (!call.call.forWebSocket) {val existingCall = findExistingCallWithHost(call.host)if (existingCall != null) call.reuseCallsPerHostFrom(existingCall)}}//执行promoteAndExecute()}
readyAsyncCalls -> ArrayDeque
存储准备要执行但是还没有执行的请求,包括请求达到了maxRequest或者maxRequestPerHost的请求也会加入这个队列中去。 promoteAndExecute去执行请求
findExistingCallWithHost去找到目前正在执行的请求或者准备的请求是否存在当前请求的host,这里代码比较简单,直接遍历队列即可
private fun findExistingCallWithHost(host: String): AsyncCall? {for (existingCall in runningAsyncCalls) {if (existingCall.host == host) return existingCall}for (existingCall in readyAsyncCalls) {if (existingCall.host == host) return existingCall}return null}
当findExistingCallWithHost存在和当前请求相同的主机名host时,调用当前请求的AsyncCall中的reuseCallsPerHostFrom方法,并且传入目前存在的AsyncCall的实例,其实每次执行请求,都会在AsyncCall中存储一个变量callsPerHost记录当前请求host的数量,去同步当前的请求的host的数量.
@Volatile var callsPerHost = AtomicInteger(0)private setfun reuseCallsPerHostFrom(other: AsyncCall) {this.callsPerHost = other.callsPerHost}
在通过执行AsyncCall的请求的时候,也就是通过promoteAndExecute将callsPerHost进行加1
asyncCall.callsPerHost.incrementAndGet()
这里记录同时请求主机数的设计非常巧妙,通过遍历正在执行或者准备执行的
AsyncCall队列,并且每个AsyncCall都会有一个callsPerHost进行共享,在调用promoteAndExecute执行请求的时候进行+1,当某个请求完成后执行Dispatcher.finished(call)方法,decrementAndGet -1操作,并且从runningAsyncCalls移除call,这里的call的移除一定要线程安全的通过synchronized进行线程锁定
internal fun finished(call: AsyncCall) {call.callsPerHost.decrementAndGet()finished(runningAsyncCalls, call)}private fun <T> finished(calls: Deque<T>, call: T) {val idleCallback: Runnable?synchronized(this) {if (!calls.remove(call)) throw AssertionError("Call wasn't in-flight!")idleCallback = this.idleCallback}//idleCallback 其实和Handler中的idelHandler类似,空闲执行的操作,当所有的网络请求执行完毕了,执行idleCallback的操作//promoteAndExecute 执行下一个请求val isRunning = promoteAndExecute()if (!isRunning && idleCallback != null) {idleCallback.run()}}
执行逻辑如下:promoteAndExecute主要做了两件事,一个promote 符合条件的推举:是判断请求/主机的最大数,另一个就是Execute开启后台线程执行网络请求
private fun promoteAndExecute(): Boolean {.....// 维护一个执行的列表val executableCalls = mutableListOf<AsyncCall>()// 标记是否正在运行val isRunning: Booleansynchronized(this) {// 从准备队列中获取Callval i = readyAsyncCalls.iterator()while (i.hasNext()) {val asyncCall = i.next()// 判断运行中的Call是否超出了最大请求值,因为网络请求可能多个请求if (runningAsyncCalls.size >= this.maxRequests) break // Max capacity.// 判断请求的host是否超过最大请求if (asyncCall.callsPerHost.get() >= this.maxRequestsPerHost) continue // Host max capacity.i.remove()asyncCall.callsPerHost.incrementAndGet()// 将call添加到正在执行的列表中executableCalls.add(asyncCall)// 添加到运行中的队列中runningAsyncCalls.add(asyncCall)}isRunning = runningCallsCount() > 0}// 遍历正在执行的列表,在Dispatcher提供的线程池中执行网络请求for (i in 0 until executableCalls.size) {val asyncCall = executableCalls[i]//传递线程asyncCall.executeOn(executorService)}return isRunning}
asyncCall.executeOn 就是执行线程:
fun executeOn(executorService: ExecutorService) {client.dispatcher.assertThreadDoesntHoldLock()var success = falsetry {//执行线程 - runnableexecutorService.execute(this)....}}
AsyncCall
网络请求,最终会回到AsyncCall中执行线程,在run方法中主要通过getResponseWithInterceptorChain执行网络请求,拿到响应。这是OkHttp的核心,内部实现了网络的真正的请求
override fun run() {threadName("OkHttp ${redactedUrl()}") {.....try {val response = getResponseWithInterceptorChain()signalledCallback = trueresponseCallback.onResponse(this@RealCall, response)}finally {//执行完毕 处理完成逻辑client.dispatcher.finished(this)}}...}
配置参数详解
百度上有很多解释,这里简单介绍一下:
// 线程调度器@get:JvmName("dispatcher") val dispatcher: Dispatcher = builder.dispatcher// 连接池 内存存储一批的连接,复用连接@get:JvmName("connectionPool") val connectionPool: ConnectionPool = builder.connectionPool// 拦截器@get:JvmName("interceptors") val interceptors: List<Interceptor> =builder.interceptors.toImmutableList()@get:JvmName("networkInterceptors") val networkInterceptors: List<Interceptor> =builder.networkInterceptors.toImmutableList()// EventListener 工厂 对请求过程的监听器@get:JvmName("eventListenerFactory") val eventListenerFactory: EventListener.Factory =builder.eventListenerFactory// 在链接/请求失败的时候是否重试 默认开启@get:JvmName("retryOnConnectionFailure") val retryOnConnectionFailure: Boolean =builder.retryOnConnectionFailure// 服务器认证@get:JvmName("authenticator") val authenticator: Authenticator = builder.authenticator// 一般我们可以通过这样去操作val client = OkHttpClient.Builder().authenticator(object :Authenticator{override fun authenticate(route: Route?, response: okhttp3.Response): Request? {//.......把token进行刷新刷新return response.request.newBuilder().header("Authorization","Bearer xxxx").build()}}).build()// 是否重定向 默认打开 服务器要求重定向的时候是否要重定向@get:JvmName("followRedirects") val followRedirects: Boolean = builder.followRedirects// 协议切换 http -> https(Ssl) 切换是否需要重定向 默认打开@get:JvmName("followSslRedirects") val followSslRedirects: Boolean = builder.followSslRedirects// 饼干罐子 存储cookie,默认OkHttp是没有实现的,如果用到自己实现即可@get:JvmName("cookieJar") val cookieJar: CookieJar = builder.cookieJar// 缓存@get:JvmName("cache") val cache: Cache? = builder.cache// DNS 域名 :把域名解析为IP地址@get:JvmName("dns") val dns: Dns = builder.dns// Proxy 代理 默认是直连@get:JvmName("proxy") val proxy: Proxy? = builder.proxy// 选择代理 默认是直连NullProxySelector@get:JvmName("proxySelector") val proxySelector: ProxySelector =when {// Defer calls to ProxySelector.getDefault() because it can throw a SecurityException.builder.proxy != null -> NullProxySelectorelse -> builder.proxySelector ?: ProxySelector.getDefault() ?: NullProxySelector}// 代理认证授权@get:JvmName("proxyAuthenticator") val proxyAuthenticator: Authenticator =builder.proxyAuthenticator// socketFactory socket工厂 创建Socket@get:JvmName("socketFactory") val socketFactory: SocketFactory = builder.socketFactory// tcp 加密连接 SSLSocketFactory,在TCP上面加上TSL也是SSL加密private val sslSocketFactoryOrNull: SSLSocketFactory?@get:JvmName("sslSocketFactory") val sslSocketFactory: SSLSocketFactoryget() = sslSocketFactoryOrNull ?: throw IllegalStateException("CLEARTEXT-only client")//x509TrustManager 证书的验证器@get:JvmName("x509TrustManager") val x509TrustManager: X509TrustManager?// 连接标准/规范 加密和解密 加密套件、算法@get:JvmName("connectionSpecs") val connectionSpecs: List<ConnectionSpec> =builder.connectionSpecs// 支持的哪些协议 如:http/1.0 http/1.1 http/2 等等@get:JvmName("protocols") val protocols: List<Protocol> = builder.protocols// 证书验证相关 :hostname 验证@get:JvmName("hostnameVerifier") val hostnameVerifier: HostnameVerifier = builder.hostnameVerifier// 证书验证相关:订证书@get:JvmName("certificatePinner") val certificatePinner: CertificatePinner// 证书验证相关:操作X509TrustManager 去验证证书的合法性@get:JvmName("certificateChainCleaner") val certificateChainCleaner: CertificateChainCleaner?/*** Default call timeout (in milliseconds). By default there is no timeout for complete calls, but* there is for the connect, write, and read actions within a call.*/@get:JvmName("callTimeoutMillis") val callTimeoutMillis: Int = builder.callTimeout/** Default connect timeout (in milliseconds). The default is 10 seconds. */@get:JvmName("connectTimeoutMillis") val connectTimeoutMillis: Int = builder.connectTimeout/** Default read timeout (in milliseconds). The default is 10 seconds. */@get:JvmName("readTimeoutMillis") val readTimeoutMillis: Int = builder.readTimeout/** Default write timeout (in milliseconds). The default is 10 seconds. */@get:JvmName("writeTimeoutMillis") val writeTimeoutMillis: Int = builder.writeTimeout/** Web socket and HTTP/2 ping interval (in milliseconds). By default pings are not sent. */// 心跳间隔@get:JvmName("pingIntervalMillis") val pingIntervalMillis: Int = builder.pingInterval
连接池的复用:
在HTTP1 当这个连接用完了,下一个连接会进行复用。 在HTTP2 中支持多路复用,哪怕这个连接正在使用,也可以进行复用。
okhttp如何发送请求和获取响应
getResponseWithInterceptorChain除了最后一个Interceptor 其他的Interceptor都会有前置、中置、后置的工作

下面分析每一个Interceptor的做了什么:
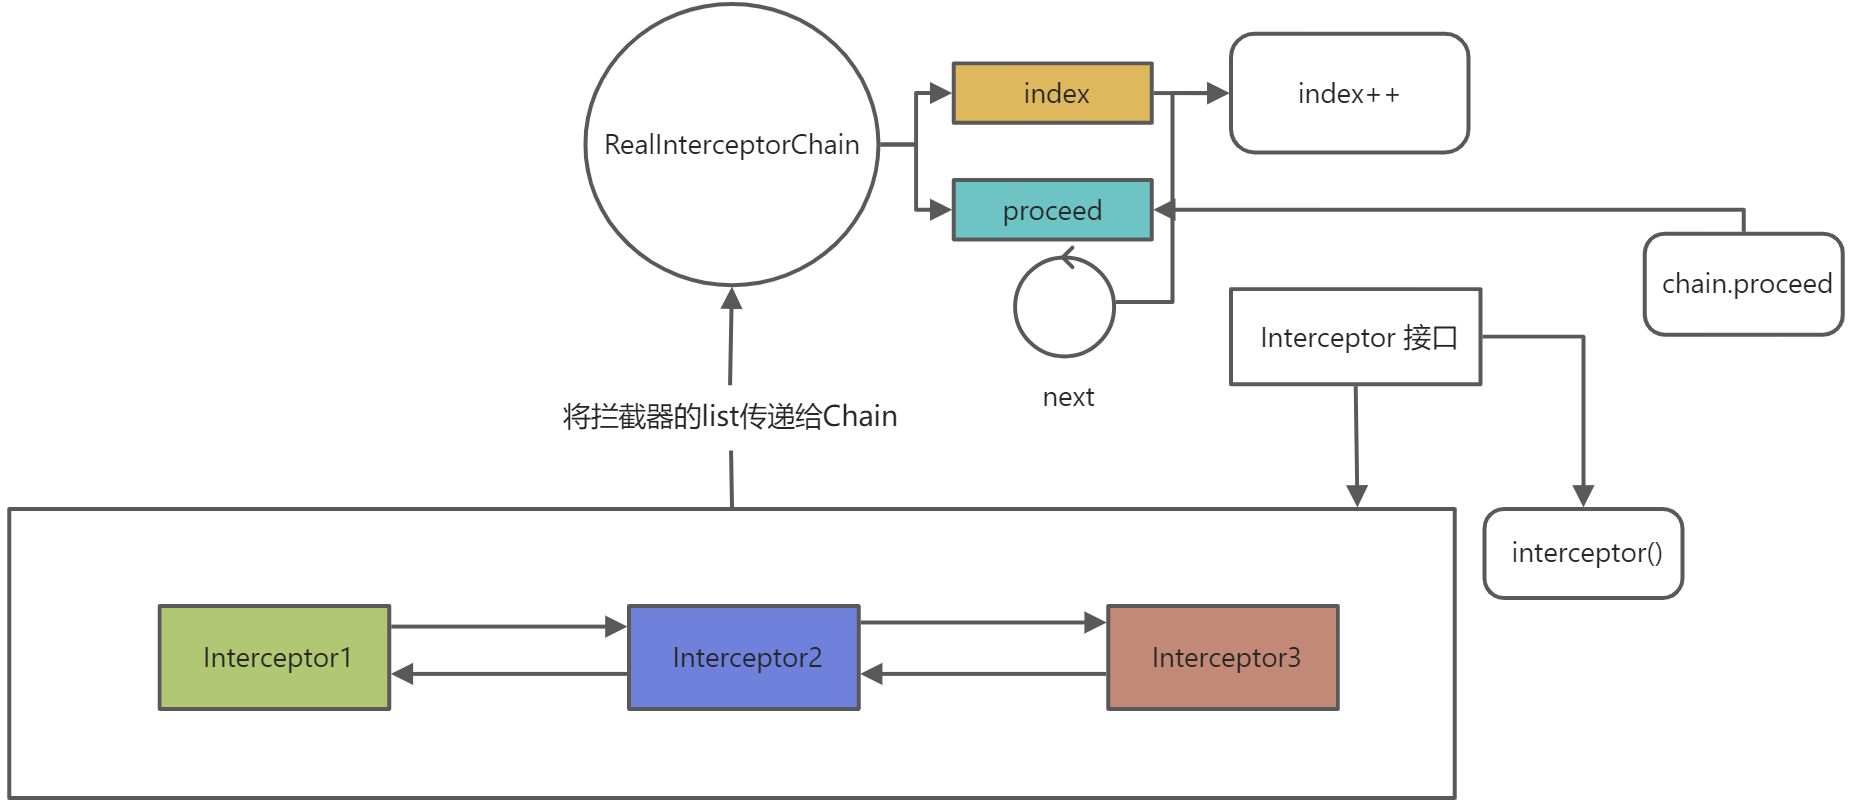
//1 拦截器列表val interceptors = mutableListOf<Interceptor>()interceptors += client.interceptorsinterceptors += RetryAndFollowUpInterceptor(client)interceptors += BridgeInterceptor(client.cookieJar)interceptors += CacheInterceptor(client.cache)interceptors += ConnectInterceptorif (!forWebSocket) {interceptors += client.networkInterceptors}interceptors += CallServerInterceptor(forWebSocket)//2 拦截器组成链条val chain = RealInterceptorChain(call = this,interceptors = interceptors,index = 0,exchange = null,request = originalRequest,connectTimeoutMillis = client.connectTimeoutMillis,readTimeoutMillis = client.readTimeoutMillis,writeTimeoutMillis = client.writeTimeoutMillis)//3 让链条转起来val response = chain.proceed(originalRequest)
procced 是让链条转起来的关键方法:interceptor.intercept会执行当前拦截器的前置工作,然后中置工作会调用next.proceed,由于next创建的Chain对象,index = index+1,所以Interceptor会拿到下一个拦截器,然后执行前置工作,中置工作同样也会调用next.proceed继续执行下一个拦截器,知道最后一个拦截器返回,前面的拦截器执行后置工作。
override fun proceed(request: Request): Response {......// Call the next interceptor in the chain.val next = copy(index = index + 1, request = request)val interceptor = interceptors[index]@Suppress("USELESS_ELVIS")val response = interceptor.intercept(next) ?: throw NullPointerException("interceptor $interceptor returned null")......return response}
责任链的实现代码模型如下:
interface Interceptor {fun interceptor(china: China): Stringinterface China {fun proceed(): String}}
创建责任链:RealInterceptorChina
class RealInterceptorChina(val index: Int = 0, val interceptors: List<Interceptor>) :Interceptor.China {private fun copy(index: Int = this.index,interceptors: List<Interceptor> = this.interceptors): Interceptor.China {return RealInterceptorChina(index, interceptors)}override fun proceed(): String {//获取下一个Interceptor,copy之后 下一个next中的China对象 index = index+1val next = copy(index + 1, interceptors)val interceptor = interceptors[index]//将有下一个拦截器的China对象传入return interceptor.interceptor(next)}}
private fun testInterceptor() {val list = mutableListOf<Interceptor>()list.add(object : Interceptor {override fun interceptor(china: Interceptor.China): String {Log.e("TAG", "interceptor1: 前置工作")val result = china.proceed()Log.e("TAG", "interceptor1: 后置工作 -> $result ")return result}})list.add(object : Interceptor {override fun interceptor(china: Interceptor.China): String {Log.e("TAG", "interceptor2: 前置工作")val result = china.proceed()Log.e("TAG", "interceptor2: 后置工作 -> $result ")return result}})list.add(object : Interceptor {override fun interceptor(china: Interceptor.China): String {Log.e("TAG", "interceptor3: 最后一个拦截器直接返回")return "Hello China"}})val china = RealInterceptorChina(0,list)val result = china.proceed()Log.e("TAG", "testInterceptor: $result")}
RetryAndFollowUpInterceptor
错误重试或重定向拦截器,
RetryAndFollowUpInterceptor的主要作用:
- 前置:准备一个 的连接
- 后置:捕捉异常,进行错误重试或者有重定向的进行重定向,整个拦截器是一个
while(true)的循环,直到没有错误或重定向return response
前置工作:准备一个可用的连接
call.enterNetworkInterceptorExchange(request, newExchangeFinder)
ExchangeFinder寻找一次数据交换,寻找一个可用的连接,做一个准备工作,在其他的Interceptor进行使用,调用的RealCall中的enterNetworkInterceptorExchange方法,主要是从连接池connectionPool中寻找一个可用的连接,存储在RealCall的exchaneFinder变量中,提供其他拦截器的使用。
fun enterNetworkInterceptorExchange(request: Request, newExchangeFinder: Boolean) {........if (newExchangeFinder) {this.exchangeFinder = ExchangeFinder(connectionPool,createAddress(request.url),this,eventListener)}}
后置工作:重试和重定向,RetryAndFollowUpInterceptor 将所有的工作写在while(true)循环中,只要出现在规定的错误或者重定向,都会重新走一次循环,直到正确返回结果或者抛出异常才会终止死循环。
while (true) {call.enterNetworkInterceptorExchange(request, newExchangeFinder)try {response = realChain.proceed(request)newExchangeFinder = true} catch (e: RouteException) {if (!recover(e.lastConnectException, call, request, requestSendStarted = false)) {throw e.firstConnectException.withSuppressed(recoveredFailures)} else {recoveredFailures += e.firstConnectException}newExchangeFinder = falsecontinue} catch (e: IOException) {if (!recover(e, call, request, requestSendStarted = e !is ConnectionShutdownException)) {throw e.withSuppressed(recoveredFailures)} else {recoveredFailures += e}newExchangeFinder = falsecontinue}}
上述代码看着比较多,但是核心代码就几行:查找异常如果不存在规定的异常则抛出,否则循环重新请求一遍。
if (!recover(e.lastConnectException, call, request, requestSendStarted = false)) {throw e.firstConnectException.withSuppressed(recoveredFailures)} else {recoveredFailures += e.firstConnectException}continue //重走循环
recover的实现如下:非常清晰的设置了那些状态下可以重试
private fun recover(e: IOException,call: RealCall,userRequest: Request,requestSendStarted: Boolean): Boolean {// OkHttpClient 是否开启了失败重试,默认开启if (!client.retryOnConnectionFailure) return false// We can't send the request body again.if (requestSendStarted && requestIsOneShot(e, userRequest)) return false// This exception is fatal. 如果存在某些异常则不重试if (!isRecoverable(e, requestSendStarted)) return false// No more routes to attempt.if (!call.retryAfterFailure()) return false// For failure recovery, use the same route selector with a new connection.return true}
下面在看重定向的机制实现:通过followUpRequest方法,去查找是否存在重定向的请求,如果followUp不为空,表示存在重定向的请求,将followUp赋值给request继续循环,使用followUp进行重新请求。
val exchange = call.interceptorScopedExchangeval followUp = followUpRequest(response, exchange)if (followUp == null) {if (exchange != null && exchange.isDuplex) {call.timeoutEarlyExit()}closeActiveExchange = falsereturn response}val followUpBody = followUp.body//isOneShot=true 表示这个连接只有一次机会,不会进行重定向 直接returnif (followUpBody != null && followUpBody.isOneShot()) {closeActiveExchange = falsereturn response}response.body?.closeQuietly().......request = followUp //下次请求使用的是followUp的重定向的请求priorResponse = response
followUpRequest的实现其实也很简单,需要用到前面学习的HTTP知识: 这里我只列出了核心的代码块 其实主要就是判断返回的response的responseCode判断是否需要重定向:这个返回其实就是返回了一个新的Request对象,重新请求。
HTTP_PROXY_AUTH -> { //407 表示设置了代理 需要代理服务器进行重定向到指定的IPval selectedProxy = route!!.proxyif (selectedProxy.type() != Proxy.Type.HTTP) {throw ProtocolException("Received HTTP_PROXY_AUTH (407) code while not using proxy")}return client.proxyAuthenticator.authenticate(route, userResponse)}// 401 未授权,这里在OkHttpClient的配置参数讲过authenticator 需要你重新配置request 然后再重新请求。。。。原来在这里这样使用啊HTTP_UNAUTHORIZED -> return client.authenticator.authenticate(route, userResponse)//3xx 剩下的就都是重定向的错误了HTTP_PERM_REDIRECT, HTTP_TEMP_REDIRECT, HTTP_MULT_CHOICE, HTTP_MOVED_PERM, HTTP_MOVED_TEMP, HTTP_SEE_OTHER -> {return buildRedirectRequest(userResponse, method)}
关于RetryAndFollowUpInterceptor前置工作和后置工作就全部清晰了,RetryAndFollowUpInterceptor通过前置工作准备一个可用的连接存储到RealCall.exchangeFinder变量中,供后续的拦截器使用,后置工作首先会捕捉请求异常,如果存在OkHttp可以重试的异常则continue重新请求,如果不存在则抛出异常。当没有请求异常时,会通过followUpRequest去判断是否存在重定向,如果返回的followUp不为空并且不是一个坏的连接则对followUp进行重新请求。
BridgeInterceptor
BridgeInterceptor 拦截器主要作用就是帮助开发者补充Header信息,以及解压gzip的压缩数据
BridgeInterceptor 拦截器的前置工作:补齐Header信息,OkHttp请求只需要我们传入一个URL,其他的OkHttp通过BridgeInterceptor 帮助我们都完成了。
POST /user/api HTTP 1.1Content-Type : xxxxContent-Length : ????body.......
比较有趣的是,BridgeInterceptor 帮助我们开启了gzip的数据压缩, 这里默认就开启了,因为数据的压缩有利于网络的传输。
var transparentGzip = falseif (userRequest.header("Accept-Encoding") == null && userRequest.header("Range") == null) {transparentGzip = truerequestBuilder.header("Accept-Encoding", "gzip")}
在BridgeInterceptor 的后置工作主要就是解压gzip数据,也就是说OKHttp帮助我们完成了gzip的解压工作,不需要开发人员进行处理,so :OkHttp 帮助我们完成了很多工作
GzipSource 是okio实现的,okio后续在详细的讲解。
val networkResponse = chain.proceed(requestBuilder.build()) //执行下一个拦截器 拿到返回结果cookieJar.receiveHeaders(userRequest.url, networkResponse.headers)val responseBuilder = networkResponse.newBuilder().request(userRequest)//将返回的压缩数据进行解压if (transparentGzip &&"gzip".equals(networkResponse.header("Content-Encoding"), ignoreCase = true) &&networkResponse.promisesBody()) {val responseBody = networkResponse.bodyif (responseBody != null) {val gzipSource = GzipSource(responseBody.source())val strippedHeaders = networkResponse.headers.newBuilder().removeAll("Content-Encoding").removeAll("Content-Length").build()responseBuilder.headers(strippedHeaders)val contentType = networkResponse.header("Content-Type")responseBuilder.body(RealResponseBody(contentType, -1L, gzipSource.buffer()))}}
整个BridgeInterceptor 的工作还是比较简单的:前置工作补齐Header内容开启gzip,后置工作主要是解压gzip的压缩数据。
CacheInterceptor
前置工作:请求之前有可用缓存就是用缓存,后置工作:如果请求的结果可以缓存就缓存下来

若有收获,就点个赞吧
0 人点赞
