掌握Java并发编程的开篇,必须要掌握的线程核心基础知识.
为什么要学习并发编程:
- 面试必问-但是并发内容繁杂
- 高级工程师必经之路 几乎所有程序都用到了并发和多线程
- 并发是众多框架都原理和基础
系统体系的学习并发的知识,下面会通过如下脑图来讲解,深度掌握的线程核心基础.
- 实现多线程的方法有几种?
- 正确的线程启动方式
- 如何正确停止线程(重点)
- 线程生命周期(重点)
- Thread和Object类中重要方法讲解
实现多线程的方法
主要围绕如下的脑图进行讲解多线程的实现方法有几种和正确是实现多线程以及错误的方式.正确的理解
从Oracle官方的解释来看:实现多线程的方法2种:
- 实现Runnable接口
- 继承Thread类
代码示例
Runnable接口的方式
/*** 使用Runnable方式创建线程*/public class RunnableStyle implements Runnable {public static void main(String[] args) {Thread thread = new Thread(new RunnableStyle());thread.start();}@Overridepublic void run() {System.out.println("用runnable方法实现线程");}}
实现的Thread类的方式
/*** 使用继承Thread方式实现线程* @author prim*/public class ThreadStyle extends Thread{public static void main(String[] args) {ThreadStyle threadStyle = new ThreadStyle();threadStyle.start();}@Overridepublic void run() {System.out.println("使用Thread方式创建线程");}}
两种方法的对比推荐使用Runnable的方式实现
为什么实现Runnable接口的方法更好:
- 从代码架构的角度:具体的任务run()方法应该和“创建和运行线程的机制Thread类”解耦,用Runnable对象可以轻松的实现解耦
- 使用继承Thread类的方式的话,那么每次想新建一个任务,只能新建一个独立的线程,而这样损耗比较大,比如重新创建一个线程、执行完毕以后在销毁,而线程的实际工作内容是在run方法中打印了一句话,那么线程的实际工作内容还不如损耗来的大.如果使用Runnable和线程池,就可以大大减小这种损耗.
- 继承Thread类的话Java不支持多重继承,这样就无法继承其他的类了,限制了扩展性
综合上述的问题,所以使用Runnable的方式实现多线程的方法更好.
其实在实现Runnable接口和实现Thread类重写run方法本质上没有区别的.主要在于run方法的来源.
实现Runnable接口的方式,是由实现类提供的run方法,而继承Thread类重新run方法,调用的重写run的方法
主要的代码如下:使用Runnable接口的方式其实就是把Runnable赋值给了target,Thread.run()方法调用的正式target.run().而实现的Thread类的方式,重写了run方法直接调用的重写的run方法
@Overridepublic void run() {if (target != null) {target.run();}}
同时用两种方法会怎么样?
其实很容易理解实现Thread类的方式,已经将run方法重写了,即便你在传入Runnable对象,运行的run方法也是你重写的run方法.从面向对象的思想去考虑.
有多少中实现线程的方法? 这种问题要如何回答: 有两种方式:实现Runnable接口以及继承Thread类. 其实本质上一种,“继承Thread类重写run方法”和“传入Runnable实现run方法”,并没有区别,都是最终调用start()方法来新建线程,这两种方式的最主要区别就是run()方法的内容来源,实现Runnable接口,最终调用的是target.run();继承Thread 重写了整个run方法. 还有其他的方法实现线程,比如线程池,但是本质上也就是实现Runnable接口和继承Thread类 总结: 只能通过新建Thread类这一种方式来新建线程,当类里面的run方法有两种方式来实现,第一种方式是继承Thread类重写run方法,第二种方式实现Runnable接口的run方法,传递给Thread类.除此之外,从表面上看线程池、定时器等工具也可以创建线程,但是它们本质都是一样的.
错误观点
如下的错误观点
- “线程池创建线程也算是一种新建线程的方式”.
如下代码,写的一点问题都没有,也确实在子线程种运行了,为什么说线程池不是一种新建线程的方式呢?
public static void main(String[] args) {//内部也是new Thread()ExecutorService executorService = Executors.newCachedThreadPool();for (int i = 0; i < 1000; i++) {executorService.submit(new Task());}}static class Task implements Runnable {@Overridepublic void run() {try {Thread.sleep(500);} catch (InterruptedException e) {e.printStackTrace();}System.out.println(Thread.currentThread().getName());}}
看一下Executors内部代码,就明白了如下,本质上还是通过new Thread()传递Runnable对象.这么看你还觉得这是一种新建线程的方式吗?
public Thread newThread(Runnable r) {Thread t = new Thread(group, r,namePrefix + threadNumber.getAndIncrement(),0);if (t.isDaemon())t.setDaemon(false);if (t.getPriority() != Thread.NORM_PRIORITY)t.setPriority(Thread.NORM_PRIORITY);return t;}
- “通过Callable和FutureTask创建线程,也算一种新建线程的方式”
看到如下代码,并没有任何错误啊? ,确实创建了线程啊?.
FutureTask task = new FutureTask(new Callable() {@Overridepublic Object call() throws Exception {return 1;}});Thread thread1 = new Thread(task);
但是深入FutureTask内部,就会看到如下代码,其实FutureTask本质上就是实现Runnable接口,看到这里你还会认为这是一种新建线程的方式吗?
FutureTask<V> implements RunnableFuture<V>public interface RunnableFuture<V> extends Runnable, Future<V>
- “无返回值是实现runnable接口,有返回值实现的是callable接口,所以callable是新的实现线程的方式”
这句话错误的,和上述的FutureTask是一样的道理.
- 定时器
如下通过定时器创建一个线程
Timer timer = new Timer();timer.scheduleAtFixedRate(new TimerTask() {@Overridepublic void run() {System.out.println(Thread.currentThread().getName());}}, 1000, 1000);
但是TimerTask 实现了Runnable接口,所以本质上并没有其他的变化,TimerThread 继承了 Thread
- 匿名内部类
本质上没有区别的,并不是一种新的创建线程的方式
new Thread(new Runnable() {@Overridepublic void run() {System.out.println(Thread.currentThread().getName());}}).start();new Thread() {@Overridepublic void run() {System.out.println(Thread.currentThread().getName());}}.start();
- Lambda表达式
new Thread(() -> System.out.println(Thread.currentThread())).start();
多线程的实现方式,在代码中写法千变万化,其本质万变不离其宗. 上述几种观点之所以错误,是因为它们都只不过是包装了new Thread(),如果我们把创建新线程的类,称作是创建线程的一种方法就太过于表面了,而没有理解底层的原理.
启动线程
start()和run()方法
public static void main(String[] args) {Runnable runnable = () -> {System.out.println(Thread.currentThread().getName());};runnable.run();//mainnew Thread(runnable).start();//Thread-0}
调用start方法才会真正的去启动一个线程,而调用run方法只是调用了这个方法而已并没有启动线程.
start()原理解读
start()方法的作用
- 启动新线程
- 准备工作
- 不能重复start
Exception in thread "main" java.lang.IllegalThreadStateExceptionat java.lang.Thread.start(Thread.java:708)at com.prim.threadcoreknowledge.startthread.CantStartTwice.main(CantStartTwice.java:15)
启动新线程检查线程状态 -> 加入线程组 -> 调用start0()
start()方法是被synchronized修饰的方法,可以保证线程安全;有JVM创建的main方法线程和system组线程,并不会通过start来启动.
/*** 只有在NEW 状态下的线程才能继续否则抛出异常 不能重复调用start()因为当线程调用start()后状态就会改变*/if (threadStatus != 0)throw new IllegalThreadStateException();/*加入线程组*/group.add(this);boolean started = false;try {//调用start0方法启动线程start0();started = true;} finally {try {if (!started) {group.threadStartFailed(this);}} catch (Throwable ignore) {/* do nothing. If start0 threw a Throwable thenit will be passed up the call stack */}}
如何正确的停止线程
线程停止的原则
使用interrupt来通知,而不是强制. 在Java中,最好的停止线程就是使用interrupt中断,但是这仅仅是会通知到被终止的线程“你该停止运行了”,被终止的线程自身拥有决定权(决定是否、以及何时停止),这依赖于请求停止方和被停止方都遵循一种约定好的编码规范.
任何和线程的启动很容易,在大多时候,我们都会让它们运行到结束,或者让它们自行停止.但是有时候需要提前停止和结束线程,或者用户取消了操作,或者服务需要被快速关闭,或者运行超时出错了.
要使任务、线程快速、可靠、安全的停止下来,并不是一件容易的事,Java没有提供任何的机制来安全地终止线程,而是提供了中断(interrupt) 这是一种协作机制.当需要停止时,它们会首先清除当前正在执行的工作,然后再结束.这提供了更好的灵活性,因为任务本身的代码比发出取消请求的代码更清晰如何执行清除工作.将停止的权利交给了被停止线程的本身,因为被停止的线程更清晰停止线程的业务逻辑和收尾工作.而不是去强制对方停止.
正确停止线程
通常线程在run方法执行完毕后,会自动停止.
线程可能会阻塞
如果线程在每次迭代后都阻塞
- run方法内没有阻塞方法时停止线程
如下代码thread.interrupt()执行后如果线程不去处理中断,那么线程正常执行.如果线程run方法中判断了线程是否中断,那么就会响应中断.
/*** run方法内没有阻塞方法时停止线程*/public class RightWayStopThreadWithoutSleep implements Runnable {public static void main(String[] args) throws InterruptedException {Thread thread = new Thread(new RightWayStopThreadWithoutSleep());thread.start();Thread.sleep(2000);thread.interrupt();//interrupt只是通知了线程中断,但是线程是否要中断取决于线程本身。}@Overridepublic void run() {int num = 0;//Thread.currentThread().isInterrupted()加上线程响应中断while (!Thread.currentThread().isInterrupted() && num <= Integer.MAX_VALUE / 2) {if (num % 10000 == 0) {System.out.println(num + "是10000的倍数");}num++;}System.out.println("任务执行结束");}}
**
正常线程运行完毕是10亿左右,当线程响应中断时打印到了4亿左右 确实线程进行了中断.也进一步验证了interrupt只是通知线程中断,但是线程中断还是不中断取决于它自己.
- 当停止线程遇到阻塞如何停止
run方法在迭代外进行阻塞
/*** run方法阻塞方法时停止线程*/public class RightWayStopThreadWithSleep implements Runnable {public static void main(String[] args) throws InterruptedException {Thread thread = new Thread(new RightWayStopThreadWithSleep());thread.start();Thread.sleep(500);thread.interrupt();//interrupt只是通知了线程中断,但是线程是否要中断取决于线程本身。}@Overridepublic void run() {try {int num = 0;//Thread.currentThread().isInterrupted()加上线程响应中断while (!Thread.currentThread().isInterrupted() && num <= 30000) {if (num % 100 == 0) {System.out.println(num + "是100的倍数");}num++;}Thread.sleep(1000);System.out.println("任务执行结束");} catch (InterruptedException e) {e.printStackTrace();}}}
run方法阻塞方法每次循环都会sleep或wait等方法
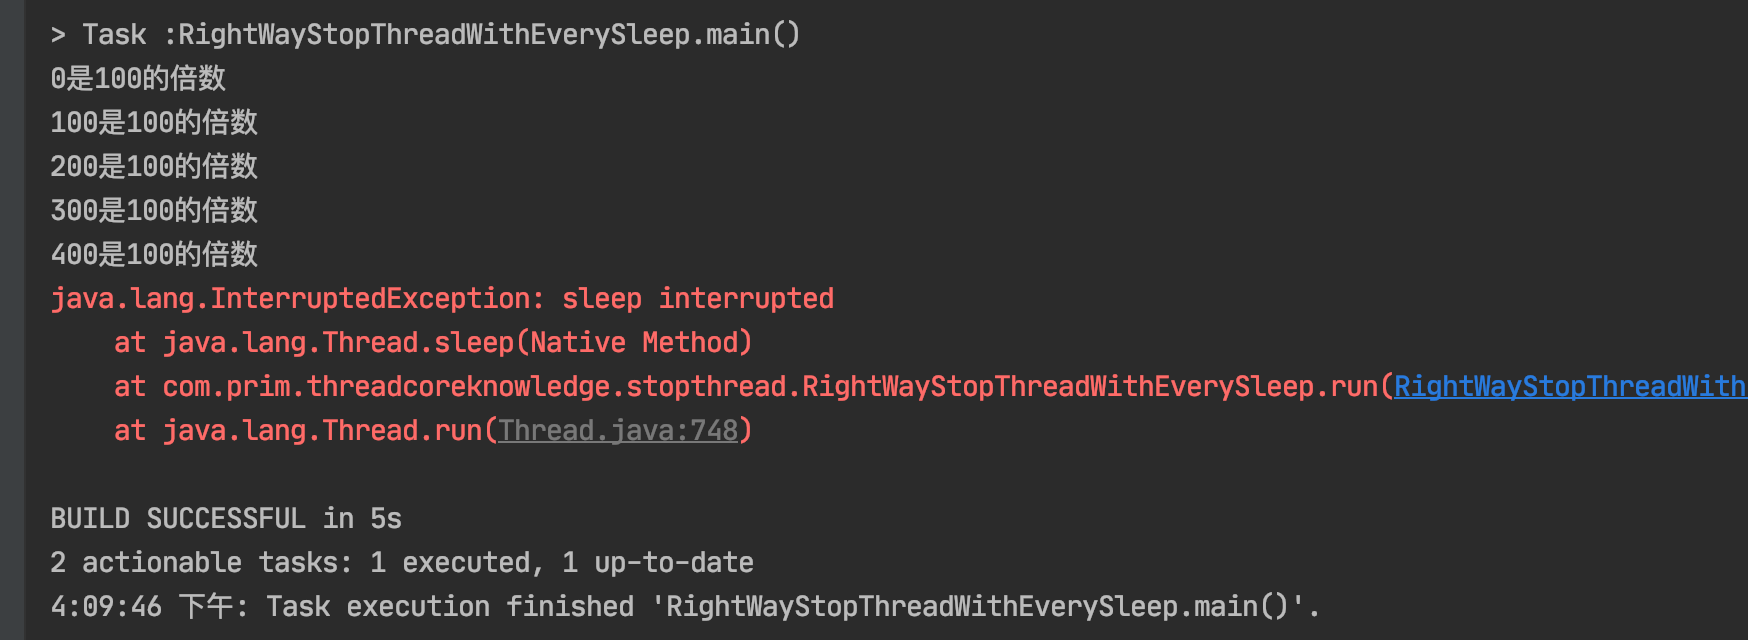
/*** run方法阻塞方法每次循环都会sleep或wait等方法 时停止线程* 那么不需要每次迭代都检查是否已中断*/public class RightWayStopThreadWithEverySleep implements Runnable {public static void main(String[] args) throws InterruptedException {Thread thread = new Thread(new RightWayStopThreadWithEverySleep());thread.start();Thread.sleep(5000);thread.interrupt();//interrupt只是通知了线程中断,但是线程是否要中断取决于线程本身。}@Overridepublic void run() {try {int num = 0;while (num <= 10000) {if (num % 100 == 0) {System.out.println(num + "是100的倍数");}num++;Thread.sleep(10);}System.out.println("任务执行结束");} catch (InterruptedException e) {e.printStackTrace();}}}
执行结果如下:线程的中断随着异常抛出中断,因为try/catch包裹run方法中的所有代码,当出现异常抛出 线程执行结束.
- while内try/catch的问题
while里面方try catch会导致中断失效,继续执行
/*** 如果while里面方try catch会导致中断失效* 线程会正常运行到结束** @author prim*/public class CantInterrupt {public static void main(String[] args) throws InterruptedException {Runnable runnable = () -> {int num = 0;while (num <= 10000 && !Thread.currentThread().isInterrupted()) {if (num % 100 == 0) {System.out.println(num + "是100的倍数");}num++;//如果线程收到中断try {Thread.sleep(10);} catch (InterruptedException e) {e.printStackTrace();}}System.out.println("任务执行完毕");};Thread thread = new Thread(runnable);thread.start();Thread.sleep(5000);thread.interrupt();//interrupt只是通知了线程中断,但是线程是否要中断取决于线程本身。}}
执行结果如下: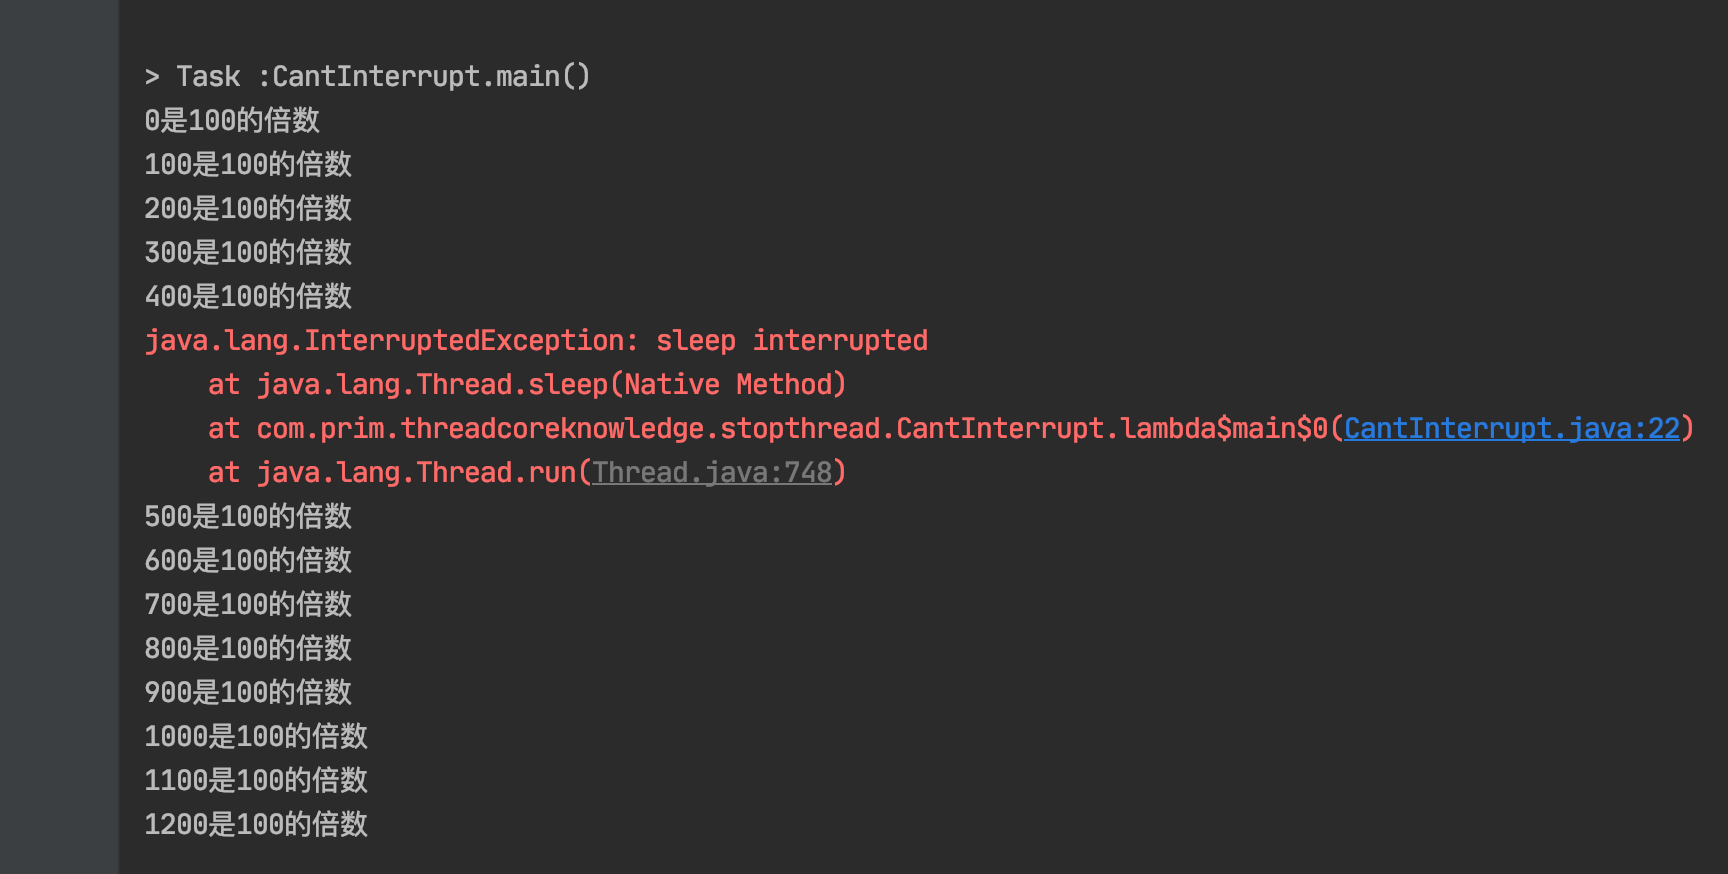
中断线程的两种最佳实践
- 优先选择:传递中断
处理中断的最好方法: 优先选择在方法上抛出异常,用throws InterruotedException 标记方法,而不是用try/catch语句块捕捉异常,以便于该异常可以传递到顶层,让run方法可以捕获到异常.run方法无法无法抛出checked Exception(只能使用try/catch) 顶层方法必须处理异常,避免漏掉或被吞掉的情况,增强代码的健壮性. 在catch子句中设置中断状态,以便于while后续执行能够检查到刚才发生了中断.
/*** 最佳实践:* catch了InterruptedException之后优先选择,在方法签名中抛出异常* 那么run会强制try/catch*/public class RightWayStopThreadInProd implements Runnable {@Overridepublic void run() {while (true && !Thread.currentThread().isInterrupted()) {System.out.println("go");try {throwInMethod();} catch (InterruptedException e) {//保存日志 停止程序System.out.println("保存日志");Thread.currentThread().interrupt();e.printStackTrace();}}}private void throwInMethod() throws InterruptedException {Thread.sleep(2000);}public static void main(String[] args) throws InterruptedException {Thread thread = new Thread(new RightWayStopThreadInProd());thread.start();Thread.sleep(1000);thread.interrupt();}}
- 不想或无法传递:恢复中断
如果不能抛出中断异常,向上述一样的处理那么应该如何去做呢? 如果不想或者无法传递InterruptException,那么就需要在catch子句中调用
Thread.currentThread().interrupt()来恢复设置中断状态,以便于后续执行依然能够检查到刚才发生了中断.
如下代码演示:
/*** 最佳实践2:* 在catch 语句中调用Thread.currentThread.interrupt()来恢复设置中断状态,* 以便于在后续的执行中,依然能够在检查到刚才发生了中断* 回到RightWayStopThreadInProd补上中断,让它跳出*/public class RightWayStopThreadInProd2 implements Runnable {@Overridepublic void run() {while (true) {if (Thread.currentThread().isInterrupted()) {System.out.println("Interrupted 程序运行结束");break;}reInMethod();}}private void reInMethod() {try {Thread.sleep(2000);} catch (InterruptedException e) {Thread.currentThread().interrupt();e.printStackTrace();}}public static void main(String[] args) throws InterruptedException {Thread thread = new Thread(new RightWayStopThreadInProd2());thread.start();Thread.sleep(1000);thread.interrupt();}}
运行结果:
run方法中正常获取到了线程中断的设置.
通过上述两种实践,我们不应屏蔽中断,而是正确的处理中断异常
响应中断的方法列表
| Object.wait() |
|---|
| Thread.sleep() |
| Thread.join() |
| BlockingQueue.take()/put() |
| Lock.lockInterruptibly() |
| CountDownLatch.await() |
| CyclicBarrier.await() |
| Exchanger.exchange() |
| InterruptibleChannel相关方法(NIO) |
| Selector的相关方法(NIO) |
错误的停止线程
- 被弃用的stop suspend和resume方法
stop()方法停止线程,会导致线程运行一般,突然停止造成脏数据 suspend和resume方法 会造成死锁的现象
/*** 错误的停止方法用stop停止线程,* 会导致线程运行一半,突然停止,没办法完成一个基本单位的操作* 会造成脏数据*/public class StopThread implements Runnable {@Overridepublic void run() {//模拟指挥军队:一共有5个连队,每个连队100人,以连队为单位,发放武器弹药//叫到号的士兵 领取装备for (int i = 0; i < 5; i++) {System.out.println("连队" + i + "开始领取武器");for (int j = 0; j < 10; j++) {System.out.println(j);try {Thread.sleep(50);} catch (InterruptedException e) {e.printStackTrace();}}System.out.println("连队" + i + "领取完毕");}}public static void main(String[] args) throws InterruptedException {Thread thread = new Thread(new StopThread());thread.start();//假设1s后,立马去前线Thread.sleep(1000);//错误的停止方法导致连队的士兵没有领取到装备thread.stop();}}
- 用volatile设置boolean标记为
在某些书或者课程中就讲到了使用volatile来停止线程,但是这样的做法确实错误的.为什么会错误看下面的讲解
volatile看似可行,volatile是可见性的意思,我会在后面的章节中单独的讲解
如下代码,确实可以帮助我们停止线程,看似是可行的那么为什么不推荐呢?
public class WrongWayVolatile implements Runnable {private volatile boolean canceled = false;@Overridepublic void run() {int num = 0;try {while (num <= 100000 && !canceled) {if (num % 100 == 0) {System.out.println(num + "是100倍数");}num++;Thread.sleep(1);}} catch (Exception e) {e.printStackTrace();}}public static void main(String[] args) throws InterruptedException {WrongWayVolatile wrongWayVolatile = new WrongWayVolatile();Thread thread = new Thread(wrongWayVolatile);thread.start();Thread.sleep(5000);wrongWayVolatile.canceled = true;}}
volatile 的局限:陷入阻塞时,volatile是无法停止线程的,来看下面的例子
volatile停止线程是错误的,有局限性不够全面的,在某些情况下虽然可用,但在某些情况下有严重但问题 在《Java并发编程实战》一书中已被明确指出了缺陷 此方法错误的原因在于,如果我们遇到了线程长时间阻塞(这是一种很常见的情况,例如生产者和消费者模式就存在这种情况),就没有办法唤醒它, 或者永远都无法唤醒该线程,而interrupt的设计之初就是把wait等长期阻塞作为作为一种特殊情况考虑在内,我们应该用interrupt思维来停止线程.
如下代码,演示错误的示例:
/*** volatile 的局限:陷入阻塞时,volatile是无法停止线程的* 此例中进行演示:生产者的生产速度很快,而消费者消费速度很慢* 所以阻塞队列满了以后,生产者会阻塞,等待消费者进一步消费*/public class WrongWayVolatileCantStop {public static void main(String[] args) throws InterruptedException {ArrayBlockingQueue storage = new ArrayBlockingQueue(10);Producer producer = new Producer(storage);Thread thread = new Thread(producer);thread.start();//塞满这个队列Thread.sleep(1000);Consumer consumer = new Consumer(storage);while (consumer.needMoreNums()) {System.out.println(storage.take() + "被消费了");Thread.sleep(100);}System.out.println("消费者不需要更多数据了");//消费者不需要数据了,让生产者停止下来 但实际情况生产者并没有停止producer.canceled = true;//错误原因 一旦线程被长时间阻塞就没有办法去停止线程了,不能唤醒线程 一直等待put()的方法//所以interrupt方法即便线程长时间阻塞,interrupt可以即使响应的。}}class Producer implements Runnable {public volatile boolean canceled = false;private BlockingQueue storage;public Producer(BlockingQueue storge) {this.storage = storge;}@Overridepublic void run() {int num = 0;try {while (num <= 100000 && !canceled) {if (num % 100 == 0) {storage.put(num);System.out.println(num + "是100倍数 放到仓库中");}num++;}} catch (Exception e) {e.printStackTrace();} finally {System.out.println("生产者停止运行");}}}class Consumer {private BlockingQueue storage;public Consumer(BlockingQueue storage) {this.storage = storage;}public boolean needMoreNums() {if (Math.random() > 0.95) {return false;}return true;}}
运行结果如下:并没有打印出“生产者停止运行” 当线程长期阻塞时,设置volatile并不会唤醒线程,导致线程无法执行中断.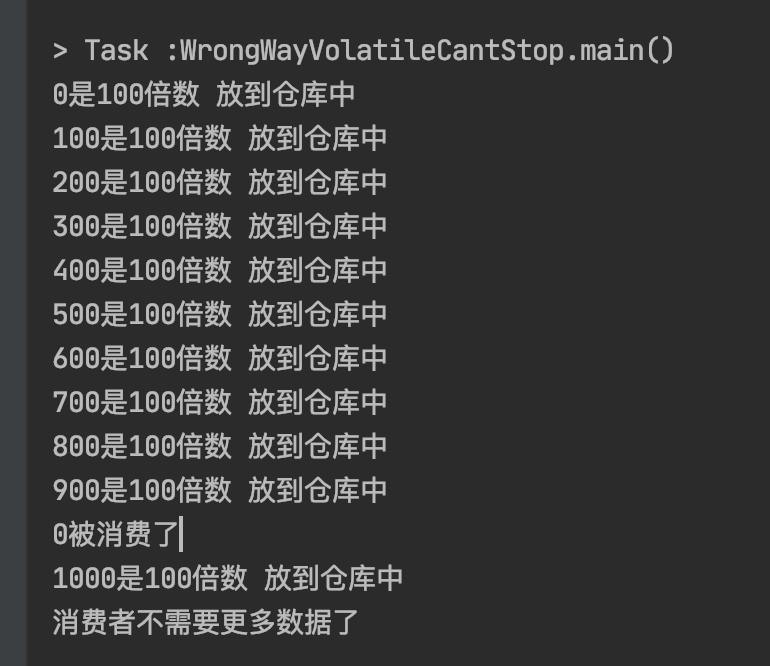
那么正确的停止方式是什么呢?使用interrupt如何修复volatile的问题,如下代码通过Thread.currentThread().isInterrupted()来判断线程是否中断,然后通过thread.interrupt()来中断线程
/*** 正确的方式*/public class WrongWayVolatileFixed {public static void main(String[] args) throws InterruptedException {WrongWayVolatileFixed body = new WrongWayVolatileFixed();ArrayBlockingQueue storage = new ArrayBlockingQueue(10);Producer producer = body.new Producer(storage);Thread thread = new Thread(producer);thread.start();//塞满这个队列Thread.sleep(1000);Consumer consumer = body.new Consumer(storage);while (consumer.needMoreNums()) {System.out.println(storage.take() + "被消费了");Thread.sleep(100);}System.out.println("消费者不需要更多数据了");thread.interrupt();}class Producer implements Runnable {public volatile boolean canceled = false;private BlockingQueue storage;public Producer(BlockingQueue storge) {this.storage = storge;}@Overridepublic void run() {int num = 0;try {while (num <= 100000 && !Thread.currentThread().isInterrupted()) {if (num % 100 == 0) {storage.put(num);System.out.println(num + "是100倍数 放到仓库中");}num++;}} catch (Exception e) {e.printStackTrace();} finally {System.out.println("生产者停止运行");}}}class Consumer {private BlockingQueue storage;public Consumer(BlockingQueue storage) {this.storage = storage;}public boolean needMoreNums() {if (Math.random() > 0.95) {return false;}return true;}}}
运行结果如下: 长期阻塞的线程被正常停止了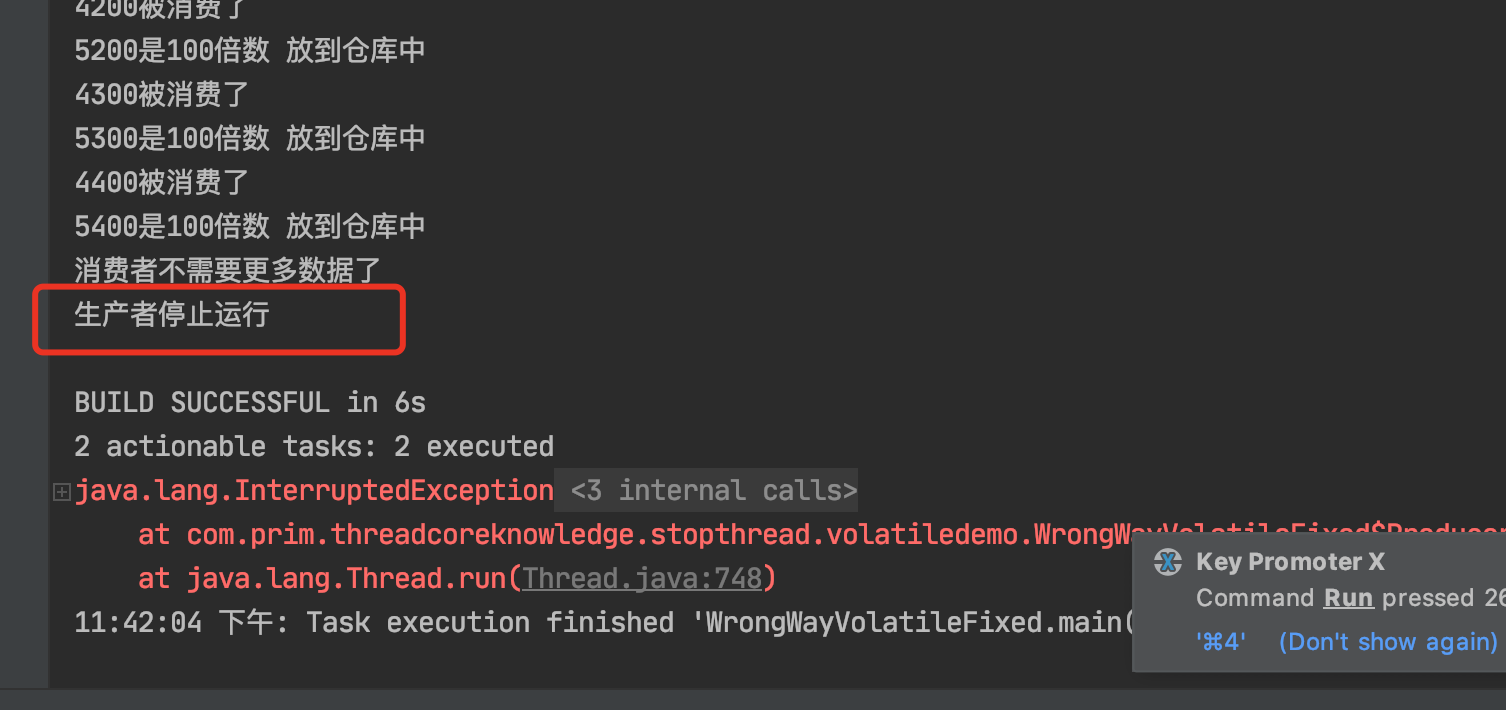
interrupt状态的方法辨析
注意
- static boolean interrupted() 清除中断状态
- boolean isInterrupted() 不会清除中断状态
- Thread.interrupted() 目标对象是当前线程 需要注意Thread类的interrupted()静态方法中是获取currentThread 调用中断方法
如下代码:当thread调用interrupt()方法后,在调用thread.isInterrupted()肯定是返回true的,如果调用静态方法interrupted() 判断的是当前的线程中断状态.
public class RightWayInterrupted {public static void main(String[] args) throws InterruptedException {Thread thread = new Thread(new Runnable() {@Overridepublic void run() {for (; ; ) {}}});thread.start();//设置中断标志thread.interrupt();//获取中断标志System.out.println("获取中断标志不会重置中断标志isInterrupted:" + thread.isInterrupted());//true//获取中断标志并重置 thread.interrupted() 静态方法但是获取的是当前线程而当前的线程是主线程,主线程并没有中断 所以返回falseSystem.out.println("获取中断标志并重置中断标志 isInterrupted:" + thread.interrupted());//false//获取中断标志并重置 获取当前的线程也就是主线程 返回falseSystem.out.println("Thread.interrupted() 获取中断标志并重置中断标志 isInterrupted:" + Thread.interrupted());//false//重新获取中断标志 前两个方法并不会清除状态 所以还是返回trueSystem.out.println("isInterrupt:" + thread.isInterrupted());//truethread.join();System.out.println("Main Thread is over");}}
运行结果如下:在最后再次调用了thread.isInterrupted()返回还是返回true, 这是为什么呢? 我们去看一下源码
从源码中就可以看出来,静态方法interrupted() 是调用了currentThread().isInterrupted(true); 也就是当前线程的中断标志,而在上述代码中,当前线程就是main主线程,而主线程没有中断,所以返回的是false,那么这个方法的清除中断标志的状态对thread这个新线程是不会造成影响的.
public static boolean interrupted() {return currentThread().isInterrupted(true);}public boolean isInterrupted() {return isInterrupted(false);}
总结
如何停止线程
- 原理:用interrupt来请求 好处
- 想停止线程,要请求方、被停止方、子方法被调用方互相配置
- 错误的方法:stop/suspend已废弃,volatile的boolean无法处理长时间阻塞的情况
如何处理不可中断阻塞,并没有通用的解决方案.
线程的生命周期
有哪6种状态
- New 线程刚被创建的状态
- Runnable 可运行的状态
- Blocked 被synchronized关键字修饰的,且没有拿到锁才是Blocked状态
- Waiting 等待状态
- Timed Waiting 计时等待
- Terminated 已终止状态
状态间的转化图如下,只看图的话还不能完全掌握到,下面我会通过代码来演示线程的各种状态间的转化.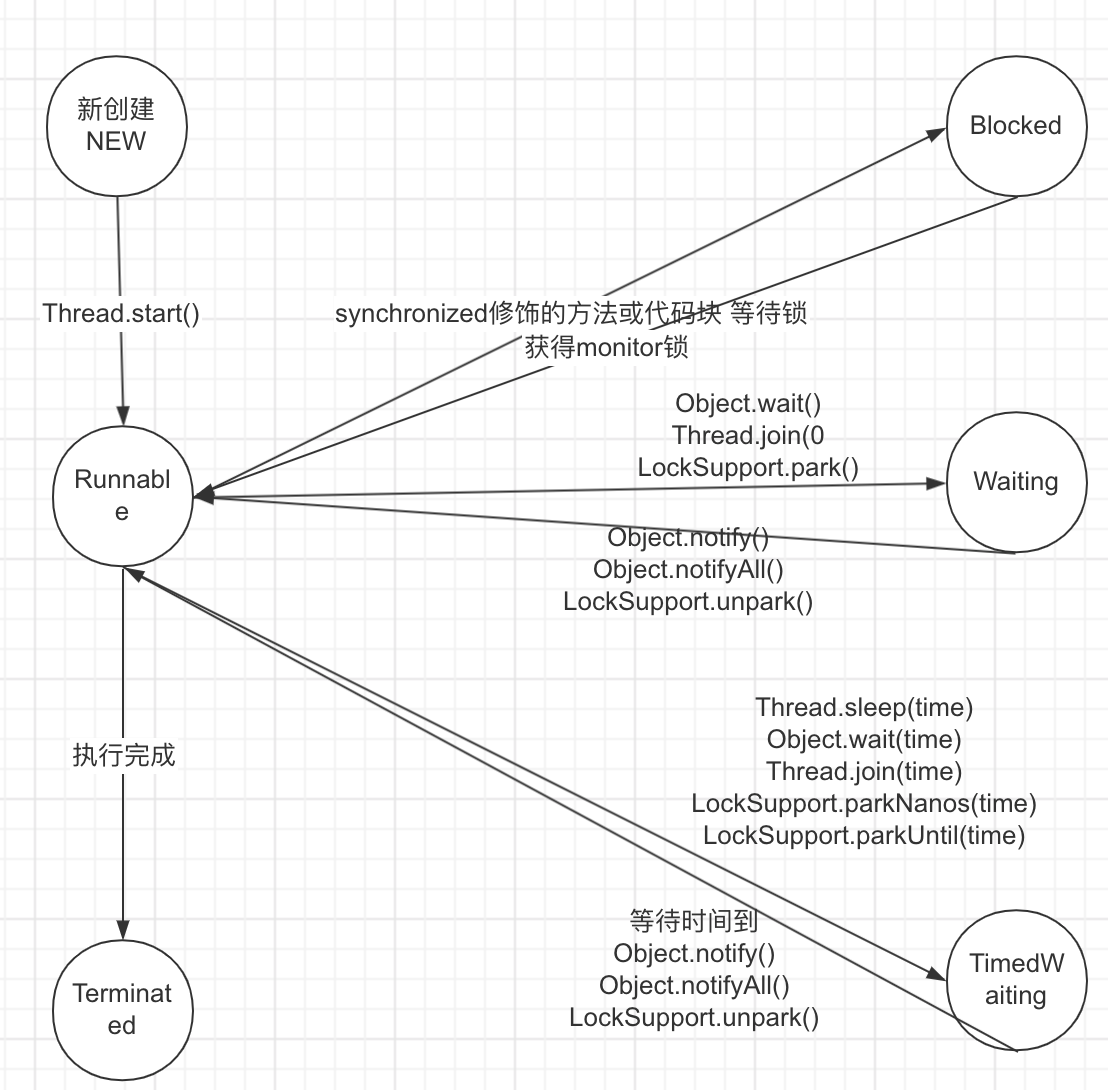
代码实现
展示线程 New Runnable Terminated 状态:
/*** 展示线程 New Runnable Terminated 状态* 即使正在运行也是Runnable状态,而不是Running** @author prim*/public class NewRunnableTerminated implements Runnable {public static void main(String[] args) throws InterruptedException {Thread thread = new Thread(new NewRunnableTerminated());//New 状态System.out.println(thread.getState().toString());thread.start();//Runnable 状态System.out.println(thread.getState().toString());try {Thread.sleep(10);} catch (InterruptedException e) {e.printStackTrace();}//Runnable 状态 即使是正在运行也是Runnable而不是RunningSystem.out.println(thread.getState().toString());Thread.sleep(100);//打印出Terminated状态System.out.println(thread.getState().toString());}@Overridepublic void run() {for (int i = 0; i < 1000; i++) {System.out.println(i);}}}
展示 Blocked Waiting TimedWaiting 三种状态 代码实现:
package com.prim.threadcoreknowledge.sixstater;/*** 展示 Blocked Waiting TimedWaiting 三种状态** @author prim*/public class BlockedWaitingTimedWaiting implements Runnable {public static void main(String[] args) {BlockedWaitingTimedWaiting runnable = new BlockedWaitingTimedWaiting();Thread thread1 = new Thread(runnable);thread1.start();Thread thread2 = new Thread(runnable);thread2.start();//打印出 TimedWaiting状态 因为正在执行Thread.sleep(1000)System.out.println(thread1.getState());//打印出 Blocked状态,因为thread2想要拿到synchronized锁却拿不到。System.out.println(thread2.getState());try {Thread.sleep(1300);} catch (InterruptedException e) {e.printStackTrace();}//打印出Waiting状态 因为thread1 休眠1后 又执行了wait()方法 thread1处于waiting状态System.out.println(thread1.getState());}@Overridepublic void run() {//线程1 拿到锁 休眠//线程2 没有拿到锁 blocked 状态syn();}private synchronized void syn(){try {Thread.sleep(1000);wait();} catch (InterruptedException e) {e.printStackTrace();}}}
阻塞状态
一般习惯而言,把Blocked(阻塞)、Waiting(等待)、TimedWaiting(计时等待) 都称为阻塞状态. 不仅仅是Blocked.
常见面试问题:
线程有哪几种状态?生命周期是什么?
这里可以通过画图来讲解,如上图.先讲解图中的六个圈的状态,然后在说明状态之间的流转(例如new 只能跳转到 runnable状态).
Thread和Object类中重要的方法
带着下面这些问题进行讲解,如果你都能回答出来,这一块就可以不用看了
- 为什么线程通信的方法wait() notify() notifyAll()被定义在Object类里?而sleep定义在Thread类里呢?
- 用3种方法实现生产者模式
- Java SE 8 和Java1.8 和JDK8 是什么关系?
- Join sleep wait 期间线程的状态分别是什么? 为什么呢?
方法概述
| 类 | 方法名 | 简介 |
|---|---|---|
| Thread | sleep | 是线程休眠一段时间 |
| join | 等待其他线程执行完毕 | |
| yield | 放弃已经获取到的CPU资源 | |
| currentThread | 获取当前执行线程的引用 | |
| start run | 启动线程相关 | |
| interrupt | 中断线程 | |
| stop suspend resume | 已废弃的方法 | |
| Object | wait/notify/notifyAll | 让线程暂时休息和唤醒 |
wait notify notifyAll 讲解
- wait notify notifyAll 作用用法
wait 方法导致当前线程等待,加入该对象的等待集合中,并且放弃当前持有的对象锁.
notify/notifyAll 方法唤醒一个或所有正在等待这个对象锁的线程.
注意1 虽然会wait自动解锁,但是对顺序有要求,如果在notify被调用之后,才开始wait方法的调用,线程会永远处于WAITING状态.
注意2 wait notify notifyAll 方法只能由同一对象锁的持有者线程调用,也就是写在同步块synchornized里面,否则会抛出IllegalMonitorStateExeption异常
另一个线程调用这个对象的notify()方法且刚好被唤醒的是本线程
另一个线程调用这个对象的notifyAll()方法
过了wait(long timeout) 规定的超时时间,如果传入0就是永久等待另一个线程调用这个对象的notify()方法且刚好被唤醒的是本线程
另一个线程调用这个对象的notifyAll()方法
过了wait(long timeout) 规定的超时时间,如果传入0就是永久等待
线程自身调用了interrupt方法
notify() 只会唤醒一个等待的线程
notifyAll() 会唤醒所有等待的线程.
下面通过代码来深入的理解
wait和notify的基本用法
注意 wait 和 notify的执行顺序,如果notify在wait之前执行,那么就永远不会唤醒线程了.
public class Wait {public static Object object = new Object();static class Thread1 extends Thread {@Overridepublic void run() {//线程1 先获得锁来证明wait会释放锁synchronized (object) {System.out.println(Thread.currentThread().getName() + "开始执行了");try {object.wait();//释放锁 等待期间遇到中断会抛出异常} catch (InterruptedException e) {e.printStackTrace();}System.out.println("重新获得了锁" + Thread.currentThread().getName());}}}static class Thread2 extends Thread {@Overridepublic void run() {synchronized (object) {//唤醒object.notify();System.out.println("线程" + Thread.currentThread().getName() + "调用了notify");}//synchronized 同步块代码执行完毕之后 才会释放锁System.out.println("线程"+Thread.currentThread().getName()+"释放锁");}}public static void main(String[] args) throws InterruptedException {Thread1 thread1 = new Thread1();Thread2 thread2 = new Thread2();thread1.start();Thread.sleep(200);thread2.start();}}
执行结果如下: 线程Thread-0 会先获得锁,然后执行wait释放锁. 线程Thread-1获得锁,然后执行notify唤醒线程,注意这时候线程Thread-0没有被真正的唤醒,因为Thread-1没有释放锁,这时候Thread-0的状态是Blocked状态,要等待线程Thread-1中的synchronized同步块中的代码执行完毕后,才会释放锁.Thread-1释放完锁后,Thread-0才会真正的获得锁,状态为Runnable状态,然后继续执行.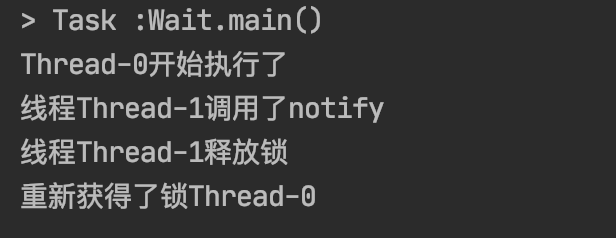
演示notify 和 notifyAll
public class WaitNotifyAll implements Runnable {private static final Object resourceA = new Object();public static void main(String[] args) throws InterruptedException {WaitNotifyAll runnable = new WaitNotifyAll();Thread threadA = new Thread(runnable);Thread threadB = new Thread(runnable);Thread threadC = new Thread(new Runnable() {@Overridepublic void run() {synchronized (resourceA) {resourceA.notifyAll();// resourceA.notify();System.out.println(Thread.currentThread().getName() + " notifyed.");}}});threadA.start();threadB.start();Thread.sleep(200);threadC.start();}@Overridepublic void run() {synchronized (resourceA) {System.out.println(Thread.currentThread().getName()+" got resourceA lock.");try {System.out.println(Thread.currentThread().getName()+" waits to start.");resourceA.wait();System.out.println(Thread.currentThread().getName()+"'s waiting to end.");} catch (InterruptedException e) {e.printStackTrace();}}}}
运行结果如下: Thread-0 获得锁A,然后执行wait释放锁A. 然后Thread-1获得锁A,执行wait释放锁A.
Thread-2执行notifyAll 唤醒所有resourceAlock. 之后Thread-1获得锁A 执行打印 synchronized同步块中的代码执行完毕后,释放锁A.
Thread-0获得锁A 执行打印synchronized同步块中的代码执行完毕后,释放锁A. 整个过程执行完毕.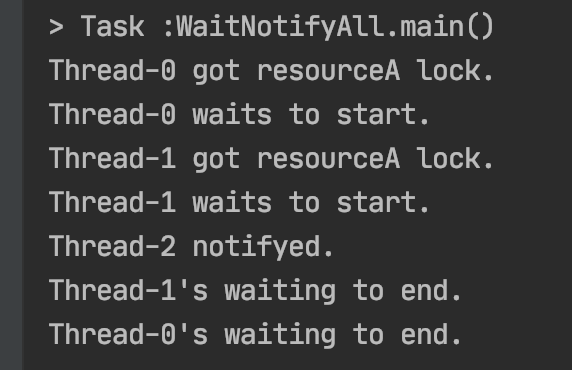
下面再来测试一下notify()方法
resourceA.notify();
运行结果如下: notify()方法只会唤醒其中的一个.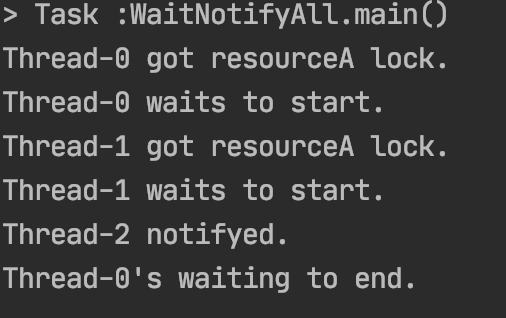
下面我们再来测试一下.start方法先执行是否就是代表着线程先启动呢?
将代码中休眠的200ms去掉
threadA.start();threadB.start();// Thread.sleep(200);threadC.start();
运行结果如下:Thread-0执行完毕后,就去执行了Thread-2,这样就导致了只唤醒了Thread-0,而Thread-1一直处于等待状态.一定要注意这个问题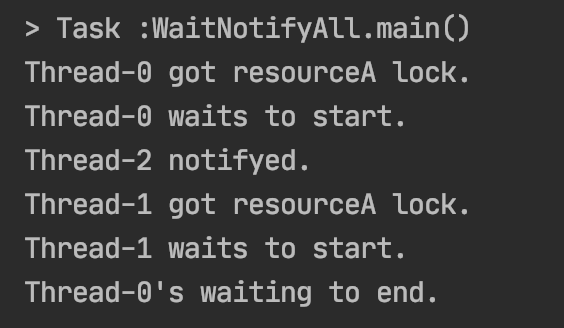
:::success start方法先执行,不代表着线程先启动. :::
演示wait只能释放当前的锁
public class WaitNotifyReleaseOwnMonitor {private static volatile Object resourceA = new Object();private static volatile Object resourceB = new Object();public static void main(String[] args) {Thread threadA = new Thread(new Runnable() {@Overridepublic void run() {synchronized (resourceA) {System.out.println("Thread A got resourceA lock.");synchronized (resourceB){System.out.println("Thread A got resourceB lock.");try {System.out.println("Thread A releases resource A lock.");resourceA.wait();} catch (InterruptedException e) {e.printStackTrace();}}}}});Thread threadB = new Thread(new Runnable() {@Overridepublic void run() {try {Thread.sleep(1000);} catch (InterruptedException e) {e.printStackTrace();}synchronized (resourceA) {System.out.println("Thread B got resourceA lock.");System.out.println("Thread B tries to resourceB lock.");synchronized (resourceB){System.out.println("Thread B got resourceB lock.");}}}});threadA.start();threadB.start();}}
运行结果如下: resourceA.wait() 只能释放resourceA lock锁.无法释放resourceB锁.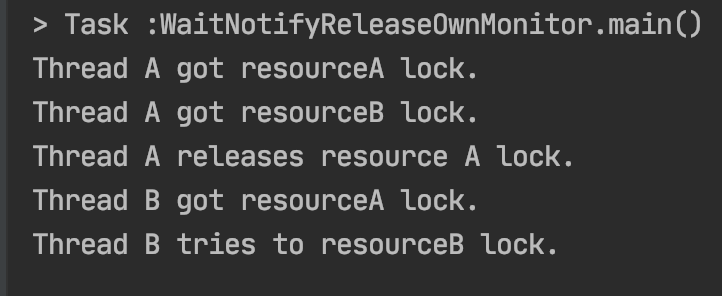
- wait notify notifyAll 特点 性质
- 必须先拥有monitor 先拥有锁
- wait在多个锁的情况下只能释放其中一个锁
- 数据Object类
- 类似功能点Condition
- notify只能唤醒其中一个线程
- start方法先执行,不代表着线程先启动.
- wait 原理
如下图所示:
入口集: Entry Set 如下图第一个框就是入口集
等待集 :Wait Set 第二个和第三个框就是等待集
Java monitor描述了在抢synchronized锁的过程中,首先从1开始,开始抢锁先进入入口集Entry Set中,入口集中可能会有多个线程,这一个一个圆圈就是多个线程,如果我们的锁被其他线程获取了.就会通通的放到入口集中去等待,直到获得锁的释放掉就是下图的紫色的框中The owner.acquire就是获得锁,释放锁分为两种一种是下图的3 还有一种是6,6是正常运行完后释放退出,下面我们再来看3,一旦拿到锁并且在执行过程中被wait了,就会释放锁,并且进入等待集 Wait中,直到被notify/notifyAll就会进入Set中,然后在Set等待锁释放,锁释放后就会获得锁acquire然后进入到The owner中,然后就是通过3 或 6再去释放锁. 这就是wait的运行原理,仔细思考很容易想明白的.
ps : acquire(获得锁) release(释放锁) notifyed(就是执行notify/notifyAll)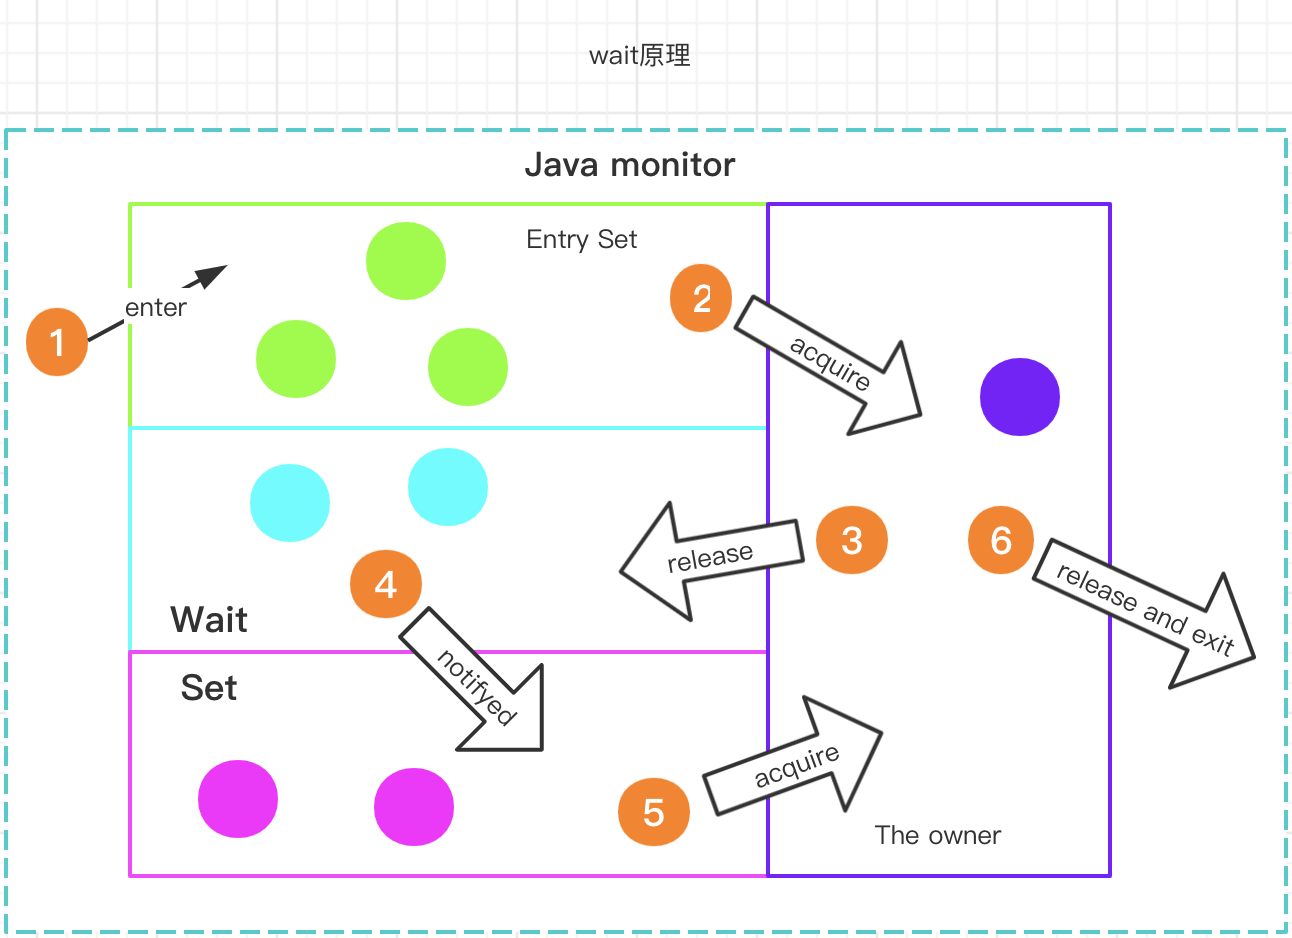
我们再来看下面这张图,线程状态转化的特殊情况,在上述中分析了wait的原理,从Object.wait()状态刚被唤醒时,通常不能立刻抢到monitor锁,就会从Waiting状态先进入Blocked状态,抢到锁后在转换到Runnable状态(官方文档的描述).如果发生异常,可以直接跳转到终止Terminated状态,不必遵循路径,可以直接从Waiting到Terminated.
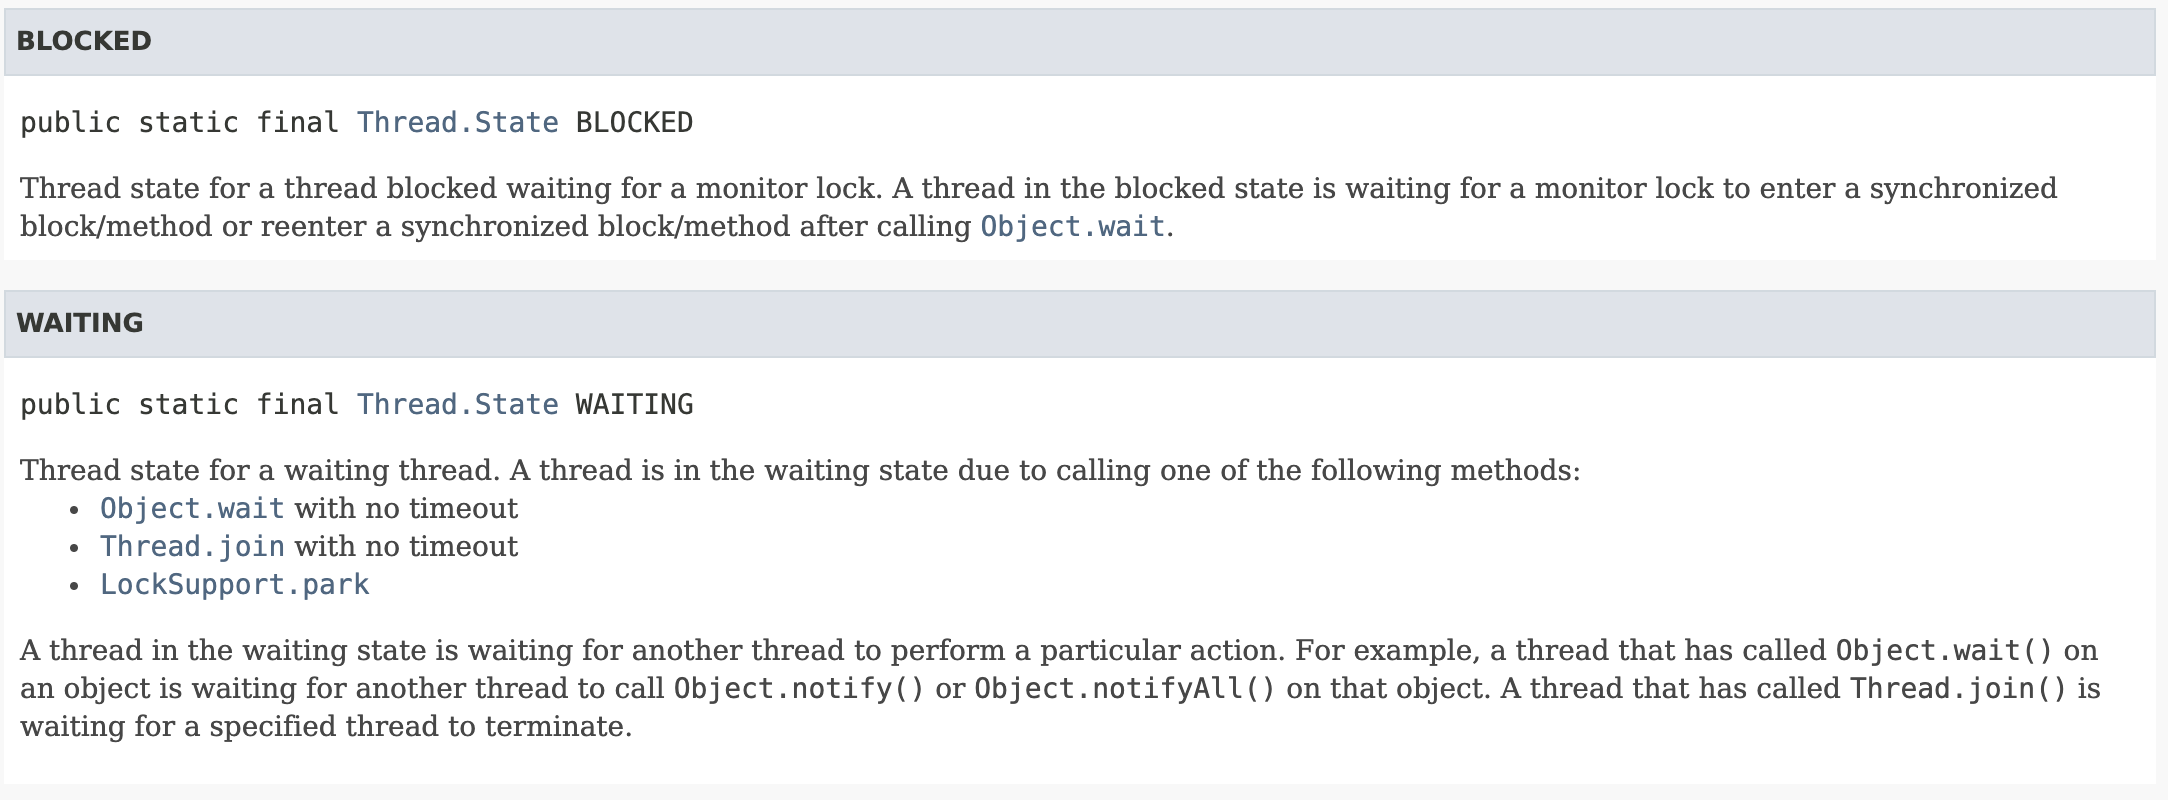
官方文档的解释 BLOCKED状态: 可以看出官方的解释 通过synchronized可以进入BOLCKED状态,或者通过wait的方式进入BLOCKED状态
Thread state for a thread blocked waiting for a monitor lock. A thread in the blocked state is waiting for a monitor lock to enter a synchronized block/method or reenter a synchronized block/method after calling
Object.wait.

在看下面的代码,来演示wait()被唤醒的过程.
下面代码中,在Thread2调用notify后,打印一下Thread1的状态.
public class Wait {public static Object object = new Object();static class Thread1 extends Thread {@Overridepublic void run() {//线程1 先获得锁来证明wait会释放锁synchronized (object) {System.out.println(Thread.currentThread().getName() + "开始执行了");try {object.wait();//释放锁 等待期间遇到中断会抛出异常} catch (InterruptedException e) {e.printStackTrace();}System.out.println("线程" + Thread.currentThread().getName() + "状态为:" + Thread.currentThread().getState());System.out.println("重新获得了锁" + Thread.currentThread().getName());}}}static class Thread2 extends Thread {@Overridepublic void run() {synchronized (object) {//唤醒object.notify();System.out.println("线程" + Thread.currentThread().getName() + "调用了notify");System.out.println("线程" + thread1.getName() + "状态为:" + thread1.getState());}//synchronized 同步块代码执行完毕之后 才会释放锁System.out.println("线程" + Thread.currentThread().getName() + "释放锁");}}static Thread1 thread1 = new Thread1();static Thread2 thread2 = new Thread2();public static void main(String[] args) throws InterruptedException {thread1.start();Thread.sleep(200);thread2.start();}}
运行结果如下: 在Thread-1调用了notify后,Thread-0先进入Blocked等待锁的状态,当Thread-1释放锁后,Thread-0进入Runnable状态.
通过上述的讲解,将线程的状态和wait notify notifyAll 讲的很清楚了,多动手实践才能出真理.
- 手写生产者消费者设计模式
为什么要使用生产者和消费者模式?
生产者生产数据,消费者消费数据,但是他们的生产速度和消费的速度是不一致的.而生产者/消费者模式就是为了解决这样的问题的.
如下图所示:
storage 容器通常是一个阻塞队列
producers 生产的数据添加到这个阻塞队列中
consumers 消费者从阻塞队列中去取数据
所有的通信都是通过阻塞队列,这样就有了一个缓冲区,不至于一方太多或太少,一旦队列满了,生产者就停止生产,而消费者一但发现队列空了就停止消费,这时候消费者就会通知生产者队列空了生产数据. 生产者生产出数据也会通知消费者来消费数据.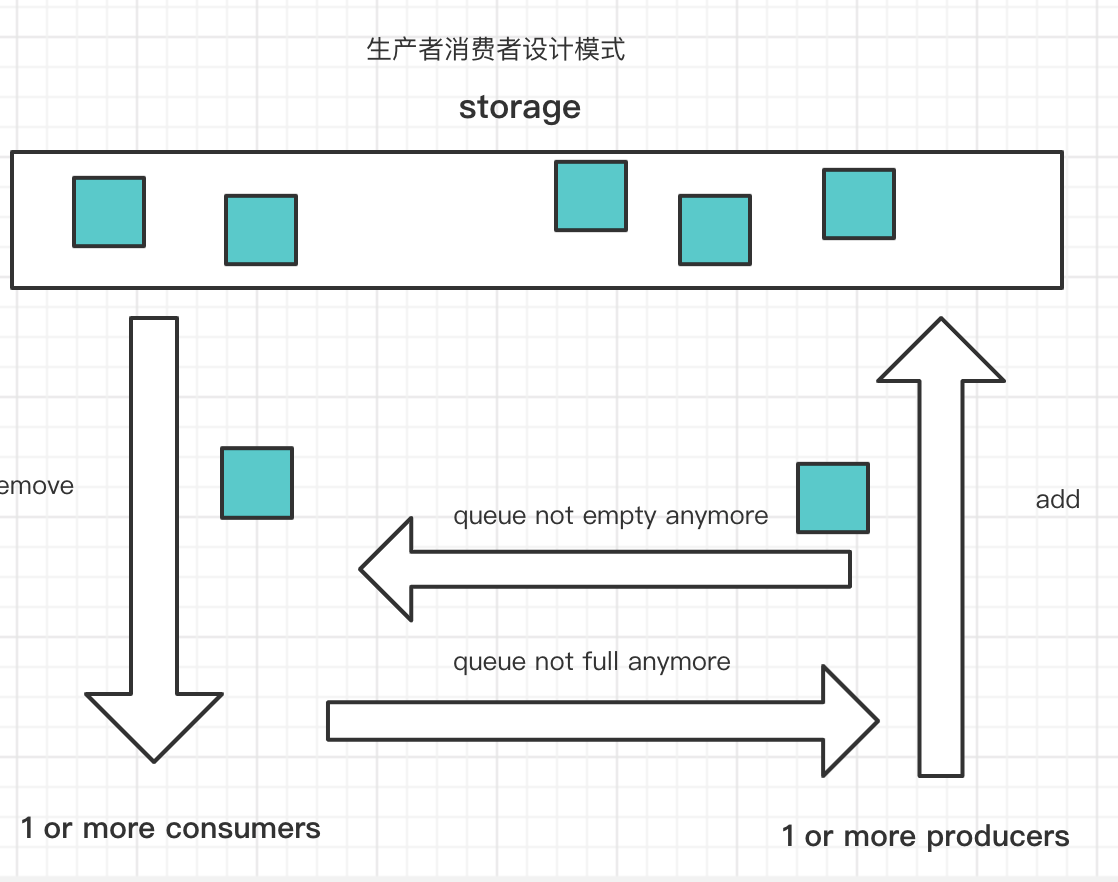
下面通过代码实现:
/*** 用wait/notify 来实现 生产者/消费者模式** @author prim*/public class ProducerConsumerModel {public static void main(String[] args) {EventStorage eventStorage = new EventStorage();Producer producer = new Producer(eventStorage);Consumer consumer = new Consumer(eventStorage);new Thread(producer).start();new Thread(consumer).start();}}/*** 生产者*/class Producer implements Runnable {private EventStorage storage;public Producer(EventStorage storage) {this.storage = storage;}@Overridepublic void run() {for (int i = 0; i < 100; i++) {storage.put();}}}/*** 生产者*/class Consumer implements Runnable {private EventStorage storage;public Consumer(EventStorage storage) {this.storage = storage;}@Overridepublic void run() {for (int i = 0; i < 100; i++) {storage.take();}}}class EventStorage {private int maxSize;private LinkedList<Date> storage;public EventStorage() {maxSize = 10;storage = new LinkedList<>();}public synchronized void put() {//一旦队列满了就等待while (storage.size() == maxSize) {try {wait();} catch (InterruptedException e) {e.printStackTrace();}}//如果没有满就添加到队列中storage.add(new Date());System.out.println("仓库里有了:" + storage.size() + "个产品");//通知消费者进行消费notify();}public synchronized void take() {//如果队列为空 就等待生产者生产数据while (storage.size() == 0) {try {wait();} catch (InterruptedException e) {e.printStackTrace();}}System.out.println("拿到了" + storage.poll() + "现在仓库还剩下:" + storage.size());//数据被消费了 通知生产者生产数据notify();}}
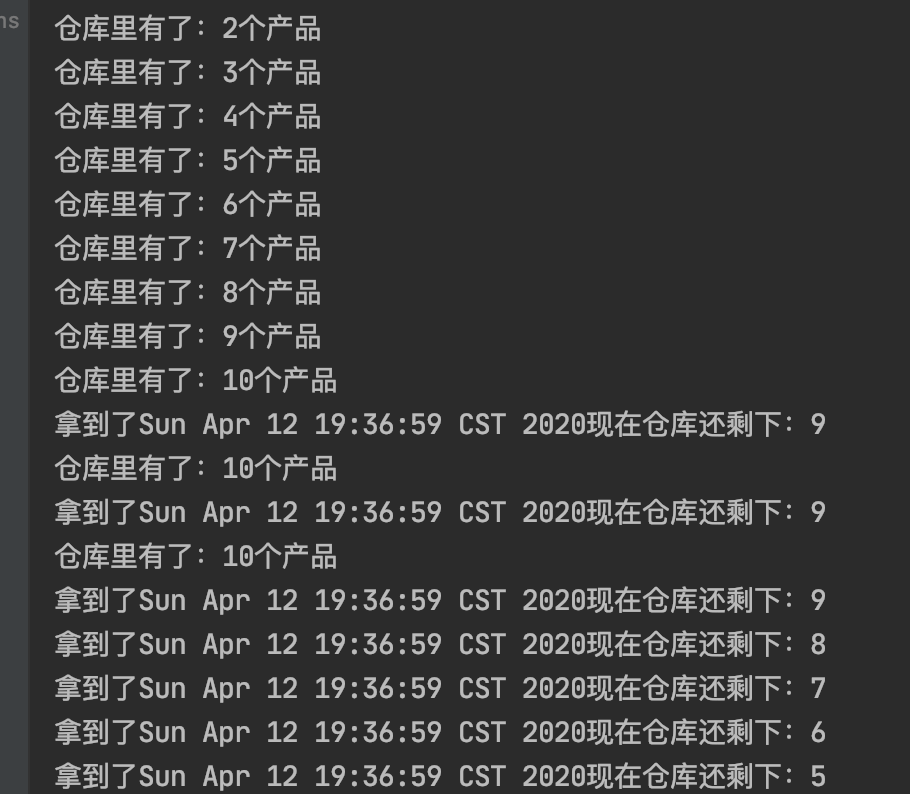
运行结果如下:
- 常见的面试题 - 实现两个线程交替打印0-100的奇偶数
第一个实现方式通过synchronized实现,理想的状态就是偶数线程先拿到锁执行判断打印,然后释放锁.这时候奇数线程拿到锁打印奇数,释放锁然后偶数在拿到锁,这样循环交替的打印,但是这只是理想的状态,看下面代码运行结果.
public class WaitNotifyPrintOddEvenSyn {private static int count;private static final Object lock = new Object();//新建两个线程 两个线程共用同一把锁//1个只处理偶数 1个只处理奇数 用位运算//用synchronized来通信public static void main(String[] args) {new Thread(new Runnable() {@Overridepublic void run() {while (count < 100) {System.out.println("偶数线程的状态:"+Thread.currentThread().getState());synchronized (lock) {//如果发现是偶数就打印出来if ((count & 1) == 0) {System.out.println(Thread.currentThread().getName() + ":" + count);count++;}}}}}, "偶数").start();new Thread(new Runnable() {@Overridepublic void run() {while (count < 100) {System.out.println("奇数线程的状态:"+Thread.currentThread().getState());synchronized (lock) {//如果发现是偶数就打印出来if ((count & 1) == 1) {System.out.println(Thread.currentThread().getName() + ":" + count);count++;}}}}}, "奇数").start();}}
运行结果如下: 这并不是我们想要的理想的状态,下面结果可以看出来,偶数线程先获得锁,然后打印count++,之后奇数线程并没有抢到锁,而偶数线程又抢到了锁,这就导致偶数线程执行了很多次的无用操作,包括奇数线程也有可能会多次抢到锁,这样实现虽然没有问题,但是非常消耗资源.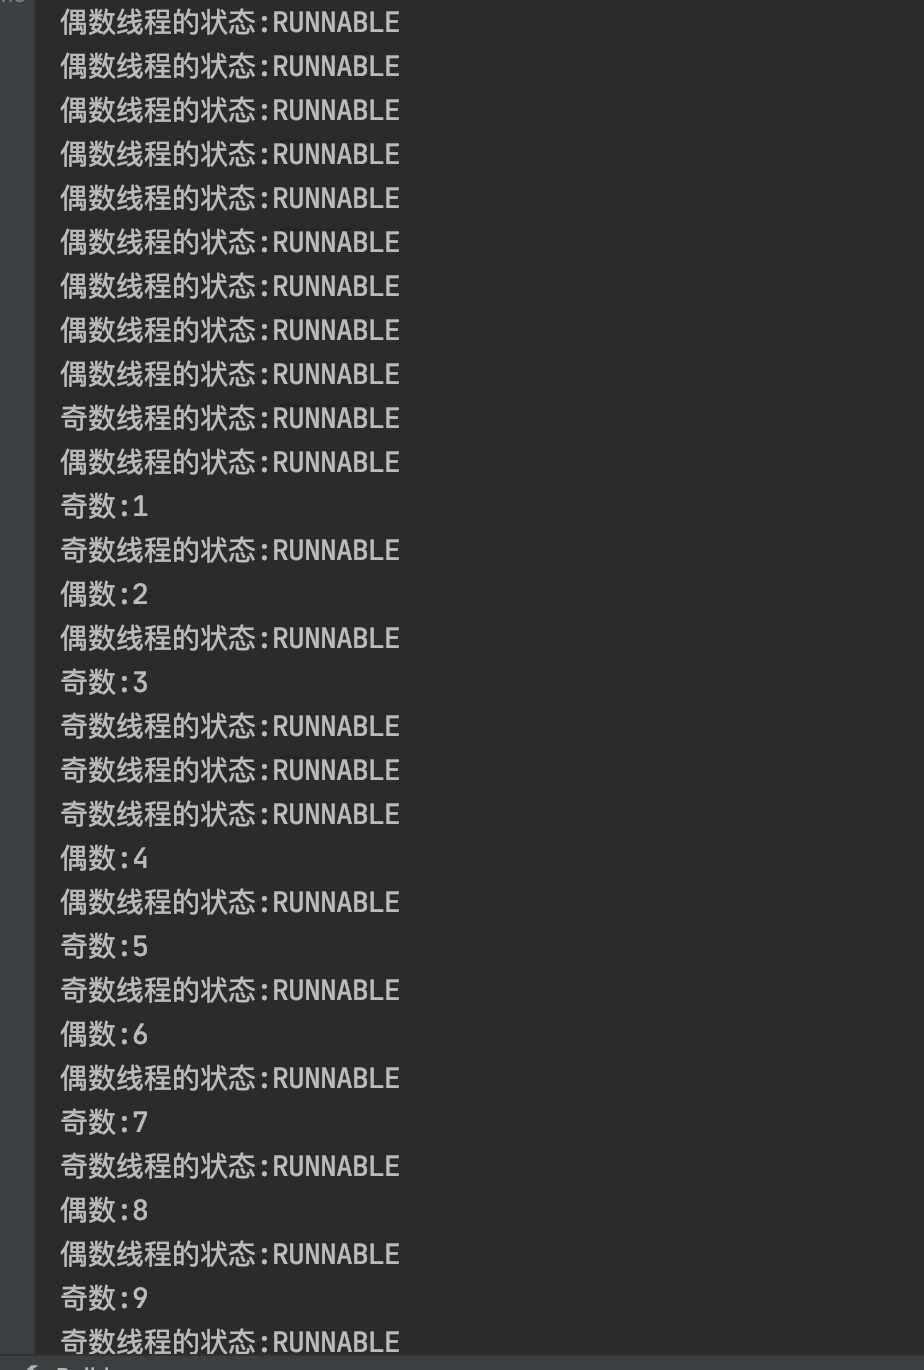
最佳的实现方式通过wait/notify方式实现,在上述讲解中,wait会释放锁并且等待.
如下代码实现:
public class WaitNotifyPrintOddEveWait {private static int count;private static final Object lock = new Object();static class TurningRuner implements Runnable {@Overridepublic void run() {while (count < 100) {//当前线程获得锁System.out.println(Thread.currentThread().getState());synchronized (lock) {System.out.println(Thread.currentThread().getName() + ":" + count++);//唤醒另一个处于BLOCKED的线程lock.notify();if (count <= 100) {try {//如果任务还没有结束 就让出锁 自己休眠lock.wait();} catch (InterruptedException e) {e.printStackTrace();}}}}}}public static void main(String[] args) {new Thread(new TurningRuner(),"偶数").start();try {//因为先执行start并不一定先执行 所以休眠100msThread.sleep(100);} catch (InterruptedException e) {e.printStackTrace();}new Thread(new TurningRuner(),"奇数").start();}}
运行结果如下:这就是我们想要的理想状态每一次循环都能得到充分的利用.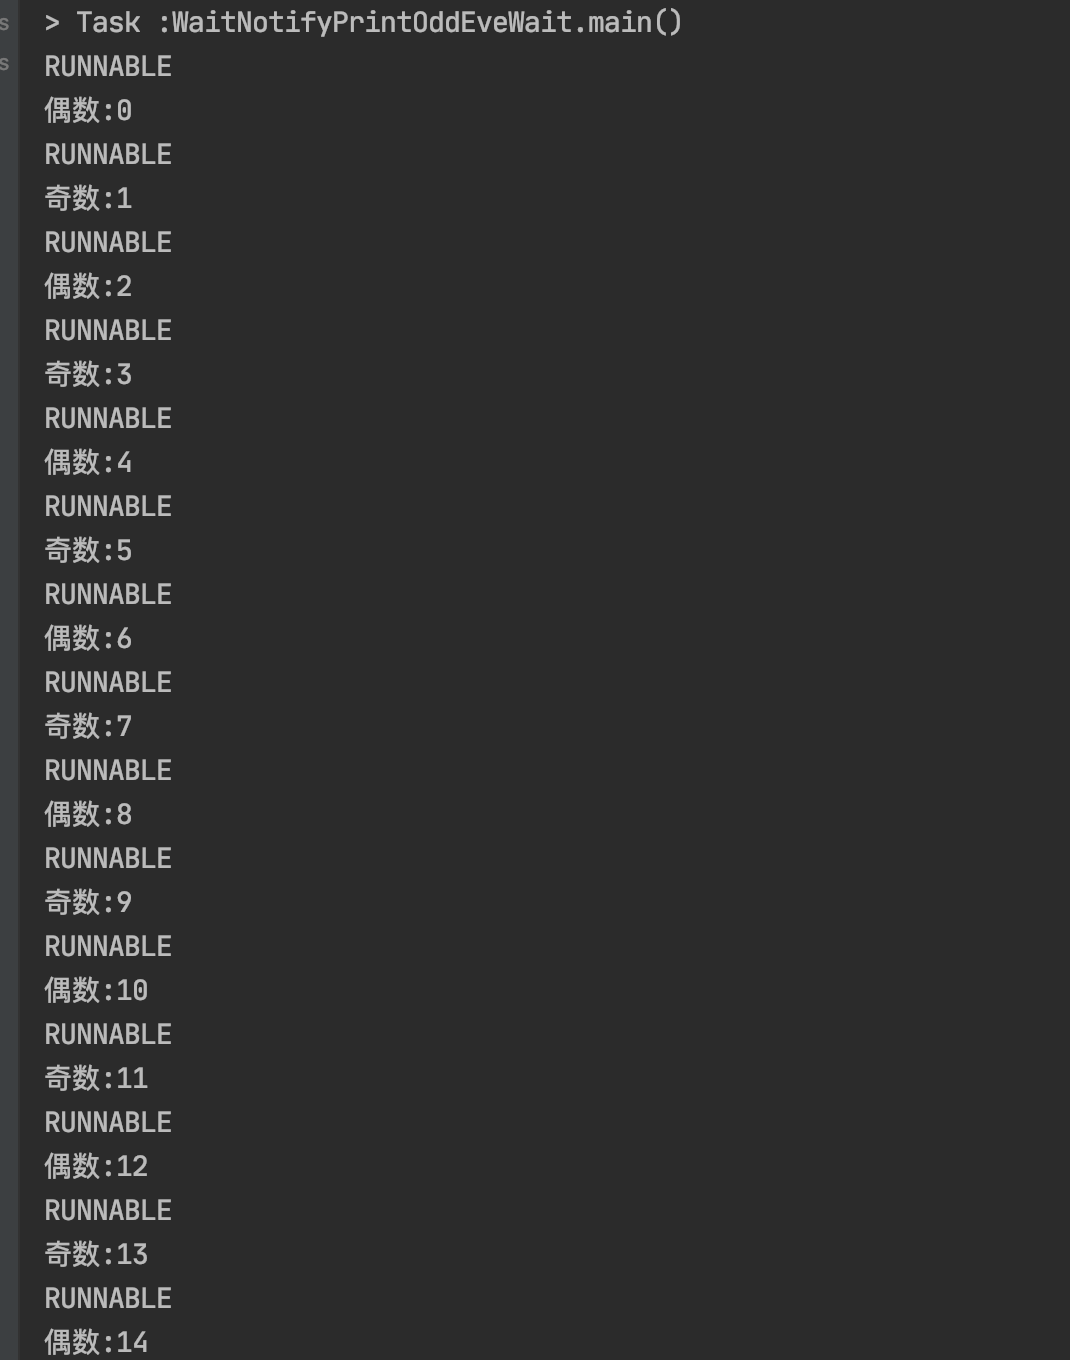
- wait() 为什么需要放在同步代码块内使用,而sleep()不需要
为了让通信变的可靠,防止死锁或者永久等待的发生,因为如果不把wait/notify放到同步代码块中,那么很有可能线程执行到wait之前,就切换到了另一个线程,而另一个线程执行了notify方法,又切回来那么当前的线程就会处于永久等待/死锁的状态了.Java设计的线程间需要互相配合的都要放到同步代码块中执行.而sleep()只有当前线程的和其他线程关系不大所以不用放到同步代码块中执行.
- 为什么线程通信的方法wait() notify() notifyAll()被定义到Object类?
主要是锁级别操作,而锁是属于某一个对象的,而并不是线程中,而线程中一个线程又可以同时持有多把锁,如果定义在Thread类中就没有办法实现灵活的逻辑了.
Thread.wait() 在线程退出的时候会自动调用notify() 这样就破坏了我们代码的执行逻辑.所以尽量不要使用Thread.wait()方法
JavaSE JavaEE JavaME 是什么? JavaSE 标准开发 JavaEE企业级开发 JavaME 移动开发 JRE和JDK和JVM是什么关系? JRE是一个环境Java运行时的环境,服务器可以只装jre可以不装JDK节省空间 JDK是开发工具包,是给开发者用的,JDK是包含JRE的 JVM:是JRE的一部分,Java虚拟机
sleep 方法讲解
作用:只想让线程在预期的时间执行,其他时候不要占用CPU资源.
sleep 不释放锁:包括synchronized和lock
和wait不同.
展示线程sleep的时候不释放synchronized 的monitor
public class SleepDontResealeMonitor implements Runnable {public static void main(String[] args) {SleepDontResealeMonitor sleepDontResealeMonitor = new SleepDontResealeMonitor();new Thread(sleepDontResealeMonitor).start();new Thread(sleepDontResealeMonitor).start();}@Overridepublic void run() {syn();}private synchronized void syn() {System.out.println(Thread.currentThread().getName()+"获得了monitor");try {Thread.sleep(5000);} catch (InterruptedException e) {e.printStackTrace();}System.out.println(Thread.currentThread().getName()+"退出了了monitor");}}
运行结果如下:wait()和sleep()的区别,很显然sleep()不会释放锁.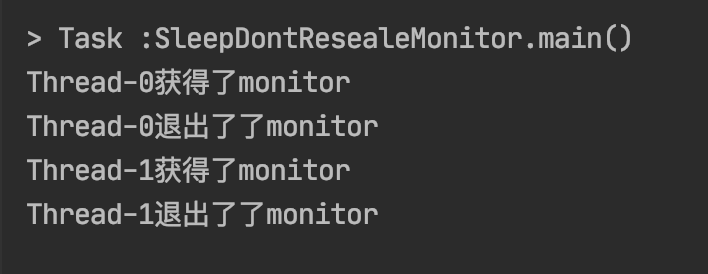
演示sleep不释放lock(lock需要手动释放)
ublic class SleepDontReleaseLock implements Runnable {private static final Lock l= new ReentrantLock();public static void main(String[] args) {SleepDontReleaseLock sleepDontReleaseLock = new SleepDontReleaseLock();new Thread(sleepDontReleaseLock).start();new Thread(sleepDontReleaseLock).start();}@Overridepublic void run() {l.lock();System.out.println("线程"+Thread.currentThread().getName()+"获取到了锁");try {Thread.sleep(5000);System.out.println("线程"+Thread.currentThread().getName()+"已经苏醒");} catch (InterruptedException e) {e.printStackTrace();}finally {l.unlock();}}}
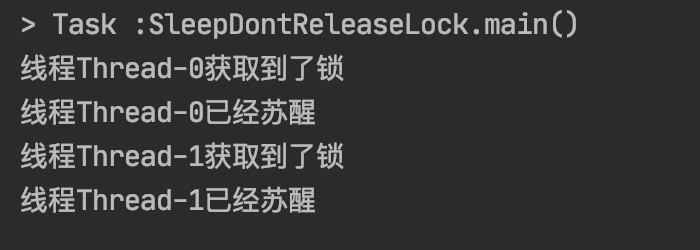
- sleep方法响应中断
- 抛出InterruptedException
- 清除中断状态
下面通过代码来演示一下:
/*** 休眠中被中断 观察* Thread.sleep()* TimeUnit.SECONDS.sleep()*/public class SleepInterrupted implements Runnable {public static void main(String[] args) throws InterruptedException {SleepInterrupted sleepInterrupted = new SleepInterrupted();Thread thread = new Thread(sleepInterrupted);thread.start();Thread.sleep(5000);thread.interrupt();}@Overridepublic void run() {for (int i = 0; i < 10; i++) {System.out.println(new Date());try {TimeUnit.SECONDS.sleep(1);} catch (InterruptedException e) {System.out.println("我被中断了");e.printStackTrace();}}}}
执行结果如下:
sleep方法可以让线程进入Waiting状态,并且不占用CPU资源,但是不释放锁,直到规定时间后再执行,休眠期间如果被中断,会抛出异常并清除中断状态.
wait/notify 和 sleep异同
- 相同
- 阻塞
- 响应中断
- 不同
- wait/notify在同步方法块中执行,而sleep不用在同步代码块中
- wait释放锁,sleep不释放锁
- sleep必须指定时间,wait不一定需要指定时间,可以一直等待直到notify唤醒
- 所属类不同,sleep()方法属于Thread类,wait/notify方法属于Object类
join方法讲解
作用:因为新的线程加入了我们,所以我们要等他执行完再出发
用法:main等待thread1执行完毕,注意谁等谁
下面通过代码实现
 public static void main(String[] args) throws InterruptedException {
        Thread thread = new Thread(new Runnable() {
            @Override
            public void run() {
                try {
                    Thread.sleep(1000);
                } catch (InterruptedException e) {
                    e.printStackTrace();
                }
                System.out.println(Thread.currentThread().getName() + "执行完毕");
            }
        });
        Thread thread2 = new Thread(new Runnable() {
            @Override
            public void run() {
                try {
                    Thread.sleep(1000);
                } catch (InterruptedException e) {
                    e.printStackTrace();
                }
                System.out.println(Thread.currentThread().getName() + "执行完毕");
            }
        });
        thread.start();
        thread2.start();
        System.out.println("开始等待子线程运行完毕");
        //主线程等待子线程执行完毕后再继续执行
        thread.join();
        thread2.join();
        //线程执行完毕会自动调用notifyAll JVM层实现的
        System.out.println("所有子线程执行完毕");
    }
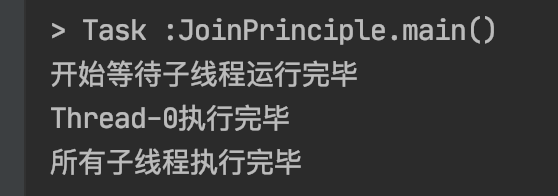
运行结果如下: 看似join方法并没有什么用,我们把join方法去掉看看结果如何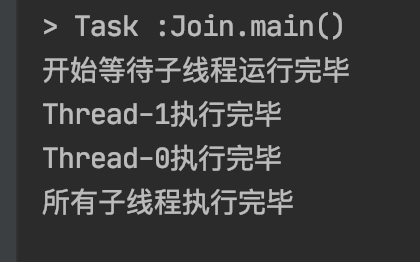
看执行顺序发生了变化:调用join方法会让主线程或父线程进入阻塞状态,等待子线程执行完毕后才会继续执行.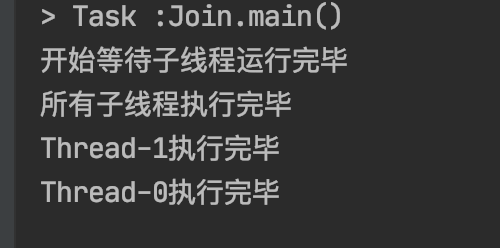
join期间,父线程处于WAITING状态
如下代码,子线程调用了join方法后,主线程处于WAITING状态.
/**
 * 先join在获取状态mainThread.getState()
 */
public class JoinThreadState {
    public static void main(String[] args) throws InterruptedException {
        Thread mainThread = Thread.currentThread();
        Thread thread = new Thread(new Runnable() {
            @Override
            public void run() {
                try {
                    Thread.sleep(3000);
                    System.out.println(mainThread.getState());//WAITING
                    System.out.println("thread-0运行结束");
                } catch (InterruptedException e) {
                    e.printStackTrace();
                }
            }
        });
        thread.start();
        System.out.println("等待子线程运行完毕");
        thread.join();
        System.out.println("子线程运行完毕");
    }
}

- join的中断处理
如下代码,如果要join发生中断,需要父线程调用中断方法interrupt(),需要注意的是当join抛出中断异常,在catch中也需要让子线程中断,否则子线程还处于运行状态.
public class JoinInterrupt {
    public static void main(String[] args) {
        Thread mainThread = Thread.currentThread();
        Thread thread = new Thread(new Runnable() {
            @Override
            public void run() {
                try {
                    //主线程中断
                    mainThread.interrupt();
                    Thread.sleep(5000);
                    System.out.println("thread1 finished.");
                } catch (InterruptedException e) {
                    e.printStackTrace();
                    System.out.println("子线程中断");
                }
            }
        });
        thread.start();
        System.out.println("等待子线程执行完毕");
        try {
            thread.join();//主线程等待子线程运行完毕
        } catch (InterruptedException e) {
            System.out.println(Thread.currentThread().getName()+"主线程中断了");
            e.printStackTrace();
            //一旦join被中断 那么子线程也要去中断 否则子线程一直处于运行状态
            thread.interrupt();
        }
        System.out.println("子线程已经运行完毕");
    }
}
如下运行结果: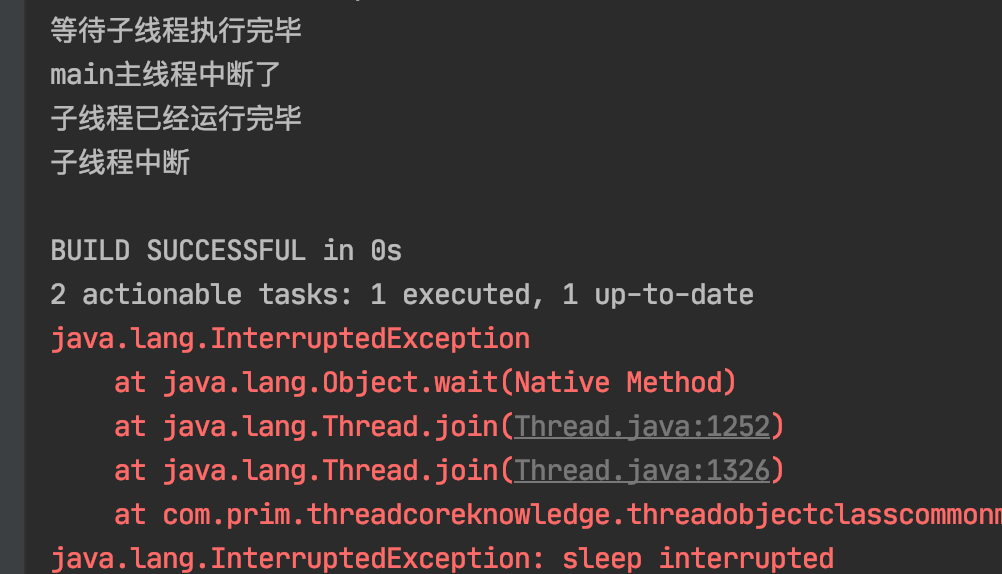
- join原理分析
如下代码是Thread中调用join方法的源码,其实源码中就是调用了wait()方法,使父线程处于等待状态,当子线程运行完毕在JVM源码中会自动调用notify唤醒父线程,使父线程继续运行.非常简单的原理.
   public final void join() throws InterruptedException {
        join(0);
    }
public final synchronized void join(long millis)
    throws InterruptedException {
        long base = System.currentTimeMillis();
        long now = 0;

        if (millis < 0) {
            throw new IllegalArgumentException("timeout value is negative");
        }

        if (millis == 0) {
            while (isAlive()) {
                wait(0);
            }
        } else {
            while (isAlive()) {
                long delay = millis - now;
                if (delay <= 0) {
                    break;
                }
                wait(delay);
                now = System.currentTimeMillis() - base;
            }
        }
    }
下面我们不使用join方法,来实现join的效果
如下代码,下面我们来分析一下代码,主线程获得子线程对象锁,然后调用wait()方法,是主线程处于等待状态.
public class JoinPrinciple {
    public static void main(String[] args) throws InterruptedException {
        Thread thread = new Thread(new Runnable() {
            @Override
            public void run() {
                try {
                    Thread.sleep(2000);
                } catch (InterruptedException e) {
                    e.printStackTrace();
                }
                System.out.println(Thread.currentThread().getName() + "执行完毕");
            }
        });
        thread.start();
        System.out.println("开始等待子线程运行完毕");
        //主线程等待子线程执行完毕后再继续执行
//        thread.join();
        //等价于join 主线程拿到锁
        synchronized (thread){
            //执行wait 主线程陷入休眠状态notify唤醒主线程
            thread.wait();
        }
        //线程执行完毕会自动调用notifyAll JVM层实现的
        System.out.println("所有子线程执行完毕");
    }
}
yield方法讲解
作用: 释放我的CPU时间片
JVM并不一定保证yield遵循,一般开发中不使用yield,但是在并发开发包中有使用到yield
yield和sleep区别:是否随时可能再次被调度

