App的启动流程
App的启动,关于系统层面的Zygote -> ActivityThread (中间的步骤先滤过)我们后面再讲,这里着重讲系统服务调用ActivityThread之后的流程.
首先看一下流程图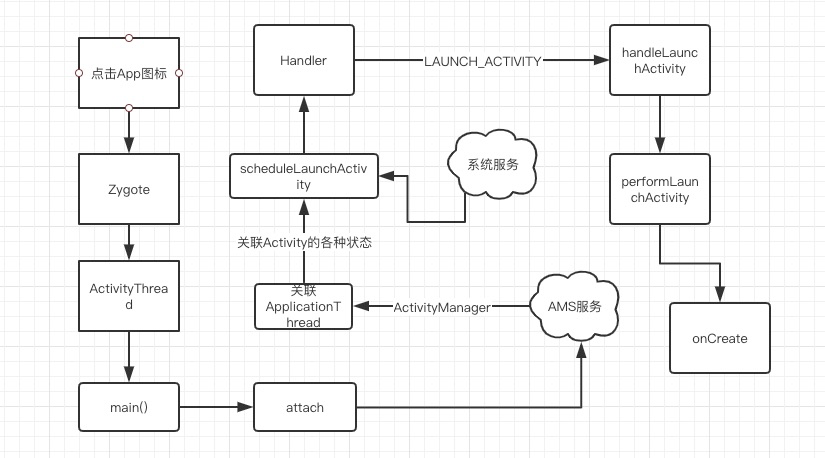
如上图中,当我们点击一个App启动的时候Zygote底层会经过一系列的调用,最终会调到ActivityThread的main()方法.
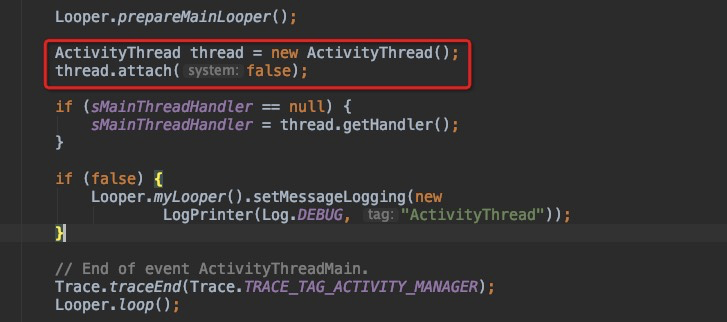
在main方法中主要做了一些初始化的工作,开启Looper循环,new ActivityThread(),调用attach方法
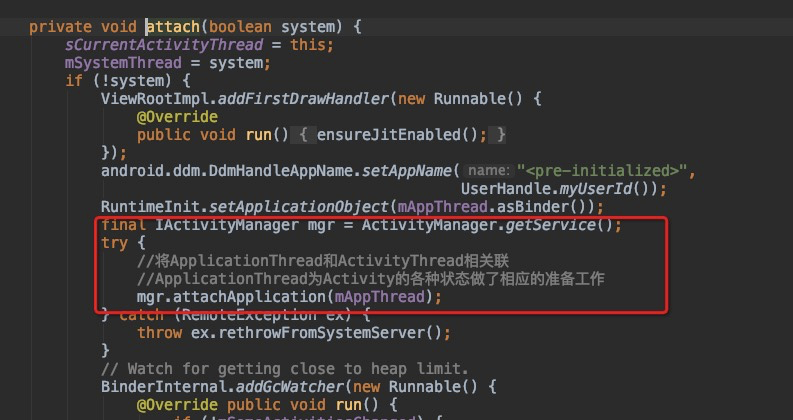
再来看看attach方法中做了什么? 调用系统的ActivityManagerService通过Binder获得IActivityManager来绑定ApplicationThread,通过ApplicationThread来响应Activity的各种状态调用生命周期方法.
来看ApplicationThread中是如何启动Activity?通过系统服务来调用scheduleLaunchActivity()方法,我们可以看到ActivityClientRecord 相当于Activity的一个包装类,内部存储着Activity,我们会在后面看到它的作用,之后会调用sendMessage(),点击去看sendMessage方法,可以看到很熟悉的代码,没错就是Message,很显然通过Handler发送一个消息.

那么我们在来看一下Handler是如何处理LAUNCH_ACTIVITY这个消息的呢? 从字面意思上看就是启动Activity,我们来看如何启动的.在Handler内部会找到一个方法handleMessage来处理消息,如果遇到LAUNCH_ACTIVITY就会执行handleLaunchActivity()方法,我们来看一下这个方法中做了些什么?
可以看到,在这个方法中,调用performLaunchActivity()方法,这个方法返回了一个Activity,那么在这个方法中,肯定new 了一个Activity.来看一下这个方法.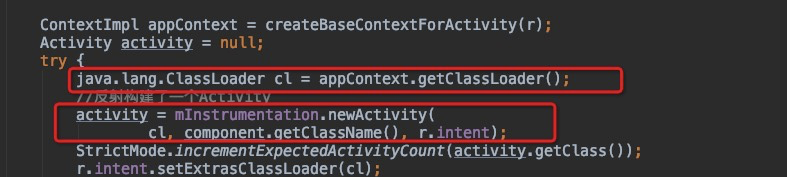


看上面三个图,我从performLaunchActivity()找到了三个关键的部分,首先从第一张图,它竟然使用了反射来创建了一个Activity,看来底层代码,也用到了很多反射.第二张图,创建完Activity后,调用了Activity的attach()方法.第三张图,回调了onCreate(). 原来如此,我们经常使用的onCreate()方法就是在这里回调的.
关于mInstrumentation是一个辅助的类,如下图,它是这样调用onCreate方法的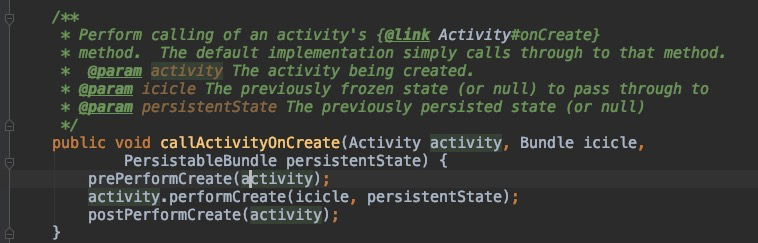
通过上述流程,启动了一个Activity,并且调用了Activity的onCreate()方法,但是Activity的界面还没有绘制出来,我们都知道在Activity的onCreate()方法中会调用setContentView(),我们看一下这个方法内部的做了什么?
setConentView执行流程
我们可以看到在Activity中的setContentView()方法,显然调用了Window的setContentView,那么这个window是从那里来的呢?
public void setContentView(@LayoutRes int layoutResID) {//PhoneWindow加载布局资源getWindow().setContentView(layoutResID);//初始化ActionBarinitWindowDecorActionBar();}
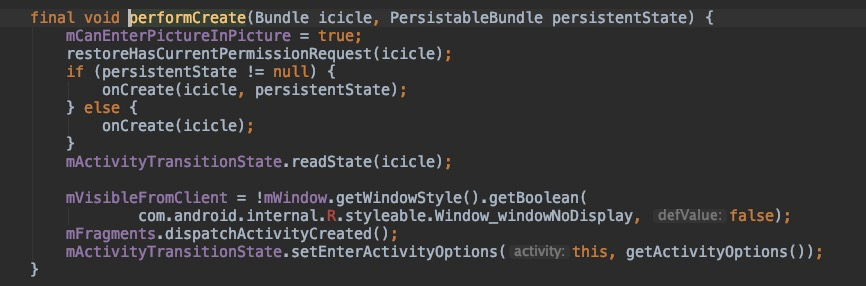
如下代码,原来在attach中初始化了Window,这个window就是PhoneWindow,我们都知道attach方法是在上述的启动Activity中调用的它是在onCreate之前就被调用了.
final void attach(Context context, ActivityThread aThread,Instrumentation instr, IBinder token, int ident,Application application, Intent intent, ActivityInfo info,CharSequence title, Activity parent, String id,NonConfigurationInstances lastNonConfigurationInstances,Configuration config, String referrer, IVoiceInteractor voiceInteractor,Window window, ActivityConfigCallback activityConfigCallback) {attachBaseContext(context);mFragments.attachHost(null /*parent*/);//TODO 此处Window被赋值 是PhoneWindowmWindow = new PhoneWindow(this, window, activityConfigCallback);}
那么接下来我们来看一下PhoneWindow中的setContentView方法. 看下面的代码,我们需要注意几个点,从下面代码可以看到我们将我们的资源xml添加到了mContentParent中,这个mContentParent是在installDecor中初始化的,那么接下来的步骤就是研究installDecor方法.
@Overridepublic void setContentView(int layoutResID) {// 注意:在安装窗口的过程中可能会设置FEATURE_CONTENT_TRANSITIONS// Note: FEATURE_CONTENT_TRANSITIONS may be set in the process of installing the window// decor,当主题属性等明确化时。不检查功能// decor, when theme attributes and the like are crystalized. Do not check the feature// 在此发生之前// before this happens.if (mContentParent == null) {//mContentParent = android.id.content//装载DecorView 最上层的ViewinstallDecor();} else if (!hasFeature(FEATURE_CONTENT_TRANSITIONS)) {mContentParent.removeAllViews();}......}
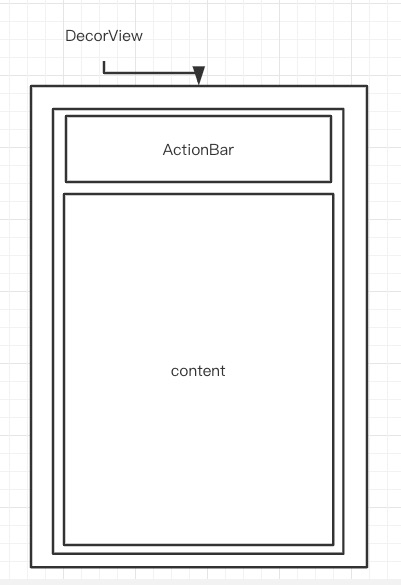
看下面的代码,mDecor其实我们猜测就可以知道.它就是DecorView.都知道DecorView是最上层的View,我们来看一下generateDecor()方法是否初始化了DecorView.
private void installDecor() {mForceDecorInstall = false;if (mDecor == null) {//DecorView 初始化 new DecorViewmDecor = generateDecor(-1);mDecor.setDescendantFocusability(ViewGroup.FOCUS_AFTER_DESCENDANTS);mDecor.setIsRootNamespace(true);if (!mInvalidatePanelMenuPosted && mInvalidatePanelMenuFeatures != 0) {mDecor.postOnAnimation(mInvalidatePanelMenuRunnable);}} else {mDecor.setWindow(this);}if (mContentParent == null) {//内容初始化 所有的xml布局都在其中mContentParent = generateLayout(mDecor);...}....}
来看generateDecor方法,和我们猜测的没错它就是new 了一个 DecorView.那么到这里其实就很明显了,mContentParent其实就是我们经常使用的android.R.id.content,不信我们看一下generateLayout
protected DecorView generateDecor(int featureId) {// System process doesn't have application context and in that case we need to directly use// the context we have. Otherwise we want the application context, so we don't cling to the// activity.Context context;if (mUseDecorContext) {Context applicationContext = getContext().getApplicationContext();if (applicationContext == null) {context = getContext();} else {context = new DecorContext(applicationContext, getContext().getResources());if (mTheme != -1) {context.setTheme(mTheme);}}} else {context = getContext();}return new DecorView(context, featureId, this, getAttributes());}
generateLayout()方法如下,代码比较多,我们从头分析,首先映入眼帘的是requestFeature(),这个方法大家肯定非常熟悉,getWindow().requestFeature(),因为我们经常会调用这个方法,这也是为什么我们必须要设置在setContentView前面的原因.其实从源码中可以发现很多乐趣.
//requestFeature 在window上设置requestFeature必须找setContentView 之前的原因if (a.getBoolean(R.styleable.Window_windowNoTitle, false)) {requestFeature(FEATURE_NO_TITLE);} else if (a.getBoolean(R.styleable.Window_windowActionBar, false)) {// Don't allow an action bar if there is no title.requestFeature(FEATURE_ACTION_BAR);}if (a.getBoolean(R.styleable.Window_windowActionBarOverlay, false)) {requestFeature(FEATURE_ACTION_BAR_OVERLAY);}if (a.getBoolean(R.styleable.Window_windowActionModeOverlay, false)) {requestFeature(FEATURE_ACTION_MODE_OVERLAY);}if (a.getBoolean(R.styleable.Window_windowSwipeToDismiss, false)) {requestFeature(FEATURE_SWIPE_TO_DISMISS);}if (a.getBoolean(R.styleable.Window_windowFullscreen, false)) {setFlags(FLAG_FULLSCREEN, FLAG_FULLSCREEN & (~getForcedWindowFlags()));}
然后我们继续看generateLayout()方法,下面的代码.这里我们会发现它竟然加载了布局文件,并且添加到了DecorView中,我们随便点开一个布局看看是否是系统给我们提供的布局.
//TODO 会加载一些最基础的布局 可能有状态栏可能没有状态栏的基础布局 有多种基础布局int layoutResource;int features = getLocalFeatures();// System.out.println("Features: 0x" + Integer.toHexString(features));if ((features & (1 << FEATURE_SWIPE_TO_DISMISS)) != 0) {layoutResource = R.layout.screen_swipe_dismiss;setCloseOnSwipeEnabled(true);} else if ((features & ((1 << FEATURE_LEFT_ICON) | (1 << FEATURE_RIGHT_ICON))) != 0) {if (mIsFloating) {TypedValue res = new TypedValue();getContext().getTheme().resolveAttribute(R.attr.dialogTitleIconsDecorLayout, res, true);layoutResource = res.resourceId;} else {layoutResource = R.layout.screen_title_icons;}// XXX Remove this once action bar supports these features.removeFeature(FEATURE_ACTION_BAR);// System.out.println("Title Icons!");} else if ((features & ((1 << FEATURE_PROGRESS) | (1 << FEATURE_INDETERMINATE_PROGRESS))) != 0&& (features & (1 << FEATURE_ACTION_BAR)) == 0) {// Special case for a window with only a progress bar (and title).// XXX Need to have a no-title version of embedded windows.layoutResource = R.layout.screen_progress;// System.out.println("Progress!");} else if ((features & (1 << FEATURE_CUSTOM_TITLE)) != 0) {// Special case for a window with a custom title.// If the window is floating, we need a dialog layoutif (mIsFloating) {TypedValue res = new TypedValue();getContext().getTheme().resolveAttribute(R.attr.dialogCustomTitleDecorLayout, res, true);layoutResource = res.resourceId;} else {layoutResource = R.layout.screen_custom_title;}// XXX Remove this once action bar supports these features.removeFeature(FEATURE_ACTION_BAR);} else if ((features & (1 << FEATURE_NO_TITLE)) == 0) {// If no other features and not embedded, only need a title.// If the window is floating, we need a dialog layoutif (mIsFloating) {TypedValue res = new TypedValue();getContext().getTheme().resolveAttribute(R.attr.dialogTitleDecorLayout, res, true);layoutResource = res.resourceId;} else if ((features & (1 << FEATURE_ACTION_BAR)) != 0) {layoutResource = a.getResourceId(R.styleable.Window_windowActionBarFullscreenDecorLayout,R.layout.screen_action_bar);} else {layoutResource = R.layout.screen_title;}// System.out.println("Title!");} else if ((features & (1 << FEATURE_ACTION_MODE_OVERLAY)) != 0) {layoutResource = R.layout.screen_simple_overlay_action_mode;} else {// Embedded, so no decoration is needed.// 绘制一个最基础的布局layoutResource = R.layout.screen_simple;// System.out.println("Simple!");}mDecor.startChanging();mDecor.onResourcesLoaded(mLayoutInflater, layoutResource);//在这个方法中进行了添加view的操作void onResourcesLoaded(LayoutInflater inflater, int layoutResource) {mStackId = getStackId();if (mBackdropFrameRenderer != null) {loadBackgroundDrawablesIfNeeded();mBackdropFrameRenderer.onResourcesLoaded(this, mResizingBackgroundDrawable, mCaptionBackgroundDrawable,mUserCaptionBackgroundDrawable, getCurrentColor(mStatusColorViewState),getCurrentColor(mNavigationColorViewState));}mDecorCaptionView = createDecorCaptionView(inflater);final View root = inflater.inflate(layoutResource, null);if (mDecorCaptionView != null) {if (mDecorCaptionView.getParent() == null) {addView(mDecorCaptionView,new ViewGroup.LayoutParams(MATCH_PARENT, MATCH_PARENT));}mDecorCaptionView.addView(root,new ViewGroup.MarginLayoutParams(MATCH_PARENT, MATCH_PARENT));} else {// Put it below the color views.addView(root, 0, new ViewGroup.LayoutParams(MATCH_PARENT, MATCH_PARENT));}mContentRoot = (ViewGroup) root;initializeElevation();}
我们来看一下R.layout.screen_simple这个布局文件,代码如下.是不是很熟悉的代码,action_mode_bar_stub应该是ActionBar,同时我们还看到了@android:id/content,原来如此.在我们设置自己的布局文件的是否,系统会根据样式加载一个基础布局,然后我们自己的布局文件添加到基础布局的content中.
<LinearLayout xmlns:android="http://schemas.android.com/apk/res/android"android:layout_width="match_parent"android:layout_height="match_parent"android:fitsSystemWindows="true"android:orientation="vertical"><ViewStub android:id="@+id/action_mode_bar_stub"android:inflatedId="@+id/action_mode_bar"android:layout="@layout/action_mode_bar"android:layout_width="match_parent"android:layout_height="wrap_content"android:theme="?attr/actionBarTheme" /><FrameLayoutandroid:id="@android:id/content"android:layout_width="match_parent"android:layout_height="match_parent"android:foregroundInsidePadding="false"android:foregroundGravity="fill_horizontal|top"android:foreground="?android:attr/windowContentOverlay" /></LinearLayout>
我们继续看,generateLayout()这个方法,很明显将android.R.id.content的ViewGroup返回了.
//加载内容 这里才会将你创建的xml放到这个view中ViewGroup contentParent = (ViewGroup)findViewById(ID_ANDROID_CONTENT);....return contentParent;
在installDecor()方法执行完毕之后,这时候我们得到了mDecor和mContentParent,我们再回到setContentView(),可以看到我们熟悉的方法inflate,将我们自己的资源xml添加到了mContentParent
if (hasFeature(FEATURE_CONTENT_TRANSITIONS)) {final Scene newScene = Scene.getSceneForLayout(mContentParent, layoutResID,getContext());transitionTo(newScene);} else {//加载配置文件,放到mContentParent 中mLayoutInflater.inflate(layoutResID, mContentParent);}mContentParent.requestApplyInsets();final Callback cb = getCallback();if (cb != null && !isDestroyed()) {cb.onContentChanged();}mContentParentExplicitlySet = true;
经过以上的流程,onCreate()方法算是执行完毕了,但是页面并没有进行绘制,那么页面是在那里进行绘制的呢?有过经验的同学肯定知道页面的绘制是在onResume()方法执行之后进行绘制的.
UI是如何绘制的?
既然在上述的流程中我们猜测页面的绘制是在onResume()方法回调之后进行绘制的,那我们在回到ActivityThread的ApplicationThread,我们知道系统服务通过调用ApplicationThread,来调用了Activity的各种状态.我们可以从handleMessage中可以找到类似:RESUME_ACTIVITY 没错这个就是onResume()的回调
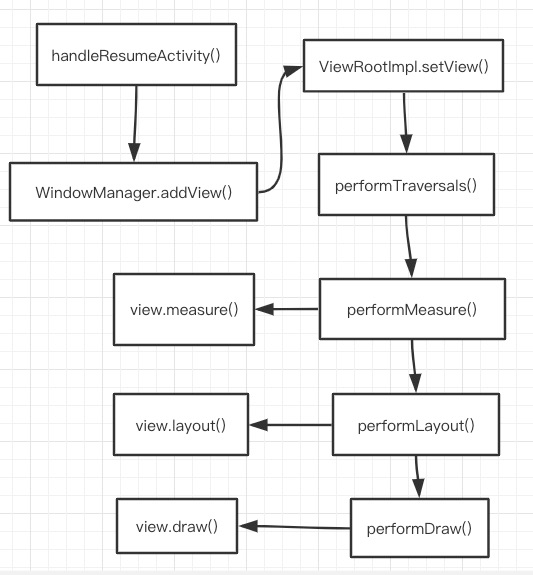
final void handleResumeActivity(IBinder token,boolean clearHide, boolean isForward, boolean reallyResume, int seq, String reason) {ActivityClientRecord r = mActivities.get(token);....r = performResumeActivity(token, clearHide, reason);//调用Activity的onResume()方法....if (r.window == null && !a.mFinished && willBeVisible) {r.window = r.activity.getWindow();//获取布局View decor = r.window.getDecorView();decor.setVisibility(View.INVISIBLE);ViewManager wm = a.getWindowManager();//所有自己的资源WindowManager.LayoutParams l = r.window.getAttributes();a.mDecor = decor;l.type = WindowManager.LayoutParams.TYPE_BASE_APPLICATION;l.softInputMode |= forwardBit;if (r.mPreserveWindow) {a.mWindowAdded = true;r.mPreserveWindow = false;// Normally the ViewRoot sets up callbacks with the Activity// in addView->ViewRootImpl#setView. If we are instead reusing// the decor view we have to notify the view root that the// callbacks may have changed.ViewRootImpl impl = decor.getViewRootImpl();if (impl != null) {impl.notifyChildRebuilt();}}if (a.mVisibleFromClient) {if (!a.mWindowAdded) {a.mWindowAdded = true;//TODO 添加Viewwm.addView(decor, l);} else {// The activity will get a callback for this {@link LayoutParams} change// earlier. However, at that time the decor will not be set (this is set// in this method), so no action will be taken. This call ensures the// callback occurs with the decor set.a.onWindowAttributesChanged(l);}}// If the window has already been added, but during resume// we started another activity, then don't yet make the// window visible.}.......}
从上述代码中,我们可以看到先执行了onResume()方法然后在进行了UI的绘制,从源码中,我们可以看出很多问题,第一点就是我们不能在onResume()方法中执行耗时的操作,否则会影响UI的绘制,影响用户体验.
我们再回到代码中,可以看到通过activity获取到window的DecorView,然后将DecorView交给ViewManager进行绘制,最终我们可以找到WindowManagerGlobal来实现ViewManager接口的方法.然后我们去看其中的addView的方法,addView()方法将DecorView和LayoutParams传递了过去.最终调用了ViewRootImpl的setView()方法,将DecorView和LayoutParams传递了过去.
//root = new ViewRootImpl(view.getContext(), display);//DecorView 调用了setLayoutParamsview.setLayoutParams(wparams);//优化性能坑、可能mViews.add(view);//DecorViewmRoots.add(root);//ViewRootImplmParams.add(wparams);//layout参数// do this last because it fires off messages to start doing thingstry {//ViewRootImpl 中调用了 requestLayoutroot.setView(view, wparams, panelParentView);} catch (RuntimeException e) {// BadTokenException or InvalidDisplayException, clean up.if (index >= 0) {removeViewLocked(index, true);}throw e;}
我们继续看ViewRootImpl中的setView()的方法.我们可以看到主要执行了requestLayout()方法,requestLayout()做了什么呢?最终执行了doTraversal()方法
@Overridepublic void requestLayout() {if (!mHandlingLayoutInLayoutRequest) {checkThread();mLayoutRequested = true;scheduleTraversals();}}void scheduleTraversals() {if (!mTraversalScheduled) {mTraversalScheduled = true;mTraversalBarrier = mHandler.getLooper().getQueue().postSyncBarrier();mChoreographer.postCallback(Choreographer.CALLBACK_TRAVERSAL, mTraversalRunnable, null);if (!mUnbufferedInputDispatch) {scheduleConsumeBatchedInput();}notifyRendererOfFramePending();pokeDrawLockIfNeeded();}}final class TraversalRunnable implements Runnable {@Overridepublic void run() {doTraversal();}}
继续看doTraversal()方法,做了什么主要执行了performTraversal()方法,在这个方法中执行view的绘制.其实主要执行了三个方法performMeasure() -> performLayout() -> performDraw().这里其实都是调用了view的measure() -> layout() -> draw(),这三个方法大家肯定非常熟悉的,因为这时自定义view的必须要重写的方法啊有不有!!! 这样整个流程下来,我们写的布局资源文件就在Activity中显示出来了
private void performTraversals() {....//TODO 1 加载窗体的一些资源WindowManager.LayoutParams lp = mWindowAttributes;....//TODO 2先画了个矩形 确定位置Rect frame = mWinFrame;....//TODO 3测量ViewperformMeasure(childWidthMeasureSpec, childHeightMeasureSpec);....//TODO 4 调用完测量后 开始进行布局摆放performLayout(lp, mWidth, mHeight);.....if (!cancelDraw && !newSurface) {if (mPendingTransitions != null && mPendingTransitions.size() > 0) {for (int i = 0; i < mPendingTransitions.size(); ++i) {mPendingTransitions.get(i).startChangingAnimations();}mPendingTransitions.clear();}//TODO 开始绘制performDraw();} else {if (isViewVisible) {// Try againscheduleTraversals();} else if (mPendingTransitions != null && mPendingTransitions.size() > 0) {for (int i = 0; i < mPendingTransitions.size(); ++i) {mPendingTransitions.get(i).endChangingAnimations();}mPendingTransitions.clear();}}}
整个UI绘制的流程如下图所示:
总结
从上述的UI绘制流程中,我们可以学习到很多知识,包括Activity的启动和绘制以及在setContentView()之前我们可以做的一些配置,还有不能在onResume()方法中进行耗时操作,否则会影响界面的绘制.
但是我们只知道了UI的绘制流程,那么UI如何具体绘制的呢? 我会在下一章中进行讲解,UI的具体绘制过程.

若有收获,就点个赞吧
0 人点赞
