变量的定义以及类型
var 定义可变的变量,val 定义不可变的变量,var 和 val会自动推导类型,var 一旦确定类型,就不能赋值其他类型的值. 在
变量名:类型来声明具体类型的变量
var age = 18 // 类型推断// age = "12" 一旦确定类型 就不能更改类型val name = "kotlin"const val name = "kotlin" // 编译期的常量 等价于 final// val world = World()var j:String = "123"
kotlin 中方法的定义:
fun doubleNumber(x: Int): Int {return x * 2}
kotlin 中和Java中的public private protect 三种设置一致。
在Kotlin 语言体系中一切皆对象,没有像Java类似的原始类型和包装类型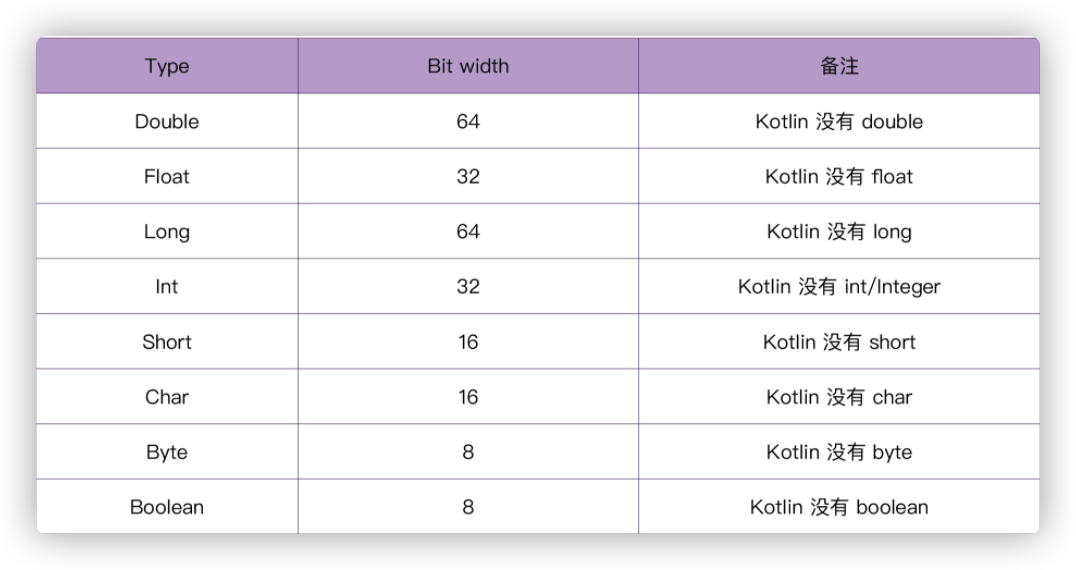
空安全机制
? 表示可空类型,!! 表示强制调用,会存在空指针异常。
lateinit 延后初始化,不可空,不能有初始值.
?. 表示如果不为空则调用方法,如果为空则不调用
// 延迟初始化private lateinit var et_username: EditText// 可空变量private var et_password: EditText? = null// 不可空时调用et_password?.text = Editable.Factory.getInstance().newEditable(CacheUtils.get(passwordKey))// 强制调用et_password!!.text = Editable.Factory.getInstance().newEditable(CacheUtils.get(passwordKey))
Kotlin 平台类型,无法做到是否为空的判断,因为在Java平台如果标记了@Nullable 那么kotlin就可以判断是否为空了
// kotlin 平台类型 无法做到是否为空的判断,// 如果Java标记@Nullable kotlin就可以判断是否可空了 Button? CodeView!//delegate.findViewById 标记了@Nullable 所以默认Button?val btn_login:Button? = delegate.findViewById<Button>(R.id.btn_login)// findViewById 在Java平台没有标记@Nullable注解,所以不能判空,强制设置不为空CodeView!// 如果为空则报空指针异常val img_code:CodeView! = findViewById<CodeView>(R.id.code_view)
如果将强制调用符用在结尾 CacheUtils.get(passwordKey)!! 表示会做非空判断,如果是null抛出异常,不是null则正常返回
类型判断与强转
is关键字判断类型,as关键字进行强转。
// is 判断类型if (view is CodeView) {// as 进行强制转换,因为通过了is判断,可以直接调用// val codeView = view as CodeView// 可以直接调用,智能判断类型,不需要强转view.updateCode()} else if (view is Button) {login()}
获取kotlin类和Java类
通过
类名::class获取kotlin类型,通过类名::class.java获取Java类型
// kotlin获取class对象:LessonActivity::class 注意这是kotlin的class对象// 要获取Java的对象需要LessonActivity::class.javastartActivity(Intent(this, LessonActivity::class.java))
kotlin 中的静态变量与单例
顶层函数
- kotlin 可以直接定义文件,不用像Java一样定义类,kotlin文件中定义的函数称为顶层函数也叫包级函数,在文件中定义的变量和方法,文件中的变量和方法可以直接访问。
- @file:JvmName() 改变文件名,如果不改变那么Java访问kotlin文件需要
文件名Kt.xx需要在文件名后面加上Kt.
@file:JvmName("Utils") //改变文件名,否则Java默认调用UtilsKt.xx//改变之后可以通过 Utils.xx调用package com.example.core.utilsimport android.content.res.Resourcesimport android.util.TypedValueimport android.widget.Toastimport com.example.core.BaseApplication// 静态变量 第一种:定义在文件中 顶层函数也叫包级函数private val displayMetrics = Resources.getSystem().displayMetricsfun dp2px(dp: Float): Float {return TypedValue.applyDimension(TypedValue.COMPLEX_UNIT_DIP, dp, displayMetrics)}fun toast(string: String) {toast(string, Toast.LENGTH_SHORT)}fun toast(string: String, duration: Int) {Toast.makeText(BaseApplication.currentApplication(), string, duration).show()}
kotlin 中调用:
import com.example.core.utils.toasttoast("用户名不合法")
Java 中的调用:@file:JvmName("Utils") //改变文件名,否则Java默认调用UtilsKt.xx
import com.example.core.utils.Utils;public class Test {public static void main(String[] args) {Utils.toast("");}}
单例
kotlin中实现单例非常简单,通过object关键字就可以定义单例类,kotlin中调用
类名.xxx()类似静态变量的调用方式,Java中的调用类名.INSTANCE.xx().
//kotlin 第二种静态变量的方式:和第一种的顶层不一样,通过类名.xx方式调用//object 实现了一个单例类,通过单例对象来访问的,Java中需要:类名.INSTANCE.xx@SuppressLint("StaticFieldLeak")object CacheUtils {@SuppressLint("StaticFieldLeak")val context: Context = BaseApplication.currentApplication()val SP: SharedPreferences =context.getSharedPreferences(context.getString(R.string.app_name), Context.MODE_PRIVATE)fun save(key: String, value: String) {SP.edit().putString(key, value).apply()}fun get(key: String): String? {return SP.getString(key, null)}}
伴生对象
kotlin中的伴生对象,其实和Java中的类的静态变量static类似,在某个类内部定义静态变量。
@JvmStatic可以是Java调用类似:类名.xx否则在Java中就是类名.Compone.xx()
class BaseApplication : Application() {override fun attachBaseContext(base: Context?) {super.attachBaseContext(base)currentApplication = this}// 伴生对象,在某个类的内部定义静态变量companion object {private lateinit var currentApplication: Context// 变成Java中的静态方法 类名.xxx@JvmStaticfun currentApplication(): Context {return currentApplication}}}
简化上述的调用方式,可以直接减少方法:
class BaseApplication : Application() {override fun attachBaseContext(base: Context?) {super.attachBaseContext(base)currentApplication = this}// 伴生对象,在某个类的内部定义静态变量companion object {@JvmStatic //方便Java 实现静态变量的方式调用// @get:JvmName 方便Java调用@get:JvmName("currentApplication")lateinit var currentApplication: Contextprivate set // 不能调用set// // 变成Java中的静态方法 类名.xxx// @JvmStatic// fun currentApplication(): Context {// return currentApplication// }}}
构造器和set/get
构造器
kotlin 中的构造函数实现方式有两种:一种通过
constructor声明构造函数,一种是通过在类名(val str:String)类似
// kotlin所有的类 继承Any open class 表示可以被继承class User : Any {// kotlin 默认构造函数constructor()// 可以声明多个构造函数constructor(username: String?, password: String?, code: String?) {this.username = usernamethis.password = passwordthis.code = code}var username: String? = nullvar password: String? = nullvar code: String? = null}
第二种方式简化了构造函数 主构造器,如果构造函数中不需要特别复杂的业务可以不用进行上述的constructor,直接在类上声明. 通过var和val声明的变量,都可以被外部调用,称为构造属性,直接写变量名那么外部不可以调用。
class Person(var string: String,val s:String, age: Int) {}val p = Person("1","2",1)p.string = "2"// p.age 外部无法调用open class User constructor() {// kotlin声明构造器constructor(username: String?, password: String?, code: String?) : this() {this.username = usernamethis.password = passwordthis.code = code}}
get/set
kotlin 默认实现了get和set方法,也可以自定义实现get/set方法进行如下调用:
// kotlin将setter和getter和属性关联在一起了,默认已经实现了var code: String? = null// set(value) {// field = value// }// get() {// return field// }
kotlin 可以直接调用
xx.code = xxx; xx.code,Java 需要使用setXX()和getXX(),要想Java直接使用xx.code的方式@JvmField生成一个公开的成员变量 在Java中可以直接访问不用get/set了
@JvmField //生成一个公开的成员变量 在Java中可以直接访问不用get/set了var username: String? = nullvar password: String? = null
继承与实现接口
kotlin的继承的实现:
类名: 继承类(),接口类,接口类...,但子类实现构造函数时,继承类的变化如下: 构造方法通过:super()调用继承类的构造方法,通过:this()调用其他的构造方法 Kotlin 接口的两个特性:接口属性、接口方法默认实现
class MainActivity : AppCompatActivity(), View.OnClickListener{}// 构造函数实现,可以在继承某个类时不用写()class CodeView : AppCompatTextView {constructor(context: Context) : this(context, null)constructor(context: Context, attrs: AttributeSet?) : super(context, attrs) {setTextSize(TypedValue.COMPLEX_UNIT_SP, 18f);gravity = Gravity.CENTER;setBackgroundColor(getContext().getColor(R.color.colorPrimary));setTextColor(Color.WHITE);paint.isAntiAlias = true;paint.style = Paint.Style.STROKE;paint.color = getContext().getColor(R.color.colorAccent);paint.strokeWidth = dp2px(6f);updateCode();}}
如果某个类需要被继承,需要添加open关键字
open class User : Any {}
简化继承:
class Person(var string: String, val s: String, age: Int) : User(string, s, age.toString()) {}
匿名内部类
kotlin 可以通过object关键字创建单例对象,那么匿名内部类也是使用
object:
// kotlin中创建一个匿名内部类,使用的object关键字 object:call.enqueue(object : Callback {override fun onFailure(call: Call, e: IOException) {TODO("Not yet implemented")}override fun onResponse(call: Call, response: Response) {TODO("Not yet implemented")}})
kotlin可以在字符串””中设置模板字符串
${}
when/in 关键字
in 关键字 支持表达式,kotlin中没有强制捕获异常
when (response.code()) {in 200..299 -> {val body = response.body()var json: String? = nulltry {json = body?.string()} catch (e: IOException) {e.printStackTrace()}entityCallback.onSuccess(convert(json, type))}in 400..499 -> {entityCallback.onFailure("客户端错误")}in 501..599 -> {entityCallback.onFailure("服务器错误")}else -> {entityCallback.onFailure("未知错误")}}
kotlin中定义抽象类和Java中的类似都是通过
abstract关键字
when 也可以进行值的返回:
var colorRes = R.color.playbackcolorRes = when (state) {Lesson.State.PLAYBACK -> R.color.playbackLesson.State.LIVE -> R.color.liveLesson.State.WAIT -> R.color.wait}
kotlin 简化判空操作符
kotlin中没有三元表达式,kotlin可以使用?:的形式
CacheUtils.get(passwordKey) ?: "123"
setText(R.id.tv_date, lesson.date ?: "日期待定")
枚举类
枚举:就是一组有限数量的值
enum class Human {MAN, WOMAN}fun isMan(data: Human) = when (data) {Human.MAN -> trueHuman.WOMAN -> false}
枚举中的值它的结构和引用都相等,每个枚举值值内存中都是同一个对象引用
// 枚举引用和地址都相等println(Human.WOMAN == Human.WOMAN) // trueprintln(Human.WOMAN === Human.WOMAN)//true
如果想要枚举值拥有不一样的对象引用,该如何实现呢?就是密封类
密封类
密封类是更强大的枚举类,密封类用来表示受限的类继承结构,是枚举类的扩展,枚举类型,每个枚举常量只存在一个实例,而密封类的子类可以有可包含状态的多个实例
sealed class Exprdata class Const(val number: Double) : Expr()data class Sum(val el: Expr, val e2: Expr) : Expr()object NotANumber : Expr()fun eval(expr: Expr): Double = when (expr) {is Const -> expr.numberis Sum -> eval(expr.el) + eval(expr.e2)NotANumber -> Double.NaN}fun main() {println(eval(Const(123.4)))println(eval(Sum(Const(1.2), Const(1.3))))}
密封类也经常用在 网络请求的结果封装中:
sealed class Result<out R> {data class Success<out T>(val data: T, val message: String = "") : Result<T>()data class Error(val error: Exception) : Result<Nothing>()data class Loading(val time: Long = System.currentTimeMillis()) : Result<Nothing>()}fun display(data: Result<*>) = when (data) {is Result.Success<*> -> "请求成功"is Result.Error -> "请求失败"is Result.Loading -> "请求中..."}//模拟网络请求display(Result.Success("success"))display(Result.Error(RuntimeException("e")))display(Result.Loading())
获取外部引用
this@LessonPresenter.lessons
private var lessons = ArrayList<Lesson>()private val type = object : TypeToken<List<Lesson>>() {}.typefun fetchData() {HttpClient.get(LESSON_PATH, type, object : EntityCallback<List<Lesson>> {override fun onSuccess(@NonNull lessons: List<Lesson>) {this@LessonPresenter.lessons = lessons as ArrayList<Lesson>activity.runOnUiThread { activity.showResult(lessons); }}override fun onFailure(@Nullable message: String?) {activity.runOnUiThread {toast(message ?: "网络异常")}}})}fun showPlayback() {val playbackLessons = ArrayList<Lesson>()for (lesson in lessons) {if (lesson.state == Lesson.State.PLAYBACK) {playbackLessons.add(lesson);}}activity.showResult(playbackLessons);}
嵌套内部类
kotlin 普通的内部类是静态内部类,无法访问外部类。通过
inner关键声明为内部类就可以访问。kotlin 设计和Java相反,在Java中默认是嵌套内部类,而在kotlin中默认是静态内部类,静态内部类的好处:不会持有外部类的引用规避了内存泄漏的风险,而在Java中默认是内部类持有外部类的引用,如果不注意那么会很容易造成内存泄漏的风险。Kotlin 将默认犯错的风险抹掉了。
// kotlin 中普通的嵌套内部类 是静态内部类class A {val name: String = ""fun foo() {println("foo")}// 静态内部类class B {// println(name) 静态内部类 无法访问外部类// foo()}//C 类是A类的内部类,可以访问A类的成员属性和方法inner class C {fun f() {foo()println(name)}}}
kotlin中静态内部类,使用
internal关键字为可见修饰符,可以做到模块内可访问。
- private 意味着只在这个类内部(包含其所有成员)可见;
- protected—— 和 private一样 + 在子类中可见。
- internal —— 能见到类声明的 本模块内 的任何客户端都可见其 internal 成员;
- public —— 能见到类声明的任何客户端都可见其 public 成员。
class LessonAdapter : RecyclerView.Adapter<LessonAdapter.LessonViewHolder>() {private var list: List<Lesson> = ArrayList<Lesson>()fun updateAndNotify(list: List<Lesson>) {this.list = listnotifyDataSetChanged()}override fun onCreateViewHolder(parent: ViewGroup, viewType: Int): LessonViewHolder {return LessonViewHolder.onCreate(parent)}override fun onBindViewHolder(holder: LessonViewHolder, position: Int) {holder.onBind(list[position])}override fun getItemCount(): Int {return list.size}// internal constructor internal后面必须有constructor关键字class LessonViewHolder internal constructor(itemView: View) : BaseViewHolder(itemView) {// internal 静态内部类 可以有伴生对象,如果inner class嵌套内部类 就不允许存在伴生对象companion object {fun onCreate(parent: ViewGroup): LessonViewHolder {return LessonViewHolder(LayoutInflater.from(parent.context).inflate(R.layout.item_lesson, parent, false))}}fun onBind(lesson: Lesson) {var date = lesson.dateif (date == null) {date = "日期待定";}setText(R.id.tv_date, date)//当content不为空 调用let 抽离对象的属性lesson.content?.let { setText(R.id.tv_content, it) }val state = lesson.stateif (state != null) {setText(R.id.tv_state, state.stateName());var colorRes = R.color.playbackwhen (state) {Lesson.State.PLAYBACK -> colorRes = R.color.playbackLesson.State.LIVE -> colorRes = R.color.liveLesson.State.WAIT -> colorRes = R.color.wait}val backgroundColor = itemView.getContext().getColor(colorRes);getView<View>(R.id.tv_state).setBackgroundColor(backgroundColor);}}}}
初始化操作
注意:成员变量的初始化,要在init上面,因为kotlin会根据文件的顺序一起塞到构造函数内
init {setTextSize(TypedValue.COMPLEX_UNIT_SP, 18f)gravity = Gravity.CENTERsetBackgroundColor(getContext().getColor(R.color.colorPrimary))setTextColor(Color.WHITE)paint.isAntiAlias = truepaint.style = Paint.Style.STROKEpaint.color = getContext().getColor(R.color.colorAccent)paint.strokeWidth = dp2px(6f)updateCode()}
数据类
在kotlin
==表示equals方法的实现,===表示对比的是地址值,数据类对应着Java中的Bean类,data class可以实现解构。在kotlin中会将数据类自动生成一些有用的方法equals、hashCode、toString、copy、componentN
data class User(@JvmField var username: String?, var password: String?, var code: String?) {// kotlin声明构造器constructor() : this(null, null, null) {}}val (username, password, code) = User()val u1 = User()val copy = u1.copy()print(u1==copy)//调用equalsprint(u1===copy)//比较地址
扩展函数/属性
// 扩展函数 this表示自身fun Float.dp2px(): Float {return TypedValue.applyDimension(TypedValue.COMPLEX_UNIT_DIP, this, displayMetrics)}// 扩展属性val ViewGroup.first: Viewget() = getChildAt(0)
内联函数
kotlin 通过关键字inline 声明内联函数,直接将函数的内容复制到调用的地方,大大的减少调用栈的入栈和出栈操作。
inline fun doubleNumber(x: Int): Int {return x * 2}
但是如果大量的声明内联函数,会使编译器编译时变慢,内联函数中的代码不能过多。而且编辑器会提示警告:此处使用inline并不能带来性能的提升,那么如何正确的使用inline呢?
Expected performance impact from inlining is insignificant. Inlining works best for functions with parameters of functional types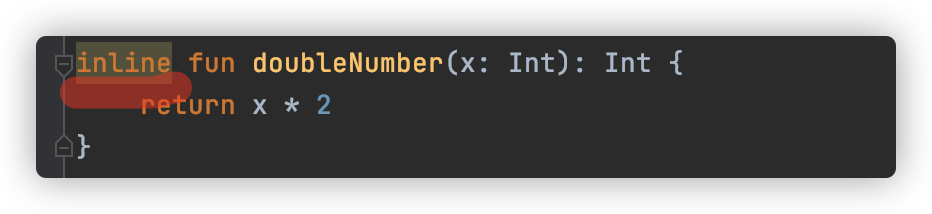
inline 主要用在函数参数时函数类型时进行设置,为什么呢?这就需要理解kotlin中的函数类型的本质
函数类型
kotlin 可以将参数作为函数类型传递,也就是经常所说的函数式编程,参数设置函数类型
(参数类型)->返回类型
class View {}fun click(view: View) {println("函数被执行")}// kotlin 声明函数类型(参数类型)->返回类型fun setOnClickListener(listener: (View) -> Unit) {// 调用函数println("调用函数,此处进行函数的传参")listener(View())}
当调用setOnClickListener函数,可以给参数传递函数:通过::click作为参数的传递
//传递一个函数setOnClickListener(::click)
同时可以传递匿名函数:
//可以使用lambal 表达式 匿名函数setOnClickListener {//listener(View()) it == View()println("直接执行 view$it")}
那么在Java中如何调用Kotlin的函数类型的呢?kotlin在编译时将函数类型,改成了Java中的接口
HelloKt.setOnClickListener(new Function1<View, Unit>() {@Overridepublic Unit invoke(View view) {return null;}});// Functions.ktpublic interface Function1<in P1, out R> : Function<R> {/** Invokes the function with the specified argument. */public operator fun invoke(p1: P1): R}
那么kotlin将函数类型,设置成了一个通用的接口,那么反编译Java后就需要创建接口对象,调用次数频繁就会创建很多对象,会非常损耗性能。上述讲的inline内联函数,可以解决kotlin函数类型性能的问题。
先看没有使用lnline之前:每次调用setOnClickListener都会创建对象
setOnClickListener((Function1)null.INSTANCE);setOnClickListener((Function1)null.INSTANCE);
来看使用inline之后
// kotlin 声明函数类型(参数类型)->返回类型inline fun setOnClickListener(listener: (View) -> Unit) {// 调用函数println("调用函数,此处进行函数的传参")listener(View())}
编译后的结果:直接将代码赋值过来了,没有在去创建对象
public static final void main() {int $i$f$setOnClickListener = false;String var1 = "调用函数,此处进行函数的传参";System.out.println(var1);View p1 = new View();int var3 = false;click(p1);}
:::tips 注意:inline 不仅可以减少调用栈的次数,还可以用在函数的参数是函数类型时,减少创建对象的次数。 :::
inline + reified 简化泛型类型逻辑
使用reified处理后的kotlin方法无法被java代码调用。 reified 必须和 inline进行搭配使用,reified 使抽象的东西更具体更真实,类似泛型T 抽象的类型
interface API {@GET("lessons")fun lessons(): Call<Any>}val RETROFIT = Retrofit.Builder().baseUrl("https://api.hencoder.com").build()fun <T> create(clazz: Class<T>): T {return RETROFIT.create(clazz)}// 通过inline + reified 优化调用 inline可以直接将create代码copy到调用的地方 在通过reified 推断调用的类型inline fun <reified T> create2(): T {return RETROFIT.create(T::class.java)}fun main() {// 常规的写法print(create(API::class.java).lessons())// 这样写就简单很多 只需要指定泛型,而不需要指定classprint(create2<API>().lessons())}
委托 by
by lazy内部的代码块只会加载一次,只有在初次调用的使用才会调用代码块中的代码。 by 关键字将 统一的操作委托给一个统一的对象处理。
// by lazy 只会调用一次,并且只有在初次调用的时候才会创建对象,声明时不会创建对象,大大简化了代码private val lessonPresenter by lazy {// 最后一行默认returnLessonPresenter(this)}
by 委托代理,是kotlin的核心特性之一,那么by它可以应用到那些场景呢?
例如:要在应用中存储token信息,常规的写法:
var token: Stringset(value) {CacheUtils.save("token", value)}get() {return CacheUtils.get("token")!!}
那么如果 要存储多个token信息的话,代码就变成了火葬场:
var token: Stringset(value) {CacheUtils.save("token", value)}get() {return CacheUtils.get("token")!!}var token2: Stringset(value) {CacheUtils.save("token", value)}get() {return CacheUtils.get("token")!!}.......
相同的操作,确要重复写多次,by 就是用来统一处理相同的操作逻辑,通过代理对象来简化处理:委托类需要实现两个方法getValue setValue,当然如果val 只需要实现getValue方法即可
// 通过委托的方式 创建委托类class Saver(private val key: String) {operator fun getValue(lessonActivity: LessonActivity, property: KProperty<*>): String {return CacheUtils.get(key)!!}operator fun setValue(lessonActivity: LessonActivity,property: KProperty<*>,value: String) {CacheUtils.save(key, value)}}
使用委托类的:by 委托对象
var token: String by Saver("token")// 加入有另一个token 也需要进行存储和读取操作,就可以使用委托的方式统一实现 他太棒了var token2: String by Saver("token2")
委托的更多用法:
class byTest {//属性委托val a: Int = 0val count: Int by ::a //::a是属性的引用//懒加载委托val data: String by lazy {request()}fun request(): String {println("网络请求")return "请求结果"}}// 自定义委托的方式1class StringDelegate(private var s: String = "hello") {operator fun getValue(thisRef: Owner, property: KProperty<*>): String {return s}operator fun setValue(thisRef: Owner, property: KProperty<*>, value: String) {s = value}}// 自定义委托的方式2 实现ReadWriteProperty来进行自定义委托class StringDelegate2(private var s: String = "hello") : ReadWriteProperty<Owner, String> {override fun getValue(thisRef: Owner, property: KProperty<*>): String {return s}override fun setValue(thisRef: Owner, property: KProperty<*>, value: String) {s = value}}//提供委托 provideDelegate来实现 在属性委托之前做一些额外的工作class SmartDelegate : PropertyDelegateProvider<Owner, ReadWriteProperty<Owner, String>> {override operator fun provideDelegate(thisRef: Owner,prop: KProperty<*>): ReadWriteProperty<Owner, String> {//根据属性名 来进行委托的变更return if (prop.name.contains("log")) {StringDelegate2("log")} else {StringDelegate2("normal")}}}class Owner {var text: String by StringDelegate()var logText: String by SmartDelegate()var normalText: String by SmartDelegate()}// 利用委托实现可见性的封装class Model {//data的修改权 留在内部private val _data: MutableList<String> = mutableListOf()//只读的data 对外暴露val data: List<String> by ::_datafun load() {_data.add("hello")}}// 数据与view绑定operator fun TextView.provideDelegate(value: Any?, property: KProperty<*>) =object : ReadWriteProperty<Any?, String?> {override fun getValue(thisRef: Any?, property: KProperty<*>): String? = text.toString()override fun setValue(thisRef: Any?, property: KProperty<*>, value: String?) {text = value}}fun main() {// val textView = TextView(this)// var message: String? by textView// message = "123"// textView.text = "456"// println(message)}
作用域函数
apply 特别适合对象的附加操作,特别适合在初始化操作。apply 返回自身
private val paint = Paint().apply {isAntiAlias = truestyle = Paint.Style.STROKEcolor = getContext().getColor(R.color.colorAccent)strokeWidth = 6f.dp2px()}
let 的需要主动return返回最后一行,let作用域内部是it和apply比起来不优雅,let 非常适合空判断的情况, also 是返回对象的本身其他的和let没有区别
val state = lesson.state?.let {setText(R.id.tv_state, it.stateName())var colorRes = R.color.playbackcolorRes = when (it) {Lesson.State.PLAYBACK -> R.color.playbackLesson.State.LIVE -> R.color.liveLesson.State.WAIT -> R.color.wait}val backgroundColor = itemView.context.getColor(colorRes);getView<View>(R.id.tv_state).setBackgroundColor(backgroundColor);return@let it}
run 和 let类似,只不过内部作用域是this不是it,默认不返回自身
val recyclerView = findViewById<RecyclerView>(R.id.list).run {layoutManager = LinearLayoutManager(this@LessonActivity)adapter = lessonAdapteraddItemDecoration(DividerItemDecoration(this@LessonActivity, LinearLayout.VERTICAL))return@run this}val recyclerView = findViewById<RecyclerView>(R.id.list).run {layoutManager = LinearLayoutManager(this@LessonActivity)adapter = lessonAdapteraddItemDecoration(DividerItemDecoration(this@LessonActivity, LinearLayout.VERTICAL))return@run this}refreshLayout = findViewById<SwipeRefreshLayout>(R.id.swipe_refresh_layout).run{this.setOnRefreshListener { lessonPresenter.fetchData() }this.isRefreshing = truereturn@run this}
run 和 apply 作用域都是this,apply返回自身,run返回最后一行 let 和 also 作用域都是it, also 返回自身,let 返回最后一行

若有收获,就点个赞吧
0 人点赞
