5.1 Atomic系列类整体介绍
版本说明
在JDK1.5版本之前,多行代码的原子性主要通过synchronized关键字进行保证。
在JDK1.5版本,Java提供了原子类型专门确保变量操作的原子性。
开发包整体说明
原子类型位于java.util.concurrent.atomic包下,其主要类如下: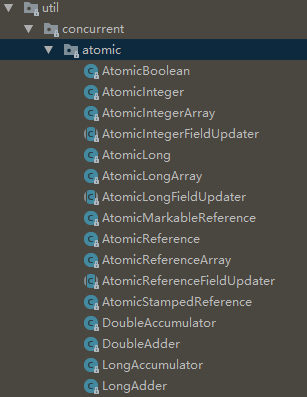
原子类型划分
为了方面对这些类逐级掌握,我将这些原子类型分为以下几类:
- 普通原子类型:提供对boolean、int、long和对象的原子性操作。
- AtomicBoolean
- AtomicInteger
- AtomicLong
- AtomicReference
- 原子类型数组:提供对数组元素的原子性操作。
- AtomicLongArray
- AtomicIntegerArray
- AtomicReferenceArray
- 原子类型字段更新器:提供对指定对象的指定字段进行原子性操作。
- AtomicLongFieldUpdater
- AtomicIntegerFieldUpdater
- AtomicReferenceFieldUpdater
- 带版本号的原子引用类型:以版本戳的方式解决原子类型的ABA问题。
- AtomicStampedReference
- AtomicMarkableReference
- 原子累加器(JDK1.8):AtomicLong和AtomicDouble的升级类型,专门用于数据统计,性能更高。
- DoubleAccumulator
- DoubleAdder
- LongAccumulator
- LongAdder
5.2 Atomic使用
5.2.1 原子整数
原子整数
J.U.C 并发包提供了:
AtomicBooleanAtomicIntegerAtomicLong
以 AtomicInteger为例
AtomicInteger i = new AtomicInteger(0);// 获取并自增(i = 0, 结果 i = 1, 返回 0),类似于 i++System.out.println(i.getAndIncrement());// 自增并获取(i = 1, 结果 i = 2, 返回 2),类似于 ++iSystem.out.println(i.incrementAndGet());// 自减并获取(i = 2, 结果 i = 1, 返回 1),类似于 --iSystem.out.println(i.decrementAndGet());// 获取并自减(i = 1, 结果 i = 0, 返回 1),类似于 i--System.out.println(i.getAndDecrement());// 获取并加值(i = 0, 结果 i = 5, 返回 0)System.out.println(i.getAndAdd(5));// 加值并获取(i = 5, 结果 i = 0, 返回 0)System.out.println(i.addAndGet(-5));// 获取并更新(i = 0, p 为 i 的当前值, 结果 i = -2, 返回 0)// 其中函数中的操作能保证原子,但函数需要无副作用System.out.println(i.getAndUpdate(p -> p - 2));// 更新并获取(i = -2, p 为 i 的当前值, 结果 i = 0, 返回 0)// 其中函数中的操作能保证原子,但函数需要无副作用System.out.println(i.updateAndGet(p -> p + 2));// 获取并计算(i = 0, p 为 i 的当前值, x 为参数1, 结果 i = 10, 返回 0)// 其中函数中的操作能保证原子,但函数需要无副作用// getAndUpdate 如果在 lambda 中引用了外部的局部变量,要保证该局部变量是 final 的// getAndAccumulate 可以通过 参数1 来引用外部的局部变量,但因为其不在 lambda 中因此不必是 finalSystem.out.println(i.getAndAccumulate(10, (p, x) -> p + x));// 计算并获取(i = 10, p 为 i 的当前值, x 为参数1, 结果 i = 0, 返回 0)// 其中函数中的操作能保证原子,但函数需要无副作用System.out.println(i.accumulateAndGet(-10, (p, x) -> p + x));
5.2.2 原子引用
AtomicReferenceAtomicMarkableReferenceAtomicStampedReference
为什么需要原子引用类型?
有如下方法
public interface DecimalAccount {// 获取余额BigDecimal getBalance();// 取款void withdraw(BigDecimal amount);/*** 方法内会启动 1000 个线程,每个线程做 -10 元 的操作* 如果初始余额为 10000 那么正确的结果应当是 0*/static void demo(DecimalAccount account) {List<Thread> ts = new ArrayList<>();for (int i = 0; i < 1000; i++) {ts.add(new Thread(() -> {account.withdraw(BigDecimal.TEN);}));}ts.forEach(Thread::start);ts.forEach(t -> {try {t.join();} catch (InterruptedException e) {e.printStackTrace();}});System.out.println(account.getBalance());}}
试着提供不同的 DecimalAccount 实现,实现安全的取款操作
不安全实现
class DecimalAccountUnsafe implements DecimalAccount {
    BigDecimal balance;

    public DecimalAccountUnsafe(BigDecimal balance) {
        this.balance = balance;
    }
    @Override
    public BigDecimal getBalance() {
        return balance;
    }

    @Override
    public void withdraw(BigDecimal amount) {
        BigDecimal balance = this.getBalance();
        this.balance = balance.subtract(amount);
    }
}
安全实现-使用锁
class DecimalAccountSafeLock implements DecimalAccount {
    private final Object lock = new Object();
    BigDecimal balance;

    public DecimalAccountSafeLock(BigDecimal balance) {
        this.balance = balance;
    }

    @Override
    public BigDecimal getBalance() {
        return balance;
    }

    @Override
    public void withdraw(BigDecimal amount) {
        synchronized (lock) {
            BigDecimal balance = this.getBalance();
            this.balance = balance.subtract(amount);
        }
    }
}
安全实现-使用 CAS
class DecimalAccountSafeCas implements DecimalAccount {
    AtomicReference<BigDecimal> ref;

    public DecimalAccountSafeCas(BigDecimal balance) {
        ref = new AtomicReference<>(balance);
    }

    @Override
    public BigDecimal getBalance() {
        return ref.get();
    }

    @Override
    public void withdraw(BigDecimal amount) {
        while (true) {
            BigDecimal prev = ref.get();
            BigDecimal next = prev.subtract(amount);
            if (ref.compareAndSet(prev, next)) {
                break;
            }
        }
    }
}
测试代码
DecimalAccount.demo(new DecimalAccountUnsafe(new BigDecimal("10000")));
DecimalAccount.demo(new DecimalAccountSafeLock(new BigDecimal("10000")));
DecimalAccount.demo(new DecimalAccountSafeCas(new BigDecimal("10000")));
运行结果
4310 cost: 425 ms
0 cost: 285 ms
0 cost: 274 ms
5.2.3 原子数组
测试代码
package com.yuanzi.java8.test;

import java.util.ArrayList;
import java.util.Arrays;
import java.util.List;
import java.util.concurrent.atomic.AtomicIntegerArray;
import java.util.function.BiConsumer;
import java.util.function.Consumer;
import java.util.function.Function;
import java.util.function.Supplier;

public class Test39 {

    public static void main(String[] args) {
        demo(
                ()->new int[10],
                (array)->array.length,
                (array, index) -> array[index]++,
                array-> System.out.println(Arrays.toString(array))
        );

        demo(
                ()-> new AtomicIntegerArray(10),
                (array) -> array.length(),
                (array, index) -> array.getAndIncrement(index),
                array -> System.out.println(array)
        );
    }

    /**
     参数1,提供数组、可以是线程不安全数组或线程安全数组
     参数2,获取数组长度的方法
     参数3,自增方法,回传 array, index
     参数4,打印数组的方法
     */
    // supplier 提供者 无中生有  ()->结果
    // function 函数   一个参数一个结果   (参数)->结果  ,  BiFunction (参数1,参数2)->结果
    // consumer 消费者 一个参数没结果  (参数)->void,      BiConsumer (参数1,参数2)->
    private static <T> void demo(
            Supplier<T> arraySupplier,
            Function<T, Integer> lengthFun,
            BiConsumer<T, Integer> putConsumer,
            Consumer<T> printConsumer ) {
        List<Thread> ts = new ArrayList<>();
        T array = arraySupplier.get();
        int length = lengthFun.apply(array);
        for (int i = 0; i < length; i++) {
            // 每个线程对数组作 10000 次操作
            ts.add(new Thread(() -> {
                for (int j = 0; j < 10000; j++) {
                    putConsumer.accept(array, j%length);
                }
            }));
        }

        ts.forEach(t -> t.start()); // 启动所有线程
        ts.forEach(t -> {
            try {
                t.join();
            } catch (InterruptedException e) {
                e.printStackTrace();
            }
        });     // 等所有线程结束
        printConsumer.accept(array);
    }
}
运行结果
[9864, 9862, 9859, 9868, 9869, 9862, 9863, 9866, 9867, 9865]
[10000, 10000, 10000, 10000, 10000, 10000, 10000, 10000, 10000, 10000]
5.2.4 字段更新器
AtomicReferenceFieldUpdate//域 字段
AtomicIntegerFieldUpdaterAtomicLongFieldUpdater
利用字段更新器,可以针对对象的某个域( Field)进行原子操作,只能配合 volatile修饰的字段使用,否则
会出现异常
Exception in thread"main java. langIllegalArgumentException Must be volatile type
package com.yuanzi.java8.test;

import lombok.extern.slf4j.Slf4j;

import java.util.concurrent.atomic.AtomicReferenceFieldUpdater;

@Slf4j(topic = "c.Test40")
public class Test40 {

    public static void main(String[] args) {
        Student stu = new Student();

        //参数1, 要修改的类
        //参数2, 要修改的字段的类型
        //参数3, 要修改的属性名
        AtomicReferenceFieldUpdater updater =
                AtomicReferenceFieldUpdater.newUpdater(Student.class, String.class, "name");

        System.out.println(updater.compareAndSet(stu, null, "张三"));
        System.out.println(stu);
    }
}

class Student {
    //需要加上volatile修饰
    volatile String name;

    @Override
    public String toString() {
        return "Student{" +
                "name='" + name + '\'' +
                '}';
    }
}
运行结果
true
Student{name='张三'}
5.2.5 原子累加器
累加器测试代码
package com.yuanzi.java8.test;

import java.util.ArrayList;
import java.util.List;
import java.util.concurrent.atomic.AtomicLong;
import java.util.concurrent.atomic.LongAdder;
import java.util.function.Consumer;
import java.util.function.Supplier;

public class Test41 {
    public static void main(String[] args) {
        for (int i = 0; i < 10; i++) {
            demo(
                () -> new AtomicLong(0),
                (adder) -> adder.getAndIncrement()
            );
        }

        for (int i = 0; i < 10; i++) {
            demo(
                () -> new LongAdder(),
                adder -> adder.increment()
            );
        }
    }

    /*
    () -> 结果    提供累加器对象
    (参数) ->     执行累加操作
     */
    private static <T> void demo(Supplier<T> adderSupplier, Consumer<T> action) {
        T adder = adderSupplier.get();
        List<Thread> ts = new ArrayList<>();
        // 4 个线程,每人累加 50 万
        for (int i = 0; i < 4; i++) {
            ts.add(new Thread(() -> {
                for (int j = 0; j < 500000; j++) {
                    action.accept(adder);
                }
            }));
        }
        long start = System.nanoTime();
        ts.forEach(t -> t.start());
        ts.forEach(t -> {
            try {
                t.join();
            } catch (InterruptedException e) {
                e.printStackTrace();
            }
        });

        long end = System.nanoTime();
        System.out.println(adder + " cost:" + (end - start) / 1000_000);
    }
}
运行结果
2000000 cost:28
2000000 cost:43
2000000 cost:38
2000000 cost:45
2000000 cost:37

2000000 cost:37
2000000 cost:22
2000000 cost:32
2000000 cost:17
2000000 cost:12
明显LongAdder比AtomicLong的性能更好
性能提升的原因很简单,就是在有竞争时,设置多个累加单元, Therad-0累加cel!oj,而 Thread-1累加 cel[1]….最后将结果汇总。这样它们在累加时操作的不同的Ce变量,因此减少了CAS重试失败,从而提 高性能。
5.3Atomic系列类使用分析
代码分析
构造函数
public class AtomicInteger extends Number implements java.io.Serializable {
    private static final long serialVersionUID = 6214790243416807050L;

    //Unsafe类提供底层的CAS机制
    private static final Unsafe unsafe = Unsafe.getUnsafe();
    //valueOffset是value值的内存地址值偏移值,这个值的作用是获取value在主内存中的值
    private static final long valueOffset;
    //类加载的时候获取valueOffset的值
    static {
        try {
            valueOffset = unsafe.objectFieldOffset
                (AtomicInteger.class.getDeclaredField("value"));
        } catch (Exception ex) { throw new Error(ex); }
    }

    //AtomicInteger具体的值存放在这个变量中,
    //这个变量使用volatile修饰,具有可见性
    private volatile int value;

    public AtomicInteger(int initialValue) {
        value = initialValue;
    }

    //默认为0
    public AtomicInteger() {
    }
}
get和set方法分析
//value使用volatile修饰,每次能拿到最新值
public final int get() {
    return value;
}

//value使用volatile修饰,赋值操作具有原子性,所以这个操作也是线程安全的
//这个方法和compareAndSet方法的区别是:compareAndSet方法会判断预期值和当前值,而set方法不会做任何判断,直接更新
// set方法不会在意原始值是多少,而compareAndSet会确保主内存中的值和预期值相等才更新。
public final void set(int newValue) {
    value = newValue;
}

//这个方法可能比较令人疑惑,我查了下unsafe的putOrderedInt方法,如下

/**  Sets the value of the integer field at the specified offset in the
  * supplied object to the given value. This is an ordered or lazy
  * version of <code>putIntVolatile(Object,long,int)</code>, which
  * doesn't guarantee the immediate visibility of the change to other
  * threads. It is only really useful where the integer field is
  * <code>volatile</code>, and is thus expected to change unexpectedly.
  */
//上面的意思大致是:putOrderedInt方法不保证可见性,只有在变量是volatile修饰时才有用,
//我们这边的value变量就是用volatile修饰的,所以我认为AtomicInteger的`set`方法和`lazySet`方法
//功能是一致的。
public final void lazySet(int newValue) {
    unsafe.putOrderedInt(this, valueOffset, newValue);
}

//将value设置成给定值,并返回旧值
public final int getAndSet(int newValue) {
    return unsafe.getAndSetInt(this, valueOffset, newValue);
}
//使用CAS机制更新
public final boolean compareAndSet(int expect, int update) {
    return unsafe.compareAndSwapInt(this, valueOffset, expect, update);
}
//使用CAS机制更新
public final boolean weakCompareAndSet(int expect, int update) {
    return unsafe.compareAndSwapInt(this, valueOffset, expect, update);
}
//CAS加1,并且返回原始值
public final int getAndIncrement() {
    return unsafe.getAndAddInt(this, valueOffset, 1);
}
//CAS减1,并且返回原始值
public final int getAndDecrement() {
    return unsafe.getAndAddInt(this, valueOffset, -1);
}
//CAS加减delta值,并且返回原始值
public final int getAndAdd(int delta) {
    return unsafe.getAndAddInt(this, valueOffset, delta);
}
//CAS加1,并且返回最新值
public final int incrementAndGet() {
    return unsafe.getAndAddInt(this, valueOffset, 1) + 1;
}
//CAS减1,并且返回最新值
public final int decrementAndGet() {
    return unsafe.getAndAddInt(this, valueOffset, -1) - 1;
}
//CAS加减delta值,并且返回最新值
public final int addAndGet(int delta) {
    return unsafe.getAndAddInt(this, valueOffset, delta) + delta;
}
策略更新
下面几个方法个人觉得不是很有用,和上面的区别就是更新的值不是穿进去的,而是通过IntUnaryOperator和IntBinaryOperator接口算出来的。
public final int getAndUpdate(IntUnaryOperator updateFunction) {
    int prev, next;
    do {
        prev = get();
        next = updateFunction.applyAsInt(prev);
    } while (!compareAndSet(prev, next));
    return prev;
}

public final int updateAndGet(IntUnaryOperator updateFunction) {
    int prev, next;
    do {
        prev = get();
        next = updateFunction.applyAsInt(prev);
    } while (!compareAndSet(prev, next));
    return next;
}

public final int getAndAccumulate(int x, IntBinaryOperator accumulatorFunction) {
    int prev, next;
    do {
        prev = get();
        next = accumulatorFunction.applyAsInt(prev, x);
    } while (!compareAndSet(prev, next));
    return prev;
}

 public final int accumulateAndGet(int x,IntBinaryOperator accumulatorFunction) {
    int prev, next;
    do {
        prev = get();
        next = accumulatorFunction.applyAsInt(prev, x);
    } while (!compareAndSet(prev, next));
    return next;
}

若有收获,就点个赞吧
0 人点赞
