- 特性
- 支持数据库
- 框架结构
- 快速开始
- 初始化工程
- 添加依赖
- 配置
- 编码
- 开始使用
- 小结
- 安装
- 配置
- 注解
- @TableField
- @Version
- @EnumValue
- @TableLogic
- @SqlParser
- @KeySequence
- 核心功能
- 代码生成器
- CRUD 接口
- Remove
- Update
- Get
- List
- Page
- Count
- Chain
- Mapper CRUD 接口
- Delete
- Update
- Select
- mapper 层 选装件
- 条件构造器
- 分页插件
- XML 自定义分页
- Sequence主键
- 自定义ID生成器
- 插件扩展
- 热加载
- 逻辑删除
- 通用枚举
- 1、声明通用枚举属性
- 2、配置扫描通用枚举
- 如何序列化枚举值为数据库存储值?
- 字段类型处理器
- 自动填充功能
- Sql 注入器
- 攻击 SQL 阻断解析器
- 性能分析插件
- 执行 SQL 分析打印
- 乐观锁插件
- 动态数据源
- 分布式事务
- 多租户 SQL 解析器
- 动态表名 SQL 解析器
- MybatisX 快速开发插件
- 常见问题
- 如何排除非表中字段?
- 排除实体父类属性
- 出现
Invalid bound statement (not found)异常 - 自定义 SQL 无法执行
- 启动时异常
- 关于 Long 型主键填充不生效的问题
- ID_WORKER 生成主键太长导致 js 精度丢失
- 插入或更新的字段有 空字符串 或者
null - 字段类型为
bit、tinyint(1)时映射为boolean类型 - 出现 2 个
limit语句 - insert 后如何返回主键
- MP 如何查指定的几个字段
- mapper 层二级缓存问题
- mapper 层二级缓存刷新问题
Cause: org.apache.ibatis.type.TypeException:Error setting null for parameter #1 with JdbcType OTHER- 自定义 sql 里使用 Page 对象传参无法获取
- 如何使用:【Map下划线自动转驼峰】
- 在 wrapper 中如何使用
limit限制 SQL - 通用 insertBatch 为什么放在 service 层处理
- 逻辑删除下 自动填充 功能没有效果
- 3.x数据库关键字如何处理?
- MybatisPlusException: Your property named “xxx” cannot find the corresponding database column name!
- Error attempting to get column ‘create_time’ from result set. Cause: java.sql.SQLFeatureNotSupportedException
- mp版本从3.1.0及以下版本升级到高版本,JDK8日期新类型LocalDateTime等无法映射(报错)
- Failed to bind properties under ‘mybatis-plus.configuration.incomplete-result-maps[0].assistant.configuration.mapped-statements[0].parameter-map.parameter-mappings[0]’ to org.apache.ibatis.mapping.ParameterMapping
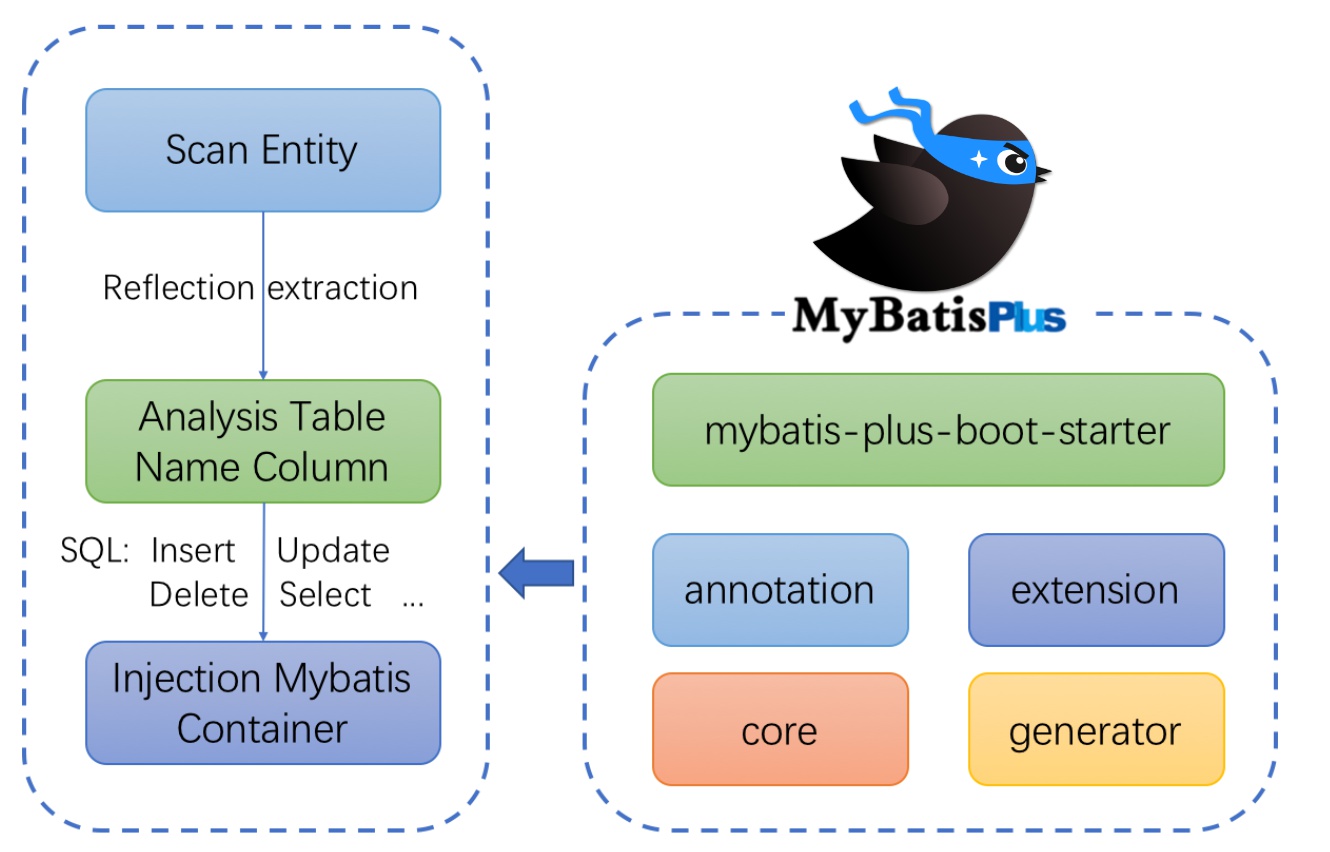
MyBatis-Plus(简称 MP)是一个 MyBatis 的增强工具,在 MyBatis 的基础上只做增强不做改变,为简化开发、提高效率而生。
特性
- 无侵入:只做增强不做改变,引入它不会对现有工程产生影响,如丝般顺滑
- 损耗小:启动即会自动注入基本 CURD,性能基本无损耗,直接面向对象操作
- 强大的 CRUD 操作:内置通用 Mapper、通用 Service,仅仅通过少量配置即可实现单表大部分 CRUD 操作,更有强大的条件构造器,满足各类使用需求
- 支持 Lambda 形式调用:通过 Lambda 表达式,方便的编写各类查询条件,无需再担心字段写错
- 支持主键自动生成:支持多达 4 种主键策略(内含分布式唯一 ID 生成器 - Sequence),可自由配置,完美解决主键问题
- 支持 ActiveRecord 模式:支持 ActiveRecord 形式调用,实体类只需继承 Model 类即可进行强大的 CRUD 操作
- 支持自定义全局通用操作:支持全局通用方法注入( Write once, use anywhere )
- 内置代码生成器:采用代码或者 Maven 插件可快速生成 Mapper 、 Model 、 Service 、 Controller 层代码,支持模板引擎,更有超多自定义配置等您来使用
- 内置分页插件:基于 MyBatis 物理分页,开发者无需关心具体操作,配置好插件之后,写分页等同于普通 List 查询
- 分页插件支持多种数据库:支持 MySQL、MariaDB、Oracle、DB2、H2、HSQL、SQLite、Postgre、SQLServer 等多种数据库
- 内置性能分析插件:可输出 Sql 语句以及其执行时间,建议开发测试时启用该功能,能快速揪出慢查询
内置全局拦截插件:提供全表 delete 、 update 操作智能分析阻断,也可自定义拦截规则,预防误操作
支持数据库
mysql 、 mariadb 、 oracle 、 db2 、 h2 、 hsql 、 sqlite 、 postgresql 、 sqlserver
-
框架结构
- 文档:https://mybatis.plus/
- MyBatis-Plus 入门 - 视频教程 - 慕课网
-
快速开始
我们将通过一个简单的 Demo 来阐述 MyBatis-Plus 的强大功能,在此之前,我们假设您已经:
拥有 Java 开发环境以及相应 IDE
- 熟悉 Spring Boot
- 熟悉 Maven
现有一张 User 表,其表结构如下:
| id | name | age | |
|---|---|---|---|
| 1 | Jone | 18 | test1@baomidou.com |
| 2 | Jack | 20 | test2@baomidou.com |
| 3 | Tom | 28 | test3@baomidou.com |
| 4 | Sandy | 21 | test4@baomidou.com |
| 5 | Billie | 24 | test5@baomidou.com |
其对应的数据库 Schema 脚本如下:
DROP TABLE IF EXISTS user;CREATE TABLE user(id BIGINT(20) NOT NULL COMMENT '主键ID',name VARCHAR(30) NULL DEFAULT NULL COMMENT '姓名',age INT(11) NULL DEFAULT NULL COMMENT '年龄',email VARCHAR(50) NULL DEFAULT NULL COMMENT '邮箱',PRIMARY KEY (id));
其对应的数据库 Data 脚本如下:
DELETE FROM user;INSERT INTO user (id, name, age, email) VALUES(1, 'Jone', 18, 'test1@baomidou.com'),(2, 'Jack', 20, 'test2@baomidou.com'),(3, 'Tom', 28, 'test3@baomidou.com'),(4, 'Sandy', 21, 'test4@baomidou.com'),(5, 'Billie', 24, 'test5@baomidou.com');
Question
如果从零开始用 MyBatis-Plus 来实现该表的增删改查我们需要做什么呢?
初始化工程
创建一个空的 Spring Boot 工程(工程将以 H2 作为默认数据库进行演示)
可以使用 Spring Initializer 快速初始化一个 Spring Boot 工程
添加依赖
引入 Spring Boot Starter 父工程:
<parent><groupId>org.springframework.boot</groupId><artifactId>spring-boot-starter-parent</artifactId><version>2.2.2.RELEASE</version><relativePath/></parent>
引入 spring-boot-starter、spring-boot-starter-test、mybatis-plus-boot-starter、lombok、h2 依赖:
<dependencies><dependency><groupId>org.springframework.boot</groupId><artifactId>spring-boot-starter</artifactId></dependency><dependency><groupId>org.springframework.boot</groupId><artifactId>spring-boot-starter-test</artifactId><scope>test</scope></dependency><dependency><groupId>org.projectlombok</groupId><artifactId>lombok</artifactId><optional>true</optional></dependency><dependency><groupId>com.baomidou</groupId><artifactId>mybatis-plus-boot-starter</artifactId><version>3.3.0</version></dependency><dependency><groupId>com.h2database</groupId><artifactId>h2</artifactId><scope>runtime</scope></dependency></dependencies>
配置
在 application.yml 配置文件中添加 H2 数据库的相关配置:
# DataSource Configspring:datasource:driver-class-name: org.h2.Driverschema: classpath:db/schema-h2.sqldata: classpath:db/data-h2.sqlurl: jdbc:h2:mem:testusername: rootpassword: test
在 Spring Boot 启动类中添加 @MapperScan 注解,扫描 Mapper 文件夹:
@SpringBootApplication@MapperScan("com.baomidou.mybatisplus.samples.quickstart.mapper")public class Application {public static void main(String[] args) {SpringApplication.run(QuickStartApplication.class, args);}}
编码
编写实体类 User.java(此处使用了 Lombok 简化代码)
@Datapublic class User {private Long id;private String name;private Integer age;private String email;}
编写Mapper类 UserMapper.java
public interface UserMapper extends BaseMapper<User> {}
开始使用
添加测试类,进行功能测试:
@RunWith(SpringRunner.class)@SpringBootTestpublic class SampleTest {@Autowiredprivate UserMapper userMapper;@Testpublic void testSelect() {System.out.println(("----- selectAll method test ------"));List<User> userList = userMapper.selectList(null);Assert.assertEquals(5, userList.size());userList.forEach(System.out::println);}}
UserMapper 中的 selectList() 方法的参数为 MP 内置的条件封装器 Wrapper,所以不填写就是无任何条件
控制台输出:
User(id=1, name=Jone, age=18, email=test1@baomidou.com)User(id=2, name=Jack, age=20, email=test2@baomidou.com)User(id=3, name=Tom, age=28, email=test3@baomidou.com)User(id=4, name=Sandy, age=21, email=test4@baomidou.com)User(id=5, name=Billie, age=24, email=test5@baomidou.com)
完整的代码示例请移步:Spring Boot 快速启动示例 | Spring MVC 快速启动示例
小结
通过以上几个简单的步骤,我们就实现了 User 表的 CRUD 功能,甚至连 XML 文件都不用编写!
从以上步骤中,我们可以看到集成MyBatis-Plus非常的简单,只需要引入 starter 工程,并配置 mapper 扫描路径即可。
但 MyBatis-Plus 的强大远不止这些功能,想要详细了解 MyBatis-Plus 的强大功能?那就继续往下看吧!
安装
全新的 MyBatis-Plus 3.0 版本基于 JDK8,提供了 lambda 形式的调用,所以安装集成 MP3.0 要求如下:
- JDK 8+
- Maven or Gradle
JDK7 以及下的请参考 MP2.0 版本,地址:2.0 文档
Release
Spring Boot
Maven:
<dependency><groupId>com.baomidou</groupId><artifactId>mybatis-plus-boot-starter</artifactId><version>3.3.0</version></dependency>
Gradle:
compile group: 'com.baomidou', name: 'mybatis-plus-boot-starter', version: '3.3.0'
Spring MVC
Maven:
<dependency><groupId>com.baomidou</groupId><artifactId>mybatis-plus</artifactId><version>3.3.0</version></dependency>
Gradle:
compile group: 'com.baomidou', name: 'mybatis-plus', version: '3.3.0'
引入 MyBatis-Plus 之后请不要再次引入 MyBatis 以及 MyBatis-Spring,以避免因版本差异导致的问题。
Snapshot
快照 SNAPSHOT 版本需要添加仓库,且版本号为快照版本 点击查看最新快照版本号。
Maven:
<repository><id>snapshots</id><url>https://oss.sonatype.org/content/repositories/snapshots/</url></repository>
Gradle:
repositories {maven { url 'https://oss.sonatype.org/content/repositories/snapshots/' }}
配置
MyBatis-Plus 的配置异常的简单,我们仅需要一些简单的配置即可使用 MyBatis-Plus 的强大功能!
在讲解配置之前,请确保您已经安装了 MyBatis-Plus,如果您尚未安装,请查看 安装 一章。
Spring Boot 工程:
- 配置 MapperScan 注解
@SpringBootApplication@MapperScan("com.baomidou.mybatisplus.samples.quickstart.mapper")public class Application {public static void main(String[] args) {SpringApplication.run(QuickStartApplication.class, args);}}
- 配置 MapperScan 注解
Spring MVC 工程:
配置 MapperScan
<bean class="org.mybatis.spring.mapper.MapperScannerConfigurer"><property name="basePackage" value="com.baomidou.mybatisplus.samples.quickstart.mapper"/></bean>
调整 SqlSessionFactory 为 MyBatis-Plus 的 SqlSessionFactory
<bean id="sqlSessionFactory" class="com.baomidou.mybatisplus.extension.spring.MybatisSqlSessionFactoryBean"><property name="dataSource" ref="dataSource"/></bean>
通常来说,一般的简单工程,通过以上配置即可正常使用 MyBatis-Plus,具体可参考以下项目:Spring Boot 快速启动示例、Spring MVC 快速启动示例。
同时 MyBatis-Plus 提供了大量的个性化配置来满足不同复杂度的工程,大家可根据自己的项目按需取用
注解
介绍
MybatisPlus注解包相关类详解(更多详细描述可点击查看源码注释)
注解类包:
👉 mybatis-plus-annotation
@TableName
- 描述:表名注解 | 属性 | 类型 | 必须指定 | 默认值 | 描述 | | :—-: | :—-: | :—-: | :—-: | —- | | value | String | 否 | “” | 表名 | | schema | String | 否 | “” | schema | | keepGlobalPrefix | boolean | 否 | false | 是否保持使用全局的 tablePrefix 的值(如果设置了全局 tablePrefix 且自行设置了 value 的值) | | resultMap | String | 否 | “” | xml 中 resultMap 的 id | | autoResultMap | boolean | 否 | false | 是否自动构建 resultMap 并使用(如果设置 resultMap 则不会进行 resultMap 的自动构建并注入) |
关于autoResultMap的说明:
mp会自动构建一个ResultMap并注入到mybatis里(一般用不上).下面讲两句: 因为mp底层是mybatis,所以一些mybatis的常识你要知道,mp只是帮你注入了常用crud到mybatis里 注入之前可以说是动态的(根据你entity的字段以及注解变化而变化),但是注入之后是静态的(等于你写在xml的东西) 而对于直接指定typeHandler,mybatis只支持你写在2个地方:
- 定义在resultMap里,只作用于select查询的返回结果封装
- 定义在
insert和updatesql的#{property}里的property后面(例:#{property,typehandler=xxx.xxx.xxx}),只作用于设置值而除了这两种直接指定typeHandler,mybatis有一个全局的扫描你自己的typeHandler包的配置,这是根据你的property的类型去找typeHandler并使用.@TableId
- 描述:主键注解 | 属性 | 类型 | 必须指定 | 默认值 | 描述 | | :—-: | :—-: | :—-: | :—-: | :—-: | | value | String | 否 | “” | 主键字段名 | | type | Enum | 否 | IdType.NONE | 主键类型 |
IdType
| 值 | 描述 |
|---|---|
| AUTO | 数据库ID自增 |
| NONE | 无状态,该类型为未设置主键类型(注解里等于跟随全局,全局里约等于 INPUT) |
| INPUT | insert前自行set主键值 |
| ASSIGN_ID | 分配ID(主键类型为Number(Long和Integer)或String)(since 3.3.0),使用接口IdentifierGenerator的方法nextId(默认实现类为DefaultIdentifierGenerator雪花算法) |
| ASSIGN_UUID | 分配UUID,主键类型为String(since 3.3.0),使用接口IdentifierGenerator的方法nextUUID(默认default方法) |
分布式全局唯一ID 长整型类型(please use ASSIGN_ID) |
|
32位UUID字符串(please use ASSIGN_UUID) |
|
分布式全局唯一ID 字符串类型(please use ASSIGN_ID) |
@TableField
- 描述:字段注解(非主键)
| 属性 | 类型 | 必须指定 | 默认值 | 描述 |
| :—-: | :—-: | :—-: | :—-: | :—-: |
| value | String | 否 | “” | 字段名 |
| el | String | 否 | “” | 映射为原生
#{ ... }逻辑,相当于写在 xml 里的#{ ... }部分 | | exist | boolean | 否 | true | 是否为数据库表字段 | | condition | String | 否 | “” | 字段where实体查询比较条件,有值设置则按设置的值为准,没有则为默认全局的%s=#{%s},参考 | | update | String | 否 | “” | 字段update set部分注入, 例如:update=”%s+1”:表示更新时会set version=version+1(该属性优先级高于el属性) | | insertStrategy | Enum | N | DEFAULT | 举例:NOT_NULL:insert into table_a(<if test="columnProperty != null">column</if>) values (<if test="columnProperty != null">#{columnProperty}</if>)| | updateStrategy | Enum | N | DEFAULT | 举例:IGNORED:update table_a set column=#{columnProperty}| | whereStrategy | Enum | N | DEFAULT | 举例:NOT_EMPTY:where <if test="columnProperty != null and columnProperty!=''">column=#{columnProperty}</if>| | fill | Enum | 否 | FieldFill.DEFAULT | 字段自动填充策略 | | select | boolean | 否 | true | 是否进行 select 查询 | | keepGlobalFormat | boolean | 否 | false | 是否保持使用全局的 format 进行处理 | | jdbcType | JdbcType | 否 | JdbcType.UNDEFINED | JDBC类型 (该默认值不代表会按照该值生效) | | typeHandler | Class<? extends TypeHandler> | 否 | UnknownTypeHandler.class | 类型处理器 (该默认值不代表会按照该值生效) | | numericScale | String | 否 | “” | 指定小数点后保留的位数 |
关于jdbcType和typeHandler以及numericScale的说明:numericScale只生效于 update 的sql. jdbcType和typeHandler如果不配合@TableName#autoResultMap = true一起使用,也只生效于 update 的sql. 对于typeHandler如果你的字段类型和set进去的类型为equals关系,则只需要让你的typeHandler让Mybatis加载到即可,不需要使用注解
FieldStrategy
| 值 | 描述 |
|---|---|
| IGNORED | 忽略判断 |
| NOT_NULL | 非NULL判断 |
| NOT_EMPTY | 非空判断(只对字符串类型字段,其他类型字段依然为非NULL判断) |
| DEFAULT | 追随全局配置 |
FieldFill
| 值 | 描述 |
|---|---|
| DEFAULT | 默认不处理 |
| INSERT | 插入时填充字段 |
| UPDATE | 更新时填充字段 |
| INSERT_UPDATE | 插入和更新时填充字段 |
@Version
-
@EnumValue
-
@TableLogic
描述:表字段逻辑处理注解(逻辑删除) | 属性 | 类型 | 必须指定 | 默认值 | 描述 | | :—-: | :—-: | :—-: | :—-: | :—-: | | value | String | 否 | “” | 逻辑未删除值 | | delval | String | 否 | “” | 逻辑删除值 |
@SqlParser
- 描述:租户注解,支持method上以及mapper接口上 | 属性 | 类型 | 必须指定 | 默认值 | 描述 | | :—-: | :—-: | :—-: | :—-: | :—-: | | filter | boolean | 否 | false | true: 表示过滤SQL解析,即不会进入ISqlParser解析链,否则会进解析链并追加例如tenant_id等条件 |
@KeySequence
- 描述:序列主键策略
oracle - 属性:value、resultMap | 属性 | 类型 | 必须指定 | 默认值 | 描述 | | :—-: | :—-: | :—-: | :—-: | :—-: | | value | String | 否 | “” | 序列名 | | clazz | Class | 否 | Long.class | id的类型, 可以指定String.class,这样返回的Sequence值是字符串”1” |
核心功能
代码生成器
AutoGenerator 是 MyBatis-Plus 的代码生成器,通过 AutoGenerator 可以快速生成 Entity、Mapper、Mapper XML、Service、Controller 等各个模块的代码,极大的提升了开发效率。
特别说明:
自定义模板有哪些可用参数?Github Gitee AbstractTemplateEngine 类中方法 getObjectMap 返回 objectMap 的所有值都可用。
演示效果图: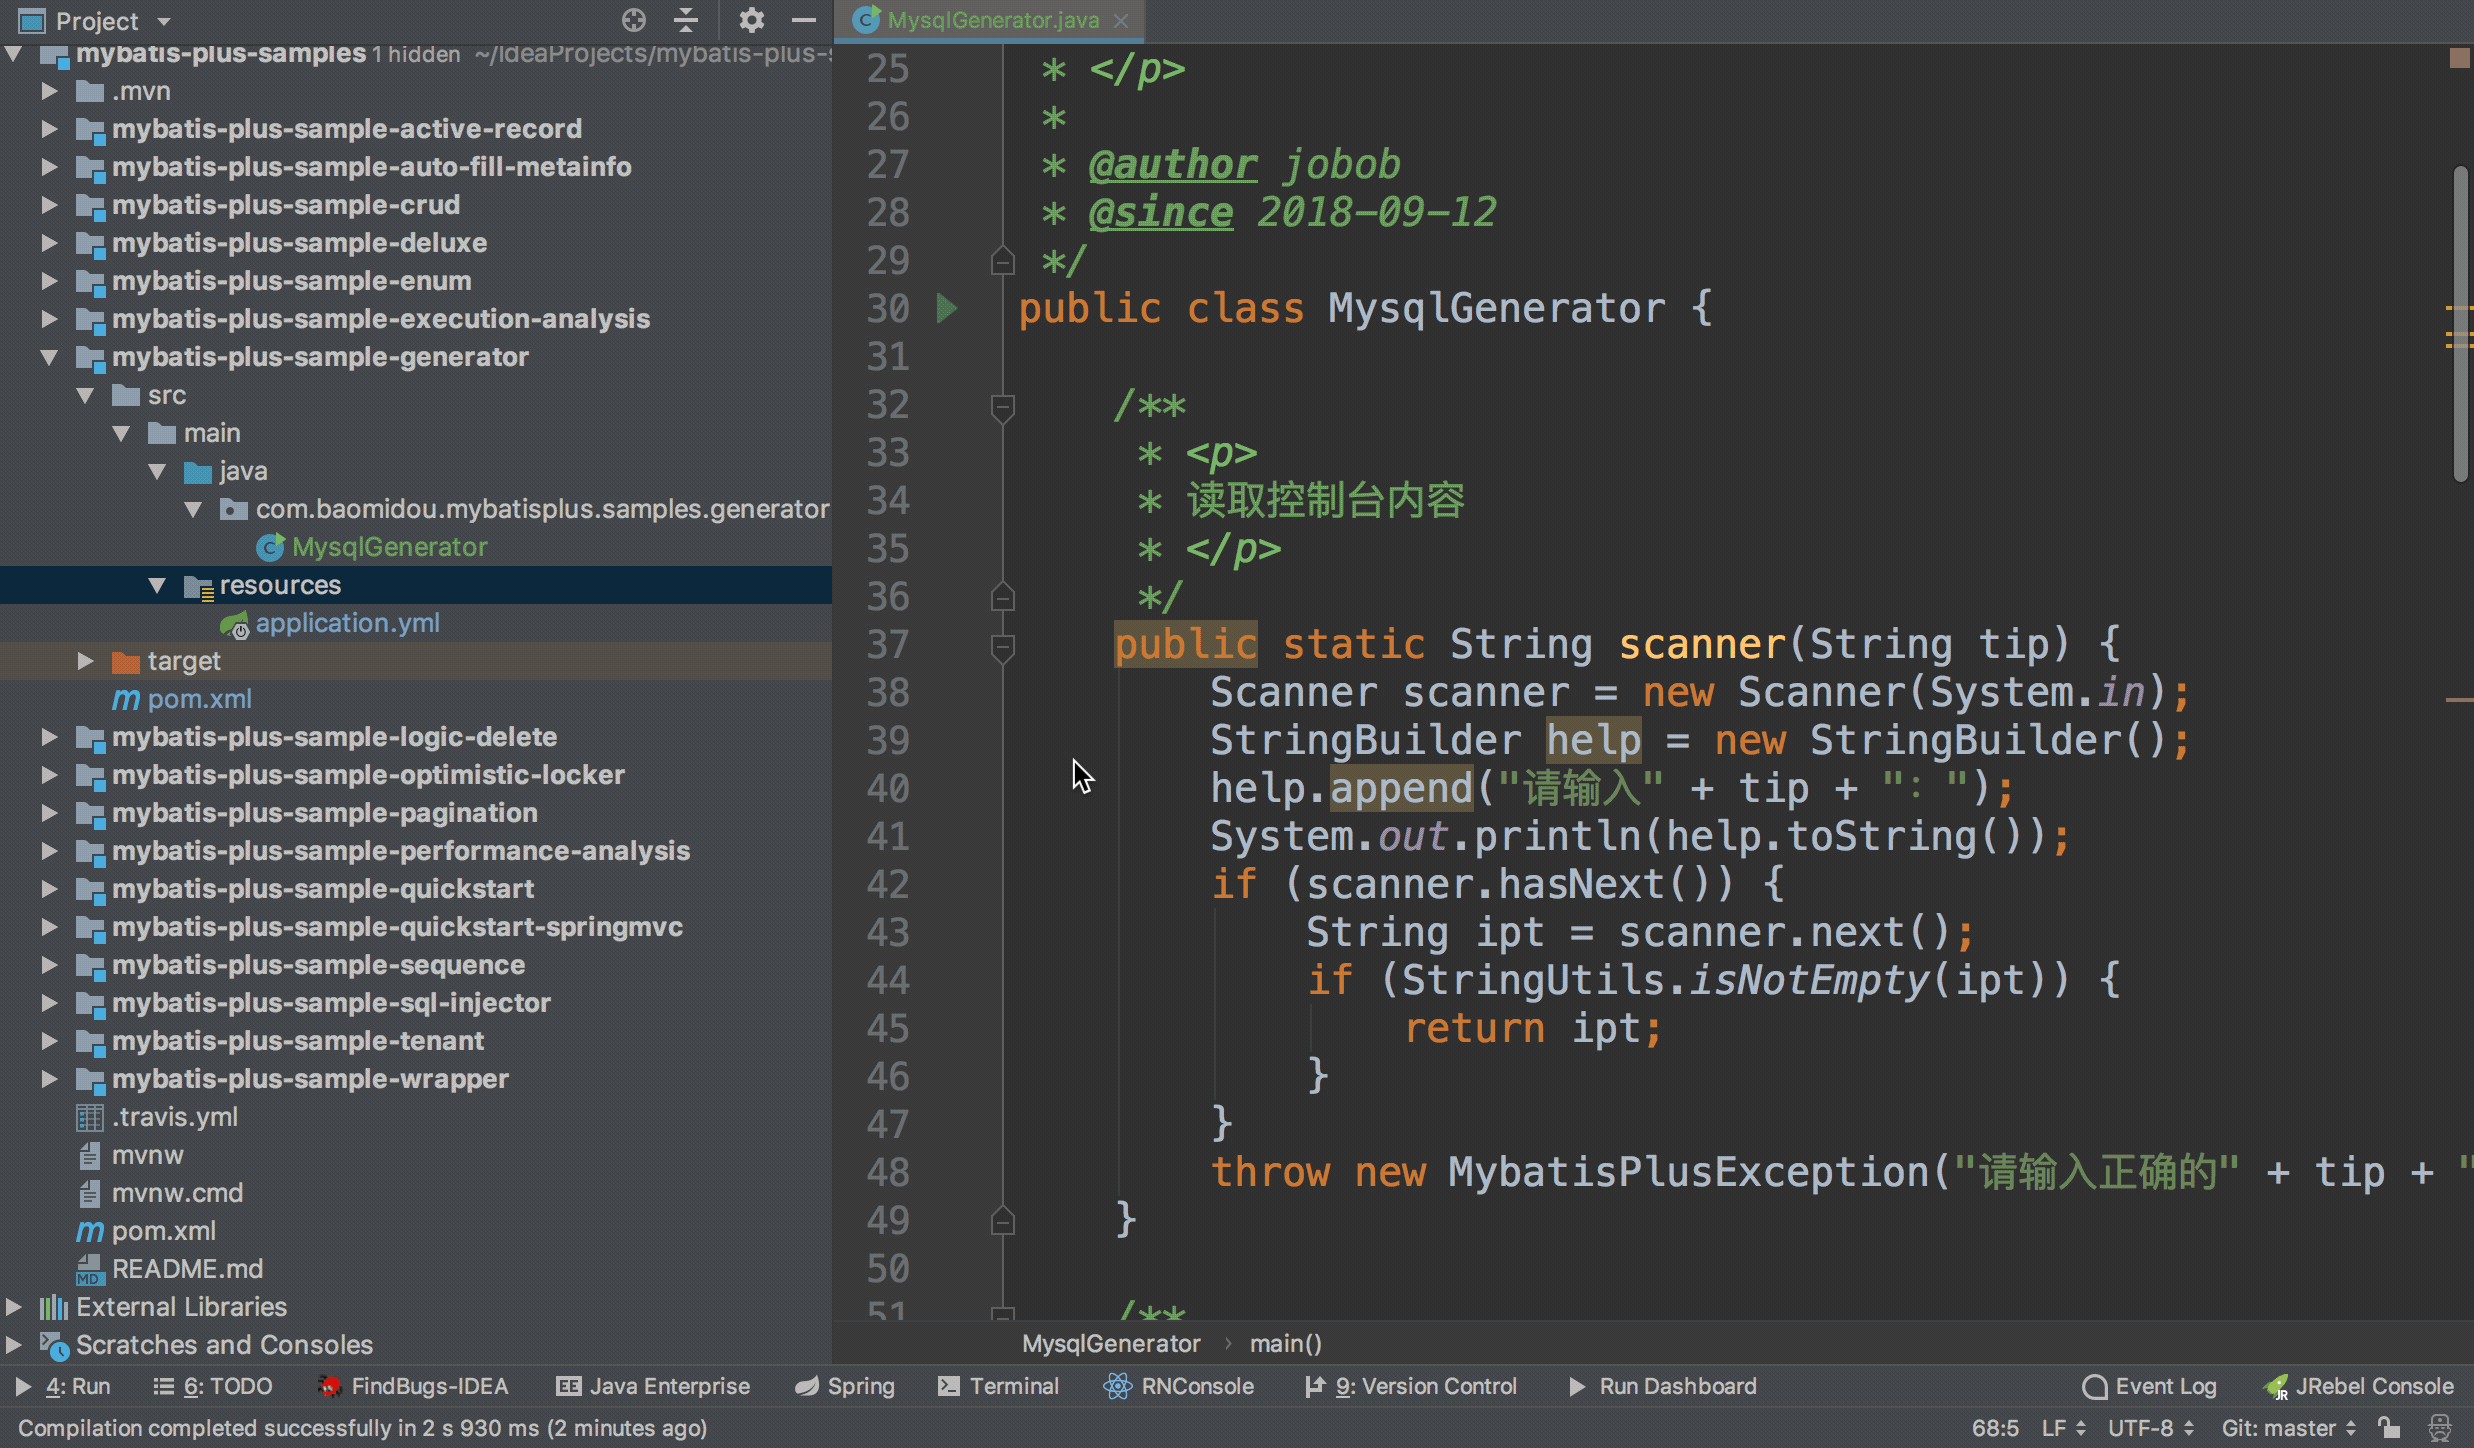
// 演示例子,执行 main 方法控制台输入模块表名回车自动生成对应项目目录中public class CodeGenerator {/*** <p>* 读取控制台内容* </p>*/public static String scanner(String tip) {Scanner scanner = new Scanner(System.in);StringBuilder help = new StringBuilder();help.append("请输入" + tip + ":");System.out.println(help.toString());if (scanner.hasNext()) {String ipt = scanner.next();if (StringUtils.isNotEmpty(ipt)) {return ipt;}}throw new MybatisPlusException("请输入正确的" + tip + "!");}public static void main(String[] args) {// 代码生成器AutoGenerator mpg = new AutoGenerator();// 全局配置GlobalConfig gc = new GlobalConfig();String projectPath = System.getProperty("user.dir");gc.setOutputDir(projectPath + "/src/main/java");gc.setAuthor("jobob");gc.setOpen(false);// gc.setSwagger2(true); 实体属性 Swagger2 注解mpg.setGlobalConfig(gc);// 数据源配置DataSourceConfig dsc = new DataSourceConfig();dsc.setUrl("jdbc:mysql://localhost:3306/ant?useUnicode=true&useSSL=false&characterEncoding=utf8");// dsc.setSchemaName("public");dsc.setDriverName("com.mysql.jdbc.Driver");dsc.setUsername("root");dsc.setPassword("密码");mpg.setDataSource(dsc);// 包配置PackageConfig pc = new PackageConfig();pc.setModuleName(scanner("模块名"));pc.setParent("com.baomidou.ant");mpg.setPackageInfo(pc);// 自定义配置InjectionConfig cfg = new InjectionConfig() {@Overridepublic void initMap() {// to do nothing}};// 如果模板引擎是 freemarkerString templatePath = "/templates/mapper.xml.ftl";// 如果模板引擎是 velocity// String templatePath = "/templates/mapper.xml.vm";// 自定义输出配置List<FileOutConfig> focList = new ArrayList<>();// 自定义配置会被优先输出focList.add(new FileOutConfig(templatePath) {@Overridepublic String outputFile(TableInfo tableInfo) {// 自定义输出文件名 , 如果你 Entity 设置了前后缀、此处注意 xml 的名称会跟着发生变化!!return projectPath + "/src/main/resources/mapper/" + pc.getModuleName()+ "/" + tableInfo.getEntityName() + "Mapper" + StringPool.DOT_XML;}});/*cfg.setFileCreate(new IFileCreate() {@Overridepublic boolean isCreate(ConfigBuilder configBuilder, FileType fileType, String filePath) {// 判断自定义文件夹是否需要创建checkDir("调用默认方法创建的目录");return false;}});*/cfg.setFileOutConfigList(focList);mpg.setCfg(cfg);// 配置模板TemplateConfig templateConfig = new TemplateConfig();// 配置自定义输出模板//指定自定义模板路径,注意不要带上.ftl/.vm, 会根据使用的模板引擎自动识别// templateConfig.setEntity("templates/entity2.java");// templateConfig.setService();// templateConfig.setController();templateConfig.setXml(null);mpg.setTemplate(templateConfig);// 策略配置StrategyConfig strategy = new StrategyConfig();strategy.setNaming(NamingStrategy.underline_to_camel);strategy.setColumnNaming(NamingStrategy.underline_to_camel);strategy.setSuperEntityClass("你自己的父类实体,没有就不用设置!");strategy.setEntityLombokModel(true);strategy.setRestControllerStyle(true);// 公共父类strategy.setSuperControllerClass("你自己的父类控制器,没有就不用设置!");// 写于父类中的公共字段strategy.setSuperEntityColumns("id");strategy.setInclude(scanner("表名,多个英文逗号分割").split(","));strategy.setControllerMappingHyphenStyle(true);strategy.setTablePrefix(pc.getModuleName() + "_");mpg.setStrategy(strategy);mpg.setTemplateEngine(new FreemarkerTemplateEngine());mpg.execute();}}
使用教程
添加依赖
MyBatis-Plus 从 3.0.3 之后移除了代码生成器与模板引擎的默认依赖,需要手动添加相关依赖:
添加 代码生成器 依赖
<dependency><groupId>com.baomidou</groupId><artifactId>mybatis-plus-generator</artifactId><version>3.3.0</version></dependency>
添加 模板引擎 依赖,MyBatis-Plus 支持 Velocity(默认)、Freemarker、Beetl,用户可以选择自己熟悉的模板引擎,如果都不满足您的要求,可以采用自定义模板引擎。
Velocity(默认):<dependency><groupId>org.apache.velocity</groupId><artifactId>velocity-engine-core</artifactId><version>2.1</version></dependency>
Freemarker:
<dependency><groupId>org.freemarker</groupId><artifactId>freemarker</artifactId><version>2.3.29</version></dependency>
Beetl:
<dependency><groupId>com.ibeetl</groupId><artifactId>beetl</artifactId><version>3.0.16.RELEASE</version></dependency>
注意!如果您选择了非默认引擎,需要在 AutoGenerator 中 设置模板引擎。
AutoGenerator generator = new AutoGenerator();// set freemarker enginegenerator.setTemplateEngine(new FreemarkerTemplateEngine());// set beetl enginegenerator.setTemplateEngine(new BeetlTemplateEngine());// set custom engine (reference class is your custom engine class)generator.setTemplateEngine(new CustomTemplateEngine());// other config...
编写配置
MyBatis-Plus 的代码生成器提供了大量的自定义参数供用户选择,能够满足绝大部分人的使用需求。
配置 GlobalConfig
GlobalConfig globalConfig = new GlobalConfig();globalConfig.setOutputDir(System.getProperty("user.dir") + "/src/main/java");globalConfig.setAuthor("jobob");globalConfig.setOpen(false);
配置 DataSourceConfig
DataSourceConfig dataSourceConfig = new DataSourceConfig();dataSourceConfig.setUrl("jdbc:mysql://localhost:3306/ant?useUnicode=true&useSSL=false&characterEncoding=utf8");dataSourceConfig.setDriverName("com.mysql.jdbc.Driver");dataSourceConfig.setUsername("root");dataSourceConfig.setPassword("password");
自定义模板引擎
请继承类 com.baomidou.mybatisplus.generator.engine.AbstractTemplateEngine
自定义代码模板
//指定自定义模板路径, 位置:/resources/templates/entity2.java.ftl(或者是.vm)//注意不要带上.ftl(或者是.vm), 会根据使用的模板引擎自动识别TemplateConfig templateConfig = new TemplateConfig().setEntity("templates/entity2.java");AutoGenerator mpg = new AutoGenerator();//配置自定义模板mpg.setTemplate(templateConfig);
自定义属性注入
InjectionConfig injectionConfig = new InjectionConfig() {//自定义属性注入:abc//在.ftl(或者是.vm)模板中,通过${cfg.abc}获取属性@Overridepublic void initMap() {Map<String, Object> map = new HashMap<>();map.put("abc", this.getConfig().getGlobalConfig().getAuthor() + "-mp");this.setMap(map);}};AutoGenerator mpg = new AutoGenerator();//配置自定义属性注入mpg.setCfg(injectionConfig);
entity2.java.ftl自定义属性注入abc=${cfg.abc}entity2.java.vm自定义属性注入abc=$!{cfg.abc}
字段其他信息查询注入

new DataSourceConfig().setDbQuery(new MySqlQuery() {/*** 重写父类预留查询自定义字段<br>* 这里查询的 SQL 对应父类 tableFieldsSql 的查询字段,默认不能满足你的需求请重写它<br>* 模板中调用: table.fields 获取所有字段信息,* 然后循环字段获取 field.customMap 从 MAP 中获取注入字段如下 NULL 或者 PRIVILEGES*/@Overridepublic String[] fieldCustom() {return new String[]{"NULL", "PRIVILEGES"};}})
CRUD 接口
Service CRUD 接口
说明:
通用 Service CRUD 封装IService接口,进一步封装 CRUD 采用
get 查询单行remove 删除list 查询集合page 分页前缀命名方式区分Mapper层避免混淆,- 泛型
T为任意实体对象 - 建议如果存在自定义通用 Service 方法的可能,请创建自己的
IBaseService继承Mybatis-Plus提供的基类 - 对象
Wrapper为 条件构造器Save
// 插入一条记录(选择字段,策略插入)boolean save(T entity);// 插入(批量)boolean saveBatch(Collection<T> entityList);// 插入(批量)boolean saveBatch(Collection<T> entityList, int batchSize);
参数说明
| 类型 | 参数名 | 描述 | | :—-: | :—-: | :—-: | | T | entity | 实体对象 | | Collection| entityList | 实体对象集合 | | int | batchSize | 插入批次数量 |
SaveOrUpdate
// TableId 注解存在更新记录,否插入一条记录boolean saveOrUpdate(T entity);// 根据updateWrapper尝试更新,否继续执行saveOrUpdate(T)方法boolean saveOrUpdate(T entity, Wrapper<T> updateWrapper);// 批量修改插入boolean saveOrUpdateBatch(Collection<T> entityList);// 批量修改插入boolean saveOrUpdateBatch(Collection<T> entityList, int batchSize);
参数说明
| 类型 | 参数名 | 描述 |
|---|---|---|
| T | entity | 实体对象 |
| Wrapper |
updateWrapper | 实体对象封装操作类 UpdateWrapper |
| Collection |
entityList | 实体对象集合 |
| int | batchSize | 插入批次数量 |
Remove
// 根据 entity 条件,删除记录boolean remove(Wrapper<T> queryWrapper);// 根据 ID 删除boolean removeById(Serializable id);// 根据 columnMap 条件,删除记录boolean removeByMap(Map<String, Object> columnMap);// 删除(根据ID 批量删除)boolean removeByIds(Collection<? extends Serializable> idList);
参数说明
| 类型 | 参数名 | 描述 |
|---|---|---|
| Wrapper |
queryWrapper | 实体包装类 QueryWrapper |
| Serializable | id | 主键ID |
| Map |
columnMap | 表字段 map 对象 |
| Collection<? extends Serializable> | idList | 主键ID列表 |
Update
// 根据 UpdateWrapper 条件,更新记录 需要设置sqlsetboolean update(Wrapper<T> updateWrapper);// 根据 whereEntity 条件,更新记录boolean update(T entity, Wrapper<T> updateWrapper);// 根据 ID 选择修改boolean updateById(T entity);// 根据ID 批量更新boolean updateBatchById(Collection<T> entityList);// 根据ID 批量更新boolean updateBatchById(Collection<T> entityList, int batchSize);
参数说明
| 类型 | 参数名 | 描述 |
|---|---|---|
| Wrapper |
updateWrapper | 实体对象封装操作类 UpdateWrapper |
| T | entity | 实体对象 |
| Collection |
entityList | 实体对象集合 |
| int | batchSize | 更新批次数量 |
Get
// 根据 ID 查询T getById(Serializable id);// 根据 Wrapper,查询一条记录。结果集,如果是多个会抛出异常,随机取一条加上限制条件 wrapper.last("LIMIT 1")T getOne(Wrapper<T> queryWrapper);// 根据 Wrapper,查询一条记录T getOne(Wrapper<T> queryWrapper, boolean throwEx);// 根据 Wrapper,查询一条记录Map<String, Object> getMap(Wrapper<T> queryWrapper);// 根据 Wrapper,查询一条记录<V> V getObj(Wrapper<T> queryWrapper, Function<? super Object, V> mapper);
参数说明
| 类型 | 参数名 | 描述 |
|---|---|---|
| Serializable | id | 主键ID |
| Wrapper |
queryWrapper | 实体对象封装操作类 QueryWrapper |
| boolean | throwEx | 有多个 result 是否抛出异常 |
| T | entity | 实体对象 |
| Function<? super Object, V> | mapper | 转换函数 |
List
// 查询所有List<T> list();// 查询列表List<T> list(Wrapper<T> queryWrapper);// 查询(根据ID 批量查询)Collection<T> listByIds(Collection<? extends Serializable> idList);// 查询(根据 columnMap 条件)Collection<T> listByMap(Map<String, Object> columnMap);// 查询所有列表List<Map<String, Object>> listMaps();// 查询列表List<Map<String, Object>> listMaps(Wrapper<T> queryWrapper);// 查询全部记录List<Object> listObjs();// 查询全部记录<V> List<V> listObjs(Function<? super Object, V> mapper);// 根据 Wrapper 条件,查询全部记录List<Object> listObjs(Wrapper<T> queryWrapper);// 根据 Wrapper 条件,查询全部记录<V> List<V> listObjs(Wrapper<T> queryWrapper, Function<? super Object, V> mapper);
参数说明
| 类型 | 参数名 | 描述 |
|---|---|---|
| Wrapper |
queryWrapper | 实体对象封装操作类 QueryWrapper |
| Collection<? extends Serializable> | idList | 主键ID列表 |
| Map<?String, Object> | columnMap | 表字段 map 对象 |
| Function<? super Object, V> | mapper | 转换函数 |
Page
// 无条件翻页查询IPage<T> page(IPage<T> page);// 翻页查询IPage<T> page(IPage<T> page, Wrapper<T> queryWrapper);// 无条件翻页查询IPage<Map<String, Object>> pageMaps(IPage<T> page);// 翻页查询IPage<Map<String, Object>> pageMaps(IPage<T> page, Wrapper<T> queryWrapper);
参数说明
| 类型 | 参数名 | 描述 |
|---|---|---|
| IPage |
page | 翻页对象 |
| Wrapper |
queryWrapper | 实体对象封装操作类 QueryWrapper |
Count
// 查询总记录数int count();// 根据 Wrapper 条件,查询总记录数int count(Wrapper<T> queryWrapper);
参数说明
| 类型 | 参数名 | 描述 |
|---|---|---|
| Wrapper |
queryWrapper | 实体对象封装操作类 QueryWrapper |
Chain
query
// 链式查询 普通QueryChainWrapper<T> query();// 链式查询 lambda 式。注意:不支持 KotlinLambdaQueryChainWrapper<T> lambdaQuery();// 示例:query().eq("column", value).one();lambdaQuery().eq(Entity::getId, value).list();
update
// 链式更改 普通UpdateChainWrapper<T> update();// 链式更改 lambda 式。注意:不支持 KotlinLambdaUpdateChainWrapper<T> lambdaUpdate();// 示例:update().eq("column", value).remove();lambdaUpdate().eq(Entity::getId, value).update(entity);
Mapper CRUD 接口
说明:
- 通用 CRUD 封装BaseMapper接口,为
Mybatis-Plus启动时自动解析实体表关系映射转换为Mybatis内部对象注入容器 - 泛型
T为任意实体对象 - 参数
Serializable为任意类型主键Mybatis-Plus不推荐使用复合主键约定每一张表都有自己的唯一id主键 - 对象
Wrapper为 条件构造器Insert
// 插入一条记录int insert(T entity);
参数说明
| 类型 | 参数名 | 描述 | | :—-: | :—-: | :—-: | | T | entity | 实体对象 |
Delete
// 根据 entity 条件,删除记录int delete(@Param(Constants.WRAPPER) Wrapper<T> wrapper);// 删除(根据ID 批量删除)int deleteBatchIds(@Param(Constants.COLLECTION) Collection<? extends Serializable> idList);// 根据 ID 删除int deleteById(Serializable id);// 根据 columnMap 条件,删除记录int deleteByMap(@Param(Constants.COLUMN_MAP) Map<String, Object> columnMap);
参数说明
| 类型 | 参数名 | 描述 |
|---|---|---|
| Wrapper |
wrapper | 实体对象封装操作类(可以为 null) |
| Collection<? extends Serializable> | idList | 主键ID列表(不能为 null 以及 empty) |
| Serializable | id | 主键ID |
| Map |
columnMap | 表字段 map 对象 |
Update
// 根据 whereEntity 条件,更新记录int update(@Param(Constants.ENTITY) T entity, @Param(Constants.WRAPPER) Wrapper<T> updateWrapper);// 根据 ID 修改int updateById(@Param(Constants.ENTITY) T entity);
参数说明
| 类型 | 参数名 | 描述 |
|---|---|---|
| T | entity | 实体对象 (set 条件值,可为 null) |
| Wrapper |
updateWrapper | 实体对象封装操作类(可以为 null,里面的 entity 用于生成 where 语句) |
Select
// 根据 ID 查询T selectById(Serializable id);// 根据 entity 条件,查询一条记录T selectOne(@Param(Constants.WRAPPER) Wrapper<T> queryWrapper);// 查询(根据ID 批量查询)List<T> selectBatchIds(@Param(Constants.COLLECTION) Collection<? extends Serializable> idList);// 根据 entity 条件,查询全部记录List<T> selectList(@Param(Constants.WRAPPER) Wrapper<T> queryWrapper);// 查询(根据 columnMap 条件)List<T> selectByMap(@Param(Constants.COLUMN_MAP) Map<String, Object> columnMap);// 根据 Wrapper 条件,查询全部记录List<Map<String, Object>> selectMaps(@Param(Constants.WRAPPER) Wrapper<T> queryWrapper);// 根据 Wrapper 条件,查询全部记录。注意: 只返回第一个字段的值List<Object> selectObjs(@Param(Constants.WRAPPER) Wrapper<T> queryWrapper);// 根据 entity 条件,查询全部记录(并翻页)IPage<T> selectPage(IPage<T> page, @Param(Constants.WRAPPER) Wrapper<T> queryWrapper);// 根据 Wrapper 条件,查询全部记录(并翻页)IPage<Map<String, Object>> selectMapsPage(IPage<T> page, @Param(Constants.WRAPPER) Wrapper<T> queryWrapper);// 根据 Wrapper 条件,查询总记录数Integer selectCount(@Param(Constants.WRAPPER) Wrapper<T> queryWrapper);
参数说明
| 类型 | 参数名 | 描述 |
|---|---|---|
| Serializable | id | 主键ID |
| Wrapper |
queryWrapper | 实体对象封装操作类(可以为 null) |
| Collection<? extends Serializable> | idList | 主键ID列表(不能为 null 以及 empty) |
| Map |
columnMap | 表字段 map 对象 |
| IPage |
page | 分页查询条件(可以为 RowBounds.DEFAULT) |
mapper 层 选装件
说明:
选装件位于 com.baomidou.mybatisplus.extension.injector.methods.additional 包下 需要配合Sql 注入器使用案例
使用详细见源码注释
AlwaysUpdateSomeColumnById
int alwaysUpdateSomeColumnById(T entity);
insertBatchSomeColumn
int insertBatchSomeColumn(List<T> entityList);
deleteByIdWithFill
int deleteByIdWithFill(T entity);
条件构造器
说明:
- 以下出现的第一个入参
boolean condition表示该条件是否加入最后生成的sql中 - 以下代码块内的多个方法均为从上往下补全个别
boolean类型的入参,默认为true - 以下出现的泛型
Param均为Wrapper的子类实例(均具有AbstractWrapper的所有方法) - 以下方法在入参中出现的
R为泛型,在普通wrapper中是String,在LambdaWrapper中是函数(例:Entity::getId,Entity为实体类,getId为字段id的getMethod) - 以下方法入参中的
R column均表示数据库字段,当R具体类型为String时则为数据库字段名(字段名是数据库关键字的自己用转义符包裹!)!而不是实体类数据字段名!!!,另当R具体类型为SFunction时项目runtime不支持eclipse自家的编译器!!! - 以下举例均为使用普通wrapper,入参为
Map和List的均以json形式表现! - 使用中如果入参的
Map或者List为空,则不会加入最后生成的sql中!!! - 有任何疑问就点开源码看,看不懂函数的点击我学习新知识
警告:
不支持以及不赞成在 RPC 调用中把 Wrapper 进行传输
- wrapper 很重
- 传输 wrapper 可以类比为你的 controller 用 map 接收值(开发一时爽,维护火葬场)
- 正确的 RPC 调用姿势是写一个 DTO 进行传输,被调用方再根据 DTO 执行相应的操作
- 我们拒绝接受任何关于 RPC 传输 Wrapper 报错相关的 issue 甚至 pr
AbstractWrapper
说明:
QueryWrapper(LambdaQueryWrapper) 和 UpdateWrapper(LambdaUpdateWrapper) 的父类
用于生成 sql 的 where 条件, entity 属性也用于生成 sql 的 where 条件
注意: entity 生成的 where 条件与 使用各个 api 生成的 where 条件没有任何关联行为allEq
allEq(Map<R, V> params)allEq(Map<R, V> params, boolean null2IsNull)allEq(boolean condition, Map<R, V> params, boolean null2IsNull)
个别参数说明:params : key为数据库字段名,value为字段值null2IsNull : 为true则在map的value为null时调用 isNull 方法,为false时则忽略value为null的
- 例1:
allEq({id:1,name:"老王",age:null})—->id = 1 and name = '老王' and age is null - 例2:
allEq({id:1,name:"老王",age:null}, false)—->id = 1 and name = '老王'
allEq(BiPredicate<R, V> filter, Map<R, V> params)allEq(BiPredicate<R, V> filter, Map<R, V> params, boolean null2IsNull)allEq(boolean condition, BiPredicate<R, V> filter, Map<R, V> params, boolean null2IsNull)
个别参数说明:filter : 过滤函数,是否允许字段传入比对条件中params 与 null2IsNull : 同上
- 例1:
allEq((k,v) -> k.indexOf("a") >= 0, {id:1,name:"老王",age:null})—->name = '老王' and age is null - 例2:
allEq((k,v) -> k.indexOf("a") >= 0, {id:1,name:"老王",age:null}, false)—->name = '老王'eq
eq(R column, Object val)eq(boolean condition, R column, Object val)
- 等于 =
例:
eq("name", "老王")—->name = '老王'ne
ne(R column, Object val)ne(boolean condition, R column, Object val)
不等于 <>
例:
ne("name", "老王")—->name <> '老王'gt
gt(R column, Object val)gt(boolean condition, R column, Object val)
大于 >
- 例:
gt("age", 18)—->age > 18ge
ge(R column, Object val)ge(boolean condition, R column, Object val)
lt(R column, Object val)lt(boolean condition, R column, Object val)
le(R column, Object val)le(boolean condition, R column, Object val)
between(R column, Object val1, Object val2)between(boolean condition, R column, Object val1, Object val2)
notBetween(R column, Object val1, Object val2)notBetween(boolean condition, R column, Object val1, Object val2)
like(R column, Object val)like(boolean condition, R column, Object val)
notLike(R column, Object val)notLike(boolean condition, R column, Object val)
likeLeft(R column, Object val)likeLeft(boolean condition, R column, Object val)
likeRight(R column, Object val)likeRight(boolean condition, R column, Object val)
isNull(R column)isNull(boolean condition, R column)
isNotNull(R column)isNotNull(boolean condition, R column)
in(R column, Collection<?> value)in(boolean condition, R column, Collection<?> value)
- 字段 IN (value.get(0), value.get(1), …)
- 例:
in("age",{1,2,3})—->age in (1,2,3)
in(R column, Object... values)in(boolean condition, R column, Object... values)
notIn(R column, Collection<?> value)notIn(boolean condition, R column, Collection<?> value)
- 字段 IN (value.get(0), value.get(1), …)
- 例:
notIn("age",{1,2,3})—->age not in (1,2,3)
notIn(R column, Object... values)notIn(boolean condition, R column, Object... values)
inSql(R column, String inValue)inSql(boolean condition, R column, String inValue)
- 字段 IN ( sql语句 )
- 例:
inSql("age", "1,2,3,4,5,6")—->age in (1,2,3,4,5,6) - 例:
inSql("id", "select id from table where id < 3")—->id in (select id from table where id < 3)notInSql
notInSql(R column, String inValue)notInSql(boolean condition, R column, String inValue)
- 字段 NOT IN ( sql语句 )
- 例:
notInSql("age", "1,2,3,4,5,6")—->age not in (1,2,3,4,5,6) - 例:
notInSql("id", "select id from table where id < 3")—->age not in (select id from table where id < 3)groupBy
groupBy(R... columns)groupBy(boolean condition, R... columns)
orderByAsc(R... columns)orderByAsc(boolean condition, R... columns)
orderByDesc(R... columns)orderByDesc(boolean condition, R... columns)
- 排序:ORDER BY 字段, … DESC
例:
orderByDesc("id", "name")—->order by id DESC,name DESCorderBy
orderBy(boolean condition, boolean isAsc, R... columns)
排序:ORDER BY 字段, …
- 例:
orderBy(true, true, "id", "name")—->order by id ASC,name ASChaving
having(String sqlHaving, Object... params)having(boolean condition, String sqlHaving, Object... params)
- HAVING ( sql语句 )
- 例:
having("sum(age) > 10")—->having sum(age) > 10 - 例:
having("sum(age) > {0}", 11)—->having sum(age) > 11or
or()or(boolean condition)
- 拼接 OR
注意事项:
主动调用or表示紧接着下一个方法不是用and连接!(不调用or则默认为使用and连接)
- 例:
eq("id",1).or().eq("name","老王")—->id = 1 or name = '老王'
or(Consumer<Param> consumer)or(boolean condition, Consumer<Param> consumer)
and(Consumer<Param> consumer)and(boolean condition, Consumer<Param> consumer)
- AND 嵌套
- 例:
and(i -> i.eq("name", "李白").ne("status", "活着"))—->and (name = '李白' and status <> '活着')nested
nested(Consumer<Param> consumer)nested(boolean condition, Consumer<Param> consumer)
- 正常嵌套 不带 AND 或者 OR
- 例:
nested(i -> i.eq("name", "李白").ne("status", "活着"))—->(name = '李白' and status <> '活着')apply
apply(String applySql, Object... params)apply(boolean condition, String applySql, Object... params)
- 拼接 sql
注意事项:
该方法可用于数据库函数 动态入参的params对应前面applySql内部的{index}部分.这样是不会有sql注入风险的,反之会有!
- 例:
apply("id = 1")—->id = 1 - 例:
apply("date_format(dateColumn,'%Y-%m-%d') = '2008-08-08'")—->date_format(dateColumn,'%Y-%m-%d') = '2008-08-08'") - 例:
apply("date_format(dateColumn,'%Y-%m-%d') = {0}", "2008-08-08")—->date_format(dateColumn,'%Y-%m-%d') = '2008-08-08'")last
last(String lastSql)last(boolean condition, String lastSql)
- 无视优化规则直接拼接到 sql 的最后
注意事项:
只能调用一次,多次调用以最后一次为准 有sql注入的风险,请谨慎使用
exists(String existsSql)exists(boolean condition, String existsSql)
- 拼接 EXISTS ( sql语句 )
- 例:
exists("select id from table where age = 1")—->exists (select id from table where age = 1)notExists
notExists(String notExistsSql)notExists(boolean condition, String notExistsSql)
- 拼接 NOT EXISTS ( sql语句 )
- 例:
notExists("select id from table where age = 1")—->not exists (select id from table where age = 1)QueryWrapper
说明:
继承自 AbstractWrapper ,自身的内部属性 entity 也用于生成 where 条件
及 LambdaQueryWrapper, 可以通过 new QueryWrapper().lambda() 方法获取select
select(String... sqlSelect)select(Predicate<TableFieldInfo> predicate)select(Class<T> entityClass, Predicate<TableFieldInfo> predicate)
- 设置查询字段
说明:
以上方分法为两类.
第二类方法为:过滤查询字段(主键除外),入参不包含 class 的调用前需要wrapper内的entity属性有值! 这两类方法重复调用以最后一次为准
- 例:
select("id", "name", "age") 例:
select(i -> i.getProperty().startsWith("test"))excludeColumns @Deprecated
排除查询字段
UpdateWrapper
说明:
继承自 AbstractWrapper ,自身的内部属性 entity 也用于生成 where 条件
及 LambdaUpdateWrapper, 可以通过 new UpdateWrapper().lambda() 方法获取!
set
set(String column, Object val)set(boolean condition, String column, Object val)
- SQL SET 字段
- 例:
set("name", "老李头") - 例:
set("name", "")—->数据库字段值变为空字符串 例:
set("name", null)—->数据库字段值变为nullsetSql
setSql(String sql)
设置 SET 部分 SQL
-
lambda
获取
LambdaWrapper
在QueryWrapper中是获取LambdaQueryWrapper
在UpdateWrapper中是获取LambdaUpdateWrapper使用 Wrapper 自定义SQL
需求来源:
在使用了mybatis-plus之后, 自定义SQL的同时也想使用Wrapper的便利应该怎么办? 在mybatis-plus版本3.0.7得到了完美解决 版本需要大于或等于3.0.7, 以下两种方案取其一即可Service.java
mysqlMapper.getAll(Wrappers.<MysqlData>lambdaQuery().eq(MysqlData::getGroup, 1));
方案一 注解方式 Mapper.java
@Select("select * from mysql_data ${ew.customSqlSegment}")List<MysqlData> getAll(@Param(Constants.WRAPPER) Wrapper wrapper);
方案二 XML形式 Mapper.xml
<select id="getAll" resultType="MysqlData">SELECT * FROM mysql_data ${ew.customSqlSegment}</select>
分页插件
示例工程:
👉 mybatis-plus-sample-pagination<!-- spring xml 方式 --><property name="plugins"><array><bean class="com.baomidou.mybatisplus.extension.plugins.PaginationInterceptor"><property name="sqlParser" ref="自定义解析类、可以没有"/><property name="dialectClazz" value="自定义方言类、可以没有"/><!-- COUNT SQL 解析.可以没有 --><property name="countSqlParser" ref="countSqlParser"/></bean></array></property><bean id="countSqlParser" class="com.baomidou.mybatisplus.extension.plugins.pagination.optimize.JsqlParserCountOptimize"><!-- 设置为 true 可以优化部分 left join 的sql --><property name="optimizeJoin" value="true"/></bean>
//Spring boot方式@EnableTransactionManagement@Configuration@MapperScan("com.baomidou.cloud.service.*.mapper*")public class MybatisPlusConfig {@Beanpublic PaginationInterceptor paginationInterceptor() {PaginationInterceptor paginationInterceptor = new PaginationInterceptor();// 设置请求的页面大于最大页后操作, true调回到首页,false 继续请求 默认false// paginationInterceptor.setOverflow(false);// 设置最大单页限制数量,默认 500 条,-1 不受限制// paginationInterceptor.setLimit(500);// 开启 count 的 join 优化,只针对部分 left joinpaginationInterceptor.setCountSqlParser(new JsqlParserCountOptimize(true));return paginationInterceptor;}}
XML 自定义分页
UserMapper.java 方法内容
public interface UserMapper {//可以继承或者不继承BaseMapper/*** <p>* 查询 : 根据state状态查询用户列表,分页显示* </p>** @param page 分页对象,xml中可以从里面进行取值,传递参数 Page 即自动分页,必须放在第一位(你可以继承Page实现自己的分页对象)* @param state 状态* @return 分页对象*/IPage<User> selectPageVo(Page<?> page, Integer state);}
UserMapper.xml 等同于编写一个普通 list 查询,mybatis-plus 自动替你分页
<select id="selectPageVo" resultType="com.baomidou.cloud.entity.UserVo">SELECT id,name FROM user WHERE state=#{state}</select>
UserServiceImpl.java 调用分页方法
public IPage<User> selectUserPage(Page<User> page, Integer state) {// 不进行 count sql 优化,解决 MP 无法自动优化 SQL 问题,这时候你需要自己查询 count 部分// page.setOptimizeCountSql(false);// 当 total 为小于 0 或者设置 setSearchCount(false) 分页插件不会进行 count 查询// 要点!! 分页返回的对象与传入的对象是同一个return userMapper.selectPageVo(page, state);}
Sequence主键
主键生成策略必须使用INPUT
支持父类定义@KeySequence子类继承使用支持主键类型指定(3.3.0开始自动识别主键类型)
内置支持:DB2KeyGenerator
- H2KeyGenerator
- KingbaseKeyGenerator
- OracleKeyGenerator
- PostgreKeyGenerator
如果内置支持不满足你的需求,可实现IKeyGenerator接口来进行扩展.
举个栗子
@KeySequence(value = "SEQ_ORACLE_STRING_KEY", clazz = String.class)public class YourEntity {@TableId(value = "ID_STR", type = IdType.INPUT)private String idStr;}
Spring-Boot
方式一:使用配置类
@Beanpublic IKeyGenerator keyGenerator() {return new H2KeyGenerator();}
方式二:通过MybatisPlusPropertiesCustomizer自定义
@Beanpublic MybatisPlusPropertiesCustomizer plusPropertiesCustomizer() {return plusProperties -> plusProperties.getGlobalConfig().getDbConfig().setKeyGenerator(new H2KeyGenerator());}
Spring
方式一: XML配置
<bean id="globalConfig" class="com.baomidou.mybatisplus.core.config.GlobalConfig"><property name="dbConfig" ref="dbConfig"/></bean><bean id="dbConfig" class="com.baomidou.mybatisplus.core.config.GlobalConfig.DbConfig"><property name="keyGenerator" ref="keyGenerator"/></bean><bean id="keyGenerator" class="com.baomidou.mybatisplus.extension.incrementer.H2KeyGenerator"/>
方式二:注解配置
@Beanpublic GlobalConfig globalConfig() {GlobalConfig conf = new GlobalConfig();conf.setDbConfig(new GlobalConfig.DbConfig().setKeyGenerator(new H2KeyGenerator()));return conf;}
自定义ID生成器
自3.3.0开始,默认使用雪花算法+UUID(不含中划线)
自定义示例工程:
- spring-boot示例 :传送门
| 方法 | 主键生成策略 | 主键类型 | 说明 |
| —- | —- | —- | —- |
| nextId | ASSIGN_ID,
ID_WORKER,ID_WORKER_STR| Long,Integer,String | 支持自动转换为String类型,但数值类型不支持自动转换,需精准匹配,例如返回Long,实体主键就不支持定义为Integer | | nextUUID | ASSIGN_UUID,UUID| String | 默认不含中划线的UUID生成 |
Spring-Boot
方式一:声明为Bean供Spring扫描注入
@Componentpublic class CustomIdGenerator implements IdentifierGenerator {@Overridepublic Long nextId(Object entity) {//可以将当前传入的class全类名来作为bizKey,或者提取参数来生成bizKey进行分布式Id调用生成.String bizKey = entity.getClass().getName();//根据bizKey调用分布式ID生成long id = ....;//返回生成的id值即可.return id;}}
方式二:使用配置类
@Beanpublic IdentifierGenerator idGenerator() {return new CustomIdGenerator();}
方式三:通过MybatisPlusPropertiesCustomizer自定义
@Beanpublic MybatisPlusPropertiesCustomizer plusPropertiesCustomizer() {return plusProperties -> plusProperties.getGlobalConfig().setIdentifierGenerator(new CustomIdGenerator());}
Spring
方式一: XML配置
<bean name="customIdGenerator" class="com.baomidou.samples.incrementer.CustomIdGenerator"/><bean id="globalConfig" class="com.baomidou.mybatisplus.core.config.GlobalConfig"><property name="identifierGenerator" ref="customIdGenerator"/></bean>
方式二:注解配置
@Beanpublic GlobalConfig globalConfig() {GlobalConfig conf = new GlobalConfig();conf.setIdentifierGenerator(new CustomIdGenerator());return conf;}
插件扩展
热加载
3.0.6版本上移除了该功能,不过最新快照版已加回来并打上废弃标识,3.1.0版本上已完全移除
开启动态加载 mapper.xml
- 多数据源配置多个 MybatisMapperRefresh 启动 bean
默认情况下,eclipse保存会自动编译,idea需自己手动编译一次
参数说明:sqlSessionFactory:session工厂mapperLocations:mapper匹配路径enabled:是否开启动态加载 默认:falsedelaySeconds:项目启动延迟加载时间 单位:秒 默认:10ssleepSeconds:刷新时间间隔 单位:秒 默认:20s提供了两个构造,挑选一个配置进入spring配置文件即可:构造1:<bean class="com.baomidou.mybatisplus.spring.MybatisMapperRefresh"><constructor-arg name="sqlSessionFactory" ref="sqlSessionFactory"/><constructor-arg name="mapperLocations" value="classpath*:mybatis/mappers/*/*.xml"/><constructor-arg name="enabled" value="true"/></bean>构造2:<bean class="com.baomidou.mybatisplus.spring.MybatisMapperRefresh"><constructor-arg name="sqlSessionFactory" ref="sqlSessionFactory"/><constructor-arg name="mapperLocations" value="classpath*:mybatis/mappers/*/*.xml"/><constructor-arg name="delaySeconds" value="10"/><constructor-arg name="sleepSeconds" value="20"/><constructor-arg name="enabled" value="true"/></bean>
逻辑删除
SpringBoot 配置方式:
application.yml 加入配置(如果你的默认值和mp默认的一样,该配置可无):
mybatis-plus:global-config:db-config:logic-delete-field: flag #全局逻辑删除字段值 3.3.0开始支持,详情看下面。logic-delete-value: 1 # 逻辑已删除值(默认为 1)logic-not-delete-value: 0 # 逻辑未删除值(默认为 0)
注册 Bean(3.1.1开始不再需要这一步):import com.baomidou.mybatisplus.core.injector.ISqlInjector;import com.baomidou.mybatisplus.extension.injector.LogicSqlInjector;import org.springframework.context.annotation.Bean;import org.springframework.context.annotation.Configuration;@Configurationpublic class MyBatisPlusConfiguration {@Beanpublic ISqlInjector sqlInjector() {return new LogicSqlInjector();}}
实体类字段上加上
@TableLogic注解@TableLogicprivate Integer deleted;
效果: 使用mp自带方法删除和查找都会附带逻辑删除功能 (自己写的xml不会)
example删除时 update user set deleted=1 where id =1 and deleted=0查找时 select * from user where deleted=0
全局逻辑删除: 3.3.0开始支持
如果公司代码比较规范,比如统一了全局都是flag为逻辑删除字段。
使用此配置则不需要在实体类上添加 @TableLogic。
但如果实体类上有 @TableLogic 则以实体上的为准,忽略全局。 即先查找注解再查找全局,都没有则此表没有逻辑删除。mybatis-plus:global-config:db-config:logic-delete-field: flag #全局逻辑删除字段值
附件说明
逻辑删除是为了方便数据恢复和保护数据本身价值等等的一种方案,但实际就是删除。
- 如果你需要再查出来就不应使用逻辑删除,而是以一个状态去表示。
如: 员工离职,账号被锁定等都应该是一个状态字段,此种场景不应使用逻辑删除。
- 若确需查找删除数据,如老板需要查看历史所有数据的统计汇总信息,请单独手写sql。
通用枚举
解决了繁琐的配置,让 mybatis 优雅的使用枚举属性!自
3.1.0开始,如果你无需使用原生枚举,可配置默认枚举来省略扫描通用枚举配置 默认枚举配置- 升级说明:
3.1.0以下版本改变了原生默认行为,升级时请将默认枚举设置为EnumOrdinalTypeHandler - 影响用户:
实体中使用原生枚举 - 其他说明:
配置枚举包扫描的时候能提前注册使用注解枚举的缓存
- 升级说明:
1、声明通用枚举属性
方式一: 使用 @EnumValue 注解枚举属性 完整示例
public enum GradeEnum {PRIMARY(1, "小学"), SECONDORY(2, "中学"), HIGH(3, "高中");GradeEnum(int code, String descp) {this.code = code;this.descp = descp;}@EnumValue//标记数据库存的值是codeprivate final int code;//。。。}
方式二: 枚举属性,实现 IEnum 接口如下:
public enum AgeEnum implements IEnum<Integer> {ONE(1, "一岁"),TWO(2, "二岁"),THREE(3, "三岁");private int value;private String desc;@Overridepublic Integer getValue() {return this.value;}}
实体属性使用枚举类型
public class User {/*** 名字* 数据库字段: name varchar(20)*/private String name;/*** 年龄,IEnum接口的枚举处理* 数据库字段:age INT(3)*/private AgeEnum age;/*** 年级,原生枚举(带{@link com.baomidou.mybatisplus.annotation.EnumValue}):* 数据库字段:grade INT(2)*/private GradeEnum grade;}
2、配置扫描通用枚举
- 注意!! spring mvc 配置参考,安装集成 MybatisSqlSessionFactoryBean 枚举包扫描,spring boot 例子配置如下:
示例工程:
👉 mybatisplus-spring-boot
配置文件 resources/application.yml
mybatis-plus:# 支持统配符 * 或者 ; 分割typeEnumsPackage: com.baomidou.springboot.entity.enums....
如何序列化枚举值为数据库存储值?
Jackson
一、重写toString方法
springboot
@Beanpublic Jackson2ObjectMapperBuilderCustomizer customizer(){return builder -> builder.featuresToEnable(SerializationFeature.WRITE_ENUMS_USING_TO_STRING);}
jackson
ObjectMapper objectMapper = new ObjectMapper();objectMapper.configure(SerializationFeature.WRITE_ENUMS_USING_TO_STRING, true);
以上两种方式任选其一,然后在枚举中复写toString方法即可.
二、注解处理
public enum GradeEnum {PRIMARY(1, "小学"), SECONDORY(2, "中学"), HIGH(3, "高中");GradeEnum(int code, String descp) {this.code = code;this.descp = descp;}@EnumValue@JsonValue //标记响应json值private final int code;}
Fastjson
一、重写toString方法
全局处理方式
FastJsonConfig config = new FastJsonConfig();config.setSerializerFeatures(SerializerFeature.WriteEnumUsingToString);
全局部处理方式
@JSONField(serialzeFeatures= SerializerFeature.WriteEnumUsingToString)private UserStatus status;
以上两种方式任选其一,然后在枚举中复写toString方法即可.
字段类型处理器
类型处理器,用于 JavaType 与 JdbcType 之间的转换,用于 PreparedStatement 设置参数值和从 ResultSet 或 CallableStatement 中取出一个值,本文讲解
mybaits-plus内置常用类型处理器如何通过TableField注解快速注入到mybatis容器中。
示例工程:
👉 mybatis-plus-sample-typehandler
JSON 字段类型
@Data@Accessors(chain = true)@TableName(autoResultMap = true)public class User {private Long id;.../*** 注意!! 必须开启映射注解** @TableName(autoResultMap = true)** 以下两种类型处理器,二选一 也可以同时存在** 注意!!选择对应的 JSON 处理器也必须存在对应 JSON 解析依赖包*/@TableField(typeHandler = JacksonTypeHandler.class)// @TableField(typeHandler = FastjsonTypeHandler.class)private OtherInfo otherInfo;}
该注解对应了 XML 中写法为
<result column="other_info" jdbcType="VARCHAR" property="otherInfo" typeHandler="com.baomidou.mybatisplus.extension.handlers.JacksonTypeHandler" />
自动填充功能
实现元对象处理器接口:com.baomidou.mybatisplus.core.handlers.MetaObjectHandler
注解填充字段
@TableField(.. fill = FieldFill.INSERT)生成器策略部分也可以配置!public class User {// 注意!这里需要标记为填充字段@TableField(.. fill = FieldFill.INSERT)private String fillField;....}
自定义实现类 MyMetaObjectHandler
@Slf4j@Componentpublic class MyMetaObjectHandler implements MetaObjectHandler {@Overridepublic void insertFill(MetaObject metaObject) {log.info("start insert fill ....");this.strictInsertFill(metaObject, "createTime", LocalDateTime.class, LocalDateTime.now()); // 起始版本 3.3.0(推荐使用)this.fillStrategy(metaObject, "createTime", LocalDateTime.now()); // 也可以使用(3.3.0 该方法有bug请升级到之后的版本如`3.3.1.8-SNAPSHOT`)/* 上面选其一使用,下面的已过时(注意 strictInsertFill 有多个方法,详细查看源码) *///this.setFieldValByName("operator", "Jerry", metaObject);//this.setInsertFieldValByName("operator", "Jerry", metaObject);}@Overridepublic void updateFill(MetaObject metaObject) {log.info("start update fill ....");this.strictUpdateFill(metaObject, "updateTime", LocalDateTime.class, LocalDateTime.now()); // 起始版本 3.3.0(推荐使用)this.fillStrategy(metaObject, "updateTime", LocalDateTime.now()); // 也可以使用(3.3.0 该方法有bug请升级到之后的版本如`3.3.1.8-SNAPSHOT`)/* 上面选其一使用,下面的已过时(注意 strictUpdateFill 有多个方法,详细查看源码) *///this.setFieldValByName("operator", "Tom", metaObject);//this.setUpdateFieldValByName("operator", "Tom", metaObject);}}
注意事项:
字段必须声明
TableField注解,属性fill选择对应策略,该声明告知Mybatis-Plus需要预留注入SQL字段- 填充处理器
MyMetaObjectHandler在 Spring Boot 中需要声明@Component或@Bean注入 - 要想根据注解
FieldFill.xxx和字段名以及字段类型来区分必须使用父类的strictInsertFill或者strictUpdateFill方法 不需要根据任何来区分可以使用父类的
fillStrategy方法public enum FieldFill {/*** 默认不处理*/DEFAULT,/*** 插入填充字段*/INSERT,/*** 更新填充字段*/UPDATE,/*** 插入和更新填充字段*/INSERT_UPDATE}
Sql 注入器
注入器配置
全局配置sqlInjector用于注入ISqlInjector接口的子类,实现自定义方法注入。
参考默认注入器 DefaultSqlInjectorSQL 自动注入器接口
ISqlInjectorpublic interface ISqlInjector {/*** <p>* 检查SQL是否注入(已经注入过不再注入)* </p>** @param builderAssistant mapper 信息* @param mapperClass mapper 接口的 class 对象*/void inspectInject(MapperBuilderAssistant builderAssistant, Class<?> mapperClass);}
自定义自己的通用方法可以实现接口
ISqlInjector也可以继承抽象类AbstractSqlInjector注入通用方法SQL 语句然后继承BaseMapper添加自定义方法,全局配置sqlInjector注入 MP 会自动将类所有方法注入到mybatis容器中。
攻击 SQL 阻断解析器
作用!阻止恶意的全表更新删除
@Beanpublic PaginationInterceptor paginationInterceptor() {PaginationInterceptor paginationInterceptor = new PaginationInterceptor();...List<ISqlParser> sqlParserList = new ArrayList<>();// 攻击 SQL 阻断解析器、加入解析链sqlParserList.add(new BlockAttackSqlParser() {@Overridepublic void processDelete(Delete delete) {// 如果你想自定义做点什么,可以重写父类方法像这样子if ("user".equals(delete.getTable().getName())) {// 自定义跳过某个表,其他关联表可以调用 delete.getTables() 判断return ;}super.processDelete(delete);}});paginationInterceptor.setSqlParserList(sqlParserList);...return paginationInterceptor;}
性能分析插件
性能分析拦截器,用于输出每条 SQL 语句及其执行时间 该插件
3.2.0以上版本移除推荐使用第三方扩展 执行SQL分析打印 功能
使用如下:
<plugins>....<!-- SQL 执行性能分析,开发环境使用,线上不推荐。 maxTime 指的是 sql 最大执行时长 --><plugin interceptor="com.baomidou.mybatisplus.extension.plugins.PerformanceInterceptor"><property name="maxTime" value="100" /><!--SQL是否格式化 默认false--><property name="format" value="true" /></plugin></plugins>
//Spring boot方式@EnableTransactionManagement@Configuration@MapperScan("com.baomidou.cloud.service.*.mapper*")public class MybatisPlusConfig {/*** SQL执行效率插件*/@Bean@Profile({"dev","test"})// 设置 dev test 环境开启public PerformanceInterceptor performanceInterceptor() {return new PerformanceInterceptor();}}
注意!参数说明:
参数:maxTime SQL 执行最大时长,超过自动停止运行,有助于发现问题。
- 参数:format SQL SQL是否格式化,默认false。
- 该插件只用于开发环境,不建议生产环境使用。
执行 SQL 分析打印
该功能依赖
p6spy组件,完美的输出打印 SQL 及执行时长3.1.0以上版本
示例工程:
👉 mybatis-plus-sample-crud
- p6spy 依赖引入
Maven:
<dependency><groupId>p6spy</groupId><artifactId>p6spy</artifactId><version>最新版本</version></dependency>
Gradle:
compile group: 'p6spy', name: 'p6spy', version: '最新版本'
application.yml 配置:
spring:datasource:driver-class-name: com.p6spy.engine.spy.P6SpyDriverurl: jdbc:p6spy:h2:mem:test...
spy.properties 配置:
#3.2.1以上使用modulelist=com.baomidou.mybatisplus.extension.p6spy.MybatisPlusLogFactory,com.p6spy.engine.outage.P6OutageFactory#3.2.1以下使用或者不配置#modulelist=com.p6spy.engine.logging.P6LogFactory,com.p6spy.engine.outage.P6OutageFactory# 自定义日志打印logMessageFormat=com.baomidou.mybatisplus.extension.p6spy.P6SpyLogger#日志输出到控制台appender=com.baomidou.mybatisplus.extension.p6spy.StdoutLogger# 使用日志系统记录 sql#appender=com.p6spy.engine.spy.appender.Slf4JLogger# 设置 p6spy driver 代理deregisterdrivers=true# 取消JDBC URL前缀useprefix=true# 配置记录 Log 例外,可去掉的结果集有error,info,batch,debug,statement,commit,rollback,result,resultset.excludecategories=info,debug,result,commit,resultset# 日期格式dateformat=yyyy-MM-dd HH:mm:ss# 实际驱动可多个#driverlist=org.h2.Driver# 是否开启慢SQL记录outagedetection=true# 慢SQL记录标准 2 秒outagedetectioninterval=2
注意!
driver-class-name 为 p6spy 提供的驱动类
- url 前缀为 jdbc:p6spy 跟着冒号为对应数据库连接地址
- 打印出sql为null,在excludecategories增加commit
- 批量操作不打印sql,去除excludecategories中的batch
- 批量操作打印重复的问题请使用MybatisPlusLogFactory (3.2.1新增)
-
乐观锁插件
主要适用场景
意图:
当要更新一条记录的时候,希望这条记录没有被别人更新
乐观锁实现方式: 取出记录时,获取当前version
- 更新时,带上这个version
- 执行更新时, set version = newVersion where version = oldVersion
- 如果version不对,就更新失败
1.插件配置
spring xml:
<bean class="com.baomidou.mybatisplus.extension.plugins.OptimisticLockerInterceptor"/>
spring boot:
@Beanpublic OptimisticLockerInterceptor optimisticLockerInterceptor() {return new OptimisticLockerInterceptor();}
2.注解实体字段 @Version 必须要!
@Versionprivate Integer version;
特别说明:
- 支持的数据类型只有:int,Integer,long,Long,Date,Timestamp,LocalDateTime
- 整数类型下
newVersion = oldVersion + 1 newVersion会回写到entity中- 仅支持
updateById(id)与update(entity, wrapper)方法 在
update(entity, wrapper)方法下,wrapper不能复用!!!示例
示例Java代码(参考test case代码)
int id = 100;int version = 2;User u = new User();u.setId(id);u.setVersion(version);u.setXXX(xxx);if(userService.updateById(u)){System.out.println("Update successfully");}else{System.out.println("Update failed due to modified by others");}
示例SQL原理
update tbl_user set name = 'update',version = 3 where id = 100 and version = 2
动态数据源

一个基于springboot的快速集成多数据源的启动器-
简介
dynamic-datasource-spring-boot-starter 是一个基于springboot的快速集成多数据源的启动器。
其支持 Jdk 1.7+, SpringBoot 1.4.x 1.5.x 2.0.x。最新版为
示例项目 可参考项目下的samples目录。
示例项目 可参考项目下的samples目录。
示例项目 可参考项目下的samples目录。优势
网上关于动态数据源的切换的文档有很多,核心只有两种。
- 构建多套环境,优势是方便控制也容易集成一些简单的分布式事务,缺点是非动态同时代码量较多,配置难度大。
- 基于spring提供原生的
AbstractRoutingDataSource,参考一些文档自己实现切换。
如果你的数据源较少,场景不复杂,选择以上任意一种都可以。如果你需要更多特性,请尝试本动态数据源。
- 数据源分组,适用于多种场景 纯粹多库 读写分离 一主多从 混合模式。
- 简单集成Druid数据源监控多数据源,简单集成Mybatis-Plus简化单表,简单集成P6sy格式化sql,简单集成Jndi数据源。
- 简化Druid和HikariCp配置,提供全局参数配置。
- 提供自定义数据源来源(默认使用yml或properties配置)。
- 项目启动后能动态增减数据源。
- 使用spel动态参数解析数据源,如从session,header和参数中获取数据源。(多租户架构神器)
- 多层数据源嵌套切换。(一个业务ServiceA调用ServiceB,ServiceB调用ServiceC,每个Service都是不同的数据源)
-
劣势
不能使用多数据源事务(同一个数据源下能使用事务),网上其他方案也都不能提供。
如果你需要使用到分布式事务,那么你的架构应该到了微服务化的时候了。
如果呼声强烈,项目达到800 star,作者考虑集成分布式事务。
PS: 如果您只是几个数据库但是有强烈的需求分布式事务,建议还是使用传统方式自己构建多套环境集成atomic这类,网上百度很多。约定
本框架只做 切换数据源 这件核心的事情,并不限制你的具体操作,切换了数据源可以做任何CRUD。
- 配置文件所有以下划线
_分割的数据源 首部 即为组的名称,相同组名称的数据源会放在一个组下。 - 切换数据源即可是组名,也可是具体数据源名称,切换时默认采用负载均衡机制切换。
- 默认的数据源名称为 master ,你可以通过spring.datasource.dynamic.primary修改。
-
建议
强烈建议在 主从模式 下遵循普遍的规则,以便他人能更轻易理解你的代码。
主数据库 建议 只执行INSERTUPDATEDELETE操作。
从数据库 建议 只执行SELECT操作。使用方法
引入dynamic-datasource-spring-boot-starter。
<dependency><groupId>com.baomidou</groupId><artifactId>dynamic-datasource-spring-boot-starter</artifactId><version>${version}</version></dependency>
配置数据源。
spring:datasource:dynamic:primary: master #设置默认的数据源或者数据源组,默认值即为masterdatasource:master:username: rootpassword: 123456driver-class-name: com.mysql.jdbc.Driverurl: jdbc:mysql://xx.xx.xx.xx:3306/dynamicslave_1:username: rootpassword: 123456driver-class-name: com.mysql.jdbc.Driverurl: jdbc:mysql://xx.xx.xx.xx:3307/dynamicslave_2:username: rootpassword: 123456driver-class-name: com.mysql.jdbc.Driverurl: jdbc:mysql://xx.xx.xx.xx:3308/dynamic#......省略#以上会配置一个默认库master,一个组slave下有两个子库slave_1,slave_2
# 多主多从 纯粹多库(记得设置primary) 混合配置spring: spring: spring:datasource: datasource: datasource:dynamic: dynamic: dynamic:datasource: datasource: datasource:master_1: mysql: master:master_2: oracle: slave_1:slave_1: sqlserver: slave_2:slave_2: postgresql: oracle_1:slave_3: h2: oracle_2:
使用 @DS 切换数据源。
@DS 可以注解在方法上和类上,同时存在方法注解优先于类上注解。
注解在service实现或mapper接口方法上,但强烈不建议同时在service和mapper注解。 (可能会有问题)
| 注解 | 结果 |
|---|---|
| 没有@DS | 默认数据源 |
| @DS(“dsName”) | dsName可以为组名也可以为具体某个库的名称 |
@Service@DS("slave")public class UserServiceImpl implements UserService {@Autowiredprivate JdbcTemplate jdbcTemplate;public List<Map<String, Object>> selectAll() {return jdbcTemplate.queryForList("select * from user");}@Override@DS("slave_1")public List<Map<String, Object>> selectByCondition() {return jdbcTemplate.queryForList("select * from user where age >10");}}
在mybatis环境下也可注解在mapper接口层。
@DS("slave")public interface UserMapper {@Insert("INSERT INTO user (name,age) values (#{name},#{age})")boolean addUser(@Param("name") String name, @Param("age") Integer age);@Update("UPDATE user set name=#{name}, age=#{age} where id =#{id}")boolean updateUser(@Param("id") Integer id, @Param("name") String name, @Param("age") Integer age);@Delete("DELETE from user where id =#{id}")boolean deleteUser(@Param("id") Integer id);@Select("SELECT * FROM user")@DS("slave_1")List<User> selectAll();}
赶紧集成体验一下吧! 如果需要更多功能请继续往下看!
- Druid集成,MybatisPlus集成,动态增减数据源等等更多更细致的文档在这里 点击查看
- 项目Javadoc一览 点击查看
分布式事务
暂时支持 rabbit 实现可靠消息分布式事务
3.1.1以上版本
示例工程:
👉 mybatis-plus-sample-dts-rabbit
示例工程:
👉 mybatis-plus-sample-tenant
👉 mybatisplus-spring-boot
@Beanpublic PaginationInterceptor paginationInterceptor() {PaginationInterceptor paginationInterceptor = new PaginationInterceptor();/** 【测试多租户】 SQL 解析处理拦截器<br>* 这里固定写成住户 1 实际情况你可以从cookie读取,因此数据看不到 【 麻花藤 】 这条记录( 注意观察 SQL )<br>*/List<ISqlParser> sqlParserList = new ArrayList<>();TenantSqlParser tenantSqlParser = new TenantSqlParser();tenantSqlParser.setTenantHandler(new TenantHandler() {@Overridepublic Expression getTenantId(boolean where) {// 该 where 条件 3.2.0 版本开始添加的,用于分区是否为在 where 条件中使用// 此判断用于支持返回多个租户 ID 场景,具体使用查看示例工程return new LongValue(1L);}@Overridepublic String getTenantIdColumn() {return "tenant_id";}@Overridepublic boolean doTableFilter(String tableName) {// 这里可以判断是否过滤表/*if ("user".equals(tableName)) {return true;}*/return false;}});sqlParserList.add(tenantSqlParser);paginationInterceptor.setSqlParserList(sqlParserList);paginationInterceptor.setSqlParserFilter(new ISqlParserFilter() {@Overridepublic boolean doFilter(MetaObject metaObject) {MappedStatement ms = SqlParserHelper.getMappedStatement(metaObject);// 过滤自定义查询此时无租户信息约束【 麻花藤 】出现if ("com.baomidou.springboot.mapper.UserMapper.selectListBySQL".equals(ms.getId())) {return true;}return false;}});return paginationInterceptor;}
- 相关 SQL 解析如多租户可通过
@SqlParser(filter=true)排除 SQL 解析,注意!!全局配置 sqlParserCache 设置为 true 才生效。(3.1.1开始不再需要这一步)# 开启 SQL 解析缓存注解生效mybatis-plus:global-config:sql-parser-cache: true
动态表名 SQL 解析器
该功能解决动态表名支持
3.1.1以上版本
简单示例:
👉 mybatis-plus-sample-dynamic-tablename
源码文件:
👉 DynamicTableNameParser
- 具体使用参考多租户
实现 ITableNameHandler 接口注入到 DynamicTableNameParser 处理器链中,将动态表名解析器注入到 MP 解析链。
注意事项:
- 原理为解析替换设定表名为处理器的返回表名,表名建议可以定义复杂一些避免误替换
例如:真实表名为 user 设定为 mp_dt_user 处理器替换为 user_2019 等
MybatisX 快速开发插件
MybatisX 是一款基于 IDEA 的快速开发插件,为效率而生。
安装方法:打开 IDEA,进入 File -> Settings -> Plugins -> Browse Repositories,输入mybatisx搜索并安装。
如果各位觉得好用,请为该插件打一个五分好评 哦! 源码地址:MybatisX 源码功能
Java 与 XML 调回跳转
-
计划支持
连接数据源之后 xml 里自动提示字段
- sql 增删改查
- 集成 MP 代码生成
-
常见问题
如何排除非表中字段?
以下三种方式选择一种即可:
使用
transient修饰private transient String noColumn;
使用
static修饰private static String noColumn;
使用
TableField注解@TableField(exist=false)private String noColumn;
排除实体父类属性
/*** 忽略父类 createTime 字段映射*/private transient String createTime;
出现
Invalid bound statement (not found)异常不要怀疑,正视自己,这个异常肯定是你插入的姿势不对……
检查是不是引入 jar 冲突
检查 Mapper.java 的扫描路径
方法一:在
Configuration类上使用注解MapperScan@Configuration@MapperScan("com.yourpackage.*.mapper")public class YourConfigClass{...}
方法二:在
Configuration类里面,配置MapperScannerConfigurer(查看示例)@Beanpublic MapperScannerConfigurer mapperScannerConfigurer(){MapperScannerConfigurer scannerConfigurer = new MapperScannerConfigurer();//可以通过环境变量获取你的mapper路径,这样mapper扫描可以通过配置文件配置了scannerConfigurer.setBasePackage("com.yourpackage.*.mapper");return scannerConfigurer;}
检查是否指定了主键?如未指定,则会导致
selectById相关 ID 无法操作,请用注解@TableId注解表 ID 主键。当然@TableId注解可以没有!但是你的主键必须叫 id(忽略大小写)- SqlSessionFactory不要使用原生的,请使用MybatisSqlSessionFactory
检查是否自定义了SqlInjector,是否复写了getMethodList()方法,该方法里是否注入了你需要的方法(可参考DefaultSqlInjector)
自定义 SQL 无法执行
问题描述:指在 XML 中里面自定义 SQL,却无法调用。本功能同
MyBatis一样需要配置 XML 扫描路径:Spring MVC 配置(参考mybatisplus-spring-mvc)
<bean id="sqlSessionFactory" class="com.baomidou.mybatisplus.extension.spring.MybatisSqlSessionFactoryBean"><property name="dataSource" ref="dataSource" /><property name="typeAliasesPackage" value="xxx.entity" /><property name="mapperLocations" value="classpath*:/mybatis/*/*.xml"/>...</bean>
Spring Boot 配置(参考mybatisplus-spring-boot)
mybatis-plus:mapper-locations: classpath*:/mapper/**/*.xml
对于
IDEA系列编辑器,XML 文件是不能放在 java 文件夹中的,IDEA 默认不会编译源码文件夹中的 XML 文件,可以参照以下方式解决:- 将配置文件放在 resource 文件夹中
- 对于 Maven 项目,可指定 POM 文件的 resource
注意!Maven 多模块项目的扫描路径需以<build><resources><resource><!-- xml放在java目录下--><directory>src/main/java</directory><includes><include>**/*.xml</include></includes></resource><!--指定资源的位置(xml放在resources下,可以不用指定)--><resource><directory>src/main/resources</directory></resource></resources></build>
classpath*:开头 (即加载多个 jar 包下的 XML 文件)启动时异常
异常一:
java.lang.ClassCastException: sun.reflect.generics.reflectiveObjects.TypeVariableImpl cannot be cast to java.lang.Class
MapperScan 需要排除 com.baomidou.mybatisplus.mapper.BaseMapper 类 及其 子类(自定义公共 Mapper),比如:
import com.baomidou.mybatisplus.core.mapper.BaseMapper;public interface SuperMapper<T> extends BaseMapper<T> {// your methods}
异常二:
Injection of autowired
原因:低版本不支持泛型注入,请升级 Spring 版本到 4+ 以上。
异常三:
java.lang.NoSuchMethodError: org.apache.ibatis.session.Configuration.getDefaultScriptingLanguageInstance() Lorg/apache/ibatis/scripting/LanguageDriver
版本引入问题:3.4.1 版本里没有,3.4.2 里面才有!
关于 Long 型主键填充不生效的问题
检查是不是用了
long而不是Long!long类型默认值为 0,而 MP 只会判断是否为nullID_WORKER 生成主键太长导致 js 精度丢失
JavaScript 无法处理 Java 的长整型 Long 导致精度丢失,具体表现为主键最后两位永远为 0,解决思路: Long 转为 String 返回
FastJson 处理方式
@Overridepublic void configureMessageConverters(List<HttpMessageConverter<?>> converters) {FastJsonHttpMessageConverter fastJsonConverter = new FastJsonHttpMessageConverter();FastJsonConfig fjc = new FastJsonConfig();// 配置序列化策略fjc.setSerializerFeatures(SerializerFeature.BrowserCompatible);fastJsonConverter.setFastJsonConfig(fjc);converters.add(fastJsonConverter);}
JackJson 处理方式
方式一
// 注解处理,这里可以配置公共 baseEntity 处理@JsonSerialize(using=ToStringSerializer.class)public long getId() {return id;}
方式二
// 全局配置序列化返回 JSON 处理final ObjectMapper objectMapper = new ObjectMapper();SimpleModule simpleModule = new SimpleModule();simpleModule.addSerializer(Long.class, ToStringSerializer.instance);objectMapper.registerModule(simpleModule);
比较一般的处理方式:增加一个
public String getIdStr()方法,前台获取idStr
插入或更新的字段有 空字符串 或者
nullFieldStrategy 有三种策略:
IGNORED:忽略
- NOT_NULL:非 NULL,默认策略
- NOT_EMPTY:非空

当用户有更新字段为 空字符串 或者 null 的需求时,需要对 FieldStrategy 策略进行调整:
- 方式一:调整全局的验证策略
注入配置 GlobalConfiguration 属性 fieldStrategy 方式二:调整字段验证注解
根据具体情况,在需要更新的字段中调整验证注解,如验证非空:@TableField(strategy=FieldStrategy.NOT_EMPTY)
方式三:使用
UpdateWrapper(3.x)
使用以下方法来进行更新或插入操作://updateAllColumnById(entity) // 全部字段更新: 3.0已经移除mapper.update(new User().setName("mp").setAge(3),Wrappers.<User>lambdaUpdate().set(User::getEmail, null) //把email设置成null.eq(User::getId, 2));//也可以参考下面这种写法mapper.update(null,Wrappers.<User>lambdaUpdate().set(User::getAge, 3).set(User::getName, "mp").set(User::getEmail, null) //把email设置成null.eq(User::getId, 2));
字段类型为
bit、tinyint(1)时映射为boolean类型默认mysql驱动会把tinyint(1)字段映射为boolean: 0=false, 非0=true
MyBatis 是不会自动处理该映射,如果不想把tinyint(1)映射为boolean类型:修改类型tinyint(1)为tinyint(2)或者int
- 需要修改请求连接添加参数
tinyInt1isBit=false,如下:jdbc:mysql://127.0.0.1:3306/mp?tinyInt1isBit=false
出现 2 个
原因:配了 2 个分页拦截器! 检查配置文件或者代码,只留一个!limit语句insert 后如何返回主键
insert 后主键会自动 set 到实体的 ID 字段,所以你只需要 getId() 就好MP 如何查指定的几个字段
EntityWrapper.sqlSelect 配置你想要查询的字段//2.xEntityWrapper<H2User> ew = new EntityWrapper<>();ew.setSqlSelect("test_id as id, name, age");//只查询3个字段List<H2User> list = userService.selectList(ew);for(H2User u:list){Assert.assertNotNull(u.getId());Assert.assertNotNull(u.getName());Assert.assertNull(u.getPrice()); // 这个字段没有查询出来}//3.xmapper.selectList(Wrappers.<User>lambdaQuery().select(User::getId, User::getName));//或者使用QueryWrappermapper.selectList(new QueryWrapper<User>().select("id","name"));
mapper 层二级缓存问题
我们建议缓存放到 service 层,你可以自定义自己的 BaseServiceImpl 重写注解父类方法,继承自己的实现。
当然如果你是一个极端分子,请使用 CachePaginationInterceptor 替换默认分页,这样支持分页缓存。mapper 层二级缓存刷新问题
如果你按照 mybatis 的方式配置第三方二级缓存,并且使用 2.0.9 以上的版本,则会发现自带的方法无法更新缓存内容,那么请按如下方式解决(二选一):
1.在代码中 mybatis 的 mapper 层添加缓存注释,声明 implementation 或 eviction 的值为 cache 接口的实现类
2.在对应的 mapper.xml 中将原有注释修改为链接式声明,以保证 xml 文件里的缓存能够正常@CacheNamespace(implementation=MybatisRedisCache.class,eviction=MybatisRedisCache.class)public interface DataResourceMapper extends BaseMapper<DataResource>{}
<cache-ref namespace="com.mst.cms.dao.DataResourceMapper"></cache-ref>
Cause: org.apache.ibatis.type.TypeException:Error setting null for parameter #1 with JdbcType OTHER配置 jdbcTypeForNull=NULL Spring Bean 配置方式:
MybatisConfiguration configuration = new MybatisConfiguration();configuration.setDefaultScriptingLanguage(MybatisXMLLanguageDriver.class);configuration.setJdbcTypeForNull(JdbcType.NULL);configuration.setMapUnderscoreToCamelCase(true);//开启下划线转驼峰sqlSessionFactory.setConfiguration(configuration);
yml 配置
mybatis-plus:configuration:jdbc-type-for-null: 'null'
自定义 sql 里使用 Page 对象传参无法获取
Page 对象是继承 RowBounds,是 Mybatis 内置对象,无法在 mapper 里获取 请使用自定义 Map/对象,或者通过@Param(“page”) int page,size 来传参
如何使用:【Map下划线自动转驼峰】
指的是:resultType="java.util.Map"
spring boot
@Beanpublic ConfigurationCustomizer configurationCustomizer() {return i -> i.setObjectWrapperFactory(new MybatisMapWrapperFactory());}
在 wrapper 中如何使用
limit限制 SQL// 取 1 条数据wrapper.last("limit 1");
通用 insertBatch 为什么放在 service 层处理
SQL 长度有限制海量数据量单条 SQL 无法执行,就算可执行也容易引起内存泄露 JDBC 连接超时等
- 不同数据库对于单条 SQL 批量语法不一样不利于通用
目前的解决方案:循环预处理批量提交,虽然性能比单 SQL 慢但是可以解决以上问题。
逻辑删除下 自动填充 功能没有效果
自动填充的实现方式是填充到入参的
entity内,由于baseMapper提供的删除接口入参不是entity所以逻辑删除无效- 如果你想要使用自动填充有效:
- 方式一: 使用update方法:
UpdateWrapper.set("logicDeleteColumn","deleteValue") - 方式二: 配合Sql注入器
并使用我们提供的com.baomidou.mybatisplus.extension.injector.methods.LogicDeleteByIdWithFill类
注意该类只能填充指定了自动填充的字段,其他字段无效
- 方式一: 使用update方法:
方式2下: Java Config Bean 配置
配置自定义的 SqlInjector
@Beanpublic LogicSqlInjector logicSqlInjector(){return new LogicSqlInjector() {/*** 注入自定义全局方法*/@Overridepublic List<AbstractMethod> getMethodList() {List<AbstractMethod> methodList = super.getMethodList();methodList.add(new LogicDeleteByIdWithFill());return methodList;}};}
配置自己的全局 baseMapper 并使用
public interface MyBaseMapper<T> extends BaseMapper<T> {/*** 自定义全局方法*/int deleteByIdWithFill(T entity);}
3.x数据库关键字如何处理?
在以前的版本是自动识别关键字进行处理的,但是3.x移除了这个功能。
- 不同的数据库对关键字的处理不同,很难维护。
- 在数据库设计时候本身不建议使用关键字。
- 交由用户去处理关键字。
@TableField(value = "`status`")private Boolean status;
MybatisPlusException: Your property named “xxx” cannot find the corresponding database column name!
针对3.1.1以及后面的版本:
现象: 单元测试没问题,启动服务器进行调试就出现这个问题
原因: dev-tools, 3.1.1+针对字段缓存,使用.class来作为key替换了原来的className, 而使用dev-tools会把.class使用不同的classLoader加载,导致可能出现找不到的情况
解决方案: 去掉dev-tools插件Error attempting to get column ‘create_time’ from result set. Cause: java.sql.SQLFeatureNotSupportedException
3.1.0之前版本没问题,针对3.1.1以及后续版本出现上述问题
现象: 集成druid数据源,使用3.1.0之前版本没问题,升级mp到3.1.1+后,运行时报错:java.sql.SQLFeatureNotSupportedException
原因: mp3.1.1+使用了新版jdbc,LocalDateTime等新日期类型处理方式升级,但druid在1.1.21版本之前不支持,参考issue
解决方案: 1. 升级druid到1.1.21解决这个问题;2.保持mp版本3.1.0;3.紧跟mp版本,换掉druid数据源mp版本从3.1.0及以下版本升级到高版本,JDK8日期新类型LocalDateTime等无法映射(报错)
MP_3.1.0及之前的版本,依赖的是mybatis 3.5.0,
MP_3.1.1升级了mybatis的依赖到3.5.1, 而mybatis 3.5.1 对于新日期类型,需要JDBC driver支持JDBC 4.2 API.
如果你的jdbc驱动版本不支持,那么就会出现新日期类型报错。
参考 blog.mybatis.orgThere is one backward incompatible changes since 3.5.0.Because of the fix for #1478 , LocalDateTypeHandler, LocalTimeTypeHandler and LocalDateTimeTypeHandler now require a JDBC driver that supports JDBC 4.2 API.[EDIT] These type handlers no longer work with Druid. Please see #1516 .
Failed to bind properties under ‘mybatis-plus.configuration.incomplete-result-maps[0].assistant.configuration.mapped-statements[0].parameter-map.parameter-mappings[0]’ to org.apache.ibatis.mapping.ParameterMapping
springboot 2.2.0 之前无此问题, springboot 2.2.0 出现此问题
现象: 1.本地启动无问题,打成war包部署到服务器报此问题
原因:springboot 2.2.0 构造器注入的问题, mybatis 私有构造器不能绑定属性, 造成依赖mybatis的框架比如MP报错 [参考issue](https://github.com/spring-projects/spring-boot/issues/18670) 此问题已在springboot2.2.1中修复
解决方案:1.将springboot降级到2.1.x或升级到2.2.1起 (建议springboot2.2.2)

若有收获,就点个赞吧
0 人点赞
