Config 介绍
Spring Cloud Config为分布式系统中的外部配置提供服务器和客户端支持。使用Config Server,您可以在所有环境中管理应用程序的外部属性。客户端和服务器上的概念映射与SpringEnvironment和PropertySource抽象相同,因此它们与Spring应用程序非常契合,但可以与任何以任何语言运行的应用程序一起使用。随着应用程序通过从开发人员到测试和生产的部署流程,您可以管理这些环境之间的配置,并确定应用程序具有迁移时需要运行的一切。服务器存储后端的默认实现使用git,因此它轻松支持标签版本的配置环境,以及可以访问用于管理内容的各种工具。可以轻松添加替代实现,并使用Spring配置将其插入
简单来说,就是对于已经发布后的系统,可以通过修改config 的配置进行动态的更新当前系统的配置,无需重启。
关于使用
Spring Cloud Config 的功能并没有国内一些如携程的 Apollo、蚂蚁金服的 disconf、阿里的Nacos等功能强大。笔者目前公司生产使用的正是携程的 Apollo。
这里不再介绍SVN模式,SVN模式在性能及使用方面均不如Git,如果要使用的话,这里推荐开发环境可以使用native模式,其它可以使用Git模式
config服务端
本节代码地址
1. 新建模块fw-cloud-config-native-server
1.1 maven 配置
<dependencies><dependency><groupId>org.springframework.boot</groupId><artifactId>spring-boot-starter-web</artifactId></dependency><dependency><groupId>org.springframework.cloud</groupId><artifactId>spring-cloud-config-server</artifactId></dependency><!--已服务发现的方式可以加,否则不用加此包--><dependency><groupId>org.springframework.cloud</groupId><artifactId>spring-cloud-starter-netflix-eureka-client</artifactId></dependency></dependencies>
1.2 新建启动类
需要加入@EnableConfigServer
@EnableDiscoveryClient //已服务发现的方式可以加,否则不用加此注解@EnableConfigServer@SpringBootApplicationpublic class FwConfigNativeServerApplication {public static void main(String[] args) {SpringApplication.run(FwConfigNativeServerApplication.class, args);}}
1.3 配置信息-Git 模式
需要在Git) 或者 Gitee) 新建一个仓库存配置信息,在aplication.yml中配置信息见下部分内容
server:port: 8778spring:application:name: fw-config-servercloud:config:server:git:uri: https://github.com/xuyisu/fw-sping-cloud.git #设置自己的git地址username: 账号password: 密码search-paths: fw-cloud-config-repo #仓库里面如果没有见文件夹,不需要加此配置eureka:#已服务发现的方式可以加,否则不用加client:service-url:defaultZone: http://localhost:8761/eureka
1.4 在仓库中添加配置信息
1.4.1 fw-test.yml 默认
version: default-1.0
1.4.2 fw-test-dev.yml 开发
version: dev-1.0
1.4.3 fw-test-prod.yml 生产
version: prod-1.0
1.4.4 fw-test-uat.yml uat
version: uat-1.0
1.4.5 fw-register-eureka-client.yml 项目演示
eureka:client:service-url:defaultZone: http://localhost:8761/eurekalogging:level:com.yisu: debugversion: eureka-2.0
1.5 项目启动
浏览器或Postman 输入地址localhost:8778/fw-test/default
返回结果如下
{"name": "fw-test","profiles": ["default"],"label": null,"version": "05bdb20957cdb159ccc8b163010025f66ea0f0c6","state": null,"propertySources": [{"name": "https://github.com/xuyisu/fw-sping-cloud.git/fw-cloud-config-repo/fw-test.yml","source": {"version": "default-1.0"}}]}
可以看到返回的JSON中应用名是fw-test,环境是默认的,因为请求的是default,分支名label是null,默认是master,version 就是Git CommitId,propertySources里面就是配置的属性
1.6 测试读取配置(其它几个类同)
浏览器或Postman 输入localhost:8778/fw-register-eureka-client.yml
1.7 访问配置信息的URL与配置文件的映射关系如下:
- /{application}/{profile}[/{label}]
- /{application}-{profile}.yml
- /{label}/{application}-{profile}.yml
- /{application}-{profile}.properties
- /{label}/{application}-{profile}.properties
- {application} 就是应用名称,对应到配置文件上来,就是配置文件的名称部分,例如我上面创建的配置文件。
- {profile} 就是配置文件的版本,我们的项目有开发版本、测试环境版本、生产环境版本,对应到配置文件上来就是以 application-{profile}.yml 加以区分,例如application-dev.yml、application-uat.yml、application-prod.yml。
- {label} 表示 git 分支,默认是 master 分支,如果项目是以分支做区分也是可以的,那就可以通过不同的 label 来控制访问不同的配置文件了。
1.8 服务端模式
不管服务端使用什么模式,对客户端均不受影响
2. 配置信息-本地模式
本节代码地址
2.1searchLocations的配置描述
- 绝对路径 如 file:D:/workspace/fw-repo
- 相对路径:如classpath:/native
- 默认路径:classpath:/
在application.yml 中设置本地的配置spring:application:name: fw-config-serverprofiles:active: nativecloud:config:server:native:searchLocations: classpath:/nativeeureka:client:service-url:defaultZone: http://localhost:8761/eureka
2.2 添加配置文件
比如我们使用的是相对路径:如classpath:/native,将配置复制过来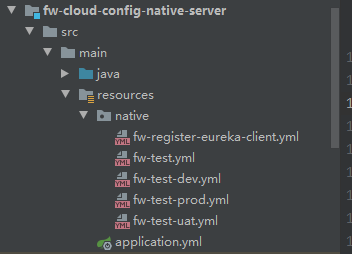
不管服务端使用什么模式,对客户端均不受影响2.3 启动项目
浏览器或Postman 输入地址localhost:8778/fw-register-eureka-client.yml(其它几个类同)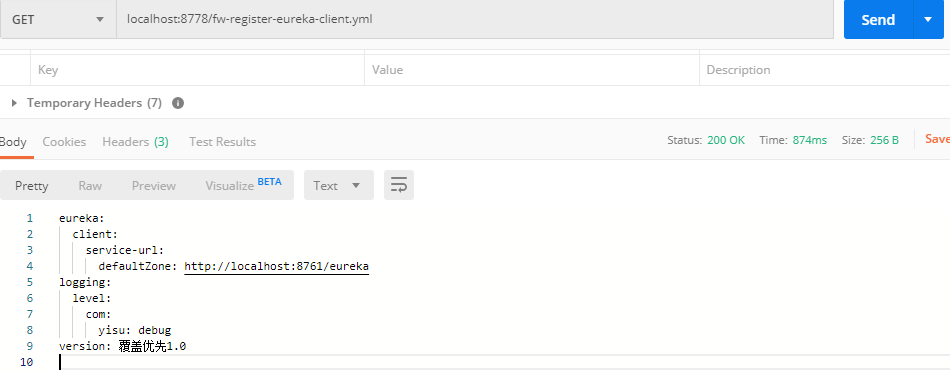
config客户端
本节代码地址
1.新建模块fw-cloud-config-native-client
1.1maven配置
加入spring-boot-starter-actuator是为了感应服务端变化
<dependencies><dependency><groupId>org.springframework.boot</groupId><artifactId>spring-boot-starter-web</artifactId></dependency><dependency><groupId>org.springframework.cloud</groupId><artifactId>spring-cloud-starter-config</artifactId></dependency><dependency><groupId>org.springframework.boot</groupId><artifactId>spring-boot-starter-actuator</artifactId></dependency><dependency><groupId>org.springframework.cloud</groupId><artifactId>spring-cloud-starter-netflix-eureka-client</artifactId></dependency></dependencies>
1.2设置启动代码
@EnableDiscoveryClient@SpringBootApplicationpublic class FwConfigClientApplication {public static void main(String[] args) {SpringApplication.run(FwConfigClientApplication.class, args);}}
1.3 加一个controller 用于验证git中配置的值
@RestController@RefreshScope //开启更新功能@RequestMapping("api")@Slf4jpublic class TestController {@Value("${version}")private String versionValue;/*** 返回配置文件中的值*/@GetMapping("/version")@ResponseBodypublic String returnFormValue(){log.debug("输出信息{}",versionValue);return versionValue;}}
1.4 添加配置文件(需要用boostrap.yml)
boostrap.yml里的配置优先于application.properties和application.yml加载
server:port: 8779spring:application:name: fw-register-eureka-client #对应 git 的配置文件名称cloud:config:uri: http://localhost:8778/ #Config Server 地址profile: dev #环境名label: master #分支名management:endpoints:web:exposure:include: refresh,health,info #暴露监控的点
配置中心的更新配置的坑,2.0前调用/refresh更新配置的方法,不再适用。 现在的方法如下: management.endpoints.web.exposure.include=/actuator/refresh,/actuator/health,/actuator/info
这里我并没有配置eureka信息,在fw-register-eureka-client.yml配置的
日志级别配置的debug模式
eureka:client:service-url:defaultZone: http://localhost:8761/eurekalogging:level:com.yisu: debugversion: eureka-1.0
1.5 启动客户端(服务端先起)
可以看到,启动的时候先到Config Server 拉去配置信息
c.c.c.ConfigServicePropertySourceLocator : Fetching config from server at : http://localhost:8778/
1.6 Postman 测试接口
2019-12-17 21:42:10.063 DEBUG 16204 --- [nio-8779-exec-2] c.y.c.client.controller.TestController : 输出信息eureka-2.0
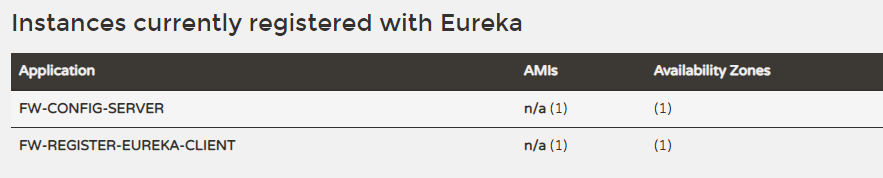
1.7 eureka 服务信息
1.8 查看服务状态
localhost:8779/actuator/health get请求
{"status": "UP"}
1.9 修改版本号提交
修改version的内容,并提交
请求localhost:8779/api/version
返回结果
eureka-1.0
没有变化,需要我们refresh一下
localhost:8779/actuator/refresh post请求
返回结果
["config.client.version","version"]
再次请求localhost:8779/api/version
返回结果
eureka-2.0
注意点
server:port: 8779spring:application:name: fw-register-eureka-clientcloud:config:#uri: http://localhost:8778/ 自己指定的profile: devlabel: masterdiscovery: #基于服务发现的enabled: trueservice-id: fw-config-servermanagement:endpoints:web:exposure:include: refresh,health,info
- 如果自己指定的方式配置的
Config Server不需要配置eureka和discovery.enabled和discovery.service-id的配置 - 如果基于eureka发现的方式,需要注释掉
spring.cloud.config.uri,加入eureka客户端依赖并且开启discovery.enabled和discovery.service-id的配置3. 属性覆盖
本节代码地址
GitHub: https://github.com/xuyisu/fw-sping-cloud/tree/master/fw-cloud-config-center/fw-cloud-config-native-server
3.1 在application.yml中添加配置
spring.cloud.config.allow-override #设置为true,表示开启覆盖的操作
3.2 配置需要覆盖的属性
spring.cloud.config.server.overrides本身是一个Map集合,可以配置多个,一些公共属性可以通过这种方式配置
spring:cloud:config:server:overrides:version: 覆盖优先1.0allow-override: true
3.3 Postman get请求
localhost:8779/api/version
返回结果
覆盖优先1.0
这说明了设置覆盖的属性的优先级比极高

若有收获,就点个赞吧
0 人点赞
