- Hystrix 介绍
- Hsystrix 入门
- 5. Hystrix 结果缓存
- 本节代码地址
- 6. Hystrix 清除缓存
- 本节代码地址
- 7. Hystrix 断路器开启
- 本节代码地址
- 8. Hystrix 断路器关闭
- 本节代码地址
- 9. Hystrix 合并请求
- 本节代码地址
- 9.1 新建FwHystrixCollapser类
- Hystrix Spring Cloud
Hystrix 介绍
很多系统在架构的时候都需要考虑单点故障和单点故障等问题,对于一个很大的分布式系统来说服务挂掉、机器损坏、响应延迟等问题不可避免,如何减少故障对整个分布式集群的影响成为一个重要的研究课题。
那么我们如何去解决呢?Spring Cloud 提供的解决的方案是Hystrix。下面我们来看下什么是Hystrix,并且如何实现服务之间的容错处理的?
Hystrix 的历史
说起Hystrix 的历史,先了解一下Netflix这家神奇的公司。
想必很多人都看过美剧《纸牌屋》,不过应该很少有人知道它的出品方就是Netflix,可以说是《纸牌屋》之父。作为一家在线影片租赁提供商,Netflix成立于1997年,在美国、加拿大提供互联网随选流媒体播放,定制DVD、蓝光光碟在线出租业务,经过多次商业模式的变革,Netflix成为了在线内容的霸主。据统计,Netflix在高峰期间的下载流量可以占到北美地区的1/3。
这里不得不提一点的是,从09年开始,Netflix逐渐把它的IT系统迁移到AWS云平台上,并开始业务的转型,从DVD租赁演变为在线视频供应商,依托于强大的AWS,这也给AWS带来了巨大挑战。
Netflix在AWS运行多年期间,总结了不少实践经验,比如必须考虑到故障的可能性,在AWS云平台上进行架构设计的一个经验法则是要作为一个悲观主义者来设计应用架构:假设会出问题。
我们知道硬件总会发生故障,服务器会发生宕机,唯一不确定的就是在什么时候发生,所以在应用架构上要进行高可用设计,比如需要有一个清晰的数据备份和恢复机制。
Netflix API团队在2011年启动了弹性工程工作,即Hystrix,旨在通过控制那些访问远程系统、服务和第三方库的节点,从而对延迟和故障提供更强大的容错能力,提供了熔断、隔离、Fallback、cache、监控等功能,能够在一个、或多个依赖同时出现问题时保证系统依然可用,目前它在Netflix每天处理着数百亿的隔离线程以及数千亿的隔离信号调用。
Hystrix是基于Apache License 2.0协议的开源的程序库,目前托管在GitHub上。Spring Cloud 目前生态里目前已经集成了Hystrix,所以我们我可以更方便的使用Hystrix 相关的API。
Hystrix的作用是什么?
Hystrix旨在执行以下操作:
- 提供保护并控制通过第三方客户端库访问(通常是通过网络)的依赖项带来的延迟和失败。
- 停止复杂的分布式系统中的级联故障。
- 快速失败并快速恢复。
- 回退并在可能的情况下正常降级。
- 启用近乎实时的监视,警报和操作控制。
Hystrix解决什么问题?
复杂分布式体系结构中的应用程序具有数十种依赖关系,每种依赖关系不可避免地会在某个时刻失败。如果主机应用程序未与这些外部故障隔离开来,则可能会被淘汰。
例如,对于依赖于30个服务的应用程序,其中每个服务的正常运行时间为99.99%,您可以期望:99.9930= 99.7%的正常运行时间 10亿个请求中的0.3%= 3,000,000个故障 /每月2小时以上的停机时间,即使所有依赖项都具有出色的正常运行时间。
现实通常更糟。
即使您没有对整个系统进行永续性设计,即使所有依赖项都能很好地执行,即使0.01%的停机时间对数十种服务中的每一项的总体影响,也可能相当于每月停机数小时。
当一切正常时,请求流如下所示: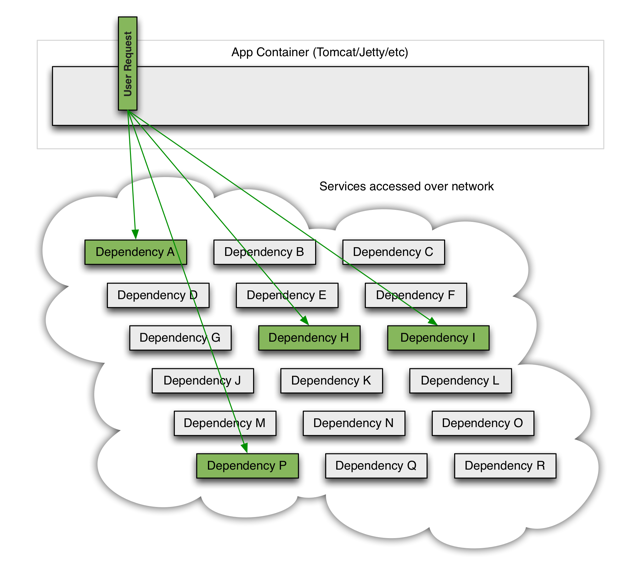
当许多后端系统之一变得潜在时,它可以阻止整个用户请求: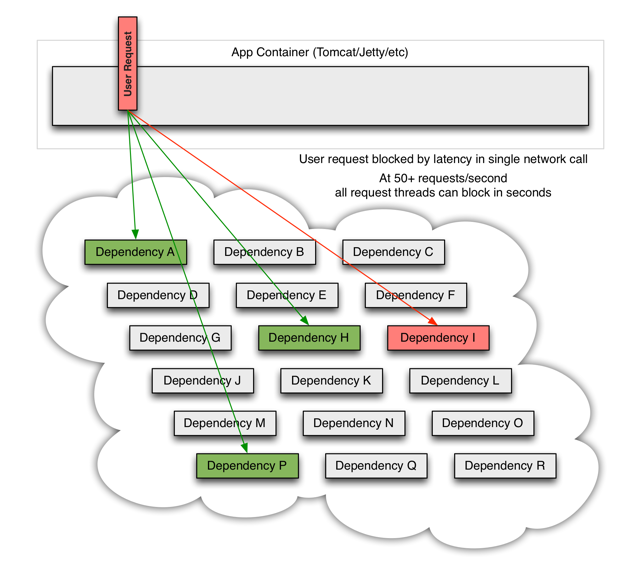
随着高流量,单个后端依赖关系变得潜在,这可能导致所有服务器上的所有资源在几秒钟内变得饱和。
应用程序中可能会导致网络请求通过网络或客户端库传播的每个点都是潜在失败的根源。比故障更糟糕的是,这些应用程序还可能导致服务之间的延迟增加,从而备份队列,线程和其他系统资源,从而导致整个系统出现更多级联故障。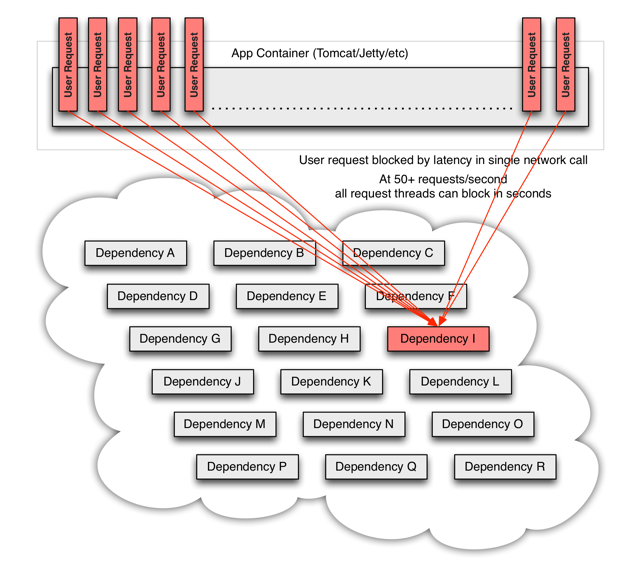
当通过第三方客户端执行网络访问时,这些问题会更加严重。第三方客户端是一个“黑匣子”,实现细节被隐藏并且可以随时更改,并且每个客户端库的网络或资源配置都不相同,并且通常难以监控和更改。
更糟糕的是,传递依赖关系会执行潜在的昂贵或易出错的网络调用,而不会被应用程序明确调用。
网络连接失败或降级。服务和服务器出现故障或变慢。新的库或服务部署会更改行为或性能特征。客户端库有错误。
所有这些都代表需要隔离和管理的故障和延迟,以使单个故障依赖项无法关闭整个应用程序或系统。
## Hystrix的设计原则是什么?
Hystrix的工作原理:
- 防止任何单个依赖项耗尽所有容器(例如Tomcat)用户线程。
- 减少负载并快速失败,而不是排队。
- 在可行的情况下提供备用,以保护用户免受故障的影响。
- 使用隔离技术(例如隔板,泳道和断路器模式)来限制任何一种依赖关系的影响。
- 通过近实时指标,监视和警报优化发现时间
- 通过在Hystrix的大多数方面中以低延迟传播配置更改来优化恢复时间,并支持动态属性更改,这使您可以通过低延迟反馈回路进行实时操作修改。
-
Hystrix如何实现其目标?
Hystrix通过以下方式做到这一点:
将对外部系统(或“依赖项”)的所有调用包装在通常在单独线程中执行的
HystrixCommand或HystrixObservableCommand对象中(这是命令模式的示例)。- 超时呼叫花费的时间超过您定义的阈值。有一个默认的,而是由“属性”,使它们比测量的99.5略高的方式对大多数依赖你自定义设置这些超时个百分点每个依存性的性能。
- 为每个依赖项维护一个小的线程池(或信号灯);如果已满,发往该依赖项的请求将立即被拒绝,而不是排队。
- 测量成功,失败(客户端抛出的异常),超时和线程拒绝。
- 如果该服务的错误百分比超过阈值,则使断路器跳闸,以在一段时间内手动或自动停止所有对特定服务的请求。
- 当请求失败,被拒绝,超时或短路时执行回退逻辑。
- 几乎实时监控指标和配置更改。
当您使用Hystrix封装每个基础依赖项时,如上图所示的体系结构将更改为类似于下图。每个依赖项彼此隔离,受到延迟时发生饱和的资源的限制,并包含回退逻辑,该逻辑决定了在依赖项中发生任何类型的故障时做出什么响应: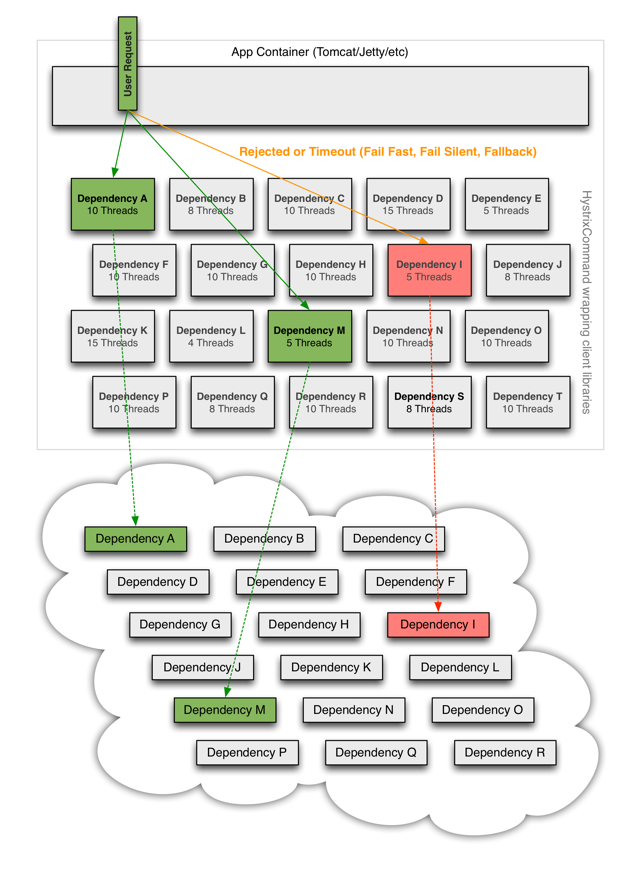
内容来自Hystrix的wiki:https://github.com/Netflix/Hystrix/wiki
Hsystrix 入门
在分布式环境中总会有一些服务会失效,Hystrix是Netfix下的一个java库,通过添加阀值及容错逻辑来帮我们控制分布式系统间的交互,通过隔离服务间的访问点、停止级联故障、提供可退回操作来实现容错故障,比如下图所示,两个服务之间调用,如果服务B服务挂了或者响应超时了,Hystrix就会及时通过隔离服务间的访问点,并通过之前设置好的fallback内容通知用户。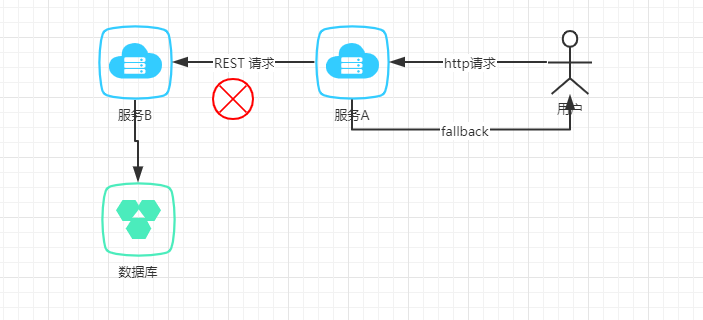
本节代码地址
1.Hystrix 的简单实用
1.1 新建项目
此项目是不在Spring Cloud下运行的,仅仅演示Hystrix的特性,后续会专门讲解和Spring Cloud的使用。
1.2 添加Maven配置
<dependencies><dependency><groupId>org.springframework.boot</groupId><artifactId>spring-boot-starter-web</artifactId></dependency><dependency><groupId>com.netflix.hystrix</groupId><artifactId>hystrix-core</artifactId><version>${hystrix-core.version}</version></dependency><dependency><groupId>commons-configuration</groupId><artifactId>commons-configuration</artifactId><version>${commons-configuration.version}</version></dependency></dependencies>
1.3 新建HystrixCommand 类
下面我们编写一个HystrixCommand的实现类,通过设置一个Groupkey。具体的逻辑卸载run()方法中,并在方法中输出当前的线程名,本节我们都将通过main()方法调用。
命令组名称(Groupkey) 是必传的,默认情况下全局维护的线程池
Map以该值作为Key,该Map的Value为执行命令的线程池。
/*** @author xuyisu* @description 简单使用* @date 2019/12/30*/public class FwHystrixCommond extends HystrixCommand<String> {private final String name;protected FwHystrixCommond(String name) {//创建一个组名super(HystrixCommandGroupKey.Factory.asKey("myGroup"));this.name=name;}@Overrideprotected String run() throws Exception {return this.name+":"+Thread.currentThread().getName();}// 非异步执行// public static void main(String[] args) {// String test = new FwHystrixCommond("test").execute();// System.out.println(test);// }// 异步执行public static void main(String[] args) throws ExecutionException, InterruptedException {Future<String> test = new FwHystrixCommond("test").queue();System.out.println(test.get());}}
右键运行之后,可以看到正常的输出,并且我们的组名变成了线程的名字
test:hystrix-myGroup-1
Hystrix 回退
上面的简单使用可能很多人觉得有点懵逼,哎,这玩意跟Hystrix有啥关系?请不要懵逼,下面一步一步介绍,请耐心。
在实现HystrixCommand方法中,有一个方getFallback()法我们需要重写,当系统断路器被打开时、实际执行命令失败时等就会触发这个方法。我们可以在这个方法中定义自己的回退逻辑。
本节代码地址
2.1 新建FwHystrixCommondFallBack类
我们在run()方法中设置延迟10秒钟,web默认1秒钟没有响应寄回发生超时异常。因此在运行的时候回触发getFallback()方法
/*** @author xuyisu* @description 回退* @date 2019/12/30*/public class FwHystrixCommondFallBack extends HystrixCommand<String> {private final String name;protected FwHystrixCommondFallBack(String name) {super(HystrixCommandGroupKey.Factory.asKey("myGroup"));this.name=name;}@Overrideprotected String run() {try {Thread.sleep(10000);} catch (InterruptedException e) {e.printStackTrace();}return this.name+":"+Thread.currentThread().getName();}/*** 默认情况下调用没在1秒内响应,就会触发回退* @return*/@Overrideprotected String getFallback() {return "当前调用失败";}public static void main(String[] args) {String test = new FwHystrixCommondFallBack("test").execute();System.out.println(test);}}
2.3 运行main 方法
可以看到运行后输出了已下日志
当前调用失败
3.Hystrix 信号量
Hystrix提供了两种隔离机制,信号量(SEMAPHORE)和线程(THREAD)隔离,我们先看信号量的隔离
当请求的并发数高于设定的阀值时,就不会再执行命令。相对于线程池机制,信号量的开销较小,但是信号量机制不支持超时和异步,除非对调用的服务有足够的信任,否则不建议使用信号量机制进行隔离。
注意:如果依赖关系被信号量隔离,然后变为潜在状态,则父线程将保持阻塞状态,直到基础网络调用超时为止。 一旦达到限制,信号灯拒绝将开始,但是填充信号量的线程无法得到释放
本节代码地址
3.1 新建FwHystrixCommondSemaphore类
需要在构造方法中指定SEMAPHORE机制,这里我们用默认的最大并发数(10)和回退并发数(10),开20线程进行测试。
/*** @author xuyisu* @description 信号量* @date 2019/12/30*/@Slf4jpublic class FwHystrixCommondSemaphore extends HystrixCommand<String> {private final String name;protected FwHystrixCommondSemaphore(String name) {super(HystrixCommand.Setter.withGroupKey(HystrixCommandGroupKey.Factory.asKey("myGroup")).andCommandPropertiesDefaults(HystrixCommandProperties.Setter().withExecutionIsolationStrategy(HystrixCommandProperties.ExecutionIsolationStrategy.SEMAPHORE)));this.name = name;}@Overrideprotected String getFallback() {log.info(this.name+":"+Thread.currentThread().getName()+"异常");return this.name+":"+Thread.currentThread().getName();}@Overrideprotected String run() throws Exception {log.info(this.name+":"+Thread.currentThread().getName()+"成功");return this.name + ":" + Thread.currentThread().getName();}public static void main(String[] args) throws ExecutionException, InterruptedException {for (int i = 0; i <20 ; i++) {final int index=i;Thread t =new Thread() {@Overridepublic void run() {FwHystrixCommondSemaphore test = new FwHystrixCommondSemaphore("test" + index);test.execute();}};t.start();}Thread.sleep(5000);}}
3.2 运行main方法
可以看到console输出的日志
13:33:06.043 [Thread-15] INFO com.yisu.hystrix.without.FwHystrixCommondSemaphore - test15:Thread-15异常13:33:06.043 [Thread-7] INFO com.yisu.hystrix.without.FwHystrixCommondSemaphore - test7:Thread-7异常13:33:06.043 [Thread-11] INFO com.yisu.hystrix.without.FwHystrixCommondSemaphore - test11:Thread-11异常13:33:06.043 [Thread-9] INFO com.yisu.hystrix.without.FwHystrixCommondSemaphore - test9:Thread-9异常13:33:06.043 [Thread-18] INFO com.yisu.hystrix.without.FwHystrixCommondSemaphore - test18:Thread-18异常13:33:06.043 [Thread-19] INFO com.yisu.hystrix.without.FwHystrixCommondSemaphore - test19:Thread-19异常13:33:06.043 [Thread-12] INFO com.yisu.hystrix.without.FwHystrixCommondSemaphore - test12:Thread-12异常13:33:06.043 [Thread-2] INFO com.yisu.hystrix.without.FwHystrixCommondSemaphore - test2:Thread-2异常13:33:06.043 [Thread-17] INFO com.yisu.hystrix.without.FwHystrixCommondSemaphore - test17:Thread-17异常13:33:06.043 [Thread-0] INFO com.yisu.hystrix.without.FwHystrixCommondSemaphore - test0:Thread-0异常13:33:06.066 [Thread-6] INFO com.yisu.hystrix.without.FwHystrixCommondSemaphore - test6:Thread-6成功13:33:06.066 [Thread-8] INFO com.yisu.hystrix.without.FwHystrixCommondSemaphore - test8:Thread-8成功13:33:06.066 [Thread-16] INFO com.yisu.hystrix.without.FwHystrixCommondSemaphore - test16:Thread-16成功13:33:06.066 [Thread-5] INFO com.yisu.hystrix.without.FwHystrixCommondSemaphore - test5:Thread-5成功13:33:06.066 [Thread-3] INFO com.yisu.hystrix.without.FwHystrixCommondSemaphore - test3:Thread-3成功13:33:06.066 [Thread-13] INFO com.yisu.hystrix.without.FwHystrixCommondSemaphore - test13:Thread-13成功13:33:06.066 [Thread-10] INFO com.yisu.hystrix.without.FwHystrixCommondSemaphore - test10:Thread-10成功13:33:06.066 [Thread-4] INFO com.yisu.hystrix.without.FwHystrixCommondSemaphore - test4:Thread-4成功13:33:06.066 [Thread-14] INFO com.yisu.hystrix.without.FwHystrixCommondSemaphore - test14:Thread-14成功13:33:06.066 [Thread-1] INFO com.yisu.hystrix.without.FwHystrixCommondSemaphore - test1:Thread-1成功
4. Hystrix 线程隔离
前面说了Hystrix 隔离机制中的一种信号量机制,现在我们来说一下线程隔离的机制。
4.1 线程池隔离的优缺点
本节代码地址
4.1.2 线程池的好处
- 应用程序会被完全保护起来,即使依赖的一个服务的线程池满了,也不会影响到应用程序的其他部分。
- 我们给应用程序引入一个新的风险较低的客户端lib的时候,如果发生问题,也是在本lib中,并不会影响到其他内容,因此我们可以大胆的引入新lib库。
- 当依赖的一个失败的服务恢复正常时,应用程序会立即恢复正常的性能。
- 如果我们的应用程序一些参数配置错误了,线程池的运行状况将会很快显示出来,比如延迟、超时、拒绝等。同时可以通过动态属性实时执行来处理纠正错误的参数配置。
- 如果服务的性能有变化,从而需要调整,比如增加或者减少超时时间,更改重试次数,就可以通过线程池指标动态属性修改,而且不会影响到其他调用请求。
- 除了隔离优势外,hystrix拥有专门的线程池可提供内置的并发功能,使得可以在同步调用之上构建异步的外观模式,这样就可以很方便的做异步编程(Hystrix引入了Rxjava异步框架)
注意:尽管有单独的线程提供了隔离,但您的基础客户端代码也应具有超时和/或对线程中断的响应,因此它不能无限期地阻塞并使Hystrix线程池饱和。
4.1.2 线程池的缺点
线程池的主要缺点是它们增加了计算开销。每个命令执行都涉及在单独的线程上运行命令所涉及的队列,调度和上下文切换。
Netflix在设计此系统时,决定接受此方式,以换取其提供的好处,并认为它很小,不会对成本或性能造成重大影响。
4.1.3 线程成本
Hystrix测量在子线程上执行construct()orrun()方法时的延迟以及父线程上的总的端到端时间。这样,您可以看到Hystrix开销(线程,度量,日志记录,断路器等)的成本。
Netflix API使用线程隔离每天处理10+亿次Hystrix Command执行。每个API实例有40多个线程池,每个线程池中有5-20个线程(大多数设置为10)。
下图表示一个HystrixCommand在单个API实例上以每秒60个请求的速度执行的情况(每个服务器每秒约350个线程执行总数):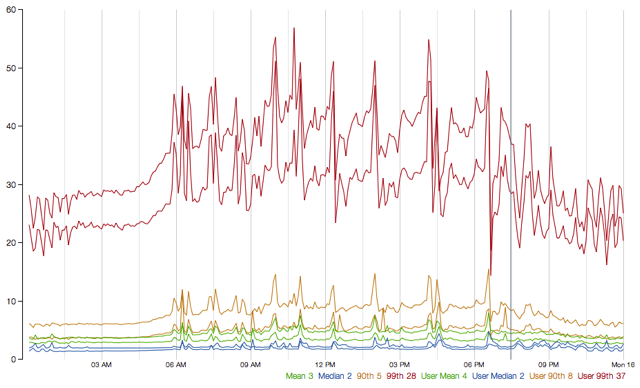
4.2 新建FwHystrixCommondThread 类
在这里我们需要设置隔离级别为THREAD,并且为线程池的大小为3,但是在代码里面运行了6个线程,所以只可能有3个成功,剩下的回退。
/*** @author xuyisu* @description 线程隔离* @date 2019/12/30*/@Slf4jpublic class FwHystrixCommondThread extends HystrixCommand<String> {private final String name;protected FwHystrixCommondThread(String name) {super(Setter.withGroupKey(HystrixCommandGroupKey.Factory.asKey("myGroup")).andCommandPropertiesDefaults(HystrixCommandProperties.Setter().withExecutionIsolationStrategy(HystrixCommandProperties.ExecutionIsolationStrategy.THREAD)).andThreadPoolPropertiesDefaults(HystrixThreadPoolProperties.Setter().withCoreSize(3)));this.name = name;}@Overrideprotected String getFallback() {log.info(this.name+":"+Thread.currentThread().getName()+"异常");return this.name+":"+Thread.currentThread().getName();}@Overrideprotected String run() throws Exception {log.info(this.name+":"+Thread.currentThread().getName()+"成功");return this.name + ":" + Thread.currentThread().getName();}public static void main(String[] args) throws ExecutionException, InterruptedException {for (int i = 0; i <6 ; i++) {final int index=i;Thread t =new Thread() {@Overridepublic void run() {FwHystrixCommondThread test = new FwHystrixCommondThread("test" + index);test.execute();}};t.start();}Thread.sleep(5000);}}
4.3 运行main方法
可以看到如下日志输出,跟我们预想的一样。
13:49:12.782 [Thread-0] INFO com.yisu.hystrix.without.FwHystrixCommondThread - test0:Thread-0异常13:49:12.782 [Thread-1] INFO com.yisu.hystrix.without.FwHystrixCommondThread - test1:Thread-1异常13:49:12.782 [Thread-2] INFO com.yisu.hystrix.without.FwHystrixCommondThread - test2:Thread-2异常13:49:12.798 [hystrix-myGroup-2] INFO com.yisu.hystrix.without.FwHystrixCommondThread - test4:hystrix-myGroup-2成功13:49:12.798 [hystrix-myGroup-1] INFO com.yisu.hystrix.without.FwHystrixCommondThread - test3:hystrix-myGroup-1成功13:49:12.798 [hystrix-myGroup-3] INFO com.yisu.hystrix.without.FwHystrixCommondThread - test5:hystrix-myGroup-3成功
4.4 设置的参数
上线我设置了线程池的大小,当然其他的参数也可以设置,在这里就不介绍了,感兴趣的话自己试试,如下截图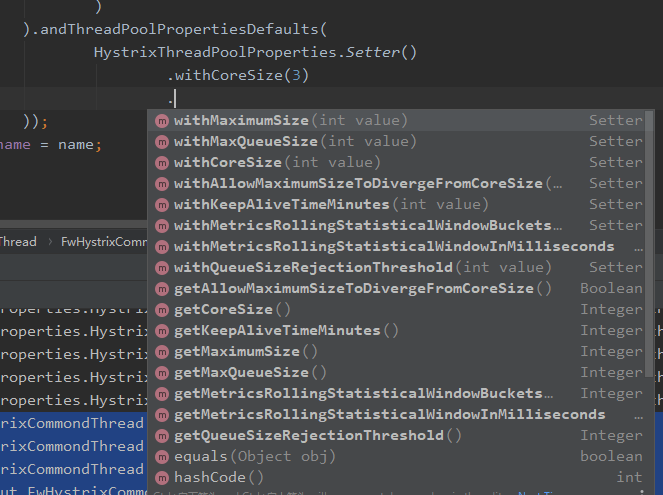
5. Hystrix 结果缓存
缓存的在开发中经常被使用,不管是本地缓存、Redis缓存、Guava、ECache、MemCache等第三方缓存,在目前的目分布式系统中,尤其是对并发要求高的系统,缓存所占的地位非常重要。
本节代码地址
hystrix支持将一个请求结果缓存起来,下一个具有相同key的请求将直接从缓存中取出结果,减少请求开销。要使用hystrix cache功能
- 重写
getCacheKey(),用来构造cache key; - 构建context,如果请求B要用到请求A的结果缓存,A和B必须同处一个context。
通过HystrixRequestContext.initializeContext()和context.shutdown()可以构建一个context,这两条语句间的所有请求都处于同一个context。5.1 新建FwHystrixCommondCache类
这里面我们重写了getCacheKey()方法,并已穿进去的参数作为缓存的key,我在run()方法中加了一个log日志,方便看到run()方法被调用到了几次/*** @author xuyisu* @description 结果缓存* @date 2019/12/30*/@Slf4jpublic class FwHystrixCommondCache extends HystrixCommand<String> {private final String name;protected FwHystrixCommondCache(String name) {super(HystrixCommandGroupKey.Factory.asKey("myGrop"));this.name=name;}@Overrideprotected String run(){log.info("get data,{}",this.name);return this.name+":"+Thread.currentThread().getName();}@Overrideprotected String getCacheKey() {return this.name;}public static void main(String[] args) throws ExecutionException, InterruptedException {HystrixRequestContext context = HystrixRequestContext.initializeContext();for (int i = 0; i <5 ; i++) {FwHystrixCommondCache test = new FwHystrixCommondCache("test");log.info(test.execute());}context.shutdown();}}
5.2 运行main方法
可以看到run()方法只被执行了一次14:14:47.847 [hystrix-myGrop-1] INFO com.yisu.hystrix.without.FwHystrixCommondCache - get data,test14:14:47.851 [main] INFO com.yisu.hystrix.without.FwHystrixCommondCache - test:hystrix-myGrop-114:14:47.858 [main] INFO com.yisu.hystrix.without.FwHystrixCommondCache - test:hystrix-myGrop-114:14:47.858 [main] INFO com.yisu.hystrix.without.FwHystrixCommondCache - test:hystrix-myGrop-114:14:47.859 [main] INFO com.yisu.hystrix.without.FwHystrixCommondCache - test:hystrix-myGrop-114:14:47.859 [main] INFO com.yisu.hystrix.without.FwHystrixCommondCache - test:hystrix-myGrop-1
6. Hystrix 清除缓存
有缓存设置就必然会有缓存清除,当代数据发生变动的时候,需要清除缓存,不让会造成脏数据。本节代码地址
GitHub: https://github.com/xuyisu/fw-sping-cloud/tree/master/fw-cloud-hystrix/fw-cloud-hystrix-without-springcloud
6.1 新建FwHystrixCommondFlushCache类
方法里面设置了HystrixCommandKey 用来指明删除缓存的Key。通过手动执行FwHystrixCommondFlushCache.flushCache("test");可以实现将缓存删除。
/*** @author xuyisu* @description 清空缓存* @date 2019/12/30*/@Slf4jpublic class FwHystrixCommondFlushCache extends HystrixCommand<String> {public static final HystrixCommandKey TEST_KEY = HystrixCommandKey.Factory.asKey("TestKey");private final String name;protected FwHystrixCommondFlushCache(String name) {super(HystrixCommand.Setter.withGroupKey(HystrixCommandGroupKey.Factory.asKey("myGroup")).andCommandKey(TEST_KEY));this.name = name;}@Overrideprotected String run() {log.info("get data,{}", this.name);return this.name + ":" + Thread.currentThread().getName();}/*** 清理缓存** @param name*/private static void flushCache(String name) {HystrixRequestCache.getInstance(TEST_KEY,HystrixConcurrencyStrategyDefault.getInstance()).clear(name);}@Overrideprotected String getCacheKey() {return this.name;}public static void main(String[] args) throws ExecutionException, InterruptedException {HystrixRequestContext context = HystrixRequestContext.initializeContext();for (int i = 0; i <5 ; i++) {FwHystrixCommondFlushCache test = new FwHystrixCommondFlushCache("test");log.info(test.execute());FwHystrixCommondFlushCache.flushCache("test");}context.shutdown();}}
6.2 执行main方法
14:24:12.662 [hystrix-myGroup-1] INFO com.yisu.hystrix.without.FwHystrixCommondFlushCache - get data,test14:24:12.670 [main] INFO com.yisu.hystrix.without.FwHystrixCommondFlushCache - test:hystrix-myGroup-114:24:12.673 [hystrix-myGroup-2] INFO com.yisu.hystrix.without.FwHystrixCommondFlushCache - get data,test14:24:12.674 [main] INFO com.yisu.hystrix.without.FwHystrixCommondFlushCache - test:hystrix-myGroup-214:24:12.675 [hystrix-myGroup-3] INFO com.yisu.hystrix.without.FwHystrixCommondFlushCache - get data,test14:24:12.676 [main] INFO com.yisu.hystrix.without.FwHystrixCommondFlushCache - test:hystrix-myGroup-314:24:12.678 [hystrix-myGroup-4] INFO com.yisu.hystrix.without.FwHystrixCommondFlushCache - get data,test14:24:12.679 [main] INFO com.yisu.hystrix.without.FwHystrixCommondFlushCache - test:hystrix-myGroup-414:24:12.680 [hystrix-myGroup-5] INFO com.yisu.hystrix.without.FwHystrixCommondFlushCache - get data,test14:24:12.681 [main] INFO com.yisu.hystrix.without.FwHystrixCommondFlushCache - test:hystrix-myGroup-5
如果我们在将方法FwHystrixCommondFlushCache.flushCache("test");注释掉,可以看到run()方法仍然被执行一次,因此清缓存OK
14:30:24.144 [hystrix-myGroup-1] INFO com.yisu.hystrix.without.FwHystrixCommondFlushCache - get data,test14:30:24.151 [main] INFO com.yisu.hystrix.without.FwHystrixCommondFlushCache - test:hystrix-myGroup-114:30:24.154 [main] INFO com.yisu.hystrix.without.FwHystrixCommondFlushCache - test:hystrix-myGroup-114:30:24.154 [main] INFO com.yisu.hystrix.without.FwHystrixCommondFlushCache - test:hystrix-myGroup-114:30:24.154 [main] INFO com.yisu.hystrix.without.FwHystrixCommondFlushCache - test:hystrix-myGroup-114:30:24.154 [main] INFO com.yisu.hystrix.without.FwHystrixCommondFlushCache - test:hystrix-myGroup-1
7. Hystrix 断路器开启
本节代码地址
在命令结果没有缓存命中的时候,Hystrix在执行命令前需要检查断路器是否为打开状态:
如果断路器是打开的,那么Hystrix不会执行命令,而是转接到fallback处理逻辑
如果断路器是关闭的,那么Hystrix调到第5步(线程池/请求队列/信号量是否占满),检查是否有可用资源来执行命令
断路器开启:
1.整个链路达到一定的阈值,默认情况下,10秒内产生超过20次请求,则符合第一个条件
2.满足第一个条件的情况下,如果请求的错误百分比大于阈值,则会打开断路器,默认50%
断路器一旦开启就会执行回退方法,不在执行目标方法,而且也不会更新链路的健康信息。
下图显示了通过Hystrix向服务依赖项请求时发生的情况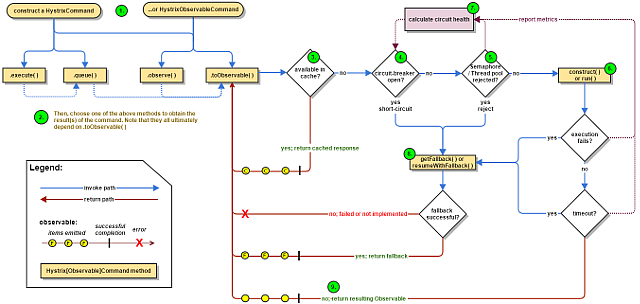
- 构造一个HystrixCommand或HystrixObservableCommand对象
- 执行命令
- 响应是否已缓存?
- 断路器开了吗?
- 线程池/队列/信号量是否已满?
- HystrixObservableCommand.construct() 要么 HystrixCommand.run()
- 计算电路健康
- 获取后备
- 返回成功的回应
7.1 接下来我们来开启断路器
新建类FwHystrixCommondCircuitEnable,在代码里设置了10秒内有10次请求,操作这个即满足第一个条件,设置操作时间为500毫秒,但是在run()方法中sleep(800),这样请求都会超时。开启断路器/*** @author xuyisu* @description 断路器开启* @date 2019/12/30*/@Slf4jpublic class FwHystrixCommondCircuitEnable {public static void main(String[] args) {//10秒内有10次请求满足第一个条件ConfigurationManager.getConfigInstance().setProperty("hystrix.command.default.circuitBreaker.requestVolumeThreshold",10);for(int i=0;i<15;i++){ErrorCommand c=new ErrorCommand();c.execute();if(c.isCircuitBreakerOpen()) {log.info("当前断路器被打开,在第{}索引",i);}}}static class ErrorCommand extends HystrixCommand<String>{public ErrorCommand(){super(Setter.withGroupKey(HystrixCommandGroupKey.Factory.asKey("ExampleGroup")).andCommandPropertiesDefaults(HystrixCommandProperties.Setter().withExecutionTimeoutInMilliseconds(500)));}protected String run() throws InterruptedException{Thread.sleep(800);return "success";}protected String getFallback(){return "fallback";}}}
7.2 运行mainf方法
可以看到从第10 个索引开始,断路器被打开14:49:23.118 [main] INFO com.yisu.hystrix.without.FwHystrixCommondCircuitEnable - 当前断路器被打开,在第10索引14:49:23.118 [main] INFO com.yisu.hystrix.without.FwHystrixCommondCircuitEnable - 当前断路器被打开,在第11索引14:49:23.118 [main] INFO com.yisu.hystrix.without.FwHystrixCommondCircuitEnable - 当前断路器被打开,在第12索引14:49:23.118 [main] INFO com.yisu.hystrix.without.FwHystrixCommondCircuitEnable - 当前断路器被打开,在第13索引14:49:23.119 [main] INFO com.yisu.hystrix.without.FwHystrixCommondCircuitEnable - 当前断路器被打开,在第14索引
8. Hystrix 断路器关闭
上面我们分析了断路器的开启,那么断路器的状态是如何变化的,怎样让断路器关闭已实现正常的系统访问。本节代码地址
GitHub: https://github.com/xuyisu/fw-sping-cloud/tree/master/fw-cloud-hystrix/fw-cloud-hystrix-without-springcloud
断路器有三个状态 :OPEN、 CLOSED(默认状态) 、HALF_OPEN状态,这些状态在什么情况下出现呢?
当断路器打开后,对应接口的请求会有段休眠期,这个休眠期内接口请求不会被正真的执行,但是如果休眠期时间过了, 这个时候断路器的状态就到了
HALF_OPEN状态,这个时候断路器允许一次真实的接口请求,如果这次请求失败,则断路 器打开OPEN,循环上面的动作,如果请求成功则断路器关CLOSED。
enum Status {CLOSED, OPEN, HALF_OPEN;}
8.1 新建FwHystrixCommondCircuitClose类
笔者设置一个变量,初始化为true,并且在run()方法中我们将根据传入的值设置时间,先让其超时,开启断路器,然后休眠6秒后,调用的时间减少值不超时。断路器关闭,并且10内满足3个请求就会触发断路器第一个条件。
/*** @author xuyisu* @description 断路器关闭* @date 2019/12/30*/@Slf4jpublic class FwHystrixCommondCircuitClose {public static void main(String[] args) throws InterruptedException {ConfigurationManager.getConfigInstance().setProperty("hystrix.command.default.circuitBreaker.requestVolumeThreshold", 3);boolean isTimeout = true;for (int i = 0; i < 10; i++) {TestCommand c = new TestCommand(isTimeout);c.execute();HystrixCommandMetrics.HealthCounts hc = c.getMetrics().getHealthCounts();System.out.println("健康信息:" + hc.getTotalRequests());if (c.isCircuitBreakerOpen()) {isTimeout = false;log.info("断路器打开了,第{}索引,等待休眠期结束",i);log.info("休眠6秒");Thread.sleep(6000);}}}static class TestCommand extends HystrixCommand<String> {private boolean isTimeout;public TestCommand(boolean isTimeout) {super(Setter.withGroupKey(HystrixCommandGroupKey.Factory.asKey("ExampleGroup")).andCommandPropertiesDefaults(HystrixCommandProperties.Setter().withExecutionTimeoutInMilliseconds(500)));this.isTimeout = isTimeout;}protected String run() throws InterruptedException {if (isTimeout) {Thread.sleep(800);} else {Thread.sleep(200);}return "";}protected String getFallback() {return "fallback";}}}
8.2 运行main方法
健康数量:0健康数量:1健康数量:2健康数量:315:28:22.157 [main] INFO com.yisu.hystrix.without.FwHystrixCommondCircuitClose - 断路器打开了,第3索引,等待休眠期结束15:28:22.157 [main] INFO com.yisu.hystrix.without.FwHystrixCommondCircuitClose - 休眠6秒健康数量:0健康数量:1健康数量:1健康数量:3健康数量:3健康数量:5
9. Hystrix 合并请求
从前面的内容可以得知,Hystrix 会为方法执行分配线程,线程的切换会消耗服务器的性能,Hystrix 提供了合并请求的功能,再一次请求的过程中,可以将一段时间内相同的请求合并到一个命令中执行,方法中允许不同的参数。合并后可以减少网络的请求,进而提升性。
本节代码地址
合并请求需要实现以下功能:
- 可以整理请求过来的参数
- 可以将多个请求合并的处理器
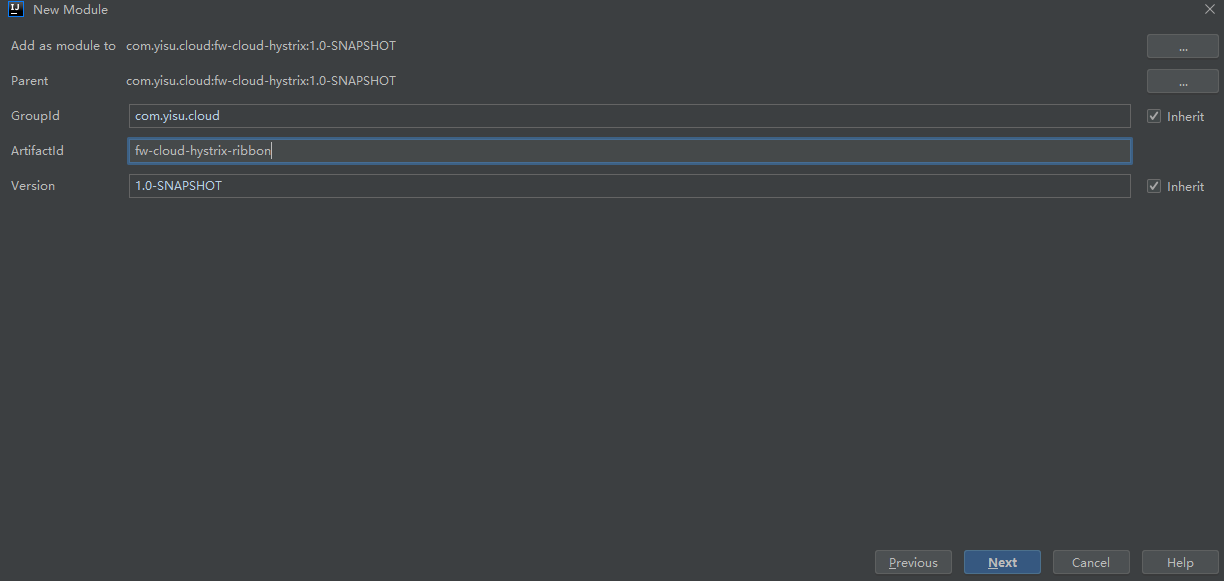
9.1 新建FwHystrixCollapser类
这里我们需要实现集成HystrixCollapser抽象类,并实现里面的方法,按照上面的设想,我们需要实现请求的合并和参数的整理,以实现最终只调用一次请求。笔者发起两次请求,参数的值是不一样的,一起看一下结果吧。/*** @author xuyisu* @description 合并请求* @date 2019/12/30*/@Slf4jpublic class FwHystrixCollapser extends HystrixCollapser<List<String>, String, String> {private final String name;public FwHystrixCollapser(String name) {this.name = name;}@Overridepublic String getRequestArgument() {return this.name;}@Overrideprotected HystrixCommand<List<String>> createCommand(Collection<CollapsedRequest<String, String>> requests) {return new FwBatchCommand(requests);}@Overrideprotected void mapResponseToRequests(List<String> strings, Collection<CollapsedRequest<String, String>> requests) {int count=0;for (CollapsedRequest<String, String> request : requests) {request.setResponse(strings.get(count++));}}private static final class FwBatchCommand extends HystrixCommand<List<String>> {private Collection<CollapsedRequest<String, String>> requests;protected FwBatchCommand(Collection<CollapsedRequest<String, String>> requests) {super(Setter.withGroupKey(HystrixCommandGroupKey.Factory.asKey("testGroup")).andCommandKey(HystrixCommandKey.Factory.asKey("testKey")));this.requests=requests;}@Overrideprotected List<String> run() throws Exception {log.info("real request");List<String> response=new ArrayList<>();for (CollapsedRequest<String, String> request : requests) {response.add("result:"+request.getArgument());}return response;}}public static void main(String[] args) throws ExecutionException, InterruptedException {HystrixRequestContext context = HystrixRequestContext.initializeContext();Future<String> tesFuture1 = new FwHystrixCollapser("test1").queue();Future<String> tesFuture2 = new FwHystrixCollapser("test2").queue();log.info(tesFuture1.get());log.info(tesFuture2.get());context.shutdown();}}
9.2 运行main方法
可以看到run()方法只执行了一次15:43:26.169 [hystrix-testGroup-1] INFO com.yisu.hystrix.without.FwHystrixCollapser - real request15:43:26.173 [main] INFO com.yisu.hystrix.without.FwHystrixCollapser - result:test115:43:26.173 [main] INFO com.yisu.hystrix.without.FwHystrixCollapser - result:test2
Hystrix Spring Cloud
1.Hystrix Ribbon
本节代码地址
GitHub: https://github.com/xuyisu/fw-sping-cloud/tree/master/fw-cloud-hystrix/fw-cloud-hystrix-ribbon
GitHub: https://github.com/xuyisu/fw-sping-cloud/tree/master/fw-cloud-ribbon/fw-cloud-ribbon-server
在Spring Cloud 中,Hystrix 主要用在被调用方,还是之前那张图,服务A调用服务B,如果服务A调用不同服务B是,及时回退信息给用户,防止因为超时问题引起更多的问题至服务不可用。
本次演示需要fw-cloud-ribbon-server先启动起来,用于提供服务,也就是上图的服务B,现在我们需要自己开发服务A。
1.1 新建项目
1.2 maven 配置
我们需要在maven引入spring-cloud-starter-netflix-hystrix的包。
<dependencies><dependency><groupId>org.springframework.boot</groupId><artifactId>spring-boot-starter-web</artifactId></dependency><dependency><groupId>org.springframework.cloud</groupId><artifactId>spring-cloud-starter-netflix-eureka-client</artifactId></dependency><dependency><groupId>org.springframework.boot</groupId><artifactId>spring-boot-starter-actuator</artifactId></dependency><dependency><groupId>org.springframework.cloud</groupId><artifactId>spring-cloud-starter-netflix-hystrix</artifactId></dependency></dependencies>
1.3 新建启动类
启动类中添加 @EnableHystrix注解用于开启Hystrix
@EnableHystrix@EnableDiscoveryClient@SpringBootApplicationpublic class FwHystrixRibbonApplication {public static void main(String[] args) {SpringApplication.run(FwHystrixRibbonApplication.class, args);}}
1.4 创建接收用的实体
/*** @author xuyisu* @description 用户* @date 2019/12/11*/@Data@AllArgsConstructor@NoArgsConstructorpublic class User implements Serializable {/*** 主键*/private long id;/*** 用户名*/private String username;/*** 真实姓名*/private String realname;/*** 邮箱*/private String email;/*** 备注*/private String remark;}
1.5 创建Ribbon调用类
这里需要注意我们在远程调用的方法上添加了@HystrixCommand(fallbackMethod = "findUserByIdFailure"),也就是说如果调用失败会执行findUserByIdFailure方法
@Service@Slf4jpublic class EurekaHystrixRibbonService {@AutowiredRestTemplate restTemplate;@HystrixCommand(fallbackMethod = "findUserByIdFailure")public User findUserById(Long id) {// http://服务提供者的serviceId/urlreturn restTemplate.getForObject("http://fw-cloud-ribbon-server/user/" + id, User.class);}/*** 服务 fw-cloud-feign-server/user/id 调用失败的回调方法** @return*/public User findUserByIdFailure(Long id) {return new User(id,null,null,null,"网络繁忙,请稍后再试,请确认手牌");}}
1.6 Ribbon 基本配置
这里添加了一个getServlet()方法,用于后面Hystrix dashboard 用,继续读你可以看到的。
@Configurationpublic class EurekaRibbonConfig {@Bean@LoadBalanced // 实现负载均衡public RestTemplate restTemplate() {return new RestTemplate();}@Beanpublic IRule ribbonRule() {//默认ZoneAvoidanceRule请求,实现自定义的规则//自定义成随机return new RandomRule();}/*** 解决dashboard显示 Unable to connect to Command Metric Stream*/@Beanpublic ServletRegistrationBean getServlet() {HystrixMetricsStreamServlet streamServlet = new HystrixMetricsStreamServlet();ServletRegistrationBean registrationBean = new ServletRegistrationBean(streamServlet);registrationBean.setLoadOnStartup(1);registrationBean.addUrlMappings("/hystrix.stream");registrationBean.setName("HystrixMetricsStreamServlet");return registrationBean;}}
1.7 控制层
@RestControllerpublic class EurekaHystrixController {@Resourceprivate EurekaHystrixRibbonService eurekaRibbonService;/*** 根据id获取用户信息* @param id* @return*/@GetMapping("/user/{id:\\d+}")public User findUserById(@PathVariable long id){return eurekaRibbonService.findUserById(id);}}
1.8 应用配置
server:port: 8675spring:application:name: fw-hystrix-ribboneureka:client:service-url:defaultZone: http://localhost:8761/eureka/
1.9 启动项目
需要先启动Eureka、再启动fw-cloud-ribbon-server、再启动当前项目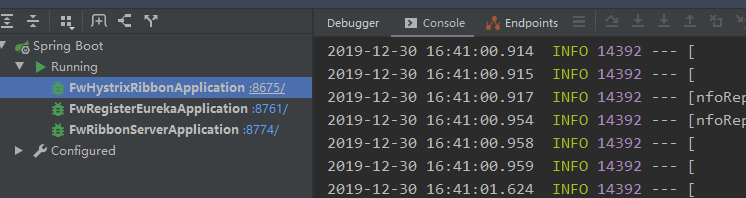
利用Postman测试localhost:8675/user/1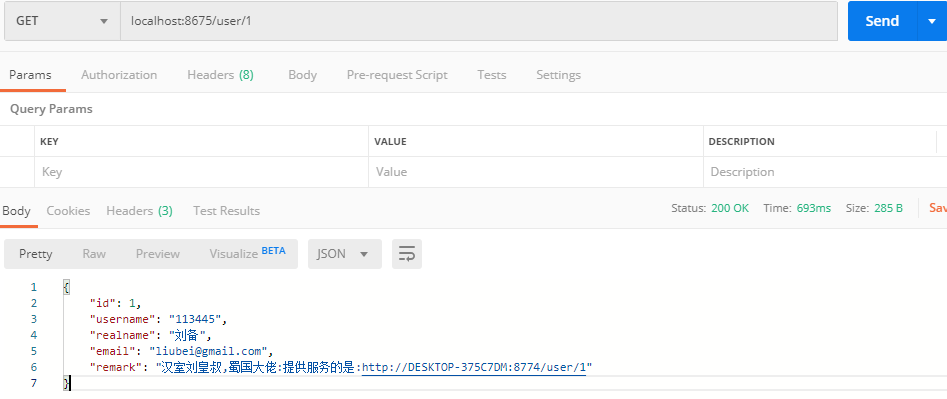
下面我们将fw-cloud-ribbon-server关掉,再测试,可以看到返回就是findUserByIdFailure设置的描述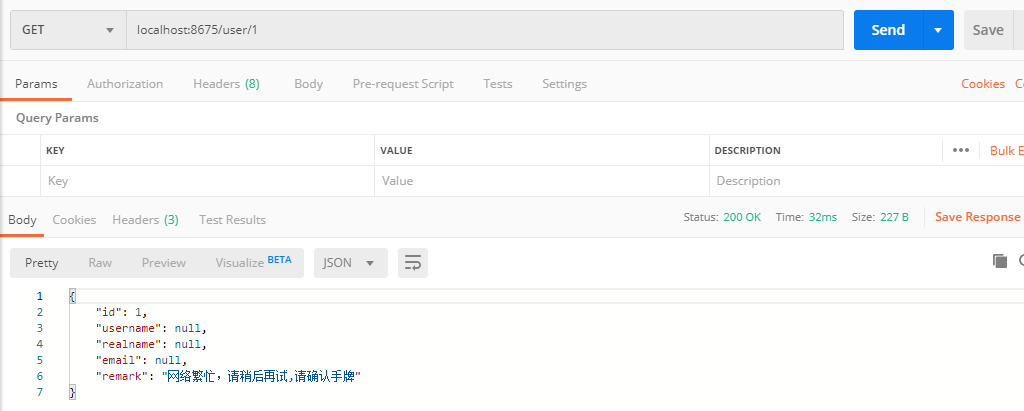
1.10 @HystrixCommand配置拓展
除了指定fallbackMethod以外,还有很多属性可以配置,下图是@HystrixCommand的全部属性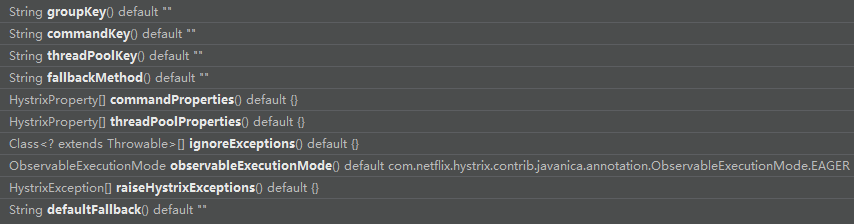
例如
指定回退方法和默认方法都是findUserByIdFailure,也可以不同,指定超时时间100毫秒,线程池大小为1,忽略Exception触发的回退等,具体的属性,根据字面意思应该没问题。一般我们也用不到这么多属性
@HystrixCommand(fallbackMethod = "findUserByIdFailure", groupKey = "MyGroup", commandKey = "MyCommandKey", threadPoolKey = "MyThreadPool", commandProperties = {@HystrixProperty(name = "execution.isolation.thread.timeoutInMilliseconds", value = "100")}, threadPoolProperties = {@HystrixProperty(name = "coreSize", value = "1")}, ignoreExceptions = {Exception.class}, observableExecutionMode = ObservableExecutionMode.EAGER, raiseHystrixExceptions = {HystrixException.RUNTIME_EXCEPTION}, defaultFallback = "findUserByIdFailure")
1.11 默认配置
对于一些默认的配置,可以使用@DefaultProperties,可以减少@HystrixCommand中的代码量,如下
@Service@Slf4j@DefaultProperties(groupKey = "MyGroup")public class EurekaHystrixRibbonService {@AutowiredRestTemplate restTemplate;......
2.Hystrix 缓存
本节代码地址
GitHub: https://github.com/xuyisu/fw-sping-cloud/tree/master/fw-cloud-hystrix/fw-cloud-hystrix-ribbon
GitHub: https://github.com/xuyisu/fw-sping-cloud/tree/master/fw-cloud-ribbon/fw-cloud-ribbon-server
前面在入门篇已经讲过了Hystrix的缓存,我们现在在Spring Cloud 篇也实现一个缓存的功能。
创建缓存我们需要创建一个实现java.servlet.Filter类的过滤器,并且需要初始化请求上下文,跟入门篇一样。这次可以减少每次创建上下文的代码量。
2.1 新建过滤器
这里我们对全部的url进行过滤,因此配置了/*
/*** @author xuyisu* @description hystrix 缓存过滤器* @date 2019/12/30*/@WebFilter(urlPatterns = "/*",filterName = "hystrixFilter")@Componentpublic class HystrixFilter implements Filter {@Overridepublic void doFilter(ServletRequest servletRequest, ServletResponse servletResponse, FilterChain filterChain) throws IOException, ServletException {HystrixRequestContext context = HystrixRequestContext.initializeContext();try {filterChain.doFilter(servletRequest,servletResponse);}finally {context.shutdown();}}}
对于接口请求的改造只需要加一个@CacheResult的注解,注意需要配合@HystrixCommand一起使用。
2.2 重启项目
这里需要将fw-cloud-ribbon-server启动起来,并且重启当前hystrix项目,侯然Postman 测试接口localhost:8675/user/1
可以看到,第一次请求之后,同样的请求就走缓存了,后面不会再调用接口了。
2.3 缓存其它注解
同样的问题,缓存不能一直不变的,如果数据发生变动,缓存里的数据要可以更新或者删除,否则就会产生脏数据。
可以使用@CacheRemove移除缓存 、@CacheKey修饰方法参数
3.Hystrix 合并请求注解
本节代码地址
GitHub: https://github.com/xuyisu/fw-sping-cloud/tree/master/fw-cloud-hystrix/fw-cloud-hystrix-ribbon
GitHub: https://github.com/xuyisu/fw-sping-cloud/tree/master/fw-cloud-ribbon/fw-cloud-ribbon-server
前面入门篇我们已经讲过请求合并,Spring Cloud 中也同样支持请求合并,并且Spring Cloud 提供了一个注解,非常方便处理合并请求。
为了方便演示合并请求,我们需要在fw-cloud-ribbon-server里添加一个接收方法,用于接收id的集合。
3.1 提供者新建方法
@GetMapping("/list")public List<User> getUserById(String ids, HttpServletRequest req){List<User> list=new ArrayList<>();String[] splitIds = ids.split(",");for (String id : splitIds) {String url = req.getRequestURL().toString();User user = userService.getUserById(Long.valueOf(id));user.setRemark(user.getRemark()+":提供服务的是:"+url);list.add(user);}return list;}
3.2 新建合并请求方法
在fw-cloud-hystrix-ribbon里EurekaHystrixRibbonService类中新建合并请求的方法,在一个单个接收方法中加上@HystrixCollapser注解,用于收集相同请求的数据,然后批量执行。
/*** @description 合并请求* @author xuyisu* @date 2019/12/30*/@HystrixCollapser(batchMethod = "findUsers",scope = com.netflix.hystrix.HystrixCollapser.Scope.REQUEST,collapserProperties = {@HystrixProperty(name = "timerDelayInMilliseconds",value = "1000")})public Future<User> getUserSingle(Long id){log.info("执行单调调用");return null;}/*** 请求多个用户数据* @param ids* @return*/@HystrixCommand(fallbackMethod = "findUsersFailure")public List<User> findUsers(List<Long> ids){return restTemplate.getForObject("http://fw-cloud-ribbon-server/user/list?ids=" + StringUtils.join(ids, ","), List.class);}public List<User> findUsersFailure(List<Long> ids){log.info("fallback");List<User> list=new ArrayList<>();for (Long id : ids) {list.add(new User(id, null, null, null, "网络繁忙,请稍后再试,请确认手牌"));}return list;}
fallbackMethod里面返回的数量要和@HystrixCollapser里面接收到的一致,否则汇报下面的错误
Caused by: java.lang.RuntimeException: Failed to map all collapsed requests to response. The expected contract has not been respected. Collapser key: 'getUserSingle', requests size: '3', response size: '1'
合并作用域,默认是REQUEST,就是不会跨越多个请求会话的,只在当前用户请求中合并多次请求为批处理请求。这里改成GLOBAL,就是可以跨越request context,合并不同用户的请求为一次批处理请求。
3.3 添加控制层方法
这里是模拟,一次请求发出3个调用方法,返回是一个数组。同时,如果失败,也会拿到一个失败的数组。
/*** 根据id获取用户信息* @return*/@GetMapping("/user/list")public List<User> findUsers() throws ExecutionException, InterruptedException {Future<User> userSingle1 = eurekaRibbonService.getUserSingle(1L);Future<User> userSingle2 = eurekaRibbonService.getUserSingle(2L);Future<User> userSingle3 = eurekaRibbonService.getUserSingle(3L);List<User> list=new ArrayList<>();list.add(userSingle1.get());list.add(userSingle2.get());list.add(userSingle3.get());return list;}
3.4重启项目
重启fw-cloud-ribbon-server项目和当前项目,然后Postman 测试localhost:8675/user/list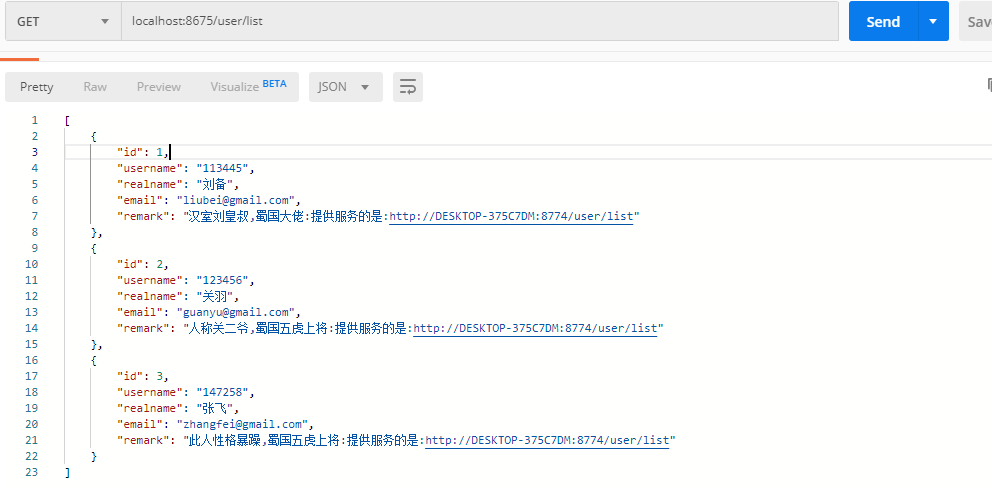
把fw-cloud-ribbon-server关掉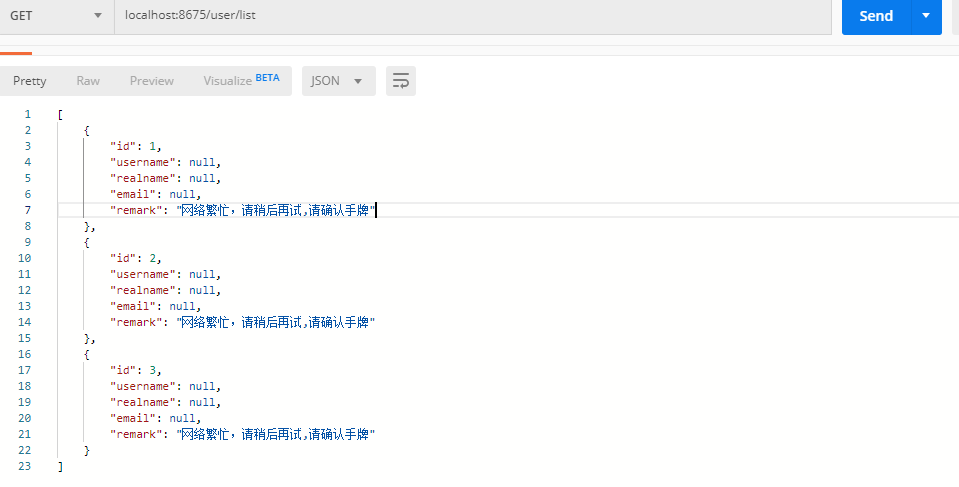
4. Hystrix Feign
前面我们详细介绍了Hystrix与Ribbon的使用,下面我们来详细说明Hystrix与Feign的使用,Feign本身已经对Hystrix提供了支持,使用时只要打开开关就行了。下面我们新建一个项目演示。
本节代码地址
GitHub: https://github.com/xuyisu/fw-sping-cloud/tree/master/fw-cloud-hystrix/fw-cloud-hystrix-feign
GitHub: https://github.com/xuyisu/fw-sping-cloud/tree/master/fw-cloud-client/fw-cloud-client-eureka
4.1 新建项目
4.2 maven 配置
需要将feign的依赖加入进来
<dependencies><dependency><groupId>org.springframework.boot</groupId><artifactId>spring-boot-starter-web</artifactId></dependency><dependency><groupId>org.springframework.cloud</groupId><artifactId>spring-cloud-starter-netflix-eureka-client</artifactId></dependency><dependency><groupId>org.springframework.boot</groupId><artifactId>spring-boot-starter-actuator</artifactId></dependency><dependency><groupId>org.springframework.cloud</groupId><artifactId>spring-cloud-starter-openfeign</artifactId></dependency></dependencies>
4.3 新建启动类
需要加上@EnableHystrix和@EnableFeignClients的注解
@EnableFeignClients@EnableHystrix@EnableDiscoveryClient@SpringBootApplicationpublic class FwHystrixFeignApplication {public static void main(String[] args) {SpringApplication.run(FwHystrixFeignApplication.class, args);}}
4.4 应用配置
最主要的是feign.hystrix.enabled: true需要打开,否则Hystrix 不起作用,默认是关闭的。
server:port: 8676spring:application:name: fw-hystrix-feigneureka:client:service-url:defaultZone: http://localhost:8761/eureka/feign:hystrix:enabled: true #开启hystrix
4.5 新建调用的service
@FeignClient注解的使用和普通的Feign 客户端没什么区别,主要就是加了一个fallback的类,回退的方法需要实现当前service的接口。
@FeignClient(value = "fw-register-eureka-client", fallback = EurekaFeignServiceFailure.class)public interface EurekaFeignService {//feign中你可以有多个@RequestParam,但只能有不超过一个@RequestBody@GetMapping("/hello")String hello();}
4.6 新建回退类
@Servicepublic class EurekaFeignServiceFailure implements EurekaFeignService {@Overridepublic String hello() {return "网络异常,稍后再试,请拿好手牌";}}
4.7 新建控制层
用于接收请求
@RestController@Slf4jpublic class EurekaFeignController {@Resourceprivate EurekaFeignService eurekaFeignService;@GetMapping("/feignInfo")public String feignInfo() {String message = eurekaFeignService.hello();log.info(message);return message;}}
4.8 启动项目
这里需要先启动Eureka,再起动fw-cloud-client-eureka项目,然后在启动当前项目
如果当前项目先启动报错
Caused by: java.lang.ClassNotFoundException: com.netflix.hystrix.contrib.javanica.aop.aspectj.HystrixCommandAspect
在maven里面添加这个依赖就可以了
<dependency><groupId>org.springframework.cloud</groupId><artifactId>spring-cloud-starter-netflix-hystrix</artifactId></dependency>
启动好的想过应该是这样的
下面利用Postman测试
- 正常的情况下
将fw-cloud-client-eureka停掉的情况下
4.9 对Hystrix配置
指定接口方法的配置就是默认的CommandKey,@FeignClient注解上的名称是默认的GroupKey,具体很多配置,可以自己尝试一下hystrix:command:EurekaFeignService#hello(): #指定接口方法的超时规则execution:isolation:thread:timeoutInMilliseconds: 500 #超时时间circuitBreaker:requestVolumeThreshold: 3 #请求并发数
#全局的hystrix:command:default:execution:isolation:thread:timeoutInMilliseconds: 500 #超时时间circuitBreaker:requestVolumeThreshold: 3 #请求并发数
5. Hystrix Dashboard
本节代码地址
GitHub: https://github.com/xuyisu/fw-sping-cloud/tree/master/fw-cloud-hystrix/fw-cloud-hystrix-feign
GitHub: https://github.com/xuyisu/fw-sping-cloud/tree/master/fw-cloud-client/fw-cloud-client-eureka
GitHub: https://github.com/xuyisu/fw-sping-cloud/tree/master/fw-cloud-hystrix/fw-cloud-hystrix-dashboard
Hystrix提供了对于微服务调用状态的监控信息,需要结合spring-boot-actuator模块一起使用。Hystrix Dashboard主要用来实时监控Hystrix的各项指标信息。通过Hystrix Dashboard反馈的实时信息,可以帮助我们快速发现系统中存在的问题
已下是官方展示的图片
下面我们要做的就是展示和这个类似的监控出来。
5.1 新建项目

5.2 maven配置
主要需要加入spring-cloud-starter-netflix-hystrix-dashboard的包,并且不需要配置什么信息,但是被监控的项目需要添加spring-boot-starter-actuator用于提供应用健康信息。
<dependencies><dependency><groupId>org.springframework.boot</groupId><artifactId>spring-boot-starter-actuator</artifactId></dependency><dependency><groupId>org.springframework.boot</groupId><artifactId>spring-boot-starter-web</artifactId></dependency><dependency><groupId>org.springframework.cloud</groupId><artifactId>spring-cloud-starter-netflix-eureka-client</artifactId></dependency><dependency><groupId>org.springframework.cloud</groupId><artifactId>spring-cloud-starter-netflix-hystrix-dashboard</artifactId></dependency></dependencies>
5.3 新建启动类
启动类上加上@EnableHystrixDashboard注解
@EnableHystrixDashboard@EnableDiscoveryClient@SpringBootApplicationpublic class FwHystrixDashboardApplication {public static void main(String[] args) {SpringApplication.run(FwHystrixDashboardApplication.class, args);}}
5.4 配置应用信息
server:port: 8677spring:application:name: fw-hystrix-feign-dashboardeureka:client:service-url:defaultZone: http://localhost:8761/eureka/
5.5 项目启动
浏览器输入http://localhost:8677/hystrix
5.6 如何使用呢?
从页面上的文件内容我们可以知道,Hystrix Dashboard共支持三种不同的监控方式:
默认的集群监控: http://turbine-hostname:port/turbine.stream
指定的集群监控: http://turbine-hostname:port/turbine.stream?cluster=[clusterName]
单体应用的监控: http://hystrix-app:port/actuator/hystrix.stream
页面上面的几个参数局域
最上面的输入框: 输入上面所说的三种监控方式的地址,用于访问具体的监控信息页面。
Delay: 该参数用来控制服务器上轮询监控信息的延迟时间,默认2000毫秒。
Title: 该参数对应头部标题Hystrix Stream之后的内容,默认会使用具体监控实例的Url。
我们先来看下单个服务实例的监控,从http://hystrix-app:port/actuator/hystrix.stream连接中可以看出,Hystrix Dashboard监控单节点实例需要访问实例的actuator/hystrix.stream接口
5.6.1 下面我们来看一下具体的监控信息
在输入框输入 http://localhost:8676/actuator/hystrix.stream其他默认,注意不要输错
如果出现以下界面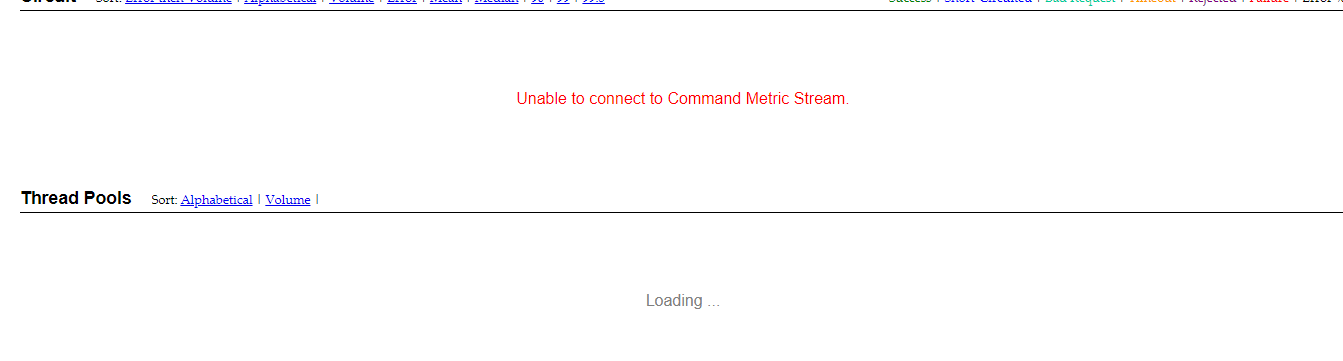
原因如下:
- 地址输入的不正确
- 被监控的服务没有添加
spring-boot-starter-actuator的包 - 没有对外暴露被监控的端点
为了方便,我们将它全部暴露出来,生产可以根据需要确定暴露的端点或者不暴露。
management:endpoints:web:exposure:include: '*'
需要注意的是
Spring Boot 2.0之后所有对外暴露的端点都加上/actuator前缀
5.6.2 正确姿势后的显示
可以看到监控信息出现了,需要连续请求几次localhost:8676/feignInfo接口
具体每个状态什么意思,直接拿官方的图片来看,看不懂应该的可以翻译一下。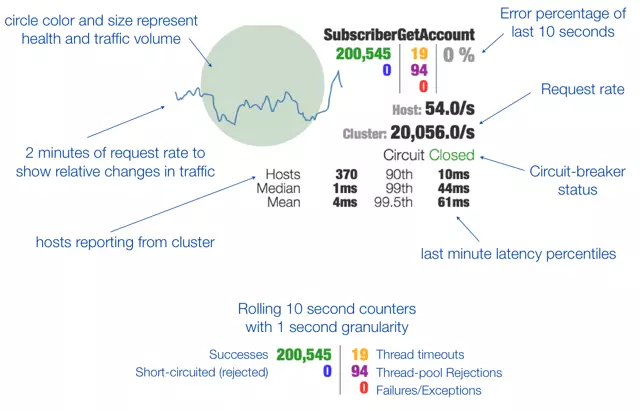
6.Hystrix Turbine
本节代码地址
GitHub: https://github.com/xuyisu/fw-sping-cloud/tree/master/fw-cloud-hystrix/fw-cloud-hystrix-feign
GitHub: https://github.com/xuyisu/fw-sping-cloud/tree/master/fw-cloud-client/fw-cloud-client-eureka
GitHub: https://github.com/xuyisu/fw-sping-cloud/tree/master/fw-cloud-hystrix/fw-cloud-hystrix-dashboard
GitHub: https://github.com/xuyisu/fw-sping-cloud/tree/master/fw-cloud-hystrix/fw-cloud-hystrix-ribbon
GitHub: https://github.com/xuyisu/fw-sping-cloud/tree/master/fw-cloud-hystrix/fw-cloud-hystrix-turbine
6.1 Turbine是什么?
是Netflix提供了一个用来提供把多个hystrix.stream的内容聚合为一个数据源供Dashboard展示
从Hystrix Dashboard的监控首页中可以看出,集群的监控端点是http://turbine-hostname:port/turbine.stream,需要我们引入Trubine聚合服务,通过它来汇集监控信息,并将聚合后的信息提供给Hystrix Dashboard,下面我们来看一下多个应用的监控。
6.2 新建项目
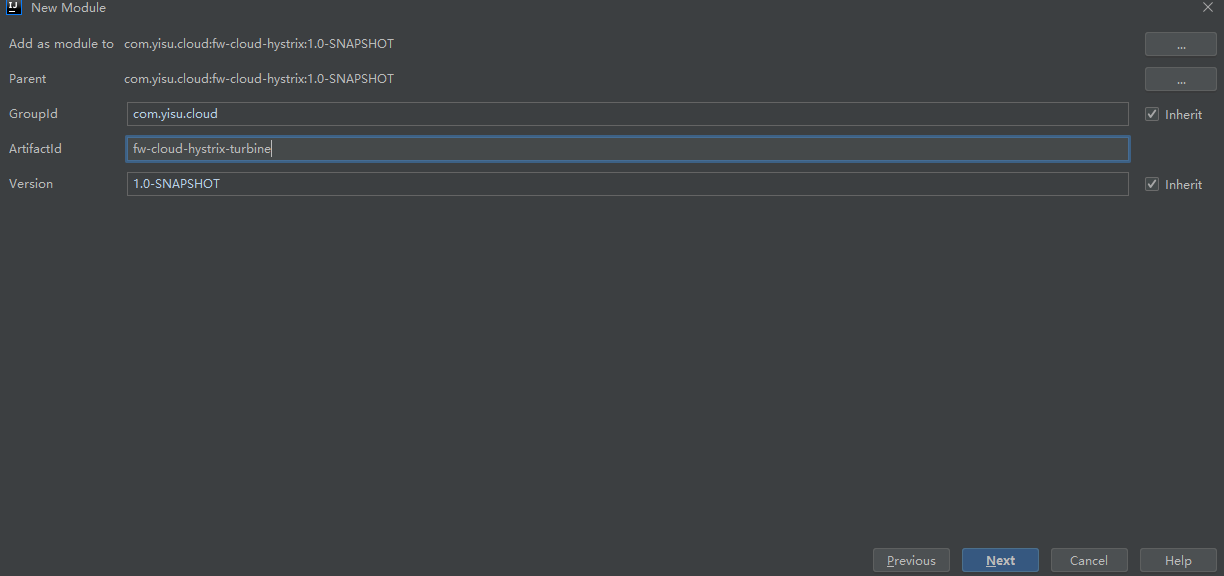
6.3 maven 配置
这里需要把spring-cloud-starter-netflix-turbine引入
<dependencies><dependency><groupId>org.springframework.boot</groupId><artifactId>spring-boot-starter-actuator</artifactId></dependency><dependency><groupId>org.springframework.boot</groupId><artifactId>spring-boot-starter-web</artifactId></dependency><dependency><groupId>org.springframework.cloud</groupId><artifactId>spring-cloud-starter-netflix-eureka-client</artifactId></dependency><dependency><groupId>org.springframework.cloud</groupId><artifactId>spring-cloud-starter-netflix-turbine</artifactId></dependency></dependencies>
6.4 新建启动类
需要在启动类上添加 @EnableTurbine注解
/*** @Author xuyisu* @Date 2019/12/6*/@EnableTurbine@EnableDiscoveryClient@SpringBootApplicationpublic class FwTurbineApplication {public static void main(String[] args) {SpringApplication.run(FwTurbineApplication.class, args);}}
6.5 应用配置
server:port: 8678spring:application:name: fw-hystrix-feign-dashboardeureka:client:service-url:defaultZone: http://localhost:8761/eureka/turbine:app-config: fw-hystrix-ribbon, fw-hystrix-feign # 配置Eureka中的serviceId列表,表明监控哪些服务aggregator:cluster-config: default # 指定聚合哪些集群,多个使用","分割,默认为default。cluster-name-expression: new String("default")instanceUrlSuffix: actuator/hystrix.stream # turbine在收集时访问的后缀
cluster-name-expression的配置默认default
- clusterNameExpression指定集群名称,默认表达式appName;此时:turbine.aggregator.clusterConfig需要配置想要监控的应用名称
- 当clusterNameExpression: default时,turbine.aggregator.clusterConfig可以不写,因为默认就是default
- 当clusterNameExpression: metadata[‘cluster’]时,假设想要监控的应用配置了eureka.instance.metadata-map.cluster: cluster1,则需要配置,同时turbine.aggregator.clusterConfig: cluster1
6.6 启动项目
这里我们将fw-cloud-hystrix-ribbon、fw-cloud-hystrix-feign、fw-cloud-hystrix-dashboard都启动起来,用于测试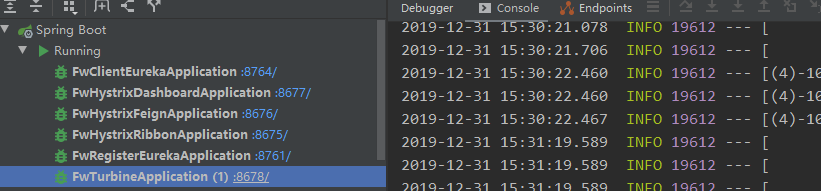
在dashboard中输入地址http://localhost:8678/turbine.stream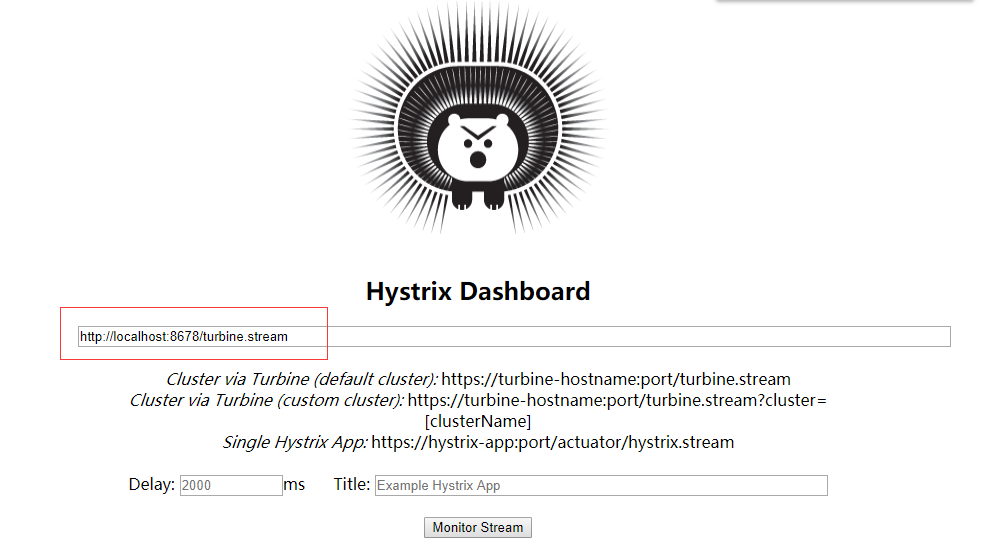
在Postman测试两个接口localhost:8676/feignInfo和localhost:8675/user/1
显示的结果如下,因为我们启动fw-cloud-ribbon-server项目,所以findUserById报了100%的错误,你也可以尝试启动fw-cloud-ribbon-server项目看看展示的效果。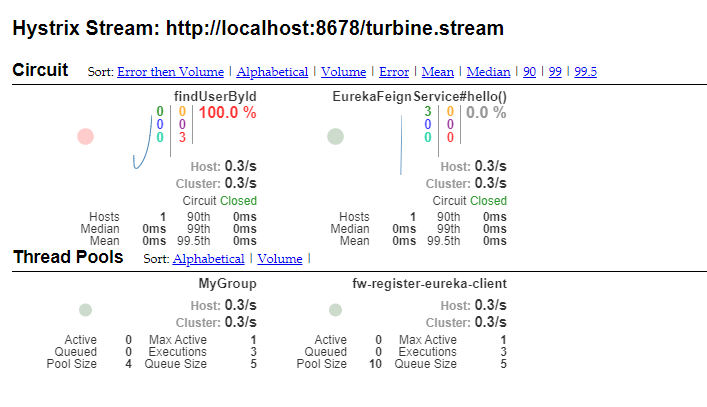

若有收获,就点个赞吧
0 人点赞
