kubeadm 的工作原理
Kubernetes在部署时,它的每一个组件都是一个需要被执行的、单独的二进制文件。所以不难想象,SaltStack 这样的运维工具或者由社区维护的脚本的功能,就是要把这些二进制文件传输到指定的机器当中,然后编写控制脚本来启停这些组件。
为什么不用容器部署 Kubernetes 呢?
这样,只要给每个 Kubernetes 组件做一个容器镜像,然后在每台宿主机上用 docker run 指令启动这些组件容器,部署不就完成了吗?
事实上,在 Kubernetes 早期的部署脚本里,确实有一个脚本就是用 Docker 部署 Kubernetes 项目的,这个脚本相比于 SaltStack 等的部署方式,也的确简单了不少。
但是,这样做会带来一个很麻烦的问题,即:如何容器化 kubelet。
kubelet 是 Kubernetes 项目用来操作 Docker 等容器运行时的核心组件。可是,除了跟容器运行时打交道外,kubelet 在配置容器网络、管理容器数据卷时,都需要直接操作宿主机。
而如果现在 kubelet 本身就运行在一个容器里,那么直接操作宿主机就会变得很麻烦。对于网络配置来说还好,kubelet 容器可以通过不开启 Network Namespace(即 Docker 的 host network 模式)的方式,直接共享宿主机的网络栈。可是,要让 kubelet 隔着容器的 Mount Namespace 和文件系统,操作宿主机的文件系统,就有点儿困难了。
比如,如果用户想要使用 NFS 做容器的持久化数据卷,那么 kubelet 就需要在容器进行绑定挂载前,在宿主机的指定目录上,先挂载 NFS 的远程目录。
可是,这时候问题来了。由于现在 kubelet 是运行在容器里的,这就意味着它要做的这个“mount -F nfs”命令,被隔离在了一个单独的 Mount Namespace 中。即,kubelet 做的挂载操作,不能被“传播”到宿主机上。
对于这个问题,有人说,可以使用 setns() 系统调用,在宿主机的 Mount Namespace 中执行这些挂载操作;也有人说,应该让 Docker 支持一个–mnt=host 的参数。
但是,到目前为止,在容器里运行 kubelet,依然没有很好的解决办法,也不推荐用容器去部署 Kubernetes 项目。
正因为如此,kubeadm 选择了一种妥协方案:把 kubelet 直接运行在宿主机上,然后使用容器部署其他的 Kubernetes 组件。
所以,使用 kubeadm 的第一步,是在机器上手动安装 kubeadm、kubelet 和 kubectl 这三个二进制文件。当然,kubeadm 的作者已经为各个发行版的 Linux 准备好了安装包。
宿主机安装必备的Kubernetes工具集
参考
CentOS(7.3)安装升级Kubernetes基础组件kubectl etc…
安装kubeadm
# CentOSyum install kubeadm# Ubuntuapt-get install kubeadm
执行kubeadm init会遇到的问题
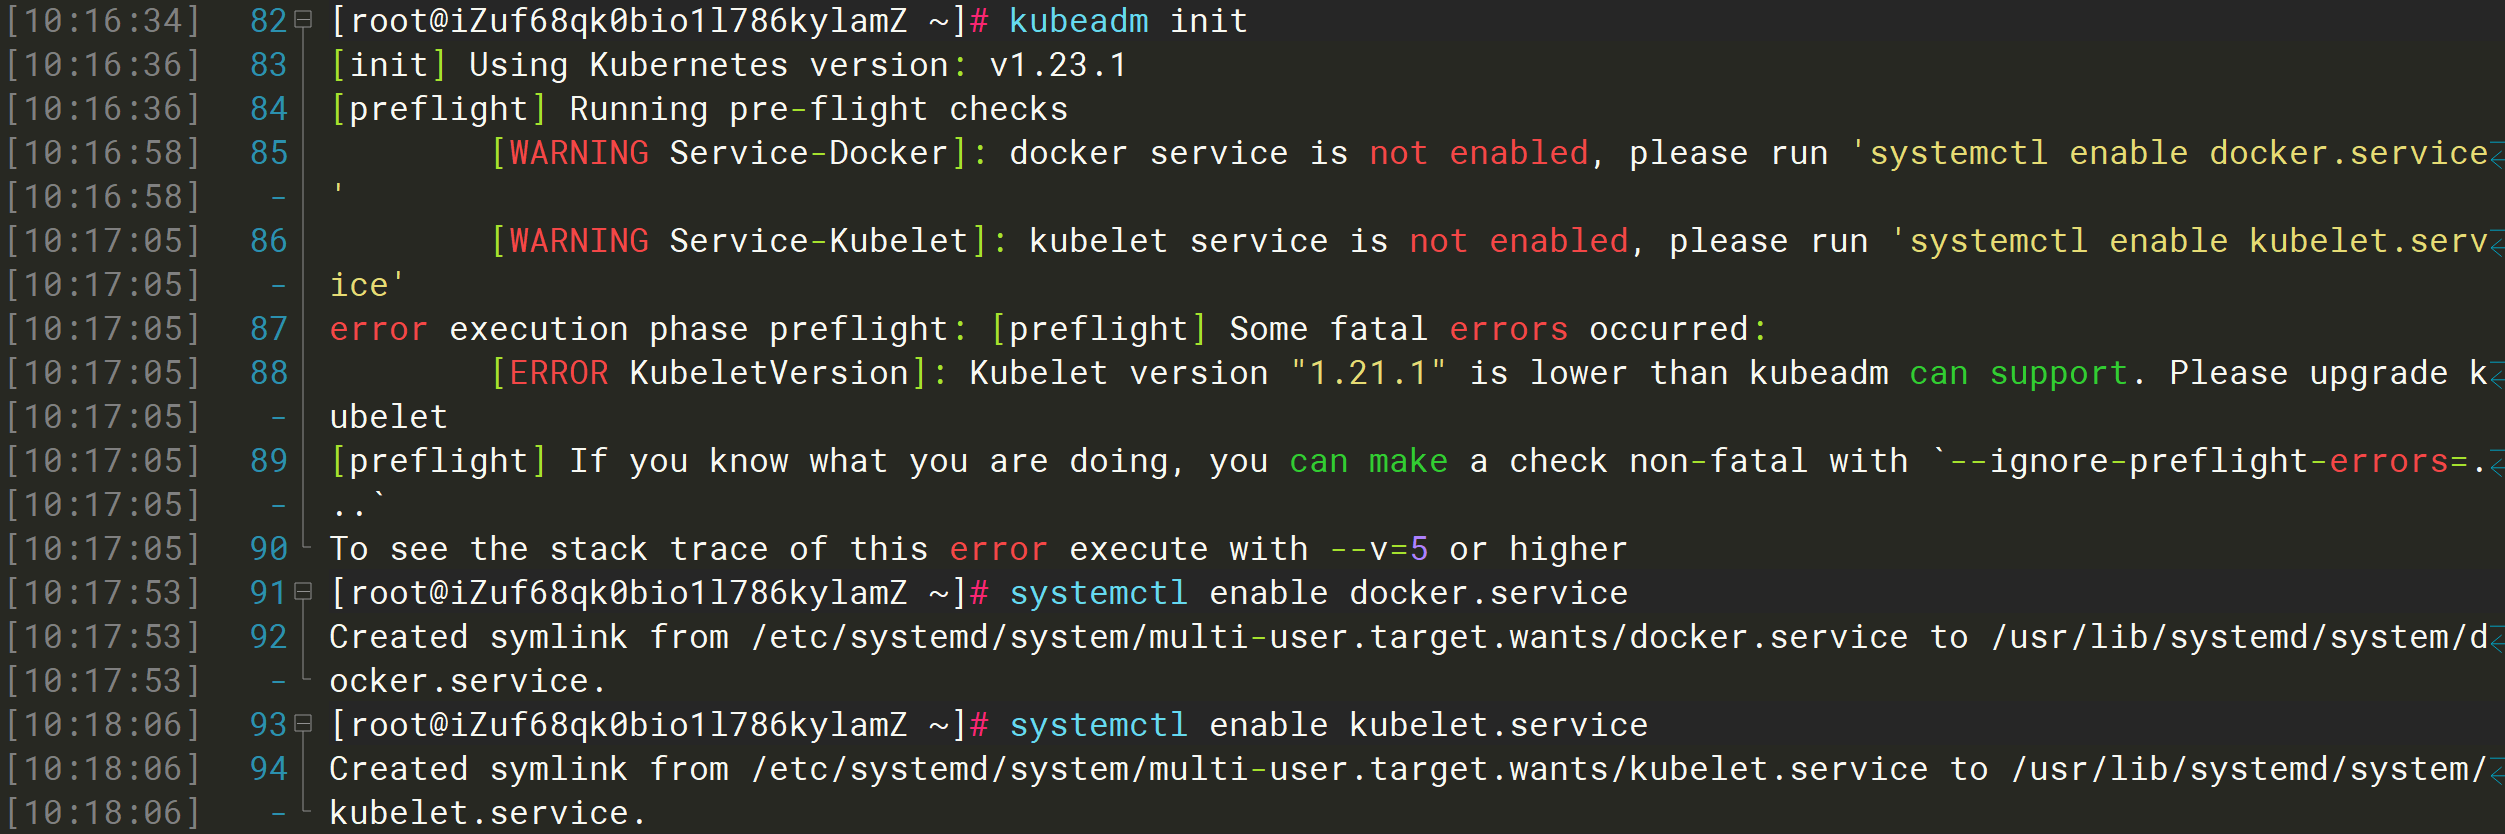
kubeadm init
 :::danger
如果在公网服务器搭建集群,则需要在启动参数添加公网IP:
:::danger
如果在公网服务器搭建集群,则需要在启动参数添加公网IP:--apiserver-cert-extra-sans=120.79.23.226
否则工作节点加入集群时会出现如下报错: :::
:::
未设置Docker和Kubelet服务开机启动
systemctl enable docker.servicesystemctl enable kubelet.service
Kubernetes组件-Kubelet版本过低,需要安装升级
参考
CentOS(7.3)安装升级Kubernetes基础组件kubectl etc…
相关镜像拉取时的网络访问问题
报错内容: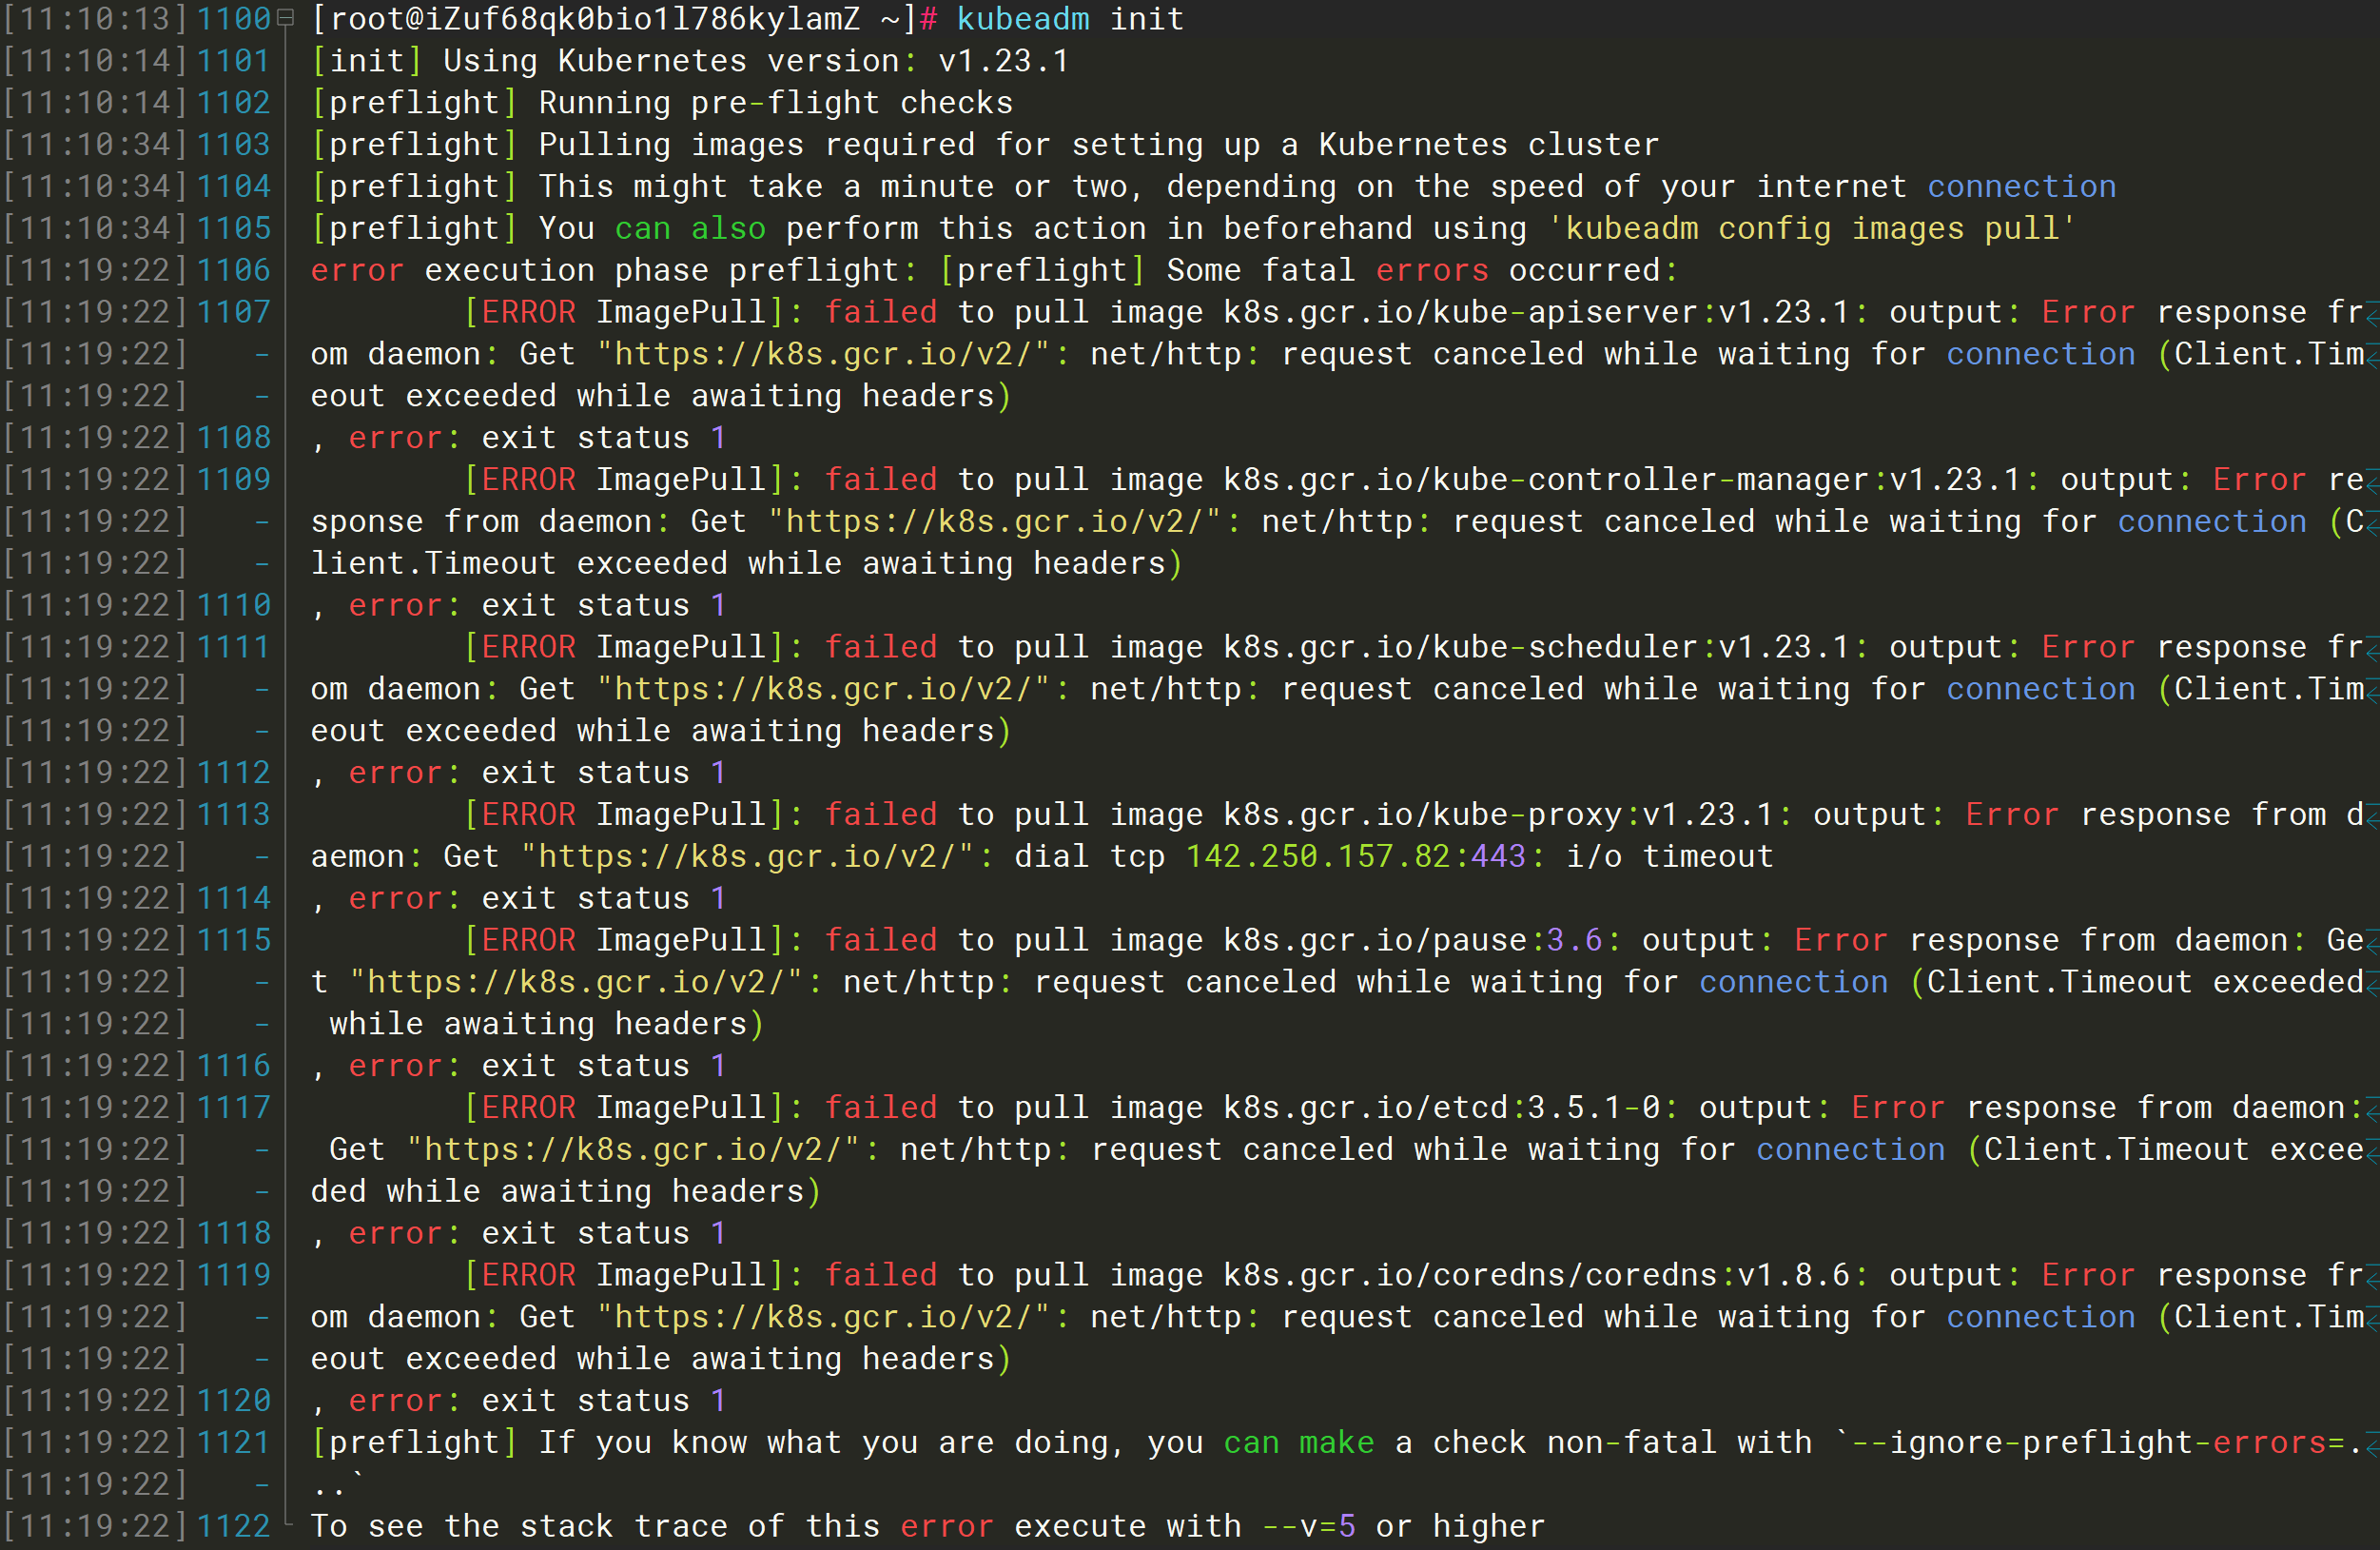
[root@iZuf68qk0bio1l786kylamZ ~]# kubeadm init[init] Using Kubernetes version: v1.23.1[preflight] Running pre-flight checks[preflight] Pulling images required for setting up a Kubernetes cluster[preflight] This might take a minute or two, depending on the speed of your internet connection[preflight] You can also perform this action in beforehand using 'kubeadm config images pull'error execution phase preflight: [preflight] Some fatal errors occurred:[ERROR ImagePull]: failed to pull image k8s.gcr.io/kube-apiserver:v1.23.1: output: Error response from daemon: Get "https://k8s.gcr.io/v2/": net/http: request canceled while waiting for connection (Client.Timeout exceeded while awaiting headers), error: exit status 1[ERROR ImagePull]: failed to pull image k8s.gcr.io/kube-controller-manager:v1.23.1: output: Error response from daemon: Get "https://k8s.gcr.io/v2/": net/http: request canceled while waiting for connection (Client.Timeout exceeded while awaiting headers), error: exit status 1[ERROR ImagePull]: failed to pull image k8s.gcr.io/kube-scheduler:v1.23.1: output: Error response from daemon: Get "https://k8s.gcr.io/v2/": net/http: request canceled while waiting for connection (Client.Timeout exceeded while awaiting headers), error: exit status 1[ERROR ImagePull]: failed to pull image k8s.gcr.io/kube-proxy:v1.23.1: output: Error response from daemon: Get "https://k8s.gcr.io/v2/": dial tcp 142.250.157.82:443: i/o timeout, error: exit status 1[ERROR ImagePull]: failed to pull image k8s.gcr.io/pause:3.6: output: Error response from daemon: Get "https://k8s.gcr.io/v2/": net/http: request canceled while waiting for connection (Client.Timeout exceeded while awaiting headers), error: exit status 1[ERROR ImagePull]: failed to pull image k8s.gcr.io/etcd:3.5.1-0: output: Error response from daemon: Get "https://k8s.gcr.io/v2/": net/http: request canceled while waiting for connection (Client.Timeout exceeded while awaiting headers), error: exit status 1[ERROR ImagePull]: failed to pull image k8s.gcr.io/coredns/coredns:v1.8.6: output: Error response from daemon: Get "https://k8s.gcr.io/v2/": net/http: request canceled while waiting for connection (Client.Timeout exceeded while awaiting headers), error: exit status 1[preflight] If you know what you are doing, you can make a check non-fatal with `--ignore-preflight-errors=...`To see the stack trace of this error execute with --v=5 or higher
解决办法:
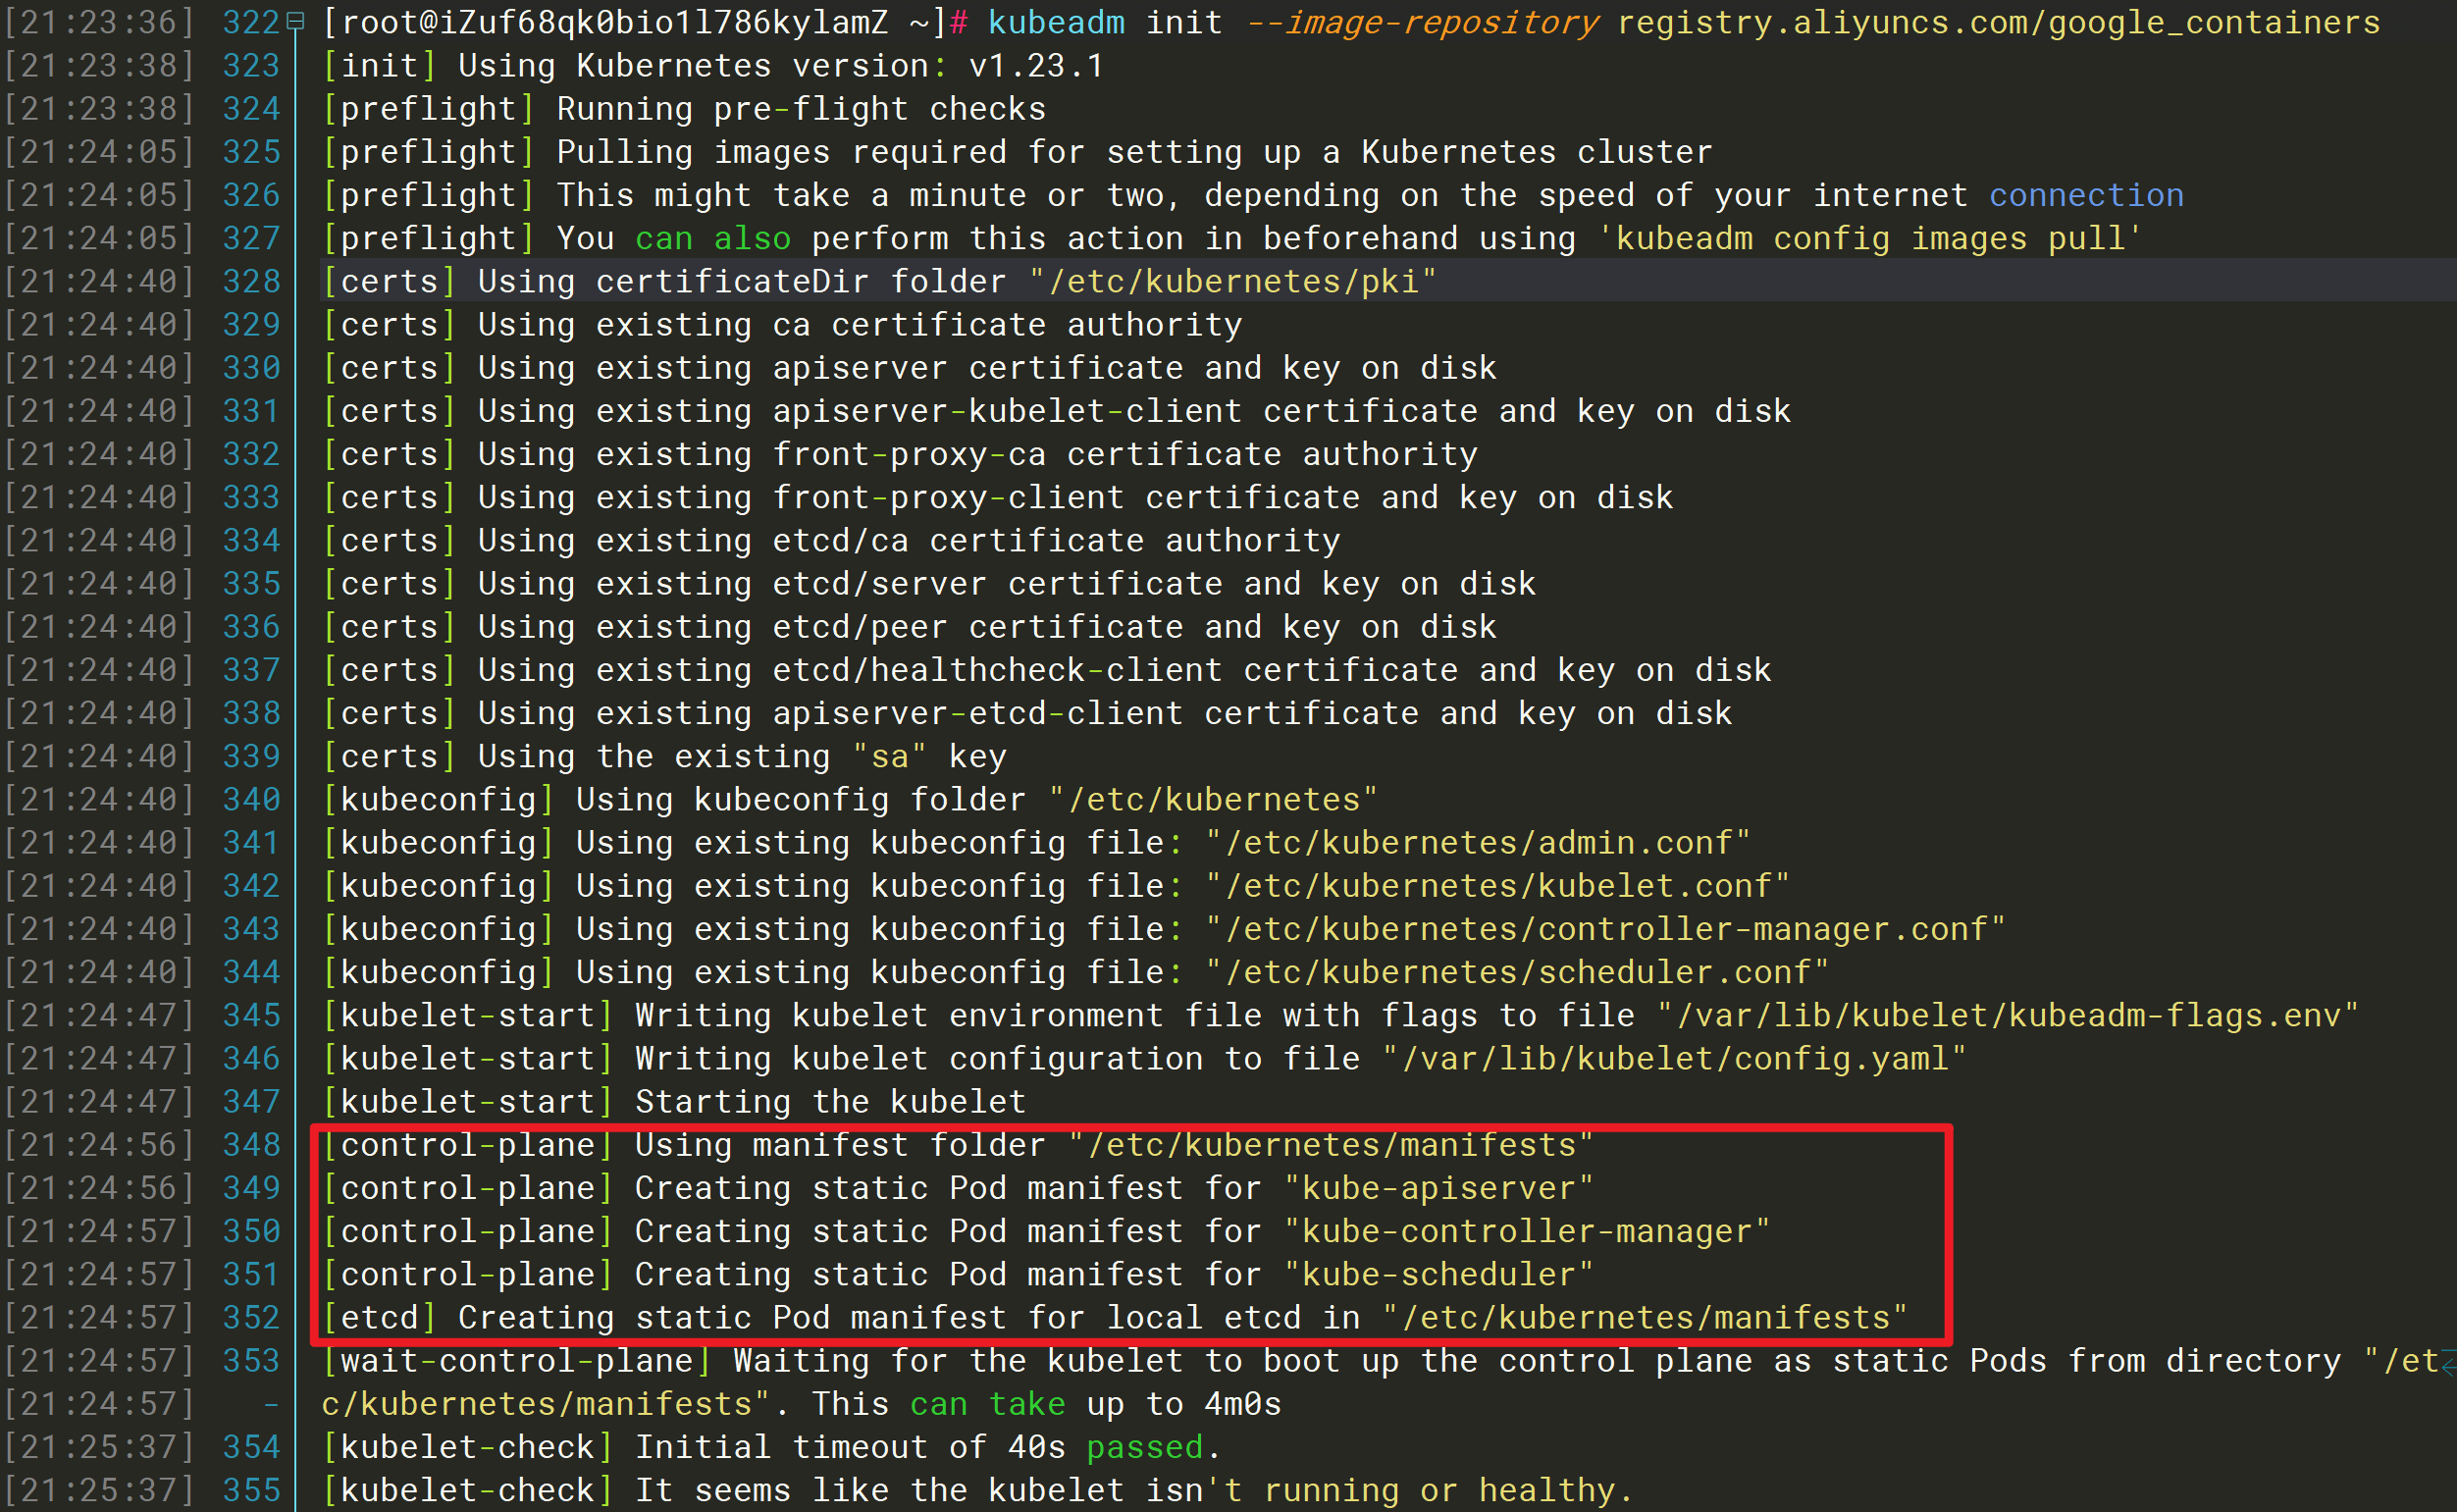
指定阿里云镜像仓库的地址
kubeadm init --image-repository registry.aliyuncs.com/google_containers
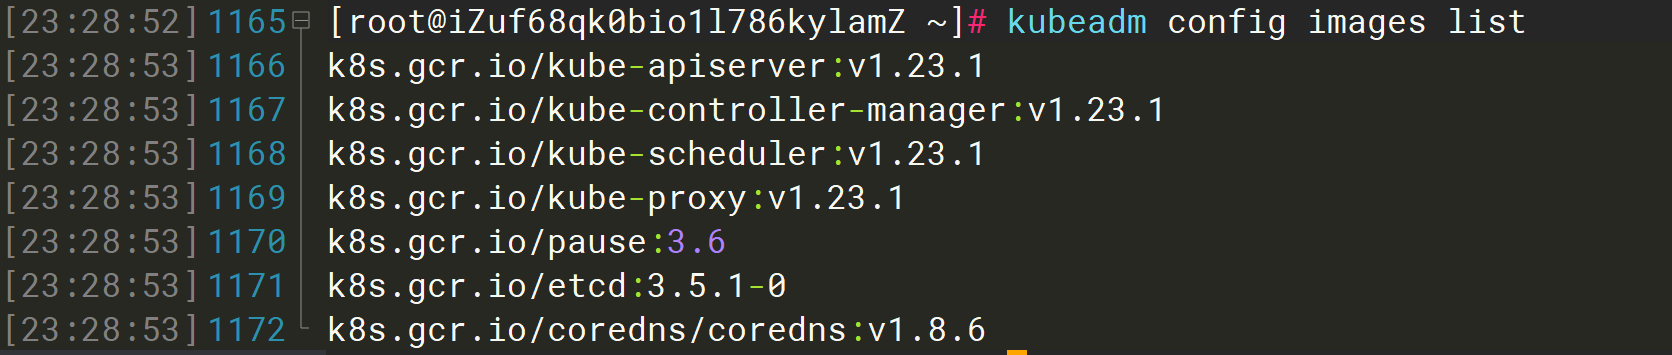
通过kubeadm config images list命令查看需要的镜像列表
kubeadm config images listk8s.gcr.io/kube-apiserver:v1.23.1k8s.gcr.io/kube-controller-manager:v1.23.1k8s.gcr.io/kube-scheduler:v1.23.1k8s.gcr.io/kube-proxy:v1.23.1k8s.gcr.io/pause:3.6k8s.gcr.io/etcd:3.5.1-0k8s.gcr.io/coredns/coredns:v1.8.6
查看Docker镜像列表可以看到已经成功拉取到对应的版本
docker imagesREPOSITORY TAG IMAGE ID CREATED SIZEregistry.aliyuncs.com/google_containers/kube-apiserver v1.23.1 b6d7abedde39 5 days ago 135MBregistry.aliyuncs.com/google_containers/kube-proxy v1.23.1 b46c42588d51 5 days ago 112MBregistry.aliyuncs.com/google_containers/kube-controller-manager v1.23.1 f51846a4fd28 5 days ago 125MBregistry.aliyuncs.com/google_containers/kube-scheduler v1.23.1 71d575efe628 5 days ago 53.5MBregistry.aliyuncs.com/google_containers/etcd 3.5.1-0 25f8c7f3da61 6 weeks ago 293MBregistry.aliyuncs.com/google_containers/coredns v1.8.6 a4ca41631cc7 2 months ago 46.8MBregistry.aliyuncs.com/google_containers/pause 3.6 6270bb605e12 3 months ago 683kB
Kubelet的cgroup和Docker的cgroup驱动不一致导致Kubelet启动失败的问题
可以看到访问Kubelet服务失败了。
[root@iZuf68qk0bio1l786kylamZ ~]# kubeadm init --image-repository registry.aliyuncs.com/google_containers[init] Using Kubernetes version: v1.23.1[preflight] Running pre-flight checks[preflight] Pulling images required for setting up a Kubernetes cluster[preflight] This might take a minute or two, depending on the speed of your internet connection[preflight] You can also perform this action in beforehand using 'kubeadm config images pull'[certs] Using certificateDir folder "/etc/kubernetes/pki"[certs] Generating "ca" certificate and key[certs] Generating "apiserver" certificate and key[certs] apiserver serving cert is signed for DNS names [izuf68qk0bio1l786kylamz kubernetes kubernetes.default kubernetes.default.svc kubernetes.default.svc.cluster.local] and IPs [10.96.0.1 172.17.157.248][certs] Generating "apiserver-kubelet-client" certificate and key[certs] Generating "front-proxy-ca" certificate and key[certs] Generating "front-proxy-client" certificate and key[certs] Generating "etcd/ca" certificate and key[certs] Generating "etcd/server" certificate and key[certs] etcd/server serving cert is signed for DNS names [izuf68qk0bio1l786kylamz localhost] and IPs [172.17.157.248 127.0.0.1 ::1][certs] Generating "etcd/peer" certificate and key[certs] etcd/peer serving cert is signed for DNS names [izuf68qk0bio1l786kylamz localhost] and IPs [172.17.157.248 127.0.0.1 ::1][certs] Generating "etcd/healthcheck-client" certificate and key[certs] Generating "apiserver-etcd-client" certificate and key[certs] Generating "sa" key and public key[kubeconfig] Using kubeconfig folder "/etc/kubernetes"[kubeconfig] Writing "admin.conf" kubeconfig file[kubeconfig] Writing "kubelet.conf" kubeconfig file[kubeconfig] Writing "controller-manager.conf" kubeconfig file[kubeconfig] Writing "scheduler.conf" kubeconfig file[kubelet-start] Writing kubelet environment file with flags to file "/var/lib/kubelet/kubeadm-flags.env"[kubelet-start] Writing kubelet configuration to file "/var/lib/kubelet/config.yaml"[kubelet-start] Starting the kubelet[control-plane] Using manifest folder "/etc/kubernetes/manifests"[control-plane] Creating static Pod manifest for "kube-apiserver"[control-plane] Creating static Pod manifest for "kube-controller-manager"[control-plane] Creating static Pod manifest for "kube-scheduler"[etcd] Creating static Pod manifest for local etcd in "/etc/kubernetes/manifests"[wait-control-plane] Waiting for the kubelet to boot up the control plane as static Pods from directory "/etc/kubernetes/manifests". This can take up to 4m0s[kubelet-check] Initial timeout of 40s passed.[kubelet-check] It seems like the kubelet isn't running or healthy.[kubelet-check] The HTTP call equal to 'curl -sSL http://localhost:10248/healthz' failed with error: Get "http://localhost:10248/healthz": dial tcp 127.0.0.1:10248: connect: connection refused.[kubelet-check] It seems like the kubelet isn't running or healthy.[kubelet-check] The HTTP call equal to 'curl -sSL http://localhost:10248/healthz' failed with error: Get "http://localhost:10248/healthz": dial tcp 127.0.0.1:10248: connect: connection refused.[kubelet-check] It seems like the kubelet isn't running or healthy.[kubelet-check] The HTTP call equal to 'curl -sSL http://localhost:10248/healthz' failed with error: Get "http://localhost:10248/healthz": dial tcp 127.0.0.1:10248: connect: connection refused.[kubelet-check] It seems like the kubelet isn't running or healthy.[kubelet-check] The HTTP call equal to 'curl -sSL http://localhost:10248/healthz' failed with error: Get "http://localhost:10248/healthz": dial tcp 127.0.0.1:10248: connect: connection refused.[kubelet-check] It seems like the kubelet isn't running or healthy.[kubelet-check] The HTTP call equal to 'curl -sSL http://localhost:10248/healthz' failed with error: Get "http://localhost:10248/healthz": dial tcp 127.0.0.1:10248: connect: connection refused.Unfortunately, an error has occurred:timed out waiting for the conditionThis error is likely caused by:- The kubelet is not running- The kubelet is unhealthy due to a misconfiguration of the node in some way (required cgroups disabled)If you are on a systemd-powered system, you can try to troubleshoot the error with the following commands:- 'systemctl status kubelet'- 'journalctl -xeu kubelet'Additionally, a control plane component may have crashed or exited when started by the container runtime.To troubleshoot, list all containers using your preferred container runtimes CLI.Here is one example how you may list all Kubernetes containers running in docker:- 'docker ps -a | grep kube | grep -v pause'Once you have found the failing container, you can inspect its logs with:- 'docker logs CONTAINERID'error execution phase wait-control-plane: couldn't initialize a Kubernetes clusterTo see the stack trace of this error execute with --v=5 or higher
Kubelet启动失败,查看系统消息
[root@iZuf68qk0bio1l786kylamZ ~]# tail -f /var/log/messagesDec 22 11:02:19 iZuf68qk0bio1l786kylamZ kubelet: I1222 11:02:19.509851 31160 docker_service.go:243] "Hairpin mode is set" hairpinMode=hairpin-vethDec 22 11:02:19 iZuf68qk0bio1l786kylamZ kubelet: I1222 11:02:19.509960 31160 cni.go:240] "Unable to update cni config" err="no networks found in /etc/cni/net.d"Dec 22 11:02:19 iZuf68qk0bio1l786kylamZ kubelet: I1222 11:02:19.513752 31160 cni.go:240] "Unable to update cni config" err="no networks found in /etc/cni/net.d"Dec 22 11:02:19 iZuf68qk0bio1l786kylamZ kubelet: I1222 11:02:19.513810 31160 docker_service.go:258] "Docker cri networking managed by the network plugin" networkPluginName="cni"Dec 22 11:02:19 iZuf68qk0bio1l786kylamZ kubelet: I1222 11:02:19.513889 31160 cni.go:240] "Unable to update cni config" err="no networks found in /etc/cni/net.d"Dec 22 11:02:19 iZuf68qk0bio1l786kylamZ kubelet: I1222 11:02:19.540939 31160 docker_service.go:264] "Docker Info" dockerInfo=&{ID:6MLZ:XNCT:HCDC:CVYA:YXGG:HJN6:VCAF:LT6Q:KWHT:4JOJ:O4S6:6VWR Containers:5 ContainersRunning:2 ContainersPaused:0 ContainersStopped:3 Images:17 Driver:overlay2 DriverStatus:[[Backing Filesystem extfs] [Supports d_type true] [Native Overlay Diff true] [userxattr false]] SystemStatus:[] Plugins:{Volume:[local] Network:[bridge host ipvlan macvlan null overlay] Authorization:[] Log:[awslogs fluentd gcplogs gelf journald json-file local logentries splunk syslog]} MemoryLimit:true SwapLimit:true KernelMemory:true KernelMemoryTCP:true CPUCfsPeriod:true CPUCfsQuota:true CPUShares:true CPUSet:true PidsLimit:true IPv4Forwarding:true BridgeNfIptables:true BridgeNfIP6tables:true Debug:false NFd:35 OomKillDisable:true NGoroutines:43 SystemTime:2021-12-22T11:02:19.514458169+08:00 LoggingDriver:json-file CgroupDriver:cgroupfs CgroupVersion:1 NEventsListener:0 KernelVersion:3.10.0-957.21.3.el7.x86_64 OperatingSystem:CentOS Linux 7 (Core) OSVersion:7 OSType:linux Architecture:x86_64 IndexServerAddress:https://index.docker.io/v1/ RegistryConfig:0xc000941880 NCPU:2 MemTotal:3823378432 GenericResources:[] DockerRootDir:/var/lib/docker HTTPProxy: HTTPSProxy: NoProxy: Name:iZuf68qk0bio1l786kylamZ Labels:[] ExperimentalBuild:false ServerVersion:20.10.8 ClusterStore: ClusterAdvertise: Runtimes:map[io.containerd.runc.v2:{Path:runc Args:[] Shim:<nil>} io.containerd.runtime.v1.linux:{Path:runc Args:[] Shim:<nil>} runc:{Path:runc Args:[] Shim:<nil>}] DefaultRuntime:runc Swarm:{NodeID: NodeAddr: LocalNodeState:inactive ControlAvailable:false Error: RemoteManagers:[] Nodes:0 Managers:0 Cluster:<nil> Warnings:[]} LiveRestoreEnabled:false Isolation: InitBinary:docker-init ContainerdCommit:{ID:e25210fe30a0a703442421b0f60afac609f950a3 Expected:e25210fe30a0a703442421b0f60afac609f950a3} RuncCommit:{ID:v1.0.1-0-g4144b63 Expected:v1.0.1-0-g4144b63} InitCommit:{ID:de40ad0 Expected:de40ad0} SecurityOptions:[name=seccomp,profile=default] ProductLicense: DefaultAddressPools:[] Warnings:[]}Dec 22 11:02:19 iZuf68qk0bio1l786kylamZ kubelet: E1222 11:02:19.540974 31160 server.go:302] "Failed to run kubelet" err="failed to run Kubelet: misconfiguration: kubelet cgroup driver: \"systemd\" is different from docker cgroup driver: \"cgroupfs\""Dec 22 11:02:19 iZuf68qk0bio1l786kylamZ systemd: kubelet.service: main process exited, code=exited, status=1/FAILUREDec 22 11:02:19 iZuf68qk0bio1l786kylamZ systemd: Unit kubelet.service entered failed state.Dec 22 11:02:19 iZuf68qk0bio1l786kylamZ systemd: kubelet.service failed.
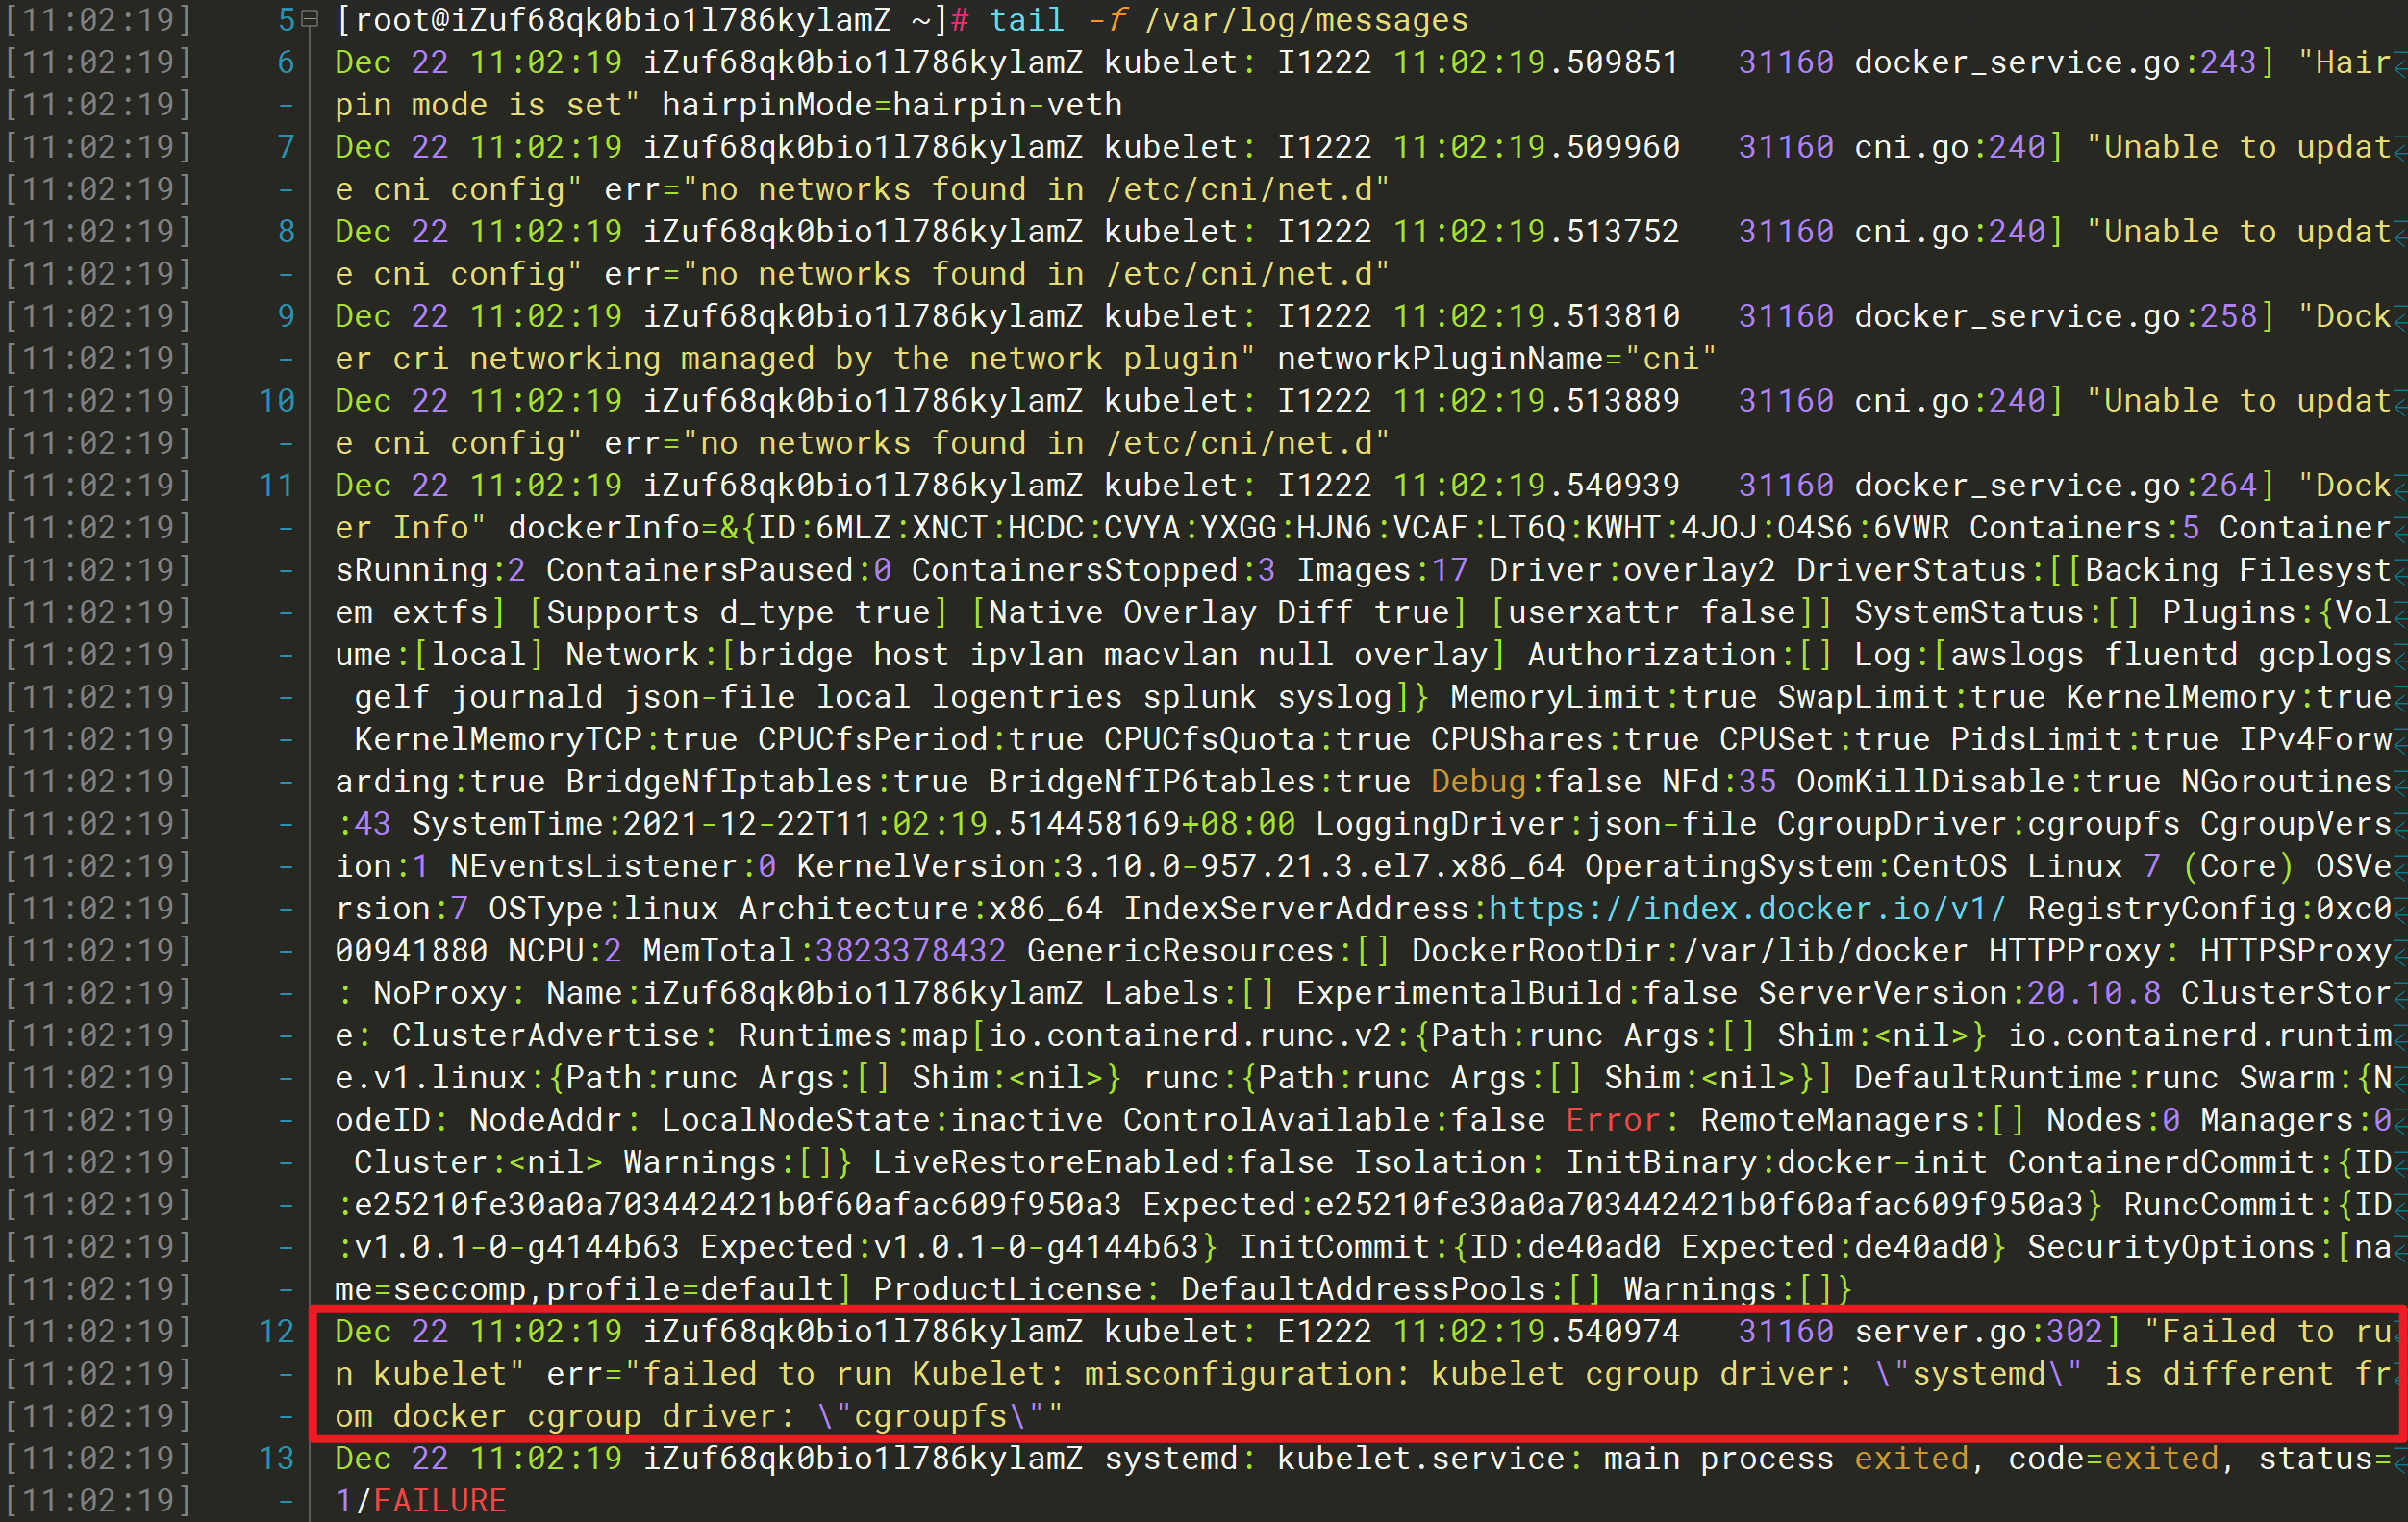
可以看到Kubelet的cgroup驱动与Docker的cgroup驱动不匹配。
解决办法:
①、修改Kubelet的配置文件
由启动日志可知Kubelet的配置文件为:/var/lib/kubelet/config.yaml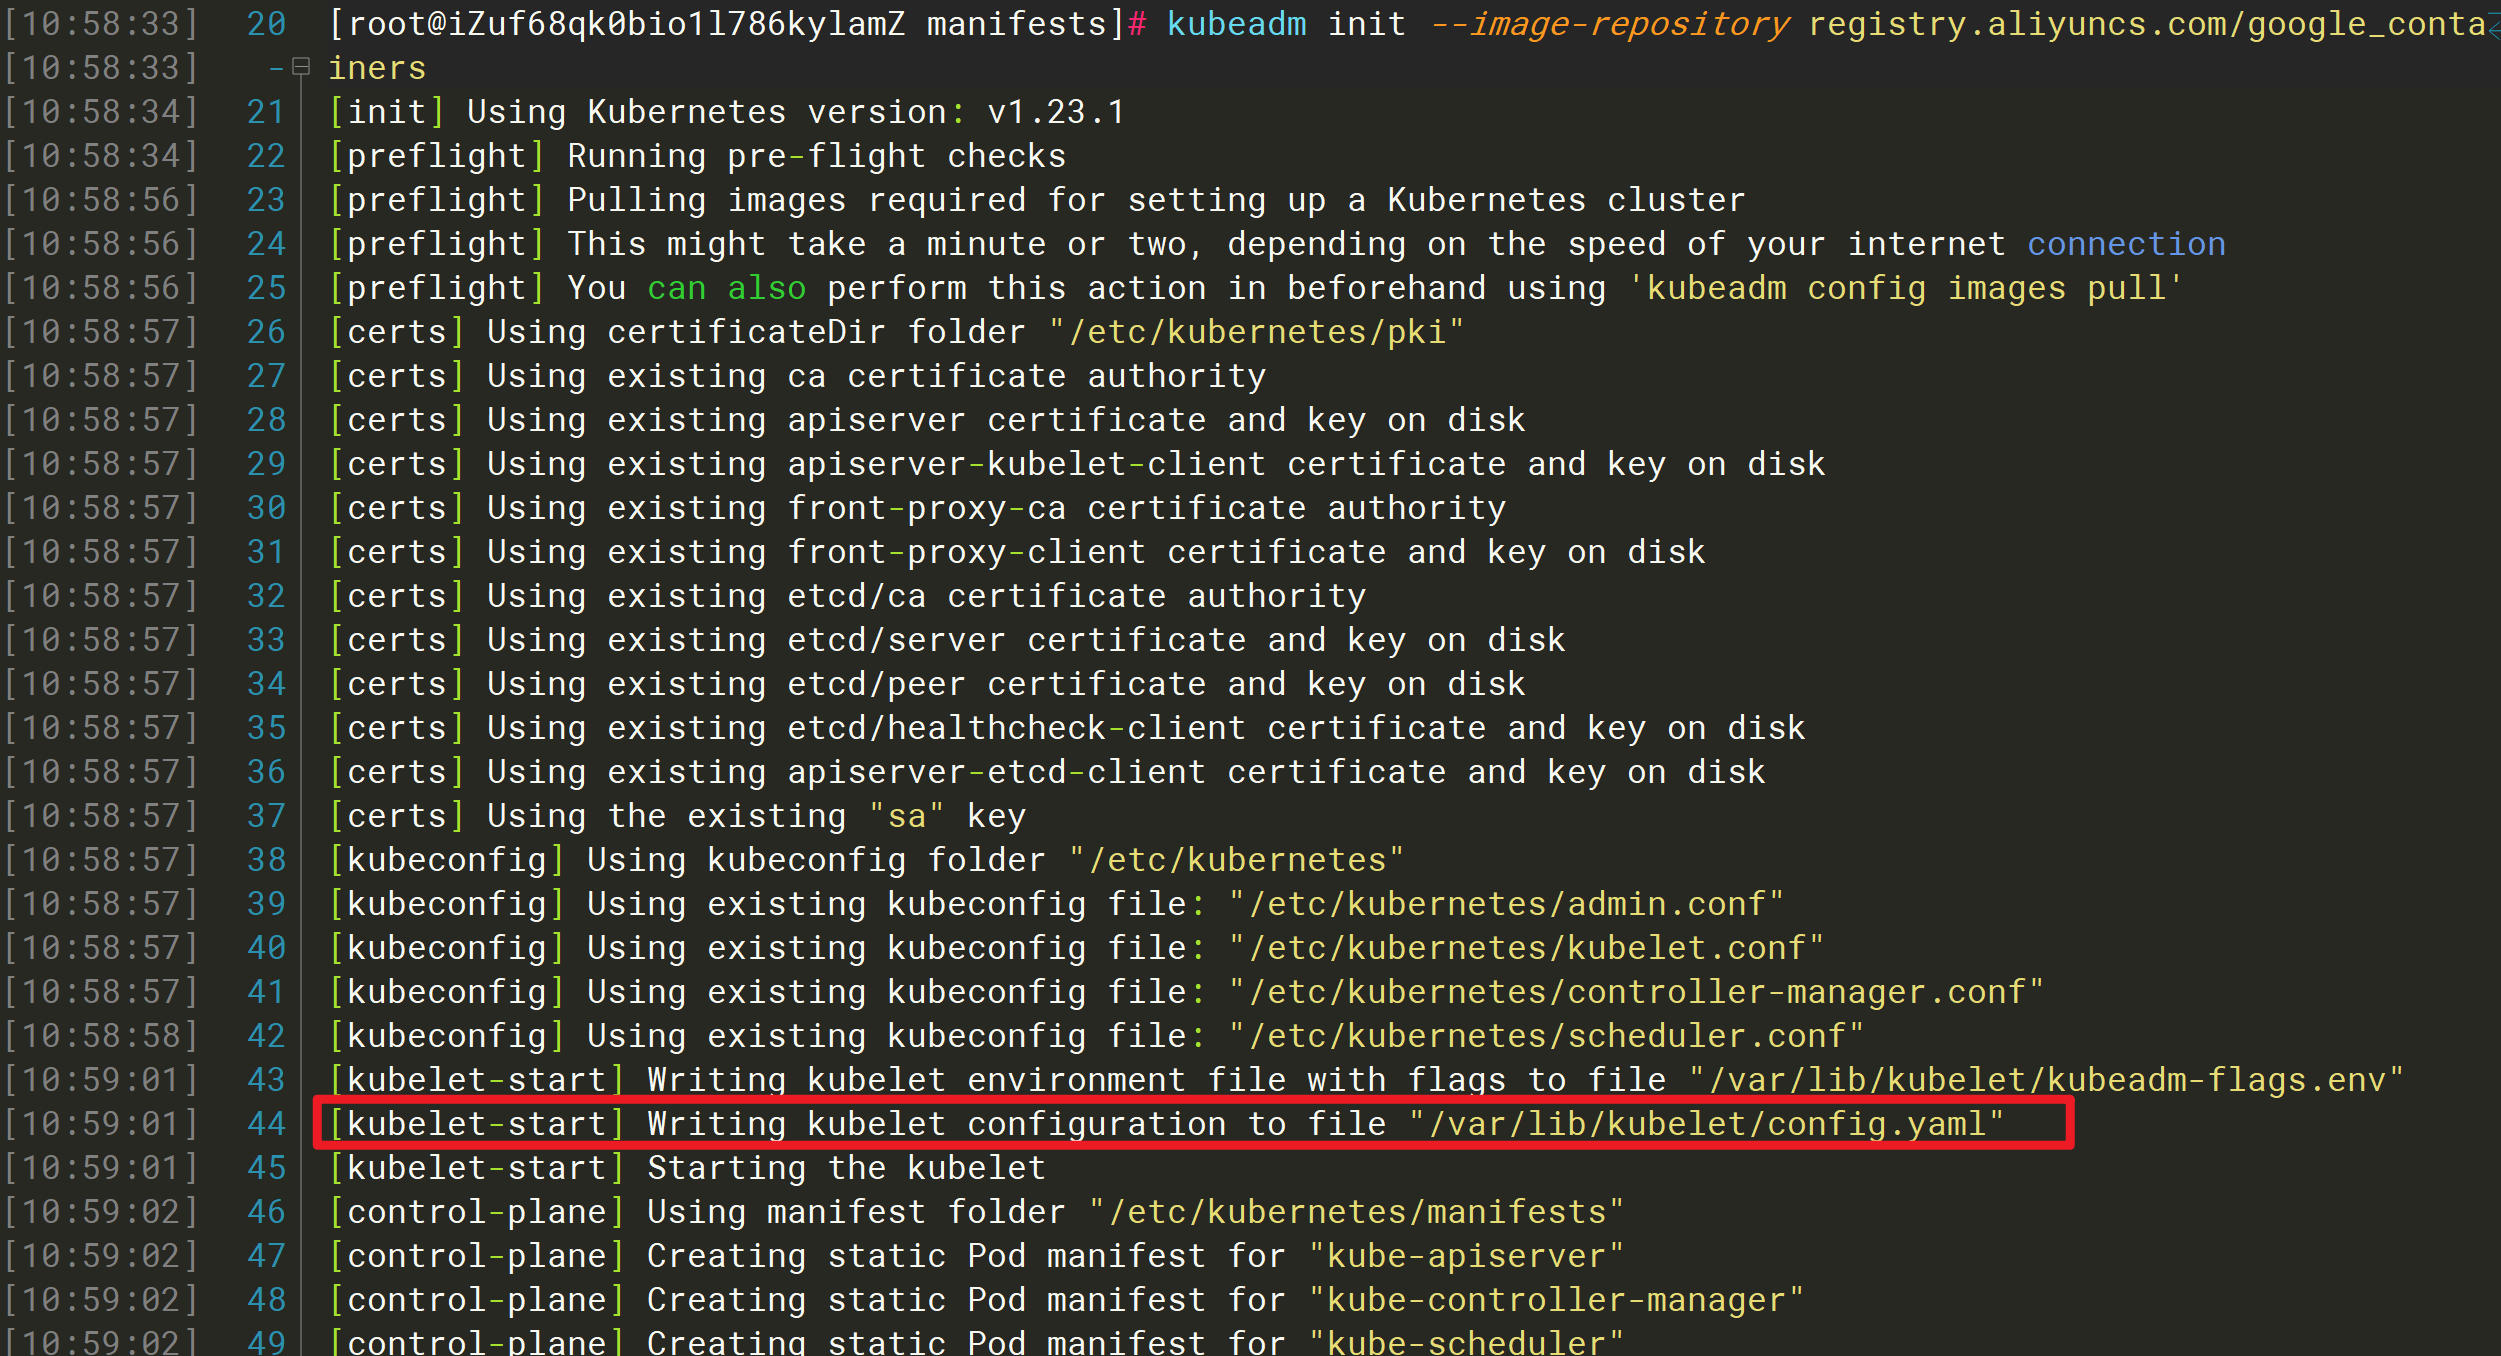
因为启动时会重写该配置文件,所以手动修改可能会失效。
②、修改Docker的启动参数
修改配置文件/usr/lib/systemd/system/docker.service,修改或添加--exec-opt native.cgroupdriver=systemd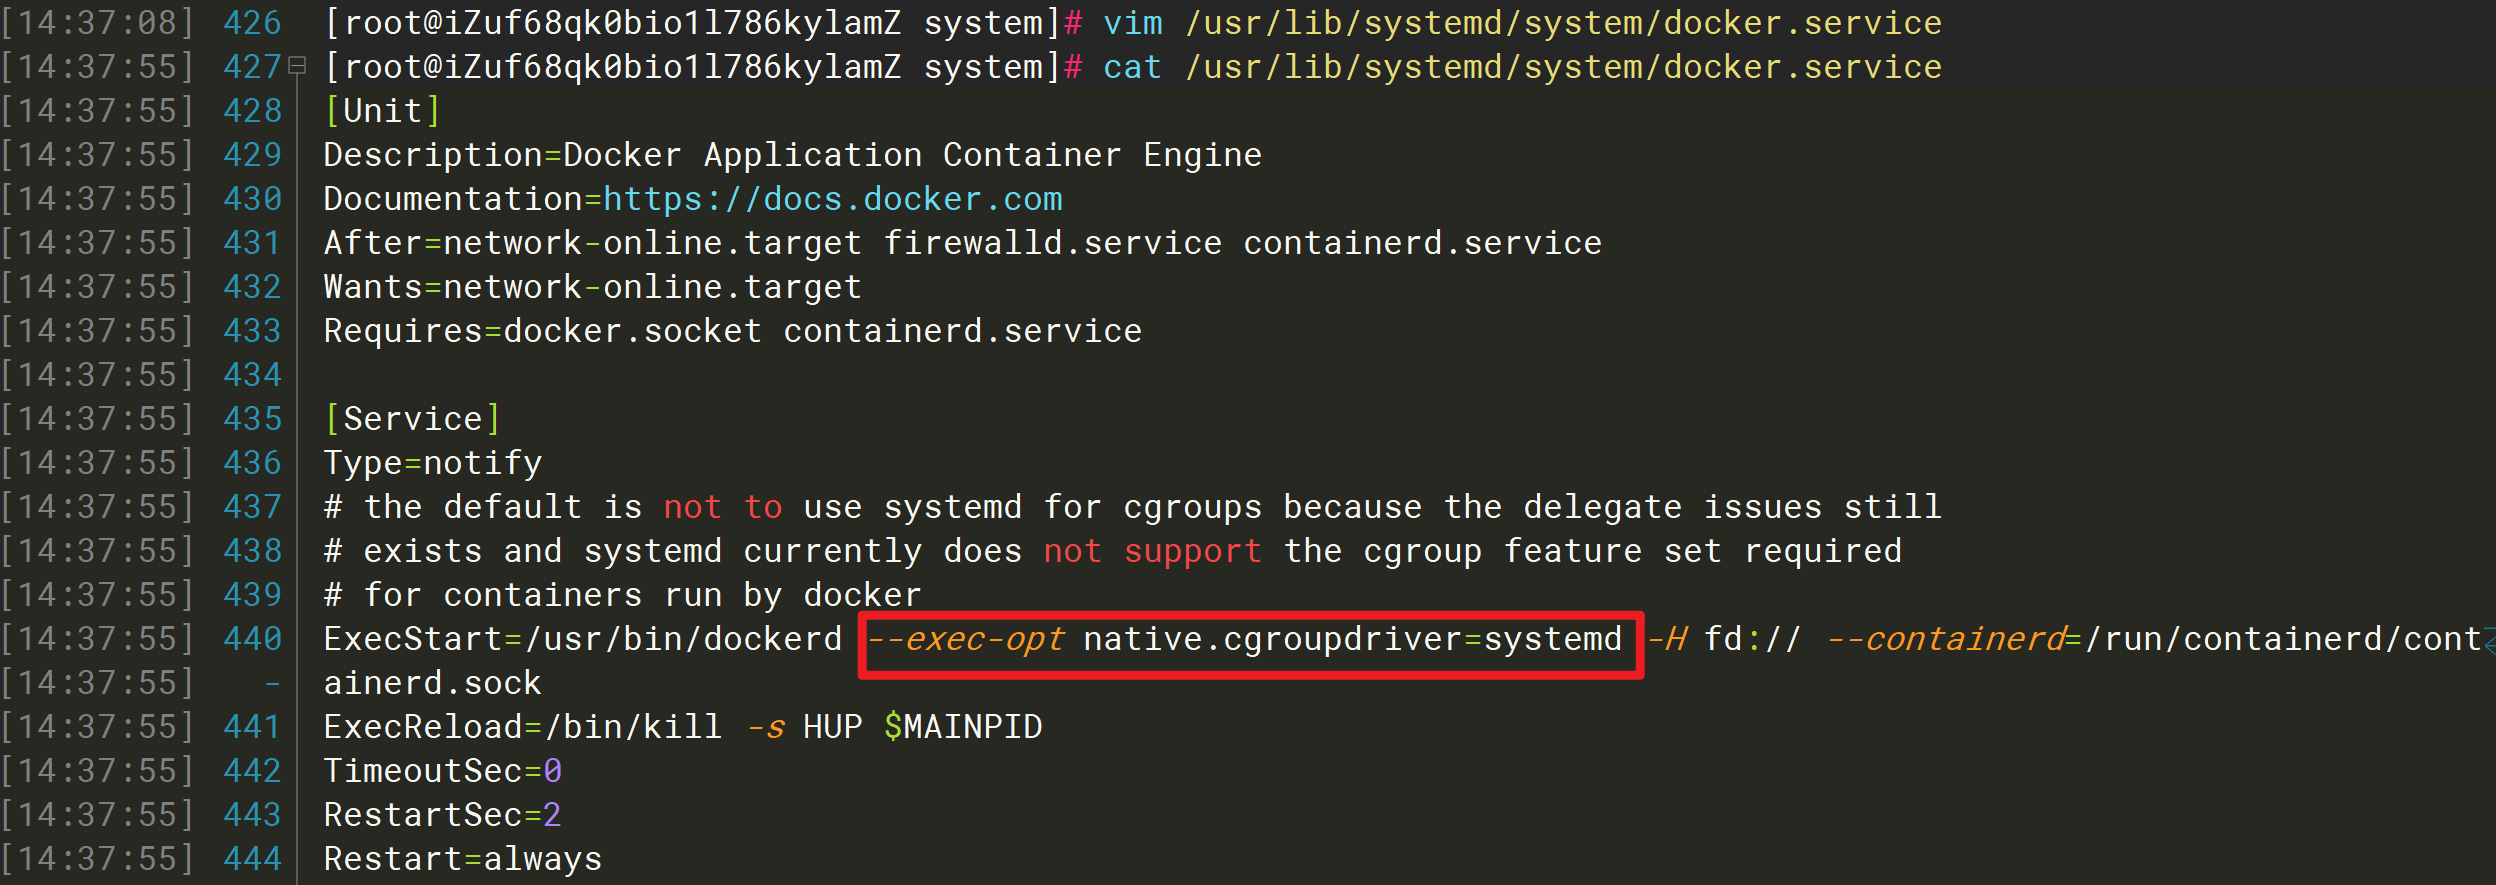
然后重新加载配置信息,重启Docker服务
systemctl daemon-reload && systemctl restart docker
因为多次执行kubeadm init命令导致Kubelet的端口占用的问题
报错如下:
[root@iZuf68qk0bio1l786kylamZ ~]# kubeadm init --image-repository registry.aliyuncs.com/google_containers[init] Using Kubernetes version: v1.23.1[preflight] Running pre-flight checkserror execution phase preflight: [preflight] Some fatal errors occurred:[ERROR Port-10250]: Port 10250 is in use[preflight] If you know what you are doing, you can make a check non-fatal with `--ignore-preflight-errors=...`To see the stack trace of this error execute with --v=5 or higher

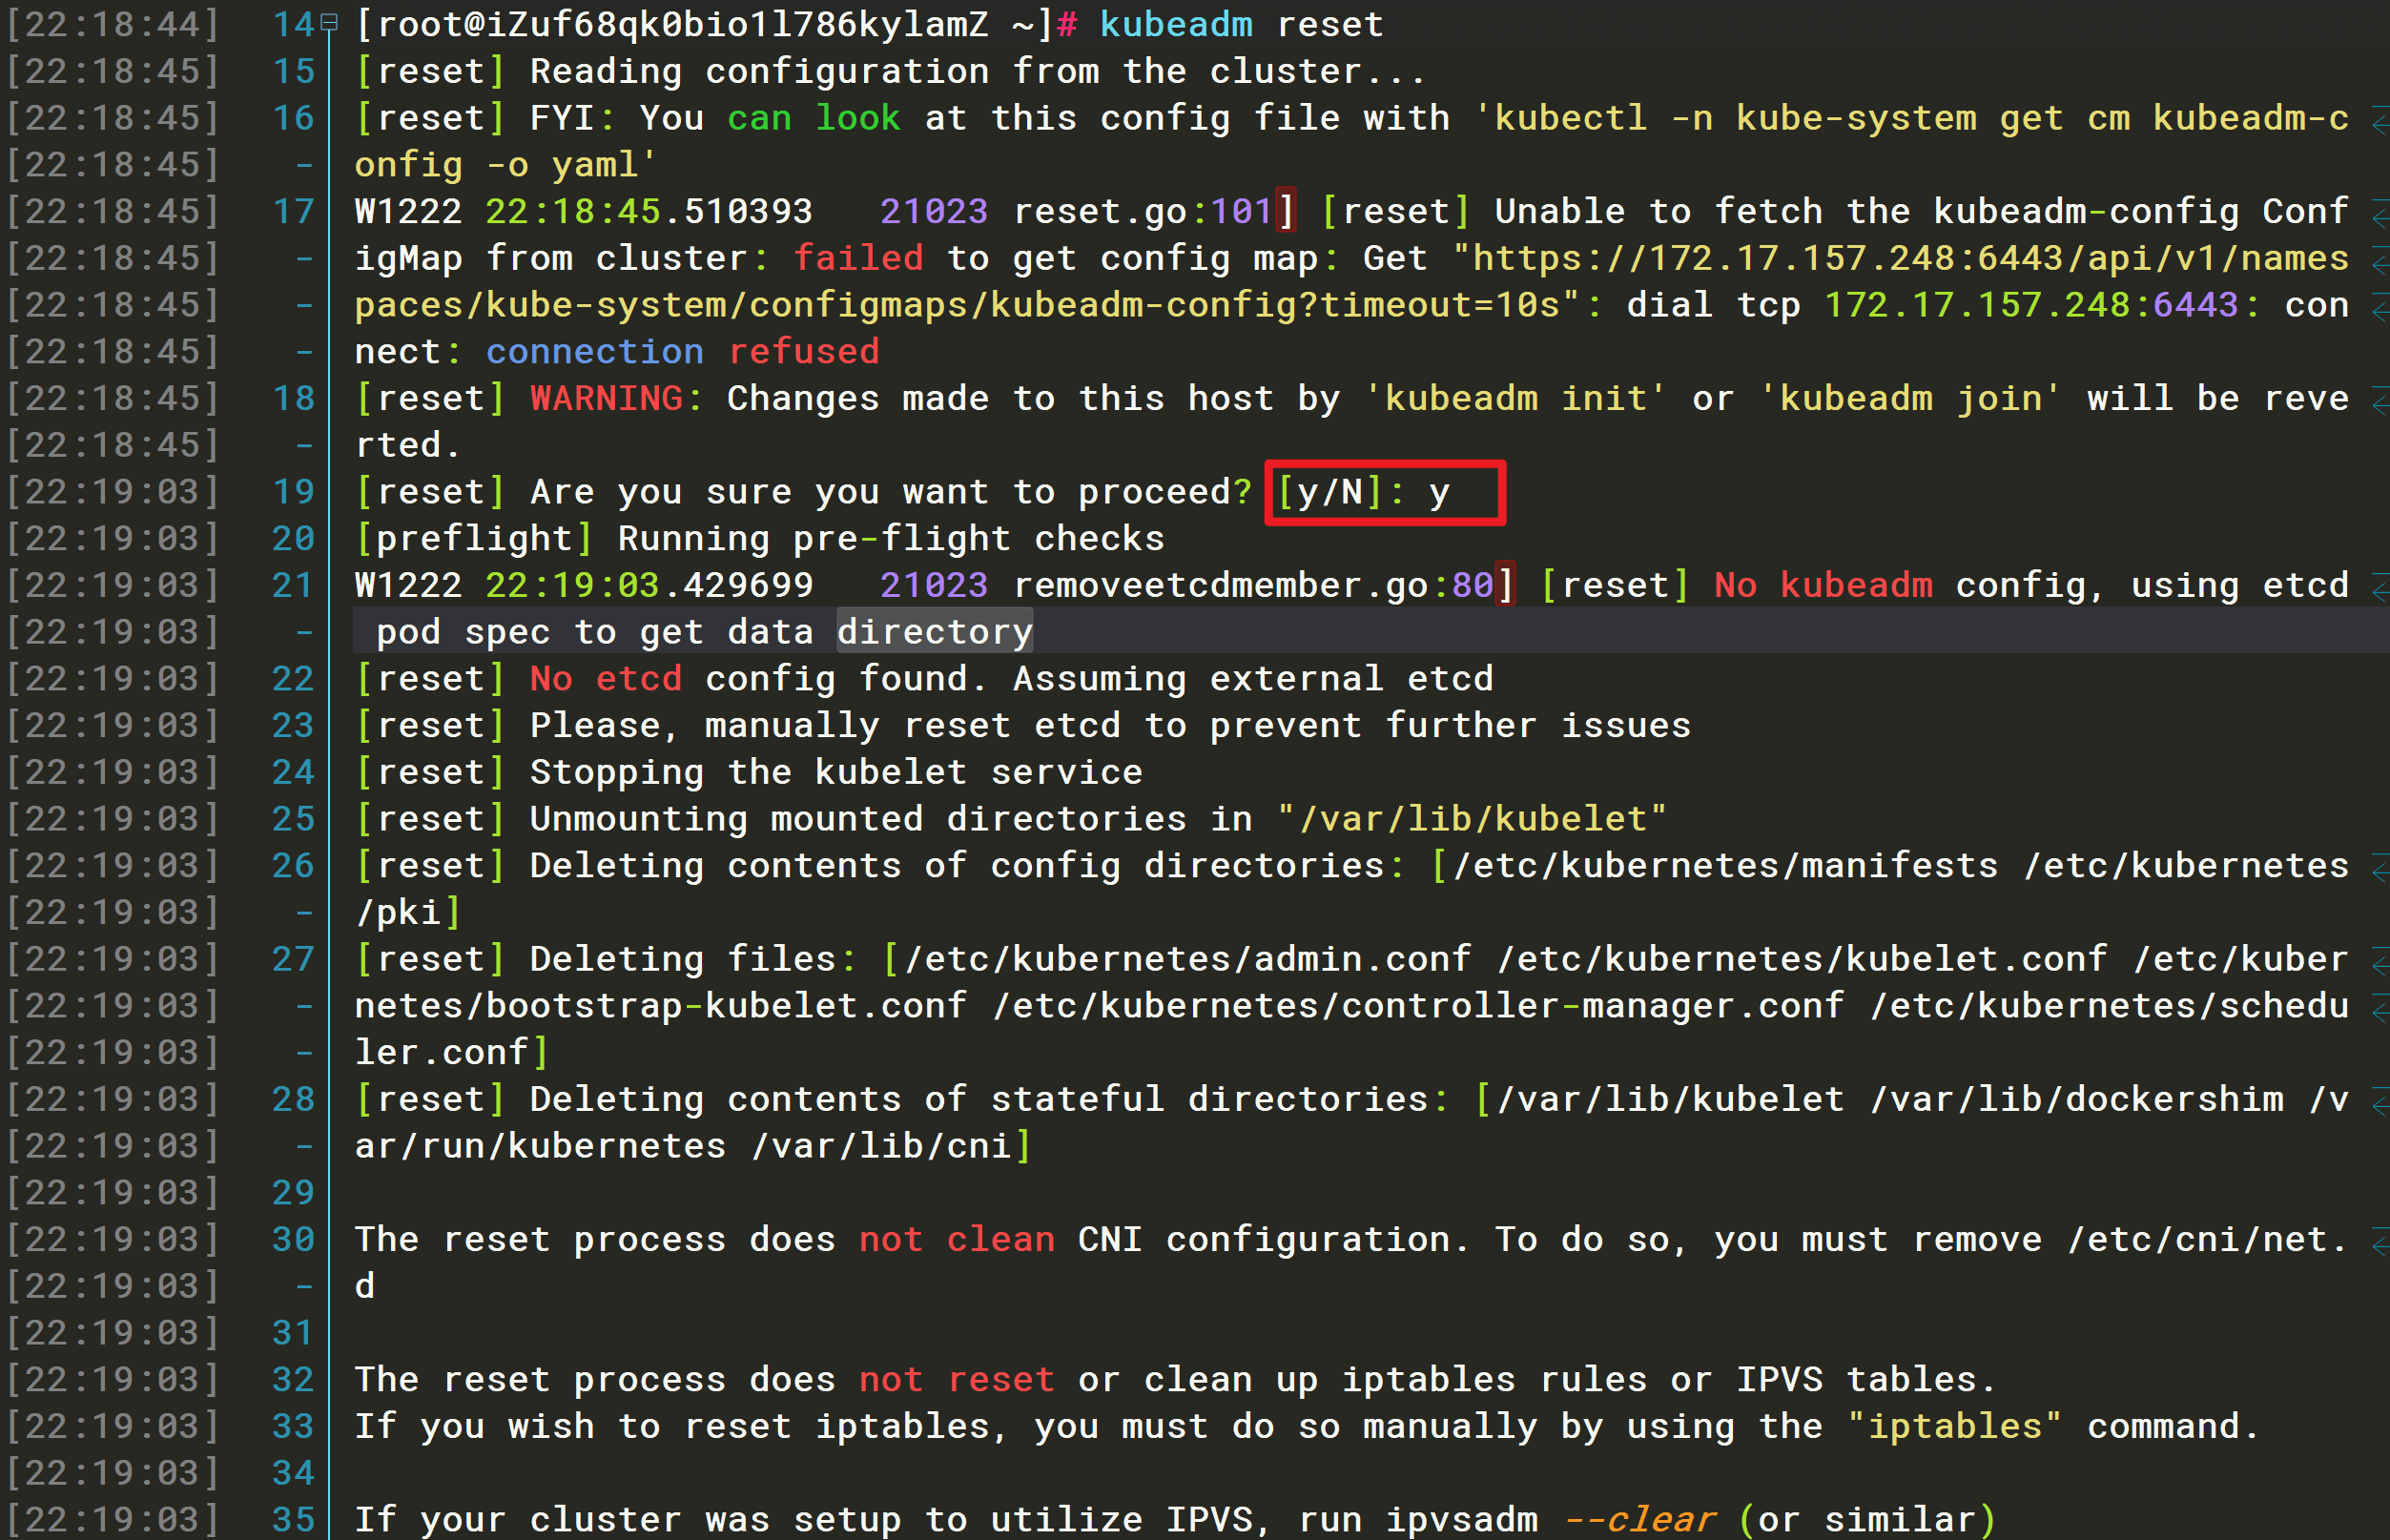
解决办法:执行kubeadm reset重置配置
[root@iZuf68qk0bio1l786kylamZ ~]# kubeadm reset[reset] Reading configuration from the cluster...[reset] FYI: You can look at this config file with 'kubectl -n kube-system get cm kubeadm-config -o yaml'W1222 22:18:45.510393 21023 reset.go:101] [reset] Unable to fetch the kubeadm-config ConfigMap from cluster: failed to get config map: Get "https://172.17.157.248:6443/api/v1/namespaces/kube-system/configmaps/kubeadm-config?timeout=10s": dial tcp 172.17.157.248:6443: connect: connection refused[reset] WARNING: Changes made to this host by 'kubeadm init' or 'kubeadm join' will be reverted.[reset] Are you sure you want to proceed? [y/N]: y[preflight] Running pre-flight checksW1222 22:19:03.429699 21023 removeetcdmember.go:80] [reset] No kubeadm config, using etcd pod spec to get data directory[reset] No etcd config found. Assuming external etcd[reset] Please, manually reset etcd to prevent further issues[reset] Stopping the kubelet service[reset] Unmounting mounted directories in "/var/lib/kubelet"[reset] Deleting contents of config directories: [/etc/kubernetes/manifests /etc/kubernetes/pki][reset] Deleting files: [/etc/kubernetes/admin.conf /etc/kubernetes/kubelet.conf /etc/kubernetes/bootstrap-kubelet.conf /etc/kubernetes/controller-manager.conf /etc/kubernetes/scheduler.conf][reset] Deleting contents of stateful directories: [/var/lib/kubelet /var/lib/dockershim /var/run/kubernetes /var/lib/cni]The reset process does not clean CNI configuration. To do so, you must remove /etc/cni/net.dThe reset process does not reset or clean up iptables rules or IPVS tables.If you wish to reset iptables, you must do so manually by using the "iptables" command.If your cluster was setup to utilize IPVS, run ipvsadm --clear (or similar)to reset your system's IPVS tables.The reset process does not clean your kubeconfig files and you must remove them manually.Please, check the contents of the $HOME/.kube/config file.
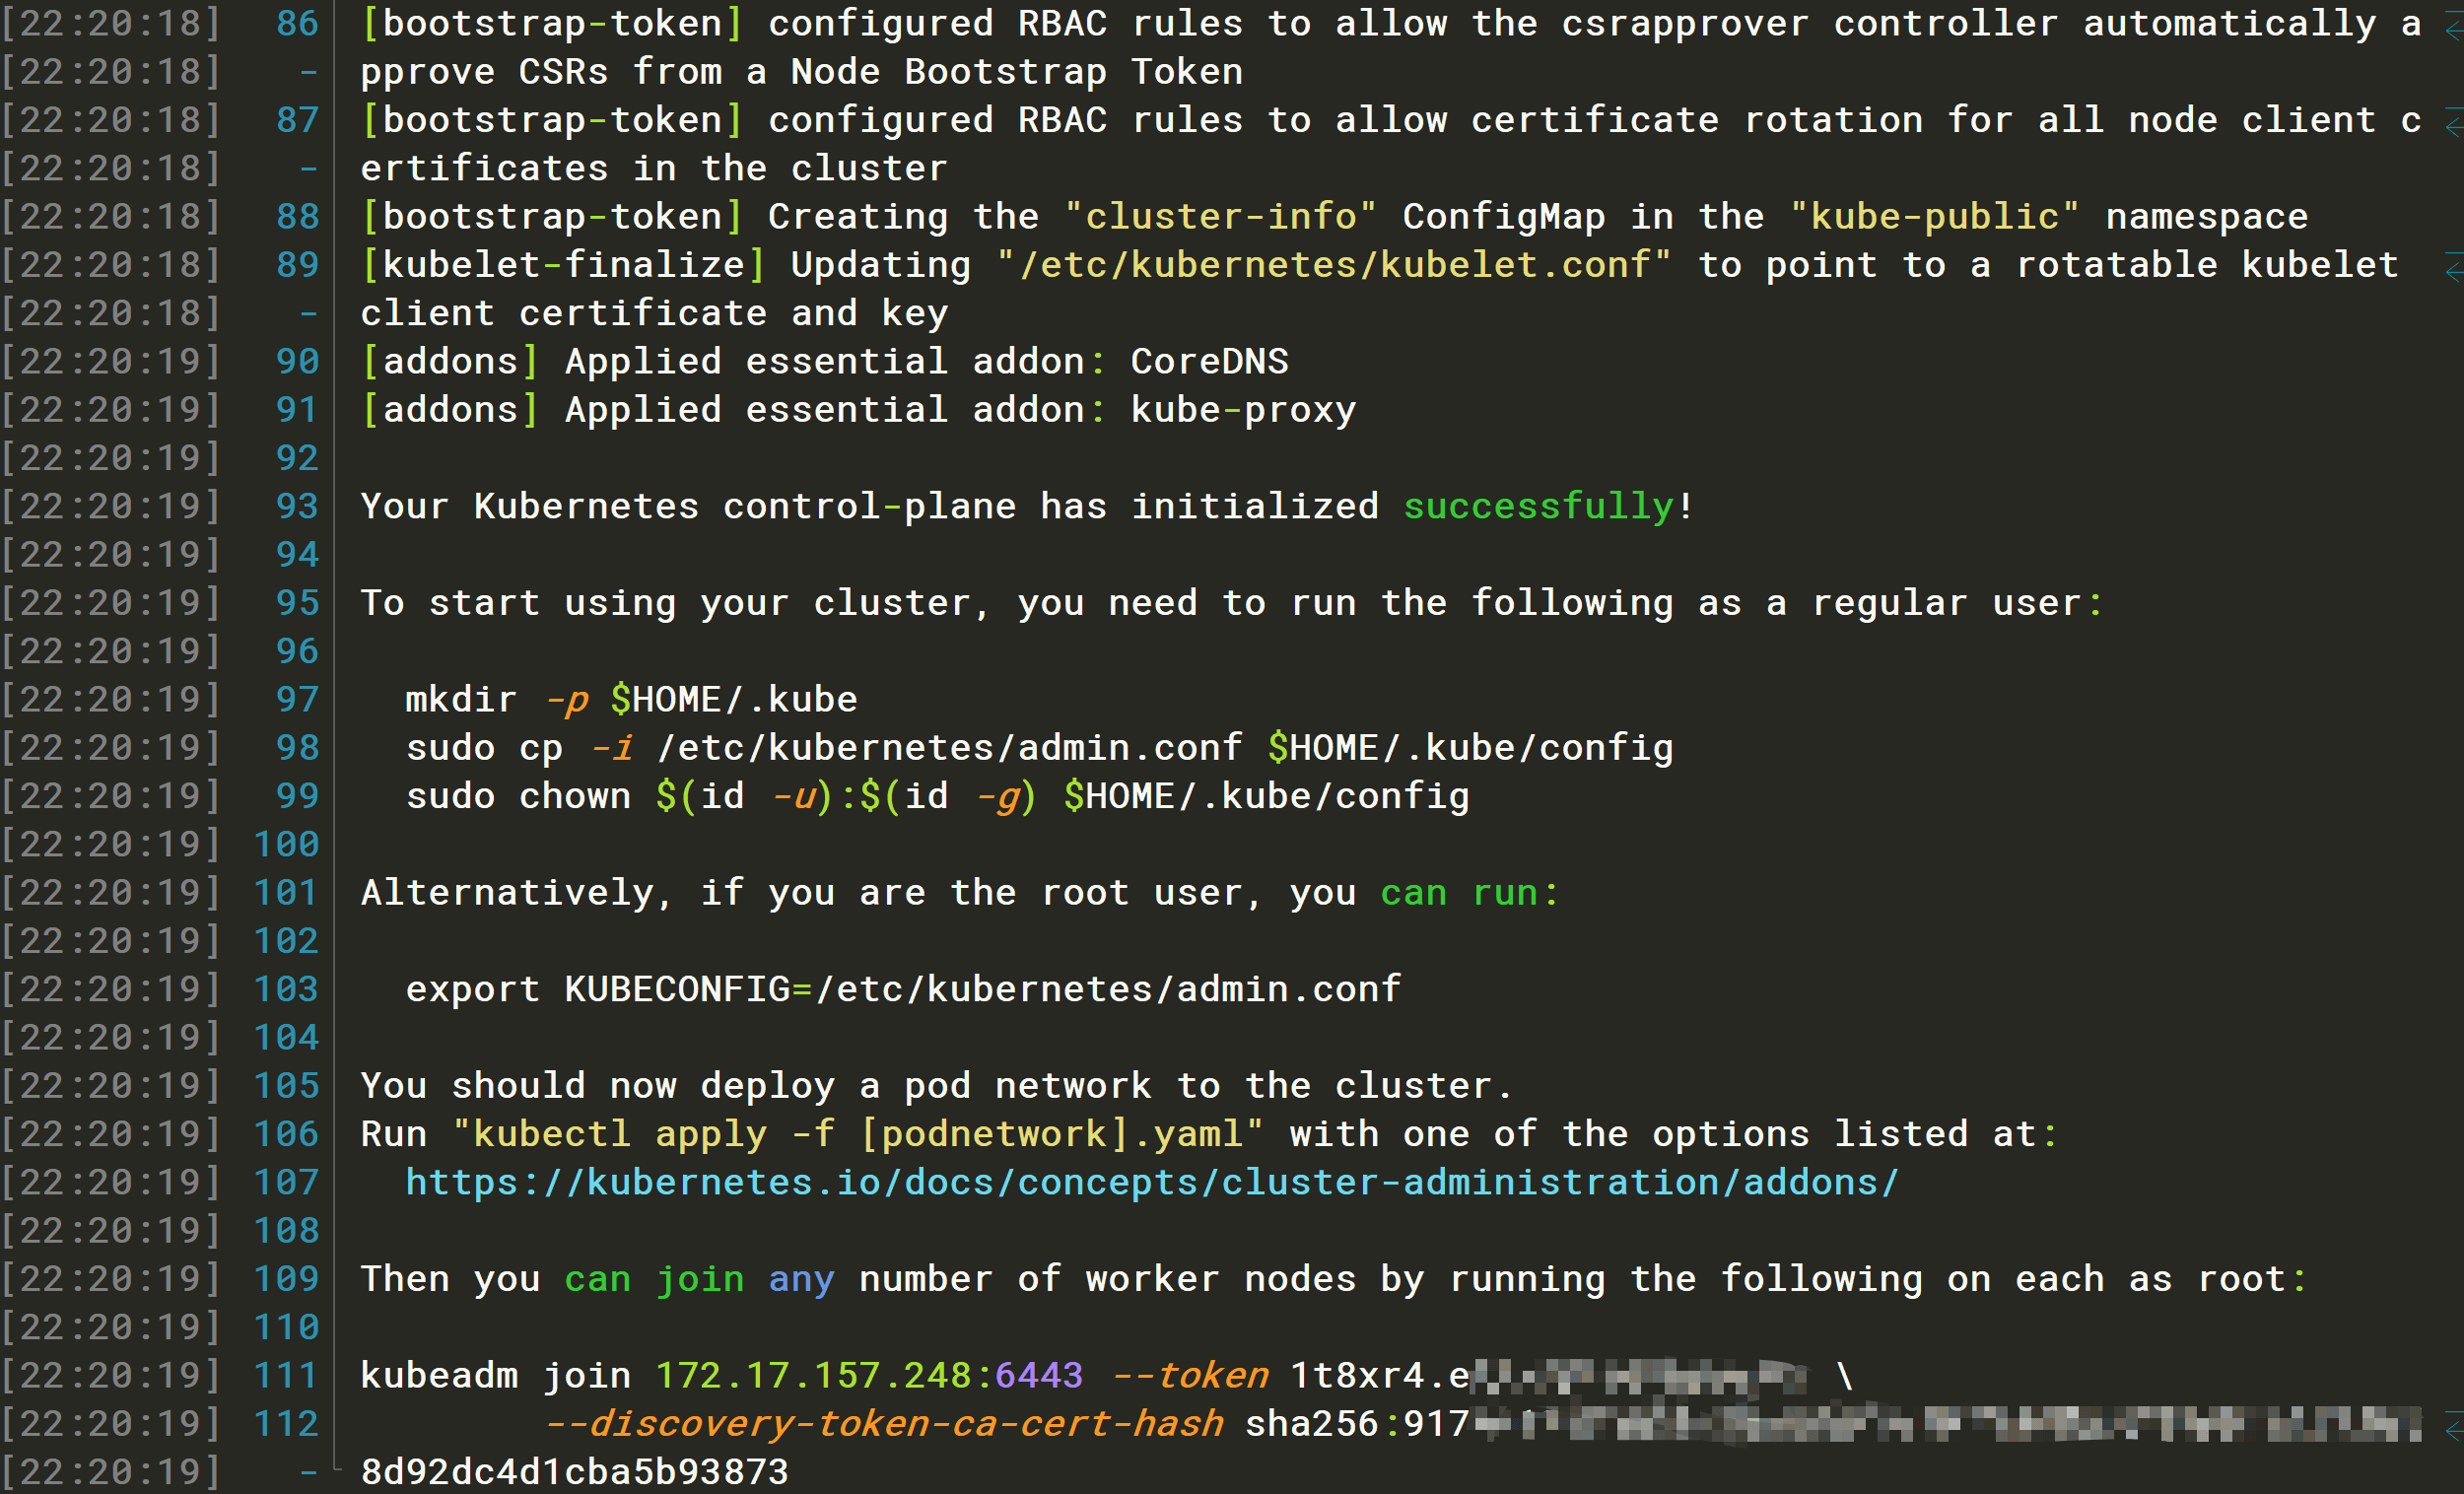
解决完以上问题再次执行kubeadm init启动成功
[root@iZuf68qk0bio1l786kylamZ ~]# kubeadm init --image-repository registry.aliyuncs.com/google_containers[init] Using Kubernetes version: v1.23.1[preflight] Running pre-flight checks[preflight] Pulling images required for setting up a Kubernetes cluster[preflight] This might take a minute or two, depending on the speed of your internet connection[preflight] You can also perform this action in beforehand using 'kubeadm config images pull'[certs] Using certificateDir folder "/etc/kubernetes/pki"[certs] Generating "ca" certificate and key[certs] Generating "apiserver" certificate and key[certs] apiserver serving cert is signed for DNS names [izuf68qk0bio1l786kylamz kubernetes kubernetes.default kubernetes.default.svc kubernetes.default.svc.cluster.local] and IPs [10.96.0.1 172.17.157.248][certs] Generating "apiserver-kubelet-client" certificate and key[certs] Generating "front-proxy-ca" certificate and key[certs] Generating "front-proxy-client" certificate and key[certs] Generating "etcd/ca" certificate and key[certs] Generating "etcd/server" certificate and key[certs] etcd/server serving cert is signed for DNS names [izuf68qk0bio1l786kylamz localhost] and IPs [172.17.157.248 127.0.0.1 ::1][certs] Generating "etcd/peer" certificate and key[certs] etcd/peer serving cert is signed for DNS names [izuf68qk0bio1l786kylamz localhost] and IPs [172.17.157.248 127.0.0.1 ::1][certs] Generating "etcd/healthcheck-client" certificate and key[certs] Generating "apiserver-etcd-client" certificate and key[certs] Generating "sa" key and public key[kubeconfig] Using kubeconfig folder "/etc/kubernetes"[kubeconfig] Writing "admin.conf" kubeconfig file[kubeconfig] Writing "kubelet.conf" kubeconfig file[kubeconfig] Writing "controller-manager.conf" kubeconfig file[kubeconfig] Writing "scheduler.conf" kubeconfig file[kubelet-start] Writing kubelet environment file with flags to file "/var/lib/kubelet/kubeadm-flags.env"[kubelet-start] Writing kubelet configuration to file "/var/lib/kubelet/config.yaml"[kubelet-start] Starting the kubelet[control-plane] Using manifest folder "/etc/kubernetes/manifests"[control-plane] Creating static Pod manifest for "kube-apiserver"[control-plane] Creating static Pod manifest for "kube-controller-manager"[control-plane] Creating static Pod manifest for "kube-scheduler"[etcd] Creating static Pod manifest for local etcd in "/etc/kubernetes/manifests"[wait-control-plane] Waiting for the kubelet to boot up the control plane as static Pods from directory "/etc/kubernetes/manifests". This can take up to 4m0s[apiclient] All control plane components are healthy after 15.002946 seconds[upload-config] Storing the configuration used in ConfigMap "kubeadm-config" in the "kube-system" Namespace[kubelet] Creating a ConfigMap "kubelet-config-1.23" in namespace kube-system with the configuration for the kubelets in the clusterNOTE: The "kubelet-config-1.23" naming of the kubelet ConfigMap is deprecated. Once the UnversionedKubeletConfigMap feature gate graduates to Beta the default name will become just "kubelet-config". Kubeadm upgrade will handle this transition transparently.[upload-certs] Skipping phase. Please see --upload-certs[mark-control-plane] Marking the node izuf68qk0bio1l786kylamz as control-plane by adding the labels: [node-role.kubernetes.io/master(deprecated) node-role.kubernetes.io/control-plane node.kubernetes.io/exclude-from-external-load-balancers][mark-control-plane] Marking the node izuf68qk0bio1l786kylamz as control-plane by adding the taints [node-role.kubernetes.io/master:NoSchedule][bootstrap-token] Using token: 1t8xr4.eqlezpou8dm8mpcy[bootstrap-token] Configuring bootstrap tokens, cluster-info ConfigMap, RBAC Roles[bootstrap-token] configured RBAC rules to allow Node Bootstrap tokens to get nodes[bootstrap-token] configured RBAC rules to allow Node Bootstrap tokens to post CSRs in order for nodes to get long term certificate credentials[bootstrap-token] configured RBAC rules to allow the csrapprover controller automatically approve CSRs from a Node Bootstrap Token[bootstrap-token] configured RBAC rules to allow certificate rotation for all node client certificates in the cluster[bootstrap-token] Creating the "cluster-info" ConfigMap in the "kube-public" namespace[kubelet-finalize] Updating "/etc/kubernetes/kubelet.conf" to point to a rotatable kubelet client certificate and key[addons] Applied essential addon: CoreDNS[addons] Applied essential addon: kube-proxyYour Kubernetes control-plane has initialized successfully!To start using your cluster, you need to run the following as a regular user:mkdir -p $HOME/.kubesudo cp -i /etc/kubernetes/admin.conf $HOME/.kube/configsudo chown $(id -u):$(id -g) $HOME/.kube/configAlternatively, if you are the root user, you can run:export KUBECONFIG=/etc/kubernetes/admin.confYou should now deploy a pod network to the cluster.Run "kubectl apply -f [podnetwork].yaml" with one of the options listed at:https://kubernetes.io/docs/concepts/cluster-administration/addons/Then you can join any number of worker nodes by running the following on each as root:kubeadm join 172.17.157.248:6443 --token 1t8xr4.eqlzpo8m8mpy \--discovery-token-ca-cert-hash sha256:917019223b6a70aedf919f219846728e67e1182f8d92dc4d1cba5b3873
kubeadm init 的工作流程
当执行 kubeadm init 指令后,kubeadm 首先要做的,是一系列的检查工作,以确定这台机器可以用来部署 Kubernetes。这一步检查,称为“Preflight Checks”,它可以省掉很多后续的麻烦。
其实,Preflight Checks 包括了很多方面,比如:
- Linux 内核的版本必须是否是 3.10 以上?
- Linux Cgroups 模块是否可用?
- 机器的 hostname 是否标准?
- 在 Kubernetes 项目里,机器的名字以及一切存储在 Etcd 中的 API 对象,都必须使用标准的 DNS 命名(RFC 1123)。
- 用户安装的 kubeadm 和 kubelet 的版本是否匹配?
- 机器上是不是已经安装了 Kubernetes 的二进制文件?
- Kubernetes 的工作端口 10250/10251/10252 端口是不是已经被占用?
- ip、mount 等 Linux 指令是否存在?
- Docker 是否已经安装?
- ……
在通过了 Preflight Checks 之后,kubeadm 要做的,是生成 Kubernetes 对外提供服务所需的各种证书和对应的目录。
Kubernetes 对外提供服务时,除非专门开启“不安全模式”,否则都要通过 HTTPS 才能访问 kube-apiserver。这就需要为 Kubernetes 集群配置好证书文件。
kubeadm 为 Kubernetes 项目生成的证书文件都放在 Master 节点的 /etc/kubernetes/pki 目录下。在这个目录下,最主要的证书文件是 ca.crt 和对应的私钥 ca.key。
此外,用户使用 kubectl 获取容器日志等 streaming 操作时,需要通过 kube-apiserver 向 kubelet 发起请求,这个连接也必须是安全的。kubeadm 为这一步生成的是 apiserver-kubelet-client.crt 文件,对应的私钥是 apiserver-kubelet-client.key。
除此之外,Kubernetes 集群中还有 Aggregate APIServer 等特性,也需要用到专门的证书,这里就不再一一列举了。需要指出的是,可以选择不让 kubeadm 生成这些证书,而是拷贝现有的证书到如下证书的目录里:
/etc/kubernetes/pki/ca.{crt,key}
这时,kubeadm 就会跳过证书生成的步骤,把它完全交给用户处理。
证书生成后,kubeadm 接下来会为其他组件生成访问 kube-apiserver 所需的配置文件。这些文件的路径是:/etc/kubernetes/xxx.conf:
ls /etc/kubernetes/admin.conf controller-manager.conf kubelet.conf scheduler.conf
这些文件里面记录的是,当前这个 Master 节点的服务器地址、监听端口、证书目录等信息。这样,对应的客户端(比如 scheduler,kubelet 等),可以直接加载相应的文件,使用里面的信息与 kube-apiserver 建立安全连接。
接下来,kubeadm 会为 Master 组件生成 Pod 配置文件。Kubernetes 有三个 Master 组件 kube-apiserver、kube-controller-manager、kube-scheduler,而它们都会被使用 Pod 的方式部署起来。
这时,Kubernetes 集群尚不存在,难道 kubeadm 会直接执行 docker run 来启动这些容器吗?
当然不是。在 Kubernetes 中,有一种特殊的容器启动方法叫做“Static Pod”。它允许把要部署的 Pod 的 YAML 文件放在一个指定的目录里。这样,当这台机器上的 kubelet 启动时,它会自动检查这个目录,加载所有的 Pod YAML 文件,然后在这台机器上启动它们。
从这一点也可以看出,kubelet 在 Kubernetes 项目中的地位非常高,在设计上它就是一个完全独立的组件,而其他 Master 组件,则更像是辅助性的系统容器。
在 kubeadm 中,Master 组件的 YAML 文件会被生成在 /etc/kubernetes/manifests 路径下。比如,kube-apiserver.yaml:
apiVersion: v1kind: Podmetadata:annotations:scheduler.alpha.kubernetes.io/critical-pod: ""creationTimestamp: nulllabels:component: kube-apiservertier: control-planename: kube-apiservernamespace: kube-systemspec:containers:- command:- kube-apiserver- --authorization-mode=Node,RBAC- --runtime-config=api/all=true- --advertise-address=10.168.0.2...- --tls-cert-file=/etc/kubernetes/pki/apiserver.crt- --tls-private-key-file=/etc/kubernetes/pki/apiserver.keyimage: k8s.gcr.io/kube-apiserver-amd64:v1.11.1imagePullPolicy: IfNotPresentlivenessProbe:...name: kube-apiserverresources:requests:cpu: 250mvolumeMounts:- mountPath: /usr/share/ca-certificatesname: usr-share-ca-certificatesreadOnly: true...hostNetwork: truepriorityClassName: system-cluster-criticalvolumes:- hostPath:path: /etc/ca-certificatestype: DirectoryOrCreatename: etc-ca-certificates...
在这里,只需要关注这样几个信息:
- 这个 Pod 里只定义了一个容器,它使用的镜像是:k8s.gcr.io/kube-apiserver-amd64:v1.11.1 。这个镜像是 Kubernetes 官方维护的一个组件镜像。
- 这个容器的启动命令(commands)是 kube-apiserver —authorization-mode=Node,RBAC …,这样一句非常长的命令。其实,它就是容器里 kube-apiserver 这个二进制文件再加上指定的配置参数而已。
- 如果要修改一个已有集群的 kube-apiserver 的配置,需要修改这个 YAML 文件。
- 这些组件的参数也可以在部署时指定。
在这一步完成后,kubeadm 还会再生成一个 Etcd 的 Pod YAML 文件,用来通过同样的 Static Pod 的方式启动 Etcd。所以,最后 Master 组件的 Pod YAML 文件如下所示:
$ ls /etc/kubernetes/manifests/etcd.yaml kube-apiserver.yaml kube-controller-manager.yaml kube-scheduler.yaml
而一旦这些 YAML 文件出现在被 kubelet 监视的 /etc/kubernetes/manifests 目录下,kubelet 就会自动创建这些 YAML 文件中定义的 Pod,即 Master 组件的容器。
Master 容器启动后,kubeadm 会通过检查 localhost:6443/healthz 这个 Master 组件的健康检查 URL,等待 Master 组件完全运行起来。
然后,kubeadm 就会为集群生成一个 bootstrap token。在后面,只要持有这个 token,任何一个安装了 kubelet 和 kubadm 的节点,都可以通过 kubeadm join 加入到这个集群当中。
这个 token 的值和使用方法,会在 kubeadm init 结束后被打印出来。
在 token 生成之后,kubeadm 会将 ca.crt 等 Master 节点的重要信息,通过 ConfigMap 的方式保存在 Etcd 当中,供后续部署 Node 节点使用。这个 ConfigMap 的名字是 cluster-info。
kubeadm init 的最后一步,就是安装默认插件。Kubernetes 默认 kube-proxy 和 DNS 这两个插件是必须安装的。它们分别用来提供整个集群的服务发现和 DNS 功能。其实,这两个插件也只是两个容器镜像而已,所以 kubeadm 只要用 Kubernetes 客户端创建两个 Pod 就可以了。
kubeadm join 的工作流程
这个流程其实非常简单,kubeadm init 生成 bootstrap token 之后,就可以在任意一台安装了 kubelet 和 kubeadm 的机器上执行 kubeadm join 了。
为什么执行 kubeadm join 需要这样一个 token 呢?
因为,任何一台机器想要成为 Kubernetes 集群中的一个节点,就必须在集群的 kube-apiserver 上注册。可是,要想跟 apiserver 打交道,这台机器就必须要获取到相应的证书文件(CA 文件)。可是,为了能够一键安装,就不能让用户去 Master 节点上手动拷贝这些文件。
所以,kubeadm 至少需要发起一次“不安全模式”的访问到 kube-apiserver,从而拿到保存在 ConfigMap 中的 cluster-info(它保存了 APIServer 的授权信息)。而 bootstrap token,扮演的就是这个过程中的安全验证的角色。
只要有了 cluster-info 里的 kube-apiserver 的地址、端口、证书,kubelet 就可以以“安全模式”连接到 apiserver 上,这样一个新的节点就部署完成了。
接下来,只要在其他节点上重复这个指令就可以了。
配置 kubeadm 的部署参数
kubeadm 部署 Kubernetes 集群最关键的两个步骤,kubeadm init 和 kubeadm join。kubeadm 确实简单易用,可是该如何定的集群组件参数呢?
比如,要指定 kube-apiserver 的启动参数,该怎么办?
在这里,强烈推荐在使用 kubeadm init 部署 Master 节点时,使用下面这条指令:
$ kubeadm init --config kubeadm.yaml
这时就可以给 kubeadm 提供一个 YAML 文件(比如,kubeadm.yaml),它的内容如下所示(仅列举了主要部分):
apiVersion: kubeadm.k8s.io/v1alpha2kind: MasterConfigurationkubernetesVersion: v1.11.0api:advertiseAddress: 192.168.0.102bindPort: 6443...etcd:local:dataDir: /var/lib/etcdimage: ""imageRepository: k8s.gcr.iokubeProxy:config:bindAddress: 0.0.0.0...kubeletConfiguration:baseConfig:address: 0.0.0.0...networking:dnsDomain: cluster.localpodSubnet: ""serviceSubnet: 10.96.0.0/12nodeRegistration:criSocket: /var/run/dockershim.sock...
通过制定这样一个部署参数配置文件,就可以很方便地在这个文件里填写各种自定义的部署参数了。比如,现在要指定 kube-apiserver 的参数,那么只要在这个文件里加上这样一段信息:
...apiServerExtraArgs:advertise-address: 192.168.0.103anonymous-auth: falseenable-admission-plugins: AlwaysPullImages,DefaultStorageClassaudit-log-path: /home/johndoe/audit.log
然后,kubeadm 就会使用上面这些信息替换 /etc/kubernetes/manifests/kube-apiserver.yaml 里的 command 字段里的参数了。
而这个 YAML 文件提供的可配置项远不止这些。比如,还可以修改 kubelet 和 kube-proxy 的配置,修改 Kubernetes 使用的基础镜像的 URL(默认的k8s.gcr.io/xxx镜像 URL 在国内访问是有困难的),指定自己的证书文件,指定特殊的容器运行时等等。

若有收获,就点个赞吧
0 人点赞
