- 一、什么是本地域名映射
- Copyright (c) 1993-2009 Microsoft Corp.
- entry should be kept on an individual line. The IP address should
- be placed in the first column followed by the corresponding host name.
- The IP address and the host name should be separated by at least one
- space.## Additionally, comments (such as these) may be inserted on individual
- lines or following the machine name denoted by a ‘#’ symbol.
- source server
- 38.25.63.10 x.acme.com
- x client host
- localhost name resolution is handled within DNS itself.
- 127.0.0.1 localhost
- ::1 localhost
一、什么是本地域名映射
域名解析的流程,先从本地电脑里面有个host的解析, 如果本地有对应的域名ip的映射,它就会优先用本地的。好比通过浏览器访问 127.0.0.1 的效果localhost跟访问都是一样的。
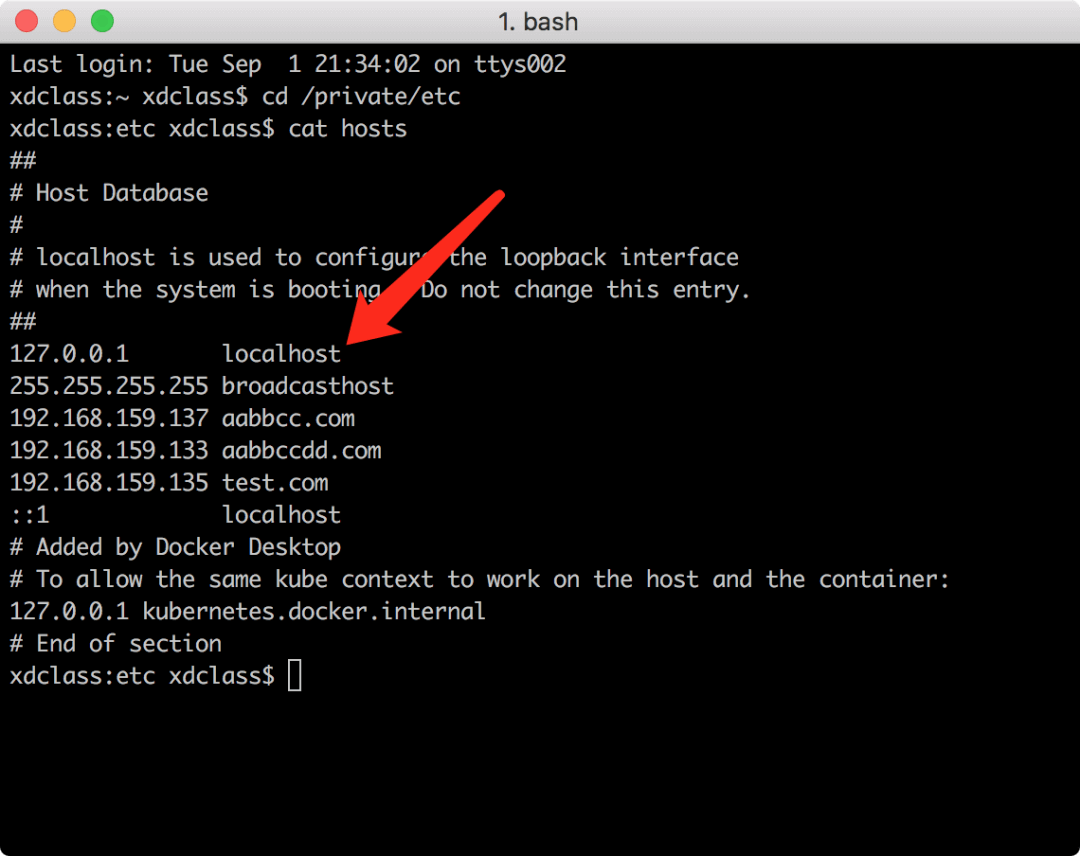
1、Mac配置本地域名映射
下面这个图就是Mac操作系统里面host文件 关于域名跟ip的映射, 结尾增加一个
192.168.159.137 aabbcc.com 就行,那浏览器访问 aabbcc.com就会映射到 192.168.159.137这个ip
cd /private/etcsudo vim hosts
2、Window配置本地域名映射
- 首先找到host文件:C:\Windows\System32\drivers\etc
- 打开host文件
```bash
Copyright (c) 1993-2009 Microsoft Corp.
This is a sample HOSTS file used by Microsoft TCP/IP for Windows.
This file contains the mappings of IP addresses to host names. Each
entry should be kept on an individual line. The IP address should
be placed in the first column followed by the corresponding host name.
The IP address and the host name should be separated by at least one
space.## Additionally, comments (such as these) may be inserted on individual
lines or following the machine name denoted by a ‘#’ symbol.
For example:
102.54.94.97 rhino.acme.com
source server
38.25.63.10 x.acme.com
x client host
localhost name resolution is handled within DNS itself.
127.0.0.1 localhost
::1 localhost
192.168.159.137 aabbccdd.com
- 注意#为注释,去掉后添加新的比如:192.168.159.137 aabbccdd.com- ping aabbccdd.com 回车,能看到来自输入的ip地址,127.0.0.1 ,就成功了<a name="s3igC"></a>### 二、Nginx目录文件讲解安装好Nginx之后,需要进去看一下它里面常见的几个文件夹以及每个常用文件的作用。- 源码编译安装后,默认目录```bash/usr/local/nginx
- 目录和配置文件介绍 ```bash conf #所有配置文件目录 nginx.conf #默认的主要的配置文件 nginx.conf.default #默认模板
html # 这是编译安装时Nginx的默认站点目录 50x.html #错误页面 index.html #默认首页
logs # nginx默认的日志路径,包括错误日志及访问日志 error.log #错误日志 nginx.pid #nginx启动后的进程id access.log #nginx访问日志
sbin #nginx命令的目录 nginx #启动命令
- 还有一些常见的Nginx操作命令```bash./nginx #默认配置文件启动./nginx -s reload #重启,加载默认配置文件./nginx -c /usr/local/nginx/conf/nginx.conf #启动指定某个配置文件./nginx -s stop #停止#关闭进程,nginx有master process 和worker process,关闭master即可ps -ef | grep "nginx"kill -9 PID
二、Nginx核心配置文件剖析
Nginx的配置文件比较多,从全局里面把它划分为全局配置、虚拟主机配置还有路径映射。
下面这个配置文件就是拷贝出来的有配置文件,增加了很多注释。
只要关注没有#号注释的。
# 每个配置项由配置指令和指令参数 2 个部分构成#user nobody; # 指定Nginx Worker进程运行以及用户组worker_processes 1; ##error_log logs/error.log; # 错误日志的存放路径 和错误日志#error_log logs/error.log notice;#error_log logs/error.log info;#pid logs/nginx.pid; # 进程PID存放路径# 事件模块指令,用来指定Nginx的IO模型,Nginx支持的有select、poll、kqueue、epoll 等。不同的是epoll用在Linux平台上,而kqueue用在BSD系统中,对于Linux系统,epoll工作模式是首选events {use epoll;# 定义Nginx每个进程的最大连接数, 作为服务器来说: worker_connections * worker_processes,# 作为反向代理来说,最大并发数量应该是worker_connections * worker_processes/2。因为反向代理服务器,每个并发会建立与客户端的连接和与后端服务的连接,会占用两个连接worker_connections 1024;}http {include mime.types;default_type application/octet-stream;# 自定义服务日志#log_format main '$remote_addr - $remote_user [$time_local] "$request" '# '$status $body_bytes_sent "$http_referer" '# '"$http_user_agent" "$http_x_forwarded_for"';#access_log logs/access.log main;# 是否开启高效传输模式 on开启 off关闭sendfile on;#减少网络报文段的数量#tcp_nopush on;#keepalive_timeout 0;# 客户端连接保持活动的超时时间,超过这个时间之后,服务器会关闭该连接keepalive_timeout 65;#gzip on;# 虚拟主机的配置,可以配置做个serverserver {listen 80; # 虚拟主机的服务端口server_name localhost; #用来指定IP地址或域名,多个域名之间用空格分开#charset koi8-r;#access_log logs/host.access.log main;#URL地址匹配location / {root html; # 服务默认启动目录index index.html index.htm; #默认访问文件,按照顺序找}#error_page 404 /404.html; #错误状态码的显示页面# redirect server error pages to the static page /50x.html# 根据后端返回的错误状态码,跳转页面error_page 500 502 503 504 /50x.html;location = /50x.html {root html;}}# 配置多个server案例#server {# listen 8000;# listen somename:8080;# server_name somename alias another.alias;# location / {# root html;# index index.html index.htm;# }#}# 配置多个server案例#server {# listen 443 ssl;# server_name localhost;# ssl_certificate cert.pem;# ssl_certificate_key cert.key;# ssl_session_cache shared:SSL:1m;# ssl_session_timeout 5m;# ssl_ciphers HIGH:!aNULL:!MD5;# ssl_prefer_server_ciphers on;# location / {# root html;# index index.html index.htm;# }#}}
一个HTTP节点里面,可以配置很多个server,每个server就是一个虚拟主机,可以配置单独的一个域名映射上去。
server {listen 80; #监听的端口server_name aabbcc.com; #域名location / {root /usr/local/nginx/html;index xdclass.html;}}server {listen 80;server_name aabbccdd.com;location / {root html;index xdclass.html index.htm;}}

若有收获,就点个赞吧
0 人点赞
