附录 ElasticSearch安装与启动
1.1 Linux版本安装
1.1.1 下载地址
https://www.elastic.co/cn/downloads/elasticsearch
1.1.2 Linux安装ElasticSearch
1、上传ElasticSearch安装包
elasticsearch-7.4.0-linux-x86_64.tar.gz
2、执行解压操作
# 将elasticsearch-7.4.0-linux-x86_64.tar.gz解压到opt文件夹下. -C 大写
tar -zxvf elasticsearch-7.4.0-linux-x86_64.tar.gz -C /opt
3、创建普通用户
因为安全问题,ElasticSearch 不允许root用户直接运行,所以要创建新用户,用root创建新用户:
useradd atguigu # 新增atguigu用户passwd atguigu # 为atguigu用户设置密码
5、为新用户授权,如下图
chown -R atguigu:atguigu /opt/elasticsearch-7.4.0 #文件夹所有者
将 /opt/elasticsearch-7.4.0文件夹授权给atguigu用户:atguigu用户组
6、修改elasticsearch.yml文件
vim /opt/elasticsearch-7.4.0/config/elasticsearch.yml
# ======================== Elasticsearch Configuration =========================cluster.name: my-applicationnode.name: node-1network.host: 0.0.0.0http.port: 9200cluster.initial_master_nodes: ["node-1"]
cluster.name:配置elasticsearch的集群名称,默认是elasticsearch。建议修改成一个有意义的名称
node.name:节点名,elasticsearch会默认随机指定一个名字,建议指定一个有意义的名称,方便管理
network.host:设置为0.0.0.0允许外网访问
http.port:Elasticsearch的http访问端口
cluster.initial_master_nodes:初始化新的集群时需要此配置来选举master
7、修改配置文件
新创建的atguigu用户最大可创建文件数太小,最大虚拟内存太小,切换到root用户,编辑下列配置文件, 添加类似如下内容
# 切换到root用户su root#1. ===最大可创建文件数太小=======vim /etc/security/limits.conf# 在文件末尾中增加下面内容atguigu soft nofile 65536atguigu hard nofile 65536# soft xxx : 代表警告的设定,可以超过这个设定值,但是超过后会有警告。# hard xxx : 代表严格的设定,不允许超过这个设定的值。# nproc : 是操作系统级别对每个用户创建的进程数的限制# nofile : 是每个进程可以打开的文件数的限制# =====vim /etc/security/limits.d/20-nproc.conf# 在文件末尾中增加下面内容atguigu soft nofile 65536atguigu hard nofile 65536* hard nproc 4096# 注:* 代表Linux所有用户名称#2. ===最大虚拟内存太小=======vim /etc/sysctl.conf# 在文件中增加下面内容vm.max_map_count=655360# 重新加载,输入下面命令:sysctl -p
8、启动elasticsearch
su atguigu # 切换到atguigu用户启动cd /opt/elasticsearch-7.4.0/bin./elasticsearch #启动
1.1.3 访问elasticsearch
1、在访问elasticsearch前,请确保防火墙是关闭的,执行命令:
#暂时关闭防火墙systemctl stop firewalld#永久设置防火墙状态systemctl enable firewalld.service #打开防火墙永久性生效,重启后不会复原systemctl disable firewalld.service #关闭防火墙,永久性生效,重启后不会复原
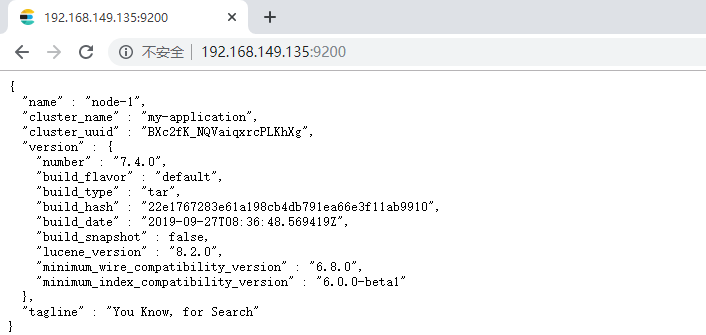
浏览器输入http://192.168.149.135:9200/,如下图
此时elasticsearch已成功启动:
重点几个关注下即可:number" : "7.4.0" 表示elasticsearch版本lucene_version" : "8.2.0" 表示lucene版本name : 默认启动的时候指定了 ES 实例名称cluster_name : 默认名为 elasticsearch
1.2 docker版本安装
# 拉取镜像docker pull elasticsearch:7.4.0# 创建容器docker create --name elasticsearch --net host -e "discovery.type=single-node" -e "network.host=192.168.137.121" elasticsearch:7.4.0# 启动docker start elasticsearch# 查看日志docker logs elasticsearch
1.3 Kibana客户端【Linux下安装】
Kibana是一个针对Elasticsearch的开源分析及可视化平台,用来搜索、查看交互存储在Elasticsearch索引中的数据。
1、什么是Kibana
Kibana是一个针对Elasticsearch的开源分析及可视化平台,用来搜索、查看交互存储在Elasticsearch索引中的数据。使用Kibana,可以通过各种图表进行高级数据分析及展示。
Kibana让海量数据更容易理解。它操作简单,基于浏览器的用户界面可以快速创建仪表板(dashboard)实时显示Elasticsearch查询动态。
2、上传kibana
kibana-7.4.0-linux-x86_64.tar.gz
2、解压kibana
tar -xzf kibana-7.4.0-linux-x86_64.tar.gz -C /opt
解压到当前目录(/opt)下
3、修改kibana配置
vim /opt/kibana-7.4.0-linux-x86_64/config/kibana.yml
server.port: 5601server.host: "0.0.0.0"server.name: "kibana-atguigu"elasticsearch.hosts: ["http://127.0.0.1:9200"]elasticsearch.requestTimeout: 99999
server.port:http访问端口
server.host:ip地址,0.0.0.0表示可远程访问
server.name:kibana服务名
elasticsearch.hosts:elasticsearch地址
elasticsearch.requestTimeout:请求elasticsearch超时时间,默认为30000,此处可根据情况设置
4、启动kibana
由于kibana不建议使用root用户启动,如果用root启动,需要加—allow-root参数
# 切换到kibana的bin目录cd /opt/kibana-7.4.0-linux-x86_64/bin# 启动./kibana --allow-root
5、访问kibana
浏览器输入http://192.168.149.135:5601
Discover:可视化查询分析器
Visualize:统计分析图表
Dashboard:自定义主面板(添加图表)
Timelion:Timelion是一个kibana时间序列展示组件(暂时不用)
Dev Tools:Console控制台(同CURL/POSTER,操作ES代码工具,代码提示,很方便)
Management:管理索引库(index)、已保存的搜索和可视化结果(save objects)、设置 kibana 服务器属性。
1.4 IK分词器安装
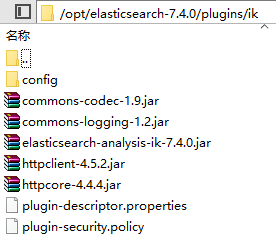
将elasticsearch-analysis-ik-7.4.0.zip解压到新建的目录plugins/ik目录下
记得一定要重启Elasticsearch!!!
1.4.1 使用IK分词器
IK分词器有两种分词模式:ik_max_word和ik_smart模式。
1、ik_max_word
会将文本做最细粒度的拆分,比如会将“乒乓球明年总冠军”拆分为“乒乓球、乒乓、球、明年、总冠军、冠军。
#方式一ik_max_wordGET /_analyze{"analyzer": "ik_max_word","text": "乒乓球明年总冠军"}
ik_max_word分词器执行如下:
{"tokens" : [{"token" : "乒乓球","start_offset" : 0,"end_offset" : 3,"type" : "CN_WORD","position" : 0},{"token" : "乒乓","start_offset" : 0,"end_offset" : 2,"type" : "CN_WORD","position" : 1},{"token" : "球","start_offset" : 2,"end_offset" : 3,"type" : "CN_CHAR","position" : 2},{"token" : "明年","start_offset" : 3,"end_offset" : 5,"type" : "CN_WORD","position" : 3},{"token" : "总冠军","start_offset" : 5,"end_offset" : 8,"type" : "CN_WORD","position" : 4},{"token" : "冠军","start_offset" : 6,"end_offset" : 8,"type" : "CN_WORD","position" : 5}]}
2、ik_smart
会做最粗粒度的拆分,比如会将“乒乓球明年总冠军”拆分为乒乓球、明年、总冠军。
#方式二ik_smartGET /_analyze{"analyzer": "ik_smart","text": "乒乓球明年总冠军"}
ik_smart分词器执行如下:
{"tokens" : [{"token" : "乒乓球","start_offset" : 0,"end_offset" : 3,"type" : "CN_WORD","position" : 0},{"token" : "明年","start_offset" : 3,"end_offset" : 5,"type" : "CN_WORD","position" : 1},{"token" : "总冠军","start_offset" : 5,"end_offset" : 8,"type" : "CN_WORD","position" : 2}]}
由此可见 使用ik_smart可以将文本“text”: “乒乓球明年总冠军”分成了【乒乓球】【明年】【总冠军】
这样看的话,这样的分词效果达到了我们的要求。
1.5 自定义词库
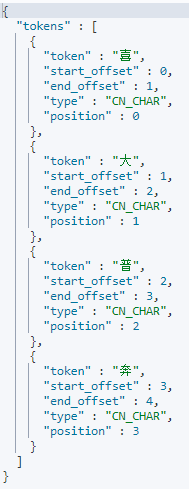
请观察结果
蓝瘦香菇:网络用语难受,想哭的意思
喜大普奔:其实就是““喜闻乐见、大快人心、普天同庆、奔走相告”四个词的缩写
这样的分词效果不是我们想要的,我们希望喜大普奔作为一个词。
1.5.1 自定义词库
修改/opt/elasticsearch-7.4.0/plugins/ik/config/KAnalyzer.cfg.xml
| <?xml version=”1.0” encoding=”UTF-8”?> <!DOCTYPE properties SYSTEM “http://java.sun.com/dtd/properties.dtd“> |
|---|
1.5.2 按照标红的路径利用nginx发布静态资源
在nginx.conf中配置 | server {
listen 80;
server_name 192.168.137.3;
location /fenci/ {
root es;
}
} | | —- |并且在/usr/local/nginx/下建/es/fenci/目录,目录下加myword.txt
myword.txt中编写关键词,每一行代表一个词。
- 启动nginx。
- 在浏览器中访问自定义词库:http://192.168.137.3/fenci/myword.txt
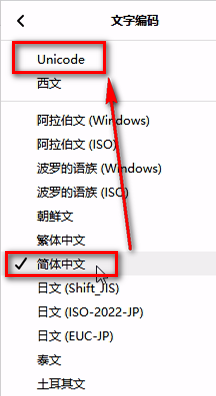
火狐浏览器默认GBK 


- 在kibana中测试分词效果
| GET movie_index/_analyze
{
“analyzer”: “ik_max_word”,
“text”: “蓝瘦香菇”
} | {
“tokens”: [
{
“token”: “蓝瘦香菇”,
“start_offset”: 0,
“end_offset”: 4,
“type”: “CN_WORD”,
“position”: 0
},
{
“token”: “香菇”,
“start_offset”: 2,
“end_offset”: 4,
“type”: “CN_WORD”,
“position”: 1
}
]
} | | —- | —- | | GET /_analyze
{
“analyzer”: “ik_max_word”,
“text”: “喜大普奔”
} | {
“tokens” : [
{
“token” : “喜大普奔”,
“start_offset” : 0,
“end_offset” : 4,
“type” : “CN_WORD”,
“position” : 0
}
]
} |

