Required reading before development
Please turn on debug mode for development environment.
Dcat Admin provides some development tools (such as code generator) that need to be in debug mode to use.
It is recommended that developers turn on debug mode in their development environment and set APP_DEBUG to true in the .env configuration file.
Introduce JS scripts on demand
Dcat Admin uses jquery-pjax to build refresh-free pages (single-page applications) and supports loading JS scripts on-demand, allowing JS scripts to be introduced in any page method (except template files) and each page to load only the js scripts needed for the current page.
Example:
To write a custom page, this page component needs to introduce some front-end static resource files
{tip} The
Dcat Adminbuild is a single page application, and theJSscript that is loaded will only be executed once, so the initialization operation cannot be placed directly in theJSscript, it should be loaded using theAdmin::scriptmethod.
<?phpuse Illuminate\Contracts\Support\Renderable;use Dcat\Admin\Admin;class Card implements Renderable{public static $js = [// The js script cannot contain the initialization operation directly, otherwise the page refresh is invalid'xxx/js/card.min.js',];public static $css = ['xxx/css/card.min.css',];public function script(){return <<<JSconsole.log('All JS scripts are loaded.');// Initialization operations$('xxx').card();JS;}public function render(){// This is where you can bring in your js or css filesAdmin::js(static::$js);Admin::css(static::$css);// JS code that needs to be executed on the page, such as initialization code.// The JS code set by Admin::script will be executed automatically when all JS scripts are loaded.Admin::script($this->script());return view('...')->render();}}
Using this component in the controller
use Dcat\Admin\Layout\Content;use Card;class HomeController{public function index(Content $content){// Use the card component above.// Static files required by the Card component will only be loaded on the current request.// Other requests will not loadreturn $content->body(new Card());}}
Adding JS code to the page
Due to the addition of the ability to load JS scripts on demand, the JS code added in this project must use the Dcat.ready method to listen to the JS script load completion event, in which the JS code will be executed after all JS scripts have been loaded.
The JS code added using the Dcat\Admin\Admin::script method is automatically placed inside the Dcat.ready method for execution.
<?phpuse Dcat\Admin\Admin;use Dcat\Admin\Layout\Content;class UserController{public function index(Content $content){Admin::script(<<<JS(function () {// If there is a need to define local variables, it is better to put them inside an anonymous function to prevent variable contamination.var name = 'test';console.log('All JS scripts are loaded.~~', name)})()JS);return $content->header(...)->body(...);}}
If you are adding JS code to a template file, you need to execute the code in Dcat.ready
<script>// Replace $() with Dcat.ready()// This method will be executed after all js scripts are loadedDcat.ready(function () {// Writing your js codeconsole.log('All js scripts are loaded!~~');});</script>
Page content and layout
{tip} The page content layout function is the cornerstone of
Dcat Admin, mastering this function of the Usages, you can easily useDcat Adminto build pages or extend functionality, so please read carefully.
The layout of Dcat Admin can be referred to the index() method of the app/Admin/Controllers/HomeController.php layout file on the backend home page.
The Dcat\Admin\Layout\Content class is used to implement the layout of the content area. The Content::body($content) method is used to add page content.
A simple backstage page code would be as follows:
use Dcat\Admin\Layout\Content;public function index(Content $content){// optional filling$content->header('Fill page header TITLE');// optional filling$content->description('Fill page descriptions with small TITLE');// Adding breadcrumb navigation$content->breadcrumb(['text' => 'first page', 'url' => '/admin'],['text' => 'user management', 'url' => '/admin/users'],['text' => 'Edit User']);// Fill the body part of the page with any objects that can be rendered.return $content->body('hello world');}
The $content->body() method is an alias of $content->row(), which can accept any stringable object as arguments, including strings, numbers, objects with the __toString method, and implements the Renderable and Htmlable interfaces. objects, including laravel views.
Layout
The layout of dcat-admin uses a bootstrap grid system with each line being 12 in length, and the following are a few simple Examples:
Add a line of content:
$content->row('hello')---------------------------------|hello || || || || || |---------------------------------
Add multiple columns within rows:
$content->row(function(Row $row) {$row->column(4, 'foo');$row->column(4, 'bar');$row->column(4, 'baz');});----------------------------------|foo |bar |baz || | | || | | || | | || | | || | | |----------------------------------$content->row(function(Row $row) {$row->column(4, 'foo');$row->column(8, 'bar');});----------------------------------|foo |bar || | || | || | || | || | |----------------------------------
Adding rows to columns:
$content->row(function (Row $row) {$row->column(4, 'xxx');$row->column(8, function (Column $column) {$column->row('111');$column->row('222');$column->row('333');});});----------------------------------|xxx |111 || |---------------------|| |222 || |---------------------|| |333 || | |----------------------------------
Add rows to columns, and columns within rows.:
$content->row(function (Row $row) {$row->column(4, 'xxx');$row->column(8, function (Column $column) {$column->row('111');$column->row('222');$column->row(function(Row $row) {$row->column(6, '444');$row->column(6, '555');});});});----------------------------------|xxx |111 || |---------------------|| |222 || |---------------------|| |444 |555 || | | |----------------------------------
Equal Width Layout
When the column width is set to 0, the equal-width layout is used
use Dcat\Admin\Layout\Row;use Dcat\Admin\Layout\Content;return Content::make()->body(function (Row $row) {$row->column(0, 'foo');$row->column(0, 'bar');$row->column(0, 'baz');});----------------------------------|foo |bar |baz || | | || | | || | | || | | || | | |----------------------------------
no-gutters
.row with a margin-left: -15px;margin-right: -15px; attribute, you can eliminate this attribute by defining the .no-gutters attribute on .row so that the page is not an extra 30px wide, i.e. <div class="row no- gutters"...
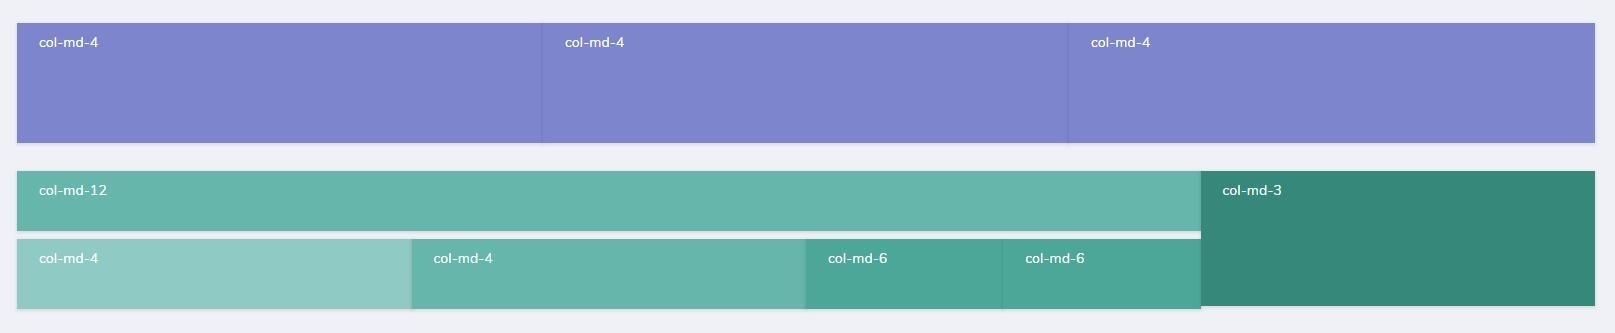
$content->row(function (Row $row) {// Enable no-gutters$row->noGutters();$row->column(9, function (Column $column) {$column->row($this->card(['col-md-12', 20], '#4DB6AC'));$column->row(function (Row $row) {// Enable no-gutters$row->noGutters();$row->column(4, $this->card(['col-md-4', 30], '#80CBC4'));$row->column(4, $this->card(['col-md-4', 30], '#4DB6AC'));$row->column(4, function (Column $column) {$column->row(function (Row $row) {// Enable no-gutters$row->noGutters();$row->column(6, $this->card(['col-md-6', 30], '#26A69A'));$row->column(6, $this->card(['col-md-6', 30], '#26A69A'));});});});});});
The result is as follows
Build a page without a menu bar (full)
The page built in the above way defaults to a page with a left menu bar and a top navigation bar. But sometimes we’ll need to build a full page without a menu bar and top navigation bar, such as a landing page, or a page that needs to be loaded in IFRAME, and so on.
The page is rendered without menu bar and top navigation bar, and all the features and components of Dcat Admin can be used, which can significantly improve the efficiency.
The following is an implementation of the login page that demonstrates this function of the Usage
controller
use Dcat\Admin\Layout\Content;class AuthController extends Controller{public function getLogin(Content $content){if ($this->guard()->check()) {return redirect($this->redirectPath());}// Building landing pages using the full methodreturn $content->full()->body(view($this->view));}...}
The following is the login function of the template content, because the controller uses the Content::full method to build the page, so there is no need to write head in the template, and do not care what static resources are introduced, just write the HTML of the current page can be, and can also use the Dcat Admin in all the functions, such as the following form submission function used.
<style>html body {background: #fff;}</style><link rel="stylesheet" href="{{ admin_asset('@admin/css/pages/authentication.css') }}"><section class="row flexbox-container"><!-- Here is the HTML code for your landing page -->...</section><script>Dcat.ready(function () {// ajax form submission$('#login-form').form({validate: true,});});</script>
This landing page uses the ajax form submission function, and comes with a button loading result, which is better than the original landing page.
Event
The following two events are triggered when the Dcat\Admin\Layout\Content class is instantiated and when the render() method is called, and the developer can change or add some behavior in both events.
instantiate (resolve)
The callback function set through the Content::resolving method is triggered when the Dcat\Admin\Layout\Content class is instantiated.
use Dcat\Admin\Layout\Content;Content::resolving(function (Content $content) {$content->view('app.admin.content');});
building pages (composing)
The callback function set by the Content::composing method is triggered when the Dcat\Admin\Layout\Content::render method is called.
use Dcat\Admin\Layout\Content;Content::composing(function (Content $content) {$content->view('app.admin.content');});
build is complete (composed)
The callback function set by the Content::composed method is triggered when all the content set by the Content::row or Content::body method has been constructed.
use Dcat\Admin\Layout\Content;class IndexController{public function index(Content $content){Content::composed(function (Content $content) {// Grid has executed the render method.});return $content->body(function ($row) {$grid = new Grid(...);...$row->column(12, $grid);});}}
AdminController
Through the above page layout of the relevant content of the learning, we understand the Dcat Admin page composition of the construction of the method.
So how does an add, delete, and check feature actually work? We can see an add/drop controller code generated by the code generator as follows
use App\Admin\Repositories\User;use Dcat\Admin\Form;use Dcat\Admin\Grid;use Dcat\Admin\Show;use Dcat\Admin\Http\Controllers\AdminController;class UserController extends AdminController{// Data tableprotected function grid(){return Grid::make(new User(), function (Grid $grid) {...});}// Data detailsprotected function detail($id){return Show::make($id, new User(), function (Show $show) {...});}// Formprotected function form(){return Form::make(new User(), function (Form $form) {...});}}
The above code mainly contains grid, detail and form, from these codes, we do not have a way to change the layout of a page, so how is this page actually built? And how do we change the layout of the page? Let’s take a look at the AdminController
<?phpnamespace Dcat\Admin\Controllers;use Dcat\Admin\Layout\Content;use Illuminate\Routing\Controller;class AdminController extends Controller{// Page TITLEprotected $title;// Page Description Informationprotected $description = [// 'index' => 'Index',// 'show' => 'Show',// 'edit' => 'Edit',// 'create' => 'Create',];// Specify the language pack name, the default corresponds to the current controller nameprotected $translation;// Back to page TITLEprotected function title(){return $this->title ?: admin_trans_label();}// Back to description informationprotected function description(){return $this->description;}// list pagepublic function index(Content $content){return $content->title($this->title())->description($this->description()['index'] ?? trans('admin.list'))->body($this->grid());}// detail pagepublic function show($id, Content $content){return $content->title($this->title())->description($this->description()['show'] ?? trans('admin.show'))->body($this->detail($id));}// edit pagepublic function edit($id, Content $content){return $content->title($this->title())->description($this->description()['edit'] ?? trans('admin.edit'))->body($this->form()->edit($id));}// create pagepublic function create(Content $content){return $content->title($this->title())->description($this->description()['create'] ?? trans('admin.create'))->body($this->form());}// Modify interfacepublic function update($id){return $this->form()->update($id);}// New interfacepublic function store(){return $this->form()->store();}// Delete/Batch Delete Interfacepublic function destroy($id){return $this->form()->destroy($id);}}
Is it now possible to understand the components of the entire page? In fact, a lot of code in the system are known by name, easy to understand, many times we only need to read the code to know the Usage.
For example, if we want to change the page TITLE, by reading this code, we can know that it can be achieved by rewriting the title method or changing its entry in the translation file. Very simple, isn’t it?
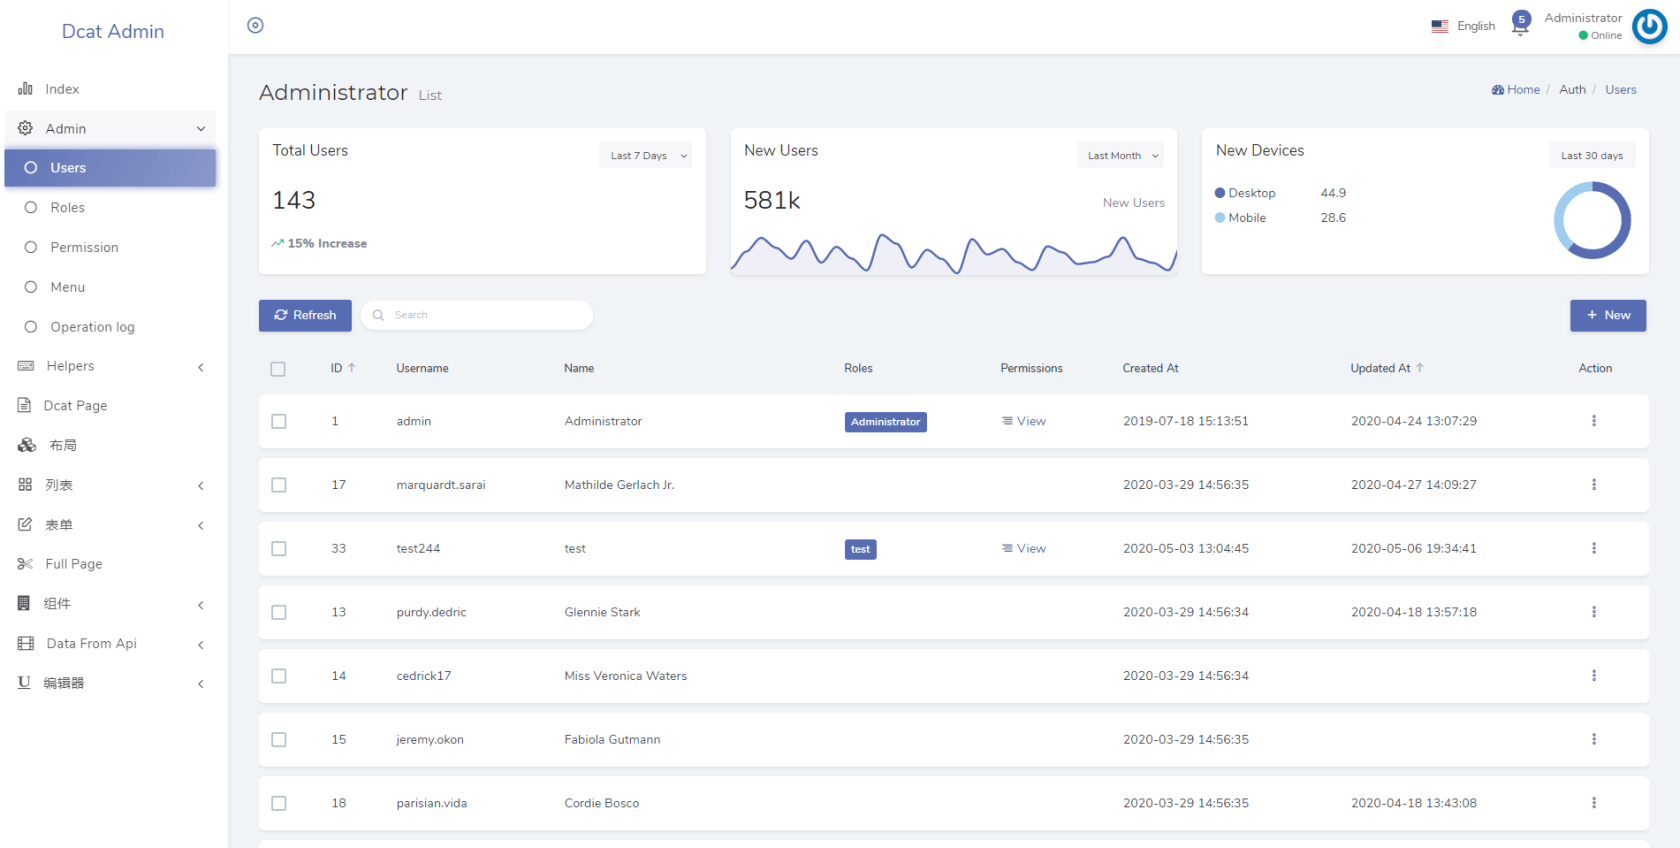
Let’s demonstrate the practical application of changing the page layout by implementing a list page of data tables + statistics cards
use App\Admin\Metrics\Examples\NewDevices;use App\Admin\Metrics\Examples\NewUsers;use App\Admin\Metrics\Examples\TotalUsers;use Dcat\Admin\Layout\Content;use Dcat\Admin\Layout\Row;public function index(Content $content){return $content->title($this->title())->description($this->description()['index'] ?? trans('admin.list'))->body(function (Row $row) {$row->column(4, new TotalUsers());$row->column(4, new NewUsers());$row->column(4, new NewDevices());})->body($this->grid());}
The result is as follows
Bootstrap4公共样式
Dcat Admin uses the bootstrap4 grid system for page layout, which is both simple and powerful, and you need to know it before you start development!
In addition, bootsrap4 provides a number of very useful public styles, which are very helpful for writing page components and can significantly improve development efficiency.
It is recommended that you consult the documentation before writing components, and the following is a list of recommended styles to learn.
- Grid layout
- Display Properties With our display utility for quickly and efficiently toggling component display values and more, including support for some of the more common values, this list of styles is very helpful for responsive layouts.
- flex layout The introduction of the new Flex Flexible Layout allows for quick management of the layout, alignment and size of grid columns, navigation, components, etc. through a set of responsive and flexible utilities. More complex presentation styles are also possible through the progressive definition of CSS.
- Color There are a number of ways to define this, including support for linking, hovering, selecting, and other state-related style sets.
- Float property Use our responsive float float universal style to toggle the float on any device breakpoint (browser size).
- sizing Easily define the width or height of any element (relative to its parent) using the system width and height styles
- spacing A variety of quick indent, isolate, and fill spacing tools are built in, responding to margin and fill utility classes to modify the appearance of elements.
- text handling Used to control text alignment, grouping, word weight, and other Examples as well as to work with documents.
- vertical alignment Easily change the vertical alignment of inline, inline block, inline table and table cell elements.
Built-in style
In addition to the previously mentioned `bootstrap4 public styles, the system also has the following common styles built in:
Colors
Please refer to color chart styles.
shadows
.shadow
.shadow-100
.shadow-200

若有收获,就点个赞吧
0 人点赞
