- 参数说明
- 返回值
- 示例
- 绘制一个余弦曲线
- 绘制一个黑色,两端缩进的箭头
- 以步长0.005绘制一个曲线
- 被注释点的数据轴坐标和所在的像素
- 设置注释文本的样式和箭头的样式
- 设置偏移量
- xycoords默认为’data’数据轴坐标,对坐标点(5,0)添加注释
- 注释文本参考被注释点设置偏移量,向左2*72points,向上72points
- xycoords以绘图区左下角为参考,单位为像素
- 注释文本参考被注释点设置偏移量,向右0.5*72points,向下72points
- 绘制一个极地坐标,再以0.001为步长,画一条螺旋曲线
- 对索引为800处画一个圆点,并做注释
- 设置绘图区标题
- 设置子绘图区标题
- 设置x y坐标轴的标识
- 红色、透明度0.5、边框留白10
- 文字中有数学公式
- 文字中有ASCII码
- 转换坐标系
- 在2,1处画个圆点,添加注释
annotate用于在图形上给数据添加文本注解,而且支持带箭头的划线工具,方便我们在合适的位置添加描述信息。
参数说明
Axes.``annotate(s, xy, args, *kwargs)
- s:注释文本的内容
- xy:被注释的坐标点,二维元组形如(x,y)
- xytext:注释文本的坐标点,也是二维元组,默认与xy相同
xycoords:被注释点的坐标系属性,允许输入的值如下 | 属性值 | 含义 | | :—- | :—- | | ‘figure points’ | 以绘图区左下角为参考,单位是点数 | | ‘figure pixels’ | 以绘图区左下角为参考,单位是像素数 | | ‘figure fraction’ | 以绘图区左下角为参考,单位是百分比 | | ‘axes points’ | 以子绘图区左下角为参考,单位是点数(一个figure可以有多个axex,默认为1个) | | ‘axes pixels’ | 以子绘图区左下角为参考,单位是像素数 | | ‘axes fraction’ | 以子绘图区左下角为参考,单位是百分比 | | ‘data’ | 以被注释的坐标点xy为参考 (默认值) | | ‘polar’ | 不使用本地数据坐标系,使用极坐标系 |
textcoords :注释文本的坐标系属性,默认与xycoords属性值相同,也可设为不同的值。除了允许输入xycoords的属性值,还允许输入以下两种: | 属性值 | 含义 | | :—- | :—- | | ‘offset points’ | 相对于被注释点xy的偏移量(单位是点) | | ‘offset pixels’ | 相对于被注释点xy的偏移量(单位是像素) |
arrowprops:箭头的样式,dict(字典)型数据,如果该属性非空,则会在注释文本和被注释点之间画一个箭头。如果不设置
'arrowstyle'关键字,则允许包含以下关键字: | 关键字 | 说明 | | :—- | :—- | | width | 箭头的宽度(单位是点) | | headwidth | 箭头头部的宽度(点) | | headlength | 箭头头部的长度(点) | | shrink | 箭头两端收缩的百分比(占总长) | | ? | 任何[matplotlib.patches.FancyArrowPatch](https://matplotlib.org/api/_as_gen/matplotlib.patches.FancyArrowPatch.html#matplotlib.patches.FancyArrowPatch)中的关键字|
如果设置了‘arrowstyle’关键字,以上关键字就不能使用。允许的值有:
| 箭头的样式 | 属性 | ||
|---|---|---|---|
'-' |
None | ||
'->' |
head_length=0.4,head_width=0.2 | ||
'-[' |
widthB=1.0,lengthB=0.2,angleB=None | ||
| `’ | - | ‘` | widthA=1.0,widthB=1.0 |
| `’- | >’` | head_length=0.4,head_width=0.2 | |
'<-' |
head_length=0.4,head_width=0.2 | ||
'<->' |
head_length=0.4,head_width=0.2 | ||
| `’< | -‘` | head_length=0.4,head_width=0.2 | |
| `’< | - | >’` | head_length=0.4,head_width=0.2 |
'fancy' |
head_length=0.4,head_width=0.4,tail_width=0.4 | ||
'simple' |
head_length=0.5,head_width=0.5,tail_width=0.2 | ||
'wedge' |
tail_width=0.3,shrink_factor=0.5 |
[FancyArrowPatch](https://matplotlib.org/api/_as_gen/matplotlib.patches.FancyArrowPatch.html#matplotlib.patches.FancyArrowPatch)的关键字包括:
| Key | Description |
|---|---|
| arrowstyle | 箭头的样式 |
| connectionstyle | 连接线的样式 |
| relpos | 箭头起始点相对注释文本的位置,默认为 (0.5, 0.5),即文本的中心, (0,0)表示左下角,(1,1)表示右上角 |
| patchA | 箭头起点处的图形(matplotlib.patches对象),默认是注释文字框 |
| patchB | 箭头终点处的图形(matplotlib.patches对象),默认为空 |
| shrinkA | 箭头起点的缩进点数,默认为2 |
| shrinkB | 箭头终点的缩进点数,默认为2 |
| mutation_scale | default is text size (in points) |
| mutation_aspect | default is 1. |
| ? | any key for matplotlib.patches.PathPatch |
annotation_clip : 布尔值,可选参数,默认为空。设为True时,只有被注释点在子图区内时才绘制注释;设为False时,无论被注释点在哪里都绘制注释。仅当xycoords为‘data’时,默认值空相当于True。
返回值
示例
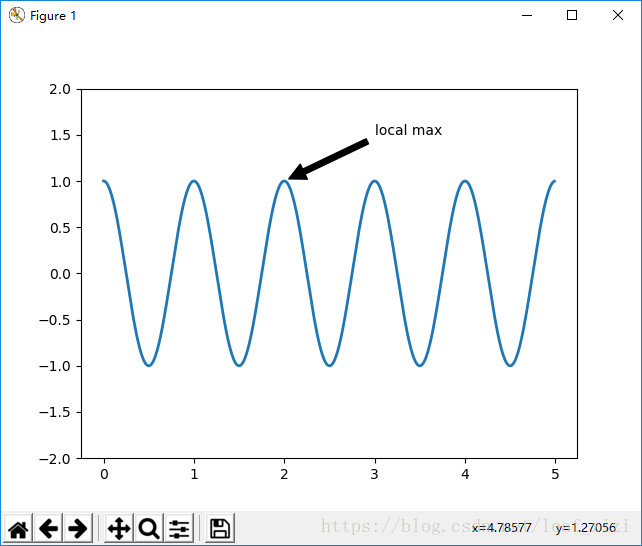
一个基本的注释示例,设置了箭头的颜色和缩进,感兴趣的话可以以此为基础尝试更多的属性和样式。 ```
- import numpy as np
- import matplotlib.pyplot as plt
- fig, ax = plt.subplots()
绘制一个余弦曲线
- t = np.arange(0.0, 5.0, 0.01)
- s = np.cos(2np.pit)
- line, = ax.plot(t, s, lw=2)
绘制一个黑色,两端缩进的箭头
- ax.annotate(‘local max’, xy=(2, 1), xytext=(3, 1.5),
- xycoords=’data’,
- arrowprops=dict(facecolor=’black’, shrink=0.05)
- )
- ax.set_ylim(-2, 2)
- plt.show()
```
- 坐标转换示例——在本例中,我们学习用不同的坐标体系绘制注释。 ```
- import numpy as np
- import matplotlib.pyplot as plt
以步长0.005绘制一个曲线
- x = np.arange(0, 10, 0.005)
- y = np.exp(-x/2.) np.sin(2np.pi*x)
- fig, ax = plt.subplots()
- ax.plot(x, y)
- ax.set_xlim(0, 10)
- ax.set_ylim(-1, 1)
被注释点的数据轴坐标和所在的像素
- xdata, ydata = 5, 0
- xdisplay, ydisplay = ax.transData.transform_point((xdata, ydata))
设置注释文本的样式和箭头的样式
- bbox = dict(boxstyle=”round”, fc=”0.8”)
- arrowprops = dict(
- arrowstyle = “->”,
- connectionstyle = “angle,angleA=0,angleB=90,rad=10”)
设置偏移量
- offset = 72
xycoords默认为’data’数据轴坐标,对坐标点(5,0)添加注释
注释文本参考被注释点设置偏移量,向左2*72points,向上72points
- ax.annotate(‘data = (%.1f, %.1f)’%(xdata, ydata),
- (xdata, ydata), xytext=(-2*offset, offset), textcoords=’offset points’,
- bbox=bbox, arrowprops=arrowprops)
xycoords以绘图区左下角为参考,单位为像素
注释文本参考被注释点设置偏移量,向右0.5*72points,向下72points
- disp = ax.annotate(‘display = (%.1f, %.1f)’%(xdisplay, ydisplay),
- (xdisplay, ydisplay), xytext=(0.5*offset, -offset),
- xycoords=’figure pixels’,
- textcoords=’offset points’,
- bbox=bbox, arrowprops=arrowprops)
- plt.show()
```

- 极坐标上的注释——在此例中,我们会在极坐标系绘图,并在极坐标系设置被注释点,以绘图区的百分比为参数放置注释文本。 ```
- import numpy as np
- import matplotlib.pyplot as plt
绘制一个极地坐标,再以0.001为步长,画一条螺旋曲线
- fig = plt.figure()
- ax = fig.add_subplot(111, polar=True)
- r = np.arange(0,1,0.001)
- theta = 2 2np.pi * r
- line, = ax.plot(theta, r, color=’#ee8d18’, lw=3)
对索引为800处画一个圆点,并做注释
- ind = 800
- thisr, thistheta = r[ind], theta[ind]
- ax.plot([thistheta], [thisr], ‘o’)
- ax.annotate(‘a polar annotation’,
- xy=(thistheta, thisr), # 被注释点遵循极坐标系,坐标为角度和半径
- xytext=(0.05, 0.05), # 注释文本放在绘图区的0.05百分比处
- textcoords=’figure fraction’,
- arrowprops=dict(facecolor=’black’, shrink=0.05),# 箭头线为黑色,两端缩进5%
- horizontalalignment=’left’,# 注释文本的左端和低端对齐到指定位置
- verticalalignment=’bottom’,
- )
- plt.show()
```

- 不同样式的注释文本示例 ```
- import matplotlib.pyplot as plt
设置绘图区标题
- fig = plt.figure()
- fig.suptitle(‘bold figure suptitle’, fontsize=14, fontweight=’bold’)
设置子绘图区标题
- ax = fig.add_subplot(111)
- fig.subplots_adjust(top=0.85)
- ax.set_title(‘axes title’)
设置x y坐标轴的标识
- ax.set_xlabel(‘xlabel’)
- ax.set_ylabel(‘ylabel’)
红色、透明度0.5、边框留白10
- ax.text(3, 8, ‘boxed italics text in data coords’, style=’italic’,
- bbox={‘facecolor’:’red’, ‘alpha’:0.5, ‘pad’:10})
文字中有数学公式
- ax.text(2, 6, r’an equation: $E=mc^2$’, fontsize=15)
文字中有ASCII码
- ax.text(3, 2, ‘unicode: Institut f\374r Festk\366rperphysik’)
转换坐标系
- ax.text(0.95, 0.01, ‘colored text in axes coords’,
- verticalalignment=’bottom’, horizontalalignment=’right’,
- transform=ax.transAxes,
- color=’green’, fontsize=15)
在2,1处画个圆点,添加注释
- ax.plot([2], [1], ‘o’)
- ax.annotate(‘annotate’, xy=(2, 1), xytext=(3, 4),
- arrowprops=dict(facecolor=’black’, shrink=0.05))
- ax.axis([0, 10, 0, 10])
- plt.show()
```


若有收获,就点个赞吧
0 人点赞
