参考:https://www.cnblogs.com/aurora-wen/p/15217421.html 简单使用
https://www.jianshu.com/p/308f3c54abdd 很详细的教程了 用的话看着一个就够了
https://www.jianshu.com/p/f57b7cdb1c99 拓展、原理分析
这个文章将的很不错了,并且实践的代码在gitee上有;【https://gitee.com/binC_2016/getServiceImpls】
下面做的东西都都是摘抄自 【https://www.jianshu.com/p/308f3c54abdd 很详细的教程了 用的话看着一个就够了】这个的,示例代码也是该位作者上传的github
1 retrofit + simplexml xml报文调用接口
1.1 关于simplexml常用的注解
@Root(name = "resp",strict = false)@Element(name = "city",required = false)@ElementList(name = "weather" ,inline = true )这些注解都是什么意思:我这边简单描述下:使用了retrofit2的simplexml插件,然后都是字面意思。@Root : 根节点@Element :元素@ElementList :元素列表name="XXXX":是指,在xml中的名字,必须完全相同。strict = false:xml中有元素,而实体类中没有的时候设置为false.required = false:实体类中有,xml中没有,且声明为@Element的元素(个人感觉都加上吧,防止xml数据变化)inline = true:ElementList的一个属性,由于ElementList包了一层,如果为false将不能解析。
1.2 retrofit的注解
第1类:http请求方法上的(常用)⭐⭐⭐
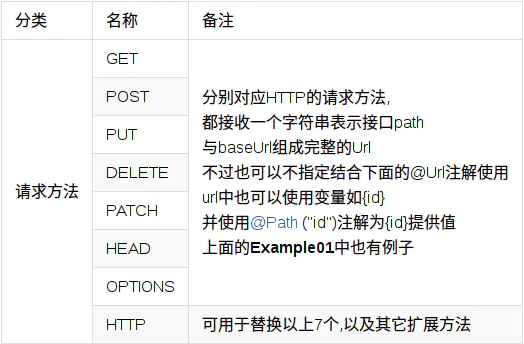
以上表格中的除HTTP以外都对应了HTTP标准中的请求方法,而HTTP注解则可以代替以上方法中的任意一个注解,有3个属性:method、path,hasBody;
public interface BlogService {

    @GET("blog/{id}") //这里的{id} 表示是一个变量
    Call<ResponseBody> getBlog(/** 这里的id表示的是上面的{id} */@Path("id") int id);

    /**
     * method 表示请求的方法,区分大小写
     * path表示路径
     * hasBody表示是否有请求体
     */
    @HTTP(method = "GET", path = "blog/{id}", hasBody = false)
    Call<ResponseBody> getBlog(@Path("id") int id);
}
注:method 的值 retrofit 不会做处理,所以要自行保证其准确性;
~~第2类:标记类 ~~
我们作为后端的话,这个用的会非常少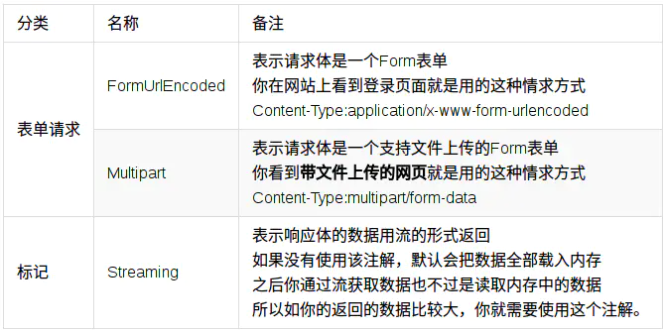
第3类:参数类 (重要)⭐⭐⭐⭐⭐
 注1:{占位符}和PATH尽量只用在URL的path部分,url中的参数使用Query和QueryMap 代替,保证接口定义的简洁
注2:Query、Field和Part这三者都支持数组和实现了Iterable接口的类型,如List,Set等,方便向后台传递数组。
public interface BlogService {
// @Path
@GET("blog/{id}") //这里的{id} 表示是一个变量
Call<ResponseBody> getBlog(/** 这里的id表示的是上面的{id} */@Path("id") int id);
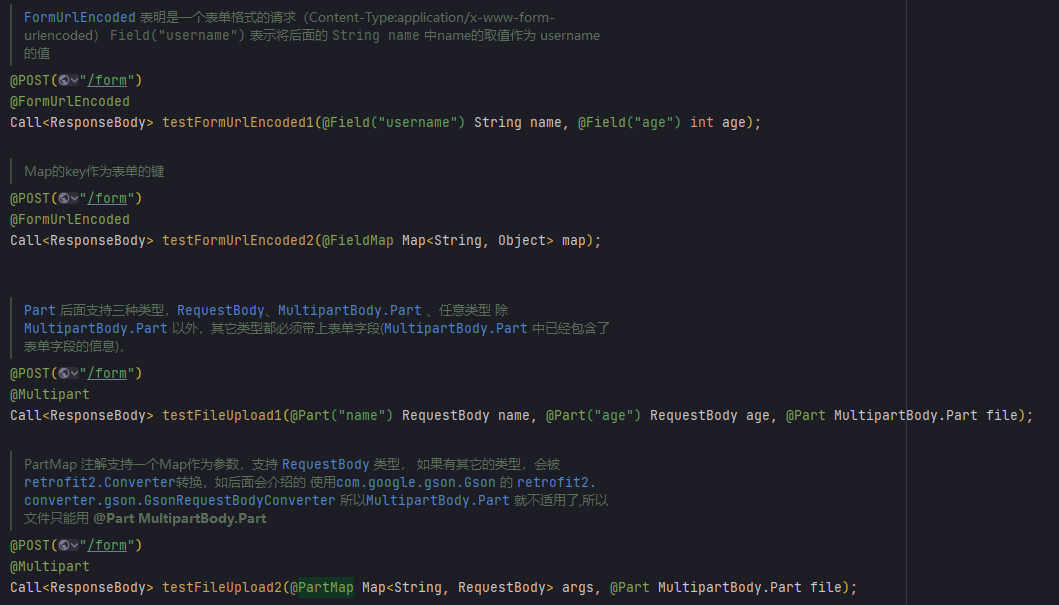
@POST("/form")
@FormUrlEncoded
Call<ResponseBody> testFormUrlEncoded1(@Field("username") String name, @Field("age") int age);
@POST("/form")
@FormUrlEncoded
Call<ResponseBody> testFormUrlEncoded2(@FieldMap Map<String, Object> map);
@POST("/form")
@Multipart
Call<ResponseBody> testFileUpload1(@Part("name") RequestBody name, @Part("age") RequestBody age, @Part MultipartBody.Part file);
// @Headers @Header
@GET("/headers?showAll=true")
@Headers({"CustomHeader1: customHeaderValue1", "CustomHeader2: customHeaderValue2"})
Call<ResponseBody> testHeader(@Header("CustomHeader3") String customHeaderValue3);
//@Url @Query
/**
* 当GET、POST...HTTP等方法中没有设置Url时,则必须使用 {@link Url}提供
* 对于Query和QueryMap,如果不是String(或Map的第二个泛型参数不是String)时会被默认会调用toString转换成String类型
* Url支持的类型有 okhttp3.HttpUrl, String, java.net.URI, android.net.Uri
* {@link retrofit2.http.QueryMap} 用法和{@link retrofit2.http.FieldMap} 用法一样,不再说明
*/
@GET //当有URL注解时,这里的URL就省略了
Call<ResponseBody> testUrlAndQuery(@Url String url, @Query("showAll") boolean showAll);
}
1.3 convert 转化器
在默认情况下Retrofit将HTTP的响应体转换为ResponseBody,这也是为什么我在前面的例子接口的返回值都是 Call
@GET("blog/{id}") //这里的{id} 表示是一个变量
Call<ResponseBody> getBlog(/** 这里的id表示的是上面的{id} */@Path("id") int id);
但如果响应体只是支持转换为ResponseBody的话何必要引入泛型呢,返回值直接用一个Call就行了嘛,既然支持泛型,那说明泛型参数可以是其它类型的,而Converter就是Retrofit为我们提供用于将ResponseBody转换为我们想要的类型,有了Converter之后我们就可以写把我们的第一个例子的接口写成这个样子了
@GET("blog/{id}")
Call<Result<Blog>> getBlog(@Path("id") int id);   // convert  就是将 默认的ResponseBody转换成 Result<Blog> 类型的;   这个Result<Blog>是我们自己封装的返回结果类;
当然只改变泛型的类型是不行的,我们在创建Retrofit时需要明确告知用于将ResponseBody转换我们泛型中的类型时需要使用的Converter
引入依赖不写了
Gson gson = new GsonBuilder()
      //配置你的Gson
      .setDateFormat("yyyy-MM-dd hh:mm:ss")
      .create();

Retrofit retrofit = new Retrofit.Builder()
      .baseUrl("http://localhost:4567/")
      //可以接收自定义的Gson,当然也可以不传
      .addConverterFactory(GsonConverterFactory.create(gson))   //这里就是告诉retrofit要用的covert是  GsonCoverterFactory ;  这样Retrofit就会使用Gson将ResponseBody转换我们想要的类型
      .build();
这样Retrofit就会使用Gson将ResponseBody转换我们想要的类型
1.4 RxJava与CallAdapter(不错)⭐⭐
说到Retrofit就不得说到另一个火到不行的库RxJava,网上已经不少文章讲如何与Retrofit结合,但这里还是会有一个RxJava的例子,不过这里主要目的是介绍使用CallAdapter所带来的效果。
第3节介绍的Converter是对于Call
引入RxJava支持:
compile 'com.squareup.retrofit2:adapter-rxjava:2.0.2'
// 针对rxjava2.x(adapter-rxjava2的版本要 >= 2.2.0)
compile 'com.squareup.retrofit2:adapter-rxjava2:2.3.0'
通过RxJavaCallAdapterFactory为Retrofit添加RxJava支持:
Retrofit retrofit = new Retrofit.Builder()
      .baseUrl("http://localhost:4567/")
      .addConverterFactory(GsonConverterFactory.create())
      .addCallAdapterFactory(RxJavaCallAdapterFactory.create())
      // 针对rxjava2.x
      .addCallAdapterFactory(RxJava2CallAdapterFactory.create())  // 給retrofit注册一个 CallAdapter(翻译:呼叫适配器)
      .build();
接口设计:
public interface BlogService {
  @POST("/blog")
  Observable<Result<List<Blog>>> getBlogs();

}
像上面的这种情况最后我们无法获取到返回的Header和响应码的,如果我们需要获取接口返回的Header 和响应码code,提供两种方案:
1、用Observable
2、用Observable
使用
BlogService service = retrofit.create(BlogService.class);
service.getBlogs(1)
  .subscribeOn(Schedulers.io())
  .subscribe(new Subscriber<Result<List<Blog>>>() {
      @Override
      public void onCompleted() {
        System.out.println("onCompleted");
      }

      @Override
      public void onError(Throwable e) {
        System.err.println("onError");
      }

      @Override
      public void onNext(Result<List<Blog>> blogsResult) {
        System.out.println(blogsResult);
      }
  });
1.5 自定义Converter
本节的内容是教大家实现在一简易的Converter,这里以返回格式为Call
0 在此之前先了解一下Converter接口及其作用:
public interface Converter<F, T> {
  // 实现从 F(rom) 到 T(o)的转换
  T convert(F value) throws IOException;

  // 用于向Retrofit提供相应Converter的工厂
  abstract class Factory {
    // 这里创建从ResponseBody其它类型的Converter,如果不能处理返回null
    // 主要用于对响应体的处理
          // 直正数据的类型 如Call<T> 中的 T, 这个 T 会作为Converter.Factory.responseBodyConverter 的第一个参数
    public Converter<ResponseBody, ?> responseBodyConverter(Type type, Annotation[] annotations,
    Retrofit retrofit) {
      return null;
    }

    // 在这里创建 从自定类型到ResponseBody 的Converter,不能处理就返回null,
    // 主要用于对Part、PartMap、Body注解的处理
    public Converter<?, RequestBody> requestBodyConverter(Type type,
    Annotation[] parameterAnnotations, Annotation[] methodAnnotations, Retrofit retrofit) {
      return null;
    }

    // 这里用于对Field、FieldMap、Header、Path、Query、QueryMap注解的处理
    // Retrfofit对于上面的几个注解默认使用的是调用toString方法
    public Converter<?, String> stringConverter(Type type, Annotation[] annotations,
    Retrofit retrofit) {
      return null;
    }

  }
}
1 我们要想从Call
// 自定义的coverter   实现 converter<From,To>
// 这个自定义的converter的作用是,将retrofit返回的ResponseBody转换成String类型;
public static class StringConverter implements Converter<ResponseBody, String> {

  public static final StringConverter INSTANCE = new StringConverter();

  @Override
  public String convert(ResponseBody value) throws IOException {
    return value.string();
  }
}
2 我们需要一个Fractory来向Retrofit注册StringConverter
// 定义一个自定义converter类的工厂  继承retrofit的converter.factory
//
public static class StringConverterFactory extends Converter.Factory {

  public static final StringConverterFactory INSTANCE = new StringConverterFactory();

  public static StringConverterFactory create() {
    return INSTANCE;
  }

  // 我们只管实现从ResponseBody 到 String 的转换,所以其它方法可不覆盖

  @Override        // 直正数据的类型 如Call<T> 中的 T, 这个 T 会作为Converter.Factory.responseBodyConverter 的第一个参数
  public Converter<ResponseBody, ?> responseBodyConverter(Type type, Annotation[] annotations, Retrofit retrofit) {
    if (type == String.class) {
      return StringConverter.INSTANCE;
    }
    //其它类型我们不处理,返回null就行
    return null;
  }
}
使用Retrofit.Builder.addConverterFactory向Retrofit注册我们StringConverterFactory
Retrofit retrofit = new Retrofit.Builder()
      .baseUrl("http://localhost:4567/")
      // 我们自定义的一定要放在Gson这类的Converter前面
      .addConverterFactory(StringConverterFactory.create())
      .addConverterFactory(GsonConverterFactory.create())
      .build();
注:addConverterFactory是有先后顺序的,如果有多个ConverterFactory都支持同一种类型,那么就是只有第一个才会被使用,而GsonConverterFactory是不判断是否支持的,所以这里交换了顺序还会有一个异常抛出,原因是类型不匹配。
只要返回值类型的泛型参数就会由我们的StringConverter处理,不管是Call
有没有很简单?如果你有其它的需求处理的就自己实现吧。
1.6 自定义CallAdapter
本节将介绍如何自定一个CallAdapter,并验证是否所有的String都会使用我们第5节中自定义的Converter。
0 先看一下CallAdapter接口定义及各方法的作用:
public interface CallAdapter<T> {

  // 直正数据的类型 如Call<T> 中的 T
  // 这个 T 会作为Converter.Factory.responseBodyConverter 的第一个参数
  // 可以参照上面的自定义Converter
  Type responseType();

  <R> T adapt(Call<R> call);

  // 用于向Retrofit提供CallAdapter的工厂类
  abstract class Factory {
    // 在这个方法中判断是否是我们支持的类型,returnType 即Call<Requestbody>和`Observable<Requestbody>`
    // RxJavaCallAdapterFactory 就是判断returnType是不是Observable<?> 类型
    // 不支持时返回null
    public abstract CallAdapter<?> get(Type returnType, Annotation[] annotations,
    Retrofit retrofit);

    // 用于获取泛型的参数 如 Call<Requestbody> 中 Requestbody
    protected static Type getParameterUpperBound(int index, ParameterizedType type) {
      return Utils.getParameterUpperBound(index, type);
    }

    // 用于获取泛型的原始类型 如 Call<Requestbody> 中的 Call
    // 上面的get方法需要使用该方法。
    protected static Class<?> getRawType(Type type) {
      return Utils.getRawType(type);
    }
  }
}
了解了CallAdapter的结构和其作用之后,我们就可以开始自定义我们的CallAdapter了,本节以CustomCall
1 在此我们需要定义一个CustomCall,不过这里的CustomCall作为演示只是对Call的一个包装,并没有实际的用途
public static class CustomCall<R> {

  public final Call<R> call;

  public CustomCall(Call<R> call) {
    this.call = call;
  }

  public R get() throws IOException {
    return call.execute().body();
  }
}
2 有了CustomCall,我们还需要一个CustomCallAdapter来实现 Call
public static class CustomCallAdapter implements CallAdapter<CustomCall<?>> {

  private final Type responseType;

  // 下面的 responseType 方法需要数据的类型
  CustomCallAdapter(Type responseType) {
    this.responseType = responseType;
  }

  @Override
  public Type responseType() {
    return responseType;
  }

  @Override
  public <R> CustomCall<R> adapt(Call<R> call) {
    // 由 CustomCall 决定如何使用
    return new CustomCall<>(call);
  }
}
3 提供一个CustomCallAdapterFactory用于向Retrofit提供CustomCallAdapter
public static class CustomCallAdapterFactory extends CallAdapter.Factory {
  public static final CustomCallAdapterFactory INSTANCE = new CustomCallAdapterFactory();

  @Override
  public CallAdapter<?> get(Type returnType, Annotation[] annotations, Retrofit retrofit) {
    // 获取原始类型
    Class<?> rawType = getRawType(returnType);
    // 返回值必须是CustomCall并且带有泛型
    if (rawType == CustomCall.class && returnType instanceof ParameterizedType) {
      Type callReturnType = getParameterUpperBound(0, (ParameterizedType) returnType);
      return new CustomCallAdapter(callReturnType);
    }
    return null;
  }
}
注: addCallAdapterFactory与addConverterFactory同理,也有先后顺序
1.7 Retrofit.Builder
前面用到了 Retrofit.Builder 中的baseUrl、addCallAdapterFactory、addConverterFactory、build方法,
还有callbackExecutor、callFactory、client、validateEagerly这四个方法没有用到,这里简单的介绍一下。
| 方法 | 用途 |
|---|---|
| callbackExecutor(Executor) | 指定Call.enqueue时使用的Executor,所以该设置只对返回值为Call的方法有效 (个人理解:指定一步调用时候的执行器) |
| callFactory(Factory) | 设置一个自定义的okhttp3.Call.Factory,那什么是Factory呢?OkHttpClient就实现了okhttp3.Call.Factory接口,下面的client(OkHttpClient)最终也是调用了该方法,也就是说两者不能共用 |
| client(OkHttpClient) | 设置自定义的OkHttpClient,以前的Retrofit版本中不同的Retrofit对象共用同OkHttpClient,在2.0各对象各自持有不同的OkHttpClient实例,所以当你需要共用OkHttpClient或需要自定义时则可以使用该方法,如:处理Cookie、使用stetho 调式等 |
| validateEagerly(boolean) | 是否在调用create(Class)时检测接口定义是否正确,而不是在调用方法才检测,适合在开发、测试时使用 |
1.8 Retrofit的Url组合规则(⭐⭐⭐⭐⭐)
| BaseUrl | 和URL有关的注解中提供的值 | 最后结果 | |
|---|---|---|---|
| http://localhost:4567/path/to/other/ | /post | http://localhost:4567/post | 1 |
| http://localhost:4567/path/to/other/ | post | http://localhost:4567/path/to/other/post | 2 注意url 没有 / |
| http://localhost:4567/path/to/other/ | https://github.com/ikidou | https://github.com/ikidou | 3 |
从上面不能难看出以下规则:
- 如果你在注解中提供的url是完整的url,则url将作为请求的url。(3)
- 如果你在注解中提供的url是不完整的url,且不以 / 开头,则请求的url为baseUrl+注解中提供的值 (2)
- 如果你在注解中提供的url是不完整的url,且以 / 开头,则请求的url为baseUrl的主机部分+注解中提供的值 (1)
1.9 Retrofit提供的Converter
| Converter | Gradle依赖 | | —- | —- | | Gson | com.squareup.retrofit2:converter-gson:2.0.2 | | Jackson | com.squareup.retrofit2:converter-jackson:2.0.2 | | Moshi | com.squareup.retrofit2:converter-moshi:2.0.2 | | Protobuf | com.squareup.retrofit2:converter-protobuf:2.0.2 | | Wire | com.squareup.retrofit2:converter-wire:2.0.2 | | Simple XML | com.squareup.retrofit2:converter-simplexml:2.0.2 | | Scalars | com.squareup.retrofit2:converter-scalars:2.0.2 |
1.10 Retrofit提供的CallAdapter:
| CallAdapter | Gradle依赖 |
|---|---|
| guava | com.squareup.retrofit2:adapter-guava:2.0.2 |
| Java8 | com.squareup.retrofit2:adapter-java8:2.0.2 |
| rxjava | com.squareup.retrofit2:adapter-rxjava:2.0.2 |
1.11 乱码问题⭐⭐⭐
看看这个:https://www.jianshu.com/p/7881b45c786a 这里是基本的解决办法 没实验,因为我们有复现
看看这个:https://www.ihewro.com/archives/971/ 这个里边有代码分析;感觉还是挺不错的,能看懂;这个防止被删,拷贝到了本地一份;
3 retrofit乱码解决
1.12 结束推荐⭐
最后放一个原文作者的公共号链接,他的文章后期可以多关注
暂时他有两个系列很想去看看
1 gson的
2 http基础的;
3 okhttp的, 这个好像还没写,稍后找找类似的资料

若有收获,就点个赞吧
0 人点赞
